Writing policy
Now that we are familiar with how CFEngine works, and how you can use modules and the web UI, let's take a look at policy. CFEngine policy language is a flexible, declarative language for describing the desired state of your infrastructure (or individual host).
To start, create a new file and open it, or the folder, in your editor:
$ cd ~/cfengine_project
$ touch my_policy.cf
$ code .
(Here we are using code - VS Code, but you can use whatever editor you want).
Hello, world
Let's take a look at the traditional "Hello, world!" example:
bundle agent main
{
  files:
    "/tmp/hello"
      content => "Hello, world!";
}
The policy above will create and write Hello, world! to the /tmp/hello file, if necessary.
If that file already exists, with the correct content, nothing is done.
In CFEngine, a bundle is a collection of promises, things you want to be true, your desired state.
In the example above, agent specifies which component this is for, the agent is the binary which makes changes to the system, (as opposed to the file server or other parts of CFEngine).
main is the name of the bundle, and has a special meaning, the bundle named main will be run by default.
The promise type, files in this case, is the type of resource we want to manage.
With files promises you can manipulate file permissions, edit lines, render templates to files, copy files around, etc.
If you are just using 1 policy file, you can run the example above from the command line, however, our project has many policy files, and we cannot have many main bundles, so we need to change that:
bundle agent hello_world
{
  meta:
    "tags"
      slist => { "autorun" };

  files:
    "/tmp/hello"
      content => "Hello, world!";
}
By changing the name of the bundle to something unique, hello_world, and adding the autorun tag to the metadata, we can now include the file in our project.
The bundles tagged autorun will be run automatically, regardless of their name.
Put the code snippet above in a file called my_policy.cf, and add it to the project:
$ cfbs add ./my_policy.cf
Now, build and deploy again:
$ cfbs build
$ cf-remote deploy
The policy has been deployed and that /tmp/hello file should be ready.
You can log in with SSH to check this, or use cf-remote:
$ cf-remote sudo -H hub "cat /tmp/hello"
root@192.168.56.2: 'cat /tmp/hello' -> 'Hello, world!'
Running the agent
In CFEngine, the program which runs all your policy / modules and makes changes to the system is called cf-agent, or the agent.
Just like above, we can use cf-remote sudo to run the agent on the hub:
$ cf-remote sudo -H hub "cf-agent --no-lock --info"
When experimenting with modules, policy, and making changes, knowing how to perform an agent run to speed things up or get feedback from what your policy is doing can be useful.
This is similar to triggering an agent run with the buttons in Mission Portal, or logging in with ssh and running cf-agent --no-lock --info from the command prompt.
Tip: cf-agent --no-lock --info can also be written using short options; cf-agent -KI.
To test that our policy works, let's delete the /tmp/hello file and watch CFEngine create it:
$ cf-remote sudo -H hub "rm /tmp/hello && cf-agent -KI"
Git promises
Earlier in this tutorial series, we added the promise-type-git module to our project.
This means that we can just start using the new promise type in policy:
bundle agent hello_world
{
  meta:
    "tags"
      slist => { "autorun" };

  git:
    "/tmp/hugo"
      repository => "https://github.com/gohugoio/hugo.git",
      version => "master";
}
This policy uses the git promise type to clone the Hugo project's source code from GitHub.
Again, put the code snippet above in the my_policy.cf file, build, and deploy:
$ cfbs build && cf-remote deploy
From now on, feel free to put each example in the my_policy.cf, and run the command to build and deploy it.
Since it's the same every time, we won't mention it again and again.
Variables
The promise type vars is used for storing data in a variable internally.
This has several benefits:
- The data, such as a string, gets a short and descriptive name
- It can be defined in one place, and edited there without having to update multiple places
- Gives you more flexibiltiy for manipulating the data, with functions and intermediate variables
Here is a simple example:
bundle agent hello_world
{
  meta:
    "tags"
      slist => { "autorun" };

  vars:
    "github_path"
      string => "/tmp/github.com";

  files:
    "$(github_path)/." # /. means a folder
      create => "true";

  git:
    "$(github_path)/hugo"
      repository => "https://github.com/gohugoio/hugo.git",
      version => "master";
}
In the above example, both git and files promises use the github_path variable.
The files promise is responsible for creating the parent directory, the git promise for cloning inside of it.
Tags, functions, and reporting
We might want to have some version information on which hugo we are using.
Since we clone and track the master branch, there isn't necessarily a version number available, but there is always a commit SHA, so let's look for that.
From the command line, you could find this by:
$ git log -1 --format="%H"
We want to put this in a variable and include it in our reports we can see in Mission Portal.
To take the output of a command and put it in a variable, we will use the execresult() function:
bundle agent hello_world
{
  meta:
    "tags"
      slist => { "autorun" };

  vars:
    "github_path"
      string => "/tmp/github.com";

    "hugo_path"
      string => "$(github_path)/hugo";

    "hugo_commit"
      string => execresult('cd "$(hugo_path)" && git log -1 --format="%H"', "useshell"),
      meta => { "inventory", "attribute_name=Hugo commit" },
      if => fileexists("$(hugo_path)/.git");

  files:
    "$(github_path)/." # /. means a folder
      create => "true";

  git:
    "$(hugo_path)"
      repository => "https://github.com/gohugoio/hugo.git",
      version => "master",
      if => fileexists("$(github_path)");
}
if => fileexists() was added to ensure the order of things; we want git clone to happen when the parent directory exists, and we want git log to happen after git clone, so when the .git folder is there.
Generally speaking, CFEngine does not evaluate the policy from top to bottom, so if you want some things to happen after other things, you should ensure this, for example with an if.
By adding meta => { "inventory", "attribute_name=Hugo commit" }, to the variable, we are saying that we want this as an inventory attribute, a part of the reporting data, and we want the attribute name, shown in the Web UI and reports, to be Hugo commit.
And indeed, after deploying this policy, we can see it show up in Inventory reports:
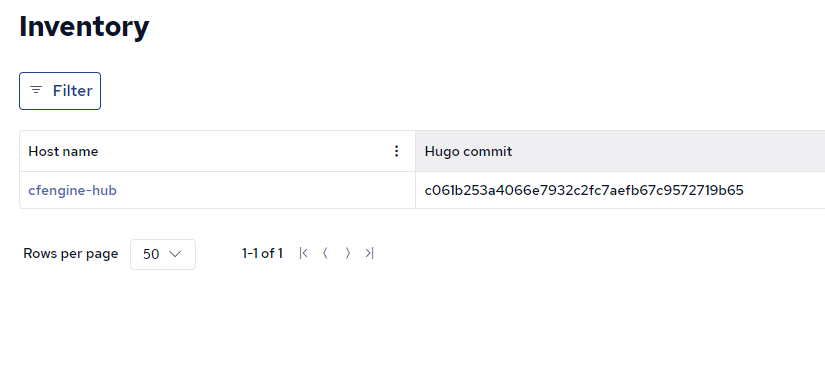
Tip: CFEngine's reporting happens on a schedule, so it might take some minutes for this new inventory attribute to appear for the first time. To speed it up, you can click the hostname to go to the host info page, and the Play button in the top right corner to trigger an extra agent run and report collection.
Next steps
This is by no means a complete guide to policy writing, but should give you an idea of how to use modules, and get started building and experimenting. Next, we will look at implementing modules, such as the git promise type we used here:
If you would like to learn more about policy writing, these are some good resources to look at: