Extending Query Builder in Mission Portal
This instruction is created to explain how to extend the Query Builder in the case where the enterprise hub database has new or custom tables that you want to use on the reporting page.
The workflow in this guide is to edit a file that will be updated by CFEngine when you upgrade to a newer version of CFEngine.
Thus your changes are going to be deleted. Please make sure to either keep a copy of the edits you want to preserve,
or add a relative file path scripts/advancedreports/dca.js to $(sys.workdir)/httpd/htdocs/preserve_during_upgrade.txt
to preserve dca.js during the CFEngine upgrade process.
How to add new table to Query Builder
To extend the query builder with your custom data you need to edit the javascript file located on your hub here:
$(sys.workdir)/share/GUI/scripts/advancedreports/dca.js.
There you will find the DCA variable that contains a JSON object:
var DCA = {
      'Hosts':
      .........
      }
Each element of this JSON object describes database table information. You need to add a new JSON element with your new table information.
Structure of JSON element
Below you can see an example of hosts table representation as JSON element.
'Hosts':
        {
        'TableID': 'Hosts',
        'Keys'   : {'primary_key': 'HostKey' },
        'label'  : 'Hosts',
        'Fields' : {
            'Hosts.HostKey': {
                "name"      : "HostKey",
                "label"     : "Host key",
                "inputType" : "text",
                "table"     : 'Hosts',
                "sqlField"  : 'Hosts.HostKey',
                "dataType"  : "string"
            },
            'Hosts.LastReportTimeStamp': {
                "name"      : "LastReportTimeStamp",
                "label"     : "Last report time",
                "inputType" : "text",
                "table"     : 'Hosts',
                "sqlField"  : 'Hosts.LastReportTimeStamp',
                "dataType"  : 'timestamp'
            },
            'Hosts.HostName': {
                "name"      : "HostName",
                "label"     : "Host name",
                "inputType" : "text",
                "table"     : 'Hosts',
                "sqlField"  : 'Hosts.HostName',
                "dataType"  : "string"
            },
            'Hosts.IPAddress': {
                "name"      : "IPAddress",
                "label"     : "IP address",
                "inputType" : "text",
                "table"     : 'Hosts',
                "sqlField"  : 'Hosts.IPAddress',
                "dataType"  : "string"
            },
            'Hosts.FirstReportTimeStamp': {
                "name"      : "FirstReportTimeStamp",
                "label"     : "First report-time",
                "inputType" : "text",
                "table"     : 'Hosts',
                "sqlField"  : 'Hosts.FirstReportTimeStamp',
                "dataType"  : 'timestamp'
            }
        }
    }
Structure:
Each element has a key and a value. When you create your own JSON element please use a unique key. The value is a
JSON object, please see explanations below. The element's key should be equal to TableID.
- TableID (string) Table id, can be the same as main element key, should be unique.
- Keys (json)
Table keys, describe there primary key, emp.:
{'primary_key': 'HostKey'}. Primary key is case-sensitive.primary_keyis the only possible key inKeysstructure. - Label (string) Label contains a table's name that will be shown on the UI. Not necessary to use a real table name, it can be an alias for better representation.
Fields (json) JSON object that contains table columns.
Fields structure:
Fields object is presented as JSON, where key is unique table's key and value is JSON representation of table column properties.
The element's key should be equal to sqlField
- name (string) Field's name
- label (string) Label contains a field's name that will be shown on the UI. Not necessary to use a real field name, an alias can be used for better representation.
- inputType (string)
Type of input fields, will be used to create filter input for this field. Allowed values:
text,textarea,select- a drop-down list,multiple- a drop-down list that allows multiple selections,radio,checkboxes - table (string) Field's table name
- sqlField (string)
Concatenation of
table name.field name. Emp.:Hosts.FirstReportTimeStamp - dataType (string)
Column's database type, allowed values:
timestamp,string,real,integer,array
After dca.js editing please validate the content of DCA variable (var DCA =) in a JSON validation tooling,
there are many online tools to do that. Once your content validated and file has saved your changes will appear after
the next agent run.
Example
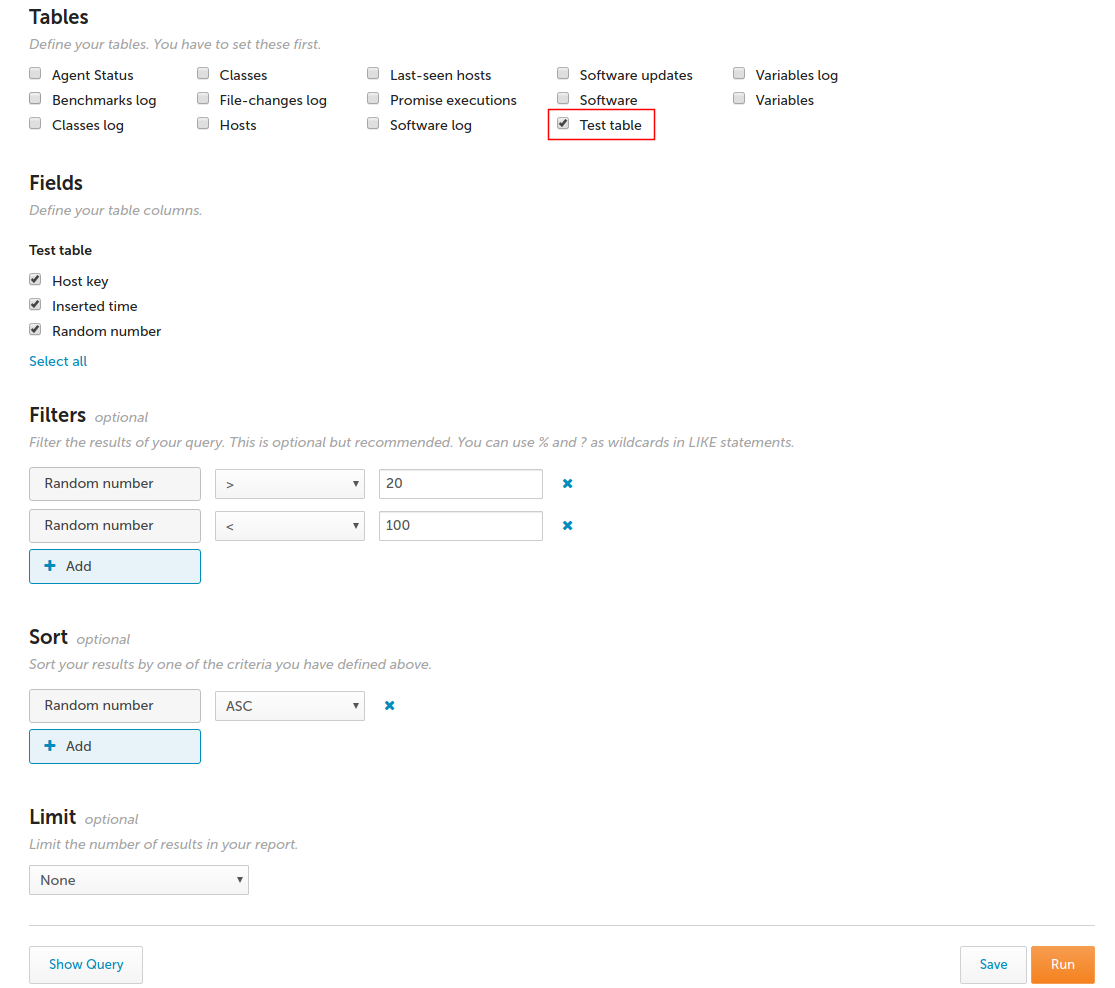
Let's see an example of Query builder extending with a new test table.
- Create a new table in the cfdb database
CREATE TABLE IF NOT EXISTS "test" (
    "hostkey" text  PRIMARY KEY,
    "random_number" integer NOT NULL,
    "inserted_time" timestamptz NOT NULL DEFAULT 'now()'
);
- Fill the table with data from the hosts.
INSERT INTO "test" SELECT "hostkey", (random() * 100)::int as random_number FROM "__hosts";
- Add a new element to the JSON object
'Test':
        {
        'TableID': 'Test',
        'Keys'   : {'primary_key': 'Hostkey' },
        'label'  : 'Test table',
        'Fields' : {
            'Test.hostkey': {
                "name"      : "hostkey",
                "label"     : "Host key",
                "inputType" : "text",
                "table"     : 'Test',
                "sqlField"  : 'Test.hostkey',
                "dataType"  : "string"
            },
            'Test.random_number': {
                "name"      : "random_number",
                "label"     : "Random number",
                "inputType" : "text",
                "table"     : 'Test',
                "sqlField"  : 'Test.random_number',
                "dataType"  : 'integer'
            },
            'Test.inserted_time': {
                "name"      : "inserted_time",
                "label"     : "Inserted time",
                "inputType" : "text",
                "table"     : 'Test',
                "sqlField"  : 'Test.inserted_time',
                "dataType"  : "timestamp"
            }
        }
    }
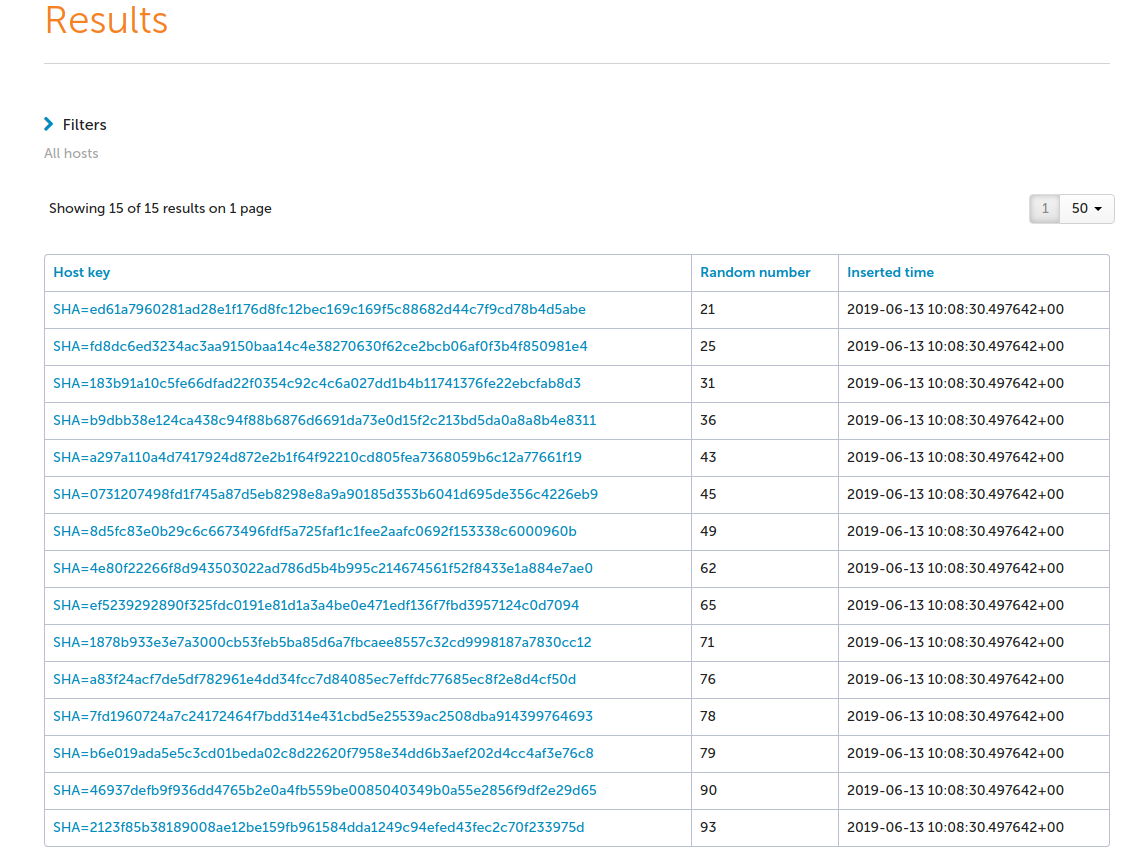
- See the result in the Query Builder
After the next cf-agent run file should be changed in the Mission Portal and you will be able to see the new table in the Query builder. You can use this table as predefined ones.
Report based on the new table: