Installation Guide
Overview
This tutorial is describing the installation steps of the CFEngine High Availability feature. It is suitable for both upgrading existing CFEngine installations to HA and for installing HA from scratch. Before starting installation we strongly recommend reading the CFEngine High Availability overview. More detailed information can be found here.
Installation procedure
As with most High Availability systems, setting it up requires carefully following a series of steps with dependencies on network components. The setup can therefore be error-prone, so if you are a CFEngine Enterprise customer we recommend that you contact support for assistance if you do not feel 100% comfortable of doing this on your own.
Please also make sure you have a valid license for the passive hub so that it will be able to handle all your CFEngine clients in case of failover.
Hardware configuration and OS pre-configuration steps
- CFEngine 3.6.2 (or later) hub package for RHEL6 or CentOS6.
- We recommend selecting dedicated interface used for PostgreSQL replication and optionally one for heartbeat.
- We recommend having one shared IP address assigned for interface where MP is accessible (optionally) and one where PostgreSQL replication is configured (mandatory).
- Both active and passive hub machines must be configured so that host names are different.
- Basic hostname resolution works (hub names can be placed in /etc/hosts or DNS configured).
Example configuration used in this tutorial
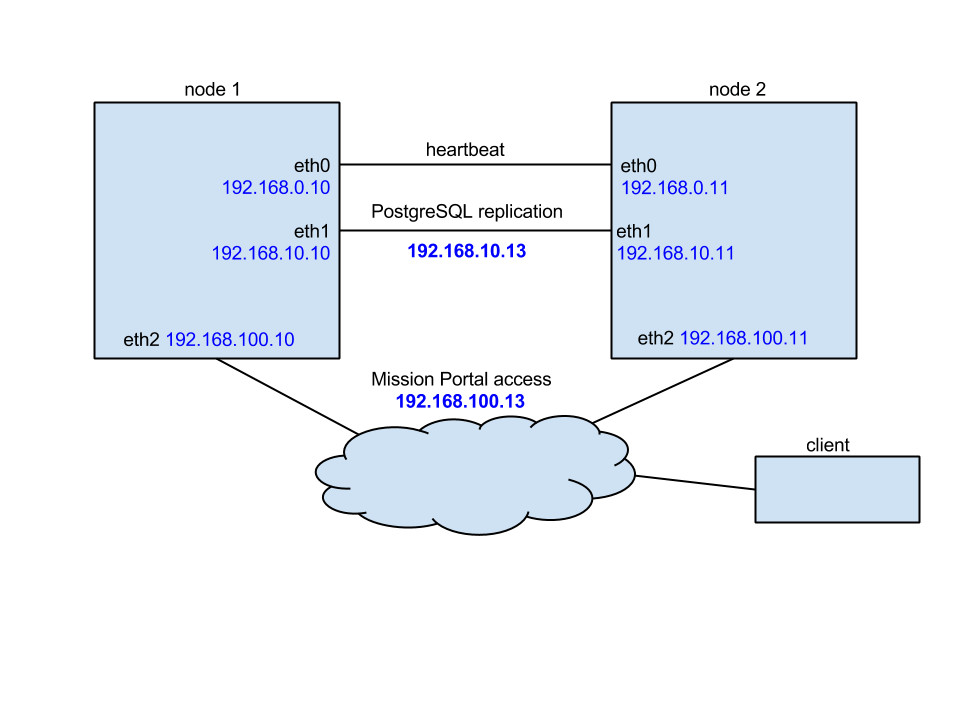
In this tutorial we use the following network configuration:
- Two nodes, one acting as active (node1) and one acting as passive (node2).
- Optinally a third node (node3) used as a database backup for offsite replication.
- Each node having three NICs so that eth0 is used for heartbeat, eth1 is used for PostgreSQL replication and eth2 is used for MP and bootstrapping clients.
- IP addresses configured as follows:
| Node | eth0 | eth1 | eth2 |
|---|---|---|---|
| node1 | 192.168.0.10 | 192.168.10.10 | 192.168.100.10 |
| node2 | 192.168.0.11 | 192.168.10.11 | 192.168.100.11 |
| node3 (optional) | --- | 192.168.10.12 | 192.168.100.12 |
| cluster shared | --- | 192.168.10.100 | 192.168.100.100 |
Detailed network configuration is shown on the picture below:
Install cluster management tools
Before you begin you should have corosync (version 1.4.1 or higher) and pacemaker (version 1.1.10-14.el6_5.3 or higher) installed on both nodes. For your convenience we also recommend having pcs installed. Detailed instructions how to install and set up all components are accessible here and here. Please also note that for RHEL 6, additional components might be needed to create the cluster when using the recommendation from Red Hat. One of those components is cman.
Once pacemaker and corosync are successfully installed on both nodes please follow steps below to set up it as needed by CFEngine High Availability. Please note that most of those instructions follow the method recommended by the Red Hat High Availability project.
In order to operate cluster, proper fencing must be configured but description how to fence cluster and what mechanism use is out of the scope of this document. For reference please use following guide.
IMPORTANT: please carefully follow the indicators describing if the given step should be performed on active, passive or both nodes.
Make sure that the hostnames of all nodes nodes are node1, node2 and node3 respectively. Running the command
uname -n | tr '[A-Z]' '[a-z]'should return the correct node name. Make sure that the DNS or entries in /etc/hosts are updated so that hosts can be accessed using their host names.In order to use pcs to manage the cluster, create the user designated to manage the cluster with
passwd haclusteron both cluster nodes.Make sure that pcsd demon is started and configure both nodes so that it will be enabled to boot on startup on each node.
On RHEL 7:
systemctl start pcsd.service;
systemctl enable pcsd.service
On RHEL 6:
/etc/init.d/pcsd start;
chkconfig pcsd on
Authenticate hacluster user for each node of the cluster. Run the command below only on the active node (node1):
pcs cluster auth node1 node2As the result you should see a message similar to one below:
Username: hacluster
Password:
node1: Authorized
node2: Authorized
Create the cluster by running the following command on the active node (node1):
pcs cluster setup --start --name cfcluster node1 node2This will create the cluser
cfclusterconsisting of node1 and node2.Enable the cluster services to start on boot on both the cluster nodes:
pcs cluster enable --allAt this point the cluster should be up and running without any resource nor STONITH/fencing configured. Running
pcs statusshould print something similar to one below.Cluster name: cfcluster Last updated: Tue Jul 7 09:29:10 2015 Last change: Fri Jul 3 08:41:24 2015 Stack: cman Current DC: node1 - partition with quorum Version: 1.1.11-97629de 2 Nodes configured 0 Resources configured Online: [ node1 node2 ] Full list of resources:
PostgreSQL configuration
Before starting this make sure that cluster is not running.
- Install the CFEngine hub package on both active and passive node.
- On the active node (node1) bootstrap the hub to itself so it starts acting as policy server (this step can be skipped if you are upgrading existing installation to High Availability).
- Bootstrap the passive node (node2) to the active hub. While bootstrapping, trust between both hubs will be established and keys will be exchanged.
After successfully bootstrapping passive to active, bootstrap the passive node to itself. From now on it will start operate as a hub so that it will be capable of collecting reports and serve policy. Please note that while bootstrapping passive to itself you may see following message:
"R: This host assumes the role of policy server
R: Updated local policy from policy server
R: Failed to start the server
R: Did not start the scheduler
R: You are running a hard-coded failsafe. Please use the following command instead.
    "/var/cfengine/bin/cf-agent" -f /var/cfengine/inputs/update.cf
2015-06-29T17:36:24+0000   notice: Bootstrap to '10.100.100.116' completed successfully!"
Configure PostgreSQL on active node:
- Create two directories owned by PostgreSQL user: /var/cfengine/state/pg/data/pg_archive and /var/cfengine/state/pg/tmp
Modify postgresql.conf configuration file
echo "listen_addresses = '*'
wal_level = hot_standby
max_wal_senders=5
wal_keep_segments = 32
hot_standby = on
restart_after_crash = off

#not needed but makes failover faster and cluster more stable
checkpoint_segments = 8
wal_keep_segments = 8
archive_mode = on
archive_command = 'cp %p /var/cfengine/state/pg/pg_arch/%f'
" >> /var/cfengine/state/pg/data/postgresql.conf
NOTE: In the above configuration, the wal_keep_segments value specifies the minimum number of segments (16 megabytes each) retained in PostgreSQL WAL logs directory in case a standby server needs to fetch them for streaming replication. It should be adjusted to number of clients handled by CFEngine hub and available disk space. In an installation with 1000 clients bootstrapped to the CFEngine hub and assuming passive hub should be able to catch up with the active one after 24 hours break, the value should be set close to 250 (4 GB of additional disk space).
Modify the pg_hba.conf configuration file to enable access to PostgreSQL form listed host. Please note that 192.168.10.10, 192.168.10.11 and 192.168.10.12 are IP addresses of node1, node2 and node3 respectively.
echo "host replication all 192.168.10.10/32 trust
host replication all 192.168.10.11/32 trust
#use one below only in case of having 3rd node used as database backup
host replication all 192.168.10.12/32 trust
local replication all trust
host replication all 127.0.0.1/32 trust
host replication all ::1/128 trust
" >> /var/cfengine/state/pg/data/pg_hba.conf
IMPORTANT: The above configuration allows accessing the hub using the cfpostgres user without any authentication from both cluster nodes. For security reasons we strongly advise to create a replication user in PostgreSQL and protect access using a password or certificate. Furthermore, we advise using ssl-secured replication instead of the unencrypted method described here if the hubs are in an untrusted network.
Create the PostgreSQL archive directory (
mkdir /var/cfengine/state/pg/pg_arch/) and make the cfpostgres user the owner of it (chown -R cfpostgres:cfpostgres /var/cfengine/state/pg/pg_arch/).IMPORTANT: If the archive directory location is different, make sure to change the archive_command entry in postgresql.conf and the restore_command command described later in this document.
Restart the PostgreSQL server so that the configuration changes take effect.
cd /tmp && su cfpostgres -c "/var/cfengine/bin/pg_ctl -w -D /var/cfengine/state/pg/data stop -m fast"
cd /tmp && su cfpostgres -c "/var/cfengine/bin/pg_ctl -w -D /var/cfengine/state/pg/data -l /var/log/postgresql.log start"
Configure PostgreSQL on the passive node:
- Remove the PostgreSQL directory by running
rm -rf /var/cfengine/state/pg/data/*. - Do a database backup by running
su cfpostgres -c "cd /tmp && /var/cfengine/bin/pg_basebackup -h node1 -U cfpostgres -D /var/cfengine/state/pg/data -X stream -P". Change the recovery.conf file to indicate that PostgreSQL is running as a hot-standby replica:
echo "standby_mode = 'on'
#192.168.10.100 is the shared over cluster IP address of active/master cluster node
primary_conninfo = 'host=192.168.10.100 port=5432 user=cfpostgres application_name=node2'
#not needed but recommended for faster failover and more stable cluster operations
restore_command = 'cp /var/cfengine/state/pg/pg_arch/%f %p'
" > /var/cfengine/state/pg/data/recovery.conf
NOTE: change host and application_name to point to host names of active and passive nodes respectively.
- Remove the PostgreSQL directory by running
Start PostgreSQL on the passive node by running the following command:
cd /tmp && su cfpostgres -c "/var/cfengine/bin/pg_ctl -w -D /var/cfengine/state/pg/data -l /var/log/postgresql.log start"
Verify the PostgreSQL status on the passive node by running echo "select pg_is_in_recovery();" | /var/cfengine/bin/psql cfdb.
The command should return t, which indicates that the passive node is working in recovery mode.
Verify that the passive node is connected to the active by running the following command on the active node: echo "select * from pg_stat_replication;" | /var/cfengine/bin/psql cfdb.
The command should return one entry indicating that node1 is connected to the database in streaming replication mode.
CFEngine configuration
Before starting this step make sure that PostgreSQL is running on both active and passive nodes and that the passive node is being replicated.
Create the HA configuration file on both active and passive nodes:
echo "cmp_master: PRI
cmp_slave: HS:async,HS:sync,HS:alone
cmd: /usr/sbin/crm_attribute -l reboot -n cfpgsql-status -G -q" > /var/cfengine/ha.cfg
Create the HA JSON configuration file:
echo "{
\"192.168.100.10\":
{
 \"sha\": \"c14a17325b9a1bdb0417662806f579e4187247317a9e1739fce772992ee422f6\",
 \"internal_ip\": \"192.168.100.10\",
},
\"192.168.100.11\":
{
 \"sha\": \"b492eb4b59541c02a13bd52efe17c6a720e8a43b7c8f8803f3fc85dee7951e4f\",
 \"internal_ip\": \"192.168.100.11\",
}
}" > /var/cfengine/masterfiles/cfe_internal/enterprise/ha/ha_info.json
The
internal_ipattribute is the IP address of the hub (the one you used to bootstrapped itself to) andshais the key of the hub. Theshakey can be found by runningcf-key -sthe on the respective hub and match that to theinternal_ip.Modify /var/cfengine/masterfiles/controls/VERSION/def.cf and /var/cfengine/masterfiles/controls/VERSION/update_def.cf to enable HA by uncommenting the line
"enable_cfengine_enterprise_hub_ha" expression => "enterprise_edition";(also make sure to comment or remove the line"enable_cfengine_enterprise_hub_ha" expression => "!any";).Run
cf-agent -f update.cfto make sure that the new policy is copied from masterfiles to inputs on the active node first and then on the passive node. From this point on, PostgreSQL will not be managed by CFEngine but it will be left unmanaged until the pgsql cluster resource is properly configured.
Cluster resource configuration
Configure the shared cluster IP address used for PostgreSQL database replication:
pcs resource create cfvirtip IPaddr2 ip=192.168.10.100 cidr_netmask=24 --group cfengineThis will create a shared IP address at the appropriate interface (where the 192.168.10.x address already exists).
Verify that the cfvirtip resource is properly configured and running.
[root@node1] pcs status
Cluster name: cfcluster
Last updated: Tue Jul  7 09:29:10 2015
Last change: Fri Jul  3 08:41:24 2015
Stack: cman
Current DC: node1 - partition with quorum
Version: 1.1.11-97629de
2 Nodes configured
1 Resources configured

Online: [ node1 node2 ]

Full list of resources:

Resource Group: cfengine
   cfvirtip   (ocf::heartbeat:IPaddr2):   Started node1
IMPORTANT If fencing is not configured, resources might not be started by default. To enable resource start please run one of the following commands
pcs cluster enable --allorpcs resource debug-start cfvirtip.Add global cluster configuration.
pcs resource defaults resource-stickiness="INFINITY"
pcs resource defaults migration-threshold="1"
Stop PostgreSQL on all nodes.
Download the latest version of PostgreSQL RA as the default one is known to have a bug while using Master/Slave configuration.
wget https://raw.github.com/ClusterLabs/resource-agents/a6f4ddf76cb4bbc1b3df4c9b6632a6351b63c19e/heartbeat/pgsql
cp pgsql /usr/lib/ocf/resource.d/heartbeat/
chmod 755 /usr/lib/ocf/resource.d/heartbeat/pgsql
Create the PostgreSQL resource (recommended way with PostgreSQL archive mode enabled).
pcs resource create cfpgsql pgsql pgctl="/var/cfengine/bin/pg_ctl" psql="/var/cfengine/bin/psql" pgdata="/var/cfengine/state/pg/data" pgdba="cfpostgres" repuser="cfpostgres" tmpdir="/var/cfengine/state/pg/tmp" rep_mode="async" node_list="node1 node2" primary_conninfo_opt="keepalives_idle=60 keepalives_interval=5 keepalives_count=5" master_ip="192.168.10.100" restart_on_promote="true" logfile="/var/log/postgresql.log" config="/var/cfengine/state/pg/data/postgresql.conf" check_wal_receiver=true restore_command="cp /var/cfengine/state/pg/pg_arch/%f %p" op monitor timeout="60s" interval="3s" on-fail="restart" role="Master" op monitor timeout="60s" interval="4s" on-fail="restart"Alternatively, you can use following command for minimal setup (no archive enabled):
pcs resource create cfpgsql pgsql pgctl="/var/cfengine/bin/pg_ctl" psql="/var/cfengine/bin/psql" pgdata="/var/cfengine/state/pg/data" pgdba="cfpostgres" repuser="cfpostgres" tmpdir="/var/cfengine/state/pg/tmp" rep_mode="async" node_list="node1 node2" primary_conninfo_opt="keepalives_idle=60 keepalives_interval=5 keepalives_count=5" master_ip="192.168.10.100" restart_on_promote="true" logfile="/var/log/postgresql.log" config="/var/cfengine/state/pg/data/postgresql.conf" op monitor timeout="60s" interval="3s" on-fail="restart" role="Master" op monitor timeout="60s" interval="4s" on-fail="restart"Configure PostgreSQL to work in Master/Slave (active/standby) mode:
pcs resource master mscfpgsql cfpgsql master-max=1 master-node-max=1 clone-max=2 clone-node-max=1 notify=trueGroup previously configured shared IP address and PostgreSQL cluster resource to make sure both will always run on the same host and add migration rules to make sure that resources will be started and stopped in correct order.
pcs constraint colocation add cfengine with Master mscfpgsql INFINITY
pcs constraint order promote mscfpgsql then start cfengine symmetrical=false score=INFINITY
pcs constraint order demote mscfpgsql then stop cfengine symmetrical=false score=0
Verify that constraints configuration is correct.
[roott@node1] pcs constraint
Location Constraints:
  Resource: mscfpgsql
    Enabled on: node1 (score:INFINITY) (role: Master)
Ordering Constraints:
  promote mscfpgsql then start cfengine (score:INFINITY) (non-symmetrical)
  demote mscfpgsql then stop cfengine (score:0) (non-symmetrical)
Colocation Constraints:
  cfengine with mscfpgsql (score:INFINITY) (rsc-role:Started) (with-rsc-role:Master)
After these steps, the cluster should be up and running. To verify, run one of the commands below.
[root@node1] pcs status
Cluster name: cfcluster
Last updated: Tue Jul  7 10:48:21 2015
Last change: Fri Jul  3 08:41:24 2015
Stack: cman
Current DC: node1 - partition with quorum
Version: 1.1.11-97629de
2 Nodes configured
3 Resources configured

Online: [ node1 node2 ]

Full list of resources:

Resource Group: cfengine
    cfvirtip   (ocf::heartbeat:IPaddr2):   Started node1
Master/Slave Set: mscfpgsql [cfpgsql]
     Masters: [ node1 ]
     Slaves: [ node2 ]

[root@node2 vagrant]# crm_mon -Afr1
Last updated: Tue Jul  7 10:50:07 2015
Last change: Tue Jul  7 10:30:03 2015
Stack: cman
Current DC: node2 - partition with quorum
Version: 1.1.11-97629de
2 Nodes configured
3 Resources configured

Online: [ node1 node2 ]

Full list of resources:

Resource Group: cfengine
     cfvirtip   (ocf::heartbeat:IPaddr2):   Started node1
Master/Slave Set: mscfpgsql [cfpgsql]
     Masters: [ node1 ]
     Slaves: [ node2 ]

Node Attributes:
    * Node node1:
    + cfpgsql-data-status               : LATEST
    + cfpgsql-master-baseline           : 000000000B000090
    + cfpgsql-receiver-status           : ERROR
    + cfpgsql-status                    : PRI
    + master-cfpgsql                    : 1000

* Node node2:
    + cfpgsql-data-status               : STREAMING|ASYNC
    + cfpgsql-receiver-status           : normal
    + cfpgsql-status                    : HS:alone
    + master-cfpgsql                    : -INFINITY
IMPORTANT: Please make sure that cfpgsql-status for the active node is reported as PRI and passive as HS:alone or HS:async.
Enjoy your working CFEngine High Availability setup!
Configuring 3rd node as disaster-recovery or database backup (optional)
Install the CFEngine hub package on node which will be used as disaster-recovery or database backup node (node3).
Bootstrap the disaster-recovery node to active node first (establish trust between hubs) and then bootstrap it to itself. At this point hub will be capable of collecting reports and serve policy.
Stop cf-execd and cf-hub processes.
Make sure that PostgreSQL configuration allows database replication connection from 3rd node (see PostgreSQL configuration section, point 5.3 for more details).
Repeat steps 6 - 7 from PostgreSQL configuration to enable and verify database replication connection from 3rd node. Make sure that both second cluster node (passive) and 3rd node (disaster-recovery) are connected to active database node and streaming replication is in progress.
[root@node1 tmp]# echo "select * from pg_stat_replication;" | /var/cfengine/bin/psql cfdb
pid  | usesysid |  usename   | application_name |  client_addr  | client_hostname | client_port |         backend_start         |   state   | sent_location | write_location | flush_location | replay_location | sync_priority | sync_state
------+----------+------------+------------------+---------------+-----------------+-------------+-------------------------------+-----------+---------------+----------------+----------------+-----------------+---------------+------------
9252 |       10 | cfpostgres | node2            | 192.168.10.11 |                 |       58919 | 2015-08-24 07:14:45.925341+00 | streaming | 0/2A7034D0    | 0/2A7034D0     | 0/2A7034D0     | 0/2A7034D0      |             0 | async
9276 |       10 | cfpostgres | node3            | 192.168.10.12 |                 |       52202 | 2015-08-24 07:14:46.038676+00 | streaming | 0/2A7034D0    | 0/2A7034D0     | 0/2A7034D0     | 0/2A7034D0      |             0 | async

(2 rows)
Modify HA JSON configuration file to contain information about 3rd node (see CFEngine configuration, point 2). You should have configuration similar to one below:
[root@node3 masterfiles]# cat /var/cfengine/masterfiles/cfe_internal/enterprise/ha/ha_info.json
{
 "192.168.100.10":
 {
  "sha": "b1463b08a89de98793d45a52da63d3f100247623ea5e7ad5688b9d0b8104383f",
  "internal_ip": "192.168.100.10",
  "is_in_cluster" : true,
 },
 "192.168.100.11":
 {
  "sha": "b13db51615afa409a22506e2b98006793c1b0a436b601b094be4ee4b32b321d5",
  "internal_ip": "192.168.100.11",
 },
 "192.168.100.12":
 {
  "sha": "98f14786389b2fe5a93dc3ef4c3c973ef7832279aa925df324f40697b332614c",
  "internal_ip": "192.168.100.12",
  "is_in_cluster" : false,
 }
}
Please note that
is_in_clusterparameter is optional for 2 nodes HA clusters and by default is set to true. For 3 nodes setup, the node which is not part od pacemaker/corosync cluster setup MUST be marked with"is_in_cluster" : falseconfiguration parameter.Start cf-execd process (don't start cf-hub process as this is not needed while manual failover to 3rd node is not performed). Please also note, that during normal operations cf-hub process should not be running on 3rd HA node.
Manual failover to disaster-recovery node
Before starting manual failover process make sure both active and passive nodes are not running.
Verify that PostgreSQL is running on 3rd node and data replication from active node is not in progress. If database is actively replicating data with active cluster node make sure that this process will be finished and no new data will be stored in active database instance.
After verifying that replication is finished and data is synchronized between active database node and replica node (or once node1 and node2 are both down) promote PostgreSQL to exit recovery and begin read-write operations
cd /tmp && su cfpostgres -c "/var/cfengine/bin/pg_ctl -c -w -D /var/cfengine/state/pg/data -l /var/log/postgresql.log promote".In order to make failover process as easy as possible there is
"failover_to_replication_node_enabled"class defined both in /var/cfengine/masterfiles/controls/VERSION/def.cf and /var/cfengine/masterfiles/controls/VERSION/update_def.cf. In order to stat collecting reports and serving policy from 3rd node uncomment the line defining mentioned class.
IMPORTANT: Please note that as long as any of the active or passive cluster nodes is accessible by client to be contacted, failover to 3rd node is not possible. If the active or passive node is running and failover to 3rd node is required make sure to disable network interfaces where clients are bootstrapped to so that clients won't be able to access any other node than disaster-recovery.
Troubleshooting
If either the IPaddr2 or pgslq resource is not running, try to enable it first with
pcs cluster enable --all. If this is not strting the resources, you can try to run them in debug mode with this commandpcs resource debug-start <resource-name>. The latter command should print diagnostics messages on why resources are not started.If
crm_mon -Afr1is printing errors similar to the below[root@node1]# pcs status Cluster name: cfcluster Last updated: Tue Jul 7 11:27:23 2015 Last change: Tue Jul 7 11:02:40 2015 Stack: cman Current DC: node1 - partition with quorum Version: 1.1.11-97629de 2 Nodes configured 3 Resources configured Online: [ node1 ] OFFLINE: [ node2 ] Full list of resources: Resource Group: cfengine cfvirtip (ocf::heartbeat:IPaddr2): Started node1 Master/Slave Set: mscfpgsql [cfpgsql] Stopped: [ node1 node2 ] Failed actions: cfpgsql_start_0 on node1 'unknown error' (1): call=13, status=complete, last-rc-change='Tue Jul 7 11:25:32 2015', queued=1ms, exec=137msyou can try to clear the errors by running
pcs resource cleanup <resource-name>. This should clean errors for the appropriate resource and make the cluster restart it.[root@node1 vagrant]# pcs resource cleanup cfpgsql Resource: cfpgsql successfully cleaned up [root@node1 vagrant]# pcs status Cluster name: cfcluster Last updated: Tue Jul 7 11:29:36 2015 Last change: Tue Jul 7 11:29:08 2015 Stack: cman Current DC: node1 - partition with quorum Version: 1.1.11-97629de 2 Nodes configured 3 Resources configured Online: [ node1 ] OFFLINE: [ node2 ] Full list of resources: Resource Group: cfengine cfvirtip (ocf::heartbeat:IPaddr2): Started node1 Master/Slave Set: mscfpgsql [cfpgsql] Masters: [ node1 ] Stopped: [ node2 ]After cluster crash make sure to always start the node that should be active first, and then the one that should be passive. If the cluster is not running on the given node after restart you can enable it by running the following command:
[root@node2]# pcs cluster start
Starting Cluster...