Using CFEngine with Open Nebula
What is Open Nebula?
Open Nebula is an Open Source framework for Cloud Computing that aims to become an industry standard. The project is designed to be scalable and offer compatibility with Amazon EC2 the Open Cloud Computing Interface (OCCI). Open Nebula is used as a cloud controller in a number of large private clouds.
How can CFEngine work with Open Nebula?
CFEngine is a lifecycle management tool that can be integrated with a Cloud Computing framework in a number of ways. Of the four phases of the computer lifecycle, Open Nebula and CFEngine will play different roles.
Build
Open Nebula focuses on building virtual machines in a managed framework, based on pre-built images. CFEngine can further customize these images through package of customized installation measures.
Deploy
Open Nebula provides manual controls to bring up and tear down generic virtualized machines containing a baseline of software. CFEngine can further deploy patches and updates to these basic images without needing to take down a machine.
Manage
One a machine is running, CFEngine can manage it exactly like any other physical computer.
Audit/Report
CFEngine's local agents can extract information and learn system trends and characteristics over time. These may be collected in CFEngine's reporting interface or Mission Portal.
Open Nebula's focus is on managing the deployment and recycling of the computing infrastructure. CFEngine picks up where Open Nebula leaves off and manages the dynamic lifecycle of software, applications and runtime state.
Example Setup
This guide is based on an example setup provding a framework to demonstrate how CFEngine can be used to automate Open Nebula configuration. The following assumptions serve as an example and should be altered to fit your needs:
- All physical hosts are running Ubnutu, KVM and CFEngine 3.
- All physical hosts are on the same network.
- The CFEngine policy hub is running on the Open nebula front end.
- NFS will be used to share virtual machine images between hosts.
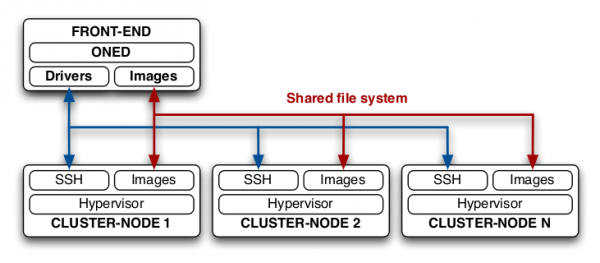
Open nebula requires a single front-end machine and one or more node controllers. The front end is a management machine that is used to monitor and issue commands to the node controllers. Node controllers provide virtual machine resources. The promises that follow concentrate on the configuration of the front-end and a single cluster-node. In order to increase the capacity of your private cloud we can simply classify a new physical machine as another cluster-node.
Installation and dependancy configuration
First we can classify the physical machines in this case by IP address:
classes:
        "front_end" or => {"192.168.1.2"};
        "node_controllers" or => {"192.168.1.3"};
If we want multiple node controllers then we can instead setup an slist variable IP addresses of intended node controllers. This will allow the "onehost create" command to execution each new node controller in turn reducing redundancy in the policy file for example:
vars:
 "node_controller" slist => { "192.168.1.3", "192.168.1.4", "192.168.1.5" };

commands:
        "/usr/bin/onehost create $(node_controller) im_kvm vmm_kvm tm_nfs",
                           contain => oneadmin;


classes:

  "policy_host" or => {
                      classmatch(canonify("ipv4_$(node_controller)")),
                      classmatch(canonify("$(node_controller)"))
                      };
To install the dependancies for each physical machine we can define these in a list and use the CFEngine standard library package promises to install them:
vars:

"front_end_deps" slist => {
                          "libcurl3",
                          "libmysqlclient16",
                          "libruby1.8",
                          "libsqlite3-ruby",
                          "libsqlite3-ruby1.8",
                          "libxmlrpc-c3",
                          "libxmlrpc-core-c3",
                          "mysql-common",
                          "ruby",
                          "ruby1.8",
                          "nfs-kernel-server"
                          };
"cluster_node_deps" slist => {
            "ruby",
            "kvm",
            "libvirt-bin",
            "ubuntu-vm-builder",
            "nfs-client",
            "kvm-pxe"
            };
Promises to perform dependency installation:
packages:

front_end::
   "$(front_end_deps)"

             comment => "Install open nebula front end dependencies",
      package_policy => "add",
      package_method => generic,
             classes => if_ok("ensure_opennebula_running");

node_controller::
   "$(node_controller_deps)"
             comment => "Install open nebula node controller dependencies",
      package_policy => "add",
      package_method => generic;
The additional line in the front end dependancy installation promise, assuming a successful installation, will ensure the Open Nebula daemon is running at all times:
front_end::

ensure_opennebula_running::
        ".*oned.*",
        restart_class => "start_oned";
Resulting in:
commands:

start_oned::
    "/usr/bin/one start",
        comment => "Execute the opennebula daemon",
        contain => oneadmin;
Since we will be using Open Nebula version 2 we must manually supply the package:
commands:

front_end.!opennebula_installed::
    "/usr/bin/dpkg -i /root/opennebula_2.0-1_i386.deb",
    comment => "install opennebula package if it isnt already";
This promise points to the Open Nebula package file in /root/. To prevent repeated installation we can do a check to see if Open Nebula has already been installed by classifying a successful installation as having the oned.conf file in existence:
classes:

    "opennebula_installed" or => {fileexists("/etc/one/oned.conf")};
Open nebula requires a privileged user "oneadmin" to issue commands. In order to have CFEngine perform these commands with the correct privileges we can use the contain body by appending the following to commands promises:
contain => oneadmin
This will in turn apply owner and group permissions of the oneadmin user:
body contain oneadmin
{
exec_owner => "oneadmin";
exec_group => "oneadmin";
}
Next: Open Nebula environment configuration, Previous: Installation and dependancy configuration, Up: Top NFS config for shared image repository
If not present append the NFS export directory stored in the corresponding variable (including a new line):
vars:

"nfs_export_dir"

   slist =>
     {
     "/var/lib/one 192.168.1.2/255.255.255.0(rw,sync,no_subtree_check)",
     ""
     };

files:

"/etc/exports",
      edit_line => append_if_no_lines($(nfs_export_dir)),
      comment => "export nfs image repo";
To ensure the NFS service remains available:
processes:

ensure_nfs_running::
        ".*nfsd.*",
                restart_class => "start_nfs";

If this is found to be false then we classify:

start_nfs::
        "service nfs-kernel-server restart",
                 comment => "restart nfs";
In order to ensure the share is mounted on all node controllers we can use the NFS promise:
storage:

cluster_node::
"/var/lib/one",
       mount  => nfs("192.168.1.2","/var/lib/one"),
       comment => "mount image repo from front end";
Next we will create a directory to hold our virtual machine images:
"/var/lib/one/images/.",
        comment => "create dir in image repo share",
        perms => mog("644", "oneadmin", "oneadmin"),
        create => "true";
Open Nebula environment configuration
Create the oneadmin bashrc file containing the ONE_XMLRPC environment variable with appropriate permissions:
files:
 front_end::
  "/var/lib/one/.bashrc"
        comment => "setup oneadmin env",
        perms => mog("644", "oneadmin", "oneadmin"),
        create => "true",
        edit_line => append_if_no_line(
            "export ONE_XMLRPC=http://localhost:2633/RPC2");
We also need to create the one_auth file:
files:
 front_end::
  "/var/lib/one/.one/one_auth",
        comment => "create open nebula auth file",
        perms => mog("644", "oneadmin", "oneadmin"),
        create => "true",
        edit_line => append_if_no_line("username:password");
Finally password-less authentication for the oneadmin user:
Add key to autorized_keys file:
files:
  front_end::
    "/var/lib/one/.ssh/authorized_keys",
        comment => "copy sshkey to authorized",
        perms => mog("644", "oneadmin", "oneadmin"),
        copy_from => local_cp("/var/lib/one/.ssh/id_rsa.pub");
Disable known hosts prompt:
front_end::
"/var/lib/one/.ssh/config",
        comment => "disable strict host key checking",
        perms => mog("644", "oneadmin", "oneadmin"),
        create => "true",
        edit_line => append_if_no_line("Host *
        StrictHostKeyChecking no");
Now on the node controller(s) we need to add the oneadmin group and user with the same uid and gid as the front end and add the oneadmin user to the libvertd group:
files:
 node_controller::
  "/etc/passwd",
      comment => "add oneadmin user to node controller",
      edit_line => append_if_no_line("oneadmin:x:999:999::/srv/cloud/one:/bin/bash");

 "/etc/group",
      comment => "add oneadmin group to node controller",
      edit_line => append_if_no_line("oneadmin:x:999:");

 "/etc/group",
      comment =>"add oneadmin to libvirtd group",
      edit_line => append_user_field("libvirtd","4","oneadmin");
Now that the user environment is configured we can register our node controller with the front end:
files:
 front_end::
      "/usr/bin/onehost create 192.168.1.2 im_kvm vmm_kvm tm_nfs",
        contain => oneadmin;
Network configuration
Before we can create virtual networks we must configure our node controller interfaces. In this example we will bridge a virtual interface (vbr0) with eth0. First we define the contents of the interfaces file in a variable:
vars:
"interfaces_contents" slist => {
                               "auto lo",
                               "iface lo inet loopback",
                               "auto vbr0",
                               "iface vbr0 inet static",
                               "address 192.168.1.2",
                               "netmask 255.255.255.0",
                               "network 192.168.1.0",
                               "broadcast 192.168.1.255",
                               "gateway 192.168.1.1",
                               "dns-nameservers 192.168.1.1",
                               "bridge_ports    eth0",
                               "bridge_stp      off",
                               "bridge_maxwait  0",
                               "bridge_fd       0"
                               };
Next we edit the interfaces file to include our new settings:
files:
node_controller::
"/etc/network/interfaces",
        comment => "ensure bridge for open nebula vm networks",
        edit_line => append_if_no_lines($(interfaces_contents)),
        create => "true",
        perms => mog("644", "root", "root");
And restart networking:
commands:
  restart_networking::

    "/etc/init.d/networking restart",
       comment => "restart networking";
Now we have configured the network bridge we can create an Open Nebula virtual network file and submit it to the system. The contents of the virtual network template file could be defined as a variable as we have seen before but in this case it is passed as a parameter to the append promise body:
"/var/lib/one/network.template",
        comment => "create lan template",
        create => "true",
        perms => mog("644", "oneadmin", "oneadmin"),
        edit_line => append_if_no_line("NAME = \"VM LAN\"
TYPE = FIXED
BRIDGE = vbr0
LEASES = [IP=192.168.1.100]");
The network template only deals with fixed ip addresses and provides only one lease. Obviously this should be altered to suite your requirements. Now we have a template we can register it with open nebula:
commands:
  front_end::
     "/usr/bin/onevnet create /var/lib/one/network.template",
        contain => oneadmin;
Virtual machine template configuration
This follows the same pattern as virtual network setup. First we create the template file:
files:

  "/var/lib/one/vm.template",
        comment => "create vm template",
        create => "true",
        perms => mog("644", "oneadmin", "oneadmin"),
        edit_line => append_if_no_line("NAME   = ubuntu-10.04-i386
CPU    = 0.1
MEMORY = 256
DISK   = [
   source   = \"/var/lib/one/images/open_nebula.img\",
   target   = \"vda\",
   readonly = \"no\" ]
DISK   = [
   type     = \"swap\",
   size     = 1024,
   target   = \"vdb\"]

NIC    = [ NETWORK = \"VM LAN\" ]
INPUT = [ TYPE = \"mouse\",  BUS = \"ps2\" ]
GRAPHICS = [TYPE = \"vnc\", LISTEN = \"localhost\", PORT = 5910]
");
Now we can launch the virtual machine defined in its template file:
commands:
  front_end::
      "/usr/bin/onevm create /var/lib/one/vm.template",
        contain => oneadmin;
If we increase the leases in our network template each time the onevm create command is issued a new virtual machine will be launched up to the number of available leases.
Open Nebula Commands
It should be noted that commands, particularly those that are Open Nebula specific, will be run each time cf-agent is executed. Since this goes against the idea of convergence it is necessary to add some additional classification. One method is to create a 'stamp' file after a particular command is successfully executed. If this file exists then (or if its time stamp is older/newer than some value) the machines classified as having to run the command loose that class preventing future execution.
Virtual machine configuration
With CFEngine preinstalled in our virtual machine image we can configure our generic image to the required specification on the fly. For community edition we will need to exchange keys and define access rules to the virtual machine can collect the policy files. with CFEngine nova this step is even simpler as we can set a start up script to issue the bootstrap command so the new vm automatically registers with the policy hub.
Once registration is complete we can define a new class based on the ip of our virtual machine. In this example that is 192.168.1.100 so we can create a class with a meaningful name:
"webserver" or => {"192_168_1_100"};
Now we have define webserver we can simply apply promises to it as if it was any other machine for example:
Webserver in Open Nebula
First we install apache:
packages:
 webserver::

   "apache2",
    comment => "install apache2 on webserver vm",
    package_policy => "add",
        package_method => generic,
        classes => if_ok("ensure_apache_running");
Next we ensure it is running
processes:
  ensure_apache_running::

         ".*apache2.*"
                restart_class => "start_apache";
If not, the service is restarted
commands:
  start_apache::

    "/etc/init.d/apache2 restart";
Finally we can copy some content into the document root on our new virtual webserver:
files:
  "/var/www"

     perms => system("744"),
     copy_from => uu_scp("/root/webserver_site_files","192.168.1.6"),
     depth_search => recurse("inf"),
     action => u_immediate;
Open Nebula Summary
Now we have a convergent self-repairing, Open Nebula powered private cloud! The main benefits in combining CFEngine and Open Nebula are the facility to increase infrastructure capacity just by connecting a new node controller to the network, and then allowing CFEngine to configure and maintain it over time. Finally, there is the hands-free configuration of generic virtual machine images to an arbitrary specification, without touching the virtual machine itself.
There is a vast array of configuration options and choices to be made in an Open Nebula setup, as with CFEngine. This flexibility is one of its strengths. This guide demonstrates only a small subset of possible configuration choices aiming to provide a starting point for more comprehensive setups.