Custom Inventory
This tutorial will show you how to add custom inventory attributes that can be leveraged in policy and reported on in the CFEngine Enterprise Mission Portal. For a more detailed overview on how the inventory system works please reference CFEngine 3 inventory modules.
Overview
This tutorial provides instructions for the following:
Choose an Attribute to Inventory
Writing inventory policy is incredibly easy. Simply add the inventory and
attribute_name= tags to any variable or namespace scoped
classes.
In this tutorial we will add Owner information into the inventory. In this
example we will use a simple shared flat file data source
/vagrant/inventory_owner.csv.
On your hosts create /vagrant/inventory_owner.csv with the following contnet:
hub, Operations Team <ops@cfengine.com>
host001, Development <dev@cfengine.com>
Note: I am using the [CFEngine Enterprise Vagrant Environment][Installing Enterprise Vagrant Environemt] and files located in the vagrant project directory are automatically available to all hosts.
Create and Deploy Inventory Policy
Now that each of your hosts has access to a data source that provides the Owner information we will write an inventory policy to report that information.
Create /var/cfengine/masterfiles/services/tutorials/inventory/owner.cf with the
following content:
bundle common tutorials_inventory_owner
# @brief Inventory Owner information
# @description Inventory owner information from `/vagrant/inventory_owner.csv`.
{
  classes:
    "have_owner"
      expression => isvariable("my_owner");

  vars:
    "data_source" string => "/vagrant/inventory_owner.csv";
    "owners" data => data_readstringarray( $(data_source), "", ", ", 100, 512 );

    "my_owner"
      string  => "$(owners[$(sys.uqhost)][0])",
      meta    => { "inventory", "attribute_name=Owner" },
      comment => "We need to tag the owner information so that it is correctly
                  reported via the UI.";

  reports:
    inform_mode.have_owner::
      "$(this.bundle): Discovered Owner='$(my_owner)'";
}
Note: For the simplicity of this tutorial we assume that masterfiles is not configured for policy updates from a Git repository. If it is, please add the policy to your repository and ensure it gets to its final destination as needed.
This policy will not be activated until it has been included in inputs. For simplicity we will be adding it to common control, but note that files can include other files through the use of inputs in file control.
Add 'services/tutorials/inventory/owner.cf' to inputs and
'tutorials_inventory_owner' to the bundlesequence in
common control found in /var/cfengine/masterfiles/promises.cf as shown below.
body common control
{
    bundlesequence =>  {
                         "inventory_control",
                         @(inventory.bundles),
                         tutorials_inventory_owner,
                         def,
                         cfe_internal_hub_vars,
# snipped for brevity
                         service_catalogue,
    };

    inputs => {
               # File definition for global variables and classes
                "def.cf",

              # Inventory policy
                @(inventory.inputs),
                "services/tutorials/inventory/owner.cf",
# snipped for brevity
                # List of services here
                  "services/init_msg.cf",
                  "services/file_change.cf",

      };
}
When you finish its a good idea to run cf-promises (syntax analyzer) to
ensure the policy validates. You can also perform a manual policy run and check
that the correct owner is discovered.
Syntax Check:
[root@hub ~]# cf-promises -f /var/cfengine/masterfiles/promises.cf
[root@hub ~]#
No output and return code 0 indicate the policy was successfully validated.
Manual Policy Run:
[root@hub ~]# cf-agent -KIf /var/cfengine/masterfiles/promises.cf -b tutorials_inventory_owner
2014-06-16T19:24:58+0000     info: Using command line specified bundlesequence
R: tutorials_inventory_owner: Discovered Owner='Operations Team <ops@cfengine.com>'
Here I have run the policy without locks (-K) in inform mode (-I), using a specific policy entry (-f) and activating only a specific bundle (-b). The inform output helps me confirm that my hubs owner is discovered from our CSV properly.
Run Reports
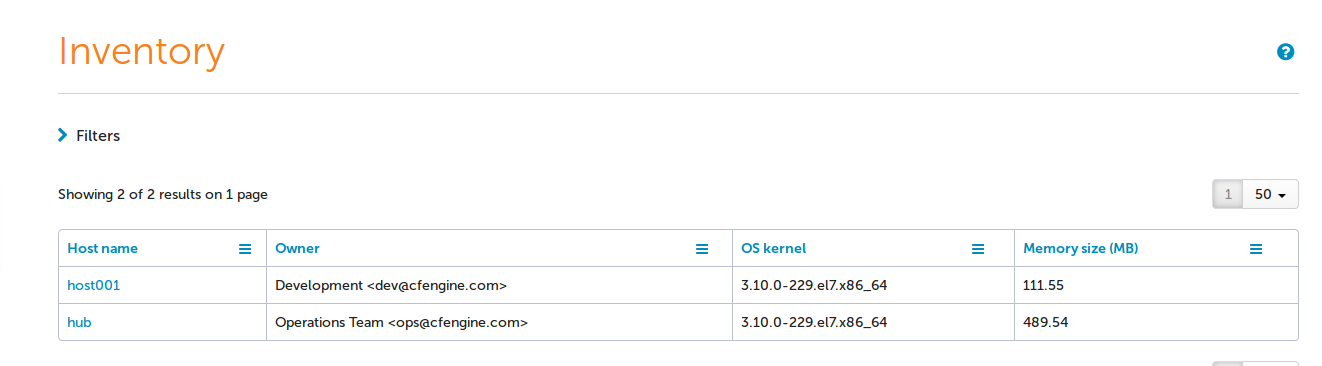
Once you have integrated the policy into promises.cf it will be distributed and run by all agents. Once the hub has had a chance to collect reports the 'Owner' attribute will be available to select as a Table column for Inventory Reports. Custom attributes appear under the 'User defined' section.
Note: It may take up to 15 minutes for your custom inventory attributes to be collected and made available for reporting.

You will see the host owner as shown in the following report.