CFEngine comes in two software editions: CFEngine Community and CFEngine 3 Nova. CFEngine 3 Nova is a commercial subscription offering, with simple productivity enhancements and reporting extensions. Features include compliance management, reporting and business integration, and tools for handling necessary complexity. CFEngine 3 Nova has features to support Cloud Computing for public and private clouds, as well as greater integration facilities with database resources.
The evaluation program aims to familiarize the user with CFEngine 3 Nova through examples and practical use of the Nova Mission Portal, a web based graphical user interface. You do not need experience with CFEngine 3, the current document provides a step-by-step guide to help you find and use the product's major features. Of course, the deeper knowledge of system administration and CFEngine 3 language that you possess, the more you will get out of this evaluation.
The Mission Portal is the centerpiece of user interaction with CFEngine 3 Nova, designed to suit the needs of the next generation of system administrators and IT managers alike. The evaluation program will allow the user to quickly:
For the purpose of this evaluation program, CFEngine 3 Nova has been set up in a network comprising several nodes. One node serves as a central hub to distribute CFEngine configuration policies and collect reports from the other nodes (clients). They run on different operating systems, comprising several linux flavors and windows servers.
Table of Contents
1 Introduction
| If you have not already done so, you may request access to the CFEngine Nova Evaluation Program by entering your information at http://cfengine.com/evaluation. |
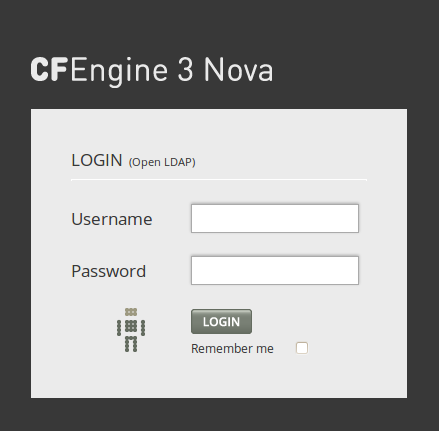
You should have received an email with account information after making an evaluation agreement with CFEngine. In it, you will find information on how to access your dedicated CFEngine 3 Nova instance, the CFEngine support ticketing system, and other online resources. Go to the url indicated in this email to access the Nova Mission Portal, use your credentials to log in.
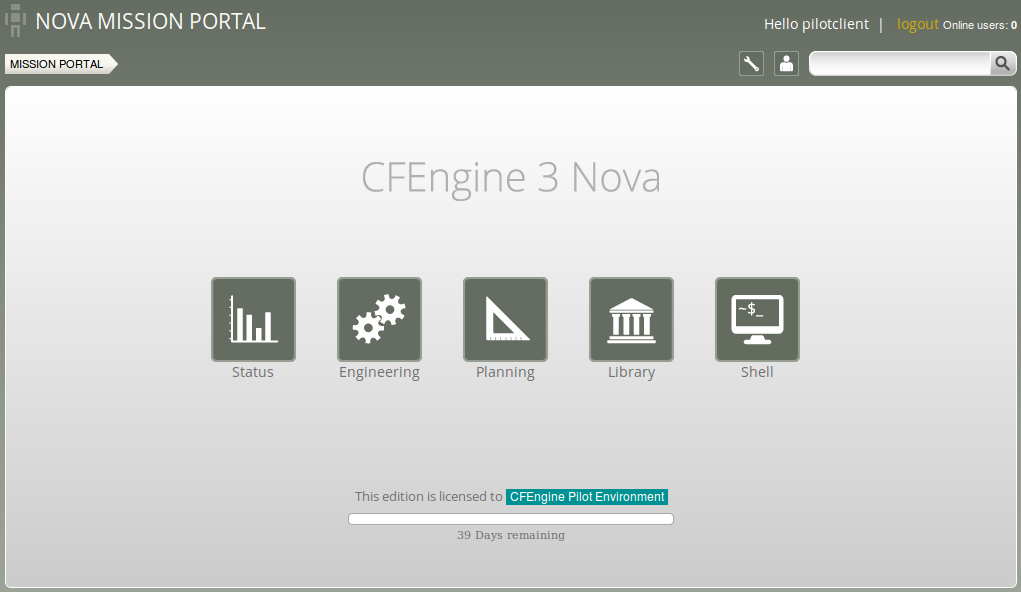
The normal Nova Mission Portal is divided into four main sections called rooms. Here we have added a fifth room which is specific to the evaluation environment (i.e. is not shipped with the actual product): shell access to machines. Each room offers insight into different aspects of operations and is a beginning from which you can refine your overview and search through information.
You can always use the breadcrumb in the top left corner to navigate and see where you are in the Mission Portal.
CFEngine uses a declarative language that describes the desired state of a system. Individual statements are called promises. Promises can be kept (CFEngine was able to keep the promise about the desired state), not kept (CFEngine was not able to keep the promise about the desired state) or repaired (promise was initially not kept, CFEngine fixed this). The desired state of your system is thus described in collections of promises, assembled in CFEngine policy files with the extension .cf.
Action item: Click the Status icon in the main page of the Mission Portal to enter the ‘Status’ room.
 Figure: Go to Status room
|
The status room gives an overview of IT goals and how close you are to an ideal state. Each section in the room is described below.

The two pie charts show the business value of the promises kept/not kept and well as host status, respectively. Business value is associated with the value of promises as defined in policy files. In the Host Status chart, each node in the network represents a slice of the pie and is classified into red, yellow, green and blue according to the level of their compliance:
The row of bar meters shows the compliance (average percentage of promises kept, repaired or not kept) of all registered hosts in blocks of 6 hours for the past week. It summarizes performance and anomalous behavior in a simple red (promises not kept), yellow (promises repaired) and green (promises kept) scale. Click on a bar to see which promises were kept/not kept.
A summary of Mission goals as defined in user policy files (these examples are from company_knowledge.cf). You can look at editing policy files in Policy editing.
Action item: Click NOVA MISSION PORTAL on the top left (or MISSION PORTAL in the breadcrumb) to go back to the main Mission Portal page. Click the Engineering icon in the main page of the Mission Portal to enter the ‘Engineering’ room.
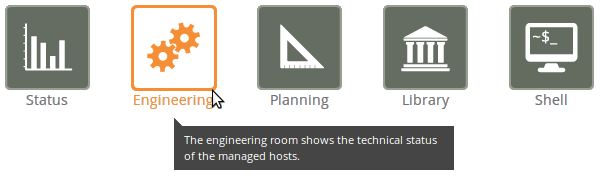 Figure: Go to Engineering room
|
Mission engineering illustrates the state of the system in relation to the desired state at all scales. Zoom in to specific areas and examine the impact of promises, query data, and extract reports. Each section in the room is described below.
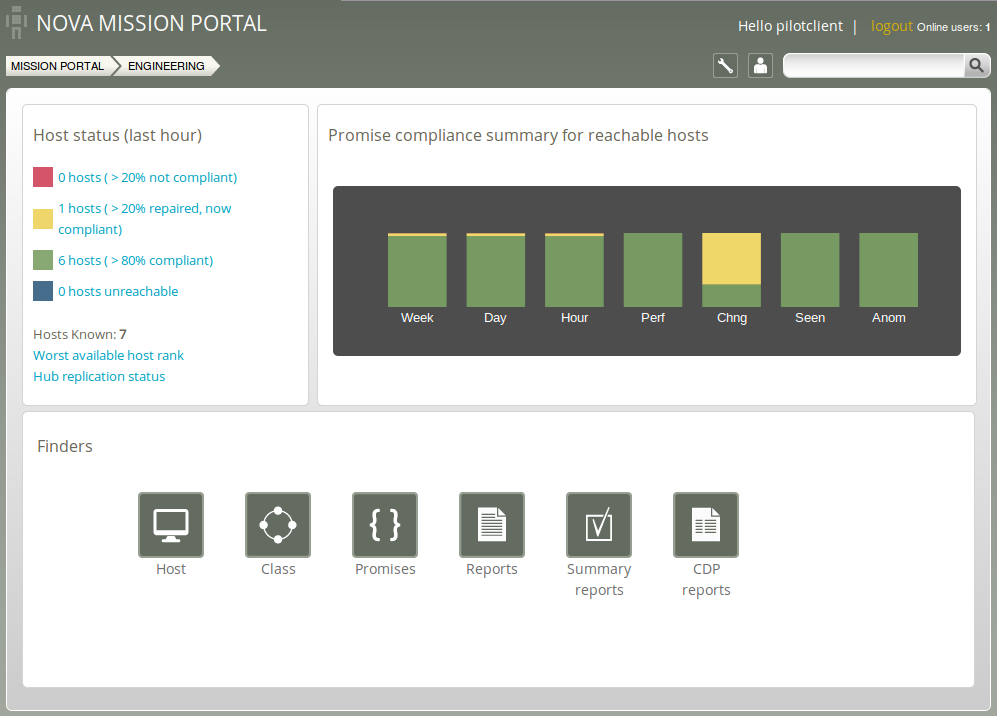
The row of bar meters shows the compliance (average percentage of promises kept, repaired or not kept) of registered hosts. It summarizes performance and anomalous behavior in a simple red (promises not kept), yellow (promises repaired), and green (promises kept) scale. The "Chng" bar relates to the amount of changes made to files monitored by a CFEngine policy in the last hour (change watch). It is green if no changes have been made. The level of yellow increases as changes occur (but it will never be red). For the "Seen" bar, CFEngine monitors the average time between connections to the clients and reports deviations as green, yellow or red according to the size of the deviation. The "Anom" bar relates to anomalies and is generated from monitoring data (vital signs) for the last week. CFEngine uses the average value of each vital sign to report deviations as green, yellow or red according to the size of the deviation.
The Mission ‘Engineering’ room comes with finder functions (modules that make it simple and intuitive to browse and search for objects of a particular type): Host, Class, Promises, Reports, Summary reports, and CDP (Content Driven Policies) reports. We will take a closer look at Reports and CDP reports in this document, but feel free to explore the different finder functions on your own.
Action item: Click NOVA MISSION PORTAL on the top left (or MISSION PORTAL in the breadcrumb) to go back to the main Mission Portal page. Click the Planning icon in the main page of the Mission Portal to enter the ‘Planning’ room.
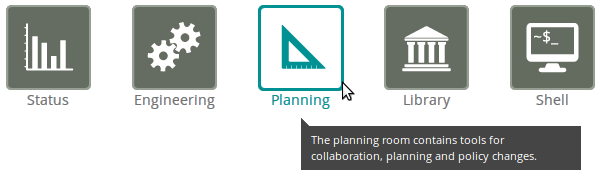 Figure: Go to Planning room
|
The ‘Planning’ room allows you to make changes to policies, goals and implement specific tactics to achieve the desired state. Interact with data, approve changes and anomalies. Get an overview of users logged on to the Mission Portal, as well as their current activity. Each section in the room is described below.
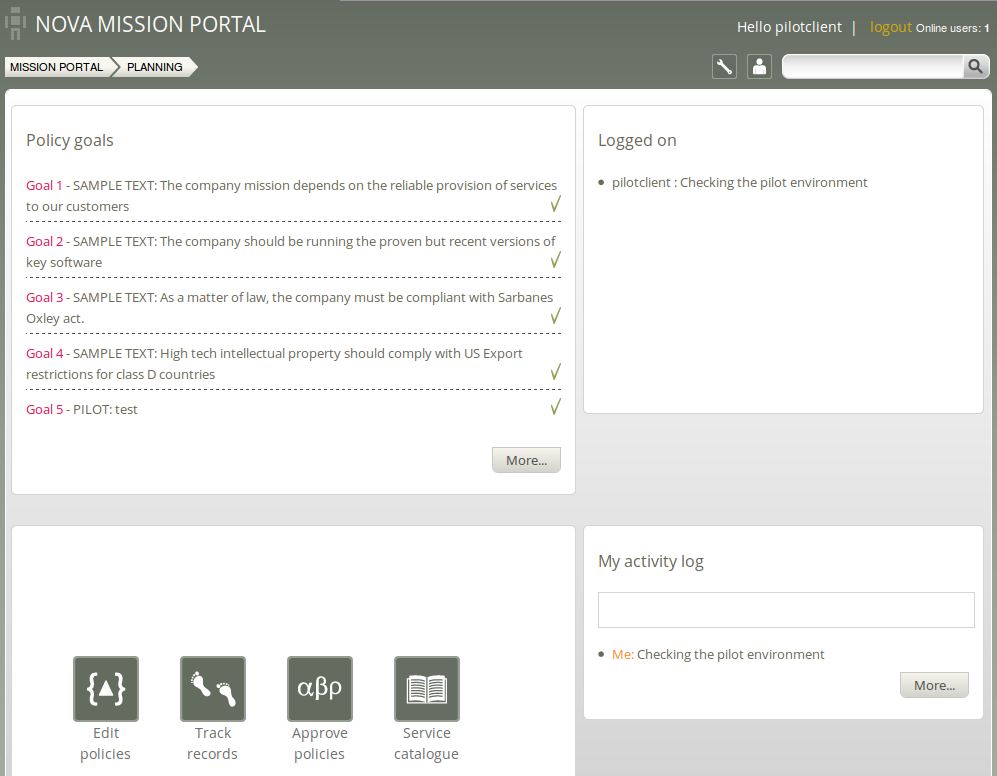
Policy Goals: List of policy goals as defined in policy files; these examples are from company_knowledge.cf (same as in the ‘Status’ room).
Icons:
Logged on: Shows users currently logged on to the Mission Portal and their activity as stated in their activity log (see below).
Activity log: Shows the latest activity entries. Type in a new activity to keep colleagues posted on current work.
Action item: Click NOVA MISSION PORTAL on the top left (or MISSION PORTAL in the breadcrumb) to go back to the main Mission Portal page. Click the Library icon in the main page of the Mission Portal to enter the ‘Library’ room.
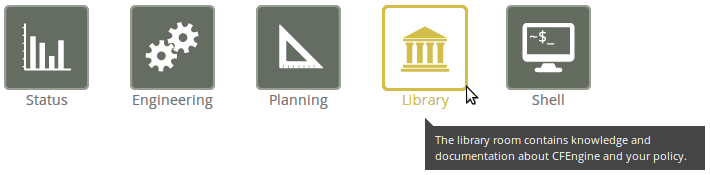 Figure: Go to Library room
|
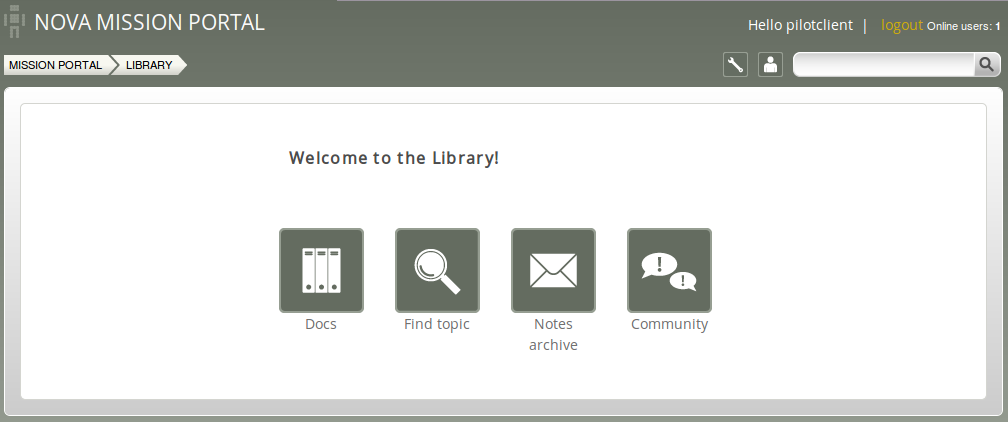
The Library room contains finders for documents, topics, a notes archive, and a link to the CFEngine community web pages.
Although the Mission Portal is the centerpiece of user interaction with CFEngine 3 Nova, system administrators often also wish to have shell access to their machines. We have therefore added a web based application specific to the Mission Portal in the evaluation environment (i.e. not found in the actual product) to provide a shell interface. You may explore the environment and verify the behavior of the Mission Portal by using this application.
Action item: Click NOVA MISSION PORTAL on the top left (or MISSION PORTAL in the breadcrumb) to go back to the main Mission Portal page. Click the Shell icon to enter the web based shell application.
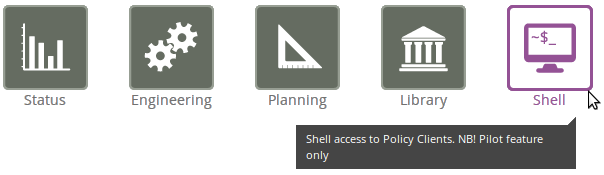 Figure: Go to shell application
|
The following screen will appear once the application is loaded:
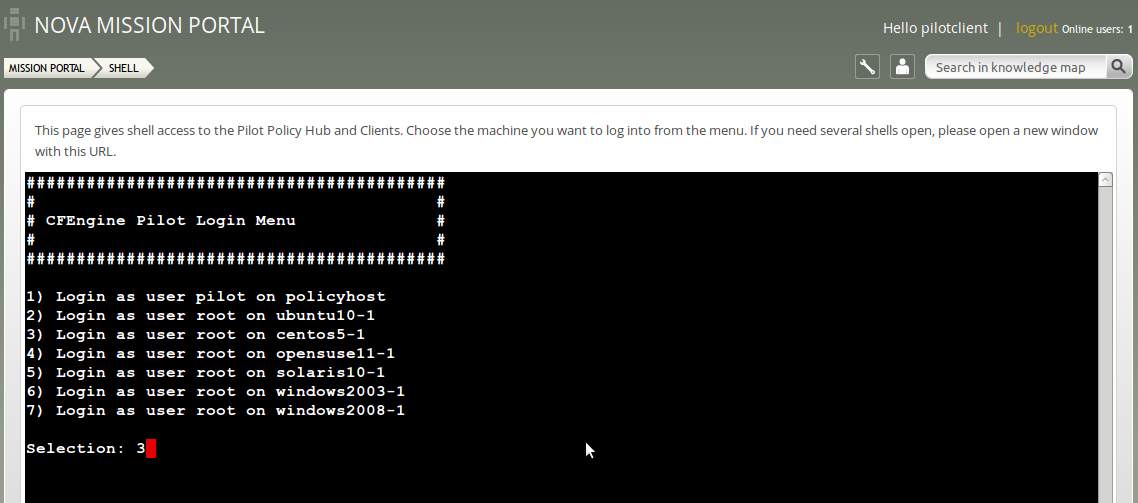
The shell application has restricted access on the hub (policy host) for security reasons. Root access has been granted on the clients, so you should be able to perform most tasks from this interface (although some restrictions have been put in place to contain access to the evaluation environment only).
| Action item: Type the number of the node you wish to log on to and press Enter. |
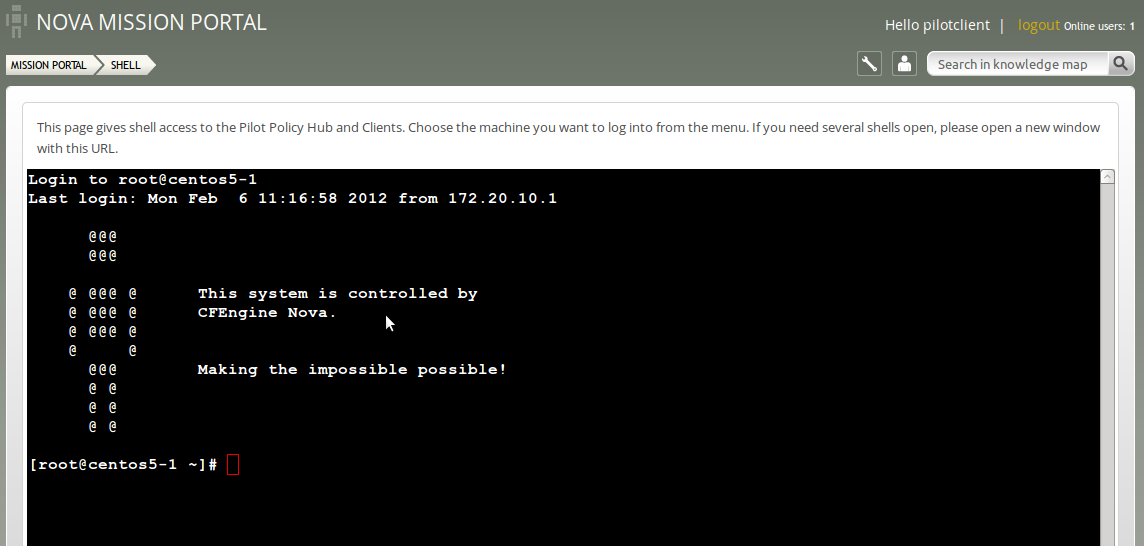
The following screen will appear after a successful login:
Action item: Explore the environment through the command line interface. Type exit to finish the session on the current node. The following screenshot will appear:
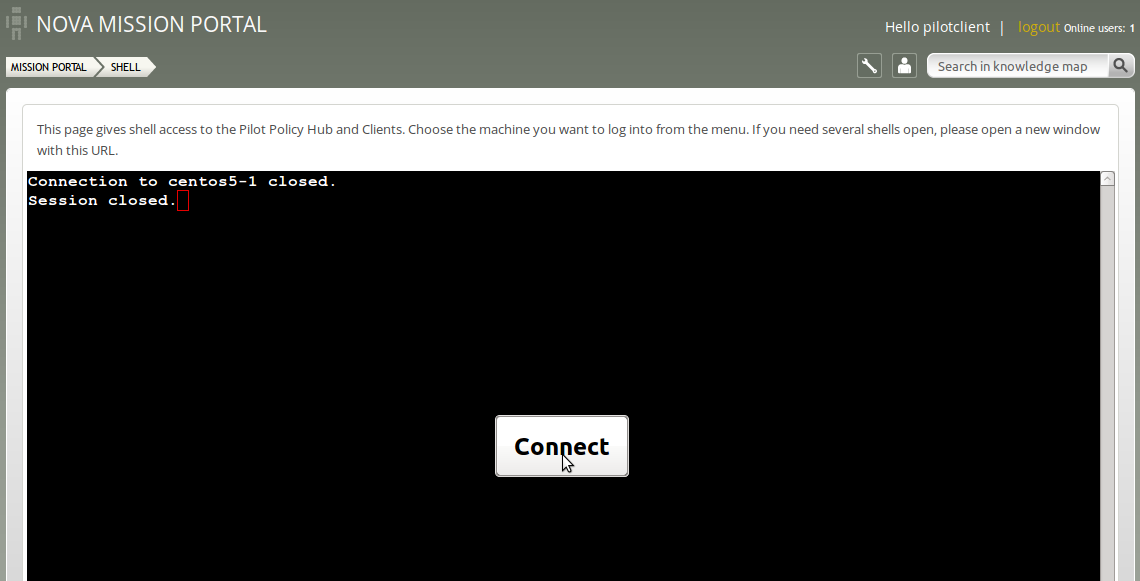 Figure: Shell logout/connect
Click Connect to access the ‘CFEngine Pilot Login Menu’ again and choose another node to log on to. Alternatively you can navigate away from the shell access by clicking NOVA MISSION PORTAL on the top left (or MISSION PORTAL in the breadcrumb). |
A significant capability of CFEngine 3 Nova is automated system reporting: it collects history, state and change data about computers and ties them together. A report is a tabular summary of CFEngine's internal information, tailored to a particular purpose, searchable, and describes attributes and qualities of managed hosts.
Standard reports in CFEngine 3 Nova can be accessed through the ‘Reports finder’:
Action item: Enter the ‘Engineering’ room as shown in Engineering room, locate and click the Reports icon to open the finder.
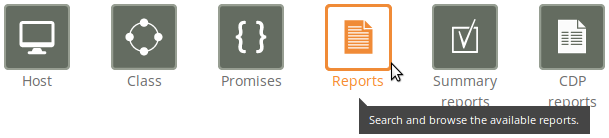 Figure: Click to open the Reports finder.
|
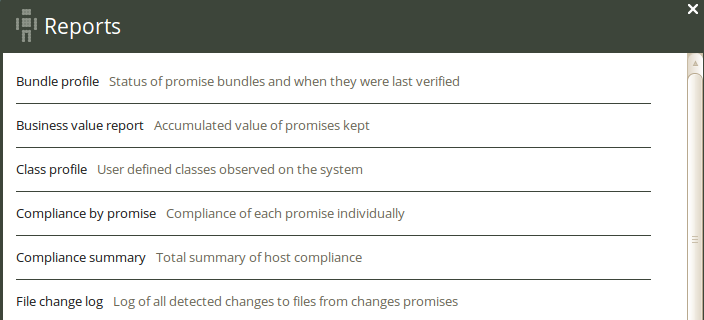
The finder lists all the standard report categories, each category contains information about different aspects of the Mission. When you click one of them, the ‘Report finder’ will present a query form that is adapted to the chosen report category.
| Action item: Scroll down and click Software installed towards the bottom of the ‘Report finder’ to open a query window. |
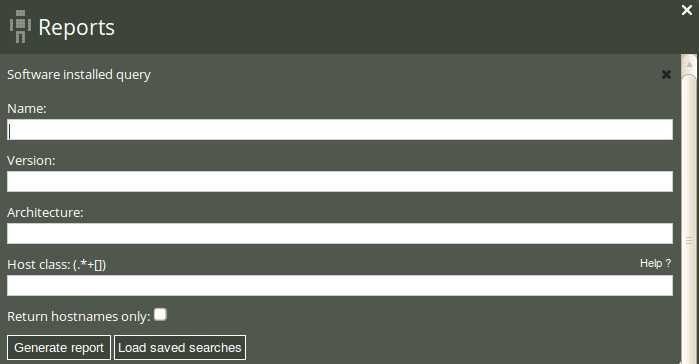
| Action item: Click Generate report in the query window without filling in any of the search fields. |
There are two ways of narrowing down the listing in these reports: one is to enter filtering criteria directly in the report query window, the other is to click on ‘New Search’ in the top right corner of the report itself and enter the filtering criteria there. We will do the latter:
| Action item: Click New Search in the ‘Software installed’ report and enter your search criteria as a regular expression (for instance, enter ‘apache.*’ in the ‘Name’ field to see what version of apache is running on the different hosts). Click Generate report. |
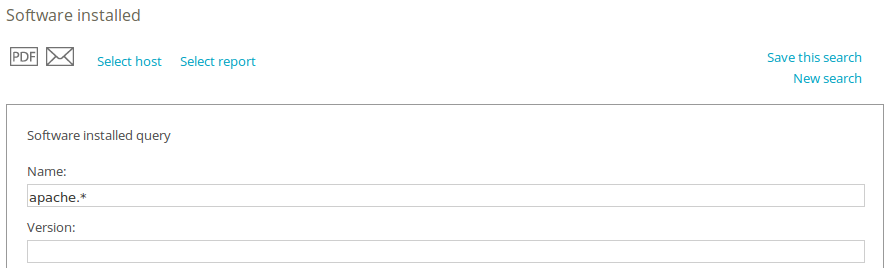
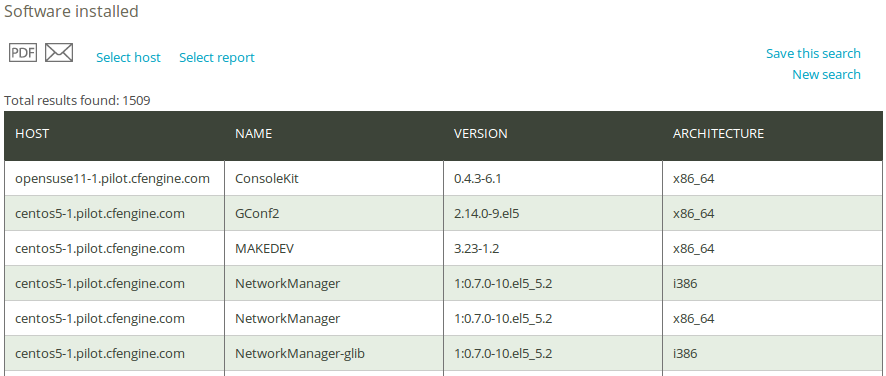
Once you have clicked ‘Generate report’, CFEngine 3 Nova will list an overview of all machines running some version of apache.
The combination of the extensive reports and detailed filtering is a flexible and powerful tool, made to give as general or granular an overview as the user needs it to be. A summary and explanation to all the standard reports can be found in the Nova Evaluation Guide Supplement.
Content-Driven Policies (CDPs) were introduced to make policy management easier. In contrast to policies written in the CFEngine language, they are composed of semi-colon separated fields in a text file that the user fills with content, like a spreadsheet or tabular file. Each line in the file is parsed and translated to be part of a regular CFEngine policy. We will take a closer look at CDP input files in a later section.
CDP reports are similar to standard reports, except that they reflect the effects of CDP input files instead of regular CFEngine policy files.
Action item: Enter the ‘Engineering’ room as shown in Engineering room, then click the CDP reports icon to access the ‘CDP reports finder’.
 Figure: Go to CDP reports finder
|
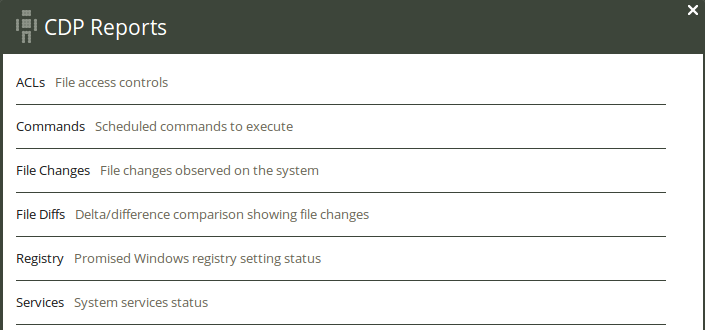
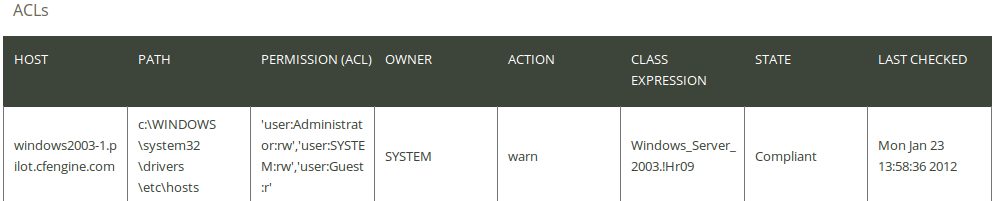
CFEngine 3 Nova comes with several default CDPs, we will use the ‘ACLs report’ as an example. An access control list (ACL) is a list which specifies which users or system processes are granted access to objects, as well as what operations are allowed on given objects. Each entry in a typical ACL specifies a subject and an operation. For instance, if a file has an ACL that contains (Alice, delete), this would give Alice permission to delete the file.
| Action item: Click on ACLs in the ‘CDP Reports finder’ to access the ACLs report (there is no query window for CDP reports). |
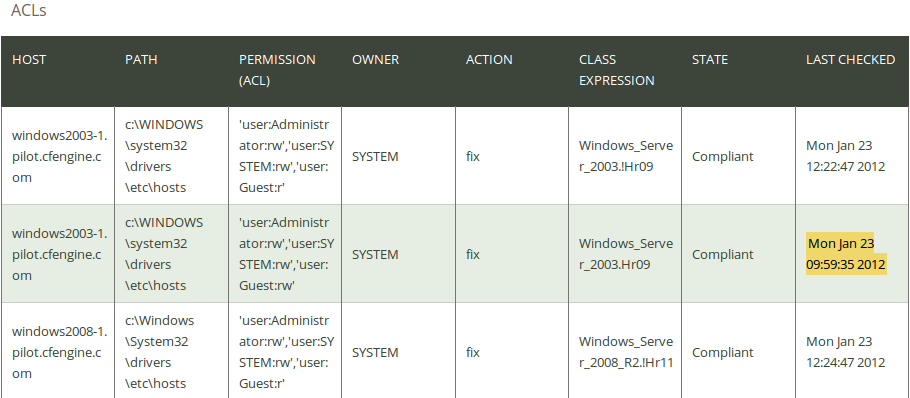
The report lists an overview of host name (‘Host’), path of the affected object (‘Path’), the permission setting (‘Permission (ACL)’), owner of the affected object (‘Owner’), action that CFEngine should execute on the object (‘Action’), the context in which the promise was made (‘Class expression’), state of compliance (‘State’), and the time the promise was last checked (‘Last checked’).
There are two types of CFEngine policies:
In the following, you will find a short introduction to both CDP and standard policies. See The Policy Editor (beta) for how to access the Policy Editor and edit these files. 1
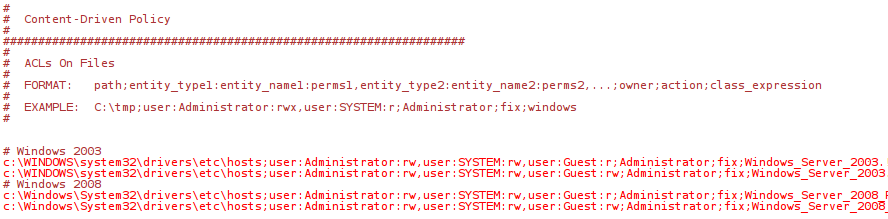
As explained previously, content driven policies consist of semi-colon separated fields in a text file. The files also contain a header that explains the format and meaning of the fields and typically looks like this (lines have been split and indented for presentability):
   #  ACLs On Files

   #

   #  FORMAT:   path;entity_type1:entity_name1:perms1,

         entity_type2:entity_name2:perms2,...;owner;action;class_expression
   #

   #  EXAMPLE:  C:\tmp;user:Administrator:rwx,user:SYSTEM:r;

         Administrator;fix;windows
   #


   # Windows 2003

   c:\WINDOWS\system32\drivers\etc\hosts;user:Administrator:rw,user:SYSTEM:rw,
       user:Guest:r;SYSTEM;fix;Windows_Server_2003.!Hr09
   c:\WINDOWS\system32\drivers\etc\hosts;user:Administrator:rw,user:SYSTEM:rw,
       user:Guest:rw;SYSTEM;fix;Windows_Server_2003.Hr09
   # Windows 2008

   c:\Windows\System32\drivers\etc\hosts;user:Administrator:rw,user:SYSTEM:rw,
       user:Guest:r;SYSTEM;fix;Windows_Server_2008_R2.!Hr11
   c:\Windows\System32\drivers\etc\hosts;user:Administrator:rw,user:SYSTEM:rw,
       user:Guest:rw;SYSTEM;fix;Windows_Server_2008_R2.Hr11
Anything with a ‘;’ before or after it is a field entry. We need to look at the header of the file to understand the structure and meaning of the fields (under the FORMAT and EXAMPLE sections). In this case we have (line has been split and indented for presentability):
  #  FORMAT:   path;entity_type1:entity_name1:perms1,

         entity_type2:entity_name2:perms2,...;owner;action;class_expression
Splitting this up into separate fields:
The advantage of CDPs is that it requires no knowledge of CFEngine syntax to quickly set up a basic policy. They function as an abstraction layer and allow system administrators to define specific functions with parameters that can be manipulated by others. The list format also allows for quick editing of multiple parameters, without having to go through tens or hundreds of lines of regular CFEngine code.
Standard CFEngine policies consist of a declarative language that describes the desired state of a system. Individual statements are called promises, they can be grouped in bundles and have parametrized body templates (‘bundle’ and ‘body’ are keywords in CFEngine that correspond to these). Below is an example of a simple CFEngine policy:
body common control
{
  bundlesequence => { "test" };
}

# Comments are defined by the hash tag (#), they will not be parsed by CFEngine.


bundle agent test
{
files:		     # This is the promise type, i.e. we make a promise about files
  "/tmp/testfile"	     # This is the promiser (i.e. the concerned object)
    create => "true";  # This tells CFEngine to create the file
}
This policy will create the file /tmp/testfile. It contains the bare minimum of a CFEngine policy, consisting of the compulsory ‘body common control’, containing (at least) a bundlesequence. Then follows a compulsory ‘bundle’, of type ‘agent’ and with the arbitrary name ‘test’ (the bundle type reflects the affected CFEngine component and can take several values, here we use ‘agent’). The bundle contains a promise type (here ‘files’), a promiser (i.e. the affected object, here ‘/tmp/testfile’) and a promise about desired state (here ‘create => "true"’).
We recommend that users familiarize themselves with the CFEngine 3 documentation and continue to learn about the CFEngine language and CFEngine 3 Nova. Documents of interest include:
We also recommend that you attend a CFEngine 3 Training Course and/or employ CFEngine Consulting to help them plan your Nova implementation.
Use our contact form, or send an email to contact@cfengine.com, to be contacted about purchasing CFEngine 3 Nova.
CFEngine 3 Nova has a beta version of an integrated editor, made for working on CFEngine policies. It provides syntax high-lighting and look-up to make policy writing easier.
Action item: To access the policy editor, enter the ‘Planning’ room as described in Planning room, then click the Edit policies icon.
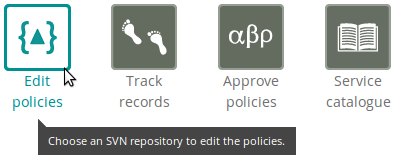 Figure: Go to Edit policies
|
The policy editor comes with a tie-in for Subversion version control repositories; the Nova Mission Portal will prompt you for the path and credentials to perform an SVN checkout.
Action item: Enter the path ‘http://localhost/svn/CFEnginePilot’, username ‘pilot’, and password ‘pilot’. Click Add.
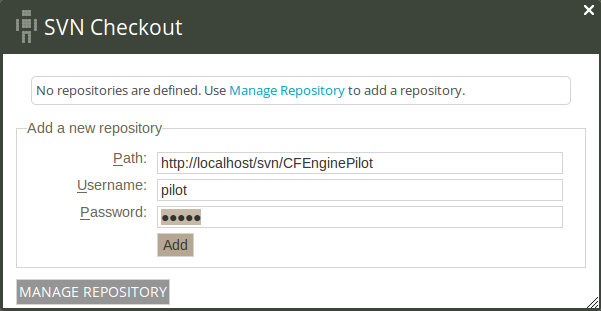 Figure: Add SVN repository
|
Action item: Click on Checkout to complete the checkout procedure.
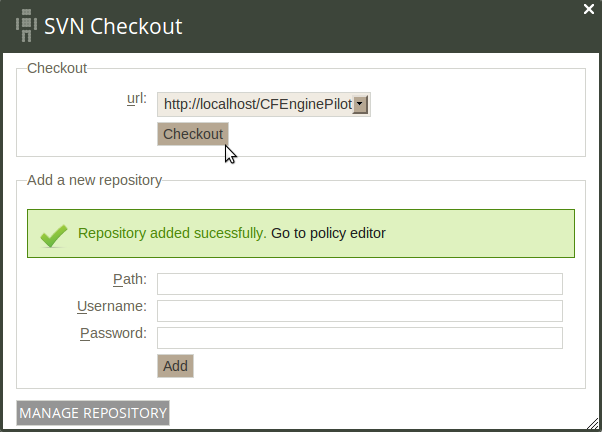 Figure: SVN checkout
|
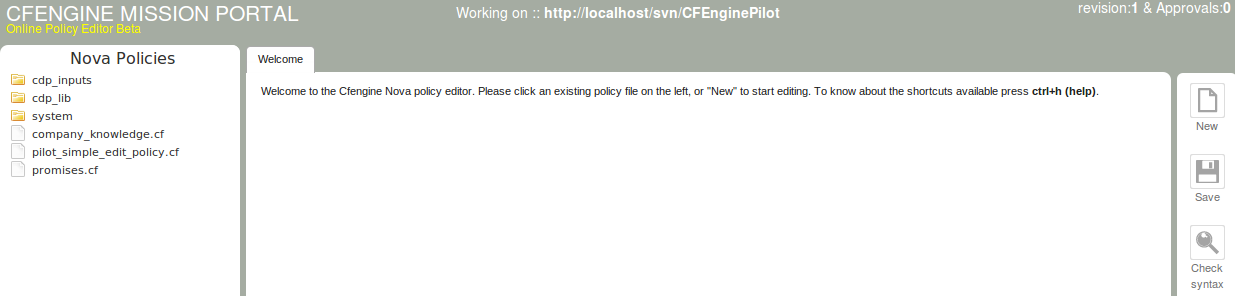
The Policy Editor appears after a successful checkout. It consists of three main columns: on the left, a list of all the policies in the checked out repository (‘Nova Policies’); in the center, the editor space (where policy files will appear as sheets/tabs); on the right, basic file and Subversion commands. We take a closer look at these functions in the following sections.
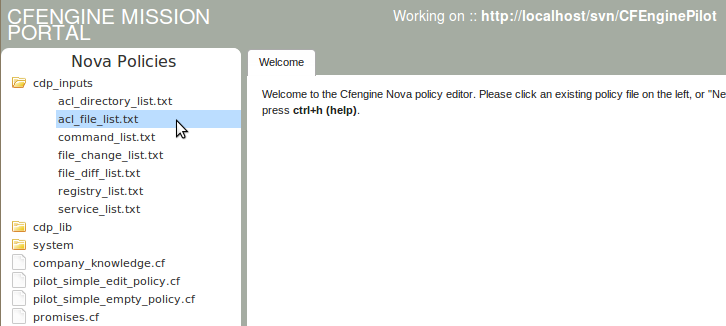
If you have not already opened the Policy Editor, follow the instruction in The Policy Editor (beta) to do so. The file acl_file_list.txt can be found under the cdp_inputs catalog in the policy editor.
| Action item: Click cdp_inputs in the file menu, then click acl_file_list.txt to open the file in the editor window. |
The content of the file looks like this:
We will now modify a field in this policy and check the result in the Mission Portal. The first two lines below
# Windows 2003 concern the file c:\WINDOWS\system32\drivers\etc\hosts, lets change the action taken by CFEngine if the promise is not compliant.
| Action item: Change the next to last field from ‘fix’ to ‘warn’. Click the Save icon on the right, then Commit (add a comment in the pop up, for example 'Changed to warn'), click Run now and wait for the execution to have finished (can take up to a minute). To check the result, go back to the main page, enter the ‘Engineering’ room (Engineering room), click the CDP reports icon and finally click ACLs File access controls in the ‘CDP reports’ finder. |
The result should look like the following figure (note that the value in the ‘Action’ column says ‘warn’ instead of ‘fix’).
If you have not already opened the Policy Editor, follow the instruction in The Policy Editor (beta) to do so. We will create a custom report as an example of writing a standard CFEngine policy. Custom reports are useful when your reporting needs differ from the CFEngine 3 Nova standard reports. Data processing and extraction from CFEngine's embedded databases must be scripted by the user if the procedure is not covered in any of the reports found in the Mission Portal. Output to files or logs may be customized on a per-promise basis and users can design their own log and report formats.
| Action item: Click New in file menu in the right column of the policy editor, a tab (‘Untitled-1’) will appear in the center, and enter the following in the text space (you can always hit Ctrl + h to see a list of available keyboard shortcuts). |
bundle agent pilot_simple_custom_report_policy

   # promise type: make a promise about variables, see details below

   vars:
      "file_to_check" string => "/tmp/somefile.txt";

   # promise type: promise about classes (context), see details below

   classes:
      "file_exists" expression => fileexists("$(file_to_check)");
(The policy continues on the next page.)
   # promise type: make a promise about reports, see details below
   reports:
      !file_exists::		# context in which the promise should be executed
				# in this case if the file does not exist

         "WARNING: File $(file_to_check) does not exist on host $(sys.uqhost)"
            handle  => "pilot_simple_report_policy",
            comment => "Simple reports policy to show up in Mission Portal";
}
The astute reader will remark that there is no ‘body common control’ statement in the above policy. The reason is that we will use this bundle in the global policy promises.cf, which already contains the compulsory body common control. We can therefore omit that statement here. This policy consists of a bundle with three main parts:
file_to_check, of type string, containing a value that represents a file name (/tmp/somefile.txt).
fileexists and set a class (boolean) called file_exists based on the result.
file_to_check and sys.uqhost variables to display the appropriate file- and host names, respectively.
| Action item: Save this file as pilot_simple_custom_report_policy.cf: click Save in the right menu and enter the file name. |
We now need to add the policy to promises.cf to verify the results in the Mission Portal:
Action item:
|
The policy will have been adopted and executed at the next CFEngine run (every five minutes by default). Again, you may execute the policy immediately by clicking the Run now button in the right column (this might take a while, please be patient and wait until the execution is finished before checking the reports for updates). You can check that the policy has been run by searching for its handle in a report.
| Action item: Open the ‘Report finder’ as shown previously, scroll to and click Compliance by promise, enter the handle (‘pilot_simple_custom_report_policy’) in the ‘By handle’ query field and click Generate. |
[1] In a standard CFEngine 3 Nova environment you would be able to choose between the integrated Policy Editor (beta) or an editor of your choice to view and edit policy files. The evaluation environment is limited to the Policy Editor (beta) for security reasons.