The Complete Reference
Table of Content
The reference documentation explains the available promise and bundle types,
components, bodies, functions, variables, classes and attributes in detail.
Language elements that belong together are typically documented on the same
page.
See also: All promise types, All body Types
Macros
Macros allow you to target different versions of the CFEngine binaries / parser.
They can be used to conditionally include or exclude parts of the policy file, depending on version number, or supported features.
A typical use case is to use new functionality or syntax on newer binaries which support it, and provide a different implementation on older versions.
Macros are evaluated in the lexer, before syntax checking.
This allows you to put syntax inside a macro which is not valid in all versions.
Note that all your binaries must support the macro that you are using.
Don't start using new macros until you know that the macro is supported on all versions you are running.
@if calls have to match up: you can't nest them and each one requires a matching @endif before the end of the file.
Versions with less specificity are considered equal to the more specific, so 3.15.4 is equal to 3.15, which is also equal to 3.
This applies to all version macros.
Minimum version
The contained policy is only included if the version is greater than or equal to the specified version.
code
bundle agent extractor
{
@if minimum_version(3.8)
# the function `new_function_3_8()` was introduced in 3.8
vars: "container" data => new_function_3_8(...);
@endif
}
History: This macro was introduced in CFEngine 3.7.0
Maximum version
The contained policy is only included if the version is lower than or equal to the specified version.
Example:
code
bundle agent extractor
{
@if maximum_version(3.15)
# This policy will only be parsed on versions 3.15 and earlier
vars:
"container" data => old_function_3_15(...);
@endif
}
Note: Don't start using new macros until all your hosts support them.
History: This macro was introduced in CFEngine 3.16.0, 3.15.1, 3.12.4.
At version
The contained policy is only included if the version is equal to the specified version.
Example:
code
bundle agent extractor
{
@if at_version(3.15)
# This policy will only be parsed on 3.15 clients
vars:
"container" data => old_function_3_15(...);
@endif
}
Note: Don't start using new macros until all your hosts support them.
History: This macro was introduced in CFEngine 3.16.0, 3.15.1, 3.12.4.
Between versions
The contained policy is only included if the version is between (inclusive) the two specified versions.
Example:
code
bundle agent extractor
{
@if between_versions(3.12, 3.15)
# Policy specific to 3.12, 3.13, 3.14, 3.15
vars:
"container" data => workaround_3_12_3_15(...);
@endif
}
Note: Don't start using new macros until all your hosts support them.
History: This macro was introduced in CFEngine 3.16.0, 3.15.1, 3.12.4.
Before version
The contained policy is only included if the version is below the specified version (Not inclusive).
Example:
code
bundle agent extractor
{
@if before_version(3.15)
# Policy to work around issue which was fixed in 3.15
vars:
"container"
data => workaround_pre_3_15(...);
@endif
}
Note: Don't start using new macros until all your hosts support them.
History: This macro was introduced in CFEngine 3.16.0, 3.15.1, 3.12.4.
After version
The contained policy is only included if the version is above the specified version (Not inclusive).
Example:
code
bundle agent extractor
{
@if after_version(3.15)
# This policy is only parsed on 3.16+
vars:
"container"
data => not_neded_on_3_15(...);
@endif
}
Note: Don't start using new macros until all your hosts support them.
History: This macro was introduced in CFEngine 3.16.0, 3.15.1, 3.12.4.
Else
Must come after an @if macro, and before the matching @endif.
Inverts the skipping state from the @if macro.
If the policy before @else was skipped due to the @if macro, the policy after will not be skipped, and vice versa.
Example:
code
bundle agent extractor
{
@if minimum_version(3.16)
# Implementation for 3.16+
vars:
"container"
data => classfiltercsv(...);
@else
# Implementation for versions before 3.16
vars:
"container"
data => readcsv(...);
@endif
}
Note: Don't start using new macros until all your hosts support them.
History: This macro was introduced in CFEngine 3.16.0, 3.15.1, 3.12.4.
Features
You can conditionally include policy test using the @if macro.
code
bundle agent extractor
{
@if feature(xml)
# the yaml library may not be compiled in
vars: "container" data => parseyaml(...);
@endif
}
The text will be inserted verbatim in the policy. This happens before
syntax validation, so any CFEngine binary that is not compiled with
the feature support macro will be able to exclude syntax from
possibly incompatible versions.
Currently available features are:
History: This macro was introduced in CFEngine 3.8.0
Components
While promises to configure your system are entirely user-defined, the
details of the operational behavior of the CFEngine software is of
course hard-coded. You can still configure the details of this
behavior using the control promise bodies. Control behavior is
defined in bodies because the actual promises are fixed and you only
change their details within sensible limits.
See the
introduction
for a high-level overview of the
CFEngine components, and each component's reference documentation for the
details about the specific control bodies.
Common control
The common control body refers to those promises that are
hard-coded into all the components of CFEngine, and therefore
affect the behavior of all the components.
code
body common control
{
inputs => {
"update.cf",
"library.cf"
};
bundlesequence => {
update("policy_host.domain.tld"),
"main",
"cfengine2"
};
goal_categories => { "goals", "targets", "milestones" };
goal_patterns => { "goal_.*", "target.*" };
output_prefix => "cfengine>";
version => "1.2.3";
}
bundlesequence
Description: The bundlesequence contains promise bundles
to verify, in a specific order.
The bundlesequence determines which of the compiled bundles will be executed
by cf-agent and in what order they will be executed. The list refers to the
names of bundles (which might be parameterized, function-like objects).
The default value for bundlesequence is { "main" }.
A bundlesequence may also be specified using the -b or
--bundlesequence command line option.
Type: slist
Allowed input range: .*
Example:
code
body common control
{
bundlesequence => {
update("policy_host.domain.tld"),
"main",
"cfengine2"
};
}
Note: Only common and agent bundles are allowed to be listed in the
bundlesequence.
The order in which you execute bundles can affect the outcome of
your promises. In general you should always define variables before
you use them.
The bundlesequence is like a genetic makeup of a machine. The
bundles act like characteristics of the systems. If you want
different systems to have different bundlesequences, distinguish
them with classes
code
webservers::
bundlesequence => { "main", "web" };
others::
bundlesequence => { "main", "otherstuff" };
If you want to add a basic common sequence to all sequences, then
use global variable lists to do this:
code
body common control
{
webservers::
bundlesequence => { @(g.bs), "web" };
others::
bundlesequence => { @(g.bs), "otherstuff" };
}
bundle common g
{
vars:
"bs" slist => { "main", "basic_stuff" };
}
History: The default to { "main" } was introduced in version 3.7.0, so if
you expect your policies to be run by older version, you'll need an explicit
bundlesequence.
bwlimit
Description: Coarse control of bandwidth any cf-serverd or cf-agent process
will send out. In Bytes/sec.
Bandwidth limit is meant to set an upper bound of traffic coming out of CFEngine
agents or servers, as a countermeasure against network abuse from them. The limit
is applied to all interfaces (in total), a single process at a time. It can
prevent network being flooded by CFEngine traffic when large files or many agents
hit a single cf-serverd.
For more fine-grained control, please use operating system (eg. iptables)
facilities.
Note: Bandwidth limiting is currently not supported on Windows.
Type: float
Default value: none (no limit)
Example:
code
body common control
{
bwlimit => "10M";
}
In this example, bwlimit is set to 10MBytes/sec = 80Mbit/s meaning that
CFEngine would only consume up to ~80% of any 100Mbit ethernet interface.
cache_system_functions
Description: Controls the caching of the results of system
functions, e.g. execresult() and returnszero() for shell execution and
ldapvalue() and friends for LDAP queries. Without this setting,
CFEngine's evaluation model will evaluate functions multiple times,
which is a performance concern. See Functions.
Although you can override this to false, in practice you should
almost never need to do so. The effect of having it true (the
default) is that the expensive functions will be run just once and
then their result will be cached.
Note that caching is per-process so results will not be cached between
runs of e.g. cf-agent and cf-promises.
Type: boolean
Default value: true
Example:
code
cache_system_functions => "true";
See also: ifelapsed in action bodies
History:
- Introduced in version 3.6.0.
domain
Description: The domain string specifies the domain name for this host.
There is no standard, universal or reliable way of determining the
DNS domain name of a host, so it can be set explicitly to simplify
discovery and name-lookup.
Type: string
Allowed input range: .*
Example:
code
body common control
{
domain => "example.org";
}
goal_patterns
Description: Contains regular expressions that match promisees/topics
considered to be organizational goals
It is used as identifier to mark business and organizational goals in
CFEngine Enterprise. CFEngine uses this to match promisees that represent
business goals in promises.
Type: slist
Allowed input range: (arbitrary string)
Example:
code
body common control
{
goal_patterns => { "goal_.*", "target.*" };
}
History: Was introduced in version 3.1.5, Nova 2.1.0 (2011)
ignore_missing_bundles
Description: Determines whether to ignore missing bundles.
If ignore_missing_bundles is set to true, if any bundles in the bundle
sequence do not exist, ignore and continue.
Type: boolean
Default value: false
Example:
code
ignore_missing_bundles => "true";
Notes:
This authorizes the bundlesequence to contain possibly
"nonexistent" pluggable modules. It defaults to false, whereupon
undefined bundles cause a fatal error in parsing, and a transition
to failsafe mode.
Description: If any input files do not exist, ignore and continue
The inputs lists determines which files are parsed by CFEngine.
Normally stringent security checks are made on input files to
prevent abuse of the system by unauthorized users.
Sometimes however, it is appropriate to consider the automatic plug-in of
modules that might or might not exist. This option permits CFEngine
to list possible files that might not exist and continue 'best
effort' with those that do exist. The default of all Booleans is
false, so the normal behavior is to signal an error if an input is
not found.
Type: boolean
Default value: false
Example:
code
ignore_missing_inputs => "true";
Description: The inputs slist contains additional filenames to parse for promises.
The filenames specified are all assumed to be in the same directory
as the file which references them (this is usually
$(sys.workdir)/inputs, but may be overridden by the -f or
--file command line option.
Type: slist
Allowed input range: .*
Example:
code
body common control
{
inputs => {
"update.cf",
"library.cf"
};
}
See also: inputs in body file control
Notes:
If no filenames are specified, no other filenames will be included in the
compilation process.
Library contents are checked for duplication by path and by hash. For
example, if you put library.cf twice in your inputs, the duplicate
library.cf is noticed because the same path is included twice. A
verbose-level message is emitted but otherwise there is no error.
In addition, if you include a file once with path /x/y/z.cf and
again with path /x/./y/z.cf, the duplicate file will be rejected
regardless of any path tricks or symbolic links. The contents are
hashed, so the same file can't be included twice.
lastseenexpireafter
Description: The value of lastseenexpireafter is the number of minutes
after which last-seen entries are purged. It is an enterprise-only feature.
Type: int
Allowed input range: 0,99999999999
Default value: One week
Note: This value affects the hostsseen() function and license counting by
cf-hub in the Enterprise edition.
Example:
code
body common control
{
lastseenexpireafter => "72";
}
See also: hostsseen(), cf-hub
output_prefix
Description: The string prefix for standard output
Type: string
Allowed input range: (arbitrary string)
Example:
code
body common control
{
output_prefix => "my_cf3";
}
Notes:
On native Windows versions of CFEngine (Enterprise), this
string is also prefixed messages in the event log.
package_inventory
Description: List of package module bodies to query for package lists.
Defines the list of package module bodies which will be queries for
package lists, for use in packagematching(), packageupdatesmatching() and in
Enterprise inventory reporting.
Type: slist
Allowed input range: (body names)
Example:
code
body common control
{
package_inventory => { "apt_get" };
}
package_module
Description: The default package module body to use.
Defines the default package module body to use for package promises,
if none is specified in the promise.
Type: string
Allowed input range: (body name)
Example:
code
body common control
{
package_module => "apt_get";
}
protocol_version
Description: Defines the protocol to use for all outgoing connections.
Type: (menu option)
Allowed input range:
1classic2tls3cookielatest
Default value: undefined
Note: protocol_version can be specified at the individual promise level
using the body copy_from protocol_version
attribute. When undefined (the default) peers automatically negotiate the latest protocol version.
See also: body copy_from protocol_version, allowlegacyconnects, allowtlsversion, allowciphers, tls_min_version, tls_ciphers, encrypt, logencryptedtransfers, ifencrypted
History:
- Introduced in CFEngine 3.6.0 with
protocol_version 1 (classic) and protocol_version 2 (tls)
- Added
protocol_version 3 (cookie) in CFEngine 3.15.0
Description: The require_comments menu option policy warns about
promises that do not have comment documentation.
When true, cf-promises will report loudly on promises that do not have
comments. Variables promises are exempted from this rule, since
they may be considered self-documenting. This may be used as a policy Quality
Assurance measure, to remind policy makers to properly document their
promises.
Type: boolean
Default value: false
Example:
code
body common control
{
common::
require_comments => "true";
}
site_classes
Description: A site_classes contains classes that will represent
geographical site locations for hosts. These should be defined elsewhere in
the configuration in a classes promise.
This list is used to match against topics when connecting
inferences about host locations in the knowledge map. Normally any
CFEngine classes promise whose name is defined as a thing or topic
under class locations:: will be assumed to be a location defining
classifier. This list will add alternative class contexts for
interpreting location.
Type: slist
Allowed input range: [a-zA-Z0-9_!&@@$|.()\[\]{}:]+
Each string is expected to be a class.
Example:
code
body common control
{
site_classes => { "datacenters","datacentres" }; # locations is by default
}
History: Was introduced in version 3.2.0, Nova 2.1.0 (2011)
syslog_host
Description: The syslog_host contains the name or address of a
host to which syslog messages should be sent directly by UDP.
This is the hostname or IP address of a local syslog service to which all
CFEngine's components may promise to send data.
Type: string
Allowed input range: [a-zA-Z0-9_$(){}.:-]+
Default value: localhost
Example:
code
body common control
{
syslog_host => "syslog.example.org";
syslog_port => "514";
}
syslog_port
Description: The value of syslog_port represents the port number
of a UDP syslog service.
It is the UDP port of a local syslog service to which all CFEngine's
components may promise to send data.
Type: int
Allowed input range: 0,99999999999
Default value: 514
Example:
code
body common control
{
syslog_host => "syslog.example.org";
syslog_port => "514";
}
system_log_level
Description: The minimum log level required for log messages to go to the system log (e.g. syslog, Windows Event Log).
Type: string
Allowed Input range: (critical|error|warning|notice|info)
Default value:
Example:
Prevent messages lower than critical on Windows.
code
body common control
{
@if minimum_version(3.18.1)
windows::
system_log_level => "critical";
cfengine::
@endif
}
History:
- Introduced in 3.19.0, 3.18.1
tls_ciphers
Description: List of ciphers allowed when making outgoing connections from components other than cf-serverd.
For a list of possible ciphers, see man page for "openssl ciphers".
Type: string
Allowed input range: (arbitrary string)
Default value: undefined
Example:
code
body common control
{
# Use one of these ciphers when making outbound connections
tls_ciphers => "AES128-SHA";
}
See also: protocol_version, allowciphers, tls_min_version, allowtlsversion, encrypt, logencryptedtransfers, ifencrypted
History: Introduced in CFEngine 3.7.0
tls_min_version
Description: Minimum tls version to allow for outgoing connections from components other than cf-serverd.
Type: string
Allowed input range: (arbitrary string)
Default value: 1.0
code
body common control
{
# Allow only TLSv1.1 or higher for outgoing connections
tls_min_version => "1.1";
}
See also: protocol_version, allowciphers, tls_ciphers, allowtlsversion, encrypt, ifencrypted, logencryptedtransfers
History: Introduced in CFEngine 3.7.0
version
Description: The version string contains the scalar version of the
configuration.
It is is used in error messages and reports.
Type: string
Allowed input range: (arbitrary string)
This string should not contain the colon ':' character, as this has
a special meaning in the context of knowledge management. This
restriction might be lifted later.
Example:
code
body common control
{
version => "1.2.3";
}
Deprecated attributes in body common control
The following attributes were functional in previous versions
of CFEngine, but today they are deprecated, either because
their functionality is being handled trasparently or because
it doesn't apply to current CFEngine version.
- fips_mode
- host_licenses_paid
cf-reactor
cf-reactor is the CFEngine event reaction daemon, it lists to NOTIFY events
on the cmdb_refresha PostgreSQL channel and upon a message received, it
refreshes the CMDB data file (host_specific.json) for the particular host.
Notes:
cf-reactor is a CFEngine Enterprise hub specific component.
Unlike other components there is no control body for cf-reactor, all
promises are hard coded within the component.
In the future, the daemon should also take care of inventory refresh for hosts
(now part of cf-hub) and many DB maintenance tasks that are now promises in
the Masterfiles Policy Framework policy under /cfe_internal/enterprise.
History:
- 3.18.2, 3.20.0 Introduced new component (
cf-reactor).
Command reference
code
--debug , -d - Enable debugging output and run in foreground
--no-fork , -F - Run as a foreground process (do not fork)
--log-level , -g value - Specify how detailed logs should be. Possible values: 'error', 'warning', 'notice', 'info', 'verbose', 'debug'
--help , -h - Print the help message
--inform , -I - Print basic information about actions being taken
--timestamp , -l - Log timestamps on each line of log output
--verbose , -v - Output verbose information about the behaviour of the agent
--version , -V - Output the version of the software
cf-agent
cf-agent evaluates policy code and makes changes to the system. Policy
bundles are evaluated in the order of the provided bundlesequence (this is normally specified in the
common control body). For
each bundle, cf-agent groups promise statements according to their type.
Promise types are then evaluated in a preset order to ensure fast system
convergence to policy.
cf-agent keeps the promises made in common and agent bundles, and is
affected by common and agent control bodies.
Notes:
cf-agent always considers the class agent to be defined.
Command reference
code
--bootstrap , -B value - Bootstrap CFEngine to the given policy server IP, hostname or :avahi (automatic detection)
--bundlesequence, -b value - Set or override bundlesequence from command line
--workdir , -w value - Override the default /var/cfengine work directory for testing (same as setting CFENGINE_TEST_OVERRIDE_WORKDIR)
--debug , -d - Enable debugging output
--define , -D value - Define a list of comma separated classes to be defined at the start of execution
--self-diagnostics, -x value - Run checks to diagnose a CFEngine agent installation
--dry-run , -n - All talk and no action mode - make no changes, only inform of promises not kept
--file , -f value - Specify an alternative input file than the default. This option is overridden by FILE if supplied as argument.
--help , -h - Print the help message
--inform , -I - Print basic information about changes made to the system, i.e. promises repaired
--log-level , -g value - Specify how detailed logs should be. Possible values: 'error', 'warning', 'notice', 'info', 'verbose', 'debug'
--negate , -N value - Define a list of comma separated classes to be undefined at the start of execution
--no-lock , -K - Ignore locking constraints during execution (ifelapsed/expireafter) if "too soon" to run
--verbose , -v - Output verbose information about the behaviour of the agent
--version , -V - Output the version of the software
--timing-output, -t - Output timing information on console when in verbose mode
--trust-server, -T value - Possible values: 'yes' (default, trust the server when bootstrapping), 'no' (server key must already be trusted)
--color , -C value - Enable colorized output. Possible values: 'always', 'auto', 'never'. If option is used, the default value is 'auto'
--no-extensions, -E - Disable extension loading (used while upgrading)
--timestamp , -l - Log timestamps on each line of log output
--ignore-preferred-augments, - - Ignore def_preferred.json file in favor of def.json
--log-modules , - value - Enable even more detailed debug logging for specific areas of the implementation. Use together with '-d'. Use --log-modules=help for a list of available modules
--no-augments , - - Do not load augments (def.json)
--no-host-specific-data, - - Do not load host-specific data (host_specific.json)
--show-evaluated-classes, - value - Show *final* evaluated classes, including those defined in common bundles in policy. Optionally can take a regular expression.
--show-evaluated-vars, - value - Show *final* evaluated variables, including those defined without dependency to user-defined classes in policy. Optionally can take a regular expression.
--skip-bootstrap-policy-run, - - Do not run policy as the last step of the bootstrap process
--skip-db-check, - value - Do not run database integrity checks and repairs at startup
--simulate , - value - Run in simulate mode, either 'manifest', 'manifest-full' or 'diff'
--simulate
Like the --dry-run option, the --simulate option tries to identify changes
to your system without making changes to the system, however it goes further
than --dry-run by making changes in a chroot and making a distinction
between safe and unsafe functions, e.g. execresult().
The agent will execute promises with unsafe functions when the --simulate
options is given only if the promise using the function is tagged simulate_safe.
For example:
code
bundle agent __main__
{
vars:
"msg"
string => execresult( "/bin/echo Hello world!", "useshell" ),
meta => { "simulate_safe" };
}
The simulate option takes a parameter, diff, manifest, or manifest-full
which is used to determine the summary output shown at the end of the run.
Notes
History
- Introduced in version 3.17.0
--simulate=manifest-full introduced in version 3.18.0
Automatic bootstrapping
Automatic bootstrapping allows the user to connect a CFEngine Host to a Policy
Server without specifying the IP address manually. It uses the Avahi service
discovery implementation of zeroconf to locate the Policy Server, obtain its IP
address, and then connect to it. To use automatic bootstrap, install the
following Avahi libraries:
- libavahi-client
- libavahi-common
To make the CFEngine Server discoverable, it needs to register itself as an
Avahi service. Run the following command:
command
/var/cfengine/bin/cf-serverd -A
This generates the configuration file for Avahi in /etc/avahi/services and
restarts the Avahi daemon in order to register the new service.
From this point on, the Policy Server will be discovered with the Avahi service.
To verify that the server is visible, run the following command (requires
avahi-utils):
command
avahi-browse -atr | grep cfenginehub
The sample output looks like this:
code
eth0 IPv4 CFEngine Community 3.5.0 Policy Server on policy_hub_debian7
_cfenginehub._tcp local
Once the Policy Server is configured with the Avahi service, you can
auto-bootstrap Hosts to it.
command
/var/cfengine/bin/cf-agent -B :avahi
The Hosts require Avahi libraries to be installed in order to use this
functionality. By default cf-agent looks for libraries in standard install
locations. Install locations vary from system to system. If Avahi is
installed in a non-standard location (i.e. compiled from source), set the
AVAHI_PATH environmental variable to specify the path.
command
AVAHI_PATH=/lib/libavahi-client.so.3 /var/cfengine/bin/cf-agent -B
If more than one server is found, or if the server has more than one IP
address, the list of all available servers is printed and the user is asked to
manually specify the IP address of the correct server by running the standard
bootstrap command of cf-agent:
command
/var/cfengine/bin/cf-agent --bootstrap <IP address>
If only one Policy Server is found in the network, cf-agent performs the
bootstrap without further manual user intervention.
Note: Automatic bootstrapping support is ONLY for Linux, and it is limited
only to one subnet.
Control promises
Settings describing the details of the fixed behavioral promises
made by cf-agent.
code
body agent control
{
# Agent email report settings based on their domain.
alpha_cfengine_com::
domain => "alpha.cfengine.com";
mailto => "admins@alpha.cfengine.com";
beta_domain_com::
domain => "beta.cfengine.com";
mailto => "admins@beta.cfengine.com";
any::
mailfrom => "root";
}
abortbundleclasses
Description: The abortbundleclasses slist contains regular expressions
that match classes which if defined lead to termination of current bundle.
Regular expressions are used for classes, or class expressions
that cf-agent will watch out for. If any of these classes becomes
defined, it will cause the current bundle to be aborted. This may
be used for validation, for example.
Type: slist
Allowed input range: .*
Example:
This example shows how to use the feature to validate input to a
method bundle.
code
body common control
{
bundlesequence => { "testbundle" };
version => "1.2.3";
}
#################################
body agent control
{
abortbundleclasses => { "invalid.*" };
}
#################################
bundle agent testbundle
{
vars:
"userlist"
slist => { "xyz", "mark", "jeang", "jonhenrik", "thomas", "eben" };
methods:
"any"
usebundle => subtest("$(userlist)");
}
#################################
bundle agent subtest(user)
{
classes:
"invalid"
not => regcmp("[a-z]{4}","$(user)");
reports:
!invalid::
"User name $(user) is valid at exactly 4 letters";
# abortbundleclasses will prevent this from being evaluated
invalid::
"User name $(user) is invalid";
}
abortclasses
Description: The abortclasses slist contains regular expressions that
match classes which if defined lead to termination of cf-agent.
Regular expressions are used for classes that cf-agent will watch out
for. If any matching class becomes defined, it will cause the
current execution of cf-agent to be aborted. This may be used for
validation, for example.
Type: slist
Allowed input range: .*
Example:
code
body agent control
{
abortclasses => { "danger.*", "should_not_continue" };
}
bundle agent main
{
methods:
"bundle_a";
"bundle_b";
"bundle_c";
}
bundle agent bundle_a
{
classes:
"abort_condition_a"
expression => "any",
scope => "namespace";
}
bundle common bundle_b
{
classes:
"abort_condition_b" expression => "any";
}
bundle agent bundle_c
{
classes:
# Here we define a class that will match the abortclasses under more complex
# conditions
"should_not_continue"
expression => "(abort_condition_a.abort_condition_b).!something_else",
scope => "namespace";
}
Output:
code
error: Fatal CFEngine error: cf-agent aborted on defined class 'should_not_continue'
Note: CFEngine class expressions are not supported. To handle class
expressions, simply create an alias for the expression with a single name.
addclasses
Description: The addclasses slist contains classes to be defined
always in the current context.
This adds global, literal classes. The only predicates available during
the control section are hard-classes.
Type: slist
Allowed input range: .*
Example:
code
any::
addclasses => { "My_Organization" }
solaris::
addclasses => { "some_solaris_alive", "running_on_sunshine" };
Notes:
Another place to make global aliases for system hardclasses.
Classes here are added unequivocally to the system. If classes are
used to predicate definition, then they must be defined in terms of
global hard classes.
agentaccess
Description: A agentaccess slist contains user names that are
allowed to execute cf-agent.
This represents a list of user names that will be allowed to attempt
execution of the current configuration. This is mainly a sanity check
rather than a security measure.
Type: slist
Allowed input range: .*
Example:
code
agentaccess => { "mark", "root", "sudo" };
agentfacility
Type: (menu option)
Allowed input range:
code
LOG_USER
LOG_DAEMON
LOG_LOCAL0
LOG_LOCAL1
LOG_LOCAL2
LOG_LOCAL3
LOG_LOCAL4
LOG_LOCAL5
LOG_LOCAL6
LOG_LOCAL7
Default value: LOG_USER
Description: The agentfacility menu option policy sets the agent's
syslog facility level.
Example:
code
agentfacility => "LOG_USER";
Notes:
This is ignored on Windows, as CFEngine Enterprise creates event logs.
See also: Manual pages for syslog.
allclassesreport
Description: The allclassesreport menu option policy determines
whether to generate the allclasses.txt report.
If set to true, the state/allclasses.txt file will be written to disk
during agent execution.
Type: boolean
Default value: false
Example:
code
body agent control
{
allclassesreport => "true";
}
Notes:
This functionality is retained only for CFEngine 2 compatibility. As of
CFEngine 3.5, the classesmatching() function provides
a more convenient way to retrieve a list of set classes at execution time.
History: Was introduced in 3.2.4, Enterprise 2.1.4 (2011)
alwaysvalidate
Description: The alwaysvalidate menu option policy is a true/false
flag to determine whether configurations will always be checked before
executing, or only after updates.
Type: boolean
Example:
code
body agent control
{
Min00_05::
# revalidate once per hour, regardless of change in configuration
alwaysvalidate => "true";
}
Notes:
The agents cf-agent and cfserverd can run cf-promises to
validate inputs before attempting to execute a configuration. As of
version 3.1.2 core, this only happens if the configuration file has
changed to save CPU cycles. When this attribute is set, cf-agent
will force a revalidation of the input.
History: Was introduced in version 3.1.2,Enterprise 2.0.1 (2010)
auditing
Deprecated: This menu option policy is deprecated, does
nothing and is kept for backward compatibility.
binarypaddingchar
Deprecated: This attribute was deprecated in 3.6.0.
bindtointerface
Description: The bindtointerface string describes the interface
to be used for outgoing connections.
On multi-homed hosts, the server and client can bind to a specific
interface for server traffic. The IP address of the interface must
be given as the argument, not the device name.
Type: string
Allowed input range: .*
Example:
code
bindtointerface => "192.168.1.1";
checksum_alert_time
Description: The value of checksum_alert_time represents the
persistence time for the checksum_alert class.
When checksum changes trigger an alert, this is registered as a
persistent class. This value determines the longevity of that
class.
Type: int
Allowed input range: 0,60
Default value: 10 mins
Example:
code
body agent control
{
checksum_alert_time => "30";
}
childlibpath
Description: The childlibpath string contains the LD_LIBRARY_PATH
for child processes.
This string may be used to set the internal LD_LIBRARY_PATH environment
of the agent.
Type: string
Allowed input range: .*
Example:
code
body agent control
{
childlibpath => "/usr/local/lib:/usr/local/gnu/lib";
}
copyfrom_restrict_keys
This attribute restricts cf-agent to copying files from hosts that have a key explicitly defined in this list.
Example:
code
body agent control
{
copyfrom_restrict_keys => {
"SHA=6565a8e647e61e4a7ff2c709e0fe772acce2e45aaa294b2bb713de0ba5a6d8c3",
"SHA=727dd7f6f8b2344c6d69cf1d3ed0446c0f9f095ce1a114481d691bf1cb2b300d",
}
}
See also: admit_keys, controls/cf_agent.cf
History:
* Introduced in 3.20.0
default_repository
Description: The default_repository string contains the path to the
default file repository.
If defined the default repository is the location where versions of
files altered by CFEngine are stored. This should be understood in
relation to the policy for 'backup' in copying, editing etc. If the
backups are time-stamped, this becomes effective a version control
repository.
Type: string
Allowed input range: "?(/.*)
Default value: unset
Example:
code
body agent control
{
default_repository => "/var/cfengine/repository";
}
Notes: When a repository is specified, the files are stored using the
canonified directory name of the original file, concatenated with the name of
the file. So, for example, /usr/local/etc/postfix.conf would ordinarily be
stored in an alternative repository as _usr_local_etc_postfix.conf.cfsaved. If
unset then backups are stored in the same directory as the original file with an
identifying suffix.
See also: edit_backup in body edit_defaults, copy_backup in body copy_from
default_timeout
Description: The value of default_timeout represents the maximum
time a network connection should attempt to connect or read from server.
The time is in seconds. It is not a guaranteed number, since it
depends on system behavior.
Type: int
Allowed input range: 0,99999999999
Default value: 30 seconds
Example:
code
body agent control
{
default_timeout => "10";
}
See also: body copy_from timeout, cf-runagent timeout
Notes:
cf-serverd will time out any transfer that takes longer than 10 minutes
(this is not currently tunable).
defaultcopytype
Description: The defaultcopytype menu option policy sets the global
default policy for comparing source and image in copy transactions.
Type: (menu option)
Allowed input range:
code
mtime
atime
ctime
digest
hash
binary
Example:
code
body agent control
{
#...
defaultcopytype => "digest";
}
dryrun
Description: The dryrun menu option, if set, makes no changes to
the system, and will only report what it needs to do.
Type: boolean
Default value: false
Example:
code
body agent control
{
dryrun => "true";
}
editbinaryfilesize
Description: The value of editbinaryfilesize represents the limit
on maximum binary file size to be edited.
This is a global setting for the file-editing safety-net for binary files,
and may be overridden on a per-promise basis with max_file_size.
Type: int
Allowed input range: 0,99999999999
Default value: 100k
Example:
code
body agent control
{
edibinaryfilesize => "10M";
}
Notes:
When setting limits, the limit on editing binary files should
generally be set higher than for text files.
editfilesize
Description: The value of editfilesize is the limit on maximum text
file size to be edited.
This is a global setting for the file-editing safety-net, and may be
overridden on a per-promise basis with max_file_size.
Type: int
Allowed input range: 0,99999999999
Default value: 100000
Example:
code
body agent control
{
editfilesize => "120k";
}
environment
Description: The environment slist contains environment variables
to be inherited by children.
This may be used to set the runtime environment of the agent process.
The values of environment variables are inherited by child commands.
Type: slist
Allowed input range: [A-Za-z0-9_]+=.*
Example:
code
body common control
{
bundlesequence => { "one" };
}
body agent control
{
environment => { "A=123", "B=456", "PGK_PATH=/tmp"};
}
bundle agent one
{
commands:
"/usr/bin/env";
}
Some interactive programs insist on values being set, for example:
code
# Required by apt-cache, debian
environment => { "LANG=C" };
expireafter
Description: The value of expireafter is a global default for time
before on-going promise repairs are interrupted.
This represents the locking time after which CFEngine will attempt to
kill and restart its attempt to keep a promise.
Type: int
Allowed input range: 0,99999999999
Default value: 1 min
Example:
code
body action example
{
ifelapsed => "120"; # 2 hours
expireafter => "240"; # 4 hours
}
See also: body action expireafter, body contain exec_timeout, body executor control agent_expireafter
files_auto_define
Description: The files_auto_define slist contains a list of regular expressions matching filenames. When a file matching one of these regular expressions is copied to classes prefixed with auto_ are defined.
Classes are automatically defined by the files that are copied. The
file is named according to the prefixed 'canonization' of the file
name. Canonization means that non-identifier characters are
converted into underscores. Thus /etc/passwd would canonize to
_etc_passwd. The prefix auto_ is added to clarify the origin
of the class. Thus in the example the copying of /etc/passwd would
lead to the class auto__etc_passwd being defined
automatically.
Type: slist
Allowed input range: (arbitrary string)
Example:
code
rm -f /tmp/example_files_auto_define.txt
rm -f /tmp/source_file.txt
code
body agent control
{
inform => "true"; # So that we can easily see class definition
files_auto_define => { ".*" }; # Trigger for any copied file
}
bundle agent main
{
files:
"/tmp/source_file.txt"
content => "Hello World!";
"/tmp/example_files_auto_define.txt"
copy_from => local_dcp( "/tmp/source_file.txt" );
reports:
"Defined '$(with)', the canonified form of 'auto_/tmp/example_files_auto_define.txt'"
with => canonify( "auto_/tmp/example_files_auto_define.txt"),
if => canonify( "auto_/tmp/example_files_auto_define.txt");
}
body copy_from local_dcp(from)
{
source => "$(from)";
compare => "digest";
}
code
info: Created file '/tmp/source_file.txt', mode 0600
info: Updated file '/tmp/source_file.txt' with content 'Hello World!'
info: Copied file '/tmp/source_file.txt' to '/tmp/example_files_auto_define.txt.cfnew' (mode '600')
info: Moved '/tmp/example_files_auto_define.txt.cfnew' to '/tmp/example_files_auto_define.txt'
info: Updated file '/tmp/example_files_auto_define.txt' from 'localhost:/tmp/source_file.txt'
info: Auto defining class 'auto__tmp_example_files_auto_define_txt'
R: Defined 'auto__tmp_example_files_auto_define_txt', the canonified form of 'auto_/tmp/example_files_auto_define.txt'
This policy can be found in
/var/cfengine/share/doc/examples/files_auto_define.cf
and downloaded directly from
github.
files_single_copy
Description: The files_single_copy slist contains filenames to be
watched for multiple-source conflicts.
This list of regular expressions will ensure that files matching
the patterns of the list are never copied from more than one source
during a single run of cf-agent. This may be considered a
protection against accidental overlap of copies from diverse
remote sources, or as a first-come-first-served disambiguation tool
for lazy-evaluation of overlapping file-copy promises.
Type: slist
Allowed input range: (arbitrary string)
Example:
code
body agent control
{
files_single_copy => { "/etc/.*", "/special/file" };
}
hashupdates
Description: The hashupdates determines whether stored hashes are
updated when change is detected in source.
If 'true' the stored reference value is updated as soon as a warning
message has been given. As most changes are benign (package updates
etc) this is a common setting.
Type: boolean
Default value: false
Example:
code
body agent control
{
hashupdates => "true";
}
hostnamekeys
Deprecated: Host identification is now handled transparently.
Description: The hostnamekeys menu option policy determines whether
to label ppkeys by hostname not IP address.
This represents a client side choice to base key associations on host
names rather than IP address. This is useful for hosts with dynamic
addresses.
Type: boolean
Default value: false
Example:
code
body server control
{
hostnamekeys => "true";
}
ifelapsed
Description: The value of ifelapsed is a global default representing
the time that must elapse before a promise will be rechecked.
This configures the default setting for cf-agent. Promises which take a long time
to verify should usually be protected with a long value for this
parameter. This serves as a resource 'spam' protection. A CFEngine
check could easily run every 5 minutes provided resource intensive
operations are not performed on every run. Using time classes like
Hr12 etc., is one part of this strategy; using ifelapsed is
another which is not tied to a specific time.
Type: int
Allowed input range: 0,99999999999
Default value: 1
Example:
code
body agent control
{
ifelapsed => "180"; # 3 hours
}
Notes:
- A value of
0 means no locking, all promises will be executed each execution if in context. This also disables function caching.
- This is not a reliable way to control frequency over a long period of time.
- Locks provide simple but weak frequency control.
- Locks older than 4 weeks are automatically purged.
See also: Promise locking, ifelapsed action body attribute
Description: The inform menu option policy sets the default output
level 'permanently' within the class context indicated.
It is equivalent to (and when present, overrides) the command line option
'-I'.
Type: boolean
Default value: false
Example:
code
body agent control
{
inform => "true";
}
intermittency
Deprecated: This attribute does nothing and is kept for backward
compatibility.
Type: boolean
Default value: false
max_children
Description: The value of max_children represents the maximum number
of background tasks that should be allowed concurrently.
For the run-agent this is the maximum number of forked background
processes allowed when parallelizing connections to servers.
For the agent it represents the number of background jobs allowed
concurrently. Background jobs often lead to contention of the disk
resources slowing down tasks considerably; there is thus a law of
diminishing returns.
Type: int
Allowed input range: 0,99999999999
Default value: 1 concurrent agent promise
Example:
code
body agent control
{
max_children => "10";
}
See also: background in action bodies
maxconnections
Description: The value of maxconnections represents the maximum
number of outgoing connections to cf-serverd.
Type: int
Allowed input range: 0,99999999999
Default value: 30 remote queries
Example:
code
# client side
body agent control
{
maxconnections => "1000";
}
Notes:
Watch out for kernel limitations for maximum numbers of open file
descriptors which can limit this.
mountfilesystems
Description: The mountfilesystems menu option policy determines
whether to mount any filesystems promised.
It issues the generic command to mount file systems defined in the
file system table.
Type: boolean
Default value: false
Example:
code
body agent control
{
mountfilesystems => "true";
}
nonalphanumfiles
Description: The nonalphanumfiles menu option policy determines
whether to warn about filenames with no alphanumeric content.
This test is applied in all recursive/depth searches.
Type: boolean
Default value: false
Example:
code
body agent control
{
nonalphanumfiles => "true";
}
refresh_processes
Description: The refresh_processes slist contains bundles to reload
the process table before verifying the bundles named in this list
(lazy evaluation).
If this list of regular expressions is non-null and an existing
bundle is mentioned or matched in this list, CFEngine will reload
the process table at the start of the named bundle, each time is is
scheduled. If the list is null, the process list will be reloaded
at the start of every scheduled bundle.
Type: slist
Allowed input range: [a-zA-Z0-9_$(){}\[\].:]+
Example:
code
body agent control
{
refresh_processes => { "mybundle" };
# refresh_processes => { "none" };
}
This examples uses a non-empty list with the name 'none'. This is not a
reserved word, but as long as there are no bundles with the name 'none' this
has the effect of never reloading the process table. This keeps improves the
efficiency of the agent.
History: Was introduced in version 3.1.3, Enterprise 2.0.2 (2010)
repchar
Description: The repchar string represents a character used to
canonize pathnames in the file repository.
Type: string
Allowed input range: .
Default value: _
Example:
code
body agent control
{
repchar => "_";
}
Notes:
report_class_log
Description: The report_class_log option enables logging of classes set by
cf-agent. Each class set by cf-agent will be logged at the end of agent
execution (all classes defined during the same cf-agent execution will have the
same timestamp).
Time classes are ignored.
Destination: '/var/cfengine/state/classes.jsonl'
Format(jsonl):
code
{"name":"class_123","timestamp":1456933993}\r\n
{"name":"pk_sha_123","timestamp":1456933993}\r\n
Type: boolean
Default value: false
Example:
code
body agent control
{
report_class_log => "true";
}
History:
Notes:
- Available in CFEngine Enterprise.
- Persistent classes are logged with the timestamp of each agent run.
The following classes are excluded from logging:
- Time based classes (
Hr01, Tuesday, Morning, etc ...)
license_expiredanyfrom_cfexecd- Life cycle (
Lcycle_0, GMT_Lcycle_3)
###### secureinput
Description: The secureinput menu option policy checks whether
input files are writable by unauthorized users.
If this is set, the agent will not accept an input file that is not
owned by a privileged user.
Type: boolean
Default value: false
Example:
code
body agent control
{
secureinput => "true";
}
select_end_match_eof
Description: When true this sets the default behavior for edit_line
promises to allow the end of a file to mark the end of a region when select_end
is defined, but not found.
It is useful for configuration files with sections that do not have end markers,
so the end could be the start of another section, or the end of a file.
Type: boolean
Default value: false
Example:
code
body agent control
{
select_end_match_eof => "true";
}
See also: select_end_match_eof in delete_lines, select_end_match_eof in field_edits, select_end_match_eof in insert_lines, select_end_match_eof in replace_patterns
sensiblecount
Description: The value of sensiblecount represents the minimum
number of files a mounted filesystem is expected to have.
Type: int
Allowed input range: 0,99999999999
Default value: 2 files
Example:
code
body agent control
{
sensiblecount => "20";
}
sensiblesize
Description: The value of sensiblesize represents the minimum
number of bytes a mounted filesystem is expected to have.
Type: int
Allowed input range: 0,99999999999
Default value: 1000 bytes
Example:
code
body agent control
{
sensiblesize => "20K";
}
skipidentify
Description: The skipidentify menu option policy determines whether
to send an IP/name during server connection because address resolution is
broken.
Hosts that are not registered in DNS cannot supply reasonable
credentials for a secondary confirmation of their identity to a
CFEngine server. This causes the agent to ignore its missing DNS
credentials.
Type: boolean
Default value: false
Example:
code
body agent control
{
skipidentify => "true";
}
suspiciousnames
Description: The suspiciousnames slist contains names to skip and warn
about if found during any file search.
If CFEngine sees these names during recursive (depth) file searches,
it will skip them and output a warning message.
Type: slist
Allowed input range: (arbitrary string)
Example:
code
body agent control
{
suspiciousnames => { ".mo", "lrk3", "rootkit" };
}
syslog
Deprecated: This menu option policy is deprecated as of 3.6.0. It performs
no action and is kept for backward compatibility.
timezone
Description: The timezone slist contains allowed timezones this
machine must comply with.
Type: slist
Allowed input range: (arbitrary string)
Example:
code
body agent control
{
timezone => { "MET", "CET", "GMT+1" };
}
track_value
Deprecated: This menu option policy is deprecated as of 3.6.0. It performs
no action and is kept for backward compatibility.
verbose
Description: The verbose menu option policy determines whether to
switch on verbose standard output.
It is equivalent to (and when present, overrides) the command line option
'-v'. Sets the default output level 'permanently' for this
promise.
Type: boolean
Default value: false
Example:
code
body agent control
{
verbose => "true";
}
cf-secret
cf-secret encrypts and decrypts files using CFEngine keys.
Files can be encrypted for one or more public keys. A matching private key is required for decryption.
Command reference
code
--help , -h - Print the help message
--manpage , -M - Print the man page
--debug , -d - Enable debugging output
--verbose , -v - Enable verbose output
--log-level , -g value - Specify how detailed logs should be. Possible values: 'error', 'warning', 'notice', 'info', 'verbose', 'debug'
--inform , -I - Enable basic information output
--key , -k value - Comma-separated list of key files to use (one of -k/-H options is required for encryption)
--host , -H value - Comma-separated list of hosts to encrypt/decrypt for (defaults to 'localhost' for decryption)
--output , -o value - Output file (required)
Example encrypting and decrypting data
First, let's create a file that contains some content we want to encrypt.
code
> $ cf-secret --help > /tmp/cf-secret.help
Next, let's encrypt the file for the public key used by the host. Run the following command to encrypt the file.
code
> $ sudo cf-secret encrypt /tmp/cf-secret.help \
--output /tmp/cf-secret.help.cfsecret \
--key /var/cfengine/ppkeys/localhost.pub
Then, inspect file. Note the file contains a header that indicates the key digest identifying the public key for which the file was encrypted.
code
> $ sudo cat /tmp/cf-secret.help.cfsecret
Version: 1.0
Encrypted-for: SHA=0df59dfd5516a0a66aad933871036fa0ad909d251da682a41775d60db092f154
t"��1)Ȫ��w�+�bX<�-�Z)��W�}��AS
�#�,v�f�u��M�N���AV�xx��*^D����OJ�����Ϊ˶�NS�2���ߡ~Bh.▒^
��?$䝒0 ��5w��x�y:�!�HQi.��W@�(�%�.M�▒
$=��h��N��$����84t/����� �� �vbb��ao��۠�'N�F줛ey,3��]��y�-n`�H��GϦٕ�LI��N�zH�拥��'1_�D��
:n/��I_��>�8U���V(�u[�_sJ-QHԀ�Ds���L��4!P��מ�~�`i�>F�~+�Q!�@��{U��T>{pTF7΄#�ȎZךfO���\�B��ݷ�L��d��*8��^��p_��֡
����}ڬ��2�5]?�e?�**▒�"�x����Ts�ԭ�`������eP����*_�
s��3cۈ�jG+��4��H��<▒���9�}��9���!��.�Ai#=�����n����?�����C��?4�I"����R�V7"g��▒_����3��UqE��n▒�����h.��e'���D^CX��)S}����O���"���s�'�[ͽ 7�y��$,��5�!�S=0�<�N���8@K�����nK��ص-BJ2 n[�▒vS��(Y�2M�����|�a 7!�3P0��y9~N9�YLg���l�'d���vĖ�QsB��/�$
��xDط���P��I&rB��"G
|E4}��+=�ښ���ς�m�E��86�E͏^�C��~�n֒���>x�Ca�pCE�鱋.▒v������
ԩ�m����y�`�Q���F�gHO▒����,�u���:�m���$ ����H������v�4��Ͳ��6���u���7%(S�饓���@kb�ӯ�:.▒����Xʐ�d-�2�6s�&$�2t����t�M��Y��Q���*9
��q�<
h1�qj<2W8O��:�T��7غ�ԥ�GN0�o�p&A=���[<����E��k����A�z]r����v�6ţ9�LH�x�&Z�֙ǖ� s@▒h!
�!Փ��?�4���85��AL��>[��/�y=�!��Hv�m������z�_��N;��W����� ��#�i�&�G��̌���K��Z�u�
��L�+wb*�����rpN�B�%
Finally, decrypt the file.
code
> $ sudo cf-secret decrypt /tmp/cf-secret.help.cfsecret \
--key /var/cfengine/ppkeys/localhost.priv \
--output /tmp/cf-secret.help.decrypted
> $ sudo diff /tmp/cf-secret.help /tmp/cf-secret.help.decrypted && echo "No difference" || echo "Difference detected"
No difference
Example leveraging cf-secret from policy
Policy:
code
bundle agent main
{
vars:
"private_key"
comment => "The decryption key",
string => "$(this.promise_filename).priv";
"encrypted_file" string => "$(this.promise_filename).cfcrypt";
"secret"
comment => "We decrypt the encrypted file directly into a variable.",
string => execresult("$(sys.cf_secret) -d $(private_key) -i $(encrypted_file) -o -", noshell);
reports:
"Encrypted file content:"
printfile => cat( $(encrypted_file) );
"Decrypted content:$(const.n)$(secret)";
}
body printfile cat(file)
{
file_to_print => "$(file)";
number_of_lines => "inf";
}
This policy can be found in
/var/cfengine/share/doc/examples/cf-secret.cf
and downloaded directly from
github.
Example Output:
code
R: Encrypted file content:
R: Version: 1.0
R:
R: ���V�cv�#�P��, ��-O�8旼[i����p�Q�
R: Φ&l�x'�#j���qQ����[�F�1����v�Q��ˮ�J'�թ�|^HG%)�`&�����~k�$wd]"�%4X\(Q�~�O����s�A~���/��:�" gi�Rn&ٍ�E^���߬3��M�ə�%2s�SB��b3���K4wm����o�B�:P��O�#��1�t8��`�@��j/��+����j��g����Z�D�iJ��͞j��8ĉ�ag�9vz?+�暢��So��.Org]�"+�S����_HѢ=_O%
R: Decrypted content:
Super secret message is here
This policy can be found in
/var/cfengine/share/doc/examples/cf-secret.cf
and downloaded directly from
github.
History:
- Introduced in 3.16.0, 3.15.3
cf-support
cf-support gathers various details about the system and creates a tarball in the current directory to submit to support.
If the system is an enterprise hub then additional details will be gathered and included.
The utility will prompt for an optional support ticket number as well as prompt whether to include masterfiles in the tarball.
Command reference
code
--yes, -y - Non-interactive use. Assume no ticket number and assume include masterfiles.
--help, -h - Print the help message
History
- Introduced in 3.21.0, 3.18.3
cf-serverd
cf-serverd is a socket listening daemon providing two services: it acts as a
file server for remote file copying and it allows an authorized
cf-runagent to start a cf-agent run. cf-agent
typically connects to a cf-serverd instance to request updated policy code,
but may also request additional files for download. cf-serverd employs
role based access control (defined in policy code) to authorize
requests.
cf-serverd keeps the promises made in common and server bundles, and is
affected by common and server control bodies.
Notes:
- This daemon reloads it's config when the SIGHUP signal is received.
- If
enable_report_dumps exists in WORKDIR (/var/cfengine/enable_report_dumps) cf-serverd will log reports provided to cf-hub to WORKDIR/diagnostics/report_dump (/var/cfengine/diagnostics/report_dumps). This data is useful when troubleshooting reporting issues with CFEngine Enterprise.
cf-serverd always considers the class server to be defined.
History:
- SIGHUP behavior added in 3.7.0
enable_report_dumps added in 3.16.0
Command reference
code
--help , -h - Print the help message
--log-level , -g value - Specify how detailed logs should be. Possible values: 'error', 'warning', 'notice', 'info', 'verbose', 'debug'
--debug , -d - Enable debugging output
--verbose , -v - Output verbose information about the behaviour of the agent
--version , -V - Output the version of the software
--file , -f value - Specify an alternative input file than the default. This option is overridden by FILE if supplied as argument.
--define , -D value - Define a list of comma separated classes to be defined at the start of execution
--negate , -N value - Define a list of comma separated classes to be undefined at the start of execution
--no-lock , -K - Ignore locking constraints during execution (ifelapsed/expireafter) if "too soon" to run
--inform , -I - Print basic information about changes made to the system, i.e. promises repaired
--diagnostic , -x - Activate internal diagnostics (developers only)
--no-fork , -F - Run as a foreground processes (do not fork)
--ld-library-path, -L value - Set the internal value of LD_LIBRARY_PATH for child processes
--generate-avahi-conf, -A - Generates avahi configuration file to enable policy server to be discovered in the network
--color , -C value - Enable colorized output. Possible values: 'always', 'auto', 'never'. If option is used, the default value is 'auto'
--timestamp , -l - Log timestamps on each line of log output
--graceful-detach, -t value - Terminate gracefully on SIGHUP by detaching from systemd and waiting n seconds before terminating
--ignore-preferred-augments, - - Ignore def_preferred.json file in favor of def.json
Control promises
Settings describing the details of the fixed behavioral promises made by
cf-serverd. Server controls are mainly about determining access policy for
the connection protocol: i.e. access to the server itself. Access to specific
files must be granted in addition.
code
body server control
{
allowconnects => { "127.0.0.1" , "::1" };
allowallconnects => { "127.0.0.1" , "::1" };
# Uncomment me under controlled circumstances
#trustkeysfrom => { "127.0.0.1" , "::1" };
}
allowconnects
Description: List of IP addresses that may connect to the
server port. They are denoted in either IP or subnet form. For
compatibility reasons, regular expressions are also accepted.
This is the first line of defence; clients who are not
in this list may not connect or send any data to the server.
See also the warning about regular expressions in
allowallconnects.
Type: slist
Allowed input range: (arbitrary string)
Examples:
code
allowconnects => {
"127.0.0.1",
"::1",
"200.1.10.0/24",
"200\.1\.10\..*",
};
allowallconnects
Description: List of IP addresses that may have more than one
connection to the server port. They are denoted in either IP or subnet
form. For compatibility reasons, regular expressions are also accepted.
The clients that are not listed here may have only one open connection
at the time with the server.
Note that 127.0.0.1 is a regular expression (i.e., "127 any
character 0 any character 0 any character 1"), but this will only
match the IP address 127.0.0.1. Take care with IP addresses and
domain names, as the hostname regular expression www.domain.com
will potentially match more than one hostname (e.g.,
wwwxdomain.com, in addition to the desired hostname
www.domain.com).
Type: slist
Allowed input range: (arbitrary string)
Examples:
code
allowallconnects => {
"127.0.0.1",
"::1",
"200.1.10.0/24",
"200\.1\.10\..*",
};
allowlegacyconnects
Description: List of hosts from which the server accepts connections
that are not using the latest protocol.
To define subnets or address ranges, use CIDR notation:
code
allowlegacyconnects => { "192.168.1.0/24", "192.168.2.123" }
In CFEngine <= 3.8, absence of this attribute means that connections from all hosts are accepted,
for compatibility with pre-3.6 CFEngine versions.
Set this attribute to an empty list to not allow any incoming connections
using legacy protocol versions:
code
allowlegacyconnects => { }
In CFEngine >= 3.9, legacy protocol is disallowed by default, and you have to
specify a list of hosts allowed to use the legacy protocol.
Type: slist
Allowed input range: (arbitrary string)
See also: protocol_version
allowciphers
Description: List of TLS ciphers the server accepts both incoming and outgoing (in the case of client initiated reporting with CFEngine Enterprise) connections using cf-serverd.
For a list of possible ciphers, see man page for "openssl ciphers".
Type: string
Allowed input range: (arbitrary string)
Default value: AES256-GCM-SHA384:AES256-SHA
Example:
code
body server control
{
# Only this non-default cipher is to be accepted
allowciphers => "RC4-MD5";
}
Note: When used with
protocol_version 1 (classic protocol),
this does not do anything as the classic protocol does not support TLS ciphers.
See also:
protocol_version,
tls_ciphers,
tls_min_version,
allowtlsversion,
encrypt,
logencryptedtransfers,
ifencrypted
History: Introduced in CFEngine 3.6.0
allowtlsversion
Description: Minimum TLS version allowed for both incoming and outgoing (in the case of client initiated reporting with CFEngine Enterprise) connections using cf-serverd.
Type: string
Allowed input range: (arbitrary string)
Default value: 1.0
Example:
code
body server control
{
# Allow only TLSv1.1 or higher
allowtlsversion => "1.1";
}
Note: When used with
protocol_version 1 (classic protocol),
this attribute does not do anything.
See also:
protocol_version,
tls_ciphers,
tls_min_version,
allowciphers,
encrypt,
logencryptedtransfers,
ifencrypted
History: Introduced in CFEngine 3.7.0
allowusers
Description: List of usernames who may execute requests from this
server
The usernames listed in this list are those asserted as public key
identities during client-server connections. These may or may not
correspond to system identities on the server-side system.
Type: slist
Allowed input range: (arbitrary string)
Example:
code
allowusers => { "cfengine", "root" };
bindtointerface
Description: IP of the interface to which the server should bind
on multi-homed hosts
On multi-homed hosts, the server and client can bind to a specific
interface for server traffic. The IP address of the interface must
be given as the argument, not the device name.
Type: string
Allowed input range: (arbitrary string)
code
bindtointerface => "192.168.1.1";
To bind to all interfaces, including IPV6:
code
bindtointerface => "::";
Note that a bug in netstat will not correctly report that cf-serverd is
listening on both IPV4 and IPV6 interfaces. A test with netcat (nc) will
confirm.
code
# nc -v -4 172.16.100.1 5308
Connection to 172.16.100.1 5308 port [tcp/cfengine] succeeded!
^C
# nc -v -6 fe80:470:1d:a2f::2 5308
Connection to fe80:470:1d:a2f::2 5308 port [tcp/cfengine] succeeded!
^C
cfruncommand
Description: Path to the cf-agent command or cf-execd wrapper for
remote execution
It is normal for this to point to the location of cf-agent but it
could also point to the cf-execd, or even another program or
shell command at your own risk.
Type: string
Allowed input range: .+
code
body server control
{
cfruncommand => "/var/cfengine/bin/cf-agent";
}
See also: cf-runagent, bundle resource_type in server access promises
call_collect_interval
CFEngine Enterprise only.
Description: The interval in minutes in between collect calls to
the CFEngine Server offering a tunnel for report collection.
If option time is set, it causes the server daemon to peer with a
policy hub by attempting a connection at regular intervals of the
value of the parameter in minutes.
This feature is designed to allow Enterprise report collection from
hosts that are not directly addressable from a hub data-aggregation
process. For example, if some of the clients of a policy hub are
behind NAT or firewall then the hub possibly is not able to
open a connection to port 5308 of the client. The solution is to
enable call_collect_interval on the client's cf-serverd.
Note: also remember to admit the client's IP on the hub's
collect_calls ACL (see resource_type in
bundle server access_rules).
If this option is set, the client's cf-serverd will "peer" with
the server daemon on a policy hub. This means that, cf-serverd on
an unreachable (e.g. NATed) host will attempt to report in to the
cf-serverd on its assigned policy hub and offer it a short time
window in which to download reports over the established
connection. The effect is to establish a temporary secure tunnel
between hosts, initiated from the satellite host end. The
connection is made in such a way that host autonomy is not
compromised. Either hub may refuse or decline to play their role at
any time, in the usual way (avoiding DOS attacks). Normal access
controls must be set for communication in both directions.
Collect calling cannot be as efficient as data collection by the
cf-hub, as the hub is not able to load balance. Hosts that use this
approach should exclude themselves from the cf-hub data
collection.
The sequence of events is this:
- The host's
cf-serverd connects to its registered CFEngine Server
- The host identifies itself to authentication and access
control and sends a collect-call pull-request to the server
- The server might honor this, if the access control grants access.
- If access is granted, the server has
collect_window seconds to
initiate a query to the host for its reports.
- The server identifies itself to authentication and access
control and sends a query request to the host to collect the
reports.
- When finished, the host closes the tunnel.
Type: int
Allowed input range: 0,99999999999
Example:
code
call_collect_interval => "5";
The full configuration to enable client initiated reporting would look something like this:
code
#########################################################
# Server config
#########################################################
body server control
{
allowconnects => { "10.10.10.0/24" , "::1" };
allowallconnects => { "10.10.10.0/24" , "::1" };
trustkeysfrom => { "10.10.10.0/24" , "::1" };
call_collect_interval => "5";
}
#########################################################
bundle server my_access_rules()
{
access:
policy_server::
"collect_calls"
resource_type => "query",
admit => { "10.10.10.10" },
comment => "The policy server must admit queries for collect_calls (client initated reporting).";
satellite_hosts::
"delta"
comment => "Grant access to cfengine hub to collect report deltas",
resource_type => "query",
admit => { "policy_hub" };
"full"
comment => "Grant access to cfengine hub to collect full report dump",
resource_type => "query",
admit => { "policy_hub" };
}
Note: In the Masterfiles Policy Framework, body server control and default access rules are found in controls/cf_serverd.cf.
History: Was introduced in Enterprise 3.0.0 (2012)
collect_window
CFEngine Enterprise only.
Description: A time in seconds that a collect-call tunnel remains
open to a hub to attempt a report transfer before it is closed
Type: int
Allowed input range: 0,99999999999
code
collect_window => "15";
Default value: 30.
History: Was introduced in Enterprise 3.0.0 (2012)
denybadclocks
Description: true/false accept connections from hosts with clocks
that are out of sync
A possible form of attack on the fileserver is to request files
based on time by setting the clocks incorrectly. This option
prevents connections from clients whose clocks are drifting too far
from the server clock (where "too far" is currently defined as
"more than an hour off"). This serves as a warning about clock
asynchronization and also a protection against Denial of Service
attempts based on clock corruption.
Type: boolean
Default value: true
Example:
code
body server control
{
denybadclocks => "true";
}
denyconnects
Description: List of IPs that may NOT connect to the
server port
Hosts or IP addresses that are explicitly denied access. This
should only be used in special circumstances. One should never
grant generic access to everything and then deny special cases.
Since the default server behavior is to grant no access to
anything, this list is unnecessary unless you have already granted
access to some set of hosts using a generic pattern, to which you
intend to make an exception.
See also the warning about regular expressions in
allowallconnects.
Type: slist
Allowed input range: (arbitrary string)
Example:
code
body server control
{
denyconnects => { "badhost\.domain\.evil", "host3\.domain\.com" };
}
logallconnections
Deprecated: This attribute was deprecated in 3.7.0.
logencryptedtransfers
Description: true/false log all successful transfers required to
be encrypted. Only applies to classic protocol connections
(because the new protocol uses TLS which enforces encryption for everything).
If true the server will log all transfers of files which the server
requires to encrypted in order to grant access (see ifencrypted)
to syslog. These files are deemed to be particularly sensitive.
Type: boolean
Default value: false
Example:
code
body server control
{
logencryptedtransfers => "true";
}
See also: ifencrypted, encrypt, tls_ciphers, tls_min_version, allowciphers, allowtlsversion, protocol_version
maxconnections
Description: Maximum number of concurrent connections the server
will accept. Recommended value for a hub is two times the total
number of hosts bootstrapped to this hub.
Type: int
Allowed input range: 0,99999999999
Default value: 30
Example:
code
# client side
body agent control
{
maxconnections => "1000";
}
# server side
body server control
{
maxconnections => "1000";
}
port
Description: Default port for the CFEngine server
Type: int
Allowed input range: 1,65535
Default value: 5308
Example:
code
body hub control
{
port => "5308";
}
body server control
{
specialhost::
port => "5308";
!specialhost::
port => "5308";
}
Notes:
The standard or registered port number is tcp/5308. CFEngine does
not presently use its registered udp port with the same number, but
this could change in the future.
Changing the standard port number is not recommended practice. You
should not do it without a good reason.
serverfacility
Description: Menu option for syslog facility level
Type: (menu option)
Allowed input range:
code
LOG_USER
LOG_DAEMON
LOG_LOCAL0
LOG_LOCAL1
LOG_LOCAL2
LOG_LOCAL3
LOG_LOCAL4
LOG_LOCAL5
LOG_LOCAL6
LOG_LOCAL7
See syslog notes.
Default value: LOG_USER
Example:
code
body server control
{
serverfacility => "LOG_USER";
}
skipverify
Description: This option is obsolete, does nothing and is retained
for backward compatibility.
Type: slist
Allowed input range: (arbitrary string)
Example:
code
body server control
{
skipverify => { "special_host.*", "192.168\..*" };
}
trustkeysfrom
Description: List of IPs from whom the server will accept and trust
new (untrusted) public keys. They are denoted in either IP or subnet
form. For compatibility reasons, regular expressions are also
accepted.
The new accepted public keys are written to the ppkeys
directory, and a message is logged:
code
192.168.122.254> Trusting new key: MD5=0d5603d68dd62d35bab2150e35d055ae
NOTE: trustkeysfrom should normally be an empty list except in
controlled circumstances, for example when the network is being set up
and keys are to be exchanged for the first time.
See also the warning about regular expressions in
allowallconnects.
Type: slist
Allowed input range: (arbitrary string)
Example:
code
body server control
{
trustkeysfrom => { "10.0.1.1", "192.168.0.0/16"};
}
listen
Description: true/false enable server daemon to listen on defined
port
This attribute allows to disable cf-serverd from listening on any
port. Should be used in conjunction with call_collect_interval.
This setting only applies to CFEngine clients, the policy hub will
not be affected. Changing this setting requires a restart of
cf-serverd for the change to take effect.
Type: boolean
Default value: true
Example:
code
body server control
{
listening_host_context::
listen => "true";
!listening_host_context::
listen => "false";
}
History: Was introduced in 3.4.0, Enterprise 3.0 (2012)
Deprecated attributes in body server control
The following attributes were functional in previous versions
of CFEngine, but today they are deprecated, either because
their functionality is being handled trasparently or because
it doesn't apply to current CFEngine version.
auditingdynamicaddresseshostnamekeyskeycacheTTL
cf-execd
cf-execd is the scheduling daemon for cf-agent. It runs
cf-agent locally according to a schedule specified in policy code (executor
control body). After a cf-agent run is completed, cf-execd gathers output
from cf-agent, and may be configured to email the output to a specified
address. It may also be configured to splay (randomize)
the execution schedule to prevent synchronized cf-agent runs across a
network.
cf-execd keeps the promises made in common bundles, and is affected by
common and executor control bodies.
Notes:
- This daemon reloads it's config when the SIGHUP signal is received.
cf-execd always considers the class executor to be defined.
History:
- SIGHUP behavior added in 3.7.0
Command reference
code
--help , -h - Print the help message
--debug , -d - Enable debugging output
--verbose , -v - Output verbose information about the behaviour of cf-execd
--dry-run , -n - All talk and no action mode - make no changes, only inform of promises not kept
--version , -V - Output the version of the software
--file , -f value - Specify an alternative input file than the default. This option is overridden by FILE if supplied as argument.
--define , -D value - Define a list of comma separated classes to be defined at the start of execution
--negate , -N value - Define a list of comma separated classes to be undefined at the start of execution
--no-lock , -K - Ignore locking constraints during execution (ifelapsed/expireafter) if "too soon" to run
--inform , -I - Print basic information about changes made to the system, i.e. promises repaired
--diagnostic , -x - Activate internal diagnostics (developers only)
--log-level , -g value - Specify how detailed logs should be. Possible values: 'error', 'warning', 'notice', 'info', 'verbose', 'debug'
--no-fork , -F - Run as a foreground processes (do not fork)
--once , -O - Run once and then exit (implies no-fork)
--no-winsrv , -W - Do not run as a service on windows - use this when running from a command shell (CFEngine Nova only)
--ld-library-path, -L value - Set the internal value of LD_LIBRARY_PATH for child processes
--color , -C value - Enable colorized output. Possible values: 'always', 'auto', 'never'. If option is used, the default value is 'auto'
--timestamp , -l - Log timestamps on each line of log output
--ignore-preferred-augments, - - Ignore def_preferred.json file in favor of def.json
--skip-db-check, - value - Do not run database integrity checks and repairs at startup
--with-runagent-socket, - value - Specify the directory for the socket for runagent requests or 'no' to disable the socket
Control promises
These body settings determine the behavior of cf-execd,including scheduling
times and output capture to WORKDIR/outputs and relay via email.
code
body executor control
{
splaytime => "5";
mailto => "cfengine@example.org";
mailfrom => "cfengine@$(host).example.org";
smtpserver => "localhost";
schedule => { "Min00", "Min30" }
}
agent_expireafter
Description: Maximum agent runtime (in minutes)
Sets a maximum time on any run of the command in exec_command. If
no data is received from the pipe opened to the process created
with exec_command after the time has elapsed, the process gets
killed.
Note that if you have long-running jobs, they may get killed with
this setting. Therefore, you should ensure it is higher than any
run of cf-agent that you want to leave alone. Alternatively, you
can make your jobs output something to STDOUT at least as often as
this threshold. This will reset the timer.
Type: int
Allowed input range: 0,10080
Default value: 120
Example:
code
body executor control
{
agent_expireafter => "120";
}
Notes:
The setting will effectively allow you to set a threshold on the
number of simultaneous agents that are running. For example, if you
set it to 120 and you are using a 5-minute agent schedule, a
maximum of 120 / 5 = 24 agents should be enforced.
See also: body action expireafter, body contain exec_timeout, body agent control expireafter
executorfacility
Description: Menu option for syslog facility level
Type: (menu option)
Allowed input range:
code
LOG_USER
LOG_DAEMON
LOG_LOCAL0
LOG_LOCAL1
LOG_LOCAL2
LOG_LOCAL3
LOG_LOCAL4
LOG_LOCAL5
LOG_LOCAL6
LOG_LOCAL7
See the syslog manual pages.
Default value: LOG_USER
Example:
code
body executor control
{
executorfacility => "LOG_USER";
}
exec_command
Description: The full path and command to the executable run by
default (overriding builtin)
The command is run in a shell encapsulation so pipes and shell
symbols may be used if desired.
Type: string
Allowed input range: "?(/.*)
Note: If exec_command is not defined cf-agent will be executed with the failsafe.cf policy.
Example:
code
exec_command => "$(sys.workdir)/bin/cf-agent -f update.cf && $(sys.workdir)/bin/cf-agent";
mailfilter_exclude
Description: List of anchored regular expressions that, if
matched by a log entry, will cause that log entry to be excluded from agent
execution emails.
If no filter is set, cf-execd acts as if no log entry matches the exclude
pattern. If a log entry also matches a pattern in mailfilter_include, the
exclude pattern takes precedence.
Type: slist
Allowed input range: .*
Note: Merely adding or removing a pattern that causes the number of matching
log entries to change, does not guarantee that the next agent execution will
generate an email from cf-execd. The actual output from cf-agent still has to be
different from the previous run for an email to be generated.
Example:
code
body executor control
{
# Ignore agent execution emails about permission errors.
mailfilter_exclude => { ".*Permission denied.*" };
}
History: Introduced in CFEngine 3.9.
mailfilter_include
Description: List of anchored regular expressions that must
match a log entry in order for it to be included in agent execution emails.
If no filter is set, cf-execd acts as if every log entry matches the include
pattern. If a log entry also matches a pattern in mailfilter_exclude, the
exclude pattern takes precedence.
Type: slist
Allowed input range: .*
Note: Merely adding or removing a pattern that causes the number of matching
log entries to change, does not guarantee that the next agent execution will
generate an email from cf-execd. The actual output from cf-agent still has to be
different from the previous run for an email to be generated.
Example:
code
body executor control
{
# Only include reports in agent execution emails.
mailfilter_include => { "R:.*" };
}
History: Introduced in CFEngine 3.9.
mailfrom
Description: Email-address CFEngine mail appears to come from
Type: string
Allowed input range: .*@.*
Example:
code
body executor control
{
mailfrom => "mrcfengine@example.org";
}
mailmaxlines
Description: Maximum number of lines of output to send by email
This limit prevents anomalously large outputs from clogging up a system
administrator's mailbox. The output is truncated in the email report, but the
complete original transcript is stored in WORKDIR/outputs/* where it can be
viewed on demand. A reference to the appropriate file is given.
Type: int
Allowed input range: 0,1000
Default value: 30
Example:
code
body executor control
{
mailmaxlines => "100";
}
mailsubject
Description: The subject in the mail sent by CFEngine.
The subject can contain system variables, like for example IP address or
architecture.
Type: string
Allowed input range: .*
Example:
code
body executor control
{
mailsubject => "CFEngine report ($(sys.fqhost))";
}
mailto
Description: Email-address CFEngine mail is sent to
The address to whom email is sent if an smtp host is configured.
Type: string
Allowed input range: .*@.*
Example:
code
body executor control
{
mailto => "cfengine_alias@example.org";
}
schedule
Description: The class schedule used by cf-execd for activating
cf-agent
The list should contain class expressions comprised of classes
which are visible to the cf-execd daemon. In principle, any
defined class expression will cause the daemon to wake up and
schedule the execution of the cf-agent. In practice, the classes
listed in the list are usually date- and time-based.
The actual execution of cf-agent may be delayed by splaytime,
and may be deferred by promise caching and the value of
ifelapsed. Note also that the effectiveness of the splayclass
function may be affected by changing the schedule.
Type: slist
Allowed input range: (arbitrary string)
Default value:
code
schedule => { "Min00", "Min05", "Min10", "Min15", "Min20", "Min25",
"Min30", "Min35", "Min40", "Min45", "Min50", "Min55" };
Example:
code
body executor control
{
schedule => { "Min00", "(Evening|Night).Min15", "Min30", "(Evening|Night).Min45" };
}
smtpserver
Description: Name or IP of a willing smtp server for sending
email
This should point to a standard port 25 server without encryption. If you are
running secured or encrypted email then you should run a mail relay on
localhost and point this to localhost.
Type: string
Allowed input range: .*
Example:
code
body executor control
{
smtpserver => "smtp.example.org";
}
splaytime
Description: Time in minutes to splay this host based on its name
hash
Whenever any class listed in the schedule attribute is present,
cf-execd can schedule an execution of cf-agent. The actual
execution will be delayed an integer number of seconds between
0-splaytime minutes. The specific amount of delay for "this" host
is based on a hash of the hostname. Thus a collection of hosts will
all execute at different times, and surges in network traffic can
be avoided.
A general rule for scaling of small updates is to set the splay time to
runinterval-1 minutes for up a few thousand hosts. For example, the default
schedule executes once every 5 minutes, so the splay time should be set to no
more than 4 minutes. The splaytime should be set to a value less than the
cf-execd scheduling interval, else multiple clients might contend for data.
In other words, splaytime + cf-agent run time should be less than the
scheduling interval.
Type: int
Allowed input range: 0,99999999999
Default value: 0
The CFEngine default policy sets splaytime to 1.
Example:
code
body executor control
{
splaytime => "2";
}
See also: The splayclass() function for a task-specific
means for setting splay times.
runagent_socket_allow_users
Description: Users who are allowed access the socket (STATEDIR/cf-execd.sockets/runagent.socket).
Type: slist
Allowed input range: .*
Default value: none
Notes:
- By default, in the Masterfiles Policy Framework,
cfapache is allowed to access the socket on Enterprise Hubs.
Example:
code
body executor control
{
runagent_socket_allow_users => { "yoda", "obi-wan" };
}
See also: cf-runagent
History:
- 3.18.0 Added
runagent_socket_allow_users attribute
Sockets
cf-execd creates STATEDIR/cf-execd.sockets/runagent.socket (/var/cfengine/state/cf-execd.sockets/runagent.socket).
The body executor control attribute runagent_socket_allow_users controls the list of users that should be allowed to access (**RW**) the socket via ACLs.
Notes:
- Unlike execution triggered with the
cf-runagent binary, there is currently no capability to define additional options like defining additional classes, or the remote bundlesequence.
Example:
Write the name or IP into the socket to request unscheduled execution on that host:
code
echo 'host001' > /var/cfengine/state/cf-execd.sockets/cf-runagent.socket
See also: cf-runagent, runagent_socket_allow_users
History:
- 3.18.0 Added socket for triggering
cf-runagent by hostname or IP.
cf-promises
cf-promises is a tool for checking CFEngine policy code. It operates by
first parsing policy code checking for syntax errors. Second, it validates the
integrity of policy consisting of multiple files. Third, it checks for
semantic errors, e.g. specific attribute set rules. Finally, cf-promises
attempts to expose errors by partially evaluating the policy, resolving as
many variable and classes promise statements as possible. At no point does
cf-promises make any changes to the system.
In 3.6.0 and later, cf-promises will not evaluate function calls
either. This may affect customers who use execresult for instance.
Use the new --eval-functions yes command-line option (default is
no) to retain the old behavior from 3.5.x and earlier.
cf-agent calls cf-promises to validate the policy before running
it. In that case --eval-functions is not specified, so functions
are not evaluated prematurely (as you would expect).
Command reference
code
--workdir , -w value - Override the work directory for testing (same as setting CFENGINE_TEST_OVERRIDE_WORKDIR)
--eval-functions value - Evaluate functions during syntax checking (may catch more run-time errors). Possible values: 'yes', 'no'. Default is 'yes'
--show-classes value - Show discovered classes, including those defined in common bundles in policy. Optionally can take a regular expression.
--show-vars value - Show discovered variables, including those defined without dependency to user-defined classes in policy. Optionally can take a regular expression.
--help , -h - Print the help message
--bundlesequence, -b value - Use the specified bundlesequence for verification
--debug , -d - Enable debugging output
--verbose , -v - Output verbose information about the behaviour of cf-promises
--log-level , -g value - Specify how detailed logs should be. Possible values: 'error', 'warning', 'notice', 'info', 'verbose', 'debug'
--dry-run , -n - All talk and no action mode - make no changes, only inform of promises not kept
--version , -V - Output the version of the software
--file , -f value - Specify an alternative input file than the default. This option is overridden by FILE if supplied as argument.
--define , -D value - Define a list of comma separated classes to be defined at the start of execution
--negate , -N value - Define a list of comma separated classes to be undefined at the start of execution
--inform , -I - Print basic information about changes made to the system, i.e. promises repaired
--diagnostic , -x - Activate internal diagnostics (developers only)
--policy-output-format, -p value - Output the parsed policy. Possible values: 'none', 'cf', 'json' (this file only), 'cf-full', 'json-full' (all parsed promises). Default is 'none'. (experimental)
--syntax-description, -s value - Output a document describing the available syntax elements of CFEngine. Possible values: 'none', 'json'. Default is 'none'.
--full-check , -c - Ensure full policy integrity checks
--warn , -W value - Pass comma-separated <warnings>|all to enable non-default warnings, or error=<warnings>|all
--color , -C value - Enable colorized output. Possible values: 'always', 'auto', 'never'. If option is used, the default value is 'auto'
--tag-release , -T value - Tag a directory with promises.cf with cf_promises_validated and cf_promises_release_id
--timestamp , -l - Log timestamps on each line of log output
--ignore-preferred-augments, - - Ignore def_preferred.json file in favor of def.json
--log-modules , - value - Enable even more detailed debug logging for specific areas of the implementation. Use together with '-d'. Use --log-modules=help for a list of available modules
cf-monitord
cf-monitord is the monitoring daemon for CFEngine. It samples probes defined
in policy using measurements type promises and attempts to learn the normal
system state based on current and past observations. Current estimates are made
available as special variables (e.g.
$(mon.av_cpu)) to cf-agent, which may use them to inform
policy decisions.
cf-monitord keeps the promises made in commonand monitor bundles, and is
affected by common and monitor control bodies.
Notes:
cf-monitord always considers the class monitor to be defined.
Command reference
code
--help , -h - Print the help message
--debug , -d - Enable debugging output
--verbose , -v - Output verbose information about the behaviour of cf-monitord
--dry-run , -n - All talk and no action mode - make no changes, only inform of promises not kept
--version , -V - Output the version of the software
--no-lock , -K - Ignore system lock
--file , -f value - Specify an alternative input file than the default. This option is overridden by FILE if supplied as argument.
--log-level , -g value - Specify how detailed logs should be. Possible values: 'error', 'warning', 'notice', 'info', 'verbose', 'debug'
--inform , -I - Print basic information about changes made to the system, i.e. promises repaired
--diagnostic , -x - Activate internal diagnostics (developers only)
--no-fork , -F - Run process in foreground, not as a daemon
--histograms , -H - Ignored for backward compatibility
--tcpdump , -T - Interface with tcpdump if available to collect data about network
--color , -C value - Enable colorized output. Possible values: 'always', 'auto', 'never'. If option is used, the default value is 'auto'
--timestamp , -l - Log timestamps on each line of log output
--ignore-preferred-augments, - - Ignore def_preferred.json file in favor of def.json
Standard measurements:
The cf-monitord service monitors a number of variables as standard on Unix
and Windows systems. Windows is fundamentally different from Unix and
currently has less support for out-of-the-box probes.
- users: Users logged in
- rootprocs: Privileged system processes
- otherprocs: Non-privileged process
- diskfree: Free disk on / partition
- loadavg: % kernel load utilization
- netbiosns_in: netbios name lookups (in)
- netbiosns_out: netbios name lookups (out)
- netbiosdgm_in: netbios name datagrams (in)
- netbiosdgm_out: netbios name datagrams (out)
- netbiosssn_in: netbios name sessions (in)
- netbiosssn_out: netbios name sessions (out)
- irc_in: IRC connections (in)
- irc_out: IRC connections (out)
- cfengine_in: CFEngine connections (in)
- cfengine_out: CFEngine connections (out)
- nfsd_in: nfs connections (in)
- nfsd_out: nfs connections (out)
- smtp_in: smtp connections (in)
- smtp_out: smtp connections (out)
- www_in: www connections (in)
- www_out: www connections (out)
- ftp_in: ftp connections (in)
- ftp_out: ftp connections (out)
- ssh_in: ssh connections (in)
- ssh_out: ssh connections (out)
- wwws_in: wwws connections (in)
- wwws_out: wwws connections (out)
- icmp_in: ICMP packets (in)
- icmp_out: ICMP packets (out)
- udp_in: UDP dgrams (in)
- udp_out: UDP dgrams (out)
- dns_in: DNS requests (in)
- dns_out: DNS requests (out)
- tcpsyn_in: TCP sessions (in)
- tcpsyn_out: TCP sessions (out)
- tcpack_in: TCP acks (in)
- tcpack_out: TCP acks (out)
- tcpfin_in: TCP finish (in)
- tcpfin_out: TCP finish (out)
- tcpmisc_in: TCP misc (in)
- tcpmisc_out: TCP misc (out)
- webaccess: Webserver hits
- weberrors: Webserver errors
- syslog: New log entries (Syslog)
- messages: New log entries (messages)
- temp0: CPU Temperature core 0
- temp1: CPU Temperature core 1
- temp2: CPU Temperature core 2
- temp3: CPU Temperature core 3
- cpu: %CPU utilization (all)
- cpu0: %CPU utilization core 0
- cpu1: %CPU utilization core 1
- cpu2: %CPU utilization core 2
- cpu3: %CPU utilization core 3
- microsoft_ds_out: Samba/MS_ds name sessions (out)
- www_alt_in: Alternative web service connections (in)
- www_alt_out: Alternative web client connections (out)
- imaps_in: encrypted imap mail service sessions (in)
- imaps_out: encrypted imap mail client sessions (out)
- ldap_in: LDAP directory service service sessions (in)
- ldap_out: LDAP directory service client sessions (out)
- ldaps_in: LDAP directory service service sessions (in)
- ldaps_out: LDAP directory service client sessions (out)
- mongo_in: Mongo database service sessions (in)
- mongo_out: Mongo database client sessions (out)
- mysql_in: MySQL database service sessions (in)
- mysql_out: MySQL database client sessions (out)
- postgres_in: PostgreSQL database service sessions (in)
- postgres_out: PostgreSQL database client sessions (out)
- ipp_in: Internet Printer Protocol (in)
- ipp_out: Internet Printer Protocol (out)
- io_reads: Number of I/O reads
- io_writes: Number of I/O writes
- io_readdata: Aggregate mount of data read across all devices
- io_writtendata: Aggregate amount of data written across all devices
- mem_total: Total system memory
- mem_free: Free system memory
- mem_cached: Size of disk cache
- mem_swap: Total swap size
- mem_freeswap: Free swap size
Slots with a higher number are used for custom measurement promises in
CFEngine Enterprise.
These values collected and analyzed by cf-monitord are transformed
into agent variables in the $(mon.name) context.
Note: There is no way for force a refresh of the monitored data.
Data storage
cf-monitord records data in $(sys.statedir) (typically /var/cfengine/state).
cf_observations.lmdbnova_measures.lmdbts_keyenv_datacf_incoming.<service id>cf_outgoing.<service id>cf_state.lmdbhistory.lmdb
Statistical classes
cf-monitord automatically defines classes based on the observation of the data
is has collected. Classes defined are named for the measurement id (the promise
handle in the case of custom measurement promises) with prefixes and or suffixes
depending on the measurement.
The following suffixes may be used when defining classes:
_high :: The last measurement seemed high. It was greater than the average of all time and also greater than the recent average. This could indicate that the measured value is experiencing a "spike" or trending in a positive direction._low :: The last measurement was low. It was lower than the average of all time and also lower than the recent average. This could indicate that the measured value is experiencing a "dip" or trending in a negative direction._normal :: The value was neither high nor low, (as per how those are described above)._ldt :: A leap (step) detected, meaning a distinct (significant) change in the average._dev1 :: The last measurement was at least 1 standard deviation higher/lower than the average._dev2 :: The last measurement was at least 2 standard deviations higher/lower than the average. These classes are persistently defined for a number of minutes._anomaly :: The last measurement was at least 3 standard deviations than the average. These classes are persistently defined for a number of minutes._microanomaly :: The last measurement was at least 2 standard deviations higher than the average.
The following prefixes may be used when defining classes:
Note: These suffixes and prefixes may be combined, resulting in a class like rootprocs_high, loadavg_high_ldt, cpu1_high_dev3, and entropy_postgresql_out_low.
Control promises
Settings describing the details of the fixed behavioral promises
made by cf-monitord. The system defaults will be sufficient for
most users. This configurability potential, however, will be a key
to developing the integrated monitoring capabilities of CFEngine.
code
body monitor control
{
#version => "1.2.3.4";
forgetrate => "0.7";
tcpdump => "false";
tcpdumpcommand => "/usr/sbin/tcpdump -i eth1 -n -t -v";
}
forgetrate
Description: Decimal fraction [0,1] weighting of new values over
old in 2d-average computation
Configurable settings for the machine-learning algorithm that
tracks system behavior. This is only for expert users. This
parameter effectively determines (together with the monitoring
rate) how quickly CFEngine forgets its previous history.
Type: real
Allowed input range: 0,1
Default value: 0.6
Example:
code
body monitor control
{
forgetrate => "0.7";
}
histograms
Deprecated: Ignored, kept for backward compatibility
cf-monitord now always keeps histograms information, so this
option is a no-op kept for backward compatibility. It used to cause
CFEngine to learn the conformally transformed distributions of
fluctuations about the mean.
Type: boolean
Default value: true
Example:
code
body monitor control
{
histograms => "true";
}
monitorfacility
Description: Menu option for syslog facility
Type: (menu option)
Allowed input range:
code
LOG_USER
LOG_DAEMON
LOG_LOCAL0
LOG_LOCAL1
LOG_LOCAL2
LOG_LOCAL3
LOG_LOCAL4
LOG_LOCAL5
LOG_LOCAL6
LOG_LOCAL7
Default value: LOG_USER
Example:
code
body monitor control
{
monitorfacility => "LOG_USER";
}
tcpdump
Description: true/false use tcpdump if found
Interface with TCP stream if possible.
Type: boolean
Default value: false
code
body monitor control
{
tcpdump => "true";
}
tcpdumpcommand
Description: Path to the tcpdump command on this system
If this is defined, the monitor will try to interface with the TCP
stream and monitor generic package categories for anomalies.
Type: string
Allowed input range: "?(/.*)
Example:
code
body monitor control
{
tcpdumpcommand => "/usr/sbin/tcpdump -i eth1";
}
cf-key
The CFEngine key generator makes key pairs for remote authentication.
Notes:
cf-key always considers the class keygenerator to be defined.
Command reference
code
--help , -h - Print the help message
--inform , -I - Print basic information about key generation
--debug , -d - Enable debugging output
--verbose , -v - Output verbose information about the behaviour of cf-key
--version , -V - Output the version of the software
--log-level , -g value - Specify how detailed logs should be. Possible values: 'error', 'warning', 'notice', 'info', 'verbose', 'debug'
--output-file , -f value - Specify an alternative output file than the default.
--key-type , -T value - Specify a RSA key size in bits, the default value is 2048.
--show-hosts , -s - Show lastseen hostnames and IP addresses
--no-truncate , -N - Don't truncate -s / --show-hosts output
--remove-keys , -r value - Remove keys for specified hostname/IP/MD5/SHA (cf-key -r SHA=12345, cf-key -r MD5=12345, cf-key -r host001, cf-key -r 203.0.113.1)
--force-removal, -x - Force removal of keys
--install-license, -l value - Install license file on Enterprise server (CFEngine Enterprise Only)
--print-digest, -p value - Print digest of the specified public key
--trust-key , -t value - Make cf-serverd/cf-agent trust the specified public key. Argument value is of the form [[USER@]IPADDR:]FILENAME where FILENAME is the local path of the public key for client at IPADDR address.
--color , -C value - Enable colorized output. Possible values: 'always', 'auto', 'never'. If option is used, the default value is 'auto'
--timestamp - Log timestamps on each line of log output
--numeric , -n - Do not lookup host names
cf-runagent
cf-runagent connects to a list of running instances of
cf-serverd. It allows foregoing the usual cf-execd schedule to activate cf-agent.
Additionally, a user may send classes to be defined
on the remote host. Two kinds of classes may be sent: classes to decide on
which hosts cf-agent will be started, and classes that the user requests
cf-agent should define on execution. The latter type is regulated by
cf-serverd's role based access control.
Notes:
cf-runagent always considers the class runagent to be defined.
Command reference
code
--help , -h - Print the help message
--background , -b value - Parallelize connections (50 by default)
--debug , -d - Enable debugging output
--verbose , -v - Output verbose information about the behaviour of cf-runagent
--log-level , -g value - Specify how detailed logs should be. Possible values: 'error', 'warning', 'notice', 'info', 'verbose', 'debug'
--dry-run , -n - All talk and no action mode - make no changes, only inform of promises not kept
--version , -V - Output the version of the software
--file , -f value - Specify an alternative input file than the default. This option is overridden by FILE if supplied as argument.
--define-class, -D value - Define a list of comma separated classes to be sent to a remote agent
--select-class, -s value - Define a list of comma separated classes to be used to select remote agents by constraint
--inform , -I - Print basic information about changes made to the system, i.e. promises repaired
--remote-options, -o value - (deprecated)
--diagnostic , -x - (deprecated)
--hail , -H value - Hail the following comma-separated lists of hosts, overriding default list
--interactive , -i - Enable interactive mode for key trust
--timeout , -t value - Connection timeout, seconds
--color , -C value - Enable colorized output. Possible values: 'always', 'auto', 'never'. If option is used, the default value is 'auto'
--timestamp , -l - Log timestamps on each line of log output
--ignore-preferred-augments, - - Ignore def_preferred.json file in favor of def.json
--log-modules , - value - Enable even more detailed debug logging for specific areas of the implementation. Use together with '-d'. Use --log-modules=help for a list of available modules
--remote-bundles, - value - Bundles to execute on the remote agent
See also: bundle resource_type in server access promises, cfruncommand in body server control
Control promises
Settings describing the details of the fixed behavioral promises made by
cf-runagent. The most important parameter here is the list of hosts that the
agent will poll for connections. This is easily read in from a file list,
however when doing so always have a stable input source that does not depend
on the network (including a database or directory service) in any way:
introducing such dependencies makes configuration brittle.
code
body runagent control
{
# default port is 5308
hosts => { "127.0.0.1:5308", "eternity.iu.hio.no:80", "slogans.iu.hio.no" };
#output_to_file => "true";
}
hosts
Description: List of host or IP addresses to attempt connection
with
The complete list of contactable hosts. The values may be either
numerical IP addresses or DNS names, optionally suffixed by a ':'
and a port number. If no port number is given, the default CFEngine
port 5308 is assumed.
Type: slist
Allowed input range: (arbitrary string)
Example:
code
body runagent control
{
network1::
hosts => { "host1.example.org", "host2", "host3" };
network2::
hosts => { "host1.example.com", "host2", "host3" };
}
port
Description: Default port for CFEngine server
Type: int
Allowed input range: 1,65535
Default value: 5308
Example:
code
body hub control
{
port => "5308";
}
body server control
{
specialhost::
port => "5308";
!specialhost::
port => "5308";
}
Notes:
The standard or registered port number is tcp/5308. CFEngine does
not presently use its registered udp port with the same number, but
this could change in the future.
Changing the standard port number is not recommended practice. You
should not do it without a good reason.
force_ipv4
Description: true/false force use of ipv4 in connection
Type: boolean
Default value: false
Example:
code
body copy_from example
{
force_ipv4 => "true";
}
Notes:
IPv6 should be harmless to most users unless you have a partially
or misconfigured setup.
trustkey
Description: true/false automatically accept all keys on trust
from servers
If the server's public key has not already been trusted, this
allows us to accept the key in automated key-exchange.
Note that, as a simple security precaution, trustkey should
normally be set to 'false', to avoid key exchange with a server one
is not one hundred percent sure about, though the risks for a
client are rather low. On the server-side however, trust is often
granted to many clients or to a whole network in which possibly
unauthorized parties might be able to obtain an IP address, thus
the trust issue is most important on the server side.
As soon as a public key has been exchanged, the trust option has no
effect. A machine that has been trusted remains trusted until its
key is manually revoked by a system administrator. Keys are stored
in WORKDIR/ppkeys.
Type: boolean
Default value: false
Example:
code
body copy_from example
{
trustkey => "true";
}
encrypt
Description: true/false encrypt connections with servers
Client connections are encrypted with using a Blowfish randomly
generated session key. The initial connection is encrypted using the
public/private keys for the client and server hosts.
Type: boolean
Default value: false
Example:
code
body copy_from example
{
servers => { "remote-host.example.org" };
encrypt => "true";
}
background_children
Description: true/false parallelize connections to servers
Causes cf-runagent to attempt parallelized connections to the
servers.
Type: boolean
Default value: false
Example:
code
body runagent control
{
background_children => "true";
}
max_children
Description: Maximum number of simultaneous connections to
attempt
For the run-agent this represents the maximum number of forked
background processes allowed when parallelizing connections to
servers. For the agent it represents the number of background jobs
allowed concurrently. Background jobs often lead to contention of
the disk resources slowing down tasks considerably; there is thus a
law of diminishing returns.
Type: int
Allowed input range: 0,99999999999
Default value: 50 runagents
Example:
code
body runagent control
{
max_children => "10";
}
output_to_file
Description: true/false whether to send collected output to
file(s)
Filenames are chosen automatically and placed in the
WORKDIR/outputs/hostname_runagent.out.
Type: boolean
Default value: false
Example:
code
body runagent control
{
output_to_file => "true";
}
output_directory
Description: Directory where the output is stored
Defines the location for parallelized output to be saved when
running cf-runagent in parallel mode.
Type: string
Allowed input range: "?(/.*)
Example:
code
body runagent control
{
output_directory => "/tmp/run_output";
}
History: Was introduced in version 3.2.0, Enterprise 2.1.0 (2011)
timeout
Description: Connection timeout in seconds
Type: int
Allowed input range: 1,9999
Examples:
code
body runagent control
{
timeout => "10";
}
See also: body copy_from timeout, agent default_timeout
Sockets
cf-runagent can be triggered by writing a hostname or IP into a socket provided by cf-execd.
Notes:
- Unlike execution triggered with the
cf-runagent binary, there is currently no capability to define additional options like defining additional classes, or the remote bundlesequence.
Example:
code
echo 'host001' > /var/cfengine/state/cf-execd.sockets/cf-runagent.socket
See also: cf-execd, runagent_socket_allow_users
History:
- 3.18.0 Added socket for triggering
cf-runagent by hostname or IP.
cf-check
Utility for diagnosis and repair of local CFEngine databases.
Command reference
code
--help , -h value - Print the help message
--manpage , -M - Print the man page
--version , -V - Output the version of the software
--debug , -d - Enable debugging output
--verbose , -v - Enable verbose output
--log-level , -g value - Specify how detailed logs should be. Possible values: 'error', 'warning', 'notice', 'info', 'verbose', 'debug'
--inform , -I - Enable basic information output
cf-hub
cf-hub connects to cf-serverd instances to collect data
about a host managed by CFEngine. cf-agent and cf-monitord
both store data at host in local databases. cf-hub connects to a
cf-serverd instance running at a host and collect the data into its own
central database. cf-hub automatically schedules data collection from hosts
that have registered a connection with a collocated cf-serverd
cf-hub keeps the promises made in common, and is affected by
common and hub control bodies.
cf-hub collects data generated from the default run only, what you'd
get if you ran cf-agent without specifying a file name. This is to
avoid reporting on data generated by test or extraordinary executions.
Notes:
cf-hub always considers the class hub to be defined.
Command reference
code
--continuous , -c value - Continuous update mode of operation. Number of report gathering iterations can be specified.
--color , -C value - Enable colorized output. Possible values: 'always', 'auto', 'never'. If option is used, the default value is 'auto'
--debug , -d value - Set debugging level 0,1,2,3
--file , -f value - Specify an alternative input file than the default
--no-fork , -F - Run as a foreground processes (do not fork)
--log-level , -g value - Specify how detailed logs should be. Possible values: 'error', 'warning', 'notice', 'info', 'verbose', 'debug'
--help , -h - Print the help message
--query-host , -H value - Remote hosts to gather reports from (for -q)
--inject-hosts, -i value - Inject and trust hosts from a hosts file (mapping IPs to public key file paths, one entry per line)
--inform , -I - Print basic information about actions taken
--no-lock , -K - Ignore locking constraints during execution (ifelapsed/expireafter) if "too soon" to run
--logging , -l - Enable logging of report collection and maintenance to hub_log in the log directory
--show-license, -L value - Show license information for this hub. Searches default locations, or specify a filename.
--manpage , -M - Print the man page
--dry-run , -n - All talk and no action mode - make no changes, only inform of promises not kept
--query , -q value - Collect reports from remote host. Value is 'rebase' or 'delta'. -H option is required.
--splay_updates, -s - Splay/load balance full-updates, overriding bootstrap times, assuming a default 5 minute update schedule.
--timestamp , -t - Log timestamps on each line of log output
--query-timeout, -T value - Connection timeout for querying clients (seconds)
--verbose , -v - Output verbose information about the behaviour of the agent
--version , -V - Output the version of the software
--ignore-preferred-augments, - - Ignore def_preferred.json file in favor of def.json
Control promises
code
body hub control
{
export_zenoss => "/var/www/reports/summary.z";
}
exclude_hosts
Description: A list of IP addresses of hosts to exclude from
report collection
This list of IP addresses will not be queried for reports by cf-hub, even
though they are in the last-seen database.
The lists may contain network addresses in CIDR notation or regular
expressions to match the IP address. However, host names are
currently not supported.
Type: slist
Allowed input range: (arbitrary string)
Example:
code
body hub control
{
exclude_hosts => { "192.168.12.21", "10.10", "10.12.*" };
}
Notes:
History: Was introduced in 3.3.0, Enterprise 2.1.1 (2011)
hub_schedule
Description: List of classes indicating when pull collection round should be initiated.
Type: slist
Allowed input range: (arbitrary string)
Default value: { "Min00", "Min05", "Min10", "Min15", "Min20", "Min25", "Min30", "Min35", "Min40", "Min45", "Min50", "Min55" }
Example:
code
body hub control
{
# Collect reports every at the top and half of the hour. Additionally collect
# reports during the evening or night at Minute 45.
hub_schedule => { "Min00", "Min30", "(Evening|Night).Min45" };
}
History:
- Introduced in version 3.1.0b1, Enterprise 2.0.0b1 (2010)
query_timeout
Description: Timeout (s) for connecting to host when querying.
Type: int
Allowed input range: (0,300)
Default value: 30
Example:
code
body hub control
{
# Configure network connection timeout when connecting to hosts
# for querying reporting data.
query_timeout => "10";
}
Notes:
This timeout is for individual connection attempts.
cf-hub will retry many times if it fails to connect.
The total time it uses for one host before giving up can be up to 10 times the configured query_timeout.
Also note that this value is passed to the underlying OS code (select()), there is no guarantee that it will wait for that long.
This parameter can also be set using the command line option, --query-timeout.
If specified in both policy and command line, the command line option takes precedence.
If one of the options (command line or policy) specifies 0, the other one is used.
If both are not specified (or 0), the default is used.
History:
- Introduced in version 3.15.0
port
Description: Default port for contacting hosts
Type: int
Allowed input range: 1024,99999
Default value: 5308
Examples:
code
body hub control
{
port => "5308";
}
body server control
{
specialhost::
port => "5308";
!specialhost::
port => "5308";
}
Notes:
The standard or registered port number is tcp/5308. CFEngine does not
presently use its registered udp port with the same number, but this could
change in the future.
Changing the standard port number is not recommended practice. You should not
do it without a good reason.
client_history_timeout
Description: If the hub can't reach a client for this many (or more) hours,
it will not collect the missed reports and it will continue collection
from current time. This is done to speed-up report collection
and minimize data transfer. The default value is 6 hours.
Type: int
Allowed input range: 1,65535
Default value: 6
Examples:
code
body hub control
{
client_history_timeout => 6;
}
History: Was introduced in version 3.6.4 and is not compatible with older CFEngine versions.
Deprecated attributes
export_zenoss
History:
- deprecated in 3.6.0
- introduced in version 3.1.0, Enterprise 2.0.0 (2010)
cf-net
cf-net can be used to send simple protocol commands to a policy server.
It is a Command-Line-Interface (CLI) to the CFEngine network protocol, and a standalone tool.
cf-net is not needed or used by any of the other binaries.
The tool can be used to send commands like GET and OPENDIR without writing policy.
It is in some ways an extremely light-weight version of cf-agent - policy evaluation is replaced with easy to use command line arguments.
Command reference
code
--help , -h - Print the help message
--manpage , -M - Print the man page
--host , -H value - Server hostnames or IPs, comma-separated (defaults to policy server)
--debug , -d - Enable debugging output
--verbose , -v - Enable verbose output
--log-level , -g value - Specify how detailed logs should be. Possible values: 'error', 'warning', 'notice', 'info', 'verbose', 'debug'
--inform , -I - Enable basic information output
--tls-version , -t value - Minimum TLS version to use
--ciphers , -c value - TLS ciphers to use (comma-separated list)
Bootstrapping and cf-key
cf-net needs a key-pair generated by cf-key to communicate with a server.
Thus, the easiest way to use cf-net is on a successfully bootstrapped client:
code
$ sudo /var/cfengine/bin/cf-key
$ sudo /var/cfengine/bin/cf-agent --bootstrap myhostname
$ sudo /var/cfengine/bin/cf-net connect
Connected & authenticated successfully to 'myhostname'
(myhostname can also be an IP address)
All three commands above are run with sudo, so they access the same key file.
cf-net commands
cf-net syntax follows the general structure:
code
$ cf-net [global options] command [command-specific options/arguments]
Note: cf-net command names are case insensitive, so cf-net get and cf-net GET are equivalent.
All other options, arguments and file names are case sensitive.
Help
Description: cf-net help is used to access help pages for cf-net.
Example:
code
$ cf-net help
Usage: cf-net [OPTIONS] command
Options:
[...]
code
$ cf-net help connect
Command: connect
Usage: cf-net -H 192.168.50.50,192.168.50.51 connect
Description: Checks if host(s) is available by connecting
Note: cf-net --help cannot be used with arguments like cf-net help.
Connect
Description: cf-net connect attempts to connect and authenticate to one or more hosts running cf-serverd.
If no hostname is specified policy_server.dat is used (this is true for all cf-net commands).
Example:
code
$ sudo /var/cfengine/bin/cf-net -H 192.168.50.50,myhostname,myhostname:5308 connect
Connected & authenticated successfully to '192.168.50.50'
Connected & authenticated successfully to 'myhostname'
Connected & authenticated successfully to 'myhostname:5308'
code
$ sudo /var/cfengine/bin/cf-net connect
Connected & authenticated successfully to 'myhostname:5308'
Stat
Description: cf-net stat is similar to UNIX stat, it gives information about a file/directory.
Example:
code
$ cf-net stat /var/cfengine/masterfiles/update.cf
myhostname:5308:'/var/cfengine/masterfiles/update.cf' is a regular file
$ cf-net stat masterfiles
myhostname:5308:'masterfiles' is a directory
code
$ cf-net -I stat masterfiles
info: Inform log level enabled
info: Detailed stat output:
mode = 40700, size = 4096,
uid = 0, gid = 0,
atime = 1495551229, mtime = 1495551172
myhostname:5308:'masterfiles' is a directory
Get
Description: Performs a stat and then get command, downloading the specified file to the current working directory.
Use the -o option to specify output path.
Example:
code
$ cf-net get masterfiles/update.cf
$ ls
cfengine update.cf
code
$ cf-net get -o test.cf masterfiles/update.cf
$ ls
cfengine test.cf update.cf
Note: The -o option must come before the remote filename:
Opendir
Description: Similar to UNIX ls, prints everything inside a directory, in no particular order.
Example:
code
$ cf-net opendir masterfiles
services
cf_promises_validated
cfe_internal
..
controls
templates
cf_promises_release_id
lib
inventory
update.cf
promises.cf
.
file control
code
body file control
{
namespace => "name1";
}
bundle agent private
{
....
}
History: Was introduced in 3.4.0, Enterprise 3.0.0 (2012)
This directive can be given multiple times within any file,
outside of body and bundle definitions.
Only soft classes from common bundles can
be used in class decisions inside file control bodies.
Description: The inputs slist contains additional filenames to parse for promises.
The filenames specified are all assumed to be relative to the directory
of the file which references them. Use an absolute file name if you need an absolute path.
Use sys.libdir (absolute library path), sys.local_libdir (library path relative to the
current masterfiles), and this.promise_dirname (the directory of the currently processed
file) to avoid hard-coding paths.
Note that in this. variables are not available in body file control or body common control
but this can be worked around with a bundle common vars promise as follows:
code
# one.cf
bundle common one
{
vars:
"inputs" slist => { "$(this.promise_dirname)/two.cf" };
}
body file control
{
inputs => { "@(one.inputs)" };
}
bundle agent main
{
methods:
"two";
}
code
# two.cf
bundle agent two
{
reports:
"hello, from $(this.promise_filename)";
}
code
$ cf-agent -KIf ./one.cf
R: hello, from /home/agent/./two.cf
See also: inputs in
body common control
History: Was introduced in CFEngine 3.6.0
namespace
Description: The namespace string identifies a private namespace
to switch to in order to protect the current file from duplicate definitions.
Type: string
Allowed input range: [a-zA-Z0-9_$(){}\[\].:]+
Example:
code
body file control
{
namespace => "name1";
}
Notes:
History: Was introduced in 3.4.0, Enterprise 3.0.0 (2012)
This directive can be given within any file, outside of body and bundle
definitions, to change the namespace of subsequent bundles
and bodies. A namespace applies until the next namespace declaration in a
file, or until the end of a file. This is similar to how class expressions
apply until the next class expression or end of bundle.
See also: namespaces
Promise types
Within a bundle, the promise types are executed in a round-robin fashion in the
following normal ordering. Which promise types are available
depends on the bundle type:
| Promise type |
common |
agent |
server |
monitor |
| defaults - a default value for bundle parameters |
x |
x |
x |
x |
| classes - a class, representing a state of the system |
x |
x |
x |
x |
| meta - information about promise bundles |
x |
x |
x |
x |
| reports - report a message |
x |
x |
x |
x |
| vars - a variable, representing a value |
x |
x |
x |
x |
| commands - execute a command |
|
x |
|
|
| databases - configure a database |
|
x |
|
|
| files - configure a file |
|
x |
|
|
| packages - install a package |
|
x |
|
|
| guest_environments |
|
x |
|
|
| methods - take on a whole bundle of other promises |
|
x |
|
|
| processes - start or terminate processes |
|
x |
|
|
| services - manage services or define new abstractions |
|
x |
|
|
| storage - verify attached storage |
|
x |
|
|
| users - add or remove users |
|
x |
|
|
| access - grant or deny access to file objects |
|
|
x |
|
| roles - allow certain users to activate certain classes |
|
|
x |
|
| measurements - measure or sample data from the system |
|
|
|
x |
See each promise type's reference documentation for detailed lists of available
attributes.
Common promise attributes
The following attributes are available to all promise types.
action
Type: body action
The action settings allow general transaction control to be implemented on
promise verification. Action bodies place limits on how often to verify the
promise and what classes to raise in the case that the promise can or cannot be
kept.
action_policy
Description: Determines whether to repair or report about non-kept promises
Type: (menu option)
Allowed input range:
fix makes changes to move toward the desired statewarn does not make changes, emits a warning level log message about non-compliance, raise repair_failed (not-kept)nop alias for warn
Default value: fix
Example:
Policy:
code
body file control
{
# Include the stdlib for local_dcp, policy, delete_lines
inputs => { "$(sys.libdir)/stdlib.cf" };
}
bundle agent example_action_policy
{
files:
# We make sure there is some files to operate on, so we simply make a copy
# of ourselves
"$(this.promise_filename).nop"
copy_from => local_dcp( $(this.promise_filename) );
"$(this.promise_filename).warn"
copy_from => local_dcp( $(this.promise_filename) );
"$(this.promise_filename).fix"
copy_from => local_dcp( $(this.promise_filename) );
# We exercise each valid value of action_policy (nop, fix, warn) defining
# classes named for the action_policy
"$(this.promise_filename).nop"
handle => "delete_lines_action_nop",
edit_line => delete_lines_matching ( ".*" ),
action => policy( "nop" ),
classes => results( "namespace", "MY_files_promise_nop" );
"$(this.promise_filename).warn"
handle => "delete_lines_action_warn",
edit_line => delete_lines_matching ( ".*" ),
action => policy( "warn" ),
classes => results( "namespace", "MY_files_promise_warn" );
"$(this.promise_filename).fix"
handle => "delete_lines_action_fix",
edit_line => delete_lines_matching ( ".*" ),
action => policy( "fix" ),
classes => results( "namespace", "MY_files_promise_fix" );
commands:
"/bin/echo Running Command nop"
handle => "command_nop",
action => policy( "nop" ),
classes => results( "namespace", "MY_commands_promise_nop" );
"/bin/echo Running Command warn"
handle => "command_warn",
action => policy( "warn" ),
classes => results( "namespace", "MY_commands_promise_warn" );
"/bin/echo Running Command fix"
handle => "command_fix",
action => policy( "fix" ),
classes => results( "namespace", "MY_commands_promise_fix" );
reports:
"MY classes:$(const.n)$(const.t)$(with)"
with => join( "$(const.n)$(const.t)", sort( classesmatching( "MY_.*" ), "lex" ));
}
bundle agent __main__
{
methods:
"example_action_policy";
}
This policy can be found in
/var/cfengine/share/doc/examples/action_policy.cf
and downloaded directly from
github.
Output:
code
warning: Should edit file '/tmp/action_policy.cf.nop' but only a warning promised
warning: Should edit file '/tmp/action_policy.cf.warn' but only a warning promised
warning: Command '/bin/echo Running Command nop' needs to be executed, but only warning was promised
warning: Command '/bin/echo Running Command warn' needs to be executed, but only warning was promised
R: MY classes:
MY_commands_promise_fix_reached
MY_commands_promise_fix_repaired
MY_commands_promise_nop_error
MY_commands_promise_nop_failed
MY_commands_promise_nop_not_kept
MY_commands_promise_nop_reached
MY_commands_promise_warn_error
MY_commands_promise_warn_failed
MY_commands_promise_warn_not_kept
MY_commands_promise_warn_reached
MY_files_promise_fix_reached
MY_files_promise_fix_repaired
MY_files_promise_nop_error
MY_files_promise_nop_failed
MY_files_promise_nop_not_kept
MY_files_promise_nop_reached
MY_files_promise_warn_error
MY_files_promise_warn_failed
MY_files_promise_warn_not_kept
MY_files_promise_warn_reached
warning: Method 'example_action_policy' invoked repairs, but only warnings promised
ifelapsed
Description: The number of minutes before next allowed assessment of a
promise is set using ifelapsed. This overrides the global settings. Promises
which take a long time to verify should usually be protected with a long value
for this parameter.
This serves as a resource 'spam' protection. A CFEngine check could easily run
every 5 minutes provided resource intensive operations are not performed on
every run. Using time classes such as Hr12 is one part of this strategy;
using ifelapsed is another, which is not tied to a specific time.
ifelapsed => "0" disables function caching
for the specific promise it's attached to.
Type: int
Allowed input range: 0,99999999999
Default value: body agent control ifelapsed value
Example:
code
body action example
{
ifelapsed => "120"; # 2 hours
expireafter => "240"; # 4 hours
}
Notes:
- This is not a reliable way to control frequency over a long period of time.
- Locks provide simple but weak frequency control.
- Locks older than 4 weeks are automatically purged.
See also: promise locking, ifelapsed in body agent control, ifelapsed and function caching
History:
ifelapsed => "0" disables function caching for specific promise introduced in 3.19.0, 3.18.1
expireafter
Description: The Number of minutes a promise is allowed to run before the
agent is terminated.
Note: Not to be confused
with body contain exec_timeout in commands type
promises, the original agent does not terminate the promise. When a
subsequent agent notices that a promise actuation has persisted for longer than
expireafter the subsequent agent will kill the agent that appears to be stuck
on the long running promise.
Type: int
Allowed input range: 0,99999999999
Default value: control body value
Example:
code
body action example
{
ifelapsed => "120"; # 2 hours
expireafter => "240"; # 4 hours
}
See also: body contain exec_timeout, body agent control expireafter, body executor control agent_expireafter
log_string
Description: The message to be written to the log when a promise
verification leads to a repair.
The log_string works together with log_kept, log_repaired, and
log_failed to define a string for logging to one of the named files depending
on promise outcome, or to standard output if the log file is stipulated as
stdout. Log strings on standard output are denoted by an L: prefix.
Note that log_string does not interact with log_level, which is about
regular system output messages.
Type: string
Allowed input range: (arbitrary string)
Example:
code
promise-type:
"promiser"
attr => "value",
action => log_me("checked $(this.promiser) in promise $(this.handle)");
# ..
body action log_me(s)
{
log_string => "$(s)";
}
Hint: The promise handle $(this.handle) can be a
useful referent in a log message, indicating the origin of the message. In
CFEngine Enterprise, promise handles make it easy to interpret report data.
log_kept
log_repaired
log_failed
Description: The names of files to which log_string will be saved
for kept, repaired and failed promises.
When used together with log_string, the current promise will log its status
using the log string to the respective file.
If these log names are absent, the default logging destination for the log
string is syslog, but only for non-kept promises. Only the log_string is
affected by this setting. Other messages destined for logging are sent to
syslog.
Type: string
Allowed input range: stdout|udp_syslog|("?[a-zA-Z]:\\.*)|(/.*)
This string should be the full path to a text file which will contain the log,
or one of the following special values:
Send the log message to the standard output, prefixed with an L: to indicate a
log message.
Log messages to syslog_host as
defined in body common control over UDP. Please note
UDP is unreliable.
Example:
code
bundle agent test
{
vars:
"software" slist => { "/root/xyz", "/tmp/xyz" };
files:
"$(software)"
create => "true",
action => logme("$(software)");
}
body action logme(x)
{
log_kept => "/tmp/private_keptlog.log";
log_failed => "/tmp/private_faillog.log";
log_repaired => "/tmp/private_replog.log";
log_string => "$(sys.date) $(x) promise status";
}
body action immediate_syslog(x)
{
log_repaired => "udp_syslog";
log_string => "CFEngine repaired promise $(this.handle) - $(x)";
}
It is intended that named file logs should be different for the three cases:
promise kept, promise not kept and promise repaired.
log_level
Description: Describes the reporting level sent to syslog.
Use this as an alternative to auditing if you wish to use the syslog mechanism
to centralize or manage messaging from CFEngine. A backup of these messages
will still be kept in WORKDIR/outputs if you are using cf-execd.
On the native Windows version of CFEngine Enterprise, using verbose will
include a message when the promise is kept or repaired in the event log.
Type: (menu option)
Allowed input range:
code
inform
verbose
error
log
Example:
code
body action example
{
log_level => "inform";
}
Note: This attribute can not make the logging for an individual promise less
verbose than specified by an agent option ( -v, --verbose, -I, --inform,
-d, --debug ).
log_priority
Type: (menu option)
Allowed input range:
code
emergency
alert
critical
error
warning
notice
info
debug
Description: The log_priority menu option policy is the priority level
of the log message, as interpreted by a syslog server. It determines the
importance of messages from CFEngine.
Example:
code
body action low_priority
{
log_priority => "info";
}
value_kept
Deprecated: This menu option policy is deprecated as of 3.6.0. It performs
no action and is kept for backward compatibility.
value_repaired
Deprecated: This menu option policy is deprecated as of 3.6.0. It performs
no action and is kept for backward compatibility.
value_notkept
Deprecated: This menu option policy is deprecated as of 3.6.0. It performs
no action and is kept for backward compatibility.
audit
Deprecated: This menu option policy is deprecated as of 3.6.0. It performs
no action and is kept for backward compatibility.
background
Description: A true/false switch for parallelizing the promise repair.
If possible, perform the verification of the current promise in the background (up to max_children in body agent control).
This is advantageous only if the verification might take a significant amount
of time, e.g. in remote copying of filesystem/disk scans.
On the Windows version of CFEngine Enterprise, this can be useful if we don't
want to wait for a particular command to finish execution before checking the
next promise. This is particular for the Windows platform because there is
no way that a program can start itself in the background here; in other words,
fork off a child process. However, file operations can not be performed in the
background on Windows.
Type: boolean
Default value: false
Example:
code
bundle agent main
{
commands:
"/bin/sleep 10"
action => background;
"/bin/sleep"
args => "20",
action => background;
}
body action background
{
background => "true";
}
See also: max_children in body agent control
report_level
Description: Defines the reporting level for standard output for this promise.
cf-agent can be run in verbose mode (-v), inform mode (-I) and just print
errors (no arguments). This attribute allows to set these three output levels
on a per promise basis, allowing the promise to be more verbose than the global
setting (but not less).
Type: (menu option)
Allowed input range:
code
inform
verbose
error
log
Default value: none
Example:
code
body action example
{
report_level => "verbose";
}
measurement_class
Description: If set, performance will be measured and recorded under this
identifier.
By setting this string you switch on performance measurement for the current
promise, and also give the measurement a name.
Type: string
Allowed input range: (arbitrary string)
Example:
code
body action measure
{
measurement_class => "$(this.promiser) long job scan of /usr";
}
The identifier forms a partial identity for optional performance scanning of
promises of the form:
code
ID:promise-type:promiser.
classes
Type: body classes
scope
Description: Scope of the class set by this body.
Type: (menu option)
Allowed input range:
Default value: namespace
Example:
code
body classes bundle_class
{
scope => "bundle";
promise_kept => { "bundle_context" };
}
History: This attribute was introduced in CFEngine 3.5
See also: scope in classes promises
promise_repaired
Description: Classes to be defined globally if the promise was 'repaired'.
If the classes are set, a corrective action had to be taken to keep the
promise.
Type: slist
Allowed input range: [a-zA-Z0-9_$(){}\[\].:]+
Note that any strings passed to this list are automatically canonified, so it
is unnecessary to call a canonify function on such inputs.
Example:
code
body classes example
{
promise_repaired => { "change_happened" };
}
Important: Complex promises can report misleadingly; for example, files
promises that set multiple parameters on a file simultaneously.
The classes for different parts of a promise are not separable. Thus, if you
promise to create and file and change its permissions, when the file exists
with incorrect permissions, cf-agent will report that the promise_kept for
the file existence, but promise_repaired for the permissions. If you need
separate reports, you should code two separate promises rather than
'overloading' a single one.
repair_failed
Description: Classes to be defined globally if the promise could not be
kept.
If the classes are set, the corrective action to keep the promise failed for
some reason.
Type: slist
Allowed input range: [a-zA-Z0-9_$(){}\[\].:]+
Note that any strings passed to this list are automatically canonified, so it
is unnecessary to call a canonify function on such inputs.
Example:
code
body classes example
{
repair_failed => { "unknown_error" };
}
repair_denied
Description: Classes to be defined globally if the promise could not be
repaired due to denied access to required resources.
Type: slist
Allowed input range: [a-zA-Z0-9_$(){}\[\].:]+
Note that any strings passed to this list are automatically canonified, so it
is unnecessary to call a canonify function on such inputs.
Example:
code
body classes example
{
repair_denied => { "permission_failure" };
}
In the above example, a promise could not be kept because access to a key
resource was denied.
repair_timeout
Description: Classes to be defined globally if the promise could not be
repaired due to timeout.
Type: slist
Allowed input range: [a-zA-Z0-9_$(){}\[\].:]+
Note that any strings passed to this list are automatically canonified, so it
is unnecessary to call a canonify function on such inputs.
Example:
code
body classes example
{
repair_timeout => { "too_slow", "did_not_wait" };
}
In the above example, a promise maintenance repair timed-out waiting for some
dependent resource.
promise_kept
Description: Classes to be defined globally if the promise was kept without
any corrective action.
Type: slist
Allowed input range: [a-zA-Z0-9_$(){}\[\].:]+
Note that any strings passed to this list are automatically canonified, so it
is unnecessary to call a canonify function on such inputs.
Example:
code
body classes example
{
promise_kept => { "success", "kaplah" };
}
The class in the above example is set if no action was necessary by cf-agent,
because the promise concerned was already kept without further action required.
Note: Complex promises can report misleadingly. For example,
filespromises that set multiple parameters on a file simultaneously.
The classes for different parts of a promise are not separable. Thus, if you
promise to create and file and change its permissions, when the file exists
with incorrect permissions, cf-agent will report that the promise_kept for
the file existence, but promise_repaired for the permissions. If you need
separate reports, you should code two separate promises rather than
'overloading' a single one.
cancel_kept
Description: Classes to be canceled if the promise is kept.
Type: slist
Allowed input range: [a-zA-Z0-9_$(){}\[\].:]+
Note that any strings passed to this list are automatically canonified, so it
is unnecessary to call a canonify function on such inputs.
Example:
code
body classes example
{
cancel_kept => { "success", "kaplah" };
}
In the above example, if the promise was already kept and nothing was done,
cancel (undefine) any of the listed classes so that they are no longer defined.
Notes:
- Hard classes can not be undefined. If you try to undefine or cancel a hard
class an error will be emitted, for example
error: You cannot cancel a
reserved hard class 'cfengine' in post-condition classes.
History: This attribute was introduced in CFEngine version 3.0.4 (2010)
cancel_repaired
Description: Classes to be canceled if the promise is repaired.
Type: slist
Allowed input range: [a-zA-Z0-9_$(){}\[\].:]+
Note that any strings passed to this list are automatically canonified, so
it is unnecessary to call a canonify function on such inputs.
Example:
code
body classes example
{
cancel_repaired => { "change_happened" };
}
In the above example, if the promise was repaired and changes were made to the
system, cancel (undefine) any of the listed classes so that they are no longer
defined.
Notes:
- Hard classes can not be undefined. If you try to undefine or cancel a hard
class an error will be emitted, for example
error: You cannot cancel a
reserved hard class 'cfengine' in post-condition classes.
History: This attribute was introduced in CFEngine version 3.0.4 (2010)
cancel_notkept
Description: Classes to be canceled if the promise is not kept for any
reason.
Type: slist
Allowed input range: [a-zA-Z0-9_$(){}\[\].:]+
Note that any strings passed to this list are automatically canonified, so
it is unnecessary to call a canonify function on such inputs.
Example:
code
body classes example
{
cancel_notkept => { "failure" };
}
In the above example, if the promise was not kept but nothing could be done,
cancel (undefine) any of the listed classes so that they are no longer
defined.
Notes:
- Hard classes can not be undefined. If you try to undefine or cancel a hard
class an error will be emitted, for example
error: You cannot cancel a
reserved hard class 'cfengine' in post-condition classes.
History: This attribute was introduced in CFEngine version 3.0.4 (2010)
kept_returncodes
Description: Return codes that indicate a kept commands promise.
Currently, the attribute has impact on the following command-related promises:
- All promises of type
commands:
files-promises containing a transformer-attribute- The package manager change command in
packages-promises (e.g. the command
for add, remove, etc.)
If none of the attributes kept_returncodes, repaired_returncodes, or
failed_returncodes are set, the default is to consider a return code zero as
promise repaired, and nonzero as promise failed.
Type: slist
Allowed input range: [-0-9_$(){}\[\].]+
Note that the return codes may overlap, so multiple classes may be set from one
return code. In Unix systems the possible return codes are usually in the range
from 0 to 255.
Example:
code
bundle agent cmdtest
{
commands:
"/bin/false"
classes => example;
reports:
waskept::
"The command-promise was kept!";
}
body classes example
{
kept_returncodes => { "0", "1" };
promise_kept => { "waskept" };
}
In the above example, a list of integer return codes indicates that a
command-related promise has been kept. This can in turn be used to define
classes using the promise_kept attribute, or merely alter the total
compliance statistics.
History: Was introduced in version 3.1.3, Nova 2.0.2 (2010)
repaired_returncodes
Description: Return codes that indicate a repaired commands promise
Currently, the attribute has impact on the following command-related promises:
- All promises of type
commands:
files-promises containing a transformer-attribute- The package manager change command in
packages-promises (e.g. the command
for add, remove, etc.)
If none of the attributes kept_returncodes, repaired_returncodes, or
failed_returncodes are set, the default is to consider a return code zero as
promise repaired, and nonzero as promise failed.
Type: slist
Allowed input range: [-0-9_$(){}\[\].]+
Note that the return codes may overlap, so multiple classes may be set from one
return code. In Unix systems the possible return codes are usually in the range
from 0 to 255.
Example:
code
bundle agent cmdtest
{
commands:
"/bin/false"
classes => example;
reports:
wasrepaired::
"The command-promise got repaired!";
}
body classes example
{
repaired_returncodes => { "0", "1" };
promise_repaired => { "wasrepaired" };
}
In the above example, a list of integer return codes indicating that a
command-related promise has been repaired. This can in turn be used to define
classes using the promise_repaired attribute, or merely alter the total
compliance statistics.
History: Was introduced in version 3.1.3, Nova 2.0.2 (2010)
failed_returncodes
Description: A failed_returncodes slist contains return codes indicating
a failed command-related promise.
Currently, the attribute has impact on the following command-related promises:
- All promises of type
commands:
files-promises containing a transformer-attribute- The package manager change command in
packages-promises (e.g. the command
for add, remove, etc.)
If none of the attributes kept_returncodes, repaired_returncodes, or
failed_returncodes are set, the default is to consider a return code zero as
promise repaired, and nonzero as promise failed.
Type: slist
Allowed input range: [-0-9_$(){}\[\].]+
Note that the return codes may overlap, so multiple classes may be set from one
return code. In Unix systems the possible return codes are usually in the range
from 0 to 255.
Example:
code
body common control
{
bundlesequence => { "cmdtest" };
}
bundle agent cmdtest
{
files:
"/tmp/test"
copy_from => copy("/etc/passwd");
"/tmp/test"
classes => example,
transformer => "/bin/grep -q lkajfo999999 $(this.promiser)";
reports:
hasfailed::
"The files-promise failed!";
}
body classes example
{
failed_returncodes => { "1" };
repair_failed => { "hasfailed" };
}
body copy_from copy(file)
{
source => "$(file)";
}
The above example contains a list of integer return codes indicating that a
command-related promise has failed. This can in turn be used to define classes
using the promise_repaired attribute, or merely alter the total compliance
statistics.
History: Was introduced in version 3.1.3, Nova 2.0.2 (2010)
persist_time
Description: The number of minutes the specified classes should remain
active.
By default classes are ephemeral entities that disappear when cf-agent
terminates. By setting a persistence time, they can last even when the agent is
not running. When a persistent class is activated it gets scope namespace.
Type: int
Allowed input range: 0,99999999999
Example:
code
body classes example
{
persist_time => "10";
}
See also: persistance classes attribute, persist_time in classes body
timer_policy
Description: Determines whether a persistent class restarts its counter
when rediscovered.
In most cases resetting a timer will give a more honest appraisal of which
classes are currently important, but if we want to activate a response of
limited duration as a rare event then an absolute time limit is useful.
Type: (menu option)
Allowed input range:
Default value: reset
Example:
code
body classes example
{
timer_policy => "reset";
}
Description: Describes the real intention of the promise.
Comments written in code follow the program, they are not merely discarded;
they appear in verbose logs and error messages.
Type: string
Allowed input range: (arbitrary string)
Example:
code
comment => "This comment follows the data for reference ...",
depends_on
Description: A list of promise handles for promises that must have an outcome of KEPT or REPAIRED in order for the promise to be actuated.
This is a list of promise handles for whom this promise is a promisee. In other
words, we acknowledge that this promise will be affected by the list of
promises whose handles are specified. It has the effect of partially ordering
promises.
As of version 3.4.0, this feature may be considered short-hand for setting
classes. If one promise depends on a list of others, it will not be verified
unless the dependent promises have already been verified and kept: in other
words, as long as the dependent promises are either kept or repaired the
dependee can be verified.
Handles in other namespaces may be referred to by namespace:handle.
Type: slist
Allowed input range: (arbitrary string)
Example:
code
body common control
{
bundlesequence => { "one" };
}
bundle agent one
{
reports:
"two"
depends_on => { "handle_one" };
"one"
handle => "handle_one";
}
This policy can be found in
/var/cfengine/share/doc/examples/depends_on.cf
and downloaded directly from
github.
handle
Description: A unique id-tag string for referring to this as a promisee
elsewhere.
A promise handle allows you to refer to a promise as the promisee of
depends_on client of another promise. Handles are essential for mapping
dependencies and performing impact analyses.
Type: string
Allowed input range: (arbitrary string)
Handles may consist of regular identifier characters. If the handle is likely to
contain non-identifier characters, you can use canonify() to turn them into
such characters.
Example:
code
access:
"/source"
handle => "update_rule",
admit => { "127.0.0.1" };
Notes: If the handle name is based on a variable, and the variable
fails to expand, the handle will be based on the name of the variable
rather than its content.
if
Description: Class expression to further restrict the promise context.
Previously called ifvarclass.
This is an additional class expression that will be evaluated after the
class:: classes have selected promises. It is provided in order to enable a
channel between variables and classes.
The result is thus the logical AND of the ordinary classes and the variable
classes.
Type: string
Allowed input range: (arbitrary string)
Example:
The generic example has the form:
code
promise-type:
"promiser"
if => "$(program)_running|($(program)_notfoundHr12)";
A specific example would be:
code
bundle agent example
{
commands:
any::
"/bin/echo This is linux"
if => "linux";
"/bin/echo This is solaris"
if => "solaris";
}
This function is provided so that one can form expressions that link variables
and classes. For example:
code
# Check that all components are running
vars:
"component" slist => { "cf-monitord", "cf-serverd" };
processes:
"$(component)" restart_class => canonify("$(component)_not_runnning");
commands:
"/var/cfengine/bin/$(component)"
if => canonify("$(component)_not_runnning");
Notes:
While strings are automatically canonified during class definition, they are not
automatically canonified when checking. You may need to use canonify() to
convert strings containing invalid class characters into a valid class.
In most cases, if => something and if => not(something) are opposite,
but because of function skipping, both of these
will be skipped if something is never resolved:
code
bundle agent main
{
classes:
"a" if => "$(no_such_var)"; # Will be skipped
"b" if => not("$(no_such_var)"); # Will be skipped
}
If you need a condition which defaults to not skipping in the cases above,
unless does this; for any expression where if will skip, unless will not
skip.
if and unless both make choices about whether to skip a promise. Both
if and unless can force a promise to be skipped - if a promise has both
if and unless constraints, skipping takes precedence.
History: In 3.7.0 if was introduced as a shorthand for ifvarclass (and
unless as an opposite).
ifvarclass
Description: Deprecated, use if instead.
History: New name if was introduced in 3.7.0, ifvarclass deprecated in 3.17.0.
Description: A list of strings to be associated with the promise for knowledge management purposes.
The strings are usually called "meta tags" or simply "tags."
Any promise (of any type) can be given a "meta" attribute.
Since the right hand side for this attribute is an slist, multiple strings (tags) can be associated with the same promise.
Note that the inventory reporting of CFEngine Enterprise 3.6 and later uses the meta attributes inventory and attribute_name=, so these should be considered reserved for this purpose.
A "meta" attribute can likewise be added into any body (of any type).
Type: slist
Allowed input range: (arbitrary string list)
Example:
code
files:
"/etc/special_file"
comment => "Special file is a requirement. Talk to John.",
create => "true",
meta => { "owner=John", "version=2.0", "ticket=CFE-1234" };
Another example:
code
some_promise_type:
any::
"my_promiser"
meta => { "Team Foo", "workaround", "non-critical" };
The meta tags may be referred to programmatically in various ways, or may be solely for human consumption.
Meta tags on vars promises and classes promises are particularly suited for programmatic interpretation;
meta tags on other promise types (or in bodies) are more likely to be intended only for human consumption.
Relevant CFEngine functions are:
classesmatching(), classmatch(), countclassesmatching(), getclassmetatags(), getvariablemetatags(), variablesmatching(), variablesmatching_as_data().
Also see meta promises: While "meta" attribute can be added to a promise of any type, there can also be promises of promise type "meta" added to any bundle.
If mention is made of "tags" on a bundle, what is actually meant is meta promises in that bundle.
(This is just a terminology point.)
Note: When a variable is re-defined the associated meta tags are also re-defined.
History: Was introduced in 3.3.0, Nova 2.2.0 (2012)
unless
Description: Class expression to further restrict the promise context. This
is exactly like if but logically inverted; see its description
for details. For any case where if would skip the promise, unless should
evaluate the promise.
Type: string
Allowed input range: (arbitrary string)
Example:
The generic example has the form:
code
promise-type:
"promiser"
unless => "forbidden";
A specific example would be:
code
bundle agent example
{
commands:
any::
"/bin/echo This is NOT linux"
unless => "linux";
}
Notes:
While strings are automatically canonified during class definition, they are not
automatically canonified when checking. You may need to use canonify() to
convert strings containing invalid class characters into a valid class.
if and unless both make choices about whether to skip a promise. Both
if and unless can force a promise to be skipped - if a promise has both
if and unless constraints, skipping takes precedence.
unless will skip a promise, only if the class expression is evaluated to
false. If the class expression is true, or not evaluated (because of
unexpanded variables, or unresolved function calls) it will not cause the
promise to be skipped. Since if defaults to skipping in those cases,
unless defaults to not skipping.
code
bundle agent main
{
classes:
"a" if => "any"; # Will be evaluated
"b" unless => "any"; # Will be skipped
"c" if => "$(no_such_var)"; # Will be skipped
"d" unless => "$(no_such_var)"; # Will be evaluated
}
History: Was introduced in 3.7.0.
with
Description: Reusable promise attribute to avoid repetition.
Very often, it's handy to refer to a single value in many places in a promise,
especially in the promiser. Especially when iterating over a list, the with
attribute can save you a lot of work and code.
Another use of the with attribute is when in reports you want to use
format() or other functions that produce lots of text, but don't want to
create an intermediate variable.
Another common use of with is to avoid canonifying a value. In that case,
you'd use with => canonify("the value") so you don't have to create a
"canonification" array.
Type: string
Allowed input range: (arbitrary string)
Example:
code
bundle agent main
{
vars:
"todo" slist => { "a 1", "b 2", "c 3" };
# Here, `with` is the canonified version of $(todo), letting us avoid an
# intermediate canonification array.
"$(with)" string => "$(todo)", with => canonify($(todo));
"complex" data => '
{
"x": 200,
"y": [ 1, 2, null, true, false ]
}
';
reports:
"For iterable '$(todo)' we created variable '$(with)' and its value is '$(todo)'"
with => canonify($(todo));
"We can print a data container compactly without creating a temporary variable: $(with)"
with => format("%S", complex);
"We can print a data container fully without creating a temporary variable: $(with)"
with => storejson(complex);
}
Output:
code
R: For iterable 'a 1' we created variable 'a_1' and its value is 'a 1'
R: For iterable 'b 2' we created variable 'b_2' and its value is 'b 2'
R: For iterable 'c 3' we created variable 'c_3' and its value is 'c 3'
R: We can print a data container compactly without creating a temporary variable: {"x":200,"y":[1,2,null,true,false]}
R: We can print a data container fully without creating a temporary variable: {
"x": 200,
"y": [
1,
2,
null,
true,
false
]
}
History: Was introduced in 3.11.0
Common body attributes
The following attributes are available to all body types.
inherit_from
Description: Inherits all attributes from another body of the same
type as a function call. For a detailed description, see
Bodies.
Type: fncall
Allowed input range: (arbitrary body invocation)
Examples:
code
bundle agent __main__
{
files:
"$(this.promise_filename).txt"
content => "Hello World$(const.n)2$(const.n)3$(const.n)4$(const.n)half-way
6$(const.n)7$(const.n)8$(const.n)9$(const.n)Byeeeeeee",
create => "true";
reports:
"The first 3 lines of this file are:"
printfile => head_n( "$(this.promise_filename).txt", "3" );
"The whole file contains:"
printfile => cat( "$(this.promise_filename).txt" );
}
body printfile head_n(file, lines)
{
# Sets file_to_print the same as cat
inherit_from => cat( $(file) );
# Overrides number_of_lines from cat
number_of_lines => "$(lines)";
}
body printfile cat(file)
{
file_to_print => "$(file)";
number_of_lines => "inf";
}
code
R: The first 3 lines of this file are:
R: Hello World
R: 2
R: 3
R: The whole file contains:
R: Hello World
R: 2
R: 3
R: 4
R: half-way
R: 6
R: 7
R: 8
R: 9
R: Byeeeeeee
This policy can be found in
/var/cfengine/share/doc/examples/inherit_from.cf
and downloaded directly from
github.
code
bundle agent __main__
{
commands:
"/bin/true"
handle => "some meaningful string",
classes => my_set_some_extra_fancy_classes( "$(this.promiser)",
"$(this.handle)",
"some_class_to_handle_dependencies" );
"/bin/false"
handle => "some meaningless string",
classes => my_set_some_extra_fancy_classes( "$(this.promiser)",
"$(this.handle)",
"some_class_to_handle_dependencies" );
reports:
"Defined classes:$(const.n)$(with)"
with => join( "$(const.n)", sort( classesmatching( "some_.*"), "lex" ));
}
body classes my_set_some_extra_fancy_classes(x, y, z)
{
inherit_from => set_some_fancy_classes( $(x), $(y) );
promise_repaired => { "some_fancy_class_${x}_${y}_repaired", $(z) };
}
body classes set_some_fancy_classes(x, y)
{
promise_kept => { "some_fancy_class_${x}_${y}_kept" };
promise_repaired => { "some_fancy_class_${x}_${y}_repaired" };
repair_failed => { "some_fancy_class_${x}_${y}_notkept" };
repair_denied => { "some_fancy_class_${x}_${y}_notkept" };
repair_timeout => { "some_fancy_class_${x}_${y}_notkept" };
}
code
error: Finished command related to promiser '/bin/false' -- an error occurred, returned 1
R: Defined classes:
some_class_to_handle_dependencies
some_fancy_class__bin_false_some_meaningless_string_notkept
some_fancy_class__bin_true_some_meaningful_string_repaired
This policy can be found in
/var/cfengine/share/doc/examples/inherit_from_classes.cf
and downloaded directly from
github.
History: Was introduced in 3.8.0.
Description: A list of strings to be associated with the body for knowledge management purposes.
The strings are usually called "meta tags" or simply "tags."
Any body can be given a "meta" attribute.
Since the right hand side for this attribute is an slist, multiple strings (tags) can be associated with the same body.
Type: slist
Allowed input range: (arbitrary string list)
Example:
code
body ANYTYPE mybody
{
meta => { "deprecated" , "CFE-1234", "CVE-2020-1234" };
}
Note: When a variable is re-defined the associated meta tags are also re-defined.
History: Was introduced in 3.7.0.
access
Access promises are conditional promises made by resources living on the server.
The promiser is the name of the resource affected and is interpreted to be a path, unless a
different resource_type is specified. Access is then granted to hosts listed in admit_ips,
admit_keys and admit_hostnames, or denied using the counterparts deny_ips, deny_keys
and deny_hostnames.
You layer the access policy by denying all access and then allowing it
only to selected clients, then denying to an even more restricted set.
code
bundle server my_access_rules()
{
access:
"/source/directory"
comment => "Access to file transfer",
admit_ips => { "192.168.0.1/24" };
}
For file copy requests, the file becomes transferable to the remote client according to the
conditions specified in the access promise. Use ifencrypted to grant access only if the
transfer is encrypted in the "classic" CFEngine protocol (the TLS protocol is always encrypted).
When access is granted to a directory, the promise is automatically
made about all of its contents and sub-directories.
Use the maproot attribute (like its NFS counterpart) to control
which hosts can see file objects not owned by the server process
owner.
File resources are specified using an absolute filepath, but can set a shortcut through
which clients can access the resource using a logical name, without having any detailed
knowledge of the filesystem layout on the server. Specifically in access promises about
files, a special variable context connection is available with variables ip, key
and hostname, containing information about the connection through which access is attempted.
code
"/var/cfengine/cmdb/$(connection.key).json"
shortcut => "me.json",
admit_keys => { "$(connection.key)" };
In this example, requesting the file me.json will transfer the file stored on the
server under the name /var/cfengine/cmdb/SHA=....json to the requesting host,
where it will be received as me.json.
Note that the usage of the $(connection.*) variables is strictly
limited to literal strings within the promiser and admit/deny lists; they cannot be
passed to functions or stored in other variables.
With CFEngine Enteprise, access promises can be made about additional query data for
reporting and orchestration.
code
# Grant orchestration communication
"did.*"
comment => "Access to class context (enterprise)",
resource_type => "context",
admit_ips => { "127.0.0.1" };
"value of my test_scalar, can expand variables here - $(sys.host)"
comment => "Grant access to the string in quotes, by name test_scalar",
handle => "test_scalar",
resource_type => "literal",
admit_ips => { "127.0.0.1" };
"XYZ"
comment => "Grant access to contents of persistent scalar variable XYZ",
resource_type => "variable",
admit_ips => { "127.0.0.1" };
# Client grants access to CFEngine hub access
"delta"
comment => "Grant access to cfengine hub to collect report deltas",
resource_type => "query",
report_data_select => default_data_select_host,
admit_ips => { "127.0.0.1" };
"full"
comment => "Grant access to cfengine hub to collect full report dump",
resource_type => "query",
report_data_select => default_data_select_host,
admit_ips => { "127.0.0.1" };
policy_server::
"collect_calls"
comment => "Grant access to cfengine client to request the collection of its reports",
resource_type => "query",
admit_ips => { "10.1.2.0/24" };
}
Using the built-in report_data_select body default_data_select_host:
code
report_data_select => default_data_select_host,
admit => { @(def.policy_servers) };
policy_server.enterprise::
"$(query_types)"
handle => "report_access_grant_$(query_types)_for_hub",
comment => "Grant $(query_types) reporting query for the hub on the policy server",
resource_type => "query",
report_data_select => default_data_select_policy_hub,
admit => { "127.0.0.1", "::1", @(def.policy_servers) };
}
The access promise allows overlapping promises to be made, and these are kept on a
first-come-first-served basis. Thus file objects (promisers) should be
listed in order of most-specific file first. In this way, specific
promises will override less specific ones.
Attributes
admit_hostnames
Description: A list of hostnames or domains that should have access to the object.
Type: slist
Allowed input range: (arbitrary string)
Note: The host trying to access the object is identified using a
reverse DNS lookup on the connecting IP. This introduces latency for
every incoming connection. If possible, avoid this penalty by
leaving admit_hostnames empty and only specifying numeric addresses
and subnets in admit_ips.
To admit an entire domain, start the string with a dot .. This
includes every hostname ending with the domain, but not a machine
named after the domain itself.
For example, here we'll admit the entire domain .cfengine.com and
the host www.cfengine3.com. A machine named cfengine.com would be
refused access because it's not in the cfengine.com domain.
code
access:
"/path/file"
admit_hostnames => {
".cfengine.com",
"www.cfengine3.com"
};
See also: deny_hostnames, admit_ips, admit_keys
History: Introduced in CFEngine 3.6.0
admit_ips
Description: A list of IP addresses that should have access to the object.
Subnets are specified using CIDR notation. For example, here we'll
admit one host, then a subnet, then everyone:
code
access:
"/path/file"
admit_ips => {"192.168.0.1", "192.168.0.0/24", "0.0.0.0/0"};
Type: slist
Allowed input range: (arbitrary string)
See also: deny_ips, admit_hostnames, admit_keys
History: Introduced in CFEngine 3.6.0
admit_keys
Description: A list of RSA keys of hosts that should have access to the object.
For example, here we'll admit the fictitious SHA key abcdef:
code
access:
"/path/file"
admit_keys => {"SHA=abcdef"};
In Community, MD5 keys are used, so similarly we can admit the
fictitious MD5 key abcdef:
code
access:
"/path/file"
admit_keys => {"MD5=abcdef"};
Type: slist
Allowed input range: (arbitrary string)
See also: deny_keys, admit_hostnames, admit_ips, copyfrom_restrict_keys
History: Introduced in CFEngine 3.6.0
deny_hostnames
Description: A list of hostnames that should be denied access to the object.
This overrides the grants in admit_hostnames, admit_ips and admit_keys.
To deny an entire domain, start the string with a dot .. This
includes every hostname ending with the domain, but not a machine
named after the domain itself.
For example, here we'll deny the entire domain .cfengine.com and the
host www.cfengine3.com. A machine named cfengine.com would be
allowed access (unless it's denied by other promises) because it's not
in the cfengine.com domain.
code
access:
"/path/file"
deny_hostnames => { ".cfengine.com", "www.cfengine3.com" };
Type: slist
Allowed input range: (arbitrary string)
Notes: Failure to resolve a hostname or it's reverse results in a denial.
Since this control is sensitive to temporary DNS failures, and cases, where
reverse DNS is not present, it should be used with extreme scrutiny.
See also: admit_hostnames, deny_ips, deny_keys
History: Introduced in CFEngine 3.6.0
deny_ips
Description: A list of IP addresses that should be denied access to the object.
Subnets are specified using CIDR notation.
This overrides the grants in admit_hostnames, admit_ips and admit_keys.
For example, here we'll deny one host, then a subnet, then everyone:
code
access:
"/path/file"
deny_ips => {
"192.168.0.1",
"192.168.0.0/24",
"0.0.0.0/0"
};
Type: slist
Allowed input range: (arbitrary string)
See also: admit_ips, deny_hostnames, deny_keys
History: Introduced in CFEngine 3.6.0
deny_keys
Description: A list of RSA keys of hosts that should be denied access to the object.
This overrides the grants in admit_hostnames, admit_ips and admit_keys.
Type: slist
Allowed input range: (arbitrary string)
For example, here we'll deny the fictitious SHA key abcdef:
code
access:
"/path/file"
deny_keys => {"SHA=abcdef"};
In Community, MD5 keys are used, so similarly we can deny the
fictitious MD5 key abcdef:
code
access:
"/path/file"
deny_keys => {"MD5=abcdef"};
See also: admit_keys, deny_hostnames, deny_ips
History: Introduced in CFEngine 3.6.0
admit
Description: The admit slist can contain a mix of entries in the
syntax of admit_ips, admit_hostnames and admit_keys, and offers
the same functionality. It's a legacy attribute that was split in the
aforementioned attributes, and it's not recommended to use in new
policy.
deny
Description: The deny slist can contain a mix of entries in the
syntax of deny_ips, deny_hostnames and deny_keys, and offers the
same functionality. It's a legacy attribute that was split in the
aforementioned attributes, and it's not recommended to use in new
policy. Example:
code
bundle server my_access_rules()
{
access:
"/directory/"
admit => {
"127.0.0.1",
".example.org",
},
deny => {
"badhost_1.example.org",
"badhost_1.example.org",
};
}
The best way to write the same policy would be the following:
code
bundle server my_access_rules()
{
access:
"/directory/"
admit_ips => { "127.0.0.1" },
admit_hostnames => { ".example.org" },
deny_hostnames => {
"badhost_1.example.org",
"badhost_1.example.org"
};
}
Notes:
Only regular expressions or exact matches are allowed in this list,
as non-specific matches are too greedy for denial.
deny will be deprecated in CFEngine 3.7 in favor of deny_ips,
deny_hostnames, and deny_keys.
maproot
Description: The maproot slist contains host names or IP addresses
to grant full read-privilege on the server.
Normally users authenticated by the server are granted access only to
files owned by them and no-one else. Even if the cf-serverd process
runs with root privileges on the server side of a client-server
connection, the client is not automatically granted access to download
files owned by non-privileged users. If maproot is true then remote
root users are granted access to all files.
A typical case where mapping is important is in making backups of many
user files.
Type: slist
Allowed input range: (arbitrary string)
Example:
code
access:
"/home"
admit_hostnames => { "backup_host.example.org" },
ifencrypted => "true",
# Backup needs to have access to all users
maproot => { "backup_host.example.org" };
Notes:
On Windows, cf-serverd, maproot is required to read files if the
connecting user does not own the file on the server.
ifencrypted
Description: The ifencrypted menu option determines whether the
current file access promise is conditional on the connection from the
client being encrypted.
This option has no effect with the TLS CFEngine protocol, where
encryption is always enabled.
If this flag is true a client cannot access the file object unless its
connection is encrypted.
Type: boolean
Default value: false
Example:
code
access:
"/path/file"
admit_hostnames => { ".example.org" },
ifencrypted => "true";
Note: This attribute is a noop when used with
protocol_version 2 or
greater.
See also: protocol_version, allowtlsversion, allowciphers, tls_min_version, tls_ciphers, encrypt, logencryptedtransfers, ifencrypted
report_data_select
This body is only available in CFEngine Enterprise.
Description: The report_data_select body restricts which data is included
for query resources, and allows filtering of data reported to the
CFEngine Enterprise server.
Use this body template to control the content of reports collected by the
CFEngine Enterprise server, and to strip unwanted data (e.g. temporary variables)
from reporting.
By default, no filtering is applied. If include and exclude rules are combined, then the
exclude statement is applied to the subset from the include statement.
If more than one report_data_select body applies to the same host, all of them are applied.
Usage of this body is only allowed in conjunction with using
resource_type => "query", as this is the resource type that is being affected.
Type: body report_data_select
Example:
code
body report_data_select report_data
{
metatags_include => { "inventory", "compliance" };
promise_handle_exclude => { "_.*" };
monitoring_exclude => { "mem_.*swap" };
}
Example:
Here are the built-in report_data_select bodies default_data_select_host() and
default_data_select_policy_hub():
code
report_data_select => default_data_select_host,
admit => { @(def.policy_servers) };
policy_server.enterprise::
"$(query_types)"
handle => "report_access_grant_$(query_types)_for_hub",
comment => "Grant $(query_types) reporting query for the hub on the policy server",
resource_type => "query",
report_data_select => default_data_select_policy_hub,
admit => { "127.0.0.1", "::1", @(def.policy_servers) };
}
code
report_data_select => default_data_select_policy_hub,
admit => { "127.0.0.1", "::1", @(def.policy_servers) };
}
See also: Common body attributes
History:
Introduced in Enterprise 3.5.0
metatags_exclude, metatags_include, promise_handle_exclude, and
promise_handle_include body attributes added in 3.6.0.
classes_exclude, classes_include, promise_notkept_log_exclude,
promise_notkept_log_include, promise_repaired_log_exclude,
promise_repaired_log_include, variables_exclude, and variables_include
body attributes removed in 3.6.0
Description: List of anchored regular expressions matching
metatags of classes or vars to exclude from reporting.
Classes and variables with metatags matching any entry of that list will not be
reported to the CFEngine Enterprise server.
When combined with metatags_include, this list is applied to the selected
subset.
Type: slist
Allowed input range: .*
See also: metatags_include, promise_handle_exclude, monitoring_exclude
History: Introduced in CFEngine 3.6.0
Description: List of anchored regular expressions matching
metatags of classes or vars to include in reporting.
Classes and variables with metatags matching any entry of that list will be
reported to the CFENgine Enterprise server.
When combined with metatags_exclude, the exclude list is applied to the subset
from this list.
Type: slist
Allowed input range: .*
See also: metatags_exclude, promise_handle_include, monitoring_include
History: Introduced in CFEngine 3.6.0
promise_handle_exclude
Description: List of anchored regular expressions matching
promise handles to exclude from reporting.
Information about promises with handles that match any entry in that list will
not be reported to the CFEngine Enterprise server.
When combined with promise_handle_include, this list is applied to the
selected subset.
Type: slist
Allowed input range: .*
See also: promise_handle_include, metatags_exclude, monitoring_exclude
History: Introduced in CFEngine 3.6.0
promise_handle_include
Description: List of anchored regular expressions matching
promise handles to include in reporting.
Information about promises with handles that match any entry in that list will
be reported to the CFEngine Enterprise server.
When combined with promise_handle_exclude, the exclude list is applied to the
subset from this list.
Type: slist
Allowed input range: .*
See also: promise_handle_exclude, metatags_include, monitoring_include
History: Introduced in CFEngine 3.6.0
monitoring_include
Description: List of anchored regular expressions matching
monitoring objects to include in reporting.
Monitoring objects with names matching any entry in that list will be reported
to the CFEngine Enterprise server.
When combined with monitoring_exclude, the exclude list is applied to the
subset from this list.
Type: slist
Allowed input range: .*
See also: monitoring_exclude, promise_handle_include, metatags_include
History: Introduced in Enterprise 3.5.0
monitoring_exclude
Description: List of anchored regular expressions matching monitoring objects
to exclude from reporting.
Monitoring objects with names matching any entry in that list will not be
reported to the CFEngine Enterprise server.
When combined with monitoring_include, this list is applied to the selected
subset.
Type: slist
Allowed input range: .*
See also: monitoring_include, promise_handle_exclude, metatags_exclude
History: Introduced in Enterprise 3.5.0
resource_type
Description: The resource_type is the type of object being granted
access.
By default, access to resources granted by the server are files
(resource_type => "path").
However, sometimes it is useful to cache literal strings, hints and
data on the server for easy access (e.g. the contents of variables or
hashed passwords). In the case of literal data, the promise handle
serves as the reference identifier for queries. Queries are instigated
by function calls by any agent.
Type: (menu option)
Allowed input range:
pathliteralcontextqueryvariablebundle
If the resource type is literal, CFEngine will grant access to a
literal data string. This string is defined either by the promiser
itself, but the name of the variable is the identifier given by the
promise handle of the access promise, since the promiser string might be
complex.
If the resource type is variable then the promiser is the name of a
persistent scalar variable defined on the server-host. Currently
persistent scalars are only used internally by Enterprise CFEngine to
hold enumerated classes for orchestration purposes.
If you want to send the value of a policy defined variable in the server
host (which for some reason is not available directly through policy on
the client, e.g. because they have different policies), then you could
use the following construction:
code
access:
"$(variable_name)"
handle => "variable_name",
resource_type => "literal";
If the resource type is context, the promiser is treated as a regular
expression to match persistent classes defined on the server host. If
these are matched by the request from the client, they will be
transmitted (See remoteclassesmatching()).
The term query may also be used in CFEngine Enterprise to query the server
for data from embedded databases. This is currently for internal use only, and
is used to grant access to report 'menus'. If the promiser of a query request
is called collect_calls, this grants access to server peering collect-call
tunneling (see also call_collect_interval).
If the resource type is bundle then the specific bundles are allowed
to be remotely executed with cf-runagent --remote-bundles from the
specified hosts. The promiser is an anchored regular expression.
Example:
code
bundle server my_access_rules()
{
access:
"value of my test_scalar, can expand variables here - $(sys.host)"
handle => "test_scalar",
comment => "Grant access to contents of test_scalar VAR",
resource_type => "literal",
admit_ips => { "127.0.0.1" };
"XYZ"
resource_type => "variable",
handle => "XYZ",
admit_ips => { "$(sys.policy_hub)" };
"delta"
comment => "Grant access to cfengine hub to collect report deltas",
resource_type => "query",
admit_ips => { "$(sys.policy_hub)" };
"full"
comment => "Grant access to cfengine hub to collect full report dump",
resource_type => "query",
admit_ips => { "$(sys.policy_hub)" };
"magic_bundle"
comment => "Grant access to the hub to activate magic_bundle with cf-runagent",
resource_type => "bundle",
admit_ips => { "$(sys.policy_hub)" };
am_policy_hub::
"collect_calls"
comment => "Enable call-collect report collection for the specific client",
resource_type => "query",
admit_ips => { "1.2.3.4" };
}
See also: --remote-bundles option for cf-runagent, cfruncommand in body server control
History:
bundle resource_type added in 3.9.0
shortcut
Description: For file promisers, the server will give access to the file under
its shortcut name.
Type: string
Allowed input range: (arbitrary string)
Example:
code
"/var/cfengine/cmdb/$(connection.key).json"
shortcut => "me.json",
admit_keys => { "$(connection.key)" };
In this example, requesting the file me.json will transfer the file stored on the
server under the name /var/cfengine/cmdb/SHA=....json to the requesting host,
where it will be received as me.json.
History: Introduced in CFEngine 3.6.0
classes
Classes promises may be made in any bundle. Classes defined by
classes type promises in common bundles are namespace (aka global) scoped by
default.
code
bundle common g
{
classes:
"one" expression => "any"; # always defined
"two"; # always defined
"client_network" expression => iprange("128.39.89.0/24");
}
Notes:
- The promiser is automatically canonified when classes are defined.
- Classes are not automatically canonified when checked.
code
bundle agent main
{
classes:
"my-illegal-class";
reports:
# We search to see what class was defined:
"$(with)" with => join( " ", classesmatching( "my.illegal.class" ) );
# We see that the illegal class is explicitly not defined.
"my-illegal-class is NOT defined (as expected, its invalid)"
unless => "my-illegal-class";
# We see the canonified form of the illegal class is defined.
"my_illegal_class is defined"
if => canonify("my-illegal-class");
# Note, if takes expressisons, you couldn't do that if it were
# automatically canonified. Here I canonify the string using with, and use
# it as part of the expression which contains an invalid classcharacter, but
# its desireable for constructing expressions.
"Slice and dice using `with`"
with => canonify( "my-illegal-class" ),
if => "linux|$(with)";
}
First we promise to define my-illegal-class. When the promise is actuated
it is automatically canonified and defined. This automatic canonification is
logged in verbose logs (verbose: Class identifier 'my-illegal-class' contains illegal characters - canonifying).
Next several reports prove which form of the class was defined. The last
report shows how if takes a class expression, and if you are checking a class
that contains invalid characters you must canonify it.
code
R: my_illegal_class
R: my-illegal-class is NOT defined (as expected, its invalid)
R: my_illegal_class is defined
R: Slice and dice using `with`
This policy can be found in
/var/cfengine/share/doc/examples/class-automatic-canonificiation.cf
and downloaded directly from
github.
If you omit all of them, the class is always defined (as if you said expression
=> "any").
For example, the following promise defines the class web when a file exists:
code
bundle agent example
{
classes:
"web"
if => fileexists("/etc/httpd/httpd.conf");
}
History: The context attributes expression, and, or, not, xor,
dist were made optional in CFEngine 3.9.0. Before that, one of them was
required. So the following examples were the valid equivalents of the example
above before 3.9.0:
code
bundle agent example
{
classes:
"web"
expression => fileexists("/etc/httpd/httpd.conf");
"webserver"
expression => "any",
if => fileexists("/etc/httpd/httpd.conf");
}
Attributes
and
Description: Combine class sources with AND
The class on the left-hand side is set if all of the class expressions listed
on the right-hand side are true.
Type: clist
Allowed input range: [a-zA-Z0-9_!@@$|.()\[\]{}:]+
Example:
code
classes:
"compound_class" and => { classmatch("host[0-9].*"), "Monday", "Hr02" };
Notes:
If an expression contains a mixture of different object types that need to be
ANDed together, this list form is more convenient than providing an
expression.
dist
Description: Generate a probabilistic class distribution
Always set one generic class and one additional class, randomly weighted on a
probability distribution.
Type: rlist
Allowed input range: -9.99999E100,9.99999E100
Example:
code
classes:
"my_dist"
dist => { "10", "20", "40", "50" };
Notes:
In the example above the values sum up to 10+20+40+50 = 120. When generating
the distribution, CFEngine picks a number between 1-120, and set the class
my_dist as well as one of the following classes:
code
my_dist_10 (10/120 of the time)
my_dist_20 (20/120 of the time)
my_dist_40 (40/120 of the time)
my_dist_50 (50/120 of the time)
expression
Description: Evaluate string expression of classes in normal form
Set the class on the left-hand side if the expression on the right-hand side
evaluates to true. With classes, the notion of "true" is not a boolean state,
because classes can never be false. They are not booleans. They can be defined
or undefined, but it's important to understand that a class may be defined
during the execution of the agent, so the result of an expression may
change during execution.
Expressions can be:
class names, with or without a namespace
the literals true (always defined) and false (never defined) that allow JSON booleans to be used inside expressions
the logical and operation, expressed as a&b or a.b, which is true if both a and b are true
the logical or operation, expressed as a|b, which is true if either a or b are true
the logical not operation, expressed as !a, which is true if a is not
true. Note again here that a could become true during the execution. So
if you have "myclass" expression => "!x" and x starts undefined but is
defined later, you could have both x and myclass defined!
parenthesis (whatever) which operate as expected to prioritize expression evaluation
the return value of a function that returns a class, such as fileexists() and() userexists() etc.
Type: class
Allowed input range: [a-zA-Z0-9_!@@$|.()\[\]{}:]+
Example:
code
classes:
"class_name" expression => "solaris|(linux.specialclass)";
"has_toor" expression => userexists("toor");
# it's unlikely a machine will become Linux during execution
# so this is fairly safe
"not_linux" expression => "!linux";
"a_or_b" expression => "a|b";
# yes, it's OK to define a class twice, and this is the same outcome
# with different syntax
"a_and_b" expression => "a&b";
"a_and_b" expression => "a.b";
# yes, it's OK to define a class twice, and this is the same outcome
# with different syntax
"linux_and_has_toor" expression => and(userexists("toor"), "linux");
"linux_and_has_toor" and => { userexists("toor"), "linux" };
or
Description: Combine class sources with inclusive OR
The class on the left-hand side will be set if any one (or more) of
the class expressions on the right-hand side are true.
Type: clist
Allowed input range: [a-zA-Z0-9_!@@$|.()\[\]{}:]+
Example:
code
classes:
"compound_test"
or => { classmatch("linux_x86_64_2_6_22.*"), "suse_10_3" };
Notes:
This is useful construction for writing expressions that contain functions.
persistence
Description: Make the class persistent to avoid re-evaluation
The value specifies time in minutes.
Type: int
Allowed input range: 0,99999999999
Example:
code
bundle common setclasses
{
classes:
"cached_classes"
or => { "any" },
persistence => "1";
"cached_class"
expression => "any",
persistence => "1";
}
Notes:
This feature can be used to avoid recomputing expensive classes calculations
on each invocation. This is useful if a class discovered is essentially
constant or only slowly varying, such as a hostname or alias from a
non-standard naming facility.
Persistent classes are always global and can not be set to local
by scope directive.
For example, to create a conditional inclusion of costly class evaluations,
put them into a separate bundle in a file classes.cf.
code
# promises.cf
body common control
{
persistent_classes::
bundlesequence => { "test" };
!persistent_classes::
bundlesequence => { "setclasses", "test" };
!persistent_classes::
inputs => { "classes.cf" };
}
bundle agent test
{
reports:
!my_persistent_class::
"no persistent class";
my_persistent_class::
"persistent class defined";
}
Then create classes.cf
code
# classes.cf
bundle common setclasses
{
classes:
"persistent_classes" # timer flag
expression => "any",
persistence => "480";
"my_persistent_class"
or => { ...long list or heavy function... } ,
persistence => "480";
}
History: Was introduced in CFEngine 3.3.0
See also: persistance classes attribute, persist_time in classes body
not
Description: Evaluate the negation of string expression in normal form
The class on the left-hand side will be set if the class expression on the
right-hand side evaluates to false.
Type: class
Allowed input range: [a-zA-Z0-9_!@@$|.()\[\]{}:]+
Example:
code
classes:
"others" not => "linux|solaris";
"no_toor" not => userexists("toor");
Notes:
Knowing that something is not the case is not the same as not knowing whether
something is the case. That a class is not set could mean either. See the note
on Negative knowledge.
scope
Description: Scope of the class set by this promise.
Type: (menu option)
Allowed input range:
Default value: bundle in agent bundles, namespace in common bundles
Example:
code
classes:
"namespace_context"
scope => "namespace";
"bundle_or_namespace_context"; # without an explicit scope, depends on bundle type
"bundle_context"
scope => "bundle";
See also: scope in body classes
select_class
Description: Select one of the named list of classes to define based on
host's fully qualified domain name, the primary IP address and the UID that
cf-agent is running under.
This feature is useful for decentralized dynamic grouping. The class is chosen
deterministically (not randomly) but it is not possible to say which host will
end up in which class in advance. Only that given stable input a host will
always end up in the same class every time while running a given version of
CFEngine.
Type: clist
Allowed input range: [a-zA-Z0-9_!@@$|.()\[\]{}:]+
Example:
code
bundle common g
{
classes:
"selection" select_class => { "one", "two" };
reports:
one::
"One was selected";
two::
"Two was selected";
selection::
"A selection was made";
}
Notes:
This feature is similar to the splayclass function. However,
instead of selecting a class for a moment in time, it always chooses one class
in the list; the same class each time for a given host. This allows hosts to
be distributed across a controlled list of classes (e.g for load balancing
purposes).
If a list is used as the input to select_class the promise will only actuate if
the list is expandable. If the list has not yet been evaluated, the
select_class will be skipped and wait for a subsequent evaluation pass.
Given stable input, the output of this function will not change between executions of the same version of CFEngine. Its output should not change between versions of CFEngine within the same minor release (3.12.0 -> 3.12.1). Its output may change between minor versions (3.12.0 -> 3.13.0).
xor
Description: Combine class sources with XOR
The class on the left-hand side is set if an odd number of class expressions
on the right-hand side matches. This is most commonly used with two class
expressions.
Type: clist
Allowed input range: [a-zA-Z0-9_!@@$|.()\[\]{}:]+
Example:
code
classes:
"order_lunch" xor => { "Friday", "Hr11"}; # we get pizza every Friday
commands
Commands and processes are separated cleanly. Restarting of
processes must be coded as a separate command. This stricter type separation
allows for more careful conflict analysis to be carried out.
code
commands:
"/path/to/command args"
args => "more args",
contain => contain_body,
module => "true|false";
Output from commands executed here is quoted inline, but prefixed with
the letter Q to distinguish it from other output; for example, from
reports, which is prefixed with the letter R.
It is possible to set classes based on the return code of a
commands-promise in a very flexible way. See the kept_returncodes,
repaired_returncodes and failed_returncodes attributes.
code
bundle agent example
{
commands:
"/bin/sleep 10"
action => background;
"/bin/sleep"
args => "20",
action => background;
}
When referring to executables the full path to the executable must be used.
When reffereing to executables whose paths contain spaces, you should quote
the entire program string separately so that CFEngine knows the name of the
executable file. For example:
code
commands:
windows::
"\"c:\Program Files\my name with space\" arg1 arg2";
linux::
"\"/usr/bin/funny command name\" -a -b -c";
Note: Commands executed with CFEngine get the environment variables set in
environment in body agent control. If you want to set
environment variables for an individual command you can prefix the command with
env and set variables before executing the command.
code
bundle agent example
{
commands:
"/usr/bin/env MY_ENVIRONMENT_VARIABLE=something_special /tmp/cmd";
# Or equivlent
"/usr/bin/env"
args => "ME=something_special /tmp/cmd";
}
Note: Some unices leave a hanging pipe on restart (they never manage to
detect the end of file condition). This occurs on POSIX.1 and SVR4 popen calls
which use wait4. For some reason they fail to find and end-of-file for an
exiting child process and go into a deadlock trying to read from an already
dead process. This leaves a zombie behind (the parent daemon process which
forked and was supposed to exit) though the child continues. A way around this
is to use a wrapper script which prints the line cfengine-die to STDOUT after
restarting the process. This causes CFEngine to close the pipe forcibly and
continue.
See also: Bundles and Bodies for commands in the stdlib
Attributes
Common attributes
Common attributes are available to all promise types. Full details for common
attributes can be found in the Common promise attributes section of
the Promise types page. The common attributes are as follows:
args
Description: Allows to separate the arguments to the command from the
command itself.
Sometimes it is convenient to separate command and arguments. The final arguments are the concatenation with one space.
Type: string
Allowed input range: (arbitrary string)
code
commands:
"/bin/echo one"
args => "two three";
So in the example above the command would be:
code
/bin/echo one two three
See also: arglist, join(), concat(), format()
arglist
Description: Allows to separate the arguments to the command from the
command itself, using an slist.
As with args, it is convenient to separate command and arguments.
With arglist you can use a slist directly instead of having to
provide a single string as with args. That's particularly useful
when there are embedded spaces and quotes in your arguments, but also
when you want to get them directly from a slist without going through
join() or other functions.
Note: Spaces are not preserved when the useshell attribute is set to
"useshell" or "powersell". The same is true when using commands promises on
Windows, even when useshell is set to "noshell", due to limited support in
the Win32 API.
The arglist is appended to args if that's defined, to preserve
backwards compatibility.
Type: slist
Allowed input range: (arbitrary string)
code
commands:
"/bin/echo one"
args => "two three",
arglist => { "four", "five" };
So in the example above the command would be:
code
/bin/echo one two three four five
History:
- Introduced in CFEngine 3.9.0.
- Fixed whitespace preservation when not using shell on non-Windows agents in 3.24.0
See also: args, join(), concat(), format()
contain
Description: Allows running the command in a 'sandbox'.
Command containment allows you to make a sandbox around a command, to run it
as a non-privileged user inside an isolated directory tree.
Type: body contain
Example:
code
body contain example
{
useshell => "noshell";
umask => "077";
exec_owner => "mysql_user";
exec_group => "nogroup";
exec_timeout => "60";
chdir => "/working/path";
chroot => "/private/path";
}
See also: Common body attributes
useshell
Description: Specifies whether or not to use a shell when executing the command.
The default is to not use a shell when executing commands. Use of a
shell has both resource and security consequences. A shell consumes an
extra process and inherits environment variables, reads commands from
files and performs other actions beyond the control of CFEngine.
If one does not need shell functionality such as piping through multiple
commands then it is best to manage without it. In the Windows version of
CFEngine Enterprise, the command is run in the cmd Command Prompt if this
attribute is set to useshell, or in the PowerShell if the attribute is set
to powershell.
Type: (menu option)
Allowed input range:
code
useshell
noshell
powershell
For compatibility, the boolean values are also supported, and map to
useshell and noshell, respectively.
Default value: noshell
Example:
code
body contain example
{
useshell => "useshell";
}
umask
Description: Sets the internal umask for the process.
Default value for the mask is 077. On Windows, umask is not supported and is
thus ignored by Windows versions of CFEngine.
Type: (menu option)
Allowed input range:
code
0
77
22
27
72
002
077
022
027
072
Example:
code
body contain example
{
umask => "077";
}
exec_owner
Description: Specifies the user under which the command executes.
This is part of the restriction of privilege for child processes when
running cf-agent as the root user, or a user with privileges.
Windows requires the clear text password for the user account to run
under. Keeping this in CFEngine policies could be a security hazard.
Therefore, this option is not yet implemented on Windows versions of
CFEngine.
Type: string
Allowed input range: (arbitrary string)
Example:
code
body contain example
{
exec_owner => "mysql_user";
}
exec_group
Description: Associates the command with a group.
This is part of the restriction of privilege for child processes when
running cf-agent as the root group, or a group with privileges. It is
ignored on Windows, as processes do not have any groups associated with
them.
Type: string
Allowed input range: (arbitrary string)
Example:
code
body contain example
{
exec_group => "nogroup";
}
exec_timeout
Description: Attempt to time-out after this number of seconds.
This cannot be guaranteed as not all commands are willing to be interrupted in
case of failure.
Type: int
Allowed input range: 1,3600
Example:
code
body contain example
{
exec_timeout => "30";
}
See also: body action expireafter, body agent control expireafter, body executor control agent_expireafter
chdir
Description: Run the command with a working directory.
This attribute has the effect of placing the running command into a
current working directory equal to the parameter given; in other words,
it works like the cd shell command.
Type: string
Allowed input range: "?(/.*)
Example:
code
body contain example
{
chdir => "/containment/directory";
}
chroot
Description: Specify the path that will be the root directory for the
process.
The path of the directory will be experienced as the top-most root directory
for the process. In security parlance, this creates a 'sandbox' for the
process. Windows does not support this feature.
Type: string
Allowed input range: "?(/.*)
Example:
code
body contain example
{
chroot => "/private/path";
}
preview
Description: This is the preview command when running in dry-run mode
(with -n).
Previewing shell scripts during a dry-run is a potentially misleading
activity. It should only be used on scripts that make no changes to the
system. It is CFEngine best practice to never write change-functionality into
user-written scripts except as a last resort. CFEngine can apply its safety
checks to user defined scripts.
Type: boolean
Default value: false
Example:
code
body contain example
{
preview => "true";
}
no_output
Description: Allows to discard all output from the command.
Setting this attribute to true is equivalent to piping standard output and
error to /dev/null.
Type: boolean
Default value: false if module is false, true if module is true.
Example:
code
body contain example
{
no_output => "true";
}
Description: Suppress inform output from commands
By default, when running with inform level logging, commands that are executed
produce output. This attribute can be used to suppress this output which may not
be useful in all cases.
Type: boolean
Default value: true
Example:
code
bundle agent main
{
commands:
"/bin/touch /tmp/module_cache"
inform => "true"; # Default
"/bin/cat /tmp/module_cache"
inform => "false", # Read-only promise, no INFO logging wanted
module => "true";
}
This policy can be found in
/var/cfengine/share/doc/examples/inform.cf
and downloaded directly from
github.
History:
- Introduced in 3.15.0 (2019)
module
Description: Set variables and classes based on command output.
CFEngine modules are commands that support a simple protocol in order to set
additional variables and classes on execution from user defined code. Modules
are intended for use as system probes rather than additional configuration
promises. Such a module may be written in any language.
This attribute determines whether or not to expect the CFEngine module protocol. If true, the module protocol is supported for this command:
- lines which begin with a
^ are protocol extensions
^context=xyz sets the module context to xyz instead of the default for any following definitions^meta=a,b,c sets the class and variable tags for any following definitions to a, b, and c^persistence=10 sets any following classes to persist for 10 minutes (use 0 to reset)^persistence=0 sets any following classes to have no persistence (this is the default)
- lines which begin with a
+ are treated as classes to be defined (like -D). NOTE: classes are defined with the namespace scope.
- lines which begin with a
- are treated as classes to be undefined (like -N)
- lines which begin with
= are scalar variables to be defined
- lines which begin with
= and include [] are array variables to be defined
- lines which begin with
@ are lists.
- lines which begin with
% are data containers. The value needs to be valid JSON and will be decoded.
These variables end up in a context that has the same name as the
module, unless the ^context extension is used.
NOTE: All variables and classes defined by the module protocol are defined
in the default namespace. It is not possible to define variables and
classes in any other namespace. Protocol extensions ( lines that start with ^
) apply until they are explicitly reset, or until the end of the modules
execution.
All the variables and classes will have at least the tag
source=module in addition to any tags you may set.
Any other lines of output are cited by cf-agent as being erroneous, so you
should normally make your module completely silent.
WARNING: Variables defined by the module protocol are currently limited to
alphanumeric characters and _, ., -, [, ], @ and
/.
Type: boolean
Default value: false
Example:
Here is an example module written in shell:
code
#####!/bin/sh
/bin/echo "@mylist= { \"one\", \"two\", \"three\" }"
/bin/echo "=myscalar= scalar val"
/bin/echo "=myarray[key]= array key val"
/bin/echo "%mydata=[1,2,3]"
/bin/echo "+module_class"
/bin/echo "^persistence=10"
/bin/echo "+persistent_10_minute_class"
And here is an example using it:
code
body common control
{
bundlesequence => { def, modtest };
}
bundle agent def
{
commands:
"$(sys.workdir)/modules/module_name"
module => "true";
reports:
# Each module forms a private context with its name as id
module_class::
"Module set variable $(module_name.myscalar)";
}
bundle agent modtest
{
vars:
"mylist" slist => { @(module_name.mylist) };
reports:
module_class::
"Module set variable $(mylist)";
}
Here is an example module written in Perl:
code
#####!/usr/bin/perl
#####
##### module:myplugin
#####
# lots of computation....
if (special-condition)
{
print "+specialclass";
}
If your module is simple and is best expressed as a shell command, then we
suggest that you expose the class being defined in the command being
executed (making it easier to see what classes are used when reading the
promises file). For example, the promises could read as follows (the two
echo commands are to ensure that the shell always exits with a successful
execution of a command):
code
bundle agent sendmail
{
commands:
# This next module checks a specific failure mode of dcc, namely
# more than 3 error states since the last time we ran cf-agent
is_mailhost::
"/bin/test `/usr/bin/tail -100 /var/log/maillog | /usr/bin/grep 'Milter (dcc): to error state' | /usr/bin/wc -l` -gt 3 echo '+start_dccm' || echo
''"
contain => shell_command,
module => "true";
start_dccm::
"/var/dcc/libexec/start-dccm"
contain => not_paranoid;
}
body contain shell_command
{
useshell => "useshell";
}
body contain not_paranoid
{
useshell => "no";
exec_owner => "root";
umask => "22";
}
Modules inherit the environment variables from cf-agent and accept
arguments, just as a regular command does.
See also: usemodule(), read_module_protocol()
History:
@ allowed in variables (intended for keys in classic array) 3.15.0, 3.12.3, 3.10.7 (2019)/ allowed in variables (intended for keys in classic array) 3.14.0, 3.12.2, 3.10.6 (2019)
custom
Custom promise types can be added as Promise modules.
These enable users to implement their own promise types for managing new resources.
They can be added without a binary upgrade, and shared between users.
History: Custom promise types were first introduced in 3.17.0.
Many improvements and bug fixes were made between 3.17.0 and 3.18.0 LTS.
This documentation article provides a complete and detailed specification.
It includes how to use them, how to implement them using modules, how the protocol works, etc.
If you are interested in shorter tutorials, there are a few different ones available:
Using custom promise types
A new top level promise block (similar to body) is used to add new promise types.
After adding a promise type, it is used in the same way as built-in promise types, there is no special syntax.
Custom promise types are only for cf-agent, so the promise block should always specify the agent component, and the promise types should only be used in agent bundles.
Example of using a promise module
code
promise agent git
{
interpreter => "/usr/bin/python3";
path => "/var/cfengine/inputs/modules/promises/git.py";
}
bundle agent main
{
git:
"/opt/cfengine/masterfiles"
repo => "https://github.com/cfengine/masterfiles";
}
Evaluation details
Common attributes and class guards are handled by the agent, and not sent to the promise module.
code
bundle agent main
{
git:
linux::
"/opt/cfengine/masterfiles"
if => "redhat",
classes => some_classes_body,
repo => "https://github.com/cfengine/masterfiles";
}
In this example, the promise module does not receive information about the if and classes attributes, or the linux:: class guard.
The agent evaluates these, and decides whether to request evaluation from the module and which classes to define based on the promise outcome and the some_classes_body classes body.
These attributes are handled by the agent, and cannot be used inside promise modules:
In an early iteration, the agent will emit errors for any of these which are not implemented yet, if you try to use them.
Due to the implementation details, the following attributes from the classes body also cannot be used inside promise modules:
Evaluation passes and normal order
In CFEngine, each bundle is evaluated in multiple passes (3 main passes for most promise types).
Within each evaluation pass of a bundle, the promises are not evaluated from top to bottom, but based on a normal order of the promise types.
Custom promise types are added dynamically and don't have a predefined order, they are evaluated as they appear within a bundle (top to bottom), but at the end of each evaluation pass, after all the built in promise types.
As with other promise types, we recommend not relying too much on this ordering, if you want some promises to be evaluated before others, use the bundlesequence or depends_on attribute to achieve this.
Note: All promises of the same type are evaluated together, so splitting up the promises of one type or interleaving promises of multiple types will not make a difference. All promises of the custom promise type which appeared first will be evaluated before all the promises of the custom promise type which appeared second are evaluated, and so on.
Creating custom promise types
The agent spawns the promise module as a subprocess and communicates with it using it's standard input and output (stdin, stdout).
It does not use command line arguments, or standard error output (stderr), but these may be used for testing / debugging promise modules.
Everything written to stdin and stdout should follow the module protocol described below.
Custom promise types using provided libraries
We provide libraries in some programming languages, which abstract away the protocol, letting you only implement the business logic for the promise type.
Here is an example promise type, written in Python, using our library:
code
import sys
import os
from cfengine import PromiseModule, ValidationError
class GitPromiseTypeModule(PromiseModule):
def validate_promise(self, promiser, attributes, metadata):
if not promiser.startswith("/"):
raise ValidationError(f"File path '{promiser}' must be absolute")
for name, value in attributes.items():
if name != "repo":
raise ValidationError(f"Unknown attribute '{name}' for git promises")
if name == "repo" and type(value) is not str:
raise ValidationError(f"'repo' must be string for git promise types")
def evaluate_promise(self, promiser, attributes, metadata):
if not promiser.startswith("/"):
raise ValidationError("File path must be absolute")
folder = promiser
url = attributes["repo"]
if os.path.exists(folder):
self.promise_kept()
return
self.log_info(f"Cloning '{url}' -> '{folder}'...")
os.system(f"git clone {url} {folder} 1>/dev/null 2>/dev/null")
if os.path.exists(folder):
self.log_info(f"Successfully cloned '{url}' -> '{folder}'")
self.promise_repaired()
else:
self.log_error(f"Failed to clone '{url}' -> '{folder}'")
self.promise_not_kept()
if __name__ == "__main__":
GitPromiseTypeModule().start()
Logging
Log levels in CFEngine are explained here:
https://github.com/cfengine/core/blob/master/CONTRIBUTING.md#log-levels
In short, when writing a promise module, these log levels should be used:
critical - Serious errors in protocol or module itself (not in policy)error - Errors when validating / evaluating a promise, including syntax errors and promise not keptwarning - The promise did not fail, but there is something the user (policy writer) should probably fix. Some examples:
- Policy relies on deprecated behavior/syntax which will change
- Policy uses demo / unsafe options which should be avoided in a production environment
notice - Unusual events which you want to notify the user about
- Most promise types won't need this - usually
info or warning is more appropriate
- Useful for events which happen rarely and are not the result of a promise, for example:
- New credentials detected
- New host bootstrapped
- The module made a change to the system for itself to work (database initialized, user created)
info - Changes made to the system (usually 1 per repaired promise, more if the promise made multiple different changes to the system)verbose - Human understandable detailed information about promise evaluationdebug - Programmer-level information that is only useful for CFEngine developers or module developers
Note that all log levels, except for debug, should be friendly to non-developers, and not include programmer's details (such as protocol messages, source code references, function names, etc.).
Results
Each operation performed by the module, sends a result back to the agent.
The possible results are as follows:
- Shared between operations:
error - an unexpected error occured in the module or protocol, indicating a bug in CFEngine or the promise module- Should be explained by a
critical level log message
- Promise validation:
valid - No problems with the data or data types in promiseinvalid - There are problems with the promise data or data types- Should be explained by an
error level log message
- Promise evaluation:
- The module should assume the promise has already been validated.
- It does not need to validate the promise again, and should not return
valid / invalid.
kept - promise satisfied already, no change maderepaired - promise not satisfied before, but fixed now- The change should be explained in a
info level log message
not_kept - promise not satisfied before, and could not be fixed- Should be explained by an
error level log message
- Teminate:
success - Module succesfully terminated without errorsfailure - There were problems when trying to clean up / terminate- Should be explained by a
critical level log message
Built-in CFEngine promises may have multiple outcomes when evaluated.
For the sake of simplicity, custom promises may only have 1 outcome, logic should be as follows:
- If the promise was already satisfied and no changes were necessary, the promise was
kept
- Otherwise, if there were issues and the module could not fix/satisfy all parts of the promise, it was
not_kept.
- Otherwise, if some changes were made (successfully), the promise was
repaired.
Protocol
To implement a promise module from scratch, you will have to implement the promise module protocol.
2 variants of the protocol are provided.
1 JSON based and 1 line based.
Note: if you are using the library, as shown above, you don't have to care / learn about the following internals of the protocol.
When a promise module starts, the agent sends a protocol header (single line), followed by 2 newline characters.
The header sent by cf-agent consists of 3 space-separated parts:
- Name of program - Example:
cf-agent
- CFEngine version - Example:
3.16.0
- Highest supported protocol version - Example:
v1
The header response sent by the module consists of 4 or more space separated parts:
- Module name - Example:
git_promise_module
- Module version - Example:
0.0.1
- Requested protocol version - Example:
v1
- Rest of line: Feature flags separated by spaces. At least
json_based or
line_based is required - Example: json_based action_policy
The header has the same syntax regardless of protocol (It is used to determine protocol).
The module should respond with the same protocol version, or lower.
Lowest protocol version wins.
The promise module should not request features which are unavailable in the requested protocol version.
There is no success message after the headers are exchanged.
The module can assume that the version and requested features were accepted.
The agent will terminate the module and error, if it requests something invalid.
Request sent by cf-agent to promise module:
Response, requesting line based protocol:
code
git_promise_module 0.0.1 v1 line_based
Response, requesting JSON based protocol:
code
git_promise_module 0.0.1 v1 json_based
After the initial exchange of protocol headers, the module responds to requests from the agent, using the agreed upon protocol.
Requests and responses follow the same format and rules, and are commonly called messages.
For each request, there should be exactly one response.
Protocol request sequence
A promise module will receive 3 types of requests (operations):
validate_promise - Validate the promiser string, attribute names, types and valuesevaluate_promise - Check the current state of the system and perform changes if necessaryterminate - Shut down the module
Both validation and evaluation happen on fully resolved promises.
If the promise has unresolved variables (strings containing $( or ${ in attributes or promiser) no requests will be sent to validate or evaluate the promise.
The agent should skip such promises until the variables are resolved, or mark them as not kept if they never resolve.
This makes it easier, safer and less error prone to implement promise modules - the module does not have to account for edge cases where strings contain unresolved variables.
(In the future, we might add other, optional mechanisms for validating unresolved promises).
Any promise must be validated before it is evaluated.
When handling evaluate_promise requests, the module can assume that validation was already performed and successful, with the same attributes and promiser string.
It is not guaranteed that the previous request was a validate_promise request.
A validate_promise request does not imply that the next request will be evaluate_promise.
The agent might start multiple processes of the same module in parallel, for example for a module implementing multiple promise types.
The module should not rely on this.
Additionally, the same module may be started and stopped multiple times during an agent run, so don't make any assumptions that it will only run once per agent run.
The promise module's responses to cf-agent requests must include operation and result.
Promiser string and attributes are typically added for convenience.
Result classes
After promise evaluation the module can send back a list of classes to set, to give more information about what happened.
Result classes should only be included in the response to evaluate requests - validation, or other operations should not define classes.
Exactly what classes to set and what information they should give the policy writer is up to the module author.
They are not required, and for simple promises, they might not be necessary.
Some examples could be: masterfiles_cloned, ran_git_clone, masterfiles_cloned_from_github etc.
Both how many classes are set, and the class names can be dynamic, depending on the promiser, attribute, module, etc.
In the JSON protocol, they are a list of strings, in the line based protocol, they are a comma separated list.
In both cases, the key is result_classes.
See examples for both protocols in their sections below.
Features
Modules can optionally implement extra features that they can advertise as supported in the protocol
header. Following are the currently recognized features supported by cf-agent.
Action policy
The Action policy feature, advertised as supported by the action_policy feature flag, indicates
that the module can properly handle the action policy mechanism which allows user to specify that
promises should only check the state of the system and produce warnings in case of mismatch instead
of actually repairing the state. When supported by the module, the cf-agent will allow use of the
promises handled by the module with:
- the
action_policy => "warn" promise attribute and/or
- in one of the evaluation modes that disable making changes:
--dry-run and --simulate.
In all the above cases, the action_policy attribute with the value "warn" is sent to the module
as part of the request. There is currently no differentiation between the cases. If the module
doesn't support the feature promises handled by it fail validation in the above cases. The reason
is that it would be unsafe to evaluate such promises in the above cases because the evaluation could
make changes to the system while the user requested no changes to be made and only warnings to be
produced instead.
The implementation of the Action policy feature must ensure that if the action_policy attribute
is sent by cf-agent with the value "warn" then either the state of the system:
- is as described by the promise in which case the result is
kept with only debug or verbose
messages returned by the module, or
- would require changes to be made in which case the result is
not_kept with log messages with the
log level warning returned by the module, but no changes are made on the system.
A common pattern for warnings about changes that should be made is "Should ACTION ON SOMETHING, but
only warnings promised" with the ACTION ON SOMETHING part describing what should be done based on
the promiser and other attributes, for example:
code
warning: Should update file '/tmp/test' with content 'Hello,world!', but only warning promised"
History:
- 3.21.0, 3.18.3 support in custom promise types introduced.
JSON protocol
The JSON based protocol supports all aspects of CFEngine promises, including slist, data containers, and strings with newlines, tabs, etc.
It is designed to be easy to implement in a language with JSON support.
Protocol messages are separated by empty lines (double newline).
The headers (request and response) are not JSON, but a sequence of space-separated values.
All messages sent by cf-agent and the promise module are single line JSON-data, except:
- Headers (both from cf-agent and promise module) are not JSON.
- JSON responses sent from promise module may optionally be preceeded by log messages, as explained below.
Within strings in the JSON data, newline characters must be escaped (\n).
This is not strictly required by the JSON spec, but most implementations do this anyway.
Example requests in JSON based protocol
code
cf-agent 3.16.0 v1
{"operation": "validate_promise", "log_level": "info", "promise_type": "git", "promiser": "/opt/cfengine/masterfiles", "attributes": {"repo": "https://github.com/cfengine/masterfiles"}}
{"operation": "evaluate_promise", "log_level": "info", "promise_type": "git", "promiser": "/opt/cfengine/masterfiles", "attributes": {"repo": "https://github.com/cfengine/masterfiles"}}
{"operation": "terminate", "log_level": "info"}
Example response in JSON based protocol
code
git_promise_module 0.0.1 v1 json_based
{"operation": "validate_promise", "promiser": "/opt/cfengine/masterfiles", "attributes": {"repo": "https://github.com/cfengine/masterfiles"}, "result": "valid"}
log_info=Cloning 'https://github.com/cfengine/masterfiles' -> '/opt/cfengine/masterfiles'...
log_info=Successfully cloned 'https://github.com/cfengine/masterfiles' -> '/opt/cfengine/masterfiles'
{"operation": "evaluate_promise", "promiser": "/opt/cfengine/masterfiles", "attributes": {"repo": "https://github.com/cfengine/masterfiles"}, "result_classes": ["masterfiles_cloned"], "result": "repaired"}
{"operation": "terminate", "result": "success"}
In the example above, log messages are sent to the agent on separate lines.
The syntax is the same as for the line based protocol, described below.
This is done so the agent can print the messages while the promise is evaluating.
(In the example, cloning the repo takes a few seconds, and it is nice to get some feedback).
Log messages formatted like this must be before the JSON message, and it is optional.
You can also include log messages in the JSON data:
code
{
"operation": "evaluate_promise",
"promiser": "/opt/cfengine/masterfiles",
"attributes": {
"repo": "https://github.com/cfengine/masterfiles"
},
"log": [
{
"level": "info",
"message": "Cloning 'https://github.com/cfengine/masterfiles' -> '/opt/cfengine/masterfiles'..."
}
],
"result_classes": [
"masterfiles_cloned"
],
"result": "repaired"
}
(Formatted here for readability, JSON data must still be on a single line in protocol).
The JSON based protocol also supports the use of custom bodies.
Custom bodies are sent as JSON objects within the respective attribute.
The following is an example using the members attribute of the custom groups promise type:
code
body members foo_members
{
include => { "alice", "bob" };
exclude => { "malcom" };
}
bundle agent foo_group
{
groups:
"foo"
policy => "present",
members => foo_members;
}
The attributes from the above example would be sent like this:
code
{
"policy": "present",
"members": {
"include": ["alice", "bob"],
"exclude": ["malcom"]
}
}
Line based protocol
The line based protocol supports a limited subset of features of CFEngine promises, which should be enough for most use cases.
In particular, data passed to the module (through promise attributes) must be strings, without newlines.
slist, data containers, and strings with newlines are not supported.
It is designed to be easy to implement in a language which doesn't have JSON support.
A protocol message is a sequence of lines, separated by newline characters, and terminated by an extra newline character (empty line).
Each line is a key-value pair, separated by =.
Anything before the first = of a line is the key, anything after is the value.
The key may not be empty, but the value may.
The key must consist of lowercase letters and underscores, not numbers, spaces, quotes, or other symbols ([a-z_]+).
The value may contain anything (including = signs) except for newlines and zero-bytes.
Example requests in line based protocol
code
cf-agent 3.16.0 v1
operation=validate_promise
log_level=info
promise_type=git
promiser=/opt/cfengine/masterfiles
attribute_repo=https://github.com/cfengine/masterfiles
operation=evaluate_promise
log_level=info
promise_type=git
promiser=/opt/cfengine/masterfiles
attribute_repo=https://github.com/cfengine/masterfiles
operation=terminate
log_level=info
Example response in line based protocol
code
git_promise_module 0.0.1 v1 line_based
operation=validate_promise
promiser=/opt/cfengine/masterfiles
attribute_repo=https://github.com/cfengine/masterfiles
result=valid
operation=evaluate_promise
promiser=/opt/cfengine/masterfiles
attribute_repo=https://github.com/cfengine/masterfiles
log_info=Cloning 'https://github.com/cfengine/masterfiles' -> '/opt/cfengine/masterfiles'...
log_info=Successfully cloned 'https://github.com/cfengine/masterfiles' -> '/opt/cfengine/masterfiles'
result_classes=masterfiles_cloned,ran_git_clone
result=repaired
operation=terminate
result=success
Repeated keys
In some cases, the left side keys within the protocol message are not unique.
Most notably, this is useful for logging in response messages:
code
log_verbose=Users left in list: 'alice', 'bob', 'charlie'
log_info=User 'alice' created
log_info=User 'alice' added to group 'testers'
log_verbose=Users left in list: 'bob', 'charlie'
log_info=User 'bob' created
log_info=User 'bob' added to group 'testers'
log_verbose=Users left in list: 'charlie'
log_info=User 'charlie' created
log_info=User 'charlie' added to group 'testers'
log_verbose=No users left in list
This enables the agent to filter the log messages based on log level, and also print them in the correct order.
Additional reading
See these tutorials / blog posts, for more examples or inspiration:
defaults
Defaults promises are related to variables. If a variable or
parameter in a promise bundle is undefined, or its value is defined to be
invalid, a default value can be promised instead.
CFEngine does not use Perl semantics: i.e. undefined variables do not map to
the empty string, they remain as variables for possible future expansion. Some
variables might be defined but still contain unresolved variables. To handle
this you will need to match the $(abc) form of the variables.
code
body common control
{
bundlesequence => { "main" };
}
bundle agent main
{
methods:
"example" usebundle => test("one","x","","$(four)");
}
bundle agent test(a,b,c,d)
{
defaults:
"a" string => "default a", if_match_regex => "";
"b" string => "default b", if_match_regex => "x";
"c" string => "default c", if_match_regex => "";
"d" string => "default d", if_match_regex => "\$\([a-zA-Z0-9_.]+\)";
reports:
"a = '$(a)', b = '$(b)', c = '$(c)' d = '$(d)'";
}
Another example:
code
bundle agent example
{
defaults:
"X" string => "I am a default value";
"Y" slist => { "I am a default list item 1", "I am a default list item 2" };
methods:
"example" usebundle => mymethod("","bbb");
reports:
"The default value of X is $(X)";
"The default value of Y is $(Y)";
}
###########################################################
bundle agent mymethod(a,b)
{
vars:
"no_return" string => "ok"; # readfile("/dont/exist","123");
defaults:
"a" string => "AAAAAAAAA", if_match_regex => "";
"b" string => "BBBBBBBBB", if_match_regex => "";
"no_return" string => "no such file";
reports:
"The value of a is $(a)";
"The value of b is $(b)";
"The value of no_return is $(no_return)";
}
Attributes
if_match_regex
Description: If this anchored regular expression matches the
current value of the variable, replace it with default.
If a parameter or variable is already defined in the current context, and the
value matches this regular expression, it will be deemed invalid and replaced
with the default value.
Type: string
Allowed input range: (arbitrary string)
Example:
code
bundle agent main
{
defaults:
# We can have default values even if variables are not defined at all.
# This is equivalent to a variable definition, so not particularly useful.
"X" string => "I am a default value";
"Y" slist => { "I am a default list item 1", "I am a default list item 2" };
methods:
# More useful, defaults if parameters are passed to a param bundle
"example" usebundle => mymethod("","bbb");
reports:
"The default value of X is $(X)";
"The default value of Y is $(Y)";
}
bundle agent mymethod(a,b)
{
vars:
"no_return" string => "ok"; # readfile("/dont/exist","123");
defaults:
"a" string => "AAAAAAAAA", if_match_regex => "";
"b" string => "BBBBBBBBB", if_match_regex => "";
"no_return" string => "no such file";
reports:
"The value of a is $(a)";
"The value of b is $(b)";
"The value of no_return is $(no_return)";
}
code
R: The value of a is AAAAAAAAA
R: The value of b is bbb
R: The value of no_return is ok
R: The default value of X is I am a default value
R: The default value of Y is I am a default list item 1
R: The default value of Y is I am a default list item 2
This policy can be found in
/var/cfengine/share/doc/examples/defaults.cf
and downloaded directly from
github.
files
Files promises manage all aspects of files. Presence, absence, file content, permissions, and ownership. File content can be fully or partially managed.
Examples
Creating a file with content
code
bundle agent __main__
{
files:
"/tmp/hello"
content => "Hello, CFEngine";
}
Before making changes to the system, CFEngine will check what the current state is, and whether it matches the desired state.
In this case, CFEngine will create and edit the file only if necessary. If /tmp/hello already exists with the correct content, no changes are made.
Tip: In this and other examples, we use the __main__ bundle.
This allows you to easily run a policy file directly.
In the real world, when incorporating policy into your policy set, you will want to pick a descriptive and unique bundle name, and ensure this bundle is evaluated by including it in the bundlesequence.
Overwriting the contents of a file only if it exists
Building on the previous example, we can add the if attribute to make CFEngine only edit the file if it exists.
code
bundle agent __main__
{
files:
"/tmp/hello"
content => "Hello, CFEngine",
if => fileexists("/tmp/hello");
}
In the example above, fileexists() is a built-in function call.
There are many others available to use, see: Functions.
code
bundle agent __main__
{
files:
ubuntu_18|ubuntu_20::
"/tmp/hello"
create => "true";
}
The line with ubuntu_18|ubuntu_20:: is called a class guard - it means the promise will only be evaluated if the ubuntu_18 or ubuntu_20 class is defined.
We can say that this defines the context where the promise is relevant.
This is similar to how we used if above.
In class guards you cannot have function calls, so they are typically used for more static / high level conditions, such as operating system, machine role, environment, or classes which have already been defined earlier in your policy set.
Then, the if attribute can be used for more advanced conditions with function calls, for example checking if a file exists, comparing strings, or even looking at the output of a shell command.
Using the output of another function or shell command
The with attribute and variable expansion allows you to easily store the output of a function in a temporary variable, which you can then expand inside content, or other strings within the same promise:
code
bundle agent __main__
{
files:
"/tmp/hello"
content => "Output of uname: $(with)",
with => execresult("uname", "useshell");
}
Tip: Shell commands come with their own security risks and performance implications.
Whenever you run shell commands within CFEngine policy, using execresult(), returnszero(), or commands promises, be careful what data actually gets sent to the shell, you may want to limit or sanitize that data depending on where it comes from.
You should also consider whether you can achieve the same result without shell commands, using built in CFEngine promise types and functions, which is generally preferable.
File copying
Copying is 'backwards'. Instead of the default object being source and the
option being the destination, in CFEngine 3 the destination is paramount
and the source is an option. This is because the model of voluntary
cooperation tells us that it is the object that is changed, which is the
agent making the promise. One cannot force change onto a destination
with CFEngine, one can only invite change from a source.
Normal ordering of promise attributes
CFEngine has no 'action sequence'. Ordering of operations
has, in most cases, a natural ordering that is assumed by the agent. For
example, 'delete then create' (normal ordering) makes sense, but
'create then delete' does not. This sort of principle can be extended
to deal with all aspects of file promises.
The diagram below shows the ordering. Notice that the same ordering
applies regardless of file type (plain-file or directory). Note also
that file editing is done "atomically".
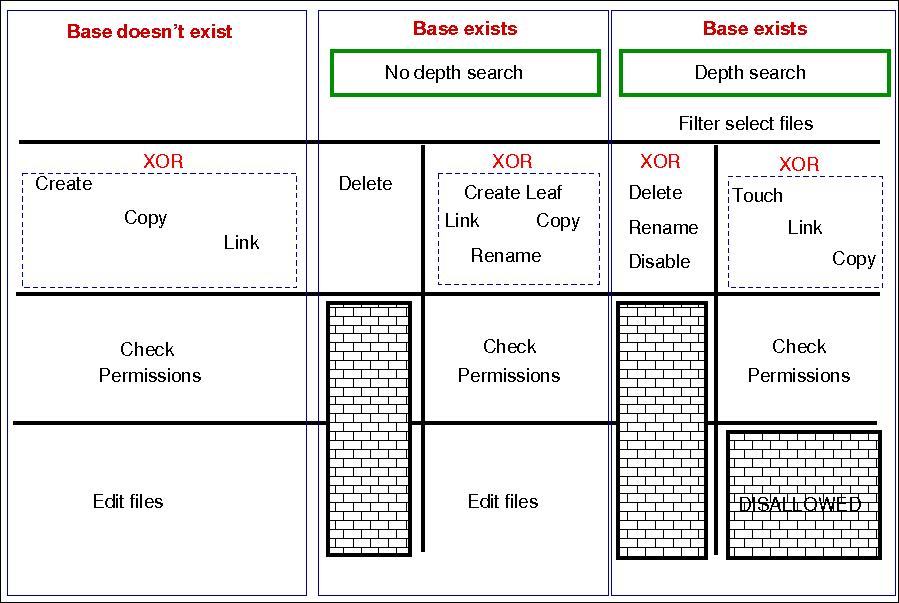
The pseudo-code for this logic is shown in the diagram and below:
code
for each file promise-object
{
if (depth_search)
do
DepthSearch (HandleLeaf)
else
(HandleLeaf)
done
}
HandleLeaf()
{
Does leaf-file exist?
NO: create
YES: rename,delete,touch,
do
for all servers in {localhost, @(servers)}
{
if (server-will-provide)
do
if (depth_search)
embedded source-depth-search (use file source)
break
else
(use file source)
break
done
done
}
done
Do all links (always local)
Check Permissions
Do edits
}
Depth searches (aka 'recursion') during searches
Recursion is called "depth-search", and CFEngine uses the 'globbing' symbols
with standard regular expressions:
code
/one/.*/two/thr.*/four
When searching for hidden files (files with names starting with a
'.') or files with specific extensions, you should take care to escape
the dot (e.g., \.cshrc or .*\.txt) when you wish it to mean a
literal character and not the any character interpretation provided by
regular expression interpretation.
When doing a recursive search, the files '.' and '..' are never
included in the matched files, even if the regular expression in the
leaf_name specifically allows them.
The filename /dir/ect/ory/. is a special case used with the create
attribute to indicate the directory named /dir/ect/ory and not any of
the files under it. If you really want to specify a regular expression
that matches any single-character filename, use /dir/ect/ory/[\w\W] as
your promise regular expression (you can't use /dir/ect/ory/[^/], see
below for an explanation.
Depth search refers to a search for file objects that starts from the
one or more matched base-paths as shown in the example above.
Filenames and regular expressions
CFEngine allows regular expressions within filenames, but only after
first doing some sanity checking to prevent some readily avoidable
problems. The biggest rule you need to know about filenames and regular
expressions is that all regular expressions in filenames are bounded
by directory separators, and that each component expression is anchored
between the directory separators. In other words, CFEngine splits up any
file paths into its component parts, and then it evaluates any regular
expressions at a component-level.
What this means is that the path /tmp/gar.* will only match filenames
like /tmp/gar, /tmp/garbage and /tmp/garden. It will not match
filename like /tmp/gar/baz; because even though the .* in a regular
expression means "zero or more of any character", CFEngine restricts
that to mean "zero or more of any character in a path component".
Correspondingly, CFEngine also restricts where you can use the /
character. For example, you cannot use it in a character class like
[^/] or in a parenthesized or repeated regular expression component.
This means that regular expressions that include "optional directory
components" will not work. You cannot have a files promise to tidy the
directory (/usr)?/tmp. Instead, you need to be more verbose and specify
/usr/tmp|/tmp. Potentially more efficient would be a declarative
approach. First, create an slist that contains both the strings /tmp
and /usr/tmp and then allow CFEngine to iterate over the list.
This also means that the path /tmp/.*/something will match files such
as /tmp/abc/something or /tmp/xyzzy/something. However, even though the
pattern .* means "zero or more of any character (except /)", CFEngine
matches files bounded by directory separators. So even though the
pathname /tmp//something is technically the same as the pathname
/tmp/something, the regular expression /tmp/.*/something will not
match on the case of /tmp//something (or /tmp/something).
Promises involving regular expressions
CFEngine can only keep (or repair, or fail to keep) a promise on files
which actually exist. If you make a promise based on a wildcard match,
then the promise is only ever attempted if the match succeeds. However,
if you make a promise containing a recursive search that includes a
wildcard match, then the promise can be kept or repaired, provided that
the directory specified in the promise exists. Consider the following
two examples, which assume that there first exist files named /tmp/gar,
/tmp/garbage and /tmp/garden. Initially, the two promises look like they
should do the same thing; but there is a subtle difference:
bundle agent foobaz
{
files:
"/tmp/gar.*"
delete => tidy,
classes => if_ok("done");
}
body classes if_ok(x)
{
promise_repaired => { "$(x)" };
promise_kept => { "$(x)" };
}
|
bundle agent foobaz
{
files:
"/tmp"
delete => tidy,
depth_search => recurse("0"),
file_select => gars,
classes => if_ok("done");
}
body file_select gars
{
leaf_name => { "gar.*" };
file_result => "leaf_name";
}
body classes if_ok(x)
{
promise_repaired => { "$(x)" };
promise_kept => { "$(x)" };
}
|
In the first example, when the configuration containing this promise is
first executed, any file starting with "gar" that exists in the /tmp
directory will be removed, and the done class will be set. However, when
the configuration is executed a second time, the pattern /tmp/gar.*
will not match any files, and that promise will not even be attempted
(and, consequently the done class will not be set).
In the second example, when the configuration containing this promise is
first executed, any file starting with "gar" that exists in the /tmp
directory will also be removed, and the done class will also be set. The
second time the configuration is executed, however, the promise on the
/tmp directory will still be executed (because /tmp of course still
exists), and the done class will be set, because all files matching
the file_select attribute have been deleted from that directory.
Local and remote searches
There are two distinct kinds of depth search:
- A local search over promiser agents.
- A remote search over provider agents.
When we are copying or linking to a file source, it is the search
over the remote source that drives the content of a promise (the
promise is a promise to use what the remote source provides). In
general, the sources are on a different device to the images that make
the promises. For all other promises, we search over existing local
objects.
If we specify depth search together with copy of a directory, then the
implied remote source search is assumed, and it is made after the search
over local base-path objects has been made. If you mix complex promise
body operations in a single promise, this could lead to confusion about
the resulting behavior, and a warning is issued. In general it is not
recommended to mix searches without a full understanding of the
consequences, but this might occasionally be useful.
Depth search is not allowed with edit_line promises.
Platforms that support named sockets (basically all Unix systems, but
not Windows), may not work correctly when using a files promise to
alter such a socket. This is a known issue, documented in
CFE-1782, and
CFE-1830.
Attributes
Common attributes
Common attributes are available to all promise types. Full details for common
attributes can be found in the Common promise attributes section of
the Promise types page. The common attributes are as follows:
acl
Type: body acl
See also: Common body attributes
History:
- perms body no longer required for base directory to be considered by files promise 3.7.5, 3.10.0
aces
Description:
Native settings for access control entry are defined by 'aces'. POSIX ACL are
available in CFEngine Community starting with 3.4.0. NTFS ACL are available in
with CFEngine Enterprise.
Type: slist
Allowed input range:
((user|group):[^:]+:[-=+,rwx()dtTabBpcoD]*(:(allow|deny))?)|((all|mask):[-=+,rwx()]*(:(allow|deny))?)
Form of the permissions is as follows:
code
aces = {
"user:uid:mode[:perm_type]", ...,
"group:gid:mode[:perm_type]", ...,
"all:mode[:perm_type]"
};
user
A valid username identifier for the system and cannot be empty. However,
user can be set to * as a synonym for the entity that owns the file
system object (e.g. user:*:r).
Notes:
- The user id is not a valid alternative.
- This ACL is required when
acl_method is set to overwrite.
uid
A valid user identifier for the system and cannot be empty. However, uid
can be set to * as a synonym for the entity that owns the file system
object (e.g. user:*:r).
Note: The username is not a valid alternative.
group
A valid group identifier for the system and cannot be empty. However,
group can be set to * as a synonym for the group that owns the POSIX
file system object (group:*:rwx).
Notes:
- The group id is not a valid alternative.
- This ACL is required when
acl_method is set to overwrite.
gid
A valid group identifier for the system and cannot be empty. However, in
some ACL types, gid can be set to * to indicate a special group (e.g. in
POSIX this refers to the file group).
Note: The group name is not a valid alternative.
all
Indicates that the line applies to every user.
Note: This ACL is required when acl_method is set to overwrite.
mask
A valid mask identifier (e.g. mask:rwx ). In essence the mask is an upper
bound of the permissions that any entry in the group class will grant. When
acl_method is overwrite if mask is not supplied, it will default to
mask:rwx).
mode
One or more strings op|perms|(nperms); a concatenation of op,
perms and optionally (nperms) separated with commas (e.g. +rx,-w(s) ).
mode is parsed from left to right.
op
Specifies the operation on any existing permissions, if the defined ACE
already exists. op can be =, empty, + or -. = or empty sets the
permissions to the ACE as stated. + adds and - removes the permissions from
any existing ACE.
nperms (optional)
Specifies file system specific (native) permissions. Only valid if
acl_type is defined and will only be enforced if the file object is
stored on a file system supporting this ACL type. For
example, nperms will be ignored if acl_type:ntfs and the object is
stored on a file system not supporting NTFS ACLs. Valid values for nperms
varies with different ACL types. When acl_type is set to ntfs, the
valid flags and their mappings is as follows:
| CFEngine nperm flag |
NTFS Special Permission |
| x |
Execute File / Traverse Folder |
| r |
Read Data / List Folder |
| t |
Read Attributes |
| T |
Read Extended Attributes |
| w |
Write Data / Create Files |
| a |
Append Data / Create Folders |
| b |
Write Attributes |
| B |
Write Extended Attributes |
| D |
Delete Sub-folders and Files |
| d |
Delete |
| p |
Read Permissions |
| c |
Change Permissions |
| o |
Take Ownership |
perm_type (optional)
Can be set to either allow or deny, and defaults to allow. deny is
only valid if acl_type is set to an ACL type that support deny
permissions. A deny ACE will only be enforced if the file object is stored
on a file system supporting the acl type set in acl_type.
gperms (generic permissions)
A concatenation of zero or more of the characters shown in the table below. If
left empty, none of the permissions are set.
| Flag |
Description |
Semantics on file |
Semantics on directory |
| r |
Read |
Read data, permissions, attributes |
Read directory contents, permissions, attributes |
| w |
Write |
Write data |
Create, delete, rename subobjects |
| x |
Execute |
Execute file |
Access subobjects |
Notes
- The
r permission is not necessary to read an object's permissions and
attributes in all file systems. For example, in POSIX, having x on its
containing directory is sufficient.
- Capital
X which is supported by the setfacl command is not
supported by the acl library, and thus not supported by the acl body.
Example:
code
body acl template
{
acl_method => "overwrite";
acl_type => "posix";
acl_default => "access";
aces => {
"user:*:r(wwx),-r:allow",
"group:*:+rw:allow",
"mask:x:allow",
"all:r"
};
}
acl_default
Description: The access control list type for the affected file system is determined by acl_default.
Directories have ACLs associated with them, but they also have the ability to
inherit an ACL to sub-objects created within them. POSIX calls the former ACL
type "access ACL" and the latter "default ACL", and we will use the same
terminology.
The constraint acl_default gives control over the default ACL of
directories. The default ACL can be left unchanged (nochange),
empty (clear), or be explicitly specified (specify). In addition, the
default ACL can be set equal to the directory's access ACL (access). This
has the effect that child objects of the directory gets the same access ACL as
the directory.
Type: (menu option)
Allowed input range:
code
nochange
access
specify
clear
Example:
code
body acl template
{
acl_method => "overwrite";
acl_type => "posix";
acl_default => "access";
aces => {
"user:*:rwx:allow",
"group:*:+rw:allow",
"mask:rx:allow",
"all:r"
};
}
History: Was introduced in 3.5. Replaces the now deprecated
acl_directory_inherit.
acl_inherit
Description: Defines whether the object inherits its ACL from its parent.
Type: (menu option)
Allowed input range:
truefalseyesnoonoffnochange
Notes: This attribute has an effect only on Windows.
acl_method
Description: The acl_method menu option defines the editing method for
an access control list.
When defining an ACL, we can either use an existing ACL as the starting point,
or state all entries of the ACL. If we just care about one entry, say that the
superuser has full access, the method constraint can be set to append,
which is the default. This has the effect that all the existing ACL entries
that are not mentioned will be left unchanged. On the other hand, if method
is set to overwrite, the resulting ACL will only contain the mentioned
entries.
Note: When acl_method is set to overwrite the acl must include the system
owner, group and all. For example user:*:rwx, group:*:rx, and all:---.
Type: (menu option)
Allowed input range:
Example:
code
body acl template
{
acl_method => "overwrite";
acl_type => "posix";
aces => { "user:*:rw:allow", "group:*:+r:allow", "all:"};
}
acl_type
Description: The acl_type menu option defines the access control list
type for the affected file system.
ACLs are supported on multiple platforms, which may have different sets of
available permission flags. By using the constraint acl_type, we
can specify which platform, or ACL API, we are targeting with the ACL.
The default, generic, is designed to work on all supported platforms.
However, if very specific permission flags are required, like Take
Ownership on the NTFS platform, we must set acl_type to indicate the target
platform. Currently, the supported values are posix and ntfs.
Type: (menu option)
Allowed input range:
Example:
code
body acl template
{
acl_type => "ntfs";
aces => { "user:Administrator:rwx(po)", "user:Auditor:r(o)"};
}
specify_default_aces
Description: The slist specify_default_aces specifies the native
settings for access control entry.
specify_default_aces (optional) is a list of access control entries that are
set on child objects. It is also parsed from left to right and
allows multiple entries with same entity-type and id. Only valid if
acl_default is set to specify.
This is an ACL which makes explicit setting for the acl inherited by new
objects within a directory. It is included for those implementations
that do not have a clear inheritance policy.
Type: slist
Allowed input range:
((user|group):[^:]+:[-=+,rwx()dtTabBpcoD]*(:(allow|deny))?)|((all|mask):[-=+,rwx()]*(:(allow|deny))?)
Example:
code
body acl template
{
specify_default_aces => { "all:r" };
}
changes
Type: body changes
See also: Common body attributes
hash
Description: The hash menu option defines the type of hash used for change detection.
The best option cross correlates the best two available algorithms known in the OpenSSL library.
Type: (menu option)
Allowed input range:
code
md5
sha1
sha224
sha256
sha384
sha512
best
Example:
code
body changes example
{
hash => "md5";
}
report_changes
Description: Specify criteria for change warnings using the report_changes menu option.
Files can change in permissions and contents, i.e. external or internal attributes. If all is chosen all attributes are checked.
Type: (menu option)
Allowed input range:
code
all
stats
content
none
Example:
code
body changes example
{
report_changes => "content";
}
update_hashes
Description: Use of update_hashes determines whether hash values should
be updated immediately after a change.
If this is positive, file hashes should be updated as soon as a change is
registered so that multiple warnings are not given about a single change. This
applies to addition and removal too.
Type: boolean
Example:
code
body changes example
{
update_hashes => "true";
}
report_diffs
This feature requires CFEngine Enterprise.
Description: Setting report_diffs determines whether to generate reports
summarizing the major differences between individual text files.
If true, CFEngine will log a 'diff' summary of major changes to the files. It
is not permitted to combine this promise with a depth search, since this would
consume a dangerous amount of resources and would lead to unreadable reports.
The feature is intended as a informational summary, not as a version control
function suitable for transaction control. If you want to do versioning on
system files, you should keep a single repository for them and use CFEngine to
synchronize changes from the repository source. Repositories should not be
used to attempt to capture random changes of the system.
Limitations:
Diffs will not be reported for files that are larger than 80MB in size.
Diffs will not be reported if the number of lines between the first and last change exceed 4500.
Diffs for binary files are not generated. Files are considered binary files if control character 0-32 excluding 9, 10, 13, and 32, or 127 are found in the file.
Type: boolean
Example:
code
body changes example
{
report_diffs => "true";
}
copy_from
Type: body copy_from
The copy_from body specifies the details for making remote copies.
Note: For improved performance, connections from cf-agent to cf-serverd
are re-used. Currently connection caching is done per pass in each bundle
activation.
See also: Common body attributes
source
Description: The source string represents the reference source file from which to copy. For remote copies this refers to the file name on the remote server.
Type: string
Allowed input range: .+
Example:
code
body copy_from example
{
source => "/path/to/source";
}
servers
Description: The servers slist names servers in order of preference from which to copy. The servers are tried in order until one of them succeeds.
Type: slist
Allowed input range: [A-Za-z0-9_.:-]+
Example:
code
body copy_from example
{
servers => { "primary.example.org", "secondary.example.org",
"tertiary.other.domain" };
}
collapse_destination_dir
Description: Use collapse_destination_dir to flatten the directory hierarchy during copy. All the files will end up in the root destination directory.
Under normal operations, recursive copies cause CFEngine to track
subdirectories of files. So, for instance, if we copy recursively from src to
dest, then src/subdir/file will map to dest/subdir/file.
By setting this option to true, the promiser destination directory promises to
aggregate files searched from all subdirectories into
itself; in other words, a single destination directory. So src/subdir/file will map to dest/file for any subdir.
Type: boolean
Example:
code
body copy_from mycopy(from,server)
{
source => "$(from)";
servers => { "$(server)" };
collapse_destination_dir => "true";
}
compare
Description: The menu option policy compare is used for comparing source
and image file attributes.
The default copy method is mtime (modification time) or ctime (change
time), meaning that the source file is copied to the destination (promiser)
file, if the source file has been modified (content, permissions, ownership,
moved to a different file system) more recently than the destination. Note this
is special behavior when no comparison is specified as generally only a single
comparison can be used.
Type: (menu option)
Allowed input range:
CFEngine copies the file if the modification time of the source file is more
recent than that of the promised file
CFEngine copies the file if the creation time of the source file is more
recent than that of the promised file
CFEngine copies the file if the modification time or creation time of the
source file is more recent than that of the promised file. If the times are
equal, a byte-for-bye comparison is done on the files to determine if it needs
to be copied.
CFEngine copies the file if the promised file does not already exist.
CFEngine copies the file if they are both plain files and a
byte-for-byte comparison determines that they are different. If both
are not plain files, CFEngine reverts to comparing the mtime and
ctime of the files. If the source file is on a different machine
(e.g. network copy), then hash is used instead to reduce network
bandwidth.
CFEngine copies the file if they are both plain files and a
message digest comparison indicates that the files are different. In
Enterprise versions of CFEngine version 3.1.0 and later, SHA256 is
used as a message digest hash to conform with FIPS; in older
Enterprise versions of CFEngine and all Community versions, MD5 is
used.
digest a synonym for hash
Default value: mtime or ctime differs
Example:
code
body copy_from example
{
compare => "digest";
}
copy_backup
Description: Menu option policy for file backup/version control
Determines whether a backup of the previous version is kept on the system.
This should be viewed in connection with default_repository in body agent control, since a
defined repository affects the location at which the backup is stored.
Type: (menu option)
Allowed input range:
code
true
false
timestamp
Default value: true
Example:
code
body copy_from example
{
copy_backup => "timestamp";
}
See also: Common body attributes, default_repository in body agent control, edit_backup in body edit_defaults
encrypt
Description: The encrypt menu option policy describes whether to use
encrypted data stream to connect to remote hosts.
Client connections are encrypted with using a Blowfish randomly generated
session key. The initial connection is encrypted using the public/private keys
for the client and server hosts.
Type: boolean
Default value: false
Example:
code
body copy_from example
{
servers => { "remote-host.example.org" };
encrypt => "true";
}
Note: When used with protocol_version 2 or greater this attribute is a
noop as the entire session is encrypted.
See also: protocol_version, ifencrypted, protocol_version, tls_ciphers, tls_min_version, allowciphers, allowtlsversion
check_root
Description: The check_root menu option policy checks permissions on the
root directory when copying files recursively by depth_search.
This flag determines whether the permissions of the root directory should be
set from the root of the source. The default is to check only copied file
objects and subdirectories within this root (false).
Type: boolean
Example:
code
body copy_from example
{
check_root => "true";
}
copylink_patterns
Description: The copylink_patterns slist of patterns are matching files
that should be copied instead of linked.
The matches are performed on the last node of the filename; in other words,
the file without its path. As Windows does not support symbolic links, this
feature is not available there.
Type: slist
Allowed input range: (arbitrary string)
Example:
code
body copy_from example
{
copylink_patterns => { "special_node1", "other_node.*" };
}
copy_size
Description: The integers specified in copy_size determines the range
for the size of files that may be copied.
The use of the irange function is optional. Ranges may also be specified as
comma separated numbers.
Type: irange[int,int]
Allowed input range: 0,inf
Default value: any size range
Example:
code
body copy_from example
{
copy_size => irange("0","50000");
}
See also: Function: irange()
findertype
Description: The findertype menu option policy describes the default finder type on MacOSX.
This applies only to the Mac OS X variants.
Type: (menu option)
Allowed input range:
Example:
code
body copy_from example
{
findertype => "MacOSX";
}
linkcopy_patterns
Description: The linkcopy_patterns contains patterns for matching files
that should be replaced with symbolic links.
The pattern matches the last node filename; in other words, without the
absolute path. Windows only supports hard links.
Type: slist
Allowed input range: (arbitrary string)
Example:
code
body copy_from mycopy(from)
{
source => "$(from)";
linkcopy_patterns => { ".*" };
}
See also: link_type.
link_type
Description: The link_type menu option policy contains the type of links
to use when copying.
Users are advised to be wary of 'hard links' (see Unix manual pages for the ln
command). The behavior of non-symbolic links is often precarious and
unpredictable. However, hard links are the only supported type by Windows.
Note that symlink is synonymous with absolute links, which are different from
relative links. Although all of these are symbolic links, the nomenclature
here is defined such that symlink and absolute are equivalent. When verifying
a link, choosing 'relative' means that the link must be relative to the
source, so relative and absolute links are mutually exclusive.
Type: (menu option)
Allowed input range:
code
symlink
hardlink
relative
absolute
Default value: symlink
Example:
code
body copy_from example
{
link_type => "symlink";
source => "/tmp/source";
}
missing_ok
Description: Treat a missing source file as a promise kept.
This allows you to override the promise outcome when a source file is missing.
When set to true if the promise is a remote copy and there is a failure to
connect the promise will not be considered kept. If the agent is able to request
the file and the file is missing the promise will be kept.
Type: boolean
Default value: false
Example:
code
bundle agent main
{
files:
"/tmp/copied_from_missing_ok"
copy_from => missing_ok( "/var/cfengine/masterfiles/missing" ),
classes => results("bundle", "copy_from_missing_ok");
reports:
"$(with)"
with => string_mustache( "", sort( classesmatching( "copy_from_.*" ), lex));
}
body copy_from missing_ok( file_path )
{
source => "$(file_path)";
missing_ok => "true";
# Run with these classes to try remote copies
remote_copy_self::
servers => { "127.0.0.1" };
remote_copy_policy_hub::
servers => { $(sys.policy_hub) };
}
body classes results(scope, class_prefix)
{
scope => "$(scope)";
promise_kept => { "$(class_prefix)_reached",
"$(class_prefix)_kept" };
promise_repaired => { "$(class_prefix)_reached",
"$(class_prefix)_repaired" };
repair_failed => { "$(class_prefix)_reached",
"$(class_prefix)_error",
"$(class_prefix)_not_kept",
"$(class_prefix)_failed" };
repair_denied => { "$(class_prefix)_reached",
"$(class_prefix)_error",
"$(class_prefix)_not_kept",
"$(class_prefix)_denied" };
repair_timeout => { "$(class_prefix)_reached",
"$(class_prefix)_error",
"$(class_prefix)_not_kept",
"$(class_prefix)_timeout" };
}
In the above example /tmp/copied_from_missing_ok promises to be a copy of the local file
/var/cfengine/masterfiles/missing. In the missing_ok copy_from body
missing_ok is set to true. This causes the promise to be considered kept if
the source file is missing. The results classes body is used to define bundle
scoped classes prefixed with copy_from_missing_ok. The reports promise
outputs a sorted list of the classes defined starting with copy_from_.
code
R: [
"copy_from_missing_ok_kept",
"copy_from_missing_ok_reached"
]
We can see in the output that the class defined for copying a local file that
does not exist is seen to be a promise kept.
```
This policy can be found in
/var/cfengine/share/doc/examples/missing_ok.cf
and downloaded directly from
github.
Notes:
This can be useful for opportunistically coping files that are not necessarily
required or available at all times. For example if there is a host specific data
that each host attempts to copy this will allow you to not have many promise
failures when a host does not have any data prepared for it.
See also: seed_cp in the MPF, compare in body copy_from
History:
force_update
Description: The force_update menu option policy instructs whether to
always force copy update.
Warning: this is a non-convergent operation. Although the end point might
stabilize in content, the operation will never quiesce. Use of this feature is
not recommended except in exceptional circumstances since it creates a
busy-dependency. If the copy is a network copy, the system will be disturbed
by network disruptions.
Type: boolean
Default value: false
Example:
code
body copy_from example
{
force_update => "true";
}
force_ipv4
Description: The force_ipv4 menu option policy can determine whether to use ipv4 on an ipv6 enabled network.
IPv6 should be harmless to most users unless you have a partially or mis-configured setup.
Type: boolean
Default value: false
Example:
code
body copy_from example
{
force_ipv4 => "true";
}
portnumber
Description: Setting portnumber determines the port number to connect to
on a server host.
The standard or registered port number is tcp/5308. CFEngine does not
presently use its registered udp port with the same number, but this could
change in the future.
Type: int
Allowed input range: 1,65535
Example:
code
body copy_from example
{
portnumber => "5308";
}
preserve
Description: Setting the preserve menu option policy determines whether
to preserve file permissions on copied files.
This ensures that the destination file (promiser) gets the same file permissions as
the source. For local copies, all attributes are preserved, including ACLs and SELinux
security contexts. For remote copies, only Unix mode is preserved.
Note: This attribute will not preserve ownership (user/group).
Type: boolean
Default value: false
Example:
code
body copy_from example
{
preserve => "true";
}
History: Version 3.1.0b3,Nova 2.0.0b1 (2010)
protocol_version
Description: Defines the protocol to use for the outgoing connection in this
copy operation.
Type: (menu option)
Allowed input range:
1classic2tls3cookielatest
Default value: classic
Note: The value here will override the setting from body common control.
See also: protocol_version in
body common, allowlegacyconnects
History: Introduced in CFEngine 3.6.0
purge
Description: The purge menu option policy instructs on whether to purge
files on client that do not match files on server when a depth_search is
used.
Purging files is a potentially dangerous matter during a file copy it implies
that any promiser (destination) file which is not matched by a source will be
deleted. Since there is no source, this means the file will be irretrievable.
Great care should be exercised when using this feature.
Note this attribute only works when combined with depth_search and purging
will also delete backup files generated during the file copying if copy_backup
is set to true.
Type: boolean
Default value: false
Example:
code
body copy_from example
{
purge => "true";
}
stealth
Description: Setting the stealth menu option policy determines whether
to preserve time stamps on copied files. This preserves file access and
modification times on the promiser files.
Type: boolean
Default value: false
Example:
code
body copy_from example
{
stealth => "true";
}
timeout
Description: The integer set in timeout is the value for the connection
timeout, in seconds.
Type: int
Allowed input range: 1,3600
Default Value: default_timeout
Example:
code
body copy_from example
{
timeout => "10";
}
See also: agent default_timeout, cf-runagent timeout
Notes:
cf-serverd will time out any transfer that takes longer than 10 minutes
(this is not currently tunable).
trustkey
Description: The trustkey menu option policy determines whether to trust
public keys from a remote server, if previously unknown.
If the server's public key has not already been trusted, trustkey provides
automated key-exchange.
Note that, as a simple security precaution, trustkey should normally be set
to false. Even though the risks to the client low, it is a good security
practice to avoid key exchange with a server one is not one hundred percent
sure about. On the server-side however, trust is often granted to many clients
or to a whole network in which possibly unauthorized parties might be able to
obtain an IP address. Thus the trust issue is most important on the server
side.
As soon as a public key has been exchanged, the trust option has no effect. A
machine that has been trusted remains trusted until its key is manually
revoked by a system administrator. Keys are stored in WORKDIR/ppkeys.
Type: boolean
Default value: false
Example:
code
body copy_from example
{
trustkey => "true";
}
type_check
Description: The type_check menu option policy compares file types
before copying.
File types at source and destination should normally match in order for
updates to overwrite them. This option allows this checking to be switched
off.
Type: boolean
Example:
code
body copy_from example
{
type_check => "false";
}
verify
Description: The verify menu option policy instructs whether to verify
transferred file by hashing after copy.
Warning: This is a highly resource intensive option, and is not
recommended for large file transfers.
Type: boolean
Default value: false
Example:
code
body copy_from example
{
verify => "true";
}
content
Description: Complete content the promised file should contain.
Type: string
Allowed input range: (arbitrary string)
Example:
code
bundle agent example_file_content
{
vars:
"my_content"
string => "Hello from var!";
files:
"/tmp/hello_string"
create => "true",
content => "Hello from string!";
"/tmp/hello_var"
create => "true",
content => "$(my_content)";
reports:
"/tmp/hello_string"
printfile => cat( $(this.promiser) );
"/tmp/hello_var"
printfile => cat( $(this.promiser) );
}
body printfile cat(file)
{
file_to_print => "$(file)";
number_of_lines => "inf";
}
bundle agent __main__
{
methods: "example_file_content";
}
code
R: /tmp/hello_string
R: Hello from string!
R: /tmp/hello_var
R: Hello from var!
This policy can be found in
/var/cfengine/share/doc/examples/files_content.cf
and downloaded directly from
github.
History: Was introduced in 3.16.0
Note: You cannot content in combination with the other edit operations
like edit_line, edit_xml, edit_template or edit_template_string.
create
Description: true/false whether to create non-existing file
Directories are created by using the /. to signify a directory type.
Note that, if no permissions are specified, mode 600 is chosen for a
file, and mode 755 is chosen for a directory. If you cannot accept these
defaults, you should specify permissions.
Note that technically, /. is a regular expression. However, it is used
as a special case meaning "directory". See filenames and regular
expressions for a more complete discussion.
Type: boolean
Default value: false
Example:
code
files:
"/path/plain_file"
create => "true";
"/path/dir/."
create => "true";
Notes: In general, you should not use create with copy_from, link_from,
template_method, or content attributes in files promises. These latter
attributes automatically create the promised file, and using create may
actually prevent the copy or link promise from being kept (since create acts
first, which may affect file comparison or linking operations). Furthermore, an
explicitly created file will be empty in the case of failure to render template
if the create attribute is explicitly used.
History:
- 3.20.0 Changed default from
false to true for cases of full file management ( e.g. when template_method is mustache, inline_mustache or cfengine, or when the content or copy_from attributes are used ).
delete
Type: body delete
See also: Common body attributes
dirlinks
Description: Menu option policy for dealing with symbolic links to
directories during deletion
Links to directories are normally removed just like any other link or
file objects. By keeping directory links, you preserve the logical
directory structure of the file system, so that a link to a directory is
not removed but is treated as a directory to be descended into.
The value keep instructs CFEngine not to remove directory links. The
values delete and tidy are synonymous, and instruct CFEngine to
remove directory links.
Type: (menu option)
Allowed input range:
Example:
code
body delete example
{
dirlinks => "keep";
}
Default value (only if body is present): dirlinks = delete
The default value only has significance if there is a delete body
present. If there is no delete body then files (and directory links)
are not deleted.
rmdirs
Description: true/false whether to delete empty directories during
recursive deletion
Type: boolean
Example:
code
body delete example
{
rmdirs => "true";
}
Note the parent directory of a search is not deleted in recursive deletions. You
must code a separate promise to delete the single parent object. This attribute does not respect include_basedir in depth_search bodies. For an example
see bundle agent rm_rf_depth in the standard library.
Default value (only if body is present): rmdirs = true
The default value only has significance if there is a delete body
present. If there is no delete body then files (and directories) are
not deleted.
depth_search
Description: Apply a promise recursively
When searching recursively from a directory, the promised directory itself is only the anchor point and is not part of the search by default. Set include_basedir to true to include the promised directory in the search.
This should be used in combination with file_select.
Type: body depth_search
See also: Common body attributes
depth
Description: Maximum depth level for search
Type: int
Allowed input range: 0,99999999999
Note that the value inf may be used for an unlimited value.
Example:
code
body depth_search example
{
depth => "inf";
}
exclude_dirs
Description: List of regexes of directory names NOT to include in depth
search
Directory names are treated specially when searching recursively through
a file system.
Type: slist
Allowed input range: .*
Example:
code
body depth_search
{
# no dot directories
exclude_dirs => { "\..*" };
}
include_basedir
Description: true/false include the start/root dir of the search
results
When checking files recursively (with depth_search) the promiser is a
directory. This parameter determines whether that initial directory
should be considered part of the promise or simply a boundary that marks
the edge of the search. If true, the promiser directory will also
promise the same attributes as the files inside it. rmdirs in delete bodies /ignore/ this attribute. A separate files promise must be made in order to delete the top level directory.
Type: boolean
Example:
code
rm -rf /tmp/CFE-3217
mkdir -p /tmp/CFE-3217/test-delete-nobasedir/one/two/three
mkdir -p /tmp/CFE-3217/test-delete/one/two/three
mkdir -p /tmp/CFE-3217/test-perms/one/two/three
mkdir -p /tmp/CFE-3217/test-perms-nobasedir/one/two/three
touch /tmp/CFE-3217/test-delete-nobasedir/one/two/three/file
touch /tmp/CFE-3217/test-delete/one/two/three/file
touch /tmp/CFE-3217/test-perms/one/two/three/file
touch /tmp/CFE-3217/test-perms-nobasedir/one/two/three/file
touch /tmp/CFE-3217/test-delete-nobasedir/file
touch /tmp/CFE-3217/test-delete/file
touch /tmp/CFE-3217/test-perms/file
touch /tmp/CFE-3217/test-perms-nobasedir/file
code
bundle agent main
{
files:
"/tmp/CFE-3217/test-delete/." -> { "CFE-3217", "CFE-3218" }
depth_search => aggressive("true"),
file_select => all,
delete => tidy,
comment => "include_basedir => 'true' will not result in thd promised directory being removed.";
"/tmp/CFE-3217/test-delete-nobasedir/."
depth_search => aggressive("false"),
file_select => all,
delete => tidy,
comment => "include_basedir => 'false' will not result in thd promised directory being removed.";
"/tmp/CFE-3217/test-perms/."
perms => m(555),
depth_search => aggressive("true"),
file_select => all,
comment => "include_basedir => 'true' results in thd promised directory having permissions managed as well.";
"/tmp/CFE-3217/test-perms-nobasedir/." -> { "CFE-3217" }
perms => m(555),
depth_search => aggressive("false"),
file_select => all,
comment => "include_basedir => 'false' results in thd promised directory not having permissions managed.";
reports:
"delete => tidy";
"/tmp/CFE-3217/test-delete present despite include_basedir => 'true'"
if => isdir("/tmp/CFE-3217/test-delete");
"/tmp/CFE-3217/test-delete-nobasedir present as expected with include_basedir => 'false'"
if => isdir("/tmp/CFE-3217/test-delete-nobasedir");
"/tmp/CFE-3217/test-delete absent, unexpectedly"
unless => isdir("/tmp/CFE-3217/test-delete");
"/tmp/CFE-3217/test-delete-nobasedir absent, unexpectedly"
unless => isdir("/tmp/CFE-3217/test-delete-nobasedir");
"perms => m(555)";
"/tmp/CFE-3217/test-perms $(with), as expected with include_basedir => 'true'"
with => filestat( "/tmp/CFE-3217/test-perms", modeoct ),
if => strcmp( filestat( "/tmp/CFE-3217/test-perms", modeoct ), "40555" );
"/tmp/CFE-3217/test-perms-nobasedir $(with), not 555, as expected with include_basedir => 'false'"
with => filestat( "/tmp/CFE-3217/test-perms-nobasedir", modeoct ),
unless => strcmp( filestat( "/tmp/CFE-3217/test-perms-nobasedir", modeoct ), "40555" );
}
body depth_search aggressive(include_basedir)
{
depth => "inf";
# exclude_dirs => { @(exclude_dirs) };
include_basedir => "$(include_basedir)";
# include_dirs => { @(include_dirs) };
# inherit_from => "$(inherit_from)";
# meta => "$(meta)"; meta attribute inside the depth_search body? It's not documented. TODO!?
rmdeadlinks => "false"; # Depth search removes dead links, this seems like something that should be in delete body. TODO!?
traverse_links => "true";
xdev => "true";
}
Inlined bodies from the stdlib in the Masterfiles Policy Framework
code
body file_select all
{
leaf_name => { ".*" };
file_result => "leaf_name";
}
body delete tidy
{
dirlinks => "delete";
rmdirs => "true";
}
body perms m(mode)
{
mode => "$(mode)";
}
code
info: Deleted file '/tmp/CFE-3217/test-delete/./one/two/three/file'
info: Deleted directory '/tmp/CFE-3217/test-delete/./one/two/three'
info: Deleted directory '/tmp/CFE-3217/test-delete/./one/two'
info: Deleted directory '/tmp/CFE-3217/test-delete/./one'
info: Deleted file '/tmp/CFE-3217/test-delete/./file'
info: Deleted file '/tmp/CFE-3217/test-delete-nobasedir/./one/two/three/file'
info: Deleted directory '/tmp/CFE-3217/test-delete-nobasedir/./one/two/three'
info: Deleted directory '/tmp/CFE-3217/test-delete-nobasedir/./one/two'
info: Deleted directory '/tmp/CFE-3217/test-delete-nobasedir/./one'
info: Deleted file '/tmp/CFE-3217/test-delete-nobasedir/./file'
info: Object '/tmp/CFE-3217/test-perms-nobasedir/./file' had permission 0664, changed it to 0555
R: delete => tidy
R: /tmp/CFE-3217/test-delete present despite include_basedir => 'true'
R: /tmp/CFE-3217/test-delete-nobasedir present as expected with include_basedir => 'false'
R: perms => m(555)
R: /tmp/CFE-3217/test-perms 40555, as expected with include_basedir => 'true'
R: /tmp/CFE-3217/test-perms-nobasedir 40775, not 555, as expected with include_basedir => 'false'
This policy can be found in
/var/cfengine/share/doc/examples/files_depth_search_include_basedir.cf
and downloaded directly from
github.
See also: rm_rf, rm_rf_depth from the standard library.
include_dirs
Description: List of regexes of directory names to include in depth
search
This is the complement of exclude_dirs.
Type: slist
Allowed input range: .*
Example:
code
body depth_search example
{
include_dirs => { "subdir1", "subdir2", "pattern.*" };
}
rmdeadlinks
Description: true/false remove links that point to nowhere
A value of true determines that links pointing to files that do not
exist should be deleted; or kept if set to false.
Type: boolean
Default value: false
Example:
code
body depth_search example
{
rmdeadlinks => "true";
}
traverse_links
Description: true/false traverse symbolic links to directories
If this is true, cf-agent will treat symbolic links to directories as
if they were directories. Normally this is considered a potentially
dangerous assumption and links are not traversed.
Type: boolean
Default value: false
Example:
code
body depth_search example
{
traverse_links => "true";
}
xdev
Description: When true files and directories on different devices from the promiser will be excluded from depth_search results.
Type: boolean
Default value: false
Example:
code
body depth_search example
{
xdev => "true";
}
edit_defaults
Type: body edit_defaults
See also: Common body attributes
edit_backup
Description: Menu option for backup policy on edit changes
Type: (menu option)
Allowed input range:
code
true
false
timestamp
rotate
Default value: true
Example:
A value of true (the default behavior) will result in the agent retaining the
previous version of the file suffixed with .cf-before-edit.
code
body edit_defaults backup( edit_backup )
{
edit_backup => "$(edit_backup)";
}
bundle agent main
{
files:
"/tmp/example_edit_backup_true"
create => "true";
"/tmp/example_edit_backup_true"
edit_line => insert_lines("Hello World"),
edit_defaults => backup("true");
vars:
"example_files" slist => sort(lsdir( "/tmp/", "example_edit_backup_true.*", false), lex);
reports:
"$(example_files)";
}
Outputs:
code
R: example_edit_backup_true
R: example_edit_backup_true.cf-before-edit
A value of timestamp will result in the original file be suffixed with the
epoch and the canonified form of the date when the file was changed followed by
.cf-before-edit. For example
_1511292441_Tue_Nov_21_13_27_22_2017.cf-before-edit.
code
body edit_defaults backup( edit_backup )
{
edit_backup => "$(edit_backup)";
}
bundle agent main
{
files:
"/tmp/example_edit_backup_timestamp"
create => "true";
"/tmp/example_edit_backup_timestamp"
edit_line => insert_lines("Hello World"),
edit_defaults => backup("timestamp");
vars:
"example_files" slist => lsdir( "/tmp/", "example_edit_backup_timestamp.*", false);
reports:
"$(example_files)";
}
Outputs:
code
R: example_edit_backup_timestamp
R: example_edit_backup_timestamp_1511300904_Tue_Nov_21_15_48_25_2017.cf-before-edit
A value of false will result in no retention of the original file.
A value of rotate will result in the original file be suffixed with
.cf-before-edit followed by an integer representing the nth previous version
of the file. The number of rotations is managed by the rotate attribute in
edit_defaults.
code
body edit_defaults backup( edit_backup )
{
edit_backup => "$(edit_backup)";
rotate => "2";
}
bundle agent main
{
files:
"/tmp/example_edit_backup_rotate"
create => "true";
"/tmp/example_edit_backup_rotate"
edit_line => insert_lines("Hello World"),
edit_defaults => backup("rotate");
"/tmp/example_edit_backup_rotate"
handle => "edit_2",
edit_line => insert_lines("Goodbye"),
edit_defaults => backup("rotate");
vars:
"example_files" slist => lsdir( "/tmp/", "example_edit_backup_rotate.*", false);
reports:
"$(example_files)";
}
Outputs:
code
R: example_edit_backup_rotate
R: example_edit_backup_rotate.cf-before-edit.1
R: example_edit_backup_rotate.cf-before-edit.2
See also: default_repository in body agent control, copy_backup in body copy_from, rotate in body edit_defaults
empty_file_before_editing
Description: Baseline memory model of file to zero/empty before
commencing promised edits.
Emptying a file before reconstructing its contents according to a fixed
recipe allows an ordered procedure to be convergent.
Type: boolean
Default value: false
Notes:
- Within
edit_line bundles the variable $(edit.empty_before_use) holds this value, allowing for decisions to be bade based on it.
Example:
code
body edit_defaults example
{
empty_file_before_editing => "true";
}
inherit
Description: If true this causes the sub-bundle to inherit the private
classes of its parent
Type: boolean
Example:
code
bundle agent name
{
methods:
"group name" usebundle => my_method,
inherit => "true";
}
body edit_defaults example
{
inherit => "true";
}
History: Was introduced in 3.4.0, Enterprise 3.0.0 (2012)
Default value: false
Notes:
The inherit constraint can be added to the CFEngine code in two
places: for edit_defaults and in methods promises. If set to true,
it causes the child-bundle named in the promise to inherit only the
classes of the parent bundle. Inheriting the variables is unnecessary as
the child can always access the parent's variables by a qualified
reference using its bundle name. For example, $(bundle.variable).
max_file_size
Description: Do not edit files bigger than this number of bytes
max_file_size is a local, per-file sanity check to make sure the file
editing is sensible. If this is set to zero, the check is disabled and
any size may be edited. The default value of max_file_size is
determined by the global control body setting whose default value is
100k.
Type: int
Allowed input range: 0,99999999999
Example:
code
body edit_defaults example
{
max_file_size => "50K";
}
recognize_join
Description: Join together lines that end with a backslash, up to 4kB
limit
If set to true, this option allows CFEngine to process line based files
with backslash continuation. The default is to not process continuation
backslashes.
Back slash lines will only be concatenated if the file requires editing,
and will not be restored. Restoration of the backslashes is not possible
in a meaningful and convergent fashion.
Type: boolean
Default value: false
Example:
code
files:
"/tmp/test_insert"
create => "true",
edit_line => Insert("$(insert.v)"),
edit_defaults => join;
}
#####
body edit_defaults join
{
recognize_join => "true";
}
rotate
Description: How many backups to store if 'rotate' edit_backup
strategy is selected. Defaults to 1
Used for log rotation. If the file is named foo and the rotate attribute
is set to 4, as above, then initially foo is copied to foo.1 and the old
file foo is zeroed out. In other words, the inode of the original
logfile does not change, but the original logfile will be empty after
the rotation is complete.
The next time the promise is executed, foo.1 will be renamed foo.2, foo
is again copied to foo.1 and the old file foo is again zeroed out.
A promise may typically be executed as guarded by time-based or
file-size-based classes. Each time the promise is executed the files are
copied/zeroed or rotated (as above) until there are rotate numbered
files, plus the one "main" file. In the example above, the file foo.3
will be renamed foo.4, but the old version of the file foo.4 will be
deleted (that is, it "falls off the end" of the rotation).
Type: int
Allowed input range: 0,99
Example:
code
body edit_defaults example
{
edit_backup => "rotate";
rotate => "4";
}
See also: edit_backup in body edit_defaults
edit_line
Type: edit_line
edit_template
Description: Path to Mustache or native-CFEngine template file to expand
Type: string
Allowed input range: "?(/.*)
Example:
code
bundle agent example
{
files:
!use_mustache::
"/etc/motd"
create => "true",
edit_template => "$(this.promise_dirname)/templates/motd.tpl",
template_method => "cfengine";
use_mustache::
"/etc/motd"
create => "true",
edit_template => "$(this.promise_dirname)/templates/motd.mustache",
template_method => "mustache";
}
History: Was introduced in 3.3.0, Nova 2.2.0 (2012). Mustache templates were introduced in 3.6.0.
See also: template_method, template_data, readjson(), parsejson(),
readyaml(), parseyaml(), mergedata(),
data, Customize message of the day
edit_template_string
Description: Mustache string to expand
Type: string
Allowed input range: (arbitrary string)
Example:
code
bundle agent example_using_template_method_inline_mustache
{
vars:
# Here we construct a data container that will be passed to the mustache
# templating engine
"d"
data => '{ "host": "docs.cfengine.com" }';
# Here we specify a string that will be used as an inline mustache template
"mustache_template_string"
string => "Welcome to host '{{{host}}}'";
files:
# Here we render the file using the data container and inline template specification
"/tmp/example.txt"
create => "true",
template_method => "inline_mustache",
edit_template_string => "$(mustache_template_string)",
template_data => @(d);
reports:
"/tmp/example.txt"
printfile => cat( $(this.promiser) );
}
body printfile cat(file)
{
file_to_print => "$(file)";
number_of_lines => "inf";
}
bundle agent __main__
{
methods: "example_using_template_method_inline_mustache";
}
code
R: /tmp/example.txt
R: Welcome to host 'docs.cfengine.com'
This policy can be found in
/var/cfengine/share/doc/examples/template_method-inline_mustache.cf
and downloaded directly from
github.
History: Was introduced in 3.12.0
See also: template_method, template_data, readjson(), parsejson(),
readyaml(), parseyaml(), mergedata(),
data, Customize message of the day
edit_xml
Type: edit_xml
file_select
Type: body file_select
See also: Common body attributes
leaf_name
Description: List of regexes that match an acceptable name
This pattern matches only the node name of the file, not its path.
Type: slist
Allowed input range: (arbitrary string)
Example:
code
body file_select example
{
leaf_name => { "S[0-9]+[a-zA-Z]+", "K[0-9]+[a-zA-Z]+" };
file_result => "leaf_name";
}
path_name
Description: List of pathnames to match acceptable target
Path name and leaf name can be conveniently tested for separately by use
of appropriate regular expressions.
Type: slist
Allowed input range: "?(/.*)
Example:
code
body file_select example
{
leaf_name => { "prog.pid", "prog.log" };
path_name => { "/etc/.*", "/var/run/.*" };
file_result => "leaf_name.path_name"
}
search_mode
Description: A list of mode masks for acceptable file permissions
The mode may be specified in symbolic or numerical form with + and -
constraints. Concatenation ug+s implies u OR g, and u+s,g+s
implies u AND g.
Type: slist
Allowed input range: [0-7augorwxst,+-]+
Example:
code
bundle agent testbundle
{
files:
"/home/mark/tmp/testcopy"
file_select => by_modes,
transformer => "/bin/echo DETECTED $(this.promiser)",
depth_search => recurse("inf");
}
body file_select by_modes
{
search_mode => { "711" , "666" };
file_result => "mode";
}
body depth_search recurse(d)
{
depth => "$(d)";
}
search_size
Type: irange[int,int]
Allowed input range: 0,inf
Description: Integer range of file sizes in bytes
Example:
code
body file_select example
{
search_size => irange("0","20k");
file_result => "size";
}
search_owners
Description: List of acceptable user names or ids for the file, or
regexes to match
A list of anchored regular expressions any of which must match the entire
userid.
Type: slist
Allowed input range: (arbitrary string)
Example:
code
body file_select example
{
search_owners => { "mark", "jeang", "student_.*" };
file_result => "owner";
}
Notes:
Windows does not have user ids, only names.
search_groups
Description: List of acceptable group names or ids for the file, or
regexes to match
A list of anchored regular expressions, any of which must match the entire group.
Type: slist
Allowed input range: (arbitrary string)
Example:
code
body file_select example
{
search_groups => { "users", "special_.*" };
file_result => "group";
}
Notes:
On Windows, files do not have group associations.
search_bsdflags
Description: String of flags for bsd file system flags expected set
Extra BSD file system flags (these have no effect on non-BSD versions of
CFEngine). See the manual page for chflags for more details.
Type: slist
Allowed input range:
[+-]*[(arch|archived|nodump|opaque|sappnd|sappend|schg|schange|simmutable|sunlnk|sunlink|uappnd|uappend|uchg|uchange|uimmutable|uunlnk|uunlink)]+
Example:
code
body file_select xyz
{
search_bsdflags => "archived|dump";
file_result => "bsdflags";
}
ctime
Description: Range of change times (ctime) for acceptable files
The file's change time refers to both modification of content and
attributes, such as permissions. On Windows, ctime refers to creation
time.
Type: irange[int,int]
Allowed input range: 0,2147483647
Example:
code
body files_select example
{
ctime => irange(ago(1,0,0,0,0,0),now);
file_result => "ctime";
}
See also: Function: irange()
mtime
Description: Range of modification times (mtime) for acceptable files
The file's modification time refers to both modification of content but
not other attributes, such as permissions.
Type: irange[int,int]
Allowed input range: 0,2147483647
Example:
code
body files_select example
{
# Files modified more than one year ago (i.e., not in mtime range)
mtime => irange(ago(1,0,0,0,0,0),now);
file_result => "!mtime";
}
See also: Function: irange()
atime
Description: Range of access times (atime) for acceptable files
A range of times during which a file was accessed can be specified in a
file_select body.
Type: irange[int,int]
Allowed input range: 0,2147483647
Example:
code
body file_select used_recently
{
# files accessed within the last hour
atime => irange(ago(0,0,0,1,0,0),now);
file_result => "atime";
}
body file_select not_used_much
{
# files not accessed since 00:00 1st Jan 2000 (in the local timezime)
atime => irange(on(2000,1,1,0,0,0),now);
file_result => "!atime";
}
See also: Function: irange()
exec_regex
Description: Matches file if this regular expression matches any full
line returned by the command
The regular expression must be used in conjunction with the
exec_program test. In this way the program must both return exit
status 0 and its output must match the regular expression. The entire
output must be matched.
Type: string
Allowed input range: .*
Example:
code
body file_select example
{
exec_regex => "SPECIAL_LINE: .*";
exec_program => "/path/test_program $(this.promiser)";
file_result => "exec_program.exec_regex";
}
exec_program
Description: Execute this command on each file and match if the exit
status is zero
This is part of the customizable file search criteria. If the
user-defined program returns exit status 0, the file is considered
matched.
Type: string
Allowed input range: "?(/.*)
Example:
code
body file_select example
{
exec_program => "/path/test_program $(this.promiser)";
file_result => "exec_program";
}
file_types
Description: List of acceptable file types from menu choices
File types vary in details between operating systems. The main POSIX
types are provided here as menu options, with reg being a synonym for
plain. In both cases this means not one of the "special" file types.
Type: (option list)
Allowed input range:
code
plain
reg
symlink
dir
socket
fifo
door
char
block
Example:
code
body file_select filter
{
file_types => { "plain","symlink" };
file_result => "file_types";
}
issymlinkto
Description: List of regular expressions to match file objects
If the file is a symbolic link that points to files matched by one of these
expressions, the file will be selected.
Type: slist
Allowed input range: (arbitrary string)
Example:
code
body file_select example
{
issymlinkto => { "/etc/[^/]*", "/etc/init\.d/[a-z0-9]*" };
}
Notes:
Windows does not support symbolic links, so this attribute is not applicable on that platform.
file_result
Description: Logical expression combining classes defined by file
search criteria
The syntax is the same as for a class expression, since the file selection
is a classification of the file-search in the same way that system
classes are a classification of the abstract host-search. That is, you
may specify a boolean expression involving any of the file-matching
components.
Type: string
Allowed input range:
[!*(leaf_name|path_name|file_types|mode|size|owner|group|atime|ctime|mtime|issymlinkto|exec_regex|exec_program|bsdflags)[|.]*]*
Example:
code
body file_select year_or_less
{
mtime => irange(ago(1,0,0,0,0,0),now);
file_result => "mtime";
}
body file_select my_pdf_files_morethan1dayold
{
mtime => irange(ago(0,0,1,0,0,0),now);
leaf_name => { ".*\.pdf" , ".*\.fdf" };
search_owners => { "mark" };
file_result => "owner.leaf_name.!mtime";
}
You may specify arbitrarily complex file-matching parameters, such as what is
shown above, "is owned by mark, has the extension '.pdf' or '.fdf', and whose
modification time is not between 1 day ago and now"; that is, it is older than
1 day.
See also: process_result
file_type
Description: By default, regular files are created, when specifying
create => "true". You can create fifos through this mechanism as well, by
specifying fifo in file_type.
Type: string
Allowed input range:
Type: (menu option)
Allowed input range:
Default value: cfengine
link_from
Type: body link_from
See also: Common body attributes
copy_patterns
Description: A set of patterns that should be copied and synchronized
instead of linked
During the linking of files, it is sometimes useful to buffer changes
with an actual copy, especially if the link is to an ephemeral file
system. This list of patterns matches files that arise during a linking
policy. A positive match means that the file should be copied and
updated by modification time.
Type: slist
Allowed input range: (arbitrary string)
Example:
code
body link_from example
{
copy_patterns => { "special_node1", "/path/special_node2" };
}
link_children
Description: true/false whether to link all directory's children to
source originals
If the promiser is a directory, instead of copying the children, link
them to the source.
Type: boolean
Default value: false
Example implementation:
code
body link_from linkchildren(tofile)
{
source => "$(tofile)";
link_type => "symlink";
when_no_source => "force";
link_children => "true";
when_linking_children => "if_no_such_file"; # "override_file";
}
body link_from linkfrom(source, type)
{
source => $(source);
link_type => $(type);
}
Example usage:
code
body file control
{
inputs => { "$(sys.libdir)/stdlib.cf" };
}
bundle agent main
{
files:
# This will make symlinks to each file in /var/cfengine/bin
# for example:
# '/usr/local/bin/cf-agent' -> '/var/cfengine/bin/cf-agent'
# '/usr/local/bin/cf-serverd' -> '/var/cfengine/bin/cf-serverd'
"/usr/local/bin"
link_from => linkchildren("/var/cfengine/bin"),
comment => "We like for cfengine binaries to be available inside of the
common $PATH";
}
This policy can be found in
/var/cfengine/share/doc/examples/symlink_children.cf
and downloaded directly from
github.
link_type
Description: The type of link used to alias the file
This determines what kind of link should be used to link files. Users
are advised to be wary of 'hard links' (see Unix manual pages for the
ln command). The behavior of non-symbolic links is often precarious and
unpredictable.
Note that symlink is synonymous with absolute links, which are different
from relative links. Although all of these are symbolic links, the
nomenclature here is defined such that symlink and absolute are
equivalent . When verifying a link, choosing 'relative' means that the
link must be relative to the source, so relative and absolute links
are mutually exclusive.
Type: (menu option)
Allowed input range:
code
symlink
hardlink
relative
absolute
Default value: symlink
Example impelementation:
code
body link_from ln_s(x)
{
link_type => "symlink";
source => "$(x)";
when_no_source => "force";
}
code
body link_from example
{
link_type => "symlink";
source => "/tmp/source";
}
Example usage:
code
body file control
{
inputs => { "$(sys.libdir)/stdlib.cf" };
}
bundle agent main
{
files:
# We use move_obstructions because we want the symlink to replace a
# regular file if necessary.
"/etc/apache2/sites-enabled/www.cfengine.com" -> { "webmaster@cfengine.com" }
link_from => ln_s( "/etc/apache2/sites-available/www.cfengine.com" ),
move_obstructions => "true",
comment => "We always want our website to be enabled.";
}
This policy can be found in
/var/cfengine/share/doc/examples/symlink.cf
and downloaded directly from
github.
Notes:
On Windows, hard links are the only supported type.
source
Description: The source file to which the link should point
For remote copies this refers to the file name on the remote server.
Type: string
Allowed input range: .+
Example:
code
body link_from example
{
source => "/path/to/source";
}
when_linking_children
Description: Policy for overriding existing files when linking
directories of children
The options refer to what happens if the directory already exists, and
is already partially populated with files. If the directory being copied
from contains a file with the same name as that of a link to be created,
it must be decided whether to override the existing destination object
with a link, or simply omit the automatic linkage for files that already
exist. The latter case can be used to make a copy of one directory with
certain fields overridden.
Type: (menu option)
Allowed input range:
code
override_file
if_no_such_file
Example:
code
body link_from example
{
when_linking_children => "if_no_such_file";
}
when_no_source
Description: Behavior when the source file to link to does not exist
This describes how CFEngine should respond to an attempt to create a
link to a file that does not exist. The options are to force the
creation to a file that does not (yet) exist, delete any existing link,
or do nothing.
Type: (menu option)
Allowed input range:
Default value: nop
Example:
code
body link_from example
{
when_no_source => "force";
}
move_obstructions
Description: true/false whether to move obstructions to file-object
creation
If we have promised to make file X a link, but it already exists as a
file, or vice-versa, or if a file is blocking the creation of a
directory, then normally CFEngine will report an error. If this is set,
existing objects will be moved aside to allow the system to heal without
intervention. Files and directories are saved/renamed, but symbolic
links are deleted.
Note that symbolic links for directories are treated as directories, not
links. This behavior can be discussed, but the aim is to err on the
side of caution.
Type: boolean
Default value: false
Example:
code
files:
"/tmp/testcopy"
copy_from => mycopy("/tmp/source"),
move_obstructions => "true",
depth_search => recurse("inf");
Notes:
Some operating systems (Solaris) use symbolic links in path names.
Copying to a directory could then result in renaming of the important
link, if the behavior is different.
pathtype
Description: Menu option for interpreting promiser file object
By default, CFEngine makes an educated guess as to whether the promise
pathname involves a regular expression or not. This guesswork is needed
due to cross-platform differences in filename interpretation.
If CFEngine guesses (or is told) that the pathname uses a regular
expression pattern, it will undertake a file search to find possible
matches. This can consume significant resources, and so the guess option
will always try to optimize this. Guesswork is, however, imperfect, so
you have the option to declare your intention.
Type: (menu option)
Allowed input range:
If the keyword literal is invoked, a path will be treated as a literal
string regardless of what characters it contains. If it is declared
regex, it will be treated as a pattern to match.
Note that CFEngine splits the promiser up into path links before
matching, so that each link in the path chain is matched separately.
Thus it it meaningless to have a / in a regular expression, as the
comparison will never see this character.
Default value: guess
Example:
code
files:
"/var/lib\d"
pathtype => "guess", # best guess (default)
perms => system;
"/var/lib\d"
pathtype => "regex", # force regex interpretation
perms => system;
"/var/.*/lib"
pathtype => "literal", # force literal interpretation
perms => system;
In these examples, at least one case implies an iteration over all
files/directories matching the regular expression, while the last case
means a single literal object with a name composed of dots and stars.
Notes:
On Windows paths using regex must use the forward slash (/) as path
separator, since the backward slash has a special meaning in a regular
expression. Literal paths may also use backslash (\) as a path
separator.
perms
Type: body perms
See also: Common body attributes
bsdflags
Description: List of menu options for BSD file system flags to set
Type: slist
Allowed input range:
[+-]*[(arch|archived|nodump|opaque|sappnd|sappend|schg|schange|simmutable|sunlnk|sunlink|uappnd|uappend|uchg|uchange|uimmutable|uunlnk|uunlink)]+
Example:
code
body perms example
{
bsdflags => { "uappnd","uchg","uunlnk","nodump",
"opaque","sappnd","schg","sunlnk" };
}
Notes:
The BSD Unices (FreeBSD, OpenBSD, NetBSD) and MacOSX have additional
file system flags which can be set. Refer to the BSD chflags
documentation for this.
groups
Description: List of acceptable groups of group ids, first is change
target
The first named group in the list is the default that will be configured
if the file does not match an element of the list. The reserved word
none may be used to match files that are not owned by a registered
group.
Type: slist
Allowed input range: [a-zA-Z0-9_$.-]+
Example:
code
body perms example
{
groups => { "users", "administrators" };
}
Notes:
On Windows, files do not have file groups associated with them,
and thus this attribute is ignored. ACLs may be used in place for this.
mode
Description: File permissions
The mode string may be symbolic or numerical, like chmod.
Type: string
Allowed input range: [0-7augorwxst,+-]+
Example:
code
body perms example
{
mode => "a+rx,o+w";
}
See also: rxdirs
Notes:
This is ignored on Windows, as the permission model uses ACLs.
owners
Description: List of acceptable owners or user ids, first is change
target
The first user is the reference value that CFEngine will set the file to
if none of the list items matches the true state of the file. The
reserved word none may be used to match files that are not owned by a
registered user.
Type: slist
Allowed input range: [a-zA-Z0-9_$.-]+
Example:
code
body perms example
{
owners => { "mark", "wwwrun", "jeang" };
}
Notes:
On Windows, users can only take ownership of files, never give it. Thus,
the first user in the list should be the user running the CFEngine
process (usually Administrator). Additionally, some groups may be owners
on Windows (such as the Administrators group).
rxdirs
Description: true/false add execute flag for directories if read flag is set
When true set the x flag on directories automatically if the r flag is
specified in mode.
Default: false
Type: boolean
Example:
code
bundle agent __main__
{
vars:
"example_dirs" slist => {
"/tmp/rxdirs_example/rxdirs=default(false)-r",
"/tmp/rxdirs_example/rxdirs=default(false)-rx",
"/tmp/rxdirs_example/rxdirs=true-r",
"/tmp/rxdirs_example/rxdirs=true-rx",
};
files:
"$(example_dirs)/."
create => "true";
"/tmp/rxdirs_example/rxdirs=default(false)-r"
perms => example:m( 600 );
"/tmp/rxdirs_example/rxdirs=default(false)-rx"
perms => example:m( 700 );
"/tmp/rxdirs_example/rxdirs=true-r"
perms => example:m_rxdirs_on( 600 );
"/tmp/rxdirs_example/rxdirs=true-rx"
perms => example:m_rxdirs_on( 700 );
reports:
"$(example_dirs) modeoct='$(with)'"
with => filestat( $(example_dirs), modeoct );
}
body file control{ namespace => "example"; }
body perms m(mode)
{
mode => "$(mode)";
}
body perms m_rxdirs_on(mode)
{
inherit_from => m( $(mode) );
rxdirs => "true";
}
code
warning: Using the default value 'false' for attribute rxdirs (promiser: /tmp/rxdirs_example/rxdirs=default(false)-r), please set it explicitly
warning: Using the default value 'false' for attribute rxdirs (promiser: /tmp/rxdirs_example/rxdirs=default(false)-r), please set it explicitly
warning: Using the default value 'false' for attribute rxdirs (promiser: /tmp/rxdirs_example/rxdirs=default(false)-rx), please set it explicitly
warning: Using the default value 'false' for attribute rxdirs (promiser: /tmp/rxdirs_example/rxdirs=default(false)-rx), please set it explicitly
R: /tmp/rxdirs_example/rxdirs=default(false)-r modeoct='40600'
R: /tmp/rxdirs_example/rxdirs=default(false)-rx modeoct='40600'
R: /tmp/rxdirs_example/rxdirs=true-r modeoct='40700'
R: /tmp/rxdirs_example/rxdirs=true-rx modeoct='40700'
warning: Using the default value 'false' for attribute rxdirs (promiser: /tmp/rxdirs_example/rxdirs=default(false)-r), please set it explicitly
warning: Using the default value 'false' for attribute rxdirs (promiser: /tmp/rxdirs_example/rxdirs=default(false)-rx), please set it explicitly
warning: Using the default value 'false' for attribute rxdirs (promiser: /tmp/rxdirs_example/rxdirs=default(false)-r), please set it explicitly
warning: Using the default value 'false' for attribute rxdirs (promiser: /tmp/rxdirs_example/rxdirs=default(false)-rx), please set it explicitly
This policy can be found in
/var/cfengine/share/doc/examples/rxdirs.cf
and downloaded directly from
github.
See also: mode
Notes:
This is ignored on Windows, as the permission model uses ACLs.
History:
- Default value changed from
true to false in CFEngine 3.20.0
- Added warning if default value is not explicitly set in 3.18.2, 3.20.0
rename
Type: body rename
See also: Common body attributes
disable
Description: true/false automatically rename and remove permissions
Disabling a file means making it unusable. For executables this means
preventing execution, for an information file it means making the file
unreadable.
Type: boolean
Default value: false
Example:
code
body rename example
{
disable => "true";
disable_suffix => ".nuked";
}
disable_mode
Description: The permissions to set when a file is disabled
To disable an executable it is not enough to rename it, you should also
remove the executable flag.
Type: string
Allowed input range: [0-7augorwxst,+-]+
Example:
code
body rename example
{
disable_mode => "0600";
}
disable_suffix
Description: The suffix to add to files when disabling
To disable files in a particular manner, use this string suffix.
Type: string
Allowed input range: (arbitrary string)
Default value: .cfdisabled
Example:
code
body rename example
{
disable => "true";
disable_suffix => ".nuked";
}
newname
Description: The desired name for the current file
Type: string
Allowed input range: (arbitrary string)
Example:
code
body rename example(s)
{
newname => "$(s)";
}
rotate
Description: Maximum number of file rotations to keep
Used for log rotation. If the file is named foo and the rotate attribute
is set to 4, as above, then initially foo is copied to foo.1 and the old
file foo is zeroed out (that is, the inode of the original logfile does
not change, but the original log file will be empty after the rotation
is complete).
The next time the promise is executed, foo.1 will be renamed foo.2, foo
is again copied to foo.1 and the old file foo is again zeroed out.
Each time the promise is executed (and typically, the promise would be
executed as guarded by time-based or file-size-based classes), the files
are copied/zeroed or rotated as above until there are rotate numbered
files plus the one "main" file.
Type: int
Allowed input range: 0,99
Example:
code
body rename example
{
rotate => "4";
}
In the example above, the file foo.3 will be renamed foo.4, but the old
version of the file foo.4 will be deleted (that is, it "falls off the end"
of the rotation).
repository
Description: Name of a repository for versioning
A local repository for this object, overrides the default.
Note that when a repository is specified, the files are stored using the
canonified directory name of the original file, concatenated with the
name of the file. So, for example, /usr/local/etc/postfix.conf would
ordinarily be stored in an alternative repository as
_usr_local_etc_postfix.conf.cfsaved.
Type: string
Allowed input range: "?(/.*)
Example:
code
files:
"/path/file"
copy_from => source,
repository => "/var/cfengine/repository";
template_data
Description: The data container to be passed to the template (Mustache or inline_mustache). It can come from a function call like mergedata() or from a data container reference like @(mycontainer).
Type: data
Allowed input range: (arbitrary string)
Example:
code
files:
"/path/file"
...
edit_template => "mytemplate.mustache",
template_data => parsejson('{"message":"hello"}'),
template_method => "mustache";
Example:
code
vars:
"mycontainer" data => '[ 1, 2, 3 ]';
files:
"/path/file"
...
edit_template => "mytemplate.mustache",
template_data => @(mycontainer),
template_method => "mustache";
If this attribute is omitted, the result of the datastate() function
call is used instead. See edit_template for how you can use the data
state in Mustache.
See also: edit_template, template_method, datastate()
template_method
Description: The template type.
By default cfengine requests the native CFEngine template
implementation, but you can use mustache or inline_mustache as well.
Type: (menu option)
Allowed input range:
cfengineinline_mustachemustache
Default value: cfengine
template_method cfengine
The default native-CFEngine template format (selected when
template_method is cfengine or unspecified) uses inline tags to
mark regions and classes. Each line represents an insert_lines
promise, unless the promises are grouped into a block using:
code
[%CFEngine BEGIN %]
...
[%CFEngine END %]
Variables, scalars and list variables are expanded within each promise
based on the current scope of the calling promise. If lines are
grouped into a block, the whole block is repeated when lists are
expanded (see the Special Topics Guide on editing).
If a class-context modified is used:
code
[%CFEngine class-expression:: %]
then the lines that follow are only inserted if the context matches the
agent's current context. This allows conditional insertion.
Note: Because classic templates are built on top of edit_line, identical
lines will not be rendered more than once unless they are included within a
block. This includes blank lines.
Example contrived cfengine template:
code
##This is a template file /templates/input.tmpl
These lines apply to anyone
[%CFEngine solaris.Monday:: %]
Everything after here applies only to solaris on Mondays
until overridden...
[%CFEngine linux:: %]
Everything after here now applies now to linux only.
[%CFEngine BEGIN %]
This is a block of text
That contains list variables: $(some.list)
With text before and after.
[%CFEngine END %]
nameserver $(some.list)
Example cfengine template for apache vhost directives:
code
[%CFEngine any:: %]
VirtualHost $(sys.ipv4[eth0]):80>
ServerAdmin $(stage_file.params[apache_mail_address][1])
DocumentRoot /var/www/htdocs
ServerName $(stage_file.params[apache_server_name][1])
AddHandler cgi-script cgi
ErrorLog /var/log/httpd/error.log
AddType application/x-x509-ca-cert .crt
AddType application/x-pkcs7-crl .crl
SSLEngine off
CustomLog /var/log/httpd/access.log
/VirtualHost>
[%CFEngine webservers_prod:: %]
[%CFEngine BEGIN %]
VirtualHost $(sys.ipv4[$(bundle.interfaces)]):443>
ServerAdmin $(stage_file.params[apache_mail_address][1])
DocumentRoot /var/www/htdocs
ServerName $(stage_file.params[apache_server_name][1])
AddHandler cgi-script cgi
ErrorLog /var/log/httpd/error.log
AddType application/x-x509-ca-cert .crt
AddType application/x-pkcs7-crl .crl
SSLEngine on
SSLCertificateFile $(stage_file.params[apache_ssl_crt][1])
SSLCertificateKeyFile $(stage_file.params[apache_ssl_key][1])
CustomLog /var/log/httpd/access.log
/VirtualHost>
[%CFEngine END %]
template_method inline_mustache
When template_method is inline_mustache the mustache input is not a file
but a string and you must set edit_template_string. The same rules apply
for inline_mustache and mustache. For mustache explanation see
template_method mustache
Example:
code
bundle agent example_using_template_method_inline_mustache
{
vars:
# Here we construct a data container that will be passed to the mustache
# templating engine
"d"
data => '{ "host": "docs.cfengine.com" }';
# Here we specify a string that will be used as an inline mustache template
"mustache_template_string"
string => "Welcome to host '{{{host}}}'";
files:
# Here we render the file using the data container and inline template specification
"/tmp/example.txt"
create => "true",
template_method => "inline_mustache",
edit_template_string => "$(mustache_template_string)",
template_data => @(d);
reports:
"/tmp/example.txt"
printfile => cat( $(this.promiser) );
}
body printfile cat(file)
{
file_to_print => "$(file)";
number_of_lines => "inf";
}
bundle agent __main__
{
methods: "example_using_template_method_inline_mustache";
}
code
R: /tmp/example.txt
R: Welcome to host 'docs.cfengine.com'
This policy can be found in
/var/cfengine/share/doc/examples/template_method-inline_mustache.cf
and downloaded directly from
github.
History: Was introduced in 3.12.0
See also: edit_template_string, template_data, datastate()
template_method mustache
When template_method is mustache data must be provided to render the
template with. Data can be provided by functions that return data ( i.e.
mergedata(), mapdata(), readdata(), findprocesses(), etc ...), lists or
data variables by reference @(data), or by specifying data as inline json
(which can take advantage of data wrapping). For convenience if template_data
is not specified the output of datastate() will be used. Thus the
datastate() (all variables and classes defined) is the default.
From
mustache Variables,
Sections,
Inverted Sections,
Comments, and
the
Set Delimiter TAG TYPES are
implemented.
NOTE: Partials
and Lambdas are not
currently supported.
template_method mustache Variables
The most basic tag type is the variable. A {{name}} tag in a basic
template will try to find the name key in the current context. If there is no
name key, the parent contexts will be checked recursively. If the top context is
reached and the name key is still not found, nothing will be rendered.
All variables are HTML escaped by default. If you want to return unescaped
HTML, use the triple mustache: {{{name}}} or an ampersand
({{& name}}).
A variable "miss" returns an empty string.
code
bundle agent main
{
vars:
"data" data => '{ "key": "Hello World & 3>2!" }';
reports:
"$(with)"
with => string_mustache(
"{{key}}
{{{key}}}
{{&key}}
Missing '{{missing}}' varibles render empty strings.",
data);
}
code
R: Hello World & 3>2!
Hello World & 3>2!
Hello World & 3>2!
Missing '' varibles render empty strings.
This policy can be found in
/var/cfengine/share/doc/examples/mustache_variables.cf
and downloaded directly from
github.
template_method mustache Sections
Sections render blocks of text one or more times, depending on the value of the
key in the current context.
A section begins with a pound and ends with a slash. That is, {{#key}}
begins a "person" section while {{/key}} ends it.
The behavior of the section is determined by the value of the key.
Empty lists:
If the key exists and has a value of false or an empty list, the HTML between
the pound and slash will not be displayed.
code
bundle agent main
{
vars:
"data" data => '{ "list": [ ] }';
reports:
"The list contains $(with)."
with => string_mustache("{{#list}} {{{.}}}{{/list}}",
data);
}
code
R: The list contains .
This policy can be found in
/var/cfengine/share/doc/examples/mustache_sections_empty_list.cf
and downloaded directly from
github.
Non-Empty Lists:
code
bundle agent main
{
vars:
"data" data => '{ "list": [ "1", "2", "3" ] }';
reports:
"$(with)"
with => string_mustache("{{#list}} {{{.}}}{{/list}}",
data);
}
This policy can be found in
/var/cfengine/share/doc/examples/mustache_sections_non_empty_list.cf
and downloaded directly from
github.
Non-False Values:
When the value is non-false but not a list, it will be used as the context for a
single rendering of the block.
code
bundle agent main
{
vars:
"data" data => parsejson('{ "classes": { "example": true } }');
reports:
"$(with)"
with => string_mustache("{{#classes.example}}This is an example.{{/classes.example}}",
data);
}
code
R: This is an example.
This policy can be found in
/var/cfengine/share/doc/examples/mustache_sections_non_false_value.cf
and downloaded directly from
github.
template_method mustache Inverted Sections
An inverted section begins with a caret (hat) and ends with a slash. That is
{{^key}} begins a "key" inverted section while
{{/key}} ends it.
While sections can be used to render text one or more times based on the value
of the key, inverted sections may render text once based on the inverse value of
the key. That is, they will be rendered if the key doesn't exist, is false, or
is an empty list.
code
bundle agent main
{
reports:
"CFEngine $(with)"
with => string_mustache("{{^classes.enterprise_edition}}Community{{/classes.enterprise_edition}}{{#classes.enterprise_edition}}Enterprise{{/classes.example}}",
datastate());
}
code
R: CFEngine Community
This policy can be found in
/var/cfengine/share/doc/examples/mustache_sections_inverted.cf
and downloaded directly from
github.
Comments begin with a bang and are ignored. Comments may contain newlines.
code
bundle agent main
{
reports:
"$(with)"
with => string_mustache("Render this.{{! But not
this}}",
datastate());
}
This policy can be found in
/var/cfengine/share/doc/examples/mustache_comments.cf
and downloaded directly from
github.
template_method mustache Set Delimiter
Set Delimiter tags start with an equal sign and change the tag delimiters from
{{ and }} to custom strings.
code
bundle agent main
{
vars:
"data" data => '{ "key": "value of key in data" }';
reports:
"$(with)"
with => string_mustache("{{=<% %>=}}key has <% key %>",
data);
}
code
R: key has value of key in data
This policy can be found in
/var/cfengine/share/doc/examples/mustache_set_delimiters.cf
and downloaded directly from
github.
template_method mustache extensions
The following are CFEngine-specific extensions.
-top- special key representing the complete data given. Useful for iterating
over the top level of a container {{#-top-}} ... {{/-top-}}
and rendering json representation of data given with $ and %.
code
bundle agent main
{
vars:
"data" data => '{ "key": "value", "list": [ "1", "2" ] }';
reports:
"-top- contains$(const.n)$(with)"
with => string_mustache("{{%-top-}}", data );
}
code
R: -top- contains
{
"key": "value",
"list": [
"1",
"2"
]
}
This policy can be found in
/var/cfengine/share/doc/examples/mustache_extension_top.cf
and downloaded directly from
github.
% variable prefix causing data to be rendered as multi-line json
representation. Like output from storejson().
code
bundle agent main
{
reports:
"$(with)"
with => string_mustache( "{{%mykey}}",
'{ "mykey": { "msg": "Hello World" } }' );
}
code
R: {
"msg": "Hello World"
}
This policy can be found in
/var/cfengine/share/doc/examples/mustache_extension_multiline_json.cf
and downloaded directly from
github.
$ variable prefix causing data to be rendered as compact json representation.
Like output from format() with the %S format string.
code
bundle agent main
{
vars:
"msg" string => "Hello World";
"report"
string => string_mustache("{{$-top-}}", bundlestate( $(this.bundle) ) ),
unless => isvariable( $(this.promiser) ); # Careful to not include
# ourselves so we only grab the
# state of the first pass.
reports:
"$(report)";
}
code
R: {"msg":"Hello World"}
This policy can be found in
/var/cfengine/share/doc/examples/mustache_extension_compact_json.cf
and downloaded directly from
github.
@ expands the current key being iterated to complement the value as accessed
with ..
code
bundle agent main
{
reports:
"$(with)"
with => string_mustache("datastate() provides {{#-top-}} {{{@}}}{{/-top-}}", datastate() );
}
code
R: datastate() provides classes vars
This policy can be found in
/var/cfengine/share/doc/examples/mustache_extension_expand_key.cf
and downloaded directly from
github.
See also: edit_template, template_data, datastate()
touch
Description: true/false whether to touch time stamps on file
Type: boolean
Example:
code
files:
"/path/file"
touch => "true";
Description: Command (with full path) used to transform current file
(no shell wrapper used)
A command to execute, usually for the promised file to transform it to
something else.
Notes:
The promised file must exist or the transformer will not be triggered.
The transformer should result in the promised file no longer existing.
By default, if the transformer returns zero, the promise will be considered
repaired, even if the transformation does not result in the promised file
becoming absent. Depending on other context restrictions this may result in
the transformer being executed during each agent execution. For example:
code
transformer => "/bin/echo I found a file named $(this.promiser)",
The interpretation of the transformer return code can be managed similarly to
commands type promises by using a classes body with kept_returncodes,
repaired_returncodes and failed_returncodes attributes.
stdout and stderr are redirected by CFEngine, and will not appear in any
output unless you run cf-agent with verbose logging.
The command is not run in a shell. This means that you cannot perform file
redirection or create pipelines.
Type: string
Allowed input range: "?(/.*)
Example:
code
rm -f /tmp/example-files-transformer.txt
rm -f /tmp/example-files-transformer.txt.gz
rm -f /tmp/this-file-does-not-exist-to-be-transformed.txt
rm -f /tmp/this-file-does-not-exist-to-be-transformed.txt.gz
code
bundle agent main
{
vars:
"gzip_path" string => ifelse( isexecutable("/bin/gzip"), "/bin/gzip",
"/usr/bin/gzip" );
files:
linux::
"/tmp/example-files-transformer.txt"
content => "Hello World";
"/tmp/example-files-transformer.txt"
transformer => "$(gzip_path) $(this.promiser)";
# The transformer in the following promise results in the promised file
# being absent on completion. Note: It is the expectation and
# responsibility of the transformer itself that the transformation results
# in the promised file no longer existing.
"/tmp/example-files-transformer.txt"
transformer => "$(gzip_path) $(this.promiser)";
# Since this file does not exist, the transformer will not be triggered
# and neither the text file nor a gzip file will exist
"/tmp/this-file-does-not-exist-to-be-transformed.txt"
transformer => "$(gzip_path) $(this.promiser)";
reports:
"/tmp/example-files-transformer.txt $(with)"
with => ifelse( fileexists( "/tmp/example-files-transformer.txt"), "exists",
"does not exist");
"/tmp/example-files-transformer.txt.gz $(with)"
with => ifelse( fileexists( "/tmp/example-files-transformer.txt.gz"), "exists",
"does not exist");
"/tmp/this-file-does-not-exist-to-be-transformed.txt $(with)"
with => ifelse( fileexists( "/tmp/this-file-does-not-exist-to-be-transformed.txt"), "exists",
"does not exist");
"/tmp/this-file-does-not-exist-to-be-transformed.txt.gz $(with)"
with => ifelse( fileexists( "/tmp/this-file-does-not-exist-to-be-transformed.txt.gz"), "exists",
"does not exist");
}
code
R: /tmp/example-files-transformer.txt does not exist
R: /tmp/example-files-transformer.txt.gz exists
R: /tmp/this-file-does-not-exist-to-be-transformed.txt does not exist
R: /tmp/this-file-does-not-exist-to-be-transformed.txt.gz does not exist
This policy can be found in
/var/cfengine/share/doc/examples/files_transformer.cf
and downloaded directly from
github.
In the example, the promise is made on the file that we wish to transform. If
the promised file exists, the transformer will change the file to a compressed
version (and the next time CFEngine runs, the promised file will no longer
exist, because it now has the .gz extension).
edit_line
Line based editing is a simple model for editing files. Before XML, and
later JSON, most configuration files were line based. The line-based
editing offers a powerful environment for model-based editing and
templating.
File editing in CFEngine 3
File editing is not just a single kind of promise but a whole range of
'promises within files'. It is therefore not merely a body to a single
kind of promise, but a bundle of promises. After all, inside each
file are new objects that can make promises, quite separate from files'
external attributes.
A typical file editing stanza has the elements in the following example:
code
body common control
{
version => "1.2.3";
bundlesequence => { "outerbundle" };
}
bundle agent outerbundle
{
files:
"/home/mark/tmp/cf3_test"
create => "true", # Like autocreate in cf2
edit_line => inner_bundle;
}
bundle edit_line inner_bundle
{
vars:
"who" string => "SysAdmin John"; # private variable in bundle
insert_lines:
"/* This file is maintained by CFEngine (see $(who) for details) */",
location => first_line;
replace_patterns:
# replace shell comments with C comments
"#(.*)"
replace_with => C_comment,
select_region => MySection("New section");
reports:
"This is file $(edit.filename)";
}
body replace_with C_comment
{
replace_value => "/* $(match.1) */"; # backreference
occurrences => "all"; # first, last all
}
body select_region MySection(x)
{
select_start => "\[$(x)\]";
select_end => "\[.*\]";
}
body location first_line
{
before_after => "before";
first_last => "first";
select_line_matching => ".*";
}
There are several things to notice:
- The line-editing promises are all convergent promises about patterns
within the file. They have bodies, just like other attributes do and
these allow us to make simple templates about file editing while
extending the power of the basic primitives.
All file edits specified in a single edit_line bundle are handled
"atomically". CFEngine edits files like this:
- CFEngine makes a copy of the file you you want to edit.
- CFEngine makes all the edits in the copy of the file. The
filename is the same as your original file with the extension
.cf-after-edit appended.
- After all promises are complete (the
vars, classes, delete_lines, field_edits,
insert_lines, replace_patterns, and finally reports promises),
CFEngine checks to see if the new file is the same as the
original one. If there are no differences, the promises have
converged, so it deletes the copy, and the original is left
completely unmodified.
- If there are any differences, CFEngine makes a copy of your
original file with the extension
.cf-before-edit (so you always
have the most recent backup available), and then renames the
edited version to your original filename.
Because file rename is an atomic operation (guaranteed by the
operating system), any application program will either see the old
version of the file or the new one. There is no "window of
opportunity" where a partially edited file can be seen (unless an
application intentionally looks for the .cf-after-edit file).
Problems during editing (such as disk-full or permission errors) are
likewise detected, and CFEngine will not rename a partial file over
your original.
All pattern matching is through Perl Compatible Regular Expressions
Editing takes place within a marked region (which defaults to the
whole file if not otherwise specified).
Search/replace functions now allow back-references.
The line edit model now contains a field or column model for dealing
with tabular files such as Unix passwd and group files. We can now
apply powerful convergent editing operations to single fields inside
a table, to append, order and delete items from lists inside fields.
The special variable $(edit.filename) contains the name of the
file being edited within an edit bundle.
The special variable $(edit.empty_before_use) holds the current value of
empty_file_before_editing which can be set by edit_defaults bodies. This
is used to know if the prior state of the file will have any effect on the
promise.
On Windows, a text file may be stored stored either with CRLF line
endings (Windows style), or LF line endings (Unix style). CFEngine
will respect the existing line ending type and make modifications
using the same type. New files will get CRLF line ending type.
In the example above, back references are used to allow conversion of
comments from shell-style to C-style.
Another example of files promises is to look for changes in files. The
following example reports on all recent changes to files in a directory
by maintaining the most recent version of the md5 hash of the file
contents. Similar checks can be used to examine metadata or both the
contents and metadata, as well as using different difference checks. The
Community Edition only reports that changes were found, but Enterprise
versions of CFEngine can also report on what exactly the significant
changes were.
code
bundle agent example
{
files:
"/home/mark/tmp" -> "Security team"
changes => lay_a_tripwire,
depth_search => recurse("inf"),
action => background;
}
body changes lay_a_tripwire
{
hash => "md5";
report_changes => "content";
update => "yes";
}
Common edit_line attributes
These attributes can be used by any promise type that applies to edit_line
bundles.
select_region
Description: Constrains edit_line operations to region identified by matching regular expressions.
Type: body select_region
Restrict edits to a specific region of a file based on select_start
and select_end regular expressions. If the beginning and ending regular
expressions match more than one region only the first region will be
selected for editing.
Example:
Prepare:
code
echo "MATCHING before region" > /tmp/example_select_region.txt
echo "BEGIN" >> /tmp/example_select_region.txt
echo "MATCHING inside region" >> /tmp/example_select_region.txt
echo "END" >> /tmp/example_select_region.txt
echo "MATCHING after region" >> /tmp/example_select_region.txt
Run:
code
bundle agent main
{
vars:
"file" string => "/tmp/example_select_region.txt";
files:
"$(file)"
comment => "We want to delete any lines that begin with the string
MATCHING inside the region described by regular expressions
matching the beginning and end of the region.",
create => "true",
edit_line => delete_inside_region("^MATCHING.*",
"^BEGIN.*",
"^END.*");
reports:
"$(file)" printfile => cat( $(this.promiser) );
}
bundle edit_line delete_inside_region(line_reg, begin_reg, end_reg)
{
delete_lines:
"$(line_reg)"
select_region => between( $(begin_reg), $(end_reg) );
}
body select_region between(start, end)
{
select_start => "$(start)";
select_end => "$(end)";
@if minimum_version(3.10)
select_end_match_eof => "false";
@endif
}
body printfile cat(file)
{
file_to_print => "$(file)";
number_of_lines => "inf";
}
Output:
code
R: /tmp/example_select_region.txt
R: MATCHING before region
R: BEGIN
R: END
R: MATCHING after region
See also: Common body attributes
Scope and lifetime
The region selected with select_region exists during the lifetime of the promise.
This means that once a promise has been started the selected region will be used regardless
of what the changes are.
There is a down side to this, promise lifetime is shorter than expected. For instance let's
look at the following code example:
code
bundle agent init
{
vars:
"states" slist => { "actual", "expected" };
"actual" string =>
"header
header
BEGIN
One potato
Two potato
Three potatoe
Four
END
trailer
trailer";
"expected" string =>
"header
header
One potato
Two potato
Four
trailer
trailer";
files:
"testfile.$(states)"
create => "true",
edit_line => init_insert("$(init.$(states))"),
edit_defaults => init_empty;
}
bundle edit_line init_insert(str)
{
insert_lines:
"$(str)";
}
body edit_defaults init_empty
{
empty_file_before_editing => "true";
}
#######################################################
bundle agent test
{
vars:
"tstr" slist => { "BEGIN", " Three potatoe", "END" };
files:
"testfile.actual"
edit_line => test_delete("$(test.tstr)");
}
bundle edit_line test_delete(str)
{
delete_lines:
"$(str)"
select_region => test_select;
}
body select_region test_select
{
select_start => "BEGIN";
select_end => "END";
include_start_delimiter => "true";
include_end_delimiter => "true";
select_end_match_eof => "true";
}
The code generates two files, testfile.actual and testfile.expected. The idea is that both files will be
equal after the promise is run, since the transformations applied to testfile.actual will convert it into
testfile.equal.
However due to the lifetime of promises, this is not true. The attribute select_region lives as long as the
promise that created it lives and it will be recreated on the next incarnation.
Notice that tstr is a slist that is used as a parameter for edit_line, which uses it to select the strings that
will be removed. The select_region body specifies that the select_start attribute is "BEGIN", which holds true only
for the first invocation of the promise because during that iteration it will be removed. Once it is removed
the select_region body will never be able to match select_start again.
In the previous example, it is easy to think that the select_region will be kept during the whole iteration of the
slist. This is not true, each element in the slist will trigger its own invocation of the promise, therefore
select_region will only match the first iteration.
The solution to this problem is simple: if the marker for a region needs to be removed, then it cannot be used as a marker.
In the example above it is enough to change the markers from "BEGIN" to "header" and from "END" to "trailer" to obtain the
desired result.
include_end_delimiter
Description: Whether to include the section delimiter
In a sectioned file, the line that marks the end of a section is not
normally included in the defined region; that is, it is recognized as a
delimiter, but it is not included as one of the lines available for
editing. Setting this option to true makes it included.
Type: boolean
Default value: false
Example:
code
body select_region BracketSection(x)
{
select_start => "$(x) \{";
select_end => "}";
include_end_delimiter => "true";
}
Input file:
code
/var/log/mail.log {
monthly
missingok
notifempty
rotate 7
}
The section does not normally include the line containing }. By setting
include_end_delimiter to true it would be possible for example, to
delete the entire section, including the section trailer. If however
include_end_delimiter is false, the contents of the section could be
deleted, but the header would be unaffected by any delete_lines
promises.
The use of include_start_delimiter and include_end_delimiter depend
on the type of sections you are dealing with, and what you want to do
with them. Note that sections can be bounded at both the start and end
(as in the example above) or just at the start (as in the sample shown
in include_start_delimiter).
History:
- Introduced in CFEngine version 3.0.5 (2010)
include_start_delimiter
Description: Whether to include the section delimiter
In a sectioned file, the line that marks the opening of a section is not
normally included in the defined region (that is, it is recognized as a
delimiter, but it is not included as one of the lines available for
editing). Setting this option to true makes it included.
Type: boolean
Default value: false
Example:
code
body select_region MySection(x)
{
select_start => "\[$(x)\]";
select_end => "\[.*\]";
include_start_delimiter => "true";
}
Input file:
code
[My section]
one
two
three
In this example, the section does not normally include the line [My
section]. By setting include_start_delimiter to true it would be
possible for example, to delete the entire section, including the
section header. If however include_start_delimiter is false, the
contents of the section could be deleted, but the header would be
unaffected by any delete_lines promises. See the next section on
include_start_delimiter for further details.
History:
- Introduced in CFEngine version 3.0.5 (2010)
select_end
Description: Anchored regular expression matches end of edit region from select_start
Type: string
Allowed input range: .*
Example:
code
body select_region example(x)
{
select_start => "\[$(x)\]";
select_end => "\[.*\]";
}
If you want to match from a starting location to the end of the file
(even if there are other lines matching select_start intervening),
then just omit the select_end promise and the selected region will run
to the end of the file.
Note: When a region does not always have an end (like the last section of an
INI formatted file) select_end_match_eof can be used to allow the end of
the file to be considered the end of the region. The global default can be
modified with select_end_match_eof.
select_end_match_eof
Description: Allow the end of a file to be considered the end of a region.
When select_end_match_eof is set to true select_end will consider end of
file as the end region if it is unable to match the end pattern. If the
select_end attribute is omitted, the selected region will run to the end of
the file no matter what the value of select_end_match_eof is set to.
Type: boolean
Default value: false
Example:
code
body select_region example(x)
{
select_start => "\[$(x)\]";
select_end => "\[.*\]";
select_end_match_eof => "true";
}
See also: select_end_match_eof in body agent control
History:
- Introduced in CFEngine version 3.9.0 (2016)
select_start
Description: Anchored regular expression matching start of edit region
Type: string
Allowed input range: .*
Example:
code
body select_region example(x)
{
select_start => "\[$(x)\]";
select_end => "\[.*\]";
}
delete_lines
This promise assures that certain lines exactly matching regular
expression patterns will not be present in a text file. If the lines are
found, the default promise is to remove them (this behavior may be
modified with further pattern matching in delete_select and/or changed
with not_matching).
code
bundle edit_line example
{
delete_lines:
"olduser:.*";
}
Note that typically, only a single line is specified in each
delete_lines promise. However, you may of course have multiple
promises that each delete a line.
It is also possible to specify multi-line delete_lines promises.
However, these promises will only delete those lines if all the lines
are present in the file in exactly the same order as specified in the
promise (with no intervening lines). That is, all the lines must match
as a unit for the delete_lines promise to be kept.
If the promiser contains multiple lines, then CFEngine assumes that all
of the lines must exist as a contiguous block in order to be deletes.
This gives preserve_block semantics to any multiline delete_lines
promise.
Attributes
delete_select
Type: body delete_select
See also: Common body attributes
delete_if_startwith_from_list
Description: Delete lines from a file if they begin with the sub-strings
listed.
Note that this determination is made only on promised lines (that is, this
attribute modifies the selection criteria, it does not make the initial
selection).
Type: slist
Allowed input range: .*
Example:
code
bundle edit_line alpha
{
delete_lines:
".*alpha.*"
delete_select => starters;
}
body delete_select starters
{
delete_if_startwith_from_list => { "begin", "start", "init" };
}
If the file contains the following lines, then this promise initially
selects the four lines containing alpha, but is moderated by the
delete_select attribute.
code
start alpha igniter
start beta igniter
init alpha burner
init beta burner
stop beta igniter
stop alpha igniter
stop alpha burner
Thus, the promise will delete only the first and third lines of the file:
delete_if_not_startwith_from_list
Description: Delete lines from a file unless they start with the
sub-strings in the list given.
Note that this determination is made only on promised lines. In other words,
this attribute modifies the selection criteria, it does not make the initial
selection.
Type: slist
Allowed input range: .*
Example:
code
body delete_select example(s)
{
delete_if_not_startwith_from_list => { @(s) };
}
delete_if_match_from_list
Description: Delete lines from a file if the lines completely match any of the anchored regular expressions listed.
Note that this attribute modifies the selection criteria, it does not make the
initial selection, and the match determination is made only on promised lines.
Type: slist
Allowed input range: .*
Example:
code
body delete_select example(s)
{
delete_if_match_from_list => { @(s) };
}
delete_if_not_match_from_list
Description: Delete lines from a file unless the lines completely match any of the anchored regular expressions listed.
Note that this attribute modifies the selection criteria, it does not make the
initial selection, and the match determination is made only on promised lines.
Type: slist
Allowed input range: .*
Example:
code
body delete_select example(s)
{
delete_if_not_match_from_list => { @(s) };
}
delete_if_contains_from_list
Description: Delete lines from a file if they contain the sub-strings
listed.
Note that this attribute modifies the selection criteria, it does not make the
initial selection, and the match determination is made only on promised lines.
Type: slist
Allowed input range: .*
Example:
code
body delete_select example(s)
{
delete_if_contains_from_list => { @(s) };
}
delete_if_not_contains_from_list
Description: Delete lines from the file which do not contain the sub-strings listed.
Note that this attribute modifies the selection criteria, it does not
make the initial selection, and the match determination is made only on
promised lines.
Type: slist
Allowed input range: .*
Example:
code
body delete_select discard(s)
{
delete_if_not_contains_from_list => { "substring1", "substring2" };
}
not_matching
Description: When this option is true, it negates the pattern match of the promised lines.
This makes no sense for multi-line deletions, and is therefore disallowed. Either a multi-line promiser matches and it should be removed (i.e. not_matching is false), or it does not match the whole thing and the ordered lines have no meaning anymore as an entity. In this case, the lines can be separately stated.
Note that this does not negate any condition expressed in delete_select. It
only negates the match of the initially promised lines.
Type: boolean
Default value: false
Example:
code
delete_lines:
# edit /etc/passwd - account names that are not "mark" or "root"
"(mark|root):.*" not_matching => "true";
select_region
Description: Constrains edit_line operations to region identified by matching regular expressions.
This body applies to all promise types within edit_line bundles.
See also: select_region with edit_line operations, select_region in field_edits, select_region in insert_lines, select_region in replace_patterns
field_edits
Certain types of text files are tabular in nature, with field separators (e.g.
: or ,). The passwd and group files are classic examples of tabular
files, but there are many ways to use this feature. For example, editing a
string:
code
VARIABLE="one two three"
View this line as a tabular line separated by " and with sub-separator
given by the space.
Field editing allows us to edit tabular files in a unique way, adding and
removing data from addressable fields.
code
bundle agent example
{
vars:
"userset" slist => { "one-x", "two-x", "three-x" };
files:
"/tmp/passwd"
create => "true",
edit_line => SetUserParam("mark","6","/set/this/shell");
"/tmp/group"
create => "true",
edit_line => AppendUserParam("root","4","@(userset)");
}
The promise in this example assumes a parameterizable model for editing the
fields of such files.
code
bundle edit_line SetUserParam(user,field,val)
{
field_edits:
"$(user):.*"
# Set field of the file to parameter
edit_field => col(":","$(field)","$(val)","set");
}
bundle edit_line AppendUserParam(user,field,allusers)
{
vars:
"val" slist => { @(allusers) };
field_edits:
"$(user):.*"
# Set field of the file to parameter
edit_field => col(":","$(field)","$(val)","alphanum");
}
First you match the line with a regular expression. The regular expression
must match the entire line; that is, it is anchored.
code
body edit_field col(split,col,newval,method)
{
field_separator => "$(split)";
select_field => "$(col)";
value_separator => ",";
field_value => "$(newval)";
field_operation => "$(method)";
extend_fields => "true";
}
Then a field_edits body describes the separators for fields and
one level of sub-fields, along with policies for editing these fields,
ordering the items within them.
Attributes
edit_field
Type: body edit_field
Example:
code
body edit_field col(split, col, newval, method)
{
field_separator => "$(split)";
select_field => "$(col)";
value_separator => ",";
field_value => "$(newval)";
field_operation => "$(method)";
extend_fields => "true";
allow_blank_fields => "true";
start_fields_from_zero => "true";
}
See also: Common body attributes
allow_blank_fields
Description: Setting allow_blank_fields defines how blank fields in a line are handled.
When editing a file using the field or column model, blank fields, especially
at the start and end, are generally discarded. If allow_blank_fields is set
to true, CFEngine will retain the blank fields and print the appropriate
number of field separators.
Type: boolean
Default value: false
Example:
code
body edit_field example
{
allow_blank_fields => "true";
}
extend_fields
Description: Setting extend_fields can add new fields, to avoid
triggering an error.
If a user specifies a field that does not exist, because there are not so many
fields, this allows the number of fields to be extended. Without this setting,
CFEngine will issue an error if a non-existent field is referenced. Blank
fields in a tabular file can be eliminated or kept depending in this setting.
If in doubt, set this to true.
Type: boolean
Default value: false
Example:
code
body edit_field example
{
extend_fields => "true";
}
field_operation
Description: Menu option policy for editing subfields.
The method by which to edit a field in multi-field/column editing of tabular
files.
Type: (menu option)
Allowed input range:
Append the specified value to the end of the field/column, separating
(potentially) multiple values with value_separator
Prepend the specified value at the beginning of the field/column, separating
(potentially) multiple values with value_separator
Insert the specified value into the field/column, keeping all the values
(separated by value_separator) in alphanumerically sorted order
Replace the entire field/column with the specified value.
Delete the specified value (if present) in the specified field/column.
Default value: append
Example:
code
body edit_field example
{
field_operation => "append";
}
field_separator
Description: The regular expression used to separate fields in a line.
Most tabular files are separated by simple characters, but by allowing a
general regular expression one can make creative use of this model to
edit all kinds of line-based text files.
Type: string
Allowed input range: .*
Default value: none
Example:
code
body edit_field example
{
field_separator => ":";
}
field_value
Description: Set a field to a constant value.
For example, reset the value to a constant default, empty the field, or set it
fixed list.
Type: string
Allowed input range: .*
Example:
code
body edit_field example(s)
{
field_value => "$(s)";
}
select_field
Description: Sets the index of the field required, see also start_fields_from_zero.
Type: int
Allowed input range: 0,99999999
Example:
code
body field_edits example
{
select_field => "5";
}
start_fields_from_zero
Description: The numbering of fields is a matter for consistency and
convention. Arrays are usually thought to start with first index equal to zero
(0), but the first column in a file would normally be 1. By setting this
option, you can tell CFEngine that the first column should be understood as
number 0 instead, for consistency with other array functions.
Type: boolean
History: Version 3.1.0b1,Nova 2.0.0b1 (2010)
value_separator
Description: Defines the character separator for subfields inside the
selected field.
For example, elements in the group file are separated by a colon (':'), but
the lists of users in these fields are separated by a comma (',').
Type: string
Allowed input range: ^.$
Default value: none
Example:
code
body field_edit example
{
value_separator => ",";
}
select_region
Description: Constrains edit_line operations to region identified by matching regular expressions.
This body applies to all promise types within edit_line bundles.
See also: select_region with edit_line operations, select_region in delete_lines, select_region in insert_lines, select_region in replace_patterns
insert_lines
This promise type is part of the line-editing model. It inserts lines into
the file at a specified location. The location is determined by
body-attributes. The promise object referred to can be a literal line or
a file-reference from which to read lines.
code
insert_lines:
"literal line or file reference"
location => location_body,
...;
By parameterizing the editing bundle, one can make generic and reusable
editing bundles.
Note: When inserting multiple lines anchored to a particular place in a
file, be careful with your intuition. If your intention is to insert a
set of lines in a given order after a marker, then the following is
incorrect:
code
bundle edit_line x
{
insert_lines:
"line one" location => myloc;
"line two" location => myloc;
}
body location myloc
{
select_line_matching => "# Right here.*";
before_after => "after";
}
This will reverse the order of the lines and will not converge, since
the anchoring after the marker applies independently for each new line.
This is not a bug in CFEngine, but an error of logic in the policy itself.
To add multiple ordered lines after the marker, a single correlated promise
should be used:
code
bundle edit_line x
{
insert_lines:
"line one$(const.n)line two" location => myloc;
}
Or:
code
bundle edit_line x
{
insert_lines:
"line one
line two"
location => myloc;
}
Attributes
expand_scalars
Description: Expand any unexpanded variables
This is a way of incorporating templates with variable expansion into file
operations. Variables should be named and scoped appropriately for the
bundle in which this promise is made. In other words, you should qualify
the variables with the bundle in which they are defined. For example:
code
$(bundle.variable)
$(sys.host)
$(mon.www_in)
Type: boolean
Default value: false
Example:
code
bundle agent testbundle
{
files:
"/home/mark/tmp/file_based_on_template"
create => "true",
edit_line => ExpandMeFrom("/tmp/source_template");
}
bundle edit_line ExpandMeFrom(template)
{
insert_lines:
"$(template)"
insert_type => "file",
expand_scalars => "true";
}
insert_type
Description: Type of object the promiser string refers to
The default is to treat the promiser as a literal string of convergent
lines.
Type: (menu option)
Allowed input range:
Treat the promiser as a literal string of convergent lines.
The string should be interpreted as a filename from which to import lines.
The default behavior assumes that multi-line entries are not ordered
specifically. They should be treated as a collection of lines of text,
and not as a single unbroken object.
If the option preserve_block is used, then CFEngine will not break up
multiple lines into individual, non-ordered objects, so that the block
of text will be preserved. Even if some of the lines in the block
already exist, they will be added again as a coherent block. Thus if you
suspect that some stray / conflicting lines might be present they should
be cleaned up with delete_lines first.
Disables idempotency during the insertion of a block of text so that
multiple identical lines may be inserted.
This means that the text will be inserted to the file even if it is already
present. To avoid that the file grows, use this together with
empty_file_before_editing.
Interpret the string as a filename, and assume preserve_block semantics.
This was added in CFEngine 3.5.x.
Default value: literal
Example:
code
bundle edit_line lynryd_skynyrd
{
vars:
"keepers" slist => { "Won't you give me", "Gimme three steps" };
insert_lines:
"And you'll never see me no more"
insert_type => "literal"; # the default
"/song/lyrics"
insert_type => "file", # read selected lines from /song/lyrics
insert_select => keep("@{keepers}");
}
body insert_select keep(s)
{
insert_if_startwith_from_list => { "@(s)" };
}
This will ensure that the following lines are inserted into the promised
file:
code
And you'll never see me no more
Gimme three steps, Mister
Gimme three steps towards the door
Gimme three steps
insert_select
Type: body insert_select
See also: Common body attributes
insert_if_startwith_from_list
Description: Insert line if it starts with a string in the list
The list contains literal strings to search for in the secondary file
(the file being read via the insert_type attribute, not the main file
being edited). If a string with matching starting characters is found,
then that line from the secondary file will be inserted at the present
location in the primary file.
insert_if_startswith_from_list is ignored unless insert_type is
file, or the promiser is a multi-line block.
Type: slist
Allowed input range: .*
Example:
code
body insert_select example
{
insert_if_startwith_from_list => { "find_me_1", "find_me_2" };
}
insert_if_not_startwith_from_list
Description: Insert line if it DOES NOT start with a string in the list
The complement of insert_if_startwith_from_list. If the start of a
line does not match one of the strings, that line is inserted into the
file being edited.
insert_if_not_startswith_from_list is ignored unless insert_type is
file or the promiser is a multi-line block.
Type: slist
Allowed input range: .*
Example:
code
body insert_select example
{
insert_if_not_startwith_from_list => { "find_me_1", "find_me_2" };
}
insert_if_match_from_list
Description: Insert line if it fully matches a regex in the list
The list contains literal strings to search for in the secondary file
(the file being read via the insert_type attribute, not the main file
being edited). If the regex matches a complete line of the file, that
line from the secondary file will be inserted at the present location in
the primary file. That is, the regex's in the list are anchored.
insert_if_match_from_list is ignored unless insert_type is file,
or the promiser is a multi-line block.
Type: slist
Allowed input range: .*
Example:
code
body insert_select example
{
insert_if_match_from_list => { ".*find_.*_1.*", ".*find_.*_2.*" };
}
insert_if_not_match_from_list
Description: Insert line if it DOES NOT fully match a regex in the list
The complement of insert_if_match_from_list. If the line does not
match a line in the secondary file, it is inserted into the file being
edited.
insert_if_not_match_from_list is ignored unless insert_type is
file, or the promiser is a multi-line block.
Type: slist
Allowed input range: .*
Example:
code
body insert_select example
{
insert_if_not_match_from_list => { ".*find_.*_1.*", ".*find_.*_2.*" };
}
insert_if_contains_from_list
Description: Insert line if a regex in the list match a line fragment.
The list contains literal strings to search for in the secondary file;
in other words, the file being read via the insert_type attribute, not
the main file being edited. If the string is found in a line of the
file, that line from the secondary file will be inserted at the present
location in the primary file.
insert_if_contains_from_list is ignored unless insert_type is
file, or the promiser is a multi-line block.
Type: slist
Allowed input range: .*
Example:
code
body insert_select example
{
insert_if_contains_from_list => { "find_me_1", "find_me_2" };
}
insert_if_not_contains_from_list
Description: Insert line if a regex in the list DOES NOT match a line
fragment.
The complement of insert_if_contains_from_list. If the line is not
found in the secondary file, it is inserted into the file being edited.
insert_if_not_contains_from_list is ignored unless insert_type is
file, or the promiser is a multi-line block.
Type: slist
Allowed input range: .*
Example:
code
body insert_select example
{
insert_if_not_contains_from_list => { "find_me_1", "find_me_2" };
}
location
Type: body location
See also: Common body attributes, location bodies in the standard library, start location body in the standard library, before(srt) location body in the standard library, after(srt) location body in the standard library
before_after
Description: Menu option, point cursor before of after matched line
Determines whether an edit will occur before or after the currently
matched line.
Type: (menu option)
Allowed input range:
Default value: after
Example:
code
body location append
{
before_after => "before";
}
first_last
Description: Choose first or last occurrence of match in file.
In multiple matches, decide whether the first or last occurrence of the
matching pattern in the case affected by the change. In principle this
could be generalized to more cases but this seems like a fragile quality
to evaluate, and only these two cases are deemed of reproducible
significance.
Type: (menu option)
Allowed input range:
Default value: last
Example:
code
body location example
{
first_last => "last";
}
select_line_matching
Description: Regular expression for matching file line location
The expression must match a whole line, not a fragment within a line;
that is, it is anchored.
Type: string
Allowed input range: .*
Example:
code
# Editing
body location example
{
select_line_matching => "Expression match.* whole line";
}
# Measurement promises
body match_value example
{
select_line_matching => "Expression match.* whole line";
}
Notes:
- This attribute is mutually exclusive of
select_line_number.
- This attribute can not match a multiple line pattern (
(?m) has no effect).
select_region
Description: Constrains edit_line operations to region identified by matching regular expressions.
This body applies to all promise types within edit_line bundles.
See also: select_region with edit_line operations, select_region in delete_lines, select_region in field_edits, select_region in replace_patterns
whitespace_policy
Description: Criteria for matching and recognizing existing lines
The white space matching policy applies only to insert_lines, as a
convenience. It works by rewriting the insert string as a regular
expression when matching lines (that is, when determining if the line
is already in the file), but leaving the string as specified when
actually inserting it.
Simply put, the 'does this line exist' test will be changed to a regexp
match. The line being tested will optionally have \s* prepended or
appended if ignore_leading or ignore_trailing is specified, and if
ignore_imbedded is used then all embedded white spaces are replaced
with \s+. Since whitespace_policy is additive you may specify more
than one.
Any regular expression meta-characters that exist in your input line
will be escaped. In this way, it is possible to safely insert a line
such as authpriv.* /var/log/something into a syslog config file.
Type: (option list)
Allowed input range:
code
ignore_leading
ignore_trailing
ignore_embedded
exact_match
Default value: exact_match
Example:
code
bundle edit_line Insert(service, filename)
{
insert_lines:
"$(service).* $(filename)"
whitespace_policy => { "ignore_trailing", "ignore_embedded" };
}
History: This attribute was introduced in CFEngine version 3.0.5
(2010)
replace_patterns
This promise refers to arbitrary text patterns in a file. The pattern is
expressed as a PCRE regular expression.
code
replace_patterns:
"search pattern"
replace_with => replace_body,
...;
In replace_patterns promises, the regular expression may
match a line fragment, that is, it is unanchored.
code
bundle edit_line upgrade_cfexecd
{
replace_patterns:
"cfexecd" replace_with => value("cf-execd");
}
body replace_with value(x) # defined in cfengine_stdlib.cf
{
replace_value => "$(x)";
occurrences => "all";
}
This is a straightforward search and replace function. Only the portion
of the line that matches the pattern in the promise will be replaced;
the remainder of the line will not be affected. You can also use PCRE
look-behind and look-ahead patterns to restrict the lines upon which the
pattern will match.
Attributes
replace_with
Type: body replace_with
See also: Common body attributes
occurrences
Description: Defines which occurrences should be replaced.
Using "first" is generally unwise, as it will change a different
matching string each time the promise is executed, and may not "catch
up" with whatever external action is altering the text the promise
applies to.
Type: (menu option)
Allowed input range:
Replace all occurrence.
Replace only the first occurrence. Note: this is non-convergent.
Default value: all
Example:
code
body replace_with example
{
occurrences => "first"; # Warning! Using "first" is non-convergent
}
replace_value
Description: Value used to replace regular expression matches in search
Type: string
Allowed input range: .*
Example:
code
body replace_with example(s)
{
replace_value => "$(s)";
}
select_region
Description: Constrains edit_line operations to region identified by matching regular expressions.
This body applies to all promise types within edit_line bundles.
See also: select_region with edit_line operations, select_region in delete_lines, select_region in field_edits, select_region in insert_lines
edit_xml
The use of XML documents in systems configuration is widespread. XML
documents represent data that is complex and can be structured in
various ways. The XML based editing offers a powerful environment for
editing hierarchical and structured XML datasets.
XML editing promises are made in a edit_xml, which is then
used in the edit_xml attribute of a files promise. The promiser of
the files promise needs to be the XML document that is being edited.
Within an edit_xml bundle, various promise types are available to create
new or manipulate existing XML documents.
Common attributes
The following attributes are available in all edit_xml promise types.
build_xpath
Description: Builds an XPath within the XML file
Please note that when build_xpath is defined as an attribute within
an edit_xml promise body, the tree described by the specified XPath
will be verified and built BEFORE other edit_xml promises within same
promise body. Therefore, the file will not be empty during the execution
of such promises.
Type: string
Allowed input range: (arbitrary string)
select_xpath
Description: Select the XPath node in the XML file to edit
Edits to the XML document take place within the selected node. This
attribute is not used when inserting XML content into an empty file.
Type: string
Allowed input range: (arbitrary string)
build_xpath
This promise type assures that a balanced XML tree, described by the given
XPath, will be present within the XML file. If the document is empty, the
default promise is to build the XML tree within the document. If the document is
not empty, the default promise is to verify the given XPath, and if necessary,
locate an insertion node and build the necessary portion of XML tree within
selected node. The insertion node is selected as the last unique node that is
described by the XPath and also found within the document. The promise object
referred to is a literal string representation of an XPath.
code
bundle edit_xml example
{
build_xpath:
"/Server/Service/Engine/Host";
}
Note that typically, only a single XPath is built in each build_xpath
promise. You may of course have multiple promises that each build an
XPath. The supported syntax used in building an XPath is currently
limited to a simple and compact format, as shown in the above example.
The XPath must begin with '/', as it is verified and built using an
absolute path, from the root node of the document.
The resulting document can then be further modified using insert_tree,
set_text, set_attribute etc promises. Using predicate statements to set
attributes or text values directly via build_xpath can lead to non-convergent
behavior, and is discouraged.
delete_attribute
This promise type assures that an attribute, with the given name, will not be
present in the specified node within the XML file. If the attribute is found,
the default promise is to remove the attribute, from within the specified node.
The specified node is determined by body-attributes. The promise object referred
to is a literal string representation of the name of the attribute to be
deleted.
code
bundle edit_xml example
{
delete_attribute:
"attribute name"
select_xpath => "/Server/Service/Engine/Host";
}
Note that typically, only a single attribute, within a single specified
node, is deleted in each delete_attribute promise. You may of course
have multiple promises that each delete an attribute.
See also: Common edit_xml attributes
delete_text
This promise type assures that a value string, containing the matching
substring, will not be present in the specified node within the XML file. If the
substring is found, the default promise is to remove the existing value string,
from within the specified node. The specified node is determined by
body-attributes. The promise object referred to is a literal string of text.
code
bundle edit_xml example
{
delete_text:
"text content to match, as a substring, of text to be deleted from specified node"
select_xpath => "/Server/Service/Engine/Host/Alias";
}
Note that typically, only a single value string, within a single
specified node, is deleted in each delete_text promise. You may of
course have multiple promises that each delete a value string.
delete_tree
This promise type assures that a balanced XML tree, containing the matching
subtree, will not be present in the specified node within the XML file. If the
subtree is found, the default promise is to remove the containing tree from
within the specified node. The specified node is determined by body-attributes.
The promise object referred to is a literal string representation of a balanced
XML subtree.
code
bundle edit_xml example
{
delete_tree:
"<Host name=\"cfe_host\"></Host>"
select_xpath => "/Server/Service/Engine";
}
Note that typically, only a single tree, within a single specified node,
is deleted in each delete_tree promise. You may of course have
multiple promises that each delete a tree.
insert_text
This proimse type assures that a value string, containing the matching
substring, will be present in the specified node within the XML file. If the
substring is not found, the default promise is to append the substring to the
end of the existing value string, within the specified node. The specified node
is determined by body-attributes. The promise object referred to is a literal
string of text.
code
bundle edit_xml example
{
insert_text:
"text content to be appended to existing text, including whitespace, within specified node"
select_xpath => "/Server/Service/Engine/Host/Alias";
}
Note that typically only a single value string, within a single
specified node, is inserted in each insert_text promise. You may of
course have multiple promises that each insert a value string.
insert_tree
This promise type assures that a
balanced XML tree, containing the matching subtree, will be present in
the specified node within the XML file. If the subtree is not found, the
default promise is to insert the tree into the specified node. The
specified node is determined by body-attributes. The promise object
referred to is a literal string representation of a balanced XML tree.
code
bundle edit_xml example
{
insert_tree:
"<Host name=\"cfe_host\"><Alias>cfe_alias</Alias></Host>"
select_xpath => "/Server/Service/Engine";
}
Note that typically, only a single tree, within a single specified node,
is inserted in each insert_tree promise. You may of course have
multiple promises that each insert a tree.
set_attribute
This promise type assures that an attribute, with the given name and value, will
be present in the specified node within the XML file. If the attribute is not
found, the default promise is to insert the attribute, into the specified node.
If the attribute is already present, the default promise is to insure that the
attribute value is set to the given value. The specified node and attribute
value are each determined by body-attributes. The promise object referred to is
a literal string representation of the name of the attribute to be set.
code
bundle edit_xml example
{
set_attribute:
"name"
attribute_value => "cfe_host",
select_xpath => "/Server/Service/Engine/Host";
}
Note that typically only a single attribute, within a single selected
node, is set in each set_attribute promise. You may of course have
multiple promises that each set an attribute.
Attributes
attribute_value
Description: Value of the attribute to be inserted into the XPath node
of the XML file
Type: string
Allowed input range: (arbitrary string)
set_text
This promise type assures that a matching value string will be present in the
specified node within the XML file. If the existing value string does not
exactly match, the default promise is to replace the existing value string,
within the specified node. The specified node is determined by body-attributes.
The promise object referred to is a literal string of text.
code
bundle edit_xml example
{
set_text:
"text content to replace existing text, including whitespace, within selected node"
select_xpath => "/Server/Service/Engine/Host/Alias";
}
Note that typically only a single value string, within a single selected
node, is set in each set_text promise. You may of course have multiple
promises that each set a value string.
measurements
By default, CFEngine's monitoring component cf-monitord records performance
data about the system. These include process counts, service traffic, load
average and CPU utilization and temperature when available. It also records a
three year trend summary based any 'shift'-averages.
Custom measurements promises can monitor or log very specific user data
through a generic interface. The end-result is to either generate a periodic
time series, like the above mentioned values, or to log the results to
custom-defined reports.
Promises of type measurement are written just like all other promises within a
bundle destined for the agent concerned, in this case monitor. However, it is
not necessary to add them to the bundlesequence, because cf-monitord
executes all bundles of type monitor.
code
bundle monitor self_watch
{
measurements:
# Follow a special process over time
# using CFEngine's process cache to avoid resampling
# Example content from /var/cfengine/state/cf_rootprocs
#USER PID PPID PGID %CPU %MEM VSZ NI RSS TTY NLWP STIME ELAPSED TIME COMMAND
#root 19103 1 19103 0.2 2.1 71716 0 10676 ? 1 18:09 40:13 00:00:06 /var/cfengine/bin/cf-monitord --no-fork
# match_value:
#root \s+ [0-9.]+ \s+ [0-9.]+ \s+ [0-9.]+ \s+ [0-9.]+ \s+ [0-9.]+ \s+ [0-9]+ \s+ [0-9]+ \s+ ([0-9]+) .*"
"/var/cfengine/state/cf_rootprocs"
handle => "cf_monitord_RSS",
stream_type => "file",
data_type => "int",
history_type => "weekly",
units => "kb",
match_value => proc_value(".*cf-monitord.*",
"root\s+[0-9.]+\s+[0-9.]+\s+[0-9.]+\s+[0-9.]+\s+[0-9.]+\s+\s+[0-9.]+\s+[0-9.]+\s+([0-9]+).*"),
comment => "The ammount of memory (RSS or Resident Set Size) cf-monitored is consuming";
}
body match_value proc_value(x,y)
{
select_line_matching => "$(x)";
select_multiline_policy => "sum";
extraction_regex => "$(y)";
}
code
bundle monitor watch_diskspace
{
measurements:
# Discover disk device information
"/bin/df"
handle => "free_diskspace_watch",
stream_type => "pipe",
data_type => "slist",
history_type => "static",
units => "device",
match_value => file_systems;
}
body match_value file_systems
{
select_line_matching => "/.*";
extraction_regex => "(.*)";
}
The general pattern of these promises is to decide whether the source of the
information is either a file or pipe, determine the data type (integer, string
etc.), specify a pattern to match the result in the file stream and then specify
what to do with the result afterwards.
History:
- Custom measurements open sourced in 3.12.0
Architecture
Information gathered by cf-monitord is stored in ${sys.statedir}/env_data to
share with other agents like cf-agent and cf-promises which both provide three
variables per measurement with different prefixes: value_ for the latest measurement,
av_ for the running average and dev_ for the standard deviation of the running average.
The standard measurements and their variable names are listed in mon special variables.
The data over time is stored in ${sys.statedir}/cf_observations.lmdb which can be examined
most easily with the cf-check command:
code
cf-check dump /var/cfengine/state/cf_observations.lmdb
By default in the Masterfiles Policy Framework, cf-serverd uses two variables, def.default_data_select_host_monitoring_include and def.default_data_select_policy_hub_monitoring_include to configure which measurements will be included in enterprise reporting.
On the hub side, reports are collected and measurements data is inserted into the MonitoringHG MonitoringMgMeta and MonitoringYrMeta tables of the Enterprise Hub database.
A diagnostic query to run with a Custom Report in Mission Portal.
Select all unique observables in the database:
code
SELECT distinct(observable) FROM monitoringmgmeta;
To see which measures are collected for each host, select all data from this
table and then use report result filters to examine a particular host or measure's having
data or not.
code
SELECT * FROM monitoringmgmeta;
Measurement data is presented in Mission Portal in the Measurements App and in the Measurements section of the Host info page.
When policy is changed in regards to monitor bundles, both cf-monitord and cf-serverd should be restarted in order to receive the updated policy.
It is possible to configure masterfiles to restart cf-monitord when variables which affect it's configuration are changed.
All measurements historical data is stored in ${sys.statedir}/cf_observations.lmdb. This is where reporting data is pulled from.
${sys.statedir}/env_data is a current snapshot of measurement values which agents (cf-agent and cf-promises) use to generate the special monitor variables.
${sys.statedir}/ts_key is the source for the list of observables/measurements used in the system. This file includes the integer id, name and other meta data in a slightly human readable form, for example:
code
0,users,Users with active processes - including system users,average users per 2.5 mins,0.000,100.000,1
The ts_key file should not be altered.
Note that if a measurement has always had a value of zero it will not be reported and so not available in Mission Portal Measurements or Host info pages.
It is important to specify a promise handle for measurement promises, as the
names defined in the handle are used to determine the name of the log file or
variable to which data will be reported. Log files are created under
WORKDIR/state. Data that have no history type are stored in a special variable
context called mon, analogous to the system variables in sys. Thus the values
may be used in other promises in the form $(mon.handle).
Attributes
stream_type
Description: The datatype being collected.
Default: pipe
CFEngine treats all input using a stream abstraction. The preferred interface
is files, since they can be read without incurring the cost of a process.
However pipes from executed commands may also be invoked.
Type: (menu option)
Allowed input range:
Example:
code
stream_type => "pipe";
data_type
Description: The datatype being collected.
When CFEngine observes data, such as the attached partitions in the example above, the datatype determines how that data will be handled. Integer and real values, counters etc., are recorded as time-series if the history type is 'weekly', or as single values otherwise. If multiple items are matched by an observation (e.g. several lines in a file match the given regular expression), then these can be made into a list by choosing slist, else the first matching item will be selected.
Type: (menu option)
Allowed input range:
code
counter
int
real
string
slist
Example:
code
"/bin/df"
handle => "free_disk_watch",
stream_type => "pipe",
data_type => "slist",
history_type => "static",
units => "device",
match_value => file_systems,
action => sample_min(10,15);
history_type
Description: Whether the data can be seen as a time-series or just an
isolated value
Type: (menu option)
Allowed input range:
A single value, with compressed statistics is retained. The value of the
data is not expected to change much for the lifetime of the daemon (and
so will be sampled less often by cf-monitord).
A synonym for 'scalar'.
The measured value is logged as an infinite time-series in
$(sys.workdir)/state/<handle>_measure.log.
A standard CFEngine two-dimensional time average (over a weekly period)
is retained.
Example:
code
"/proc/meminfo"
handle => "free_memory_watch",
stream_type => "file",
data_type => "int",
history_type => "weekly",
units => "kB",
match_value => free_memory;
Notes:
- Measurements with history type
weekly are collected by CFEngine Enterprise reporting.
- Measurements with history type
static are not collected by CFEngine Enterprise reporting.
- Measurements with history type
scalar are not collected by CFEngine Enterprise reporting.
- Measurements with history type
log are not collected by CFEngine Enterprise reporting.
units
Description: The engineering dimensions of this value or a note about
its intent used in plots
This is an arbitrary string used in documentation only.
Type: string
Allowed input range: (arbitrary string)
Example:
code
"/var/cfengine/state/cf_rootprocs"
handle => "monitor_self_watch",
stream_type => "file",
data_type => "int",
history_type => "weekly",
units => "kB",
match_value => proc_value(".*cf-monitord.*",
"root\s+[0-9.]+\s+[0-9.]+\s+[0-9.]+\s+[0-9.]+\s+([0-9]+).*");
match_value
Type: body match_value
See also: Common body attributes
select_line_matching
Description: Regular expression for matching line location
The expression is anchored, meaning it must match a whole line, and not
a fragment within a line.
This attribute is mutually exclusive of select_line_number.
Type: string
Allowed input range: .*
Example:
code
# Editing
body location example
{
select_line_matching => "Expression match.* whole line";
}
# Measurement promises
body match_value example
{
select_line_matching => "Expression match.* whole line";
}
select_line_number
Description: Read from the n-th line of the output (fixed format)
This is mutually exclusive of select_line_matching.
Type: int
Allowed input range: 0,99999999999
Example:
code
body match_value find_line
{
select_line_number => "2";
}
Description: Regular expression that should contain a single
back-reference for extracting a value.
A single parenthesized back-reference should be given to lift the value to be
measured out of the text stream. The regular expression is unanchored, meaning
it may match a partial string
Type: string
Allowed input range: (arbitrary string)
Example:
code
body match_value free_memory
{
select_line_matching => "MemFree:.*";
extraction_regex => "MemFree:\s+([0-9]+).*";
}
track_growing_file
Description: If true, CFEngine remembers the position to which is last
read when opening the file, and resets to the start if the file has
since been truncated
This option applies only to file based input streams. If this is true,
CFEngine treats the file as if it were a log file, growing continuously.
Thus the monitor reads all new entries since the last sampling time on
each invocation. In this way, the monitor does not count lines in the
log file redundantly.
This makes a log pattern promise equivalent to something like tail -f
logfile | grep pattern in Unix parlance.
Type: boolean
Example:
code
bundle monitor watch
{
measurements:
"/home/mark/tmp/file"
handle => "line_counter",
stream_type => "file",
data_type => "counter",
match_value => scan_log("MYLINE.*"),
history_type => "log",
action => sample_rate("0");
}
#
body match_value scan_log(x)
{
select_line_matching => "^$(x)$";
track_growing_file => "true";
}
#
body action sample_rate(x)
{
ifelapsed => "$(x)";
expireafter => "10";
}
select_multiline_policy
Description: Regular expression for matching line location
This option governs how CFEngine handles multiple matching lines in the
input stream. It can average or sum values if they are integer or real,
or use first or last representative samples. If non-numerical data types
are used only the first match is used.
Type: (menu option)
Allowed input range:
code
average
sum
first
last
Example:
code
body match_value myvalue(xxx)
{
select_line_matching => ".*$(xxx).*";
extraction_regex => "root\s+\S+\s+\S+\s+\S+\s+\S+\s+\S+\s+\S+\s+\S+\s+(\S+).*";
select_multiline_policy => "sum";
}
History: Was introduced in 3.4.0 (2012)
Meta-data promises have no internal function. They are intended to be used to
represent arbitrary information about promise bundles. Formally, meta promises
are implemented as variables, and the values map to a variable context called
bundlename_meta. The values can be used as variables and will appear in
CFEngine Enterprise variable reports.
code
bundle agent example
{
meta:
"bundle_version" string => "1.2.3";
"works_with_cfengine" slist => { "3.4.0", "3.5.0" };
reports:
"Not a local variable: $(bundle_version)";
"Meta data (variable): $(example_meta.bundle_version)";
}
The value of meta data can be of the types string or slist or data.
methods
Methods are compound promises that refer to whole bundles of promises.
Methods may be parameterized.
code
methods:
"any"
usebundle => method_id("parameter",...);
Methods are useful for encapsulating repeatedly used configuration issues and
iterating over parameters. They are implemented as bundles that are run
inline. Note that if the bundle you specify requires no parameters you
may omit the usebundle attribute and give the bundle name directly in
the promiser string.
code
bundle agent example
{
vars:
"userlist" slist => { "mark", "jeang", "jonhenrik", "thomas", "eben" };
"userinfo" data => parsejson('{ "mark": 10, "jeang":20, "jonhenrik":30, "thomas":40, "eben":-1 }');
methods:
# Activate subtest once for each list item
"any" usebundle => subtest("$(userlist)");
# Activate subtest once passing the entire list
"amy" usebundle => subtest(@(userlist));
# Pass a data type variable aka data container
"amp" usebundle => subtest_c(@(userinfo));
}
bundle agent subtest(user)
{
commands:
"/bin/echo Fix $(user)";
reports:
"Finished doing stuff for $(user)";
}
bundle agent subtest_c(info)
{
reports:
"user ID of mark is $(info[mark])";
}
Methods offer powerful ways to encapsulate multiple issues pertaining to
a set of parameters.
Note in the above that a list can be passed as a implicitly iterated
scalar and as a reference, while a data variable (a data container)
can only be passed by reference.
As of version 3.5.0 a methods promise outcome is tied to the outcomes of its
promises. For example if you activate a bundle and it has a promise that is
not_kept, the bundle itself would have an outcome of not_kept. If you activate
a bundle that has one promise that is repaired, and one promise that is kept,
the bundle will have an outcome of repaired. A method will only have an outcome
of kept if all promises inside that bundle are also kept.
This acceptance test
illustrates the behavior.
Starting from version 3.1.0, methods may be specified using variables.
Care should be exercised when using this approach. In order to make the
function call uniquely classified, CFEngine requires the promiser to
contain the variable name of the method if the variable is a list.
code
bundle agent default
{
vars:
"m" slist => { "x", "y" };
"p" string => "myfunction";
methods:
"set of $(m)" usebundle => $(m)("one");
"any" usebundle => $(p)("two");
}
Please note that method names must be either simple strings or slists.
They can't be array references, for instance. As a rule, they can
only look like $(name) where name is either a string or an slist.
They can't be "$(a)$(b)", $(a[b]), and so on.
Here's a full example of how you might encode bundle names and
parameters in a slist, if you need to pack and unpack method calls in
a portable (e.g. written in a file) format.
code
body common control
{
bundlesequence => { run };
}
bundle agent run
{
vars:
"todo" slist => { "call_1,a,b", "call_2,x,y", "call_2,p,q" };
methods:
"call" usebundle => unpack($(todo));
}
bundle agent unpack(list)
{
vars:
"split" slist => splitstring($(list), ",", "100");
"method" string => nth("split", "0");
"param1" string => nth("split", "1");
"param2" string => nth("split", "2");
methods:
"relay" usebundle => $(method)($(param1), $(param2));
}
bundle agent call_1(p1, p2)
{
reports:
"$(this.bundle): called with parameters $(p1) and $(p2)";
}
bundle agent call_2(p1, p2)
{
reports:
"$(this.bundle): called with parameters $(p1) and $(p2)";
}
Output:
code
2013-12-11T13:33:31-0500 notice: /run/methods/'call'/unpack/methods/'relay'/call_1: R: call_1: called with parameters a and b
2013-12-11T13:33:31-0500 notice: /run/methods/'call'/unpack/methods/'relay'/call_2: R: call_2: called with parameters x and y
2013-12-11T13:33:31-0500 notice: /run/methods/'call'/unpack/methods/'relay'/call_2: R: call_2: called with parameters p and q
Attributes
Common attributes
Common attributes are available to all promise types. Full details for common
attributes can be found in the Common promise attributes section of
the Promise types page. The common attributes are as follows:
inherit
Description: If true this causes the sub-bundle to inherit the private
classes of its parent
Inheriting the variables is unnecessary as the child can always access the
parent's variables through a qualified reference using its bundle name. For
example: $(bundle.variable).
Type: boolean
Default value: false
Example:
code
bundle agent name
{
methods:
"group name" usebundle => my_method,
inherit => "true";
}
body edit_defaults example
{
inherit => "true";
}
History: Was introduced in 3.4.0, Enterprise 3.0.0 (2012)
usebundle
Type: bundle agent
useresult
Description: Specify the name of a local variable to contain any
result/return value from the child
Return values are limited to scalars.
Type: string
Allowed input range: `[a-zA-Z0-9_$(){}[].:]+
Example:
code
bundle agent test
{
methods:
"any" usebundle => child,
useresult => "my_return_var";
reports:
"My return was: \"$(my_return_var[1])\" and \"$(my_return_var[2])\"";
}
bundle agent child
{
reports:
# Map these indices into the useresult namespace
"this is a return value"
bundle_return_value_index => "1";
"this is another return value"
bundle_return_value_index => "2";
}
See also: reports bundle_return_value_index attribute
History: Was introduced in 3.4.0 (2012)
packages (deprecated)
NOTE: This package promise is deprecated and has been superseded by
the new package promise. It is recommended to use the new package
promise whenever possible. Simply using attributes from the new package promise
interface will select the new implementation.
NOTE: CFEngine 3.6 introduces bundles package_absent, package_present,
package_latest, package_specific_present, package_specific_absent, and
package_specific_latest that provide a higher-level abstraction for
working with packages. This is the recommended way to make promises about
packages. The bundles can be found in the file packages.cf in masterfiles.
CFEngine supports a generic approach to integration with native
operating support for packaging. Package promises allow CFEngine to make
promises regarding the state of software packages conditionally, given
the assumption that a native package manager will perform the actual
manipulations. Since no agent can make unconditional promises about
another, this is the best that can be achieved.
code
vars:
"match_package" slist => {
"apache2",
"apache2-mod_php5",
"apache2-prefork",
"php5"
};
packages:
"$(match_package)"
package_policy => "add",
package_method => yum;
Packages are treated as black-boxes with three labels:
- A package name
- A version string
- An architecture name
Package managers are treated as black boxes that may support some or all
of the following promise types:
- List installed packages
- Add packages
- Delete packages
- Reinstall (repair) packages
- Update packages
- Patch packages
- Verify packages
If these services are promised by a package manager, cf-agent promises
to use the service and encapsulate it within the overall CFEngine
framework. It is possible to set classes based on the return code of a
package-manager command in a very flexible way. See the
kept_returncodes, repaired_returncodes and failed_returncodes
attributes.
Domain knowledge
CFEngine does not maintain operating system specific expert knowledge
internally, rather it uses a generic model for dealing with promises
about packages (which depend on the behavior of an external package
manager). The approach is to define package system details in
body-constraints that can be written once and for all, for each package
system.
Package promises are like commands promises in the sense that CFEngine
promises nothing about the outcome of executing a command. All it can
promise is to interface with it, starting it and using the results in
good faith. Packages are basically 'outsourced', to invoke IT parlance.
Behavior
A package promise consists of a name, a version and an architecture,
(n,v,a), and behavior to be promised about packages that match
criteria based on these. The components (n,v,a) can be determined in
one of two different ways:
- They may be specified independently, e.g.
code
packages:
"mypackage"
package_policy => "add",
package_method => rpm,
package_select => ">=",
package_architectures => { "x86_64", "i586" },
package_version => "1.2.3";
- They may be extracted from a package identifier (promiser) or
filename, using pattern matching. For example, a promiser
7-Zip-4.50-x86_64.msi and a
package_method containing the
following:
code
package_name_regex => "^(\S+)-(\d+\.?)+";
package_version_regex => "^\S+-((\d+\.?)+)";
package_arch_regex => "^\S+-[\d\.]+-(.*).msi";
When scanning a list of installed packages different managers present
the information (n,v,a) in quite different forms and pattern
extraction is necessary. When making a promise about a specific package,
the CFEngine user may choose one or the other model.
Smart and dumb package systems
Package managers vary enormously in their capabilities and in the kinds
of promises they make. There are broadly two types:
- Smart package systems that resolve dependencies and require only a
symbolic package name.
- Dumb package managers that do not resolve dependencies and need
filename input.
Normal ordering for packages is the following:
Promise repair logic
Identified package matched by name, but not version
| Command |
Dumb manager |
Smart manager |
| add |
unable |
Never |
| delete |
unable |
Attempt deletion |
| reinstall |
unable |
Attempt delete/add |
| upgrade |
unable |
Upgrade if capable |
| patch |
unable |
Patch if capable |
Package not installed
| Command |
Dumb manager |
Smart manager |
| add |
Attempt to install named |
Install any version |
| delete |
unable |
unable |
| reinstall |
Attempt to install named |
unable |
| upgrade |
unable |
unable |
| patch |
unable |
unable |
code
bundle agent packages
{
vars:
# Test the simplest case -- leave everything to the yum smart manager
"match_package" slist => {
"apache2",
"apache2-mod_php5",
"apache2-prefork",
"php5"
};
packages:
"$(match_package)"
package_policy => "add",
package_method => yum;
}
Packages promises can be very simple if the package manager is of the
smart variety that handles details for you. If you need to specify
architecture and version numbers of packages, this adds some complexity,
but the options are flexible and designed for maximal adaptability.
Patching
Some package systems also support the idea of 'patches'. These might be
formally different objects to packages. A patch might contain material
for several packages and be numbered differently. When you select
patching-policy the package name (promiser) can be a regular expression
that will match possible patch names, otherwise identifying specific
patches can be cumbersome.
Note that patching is a subtle business. There is no simple way using
the patch settings to install 'all new system patches'.
If we specify the name of a patch, then CFEngine will try to see if it
exists and/or is installed. If it exists in the pending list, it will be
installed. If it exists in the installed list it will not be installed.
Now consider the pattern .*. This will match any installed package, so
CFEngine will assume the relevant patch has been installed already. On
the other hand, the pattern no match will not match an installed patch,
but it will not match a named patch either.
Some systems provide a command to do this, which can be specified
without specific patch arguments. If so, that command can be called
periodically under commands. The main purposes of patching body items
are:
- To install specific named patches in a controlled manner.
- To generate reports of available and installed patches during system
reporting.
Installers without package/patch arguments
CFEngine supports the syntax $ at the end of a command to mean that no
package name arguments should be used or appended after the dollar sign.
This is because some commands require a list of packages, while others
require an empty list. The default behavior is to try to append the
name of one or more packages to the command, depending on whether the
policy is for individual or bulk installation.
Default package method
As of core 3.3.0, if no package_method is defined, CFEngine will look
for a method called generic. Such a method is defined in the standard
library for supported operating systems.
Currently, packages promises do not work on HP-UX because CFEngine
does not come with package bodies for that platform.
Attributes
Common attributes
Common attributes are available to all promise types. Full details for common
attributes can be found in the Common promise attributes section of
the Promise types page. The common attributes are as follows:
package_architectures
Description: Select the architecture for package selection
It is possible to specify a list of packages of different architectures
if it is desirable to install multiple architectures on the host. If no
value is specified, CFEngine makes no promise about the result; the
package manager's behavior prevails.
Type: slist
Allowed input range: (arbitrary string)
Example:
code
packages:
"$(exact_package)"
package_policy => "add",
package_method => rpm,
package_architectures => { "x86_64" };
package_method
Type: body package_method
See also: Common body attributes
package_add_command
Description: Command to install a package to the system
This command should install a package when appended with the package
reference id, formed using the package_name_convention, using the
model of (name,version,architecture). If package_file_repositories is
specified, the package reference id will include the full path to a
repository containing the package.
Package managers generally expect the name of a package to be passed as
a parameter. However, in some cases we do not need to pass the name of a
particular package to the command. Ending the command string with $
prevents CFEngine from appending the package name to the string.
Type: string
Allowed input range: .+
Example:
code
body package_method rpm
{
package_add_command => "/bin/rpm -i ";
}
package_arch_regex
Description: Regular expression with one back-reference to extract
package architecture string
This is for use when extracting architecture from the name of the
promiser, when the architecture is not specified using the
package_architectures list. It is an unanchored regular expression that
contains exactly one parenthesized back-reference which marks the location in
the promiser at which the architecture is specified.
Type: string
Allowed input range: (arbitrary string)
Example:
code
body package_method rpm
{
package_list_arch_regex => "[^.]+\.([^.]+)";
}
Notes: If no architecture is specified for thegiven package manager, then
do not define this.
package_changes
Description: Defines whether to group packages into a single aggregate
command.
This indicates whether the package manager is capable of handling
package operations with multiple arguments. If this is set to bulk then
multiple arguments will be passed to the package commands. If set to
individual packages will be handled one by one. This might add a
significant overhead to the operations, and also affect the ability of
the operating system's package manager to handle dependencies.
Type: (menu option)
Allowed input range:
Example:
code
body package_method rpm
{
package_changes => "bulk";
}
package_delete_command
Description: Command to remove a package from the system
The command that deletes a package from the system when appended with
the package reference identifier specified by package_name_convention.
Package managers generally expect the name of a package to be passed as
a parameter. However, in some cases we do not need to pass the name of a
particular package to the command. Ending the command string with $
prevents CFEngine from appending the package name to the string.
Type: string
Allowed input range: .+
Example:
code
body package_method rpm
{
package_delete_command => "/bin/rpm -e --nodeps";
}
package_delete_convention
Description: This is how the package manager expects the package to be
referred to in the deletion part of a package update, e.g. $(name)
This attribute is used when package_policy is delete, or
package_policy is update and package_file_repositories is set and
package_update_command is not set. It is then used to set the pattern
for naming the package in the way expected by the package manager during
the deletion of existing packages.
Three special variables are defined from the extracted data, in a
private context for use: $(name), $(version) and $(arch). version and
arch is the version and architecture (if package_list_arch_regex is given)
of the already installed package. Additionally, if
package_file_repositories is defined, $(firstrepo) can be prepended
to expand the first repository containing the package. For example:
$(firstrepo)$(name)-$(version)-$(arch).msi.
Type: string
Allowed input range: (arbitrary string)
Example:
code
body package_method freebsd
{
package_file_repositories => { "/path/to/packages" };
package_name_convention => "$(name)-$(version).tbz";
package_delete_convention => "$(name)-$(version)";
}
Notes:
If this is not defined, it defaults to the value of
package_name_convention.
package_file_repositories
Description: A list of machine-local directories to search for packages
If specified, CFEngine will assume that the package installation occurs
by filename and will search the named paths for a package matching the
pattern package_name_convention. If found the name will be prefixed to
the package name in the package commands.
Type: slist
Allowed input range: (arbitrary string)
Example:
code
body package_method filebased
{
package_file_repositories => { "/package/repos1", "/packages/repos2" };
}
package_installed_regex
Description: Regular expression which matches packages that are already
installed
This regular expression must match complete lines in the output of the
list command that are actually installed packages. If all
the lines match, then the regex can be set of .*, however most package
systems output prefix lines and a variety of human padding that needs to
be ignored.
Type: string
Allowed input range: (arbitrary string)
Example:
code
body package_method yum
{
package_installed_regex => ".*installed.*";
}
package_default_arch_command
Description: Command to detect the default packages' architecture
This command allows CFEngine to detect default architecture of packages
managed by package manager. As an example, multiarch-enabled dpkg only
lists architectures explicitly for multiarch-enabled packages.
In case this command is not provided, CFEngine treats all packages
without explicit architecture set as belonging to implicit default
architecture.
Type: string
Allowed input range: "?(/.*)
Example:
code
body package_method dpkg
{
package_default_arch_command => "/usr/bin/dpkg --print-architecture";
# ...
}
History: Was introduced in 3.4.0, Enterprise 3.0.0 (2012)
package_list_arch_regex
Description: Regular expression with one back-reference to extract
package architecture string
An unanchored regular expression that contains exactly one parenthesized back
reference that marks the location in the listed package at which the
architecture is specified.
Type: string
Allowed input range: (arbitrary string)
Example:
code
body package_method rpm
{
package_list_arch_regex => "[^|]+\|[^|]+\|[^|]+\|[^|]+\|\s+([^\s]+).*";
}
Notes: If no architecture is specified for the given package manager, then
do not define this regex.
package_list_command
Description: Command to obtain a list of available packages
This command should provide a complete list of the packages installed on
the system. It might also list packages that are not installed. Those
should be filtered out using the package_installed_regex.
Package managers generally expect the name of a package to be passed as
a parameter. However, in some cases we do not need to pass the name of a
particular package to the command. Ending the command string with $
prevents CFEngine from appending the package name to the string.
Type: string
Allowed input range: .+
Example:
code
body package_method rpm
{
package_list_command => "/bin/rpm -qa --queryformat \"%{name} %{version}-%{release}\n\"";
}
package_list_name_regex
Description: Regular expression with one back-reference to extract
package name string
An unanchored regular expression that contains exactly one parenthesized back
reference which marks the name of the package from the package listing.
Type: string
Allowed input range: (arbitrary string)
Example:
code
body package_method rpm
{
package_list_name_regex => "([^\s]+).*";
}
package_list_update_command
Description: Command to update the list of available packages (if any)
Not all package managers update their list information from source
automatically. This command allows a separate update command to be
executed at intervals determined by package_list_update_ifelapsed.
Type: string
Allowed input range: (arbitrary string)
Example:
code
body package_method xyz
{
debian|ubuntu::
package_list_update_command => "/usr/bin/apt-get update";
package_list_update_ifelapsed => "240"; # 4 hours
}
package_list_update_ifelapsed
Description: The ifelapsed
locking time in between updates of the package list
Type: int
Allowed input range: -99999999999,9999999999
Example:
code
body package_method xyz
{
debian|ubuntu::
package_list_update_command => "/usr/bin/apt-get update";
package_list_update_ifelapsed => "240"; # 4 hours
}
package_list_version_regex
Description: Regular expression with one back-reference to extract
package version string
This unanchored regular expression should contain exactly one parenthesized
back-reference that marks the version string of packages listed as
installed.
Type: string
Allowed input range: (arbitrary string)
Example:
code
body package_method rpm
{
package_list_version_regex => "[^\s]+ ([^.]+).*";
}
package_name_convention
Description: This is how the package manager expects the package to be
referred to, e.g. $(name).$(arch)
This sets the pattern for naming the package in the way expected by the
package manager. Three special variables are defined from the extracted
data, in a private context for use: $(name), $(version) and $(arch).
Additionally, if package_file_repositories is defined, $(firstrepo)
can be prepended to expand the first repository containing the package.
For example: $(firstrepo)$(name)-$(version)-$(arch).msi.
When package_policy is update, and package_file_repositories is
specified, package_delete_convention may be used to specify a
different convention for the delete command.
If this is not defined, it defaults to the value $(name).
Type: string
Allowed input range: (arbitrary string)
Example:
code
body package_method rpm
{
package_name_convention => "$(name).$(arch).rpm";
}
package_name_regex
Description: Regular expression with one back-reference to extract
package name string
This unanchored regular expression is only used when the promiser contains
not only the name of the package, but its version and architecture also. In
that case, this expression should contain a single parenthesized
back-reference to extract the name of the package from the string.
Type: string
Allowed input range: (arbitrary string)
Example:
code
body package_method rpm
{
package_name_regex => "([^\s]).*";
}
package_noverify_regex
Description: Regular expression to match verification failure output
Ananchored regular expression to match output from a package verification
command. If the output string matches this expression, the package is deemed
broken.
Type: string
Allowed input range: (arbitrary string)
Example:
code
body package_method xyz
{
package_noverify_regex => "Package .* is not installed.*";
package_verify_command => "/usr/bin/dpkg -s";
}
package_noverify_returncode
Description: Integer return code indicating package verification
failure
For use if a package verification command uses the return code as the
signal for a failed package verification.
Type: int
Allowed input range: -99999999999,9999999999
Example:
code
body package_method xyz
{
package_noverify_returncode => "-1";
package_verify_command => "/bin/rpm -V";
}
package_patch_arch_regex
Description: Anchored regular expression with one back-reference to
extract update architecture string
A few package managers keep a separate notion of patches, as opposed to
package updates. OpenSuSE, for example, is one of these. This provides
an analogous command struct to the packages for patch updates.
Type: string
Allowed input range: (arbitrary string)
Example:
code
body package_method zypper
{
package_patch_arch_regex => "";
}
package_patch_command
Description: Command to update to the latest patch release of an
installed package
If the package manager supports patching, this command should patch a
named package. If only patching of all packages is supported then
consider running that as a batch operation in commands. Alternatively
one can end the command string with a $ symbol, which CFEngine will
interpret as an instruction to not append package names.
Type: string
Allowed input range: .+
Example:
code
body package_method zypper
{
package_patch_command => "/usr/bin/zypper -non-interactive patch";
}
package_patch_installed_regex
Description: Anchored regular expression which matches packages that are
already installed
A few package managers keep a separate notion of patches, as opposed to
package updates. OpenSuSE, for example, is one of these. This provide an
analogous command struct to the packages for patch updates.
Type: string
Allowed input range: (arbitrary string)
Example:
code
body package_method zypper
{
package_patch_installed_regex => ".*(Installed|Not Applicable).*";
}
package_patch_list_command
Description: Command to obtain a list of available patches or updates
This command, if it exists at all, is presumed to generate a list of
patches that are available on the system, in a format analogous to (but
not necessarily the same as) the package-list command. Patches might
formally be available in the package manager's view, but if they have
already been installed, CFEngine will ignore them.
Package managers generally expect the name of a package to be passed as
a parameter. However, in some cases we do not need to pass the name of a
particular package to the command. Ending the command string with $
prevents CFEngine from appending the package name to the string.
Type: string
Allowed input range: .+
Example:
code
package_patch_list_command => "/usr/bin/zypper patches";
package_patch_name_regex
Description: Unanchored regular expression with one back-reference to
extract update name string.
A few package managers keep a separate notion of patches, as opposed to
package updates. OpenSuSE, for example, is one of these. This provides
an analogous command struct to the packages for patch updates.
Type: string
Allowed input range: (arbitrary string)
Example:
code
body package_method zypper
{
package_patch_name_regex => "[^|]+\|\s+([^\s]+).*";
}
package_patch_version_regex
Description: Unanchored regular expression with one back-reference to
extract update version string.
A few package managers keep a separate notion of patches, as opposed to
package updates. OpenSuSE, for example, is one of these. This provides
an analogous command struct to the packages for patch updates.
Type: string
Allowed input range: (arbitrary string)
Example:
code
body package_method zypper
{
package_patch_version_regex => "[^|]+\|[^|]+\|\s+([^\s]+).*";
}
package_update_command
Description: Command to update to the latest version a currently
installed package
If supported this should be a command that updates the version of a
single currently installed package. If only bulk updates are supported,
consider running this as a single command under commands. The package
reference id is appended, with the pattern of package_name_convention.
When package_file_repositories is specified, the package reference id
will include the full path to a repository containing the package. If
package_policy is update, and this command is not specified, the
package_delete_command and package_add_command will be executed to
carry out the update.
Type: string
Allowed input range: .+
Example:
code
body package_method zypper
{
package_update_command => "/usr/bin/zypper -non-interactive update";
}
package_verify_command
Description: Command to verify the correctness of an installed package
If available, this is a command to verify an already installed package.
It is required only when package_policy is verify.
The outcome of the command is compared with
package_noverify_returncode or package_noverify_regex, one of which
has to be set when using this command. If the package is not installed,
the command will not be run the promise gets flagged as not kept before
the verify command executes.
In order for the promise to be considered kept, the package must be
installed, and the verify command must be successful according to
package_noverify_returncode xor package_noverify_regex.
Package managers generally expect the name of a package to be passed as
a parameter. However, in some cases we do not need to pass the name of a
particular package to the command. Ending the command string with $
prevents CFEngine from appending the package name to the string.
Type: string
Allowed input range: .+
Example:
code
body package_method rpm
{
package_verify_command => "/bin/rpm -V";
package_noverify_returncode => "-1";
}
package_version_regex
Description: Regular expression with one back-reference to extract
package version string
If the version of a package is not specified separately using
package_version, then this should be an unanchored regular expression that
contains exactly one parenthesized back-reference that matches the
version string in the promiser.
Type: string
Allowed input range: (arbitrary string)
Example:
code
body package_method rpm
{
package_version_regex => "[^\s]+ ([^.]+).*";
}
package_multiline_start
Description: Regular expression which matches the start of a new
package in multiline output
This pattern is used in determining when a new package record begins. It
is used when package managers (like the Solaris package manager) use
multi-line output formats. This pattern matches the first line of a new
record.
Type: string
Allowed input range: (arbitrary string)
Example:
code
body package_method solaris (pkgname, spoolfile, adminfile)
{
package_changes => "individual";
package_list_command => "/usr/bin/pkginfo -l";
package_multiline_start => "\s*PKGINST:\s+[^\s]+";
...
}
package_commands_useshell
Description: Whether to use shell for commands in this body
Type: boolean
Default value: true
History: Was introduced in 3.4.0, Nova 2.3.0 (2012)
package_version_less_command
Description: Command to check whether first supplied package version is
less than second one
This attribute allows overriding of the built-in CFEngine algorithm for
version comparison, by calling an external command to check whether the
first passed version is less than another.
The built-in algorithm does a good approximation of version comparison,
but different packaging systems differ in corner cases (e.g Debian
treats symbol ~ less than any other symbol and even less than empty
string), so some sort of override is necessary.
Variables v1 and v2 are substituted with the first and second
version to be compared. Command should return code 0 if v1 is less than
v2 and non-zero otherwise.
Note that if package_version_equal_command is not specified, but
package_version_less_command is, then equality will be tested by
issuing less comparison twice (v1 equals to v2 if v1 is not less than
v2, and v2 is not less than v1).
Type: string
Allowed input range: .+
Example:
code
body package_method deb
{
...
package_version_less_command => "dpkg --compare-versions ${v1} lt ${v2}";
}
History: Was introduced in 3.4.0 (2012)
package_version_equal_command
Description: Command to check whether first supplied package version is
equal to second one
This attribute allows overriding of the built-in CFEngine algorithm for
version comparison by calling an external command to check whether the
passed versions are the same. Some package managers consider textually
different versions to be the same (e.g. optional epoch component, so
0:1.0-1 and 1.0-1 versions are the same), and rules for comparing vary
from package manager to package manager, so override is necessary.
Variables v1 and v2 are substituted with the versions to be
compared. Command should return code 0 if versions are equal and
non-zero otherwise.
Note that if package_version_equal_command is not specified, but
package_version_less_command is, then equality will be tested by
issuing less comparison twice (v1 equals to v2 if v1 is not less than
v2, and v2 is not less than v1).
Type: string
Allowed input range: .+
Example:
code
body package_method deb
{
...
package_version_equal_command => "dpkg --compare-versions ${v1} eq ${v2}";
}
Notes:
History: Was introduced in 3.4.0 (2012)
package_policy
Description: Criteria for package installation/upgrade on the current
system
Type: (menu option)
Allowed input range:
Ensure that a package is present (this is the default setting from
3.3.0).
Ensure that a package is not present.
Delete then add package (warning, non-convergent).
Update the package if an update is available (manager dependent).
Equivalent to add if the package is not installed, and update if it is
installed. Note: This attribute requires the specification of package_version
and package_select in order to select the proper version to update to if
available. See also package_latest
package_specific_latest in the
standard library.
Install one or more patches if available (manager dependent).
Verify the correctness of the package (manager dependent). The promise
is kept if the package is installed correctly, not kept otherwise.
Requires setting package_verify_command.
Default value: verify
Example:
code
packages:
"$(match_package)"
package_policy => "add",
package_method => xyz;
package_select
Description: Selects which comparison operator to use with
package_version.
This selects the operator used to compare available packages. If an
available package is found to satisfy the version requirement, it may
be selected for install (if package_policy is add, update or
addupdate). To select the right package, imagine the available package
being on the left hand side of the operator, and the value in
package_version being on the right.
Note that in the case of deleting a package, you must specify an exact
version.
If package_policy is update or addupdate, CFEngine will always
try to keep the most recent package installed that satisfies the version
requirement. For example, if package_select is < and
package_version is 3.0.0, you may still match updates to 2.x.x
series, like: 2.2.1, 2.2.2, 2.3.0, because they all satisfy the
version requirement.
Type: (menu option)
Allowed input range:
Example:
code
packages:
"$(exact_package)"
package_policy => "add",
package_method => xyz,
package_select => ">=",
package_architectures => { "x86_64" },
package_version => "1.2.3-456";
package_version
Description: Version reference point for determining promised version
Used for specifying the targeted package version when the version is
written separately from the name of the command.
Type: string
Allowed input range: (arbitrary string)
Example:
code
packages:
"mypackage"
package_policy => "add",
package_method => rpm,
package_select => "==",
package_version => "1.2.3";
packages
CFEngine 3.7 and later supports package management through a simple promise
interface. Using a small set of attributes you can make promises about the state
of software on a host, whether it should be installed, not installed, or at a
specific version.
CFEngine 3.6 and older had a different package promise implementation, which is
still functional, but considered deprecated. However, it may still be in use by
existing policy files, and it may cover platforms which the new implementation
does not currently cover. To read about the old package promise, go to the
old package promise section.
The actual communication with the package manager on the system is handled by so
called package modules, which are specifically written for
each type of package manager.
In this example, we want the software package "apache2" to be present on the
system, and we want it to be version 2.2.22. If this requirement cannot be
fulfilled (for example because the package repository doesn't have it), the
promise will fail.
It is also possible to specify a package file name, if the package resides on
the local filesystem, like this:
code
packages:
"/mnt/nfs/packages/apache2-2.2.22.x86_64.rpm"
policy => "present",
package_module => yum;
The default package module can be globally specified with the
package_module attribute
in body common control.
Note that if your policy attribute specifies "absent", then the promiser
string needs to be a bare package name, you cannot use a file name for this.
Noteable differences from package_method based implementation:
The promiser must be the fully qualified path to a file or a package name.
package_modules do not have the concept of a
flexible naming convention.
For example, here are valid ways to specify a specific package version when
using the package_module based implementation.
code
packages:
debian::
"apache2"
policy => "present",
version => "2.2.22",
package_module => apt_get,
comment => "Install apache from repository";
redhat::
"/mnt/nfs/packages/apache2-2.2.22.x86_64.rpm"
policy => "present",
package_module => yum,
comment => "Install apache from a specific RPM";
The following usage is NOT valid.
code
packages:
debian::
"apache2-2.2.22"
policy => "present",
package_module => apt_get,
comment => "INVALID specification of package version";
redhat::
"/mnt/nfs/packages/apache2-2.2.22.x86_64.rpm"
policy => "present",
package_module => yum,
version => "2.2.22",
comment => "INVALID specification of package version.";
Attributes
Common attributes
Common attributes are available to all promise types. Full details for common
attributes can be found in the Common promise attributes section of
the Promise types page. The common attributes are as follows:
architecture
Description: The architecture we want the promise to consider.
The promise will only consider the architecture specified when performing
package manipulations, but depending on the underlying package manager, this may
indirectly affect other architectures.
Type: string
Allowed input range: (arbitrary string)
Example:
code
packages:
"apache"
policy => "present",
package_module => apt_get,
architecture => "x86_64";
options
Description: Options to pass to the underlying package module.
options is a catchall attribute in order to pass arbitrary data into the
package module which is carrying out package operations. It is meant as a
rescue solution when a package module has added functionality which is not
covered by the package promise API. As such there is no official documentation
for this attribute, its usage depends on the package module in question.
Type: slist
Allowed input range: (arbitrary string)
Example:
code
packages:
"apache"
policy => "present",
package_module => my_package_module,
options => { "repository=myrepo" };
debian::
"php7.0"
policy => "present",
package_module => apt_get,
options => { "-o", "APT::Install-Recommends=0" };
policy
Description: Whether the package should be present or absent on the system.
Default value: present
Type: string
Allowed input range: present|absent
Example:
code
packages:
"apache"
policy => "absent",
package_module => apt_get;
version
Description: The version we want the promise to consider.
Type: string
Allowed input range: (arbitrary string)
Note: When policy present is used version may be set to latest to
ensure the latest available version from a repository is installed.
Example:
code
packages:
"apache"
policy => "absent",
package_module => apt_get,
version => "2.2.22";
"ssh"
policy => "present",
package_module => apt_get,
version => "latest";
package_module
Type: body package_module
The package module body you wish to use for the package promise. The default is
platform dependent, see
package_module in Components
and Common control. The name of the body is expected to be the same as the name
of the package module inside /var/cfengine/modules/packages.
See also: Common body attributes
default_options
Description: Options to pass to to the package module by default.
See the options attribute for details on what options do.
Type: slist
Allowed input range: (arbitrary string)
Example:
code
body package_module apt_get
{
default_options => { "use_curl=1" };
}
query_installed_ifelapsed
Description: How often to query the system for currently installed packages.
For performance reasons, CFEngine maintains a cache of currently installed
packages, to avoid calling the package manager too often. This attribute tells
CFEngine how often to update this cache (in minutes).
The cache is always updated when CFEngine makes changes to the system.
Type: int
Allowed input range: (Positive integer)
Example:
code
body package_module apt_get
{
# Query the package database only every four hours.
query_installed_ifelapsed => "240";
}
Note for package_module authors:
list-installed will be called when the agent
repairs a package using the given package_module, when the lock has expired or
when the agent is run without locks.
See also: Package modules
query_updates_ifelapsed
Description: How often to query the package manager for new updates.
In order not to query repository servers too often, CFEngine maintains a cache
of the currently available package updates. This attribute tells CFEngine how
often to update this cache (in minutes).
Even when making package changes to the system, CFEngine will not query this
information more often than this attribute specifies, however it may make a
local query in order to update the cache from local, already downloaded data.
Type: int
Allowed input range: (Positive integer)
Example:
code
body package_module apt_get
{
# Query package updates only every 24 hours.
query_updates_ifelapsed => "1440";
}
Note for package_module authors:
list-updates will be called when the lock has
expired or when the agent is run without locks.
list-updates-local is called in all
other conditions.
See also: Package modules
interpreter
Description: Absolute path to the interpreter to run the package module (script) with.
If the package module is implemented as a script, it has to be executed with
some interpreter. Using a hashbang/shebang may not always be possible or easy
(different versions/paths of python, etc.). This attribute tells CFEngine the
path to the interpreter to use when running the package module.
Type: string
Allowed input range: (arbitrary string)
Example:
code
body package_module apt_get
{
# better use variable like $(def.python)
interpreter => "/usr/bin/python3.6";
}
See also: Package modules
History: Introduced in 3.13.0, 3.12.2
module_path
Description: Absolute path to the the package module.
By default, the package module implementation has to be in a file with the same
name as the package module itself, under the $(sys.workdir)/modules/packages
directory. In some cases, it might be useful to use a different name or path or
to have multiple package modules using the same implementation just with
different attributes (e.g. default_options).
Type: string
Allowed input range: (arbitrary string)
Example:
code
body package_module yum_all_repos
{
module_path => $(sys.workdir)/modules/packages/yum;
default_options => { "--enablerepo=*" };
}
See also: Package modules
History: Introduced in 3.13.0, 3.12.2
Package modules out-of-the-box
yum
Manage packages using yum. This is the default package module for Red Hat, CentOS and Amazon Linux.
Examples:
File based package source.
code
packages:
redhat|centos|amazon_linux::
"/mnt/nfs/packages/httpd-2.2.22.x86_64.rpm"
policy => "present";
Repository based package source with a specific version of the package.
code
packages:
redhat|centos|amazon_linux::
"httpd"
policy => "present",
version => "2.2.22";
Enable a specific repository for a specific promise.
code
bundle agent example
{
packages:
redhat|centos|amazon_linux::
# Enable the EPEL repo when making sure git is installed
# and up to date.
"git"
policy => "present",
version => "latest",
options => { "enablerepo=EPEL" };
# Only consider updates from the main repositories for
# httpd and disable all other repositories
"httpd"
policy => "present",
version => "latest",
options => { "disablerepo=* enablerepo=UPDATES" };
}
Notes:
Supports file path and repository sourced packages.
Requires Python version 2 or 3 to be installed on the host.
If policy => "present" and version is set this package module will downgrade the promised package if necessary.
code
[root ~]# yum --show-duplicates list screen
Loaded plugins: fastestmirror
Loading mirror speeds from cached hostfile
* base: centos.mirror.constant.com
* epel: epel.mirror.constant.com
* extras: mirror.ette.biz
* updates: mirror.trouble-free.net
Installed Packages
screen.x86_64 4.1.0-0.25.20120314git3c2946.el7 @base
Available Packages
screen.x86_64 4.1.0-0.19.20120314git3c2946.el7 local-repo
screen.x86_64 4.1.0-0.25.20120314git3c2946.el7 base
Policy with promise that old version of screen is installed.
code
bundle agent example_yum_downgrades_if_necessary
{
packages:
redhat_7|centos_7::
"screen"
policy => "present",
version => "4.1.0-0.19.20120314git3c2946.el7";
}
Executing policy and the version of screen installed after policy run.
code
[root ~]# cf-agent -Kb example_yum_downgrades_if_necessary; rpm -q screen
screen-4.1.0-0.19.20120314git3c2946.el7.x86_64
History:
- Added in CFEngine 3.7.0
enablerepo and disablerepo option support added in 3.7.8, 3.10.4, 3.12.0
apt_get
Manage packages using apt-get.
Example:
Example showing file based package source.
code
packages:
"/mnt/nfs/packages/apache2-2.2.22.x86_64.deb"
policy => "present",
package_module => apt_get;
Example showing repository based package source.
code
packages:
"apache2"
policy => "present",
package_module => apt_get,
version => "2.2.22",
options => { "-o", "APT::Install-Recommends=0" };
Notes:
- Requires Python version 2 to be installed on the host.
- Supports
options attribute. Each space separate
option must be added as a separate list element. The options are passed
directly through to the package manager.
History:
freebsd_ports
Manage packages using
FreeBSD Ports.
History:
nimclient
Manage packages using nimclient on AIX.
Example:
code
packages:
aix::
"expect.base"
policy => "present",
package_module => nimclient,
options => { "lpp_source=lppaix710304" };
Notes:
options attribute support to specify
lpp_source. Please note it is REQUIRED to specify an
lpp_source when using this package module.
History:
pkg
Manage packages using
FreeBSD pkg.
Example:
code
packages:
freebsd::
"emacs-nox11"
policy => "present",
package_module => pkg;
"emacs"
policy => "absent",
package_module => pkg;
"mypackage"
policy => "present",
package_module => pkg,
options => { "option=NAMESERVER=127.0.0.01",
"option=FETCH_RETRY=5",
"repository=myrepo" };
Notes:
- Supports
options attribute.
option :: Allows specification of additional options ( -o )repository :: Allows specification of repository ( -r )
History:
- Added in CFEngine 3.9.0
- Added
repo alias for repository option in CFEngine 3.20.0, 3.18.2
- Added
option option in CFEngine 3.20.0, 3.18.2
pkgsrc
Manage packages using pkgsrc.
History:
slackpkg
Manage packages using Slackware's slackpkg.
Example
code
packages:
slackware::
"nmap"
policy => "absent",
package_module => slackpkg;
History:
msiexec
Manage MSI packages using MSI installer on Windows.
Due to lack of central software repository on supported versions of Windows,
neither installation from repository nor checking for upgrades is supported.
The full path to the MSI package file must be supplied in order to promise the
package is installed. In order to promise a package is absent (not installed)
the package name must be used.
Example: install Google Chrome but prevent it from self-upgrading
(otherwise Google Chrome's self-upgrading will conflict with CFEngine ensuring
that version from this particluar MSI is installed):
code
packages:
windows::
"C:\GoogleChromeStandaloneEnterprise.msi"
policy => "present",
package_module => msiexec;
"Google Update Helper"
policy => "absent",
package_module => msiexec;
History:
- Added in CFEngine 3.12.2 and 3.14.0
snap
Manage packages using snap.
code
bundle agent main
{
packages:
ubuntu::
"genpw"
policy => "present",
package_module => snap;
"genpw"
policy => "absent",
package_module => snap;
"genpw"
policy => "present",
package_module => snap,
version => "2.0.0";
"genpw"
policy => "absent",
package_module => snap,
version => "2.0.0";
"genpw"
policy => "present",
package_module => snap,
version => "latest";
}
History:
- Added in CFEngine 3.15.0, 3.12.3, 3.10.7
Notes:
- version
latest is not supported when promising an absence
list-updates is not implemented, snaps are automatically updated by default
processes
Process promises refer to items in the system process table, i.e., a command in
some state of execution (with a Process Control Block). Promiser objects are
patterns that are unanchored, meaning that they match parts of
command lines in the system process table.
code
processes:
"regex contained in process line"
process_select = process_filter_body,
restart_class = "activation class for process",
..;
Note: CFEngine uses the output from the ps command to inspect running
processes, and these formats differ between platforms. You can see how cfengine
views the process table for your platform by inspecting cf_otherprocs,
cf_procs, and cf_rootprocs which can be found in $(sys.workdir)/state/
(typically /var/cfengine/state).
This is an example showing how to restart a splunk process owned by root:
code
bundle agent example
{
processes:
"splunkd"
process_select => by_owner( "root" ),
handle => "example_splunk_stop_gracefully",
process_stop => "/opt/splunkforwarder/bin/splunk stop",
comment => "Find splunkd processes owned by root. Stop it gracefully
with the internal splunk binary.";
"splunkd"
restart_class => "splunk_not_running",
comment => "Set splunk_not_running class if we cant find any root owned
splunkd processes so that we can restart it using a
commands promise";
commands:
splunk_not_running::
"/opt/splunkforwarder/bin/splunk"
args => "--accept-license --answer-yes --no-prompt start";
}
This example shows using process_select and process_count to define a class
when a process has been running for longer than a day.
code
bundle agent main
{
processes:
"init"
process_count => any_count("booted_over_1_day_ago"),
process_select => days_older_than(1),
comment => "Define a class indicating we found an init process running
for more than 1 day.";
reports:
booted_over_1_day_ago::
"This system was booted over 1 days ago since there is an init process
that is older than 1 day.";
!booted_over_1_day_ago::
"This system has been rebooted recently as the init process has been
running for less than a day";
}
body process_count any_count(cl)
{
match_range => "0,0";
out_of_range_define => { "$(cl)" };
}
body process_select days_older_than(d)
{
stime_range => irange(ago(0,0,"$(d)",0,0,0),now);
process_result => "!stime";
}
This policy can be found in
/var/cfengine/share/doc/examples/processes_define_class_based_on_process_runtime.cf
and downloaded directly from
github.
Take care to not oversimplify your patterns as it may match
unexpected processes. For example, on many systems, the process pattern "^cp"
may not match any processes, even though "cp" is running. This is because the
process table entry may list "/bin/cp". However, the process pattern "cp"
will also match a process containing "scp", (the PCRE pattern anchors "\b"
and "\B" may prove very useful to you).
process_stop should only be used for commands that stop processes. To start or
restart a process, you should set a class to activate and then use a commands
promise together with that class.
code
processes:
"/path/executable"
restart_class => "restart_me";
commands:
restart_me::
"/path/executable" ... ;
Notes:
CFEngine will not allow you to signal processes 1-4 or the agent process
itself for fear of bringing down the system.
Process promises depend on the ps native tool, which by default truncates
lines at 128 columns on HP-UX. It is recommended to edit the file
/etc/default/ps and increase the DEFAULT_CMD_LINE_WIDTH setting to 1024 to
guarantee that process promises will work smoothly on that platform.
Attributes
Common attributes
Common attributes are available to all promise types. Full details for common
attributes can be found in the Common promise attributes section of
the Promise types page. The common attributes are as follows:
process_count
Type: body process_count
See also: Common body attributes
in_range_define
Description: List of classes to define if the matches are in range
Classes are defined if the processes that are found in the process table
satisfy the promised process count, in other words if the promise about
the number of processes matching the other criteria is kept.
Type: slist
Allowed input range: (arbitrary string)
Example:
code
body process_count example
{
in_range_define => { "class1", "class2" };
}
match_range
Description: Integer range for acceptable number of matches for this
process
This is a numerical range for the number of occurrences of the process
in the process table. As long as it falls within the specified limits,
the promise is considered kept.
Type: irange[int,int]
Allowed input range: 0,99999999999
Example:
code
body process_count example
{
match_range => irange("10","50");
}
out_of_range_define
Description: List of classes to define if the matches are out of range
Classes to activate remedial promises conditional on this promise
failure to be kept.
Type: slist
Allowed input range: (arbitrary string)
Example:
code
body process_count example(s)
{
out_of_range_define => { "process_anomaly", "anomaly_$(s)"};
}
process_select
Type: body process_select
See also: Common body attributes
command
Description: Regular expression matching the command/cmd field of a
process
Note: For historical reasons, this attribute is identical to the match
performed by using the promiser, except that the regular expression is anchored.
This expression should match the entire COMMAND field of the process
table, not just a fragment. This field is usually the last field on the
line, so it thus starts with the first non-space character and ends with
the end of line.
Type: string
Allowed input range: (arbitrary string)
Example:
code
body process_select example
{
command => "cf-.*";
process_result => "command";
}
pid
Description: Range of integers matching the process id of a process
Type: irange[int,int]
Allowed input range: 0,99999999999
Example:
code
body process_select example
{
pid => irange("1","10");
process_result => "pid";
}
See also: Function: irange()
pgid
Description: Range of integers matching the parent group id of a
process
Type: irange[int,int]
Allowed input range: 0,99999999999
Example:
code
body process_select example
{
pgid => irange("1","10");
process_result => "pgid";
}
See also: Function: irange()
ppid
Description: Range of integers matching the parent process id of a
process
Type: irange[int,int]
Allowed input range: 0,99999999999
Example:
code
body process_select example
{
ppid => irange("407","511");
process_result => "ppid";
}
See also: Function: irange()
priority
Description: Range of integers matching the priority field (PRI/NI) of
a process
Type: irange[int,int]
Allowed input range: -20,+20
Example:
code
body process_select example
{
priority => irange("-5","0");
}
See also: Function: irange()
process_owner
Description: List of regexes matching the user of a process
The regular expressions should match a legal user name on the system. The
regex is anchored, meaning it must match the entire name.
Type: slist
Allowed input range: (arbitrary string)
Example:
code
bundle agent main
{
processes:
# Any /usr/local/web/tomcat-logviewer processes not
# running as buildsrv should be killed on sight.
"/usr/local/web/tomcat-logviewer" -> { "security" }
process_select => not_running_as("buildsrv"),
signals => { "kill" },
comment => "It is against the security policy for this
service to run under the wrong user id.";
}
body process_select not_running_as(owner)
{
process_owner => { $(owner) };
process_result => "!process_owner";
}
code
info: Signalled 'kill' (9) to process 7211 (root 7211 7199 7211 0.0 0.1 100908 0 596 1 15:26 00:06 00:00:00 /usr/local/web/tomcat-logviewer 500)
This policy can be found in
/var/cfengine/share/doc/examples/kill_process_running_wrong_user.cf
and downloaded directly from
github.
process_result
Description: Boolean class expression with the logical combination
of process selection criteria
A logical combination of the process selection classifiers. The syntax
is the same as that for class expressions. If process_result is not
specified, then all set attributes in the process_select body are AND'ed
together.
Type: string
Allowed input range:
[(process_owner|pid|ppid||pgid|rsize|vsize|status|command|ttime|stime|tty|priority|threads)[|!.]*]*
Example:
code
body process_select proc_finder(p)
{
process_owner => { "avahi", "bin" };
command => "$(p)";
pid => irange("100","199");
vsize => irange("0","1000");
process_result => "command.(process_owner|vsize).!pid";
}
See also: file_result
rsize
Description: Range of integers matching the resident memory size of a
process, in kilobytes
Type: irange[int,int]
Allowed input range: 0,99999999999
Example:
code
body process_select
{
rsize => irange("4000","8000");
}
See also: Function: irange()
status
Description: Regular expression matching the status field of a process
For instance, characters in the set NRSsl+... Windows processes do not
have status fields.
Type: string
Allowed input range: (arbitrary string)
Example:
code
body process_select example
{
status => "Z";
}
stime_range
Description: Range of integers matching the start time of a process
The calculation of time from process table entries is sensitive to
Daylight Savings Time (Summer/Winter Time) so calculations could be an
hour off. This is for now a bug to be fixed.
Type: irange[int,int]
Allowed input range: 0,2147483647
Example:
code
body process_select example
{
stime_range => irange(ago(0,0,0,1,0,0),now);
}
See also: Function: irange()
ttime_range
Description: Range of integers matching the total elapsed time of a
process.
This is total accumulated time for a process.
Type: irange[int,int]
Allowed input range: 0,2147483647
Example:
code
body process_select example
{
ttime_range => irange(0,accumulated(0,1,0,0,0,0));
}
See also: Function: irange()
tty
Description: Regular expression matching the tty field of a process
Windows processes are not regarded as attached to any terminal, so they
all have tty '?'.
Type: string
Allowed input range: (arbitrary string)
Example:
code
body process_select example
{
tty => "pts/[0-9]+";
}
threads
Description: Range of integers matching the threads (NLWP) field of a
process
Type: irange[int,int]
Allowed input range: 0,99999999999
Example:
code
body process_select example
{
threads => irange(1,5);
}
See also: Function: irange()
vsize
Description: Range of integers matching the virtual memory size of a
process, in kilobytes.
On Windows, the virtual memory size is the amount of memory that cannot
be shared with other processes. In Task Manager, this is called Commit
Size (Windows 2008), or VM Size (Windows XP).
Type: irange[int,int]
Allowed input range: 0,99999999999
Example:
code
body process_select example
{
vsize => irange("4000","9000");
}
See also: Function: irange()
process_stop
Description: A command used to stop a running process
As an alternative to sending a termination or kill signal to a process,
one may call a 'stop script' to perform a graceful shutdown.
Type: string
Allowed input range: "?(/.*)
Example:
code
processes:
"snmpd"
process_stop => "/etc/init.d/snmp stop";
restart_class
Description: A class to be defined globally if the process is not
running, so that a command: rule can be referred to restart the process
This is a signal to restart a process that should be running, if it is
not running. Processes are signaled first and then restarted later, at
the end of bundle execution, after all possible corrective actions have
been made that could influence their execution.
Windows does not support having processes start themselves in the
background, like Unix daemons usually do; as fork off a child process.
Therefore, it may be useful to specify an action body that sets
background to true in a commands promise that is invoked by the class
set by restart_class. See the commands promise type for more
information.
Type: string
Allowed input range: [a-zA-Z0-9_$(){}\[\].:]+
Example:
code
processes:
"cf-serverd"
restart_class => "start_cfserverd";
commands:
start_cfserverd::
"/var/cfengine/bin/cf-serverd";
signals
Description: A list of names of signals to be sent to a process or sleeps
between signals.
Signals from the given list are sent to the process in a sequence. Special
strings of the form Ns or just N where N is a positive integer can be used
to add sleeps between the signals. On Windows, only the kill signal is
supported, which terminates the process.
Type: (slist)
Allowed input range:
code
hup
int
trap
kill
pipe
cont
abrt
stop
quit
term
child
usr1
usr2
bus
segv
[0-9]+s?
Example:
code
processes:
cfservd_out_of_control::
"cfservd"
signals => { "stop" , "term" },
restart_class => "start_cfserv";
any::
"snmpd"
signals => { "term" , "5s" , "kill" };
History:
- 3.18.2, 3.20.0 Added ability to sleep between signals using
Ns
reports
Reports promises simply print messages. Outputting a message without
qualification can be a dangerous operation. In a large installation it
could unleash an avalanche of messaging, so it is recommended that
reports are guarded appropriately.
code
bundle agent main
{
reports:
"It's recommended that you always guard reports"
comment => "Remember by default output from cf-agent when run
from cf-execd will be emailed";
DEBUG|DEBUG_main::
"Run with --define DEBUG or --define DEBUG_main to display this report";
methods:
"Actuate bundle that reports with a return value"
usebundle => bundle_with_return_value,
useresult => "return_array",
comment => "Reports can be used to return data into a parent bundle.
This is useful in some re-usable bundle patterns.";
reports:
"I got '$(return_array[key])' returned from bundle_with_return_value";
"Reports can be redirected and appended to files"
report_to_file => "$(sys.workdir)/report_output.txt",
comment => "It's important to note that this will suppress the report
from stdout.";
"Report content of a file:$(const.n)$(const.n)------------------------"
printfile => cat( $(this.promise_filename) );
}
bundle agent bundle_with_return_value
{
reports:
"value from bundle_with_return_value"
bundle_return_value_index => "key";
}
body printfile cat(file)
{
file_to_print => "$(file)";
number_of_lines => "inf";
}
@if minimum_version(3.8)
body printfile head(file)
{
inherit_from => "cat";
# GNU head defaults to 10
number_of_lines => "10";
}
@endif
This policy can be found in
/var/cfengine/share/doc/examples/reports.cf
and downloaded directly from
github.
Messages output by report promises are prefixed with the letter R to
distinguish them from other output.
code
bundle agent report
{
reports:
loadavg_high::
"Processes:"
printfile => cat("$(sys.statedir)/cf_procs");
}
Reports do not fundamentaly make changes to the system and report type promise
outcomes are always considered kept.
code
bundle agent report
{
vars:
"classes" slist => classesmatching("report_.*");
reports:
"HI"
classes => scoped_classes_generic("bundle", "report");
"found class: $(classes)";
}
body classes scoped_classes_generic(scope, x)
# Define x prefixed/suffixed with promise outcome
{
scope => "$(scope)";
promise_repaired => { "promise_repaired_$(x)", "$(x)_repaired", "$(x)_ok", "$(x)_reached" };
repair_failed => { "repair_failed_$(x)", "$(x)_failed", "$(x)_not_ok", "$(x)_not_kept", "$(x)_not_repaired", "$(x)_reached" };
repair_denied => { "repair_denied_$(x)", "$(x)_denied", "$(x)_not_ok", "$(x)_not_kept", "$(x)_not_repaired", "$(x)_reached" };
repair_timeout => { "repair_timeout_$(x)", "$(x)_timeout", "$(x)_not_ok", "$(x)_not_kept", "$(x)_not_repaired", "$(x)_reached" };
promise_kept => { "promise_kept_$(x)", "$(x)_kept", "$(x)_ok", "$(x)_not_repaired", "$(x)_reached" };
}
code
$ cf-agent -KIf ./example_report_outcomes.cf -b report
2015-05-13T12:48:12-0500 info: Using command line specified bundlesequence
R: HI
R: found class: report_ok
R: found class: report_kept
R: found class: report_reached
R: found class: report_not_repaired
Attributes
Common attributes
Common attributes are available to all promise types. Full details for common
attributes can be found in the Common promise attributes section of
the Promise types page. The common attributes are as follows:
friend_pattern
Deprecated: This attribute is kept for source compatibility,
and has no effect. Deprecated in CFEngine 3.4.
intermittency
Deprecated: This attribute is kept for source compatibility,
and has no effect. Deprecated in CFEngine 3.4.
printfile
Description: Outputs the content of a file to standard output
Type: body printfile
See also: Common body attributes
file_to_print
Description: Path name to the file that is to be sent to standard
output
Include part of a file in a report.
Type: string
Allowed input range: "?(/.*)
number_of_lines
Description: Integer maximum number of lines to print from selected file
Type: int
Default value: 5
Allowed input range: -99999999999,99999999999
Note: Prints lines from end of file when a negative number is passed to
argument number_of_lines
Example:
code
echo 'Line 1' > /tmp/example_file.txt
echo 'Line 2' >> /tmp/example_file.txt
echo 'Line 3' >> /tmp/example_file.txt
echo 'Line 4' >> /tmp/example_file.txt
echo 'Line 5' >> /tmp/example_file.txt
echo 'Line 6' >> /tmp/example_file.txt
echo 'Line 7' >> /tmp/example_file.txt
echo 'Line 8' >> /tmp/example_file.txt
echo 'Line 9' >> /tmp/example_file.txt
code
body common control
{
bundlesequence => { "example" };
}
bundle agent example
{
vars:
"example_file" string => "/tmp/example_file.txt";
reports:
"First three:"
printfile => first_three("$(example_file)");
"Last three:"
printfile => last_three("$(example_file)");
}
body printfile first_three(file)
{
file_to_print => "$(file)";
number_of_lines => "3";
}
body printfile last_three(file)
{
file_to_print => "$(file)";
number_of_lines => "-3";
}
Output:
code
R: First three:
R: Line 1
R: Line 2
R: Line 3
R: Last three:
R: Line 7
R: Line 8
R: Line 9
History:
- Introduced negative number support in 3.18.0
report_to_file
Description: The path and filename to which output should be appended
Append the output of the report to the named file instead of standard output.
If the file cannot be opened for writing then the report defaults to the
standard output.
Type: string
Allowed input range: "?(/.*)
Example:
code
bundle agent main
{
reports:
"$(sys.date),This is a report from $(sys.host)"
report_to_file => "/tmp/test_log";
}
bundle_return_value_index
Description: The promiser is to be interpreted as a literal value that
the caller can accept as a result for this bundle; in other words, a
return value with array index defined by this attribute.
Return values are limited to scalars.
Type: string
Allowed input range: [a-zA-Z0-9_$(){}\[\].:]+
Example:
code
bundle agent main
{
methods:
"any"
usebundle => child,
useresult => "my_return_var";
reports:
"My return was: '$(my_return_var[1])' and '$(my_return_var[2])' and '$(my_return_var[named])'";
}
bundle agent child
{
reports:
# Map these indices into the useresult namespace
"this is a return value"
bundle_return_value_index => "1";
"this is another return value"
bundle_return_value_index => "2";
"bundle_return_value_index is not required to be numerical"
bundle_return_value_index => "named";
}
See also: methods useresult attribute
History: Introduced in 3.4.0.
lastseen
Deprecated: This attribute is kept for source compatibility,
and has no effect. Deprecated in CFEngine 3.4.
showstate
Deprecated: This attribute is kept for source compatibility,
and has no effect. Deprecated in CFEngine 3.5.
roles
Roles promises are server-side decisions about which users are allowed
to define soft-classes on the server's system during remote invocation
of cf-agent. This implements a form of Role Based Access Control
(RBAC) for pre-assigned class-promise bindings. The user names cited
must be attached to trusted public keys in order to be accepted. The
regular expression is anchored, meaning it must match the entire name.
code
roles:
"regex"
authorize => { "usernames", ... };
It is worth re-iterating here that it is not possible to send commands or modify promise definitions by remote access. At best users may try to
send classes when using cf-runagent in order to activate sleeping
promises. This mechanism limits their ability to do this.
code
bundle server my_access_rules()
{
roles:
# Allow mark
"Myclass_.*" authorize => { "mark" };
}
In this example user mark is granted permission to remotely activate
classes matching the regular expression Myclass_.* hen using the
cf-runagent to activate CFEngine.
Attributes
authorize
Description: List of public-key user names that are allowed to activate
the promised class during remote agent activation
Part of Role Based Access Control (RBAC) in CFEngine. The users listed
in this section are granted access to set certain classes by using the
remote cf-runagent. The user-names will refer to public key identities
already trusted on the system.
Type: slist
Allowed input range: (arbitrary string)
Example:
code
roles:
".*" authorize => { "mark", "marks_friend" };
services
services type promises in their simplest generic form are an abstraction on
bundles. services type promises are implemented by mapping a bundle to
service_bundle in a service_method body. Reference the
services bodies and bundles in the standard library.
Most commonly services type promises are use to manage standard operating system
services using the platforms standard service management tools via the
standard_services bundle in the standard library. However, services type
promises can be leveraged to build standard abstractions around custom services
as well.
Services are registered in the operating system in some way, and get a unique name.
Service promises abstracts the mechanism for interacting with services
on the given operating system, making it as uniform and easy as possible
to work with services cross-platform. The exact mechanism CFEngine uses
vary depending on availability at the OS, but it could be System V scripts,
systemd units, tools such as chkconfig, or the Windows API.
Some operating systems are bundled with a lot of unused services that
are running as default. At the same time, faulty or inherently insecure
services are often the cause of security issues. With CFEngine, one can
create promises stating the services that should be stopped and disabled.
The operating system may start a service at boot time, or it can be
started by CFEngine. Either way, CFEngine will ensure that the service
maintains the correct state (started, stopped, or disabled).
CFEngine supports the concept of dependencies between services,
and can automatically start or stop these, if desired. Parameters can be
passed to services that are started by CFEngine.
code
bundle agent example
{
services:
"Dhcp"
service_policy => "start",
service_dependencies => { "Alerter", "W32Time" },
service_method => winmethod;
}
body service_method winmethod
{
service_type => "windows";
service_args => "--netmask=255.255.0.0";
service_autostart_policy => "none";
service_dependence_chain => "start_parent_services";
}
Notes:
Services promises for Windows are only available in CFEngine Enterprise.
Note that the name of a service in Windows may be different from its Display name.
CFEngine Enterprise policies use the name, not the display name, due to the need for uniqueness.
Windows Vista/Server 2008 and later introduced new complications
to the service security policy. Therefore, when testing services
promises from the command line, CFEngine may not be given proper access
rights, which gives errors like "Access is denied". However, when
running through the CFEngine Enterprise Executor service, typical for on
production machines, CFEngine has sufficient rights.
Services of type generic promises are implemented for all operating
systems and are merely as a convenient front-end to processes and
commands. If nothing else is specified, CFEngine looks for an special
reserved agent bundle called
code
bundle agent standard_services(service,state)
{
...
}
This bundle is called with two parameters: the name of the service and a
start/stop state variable. The CFEngine standard library defines many
common services for standard operating systems for convenience. If no
service_bundle is defined in a service_method body, then CFEngine
assumes the standard_services bundle to be the default source of action
for the services. This is executed just like a methods promise on the
service bundle, so this is merely a front-end.
The standard bundle can be replaced with another, as follows:
code
bundle agent test
{
vars:
"mail" slist => { "spamassassin", "postfix" };
services:
"www" service_policy => "start",
service_method => service_test;
"$(mail)" service_policy => "stop",
service_method => service_test;
}
body service_method service_test
{
service_bundle => non_standard_services("$(this.promiser)","$(this.service_policy)");
}
bundle agent non_standard_services(service,state)
{
reports:
!done::
"Test service promise for \"$(service)\" -> $(state)";
}
Note that the special variables $(this.promiser) and
$(this.service_policy) may be used to fill in
the service and state parameters from the promise definition. The
$(this.service_policy) variable is only defined
for services promises.
History: This promise type was introduced in CFEngine 3.3.0 (2012).
Attributes
Common attributes
Common attributes are available to all promise types. Full details for common
attributes can be found in the Common promise attributes section of
the Promise types page. The common attributes are as follows:
service_policy
Description: Policy for service status.
The service_policy is expected to be passed to the service bundle in order to
manage it's state. It is up to the mapped service_bundle to determine which
promises should be actuated in order to converge to the specified
service_policy.
Reference the policy for detailed information about the semantics of a given
service_method or service_bundle, for example the standard_services in the
standard library.
Type: string
Allowed input range: (arbitrary string)|(menu_option) depending on service_type
- When
service_type is windows allowed values are limited to start, stop, enable, or disable.
- start|enable :: Will start the service if it is not running.
Startup Type will be set to Manual if it is not Automatic or Automatic (Delayed Start).
For a service to be configured to start automatically on boot a
service_method must be declared and service_autostart_policy must be set to boot_time.
- stop :: Will stop the service if it is running. Startup Type will not be modified unless a
service_method is declared and service_autostart_policy is set.
- disable :: Will stop the service if it is running, and Startup Type
will be set to Disabled.
- When
service_type is generic any string is allowed and service_bundle is responsible for interpreting and implementing the desired state based on the service_policy value.
Historically service_type generic has supported start, stop, enable, disable, restart and reload.
Example:
code
bundle agent example
{
services:
redhat|centos::
# Manage a service using the standard_services implementation from the
# standard library.
"httpd"
service_policy => "disable";
any::
# Manage a custom service using custom service_method
"myservice"
service_policy => "my_custom_state",
service_method => "my_custom_service_method";
windows::
"AdobeARMservice"
service_policy => "stop",
comment => "Ensure the Adobe Acrobat Update Service is not running. It
may or may not be automatically started on the next boot
depending on the configuration.";
"CfengineNovaExec"
service_policy => "enable",
service_method => bootstart, # Ref stdlib
comment => "Ensure cf-execd is running and configured to start on
boot.";
"VBoxService"
service_policy => "start",
service_method => bootstart, # Ref stdlib
comment => "Ensure VirtualBox Guest Additions Service is running and
configured to start on boot.";
"Spooler"
service_policy => "disable",
comment => "Ensure the Print Spooler is not running and will not start
automatically on boot. We do not want to kill any trees.";
"tzautoupdate"
service_policy => "start",
comment => "Ensure that the Auto Time Zone Updated is running, and set
Startup Type to Manual.";
}
body service_method my_custom_service_method
{
windows::
service_bundle => my_custom_service_method_windows( $(this.promiser), $(this.service_policy) );
redhat|centos::
service_bundle => my_custom_service_method_EL( $(this.promiser), $(this.service_policy) );
debian|ubuntu::
service_bundle => my_custom_service_method_DEB( $(this.promiser), $(this.service_policy) );
}
bundle agent my_custom_service_method_windows( service_identifier, desired_service_state )
{
# Specific windows implementation
}
bundle agent my_custom_service_method_EL( service_identifier, desired_service_state )
{
# Specific Redhat|Centos implementation
}
bundle agent my_custom_service_method_DEB( service_identifier, desired_service_state )
{
# Specific Debian|Ubuntu implementation
}
See also: [generic standard_services][Services Bodies and Bundles#standard_services]
History:
- Type changed from
menu_option to string and allowed input range changed to
arbitrary string from start|stop|enable|disable|restart|reload in CFEngine
3.10. Previously enable was mapped to start, disable was mapped to stop and
reload was mapped to restart.
service_dependencies
Description: A list of services on which the named service abstraction
depends
A list of services that must be running before the service can be started.
These dependencies can be started automatically by CFEngine if they
are not running see service_dependence_chain. However, the dependencies will
never be implicitly stopped by CFEngine. Specifying dependencies is optional.
Note that the operating system may keep an additional list of dependencies for
a given service, defined during installation of the service. CFEngine
requires these dependencies to be running as well before starting
the service. The complete list of dependencies is thus the union of
service_dependencies and the internal operating system list.
Type: slist
Allowed input range: [a-zA-Z0-9_$(){}\[\].:]+
Example:
code
services:
"ftp"
service_policy => "start",
service_dependencies => { "network", "logging" };
service_method
Type: body service_method
service_method bodies have access to $(this.promiser) (the promised service)
and $(this.service_policy) (the policy state the service should have).
Notes: service_bundle is not used when service_type is windows.
See also: Common body attributes
service_args
Description: Parameters for starting the service as command
These arguments will only be passed if CFEngine starts the service.
Thus, set service_autostart_policy to none to ensure that the
arguments are always passed.
Escaped quotes can be used to pass an argument containing spaces as a
single argument, e.g. -f \"file name.conf\". Passing arguments is
optional.
Type: string
Allowed input range: (arbitrary string)
Example:
code
body service_method example
{
service_args => "-f filename.conf --some-argument";
}
service_autostart_policy
Description: Should the service be started automatically by the OS
Defaults to none, which means that the service is not registered for
automatic startup by the operating system in any way. It must be none
if service_policy is not start. boot_time means the service is
started at boot time, while on_demand means that the service is
dispatched once it is being used.
Type: (menu option)
Allowed input range:
code
none
boot_time
on_demand
Example:
code
body service_method example
{
service_autostart_policy => "boot_time";
}
Notes: on_demand is not supported by Windows, and is implemented through
inetd or xinetd on Unix.
service_bundle
Description: The agent bundle to use when managing the service.
Default: The canonified promiser string prefixed with service_. Note,
the service_bundle must be in the same namespace.
Type: bundle agent
Example:
code
bundle agent main
{
services:
"my-custom-service"
service_method => my_custom_service,
service_policy => "stop";
}
body service_method my_custom_service
{
service_type => "generic";
}
bundle agent service_my_custom_service(service, state)
{
reports:
"$(service) should have state $(state)";
}
code
R: my-custom-service should have state stop
This policy can be found in
/var/cfengine/share/doc/examples/services_default_service_bundle.cf
and downloaded directly from
github.
service_dependence_chain
Description: How to handle dependencies and dependent services
The service dependencies include both the dependencies defined by the
operating system and in service_dependencies, as described there.
Defaults to ignore, which means that CFEngine will never start or
stop dependencies or dependent services, but fail if dependencies are
not satisfied. start_parent_services means that all dependencies of
the service will be started if they are not already running. When
stopping a service, stop_child_services means that other services that
depend on this service will be stopped also. all_related means both
start_parent_services and stop_child_services.
Note that this setting also affects dependencies of dependencies and so
on.
For example, consider the case where service A depends on B, which
depends on C. If we want to start B, we must first make sure A is
running. If start_parent_services or all_related is set, CFEngine
will start A, if it is not running. On the other hand, if we want
to stop B, C needs to be stopped first. stop_child_services or
all_related means that CFEngine will stop C, if it is running.
Type: (menu option)
Allowed input range:
code
ignore
start_parent_services
stop_child_services
all_related
Example:
code
body service_method example
{
service_dependence_chain => "start_parent_services";
}
service_type
Description: Service abstraction type
Type: (menu option)
Allowed input range:
Example:
code
body service_method example
{
service_type => "windows";
}
Notes: On Windows this defaults to, and must be windows. Unix systems can
however have multiple means of registering services, but the choice must be
available on the given system. service_bundle is not used when service_type
is windows.
storage
Storage promises refer to disks and filesystem properties.
code
storage:
"/disk volume or mountpoint"
volume => volume_body,
...;
code
bundle agent storage
{
storage:
"/usr" volume => mycheck("10%");
"/mnt" mount => nfs("nfsserv.example.org","/home");
}
body volume mycheck(free) # reusable template
{
check_foreign => "false";
freespace => "$(free)";
sensible_size => "10000";
sensible_count => "2";
}
body mount nfs(server,source)
{
mount_type => "nfs";
mount_source => "$(source)";
mount_server => "$(server)";
edit_fstab => "true";
}
Attributes
Common attributes
Common attributes are available to all promise types. Full details for common
attributes can be found in the Common promise attributes section of
the Promise types page. The common attributes are as follows:
mount
Type: body mount
See also: Common body attributes
edit_fstab
Description: true/false add or remove entries to the file system table
("fstab")
The default behavior is to not place edits in the file system table.
Type: boolean
Default value: false
Example:
code
body mount example
{
edit_fstab => "true";
}
mount_type
Description: Protocol type of remote file system
Type: (menu option)
Allowed input range:
nfsnfs2nfs3nfs4panfscifs
Example:
code
bundle agent main
{
vars:
redhat|centos::
"cifs" data => '{ "server": "192.168.42.251", "path": "/Audio" }';
packages:
redhat|centos::
"cifs-utils" policy => "present";
"samba-client" policy => "present";
files:
redhat|centos::
"/mnt/CIFS/." create => "true";
storage:
redhat|centos::
"/mnt/CIFS"
mount => cifs_guest( $(cifs[server]) , $(cifs[path]) );
}
body mount cifs_guest(server,source)
{
mount_type => "cifs";
mount_source => "$(source)";
mount_server => "$(server)";
mount_options => { "guest" };
edit_fstab => "false";
}
This policy can be found in
/var/cfengine/share/doc/examples/storage-cifs.cf
and downloaded directly from
github.
History:
cifs, panfs added in 3.15.0
mount_source
Description: Path of remote file system to mount.
This is the location on the remote device, server, SAN etc.
Type: string
Allowed input range: "?(/.*)
Example:
code
body mount example
{
mount_source "/location/disk/directory";
}
mount_server
Description: Hostname or IP or remote file system server.
Type: string
Allowed input range: (arbitrary string)
Example:
code
body mount example
{
mount_server => "nfs_host.example.org";
}
mount_options
Description: List of option strings to add to the file system table
("fstab").
This list is concatenated in a form appropriate for the filesystem. The
options must be legal options for the system mount commands.
Type: slist
Allowed input range: (arbitrary string)
Example:
code
body mount example
{
mount_options => { "rw", "acls" };
}
unmount
Description: true/false unmount a previously mounted filesystem
Type: boolean
Default value: false
Example:
code
body mount example
{
unmount => "true";
}
volume
Type: body volume
See also: Common body attributes
check_foreign
Description: If true, verify storage that is mounted from a foreign
system on this host.
CFEngine will not normally perform sanity checks on filesystems that are
not local to the host. If true it will ignore a partition's network
location and ask the current host to verify storage located physically
on other systems.
Type: boolean
Default value: false
Example:
code
body volume example
{
check_foreign => "true";
}
freespace
Description: Absolute or percentage minimum disk space that should be
available before warning
The amount of free space that is promised on a storage device. Once this
promise is found not to be kept (that is, if the free space falls below
the promised value), warnings are generated. You may also want to use
the results of this promise to control other promises.
Type: string
Allowed input range: [0-9]+[MBkKgGmb%]
Example:
code
body volume example1
{
freespace => "10%";
}
body volume example2
{
freespace => "50M";
}
sensible_size
Description: Minimum size in bytes that should be used on a
sensible-looking storage device
Type: int
Allowed input range: 0,99999999999
Example:
code
body volume example
{
sensible_size => "20K";
}
sensible_count
Description: Minimum number of files that should be defined on a
sensible-looking storage device.
Files must be readable by the agent. In other words, it is assumed that
the agent has privileges on volumes being checked.
Type: int
Allowed input range: 0,99999999999
Example:
code
body volume example
{
sensible_count => "20";
}
scan_arrivals
Description: If true, generate pseudo-periodic disk change arrival
distribution.
This operation should not be left 'on' for more than a single run
(maximum once per week). It causes CFEngine to perform an extensive disk
scan noting the schedule of changes between files. This can be used for
a number of analyses including optimum backup schedule computation.
Type: boolean
Default value: false
Example:
code
body volume example
{
scan_arrivals => "true";
}
users
User promises are promises made about local users on a host. They
express which users should be present on a system, and which
attributes and group memberships the users should have.
Every user promise has at least one attribute, policy, which
describes whether or not the user should be present on the system. Other
attributes are optional; they allow you to specify UID, home directory, login
shell, group membership, description, and password. Platform native tools are
used to create/modify/delete users (C api on Windows, and useradd usermod
userdel on Unix, Linux and similar platforms). User presence is determined by
the NetUserGetInfo function on Windows and reading /etc/passwd on Unix,
Linux and similar platforms nix External/non-local for example LDAP are ignored.
A bundle can be associated with a user promise, such as when a user is created
in order to do housekeeping tasks in his/her home directory, like putting
default configuration files in place, installing encryption keys, and storing
a login picture.
Note: This promise type does not create or delete groups (not even a users
primary group). The groups the user is promised to be in need to be managed
separately.
History: Introduced in CFEngine 3.6.0
Example:
code
users:
"jsmith"
policy => "present",
description => "John Smith",
home_dir => "/remote/home/jsmith",
group_primary => "users",
groups_secondary => { "printers", "webadmin" },
shell => "/bin/bash";
Attributes
Common attributes
Common attributes are available to all promise types. Full details for common
attributes can be found in the Common promise attributes section of
the Promise types page. The common attributes are as follows:
description
Description: The description string sets the description
associated with a user.
The exact use of this string depends on the operating system,
but most systems treat it as the full name of the user and therefore
display it on graphical login terminals.
Type: string
Allowed input range: (arbitrary string)
Example:
code
users:
"jsmith"
policy => "present",
description => "John Smith";
group_primary
Description: The group_primary attribute sets the user's primary group.
Note: On Windows, no difference exists between primary and
secondary groups so specifying either one works.
Type: string
Allowed input range: (arbitrary string)
Example:
code
users:
"jsmith"
policy => "present",
group_primary => "users";
groups_secondary
Description: The groups_secondary attributes sets the user's
secondary group membership(s), in addition to his/her primary group.
Note: On Windows, no difference exists between primary and
secondary groups so specifying either one works.
Type: slist
Allowed input range: .*
Example:
code
users:
"jsmith"
policy => "present",
groups_secondary => { "site_a", "tester" };
home_bundle
Description: The home_bundle attribute specifies a bundle that
is evaluated when the user is created.
If the user already exists, the bundle is not evaluated.
The name of the promised user is not passed to the bundle
directly, but you can specify a bundle with parameters in order to
pass it in.
Note that this attribute does not set the home directory in the user
database. For that, you must use the home_dir attribute.
Type: bundle
Example:
code
bundle agent main
{
vars:
"users" slist => { "jack", "john" };
"skel" string => "/etc/skel";
users:
!windows::
"$(users)"
policy => "present",
home_dir => "/home/$(users)",
home_bundle => home_skel($(users), $(skel));
}
code
bundle agent home_skel(user, skel)
{
files:
"/home/$(user)/."
create => "true",
copy_from => seed_cp($(skel)),
depth_search => recurse("inf");
}
This example uses implicit looping to create the two users, "jack"
and "john." Each has his respective home directory that is created by
the files promise.
home_bundle_inherit
Description: The home_bundle_inherit attribute specifies if classes set
in the current bundle are inherited by the bundle specified in the
home_bundle attribute.
Type: boolean
Example:
code
bundle agent main
{
vars:
"user" string => "jack";
classes:
"should_have_home_dir" expression => regcmp("j.*", "$(user)");
users:
"$(user)"
policy => "present",
home_dir => "/home/$(user)",
home_bundle => setup_home_dir("$(user)"),
home_bundle_inherit => "true";
}
bundle agent setup_home_dir(user)
{
files:
should_have_home_dir::
"/home/$(user)/."
create => "true";
}
The user "jack" will have his home directory created, since his
username starts with "j".
home_dir
Description: The home_dir attribute associates a user with the
given home directory.
Note that this attribute does not create the directory. For that you
must use the home_bundle attribute. This just sets the home
directory in the user database.
Type: string
Allowed input range: "?(/.*)
Example:
code
users:
"jsmith"
policy => "present",
home_dir => "/home/j/jsmith";
password
Description: The password attribute specifies a password body
that contains information about a user's password.
Type: body password
Example:
code
body password user_password
{
format => "hash";
data => "jiJSlLSkZuVLE"; # "CFEngine"
}
See also: Common body attributes
Description: Specifies the format of the given password data.
If the value is "hash," then the data attribute is expected to
contain a string with a password in hashed format. Note that CFEngine
does not validate that the given hash format is supported by
the platform. The system administrator must verify this.
However, CFEngine continues to run even in the event of an
unsupported password format, so it can always be corrected by updating
the policy.
If the value is "plaintext," then the data attribute contains
the password in plain text.
Note: On Windows, only the "plaintext" password type is supported,
due to a lack of support from the operating system for setting
hashed passwords.
Type: (menu option)
Allowed input range:
Example:
code
body password user_password
{
format => "plaintext";
data => "CFEngine";
}
data
Description: Specifies the password data.
The format of the password data depends on the format attribute.
Type: string
Allowed input range: (arbitrary string)
Example:
code
body password user_password
{
format => "plaintext";
data => "CFEngine";
}
policy
Description: The policy attribute specifies what state the user
account has on the system.
If the policy is present, the user is present and active
on the system. Note that an unset password might still prevent the user
from logging in.
If the policy is locked, and the user does not exist, it is created with
password authentication disabled. If the user account already exists its
password digest is prepended with a "!", disabling password authentication.
Note that only logins via the PAM framework are prevented. This includes normal
console logins and SSH logins on most systems.
If the policy is absent, the user does not exist on the system. Note
that if a user previously existed, his/her files are not
automatically removed. You must create a separate files promise for
this.
Note: When CFEngine locks an account it does two things, it disables
the login password, and it sets the account expiration date far in the
past. The expiration date is to prevent key based SSH logins. However,
on Solaris it is not possible to set the account expiration date in this
way, hence SSH logins may still work there after an account is locked
and additional steps may be required.
Type: (menu option)
Allowed input range:
Example:
code
users:
"jsmith"
policy => "locked";
shell
Description: The shell attribute specifies the user's login
shell.
Type: string
Allowed input range: "?(/.*)
Example:
code
users:
"jsmith"
shell => "/bin/bash";
uid
Description: The uid attribute specifies the user's UID number.
Note that if the UID of an existing user is changed, the files owned
by that user do not automatically change ownership. You must create a
separate files promise for this.
Type: int
Allowed input range: -99999999999,99999999999
Example:
code
users:
"jsmith"
uid => "1357";
vars
Variables in CFEngine are defined
as promises that an identifier of a certain type represents a particular
value. Variables can be scalars or lists of types string, int, real
or data.
The allowed characters in variable names are alphanumeric (both upper and lower case)
and underscore. Associative arrays using the string type and square brackets [] to
enclose an arbitrary key are being deprecated in favor of the data variable type.
Scalar variables
string
Description: A scalar string
Type: string
Allowed input range: (arbitrary string)
Example:
code
vars:
"xxx" string => "Some literal string...";
"yyy" string => readfile( "/home/mark/tmp/testfile" , "33" );
int
Description: A scalar integer
Type: int
Allowed input range: -99999999999,99999999999
Example:
code
vars:
"scalar" int => "16k";
"ran" int => randomint(4,88);
"dim_array" int => readstringarray(
"array_name",
"/etc/passwd",
"#[^\n]*",
":",
10,
4000);
Notes:
Int variables are strings that are expected to be used as integer numbers. The
typing in CFEngine is dynamic, so the variable types are interchangeable.
However, when you declare a variable to be type int, CFEngine verifies that
the value you assign to it looks like an integer (e.g., 3, -17, 16K).
real
Description: A scalar real number
Type: real
Allowed input range: -9.99999E100,9.99999E100
Example:
code
vars:
"scalar" real => "0.5";
Notes:
Real variables are strings that are expected to be used as real numbers. The
typing in CFEngine is dynamic, so the variable types are interchangeable, but
when you declare a variable to be type real, CFEngine verifies that the
value you assign to it looks like a real number (e.g., 3, 3.1415, .17,
6.02e23, -9.21e-17).
Real numbers are not used in many places in CFEngine, but they are useful for
representing probabilities and performance data.
List variables
Lists are specified using curly brackets {} that enclose a comma-separated
list of values. The order of the list is preserved by CFEngine.
slist
Description: A list of scalar strings
Type: slist
Allowed input range: (arbitrary string)
Example:
code
vars:
"xxx" slist => { "literal1", "literal2" };
"xxx1" slist => { "1", @(xxx) }; # interpolated in order
"yyy" slist => {
readstringlist(
"/home/mark/tmp/testlist",
"#[a-zA-Z0-9 ]*",
"[^a-zA-Z0-9]",
15,
4000
)
};
"zzz" slist => { readstringlist(
"/home/mark/tmp/testlist2",
"#[^\n]*",
",",
5,
4000)
};
Notes:
Some functions return slists, and an slist
may contain the values copied from another slist, rlist, or ilist. See
policy.
ilist
Description: A list of integers
Type: ilist
Allowed input range: -99999999999,9999999999
Example:
code
vars:
"variable_id"
ilist => { "10", "11", "12" };
"xxx1" ilist => { "1", @(variable_id) }; # interpolated in order
Notes:
Integer lists are lists of strings that are expected to be treated as
integers. The typing in CFEngine is dynamic, so the variable types are
interchangeable, but when you declare a variable to be type ilist,
CFEngine verifies that each value you assign to it looks like an integer
(e.g., 3, -17, 16K).
Some functions return ilists, and an ilist may
contain the values copied from another slist, rlist, or ilist. See
policy
rlist
Description: A list of real numbers
Type: rlist
Allowed input range: -9.99999E100,9.99999E100
Example:
code
vars:
"varid" rlist => { "0.1", "0.2", "0.3" };
"xxx1" rlist => { "1.3", @(varid) }; # interpolated in order
Notes:
Real lists are lists of strings that are expected to be used as real
numbers. The typing in CFEngine is dynamic, so the variable types are
interchangeable, but when you declare a variable to be type rlist,
CFEngine verifies that each value you assign to it looks like a real
number (e.g., 3, 3.1415, .17, 6.02e23, -9.21e-17).
Some functions return rlists, and an rlist may
contain the values copied from another slist, rlist, or ilist. See policy
Data container variables
The data variables are obtained from functions that return data
containers, such as readjson(), readyaml(), parsejson(), or
parseyaml(), the various data_* functions, or from merging
existing data containers with mergedata(). They can NOT be
modified, once created.
Inline YAML and JSON data
Data containers can be specified inline, without calling functions.
Inline YAML data has to begin with the --- preamble followed by a newline. This preamble
is normally optional but here (for inline YAML) it's required by
CFEngine. To generate that in CFEngine, use $(const.n) or a literal
newline as shown in the example.
Inline JSON or YAML data may contain CFEngine variable references.
They will be expanded at runtime as if they were simply calls to
readjson() or readyaml(), which also means that syntax error in
the JSON or YAML data will only be caught when your policy is actually
being evaluated.
If the inline JSON or YAML data does not contain CFEngine variable
references, it will be parsed at compile time, which means that
cf-promises will be able to find syntax errors in your JSON or YAML
data early. Thus it is highly recommended that you try to avoid
variable references in your inline JSON or YAML data.
For example:
Inline Yaml example
code
bundle agent example_inline_yaml
{
vars:
# YAML requires "---" header (followed by newline)
# NOTE \n is not interpreted as a newline, instead use $(const.n)
"yaml_multi_line" data => '---
- "CFEngine Champions":
- Name: "Aleksey Tsalolikhin"
Year: 2011
- Name: "Ted Zlatanov"
Year : 2013';
"yaml_single_line" data => '---$(const.n)- key1: value1$(const.n)- key2: value2';
reports:
"Data container defined from yaml_multi_line: $(with)"
with => storejson( @(yaml_multi_line) );
"Data container defined from yaml_single_line: $(with)"
with => storejson( @(yaml_single_line) );
}
bundle agent __main__
{
methods:
"example_inline_yaml";
}
code
R: Data container defined from yaml_multi_line: [
{
"CFEngine Champions": [
{
"Name": "Aleksey Tsalolikhin",
"Year": 2011
},
{
"Name": "Ted Zlatanov",
"Year": 2013
}
]
}
]
R: Data container defined from yaml_single_line: [
{
"key1": "value1"
},
{
"key2": "value2"
}
]
This policy can be found in
/var/cfengine/share/doc/examples/inline-yaml.cf
and downloaded directly from
github.
Inline Json example
code
bundle agent example_inline_json
{
vars:
"json_multi_line" data => '{
"CFEngine Champions": [
{
"Name": "Aleksey Tsalolikhin",
"Year": "2011"
},
{
"Name": "Ted Zlatanov",
"Year": "2013"
}
]
}';
"json_single_line" data => '[{"key1":"value1"},{"key2":"value2"}]';
reports:
"Data container defined from json_multi_line: $(with)"
with => storejson( @(json_multi_line) );
"Data container defined from json_single_line: $(with)"
with => storejson( @(json_single_line) );
}
bundle agent __main__
{
methods:
"example_inline_json";
}
code
R: Data container defined from json_multi_line: {
"CFEngine Champions": [
{
"Name": "Aleksey Tsalolikhin",
"Year": "2011"
},
{
"Name": "Ted Zlatanov",
"Year": "2013"
}
]
}
R: Data container defined from json_single_line: [
{
"key1": "value1"
},
{
"key2": "value2"
}
]
This policy can be found in
/var/cfengine/share/doc/examples/inline-json.cf
and downloaded directly from
github.
Passing data containers to bundles
Data containers can be passed to another bundle with the
@(varname) notation, similarly to the list passing notation.
Some useful tips for using data containers
- to extract just
container[x], use mergedata("container[x]")
- to wrap a container in an array, use
mergedata("[ container ]")
- to wrap a container in a map, use
mergedata('{ "mykey": container }')
- they act like "classic" CFEngine arrays in many ways
getindices() and getvalues() work on any level, e.g. getvalues("container[x][y]")- in reports, you have to reference a part of the container that can be expressed as a string. So for instance if you have the container
c with data { "x": { "y": 50 }, "z": [ 1,2,3] } we have two top-level keys, x and z. If you report on $(c[x]) you will not get data, since there is no string there. But if you ask for $(c[x][y]) you'll get 50, and if you ask for $(c[z]) you'll get implicit iteration on 1,2,3 (just like a slist in a "classic" CFEngine array).
- read the examples below carefully to see some useful ways to access data container contents
Iterating through a data container is only guaranteed to respect list
order (e.g. [1,3,20] will be iterated in that order). Key order for
maps, as per the JSON standard, is not guaranteed. Similarly, calling
getindices() on a data container will give the list order of indices
0, 1, 2, ... but will not give the keys of a map in any particular
order. Here's an example of iterating in list order:
code
body common control
{
bundlesequence => { run };
}
bundle agent run
{
vars:
"x" data => parsejson('[
{ "one": "a" },
{ "two": "b" },
{ "three": "c" }
]');
# get the numeric indices of x: 0, 1, 2
"xi" slist => getindices(x);
# for each xi, make a variable xpiece_$(xi) so we'll have
# xpiece_0, xpiece_1, xpiece_2. Each xpiece will have that
# particular element of the list x.
"xpiece_$(xi)" string => format("%S", "x[$(xi)]");
reports:
"$(xi): $(xpiece_$(xi))";
}
Output:
code
R: 0: {"one":"a"}
R: 1: {"two":"b"}
R: 2: {"three":"c"}
Often you need to iterate through the keys of a container, and the
value is a key-value property map for that key. The example here shows
how you can pass the "animals" container and an "animal" key inside it
to a bundle, which can then report and use the data from the key-value
property map.
code
body common control
{
bundlesequence => { run };
}
bundle agent run
{
vars:
"animals" data => parsejson('
{
"dog": { "legs": 4, "tail": true, "names": [ "Fido", "Cooper", "Sandy" ] },
"cat": { "legs": 4, "tail": true, "names": [ "Fluffy", "Snowball", "Tabby" ] },
"dolphin": { "legs": 0, "tail": true, "names": [ "Flipper", "Duffy" ] },
"hamster": { "legs": 4, "tail": true, "names": [ "Skullcrusher", "Kimmy", "Fluffadoo" ] },
}');
"keys_unsorted" slist => getindices("animals");
"keys" slist => sort(keys_unsorted, "lex");
"animals_$(keys)" data => mergedata("animals[$(keys)]");
methods:
# pass the container and a key inside it
"any" usebundle => analyze(@(animals), $(keys));
}
bundle agent analyze(animals, a)
{
vars:
"names" slist => getvalues("animals[$(a)][names]");
"names_str" string => format("%S", names);
reports:
"$(this.bundle): possible names for animal '$(a)': $(names_str)";
"$(this.bundle): describe animal '$(a)' => name = $(a), legs = $(animals[$(a)][legs]), tail = $(animals[$(a)][tail])";
}
Output:
code
R: analyze: possible names for animal 'cat': { "Fluffy", "Snowball", "Tabby" }
R: analyze: describe animal 'cat' => name = cat, legs = 4, tail = true
R: analyze: possible names for animal 'dog': { "Fido", "Cooper", "Sandy" }
R: analyze: describe animal 'dog' => name = dog, legs = 4, tail = true
R: analyze: possible names for animal 'dolphin': { "Flipper", "Duffy" }
R: analyze: describe animal 'dolphin' => name = dolphin, legs = 0, tail = true
R: analyze: possible names for animal 'hamster': { "Skullcrusher", "Kimmy", "Fluffadoo" }
R: analyze: describe animal 'hamster' => name = hamster, legs = 4, tail = true
data
Description: A data container structure
Type: data
Allowed input range: (arbitrary string)
Example:
code
vars:
"loaded1" data => readjson("/tmp/myfile.json", 40000);
"loaded2" data => parsejson('{"key":"value"}');
"loaded3" data => readyaml("/tmp/myfile.yaml", 40000);
"loaded4" data => parseyaml('- key2: value2');
"merged1" data => mergedata(loaded1, loaded2, loaded3, loaded4);
# JSON or YAML can be inlined since CFEngine 3.7
"inline1" data => '{"key":"value"}'; # JSON
"inline2" data => '---$(const.n)- key2: value2'; # YAML requires "---$(const.n)" header
Attributes
policy
Description: The policy for (dis)allowing (re)definition of variables
Variables can either be allowed to change their value dynamically (be
redefined) or they can be constant.
Type: (menu option)
Allowed input range:
code
free
overridable
constant
ifdefined
Default value:
policy = free
Example:
code
vars:
"varid" string => "value...",
policy => "free";
Notes:
The policy free and overridable are synonyms. The policy constant is
deprecated, and has no effect. All variables are free or overridable by
default which means the variables values may be changed.
The policy ifdefined applies only to lists and implies that unexpanded or
undefined lists are dropped. The default behavior is otherwise to retain this
value as an indicator of the failure to quench the variable reference, for
example:
code
"one" slist => { "1", "2", "3" };
"list" slist => { "@(one)", @(two) },
policy => "ifdefined";
This results in @(list) being the same as @(one), and the reference to
@(two) disappears. This is useful for combining lists.
For example:
code
example_com::
"domain"
string => "example.com",
comment => "Define a global domain for hosts in the example.com domain";
# The promise above will be overridden by one of the ones below on hosts
# within the matching subdomain
one_example_com::
"domain"
string => "one.example.com",
comment => "Define a global domain for hosts in the one.example.com domain";
two_example_com::
"domain"
string => "two.example.com",
comment => "Define a global domain for hosts in the two.example.com domain";
(Promises within the same bundle are evaluated top to bottom, so vars promises further down in a bundle can overwrite previous values of a variable. See normal ordering for more information).
Defining variables in foreign bundles
As a general rule, variables can only be defined or re-defined from within the
bundle where they were defined. There are a few notable exceptions to this
general rule which are described below.
Variables defined by the meta promise type are defined in a bundle scope with the same name as the executing bundle suffixed with meta.
Example policy:
code
bundle agent example_meta_vars
{
meta:
"tags" slist => { "autorun" };
vars:
"myvar" string => "my value";
reports:
"$(with)" with => string_mustache( "", variablesmatching_as_data( ".*example_meta_vars.*" ) );
}
bundle agent __main__
{
methods: "example_meta_vars";
}
Example output:
code
R: {
"default:example_meta_vars.myvar": "my value",
"default:example_meta_vars_meta.tags": [
"autorun"
]
}
Injecting variables into undefined bundles
Variables can be directly set in foreign bundles if the bundle is not defined.
Example policy:
code
bundle agent example_variable_injection
{
vars:
"undefined.myvar" string => "my value";
"cant_push_this.myvar" string => "my value";
reports:
"$(with)" with => string_mustache( "", variablesmatching_as_data( ".*myvar.*" ) );
}
bundle agent cant_push_this
{
# If a bundle is defined, you can't simply define a variable in it from
# another bundle, unless the variable is defined via the module protocol.
}
bundle agent __main__
{
methods: "example_variable_injection";
}
Example output:
code
error: Ignoring remotely-injected variable 'myvar'
error: Remote bundle variable injection detected!
error: Variable identifier 'cant_push_this.myvar' is not legal
error: Promise belongs to bundle 'example_variable_injection' in file '/tmp/example_variable_injection.cf' near line 6
error: Ignoring remotely-injected variable 'myvar'
error: Remote bundle variable injection detected!
error: Variable identifier 'cant_push_this.myvar' is not legal
error: Promise belongs to bundle 'example_variable_injection' in file '/tmp/example_variable_injection.cf' near line 6
error: Remote bundle variable injection detected!
error: Variable identifier 'cant_push_this.myvar' is not legal
error: Promise belongs to bundle 'example_variable_injection' in file '/tmp/example_variable_injection.cf' near line 6
error: Remote bundle variable injection detected!
error: Variable identifier 'cant_push_this.myvar' is not legal
error: Promise belongs to bundle 'example_variable_injection' in file '/tmp/example_variable_injection.cf' near line 6
error: Remote bundle variable injection detected!
error: Variable identifier 'cant_push_this.myvar' is not legal
error: Promise belongs to bundle 'example_variable_injection' in file '/tmp/example_variable_injection.cf' near line 6
error: Remote bundle variable injection detected!
error: Variable identifier 'cant_push_this.myvar' is not legal
error: Promise belongs to bundle 'example_variable_injection' in file '/tmp/example_variable_injection.cf' near line 6
R: {
"default:undefined.myvar": "my value"
}
error: Remote bundle variable injection detected!
error: Variable identifier 'cant_push_this.myvar' is not legal
error: Promise belongs to bundle 'example_variable_injection' in file '/tmp/example_variable_injection.cf' near line 6
error: Remote bundle variable injection detected!
error: Variable identifier 'cant_push_this.myvar' is not legal
error: Promise belongs to bundle 'example_variable_injection' in file '/tmp/example_variable_injection.cf' near line 6
error: Remote bundle variable injection detected!
error: Variable identifier 'cant_push_this.myvar' is not legal
error: Promise belongs to bundle 'example_variable_injection' in file '/tmp/example_variable_injection.cf' near line 6
error: Remote bundle variable injection detected!
error: Variable identifier 'cant_push_this.myvar' is not legal
error: Promise belongs to bundle 'example_variable_injection' in file '/tmp/example_variable_injection.cf' near line 6
Module protocol
The module protocol allows specification of context (the bundle scope within which a variable gets defined).
Example policy:
code
bundle agent example_variable_injection_via_module
{
commands:
"/bin/echo '^context=undefined$(const.n)=myvar=my value" module => "true";
"/bin/echo '^context=cant_push_this$(const.n)=myvar=my value" module => "true";
reports:
"$(with)" with => string_mustache( "", variablesmatching_as_data( ".*myvar.*" ) );
}
bundle agent cant_push_this
{
# If a bundle is defined, you can't simply define a variable in it from
# another bundle, unless the variable is defined via the module protocol.
}
bundle agent __main__
{
methods: "example_variable_injection_via_module";
}
Example output:
code
R: {
"default:cant_push_this.myvar": "my value",
"default:undefined.myvar": "my value"
}
Augments
Augments defines variables in the def bundle scope.
This augments file that defines my_var will be used for all examples shown here (/tmp/def.json).
code
{
"vars": {
"my_var": "My value defined from augments"
}
}
This example policy illustrates how augments defines variables in the def bundle scope (/tmp/example.cf).
code
bundle common def
{
vars:
"some_var"
string => "My value for $(this.promiser) defined in Policy";
}
bundle agent __main__
{
reports:
"$(with)"
with => string_mustache( "", variablesmatching_as_data( "default:def.*") );
}
This command shows the execution and output from the policy above.
code
cf-agent -Kf /tmp/example.cf
code
R: {
"default:def.jq": "jq --compact-output --monochrome-output --ascii-output --unbuffered --sort-keys",
"default:def.my_var": "My value defined from augments",
"default:def.some_var": "My value for some_var defined in Policy"
}
Note, augments defines the variables at the start of agent initialization. The variables can be re-defined by policy during evaluation.
This example policy illustrates how policy will, by default, re-define variables set via augments (/tmp/example2.cf).
code
bundle common def
{
vars:
"some_var"
string => "My value for $(this.promiser) defined in Policy";
"my_var"
string => "My value for $(this.promiser) defined in Policy";
}
bundle agent __main__
{
reports:
"$(with)"
with => string_mustache( "", variablesmatching_as_data( "default:def.*") );
}
This command shows the execution and output from the policy above.
code
cf-agent -Kf /tmp/example2.cf
code
R: {
"default:def.jq": "jq --compact-output --monochrome-output --ascii-output --unbuffered --sort-keys",
"default:def.my_var": "My value for my_var defined in Policy",
"default:def.some_var": "My value for some_var defined in Policy"
}
Thus augments can be used to override defaults if the policy is instrumented to support it.
This example policy illustrates how policy can be instrumented to avoid re-definition of variables set via augments (/tmp/example3.cf).
code
bundle common def
{
vars:
"some_var"
string => "My value for $(this.promiser) defined in Policy";
# Here we set my_var if it has not yet been defined (as in the case where
# augments would define it before the policy was evaluated).
"my_var"
string => "My value for $(this.promiser) defined in Policy",
unless => isvariable( $(this.promiser) );
}
bundle agent __main__
{
reports:
"$(with)"
with => string_mustache( "", variablesmatching_as_data( "default:def.*") );
}
This command shows the execution and output from the policy above.
code
cf-agent -Kf /tmp/example3.cf
code
R: {
"default:def.jq": "jq --compact-output --monochrome-output --ascii-output --unbuffered --sort-keys",
"default:def.my_var": "My value defined from augments",
"default:def.some_var": "My value for some_var defined in Policy"
}
databases
CFEngine can interact with commonly used database servers to keep
promises about the structure and content of data within them.
There are two main cases of database management to address: small
embedded databases and large centralized databases.
Databases are often centralized entities that have a single point of
management. While large monolithic database can be more easily managed
with other tools, CFEngine can still monitor changes and discrepancies.
In addition, CFEngine can also manage smaller embedded databases that
are distributed in nature, whether they are SQL, registry or future
types.
For example, creating 100 new databases for test purposes is a task for
CFEngine; but adding a new item to an important production database is
not a recommended task for CFEngine.
There are three kinds of database supported by CFEngine:
LDAP - The Lightweight Directory Access Protocol
A hierarchical network database primarily for reading simple schema (Only
CFEngine Enterprise).
SQL - Structured Query Language
A number of relational databases (currently supported: MySQL, Postgres for
reading and writing complex data.
WARNING: Neither MySQL/MariaDB or PostgreSQL support is built into the
default binaries. If you wish to use this functionality you must compile the
agent with support.
Registry - Microsoft Registry
An embedded database for interfacing with system values in Microsoft
Windows (Only CFEngine Enterprise)
In addition, CFEngine uses a variety of embedded databases for its own
internals.
Embedded databases are directly part of the system and promises can be
made directly. However, databases running through a server process
(either on the same host or on a different host) are independent agents
and CFEngine cannot make promises on their behalf, unless they promise
(grant) permission for CFEngine to make the changes. Thus the
pre-requisite for making SQL database promises is to grant a point of
access on the server.
code
databases:
"database/subkey or table"
database_operation => "create/delete/drop",
database_type => "sql/ms_registry",
database_columns => {
"name,type,size",
"name,type",
},
database_server => body;
body database_server name
{
db_server_owner => "account name";
db_server_password => "password";
db_server_host => "hostname or omit for localhost";
db_server_type => "mysql/posgres";
db_server_connection_db => "database we can connect to";
}
code
body common control
{
bundlesequence => { "databases" };
}
bundle agent databases
{
#commands:
# "/usr/bin/createdb cf_topic_maps",
# contain => as_user("mysql");
databases:
"cf_topic_maps/topics"
database_operation => "create",
database_type => "sql",
database_columns => {
"topic_name,varchar,256",
"topic_comment,varchar,1024",
"topic_id,varchar,256",
"topic_type,varchar,256",
"topic_extra,varchar,26"
},
database_server => myserver;
}
################################################
body database_server myserver
{
any::
db_server_owner => "postgres";
db_server_password => "";
db_server_host => "localhost";
db_server_type => "postgres";
db_server_connection_db => "postgres";
none::
db_server_owner => "root";
db_server_password => "";
db_server_host => "localhost";
db_server_type => "mysql";
db_server_connection_db => "mysql";
}
body contain as_user(x)
{
exec_owner => "$(x)";
}
The promiser in database promises is a concatenation of the database
name and underlying tables. This presents a simple hierarchical model
that looks like a file-system. This is the normal structure within the
Windows registry for instance. Entity-relation databases do not normally
present tables in this way, but no harm is done in representing them as
a hierarchy of depth 1.
Attributes
Common attributes
Common attributes are available to all promise types. Full details for common
attributes can be found in the Common promise attributes section of
the Promise types page. The common attributes are as follows:
database_server
Type: body database_server
See also: Common body attributes
db_server_owner
Description: The db_server_owner string represents the user name
for a database connection.
Type: string
Allowed input range: (arbitrary string)
Example:
code
db_server_owner => "mark";
db_server_password
Description: The db_server_password string represents the clear
text password for a database connection.
Type: string
Allowed input range: (arbitrary string)
Example:
code
db_server_password => "xyz.1234";
db_server_host
Description: The db_server_host string represents the hostname or
address for a database connection.
A blank value is equal to localhost.
Type: string
Allowed input range: (arbitrary string)
Example:
cf3
db_server_host => "sqlserv.example.org";
db_server_type
Description: The db_server_type string represents the type of
database server being used.
Type: (menu option)
Allowed input range:
Default value: none
Example:
code
db_server_type => "postgres";
db_server_connection_db
Description: The db_server_connection_db string is the name of an
existing database to connect to in order to create/manage other databases.
In order to create a database on a database server (all of which practice
voluntary cooperation), one has to be able to connect to the server.
However, without an existing database this is not allowed. Thus, database
servers provide a default database that can be connected to in order to
thereafter create new databases. These are called postgres and mysql
for their respective database servers.
Type: string
Allowed input range: (arbitrary string)
Example:
code
body database_server myserver(x)
{
db_server_owner => "$(x)";
db_server_password => "";
db_server_host => "localhost";
db_server_type => "$(mysql)";
db_server_connection_db => "$(x)";
}
where x is currently mysql or postgres.
database_type
Description: The database_type menu option is a type of database
that is to be manipulated.
Type: (menu option)
Allowed input range:
Default value: none
Example:
code
database_type => "ms_registry";
database_operation
Description: The database_operation menu option represents the
nature of the promise.
Type: (menu option)
Allowed input range:
code
create
delete
drop
cache
verify
restore
Example:
code
database_operation => "create";
database_columns
Description: A database_columns slist defines column definitions
to be promised by SQL databases.
Columns are a list of tuplets (Name,type,size). Array items are triplets,
and fixed size data elements are doublets.
Type: slist
Allowed input range: .*
Example:
code
"cf_topic_maps/topics"
database_operation => "create",
database_type => "sql",
database_columns => {
"topic_name,varchar,256",
"topic_comment,varchar,1024",
"topic_id,varchar,256",
"topic_type,varchar,256",
"topic_extra,varchar,26"
},
database_server => myserver;
database_rows
Description: database_rows is an ordered list of row values to be
promised by SQL databases.
This constraint is used only in adding data to database columns. Rows are
considered to be instances of individual columns.
Type: slist
Allowed input range: .*,.*
Example:
code
bundle agent databases
{
databases:
windows::
# Regsitry has (value,data) pairs in "keys" which are directories
"HKEY_LOCAL_MACHINE\SOFTWARE\CFEngine AS\CFEngine"
database_operation => "create",
database_rows => { "value1,REG_SZ,new value 1", "value2,REG_DWORD,12345"} ,
database_type => "ms_registry";
}
Notes:
In the case of the system registry on Windows, the rows represent data on
data-value pairs. The currently supported types (the middle field) for the
Windows registry are REG_SZ (string), REG_EXPAND_SZ (expandable string)
and REG_DWORD (double word).
If a column value has a comma you can escape the comma with backslash \,.
code
bundle agent main
# @brief Configure system variables for hosts that should not use a proxy
{
databases:
windows::
"HKEY_LOCAL_MACHINE\\SYSTEM\\CurrentControlSet\\Control\\Session Manager\\Environment"
database_operation => "create",
database_rows =>
{
"NO_PROXY,REG_SZ,localhost\,127.0.0.1\,localaddress\,.localdomain\,169.254.169.254\,.cfengine.com"
},
database_type => "ms_registry";
}
registry_exclude
Description: An registry_exclude slist contains regular expressions
to ignore in key/value verification.
During recursive Windows registry scanning, this option allows us to ignore
keys of values matching a list of regular expressions. Some values in the
registry are ephemeral and some should not be considered. This provides a
convenient way of avoiding names. It is analogous to exclude_dirs for
files.
Type: slist
Allowed input range: (arbitrary string)
Example:
code
databases:
"HKEY_LOCAL_MACHINE\SOFTWARE"
database_operation => "cache",
registry_exclude => { ".*Windows.*CurrentVersion.*",
".*Touchpad.*",
".*Capabilities.FileAssociations.*",
".*Rfc1766.*" ,
".*Synaptics.SynTP.*",
".*SupportedDevices.*8086",
".*Microsoft.*ErrorThresholds"
},
database_type => "ms_registry";
guest_environments
WARNING: Due to lack of use this promise type has been removed from the
default binaries beginning with version 3.11.0. We have seen that in most cases
users want to interact with hypervisors as peripheral instead of managing the
underlying guest virtual machines. If you want to use this functionality you
must build the agent with libvirt support.
Guest environment promises describe enclosed computing environments that
can host physical and virtual machines, Solaris zones, grids, clouds or
other enclosures, including embedded systems. CFEngine will support the
convergent maintenance of such inner environments in a fixed location,
with interfaces to an external environment.
CFEngine currently seeks to add convergence properties to existing
interfaces for automatic self-healing of guest environments. The current
implementation integrates with libvirt, supporting host virtualization
for Xen, KVM, VMWare, etc. Thus CFEngine, running on a virtual host, can
maintain the state and deployment of virtual guest machines defined
within the libvirt framework. Guest environment promises are not meant
to manage what goes on within the virtual guests. For that purpose you
should run CFEngine directly on the virtual machine, as if it were any
other machine.
code
site1::
"unique_name1"
environment_resources => myresources("2GB","512MB"),
environment_interface => mymachine("hostname"),
environment_type => "xen",
environment_state => "running",
environment_host => "atlas";
"unique_name2"
environment_type => "xen_net",
environment_state => "create",
environment_host => "atlas";
CFEngine currently provides a convergent interface to libvirt.
Attributes
Common attributes
Common attributes are available to all promise types. Full details for common
attributes can be found in the Common promise attributes section of
the Promise types page. The common attributes are as follows:
environment_host
Description: environment_host is a class indicating which
physical node will execute this guest machine
The promise will only apply to the machine with this class set. Thus,
CFEngine must be running locally on the hypervisor for the promise to
take effect.
Type: string
Allowed input range: [a-zA-Z0-9_]+
Example:
code
guest_environments:
linux::
"host1"
comment => "Keep this vm suspended",
environment_resources => myresources,
environment_type => "kvm",
environment_state => "suspended",
environment_host => "ubuntu";
This attribute is required.
History: this feature was introduced in Nova 2.0.0 (2010), Community
3.3.0 (2012)
environment_interface
Type: body environment_interface
See also: Common body attributes
env_addresses
Description: env_addresses is the IP addresses of the environment's
network interfaces
The IP addresses of the virtual machine can be overridden here at run
time.
Type: slist
Allowed input range: (arbitrary string)
Example:
code
body environment_interface vnet(primary)
{
env_name => "$(this.promiser)";
env_addresses => { "$(primary)" };
host1::
env_network => "default_vnet1";
host2::
env_network => "default_vnet2";
}
env_name
Description: env_name is the hostname of the virtual environment.
The 'hostname' of a virtual guest may or may not be the same as the
identifier used as 'promiser' by the virtualization manager.
Type: string
Allowed input range: (arbitrary string)
Example:
code
body environment_interface vnet(primary)
{
env_name => "$(this.promiser)";
env_addresses => { "$(primary)" };
host1::
env_network => "default_vnet1";
host2::
env_network => "default_vnet2";
}
env_network
Description: The hostname of the virtual network
Type: string
Allowed input range: (arbitrary string)
Example:
code
body environment_interface vnet(primary)
{
env_name => "$(this.promiser)";
env_addresses => { "$(primary)" };
host1::
env_network => "default_vnet1";
host2::
env_network => "default_vnet2";
}
environment_resources
Type: body environment_resources
See also: Common body attributes
env_cpus
Description: env_cpus represents the number of virtual CPUs
in the environment.
The maximum number of cores or processors in the physical environment
will set a natural limit on this value.
Type: int
Allowed input range: 0,99999999999
Example:
code
body environment_resources my_environment
{
env_cpus => "2";
env_memory => "512"; # in KB
env_disk => "1024"; # in MB
}
Notes:
This attribute conflicts with env_spec.
env_memory
Description: env_memory represents the amount of primary storage
(RAM) in the virtual environment (in KB).
The maximum amount of memory in the physical environment will set a
natural limit on this value.
Type: int
Allowed input range: 0,99999999999
Example:
code
body environment_resources my_environment
{
env_cpus => "2";
env_memory => "512"; # in KB
env_disk => "1024"; # in MB
}
Notes:
This attribute conflicts with env_spec.
env_disk
Description: env_disk represents the amount of secondary storage
(DISK) in the virtual environment (in KB).
This parameter is currently unsupported, for future extension.
Type: int
Allowed input range: 0,99999999999
Example:
code
body environment_resources my_environment
{
env_cpus => "2";
env_memory => "512"; # in KB
env_disk => "1024"; # in MB
}
Notes:
This parameter is currently unsupported, for future extension.
This attribute conflicts with env_spec.
env_baseline
Description: The env_baseline string represents a path to an
image with which to baseline the virtual environment.
Type: string
Allowed input range: "?(/.*)
Example:
code
env_baseline => "/path/to/image";
Notes:
This function is for future development.
env_spec
Description: A env_spec string contains a technology specific
set of promises for the virtual instance.
This is the preferred way to specify the resources of an environment on
creation; in other words, when environment_state is create.
Type: string
Allowed input range: .*
Example:
code
body environment_resources virt_xml(host)
{
env_spec =>
"<domain type='xen'>
<name>$(host)/name>
<os>
<type>linux/type>
<kernel>/var/lib/xen/install/vmlinuz-ubuntu10.4-x86_64/kernel>
<initrd>/var/lib/xen/install/initrd-vmlinuz-ubuntu10.4-x86_64/initrd>
<cmdline> kickstart=http://example.com/myguest.ks /cmdline>
</os>
<memory>131072/memory>
<vcpu>1/vcpu>
<devices>
<disk type='file'>
<source file='/var/lib/xen/images/$(host).img'/>
<target dev='sda1'/>
</disk>
<interface type='bridge'>
<source bridge='xenbr0'/>
<mac address='aa:00:00:00:00:11'/>
<script path='/etc/xen/scripts/vif-bridge'/>
</interface>
<graphics type='vnc' port='-1'/>
<console tty='/dev/pts/5'/>
</devices>
</domain>
";
}
Notes:
This attribute conflicts with env_cpus, env_memory and env_disk.
History: Was introduced in version 3.1.0b1,Nova 2.0.0b1 (2010)
environment_state
Description: The environment_state defines the desired dynamic state
of the specified environment.
Type: (menu option)
Allowed input range:
The guest machine is allocated, installed and left in a running state.
The guest machine is shut down and deallocated, but no files are removed.
The guest machine is in a running state, if it previously exists.
The guest exists in a suspended state or a shutdown state. If the guest
is running, it is suspended; otherwise it is ignored.
The guest machine is shut down, but not deallocated.
Example:
code
guest_environments:
linux::
"bishwa-kvm1"
comment => "Keep this vm suspended",
environment_resources => myresources,
environment_type => "kvm",
environment_state => "suspended",
environment_host => "ubuntu";
environment_type
Description: environment_type defines the virtual environment type.
The currently supported types are those supported by libvirt. More
will be added in the future.
Type: (menu option)
Allowed input range:
code
xen
kvm
esx
vbox
test
xen_net
kvm_net
esx_net
test_net
zone
ec2
eucalyptus
Example:
code
bundle agent my_vm_cloud
{
guest_environments:
scope::
"vguest1"
environment_resources => my_environment_template,
environment_interface => vnet("eth0,192.168.1.100/24"),
environment_type => "test",
environment_state => "create",
environment_host => "atlas";
"vguest2"
environment_resources => my_environment_template,
environment_interface => vnet("eth0,192.168.1.101/24"),
environment_type => "test",
environment_state => "delete",
environment_host => "atlas";
}
Functions
Functions take zero or more values as arguments and return a value.
Argument values need to be of the type and range as documented for each
function. Some functions are documented with a ..., in which case they
take an arbitrary amount of arguments.
They can return scalar (string|int|real|bool), list (slist, ilist, rlist) and data values:
code
printf "one\ntwo\nthree\n" > /tmp/list.txt
printf "1\n2\n3\n" >> /tmp/list.txt
printf "1.0\n2.0\n3.0" >> /tmp/list.txt
code
bundle agent example_function_return_types
{
classes:
"this_file_exists" expression => fileexists( $(this.promise_filename) );
vars:
"my_string" string => concat( "Promises you cannot keep",
" are no better than lies");
"my_list_of_strings"
slist => readstringlist( "/tmp/list.txt", # File to read
"", # Don't ignore any lines
"\n", # Split on newlines
inf, # Extract as many entries as possible
inf); # Read in as much data as possible
"my_list_of_integers"
ilist => readintlist( "/tmp/list.txt", # File to read
"^(\D+)|(\d+[^\n]+)", # Ignore any lines that are not integers
"\n", # Split on newlines
inf, # Maximum number of entries
inf); # Maximum number of bytes to read
"my_list_of_reals"
rlist => readreallist( "/tmp/list.txt", # File to read
"^(\D+)", # Ignore any lines that are not digits
"\n", # Split on newlines
inf, # Maximum number of entries
inf); # Maximum number of bytes to read
"my_integer" int => string_length( $(my_string) );
"my_real" real => sum( my_list_of_integers );
"my_data" data => mergedata( '{ "Hello": "world!" }' );
reports:
"my_string: '$(my_string)'";
"my_list_of_strings includes '$(my_list_of_strings)'";
"my_list_of_integers includes '$(my_list_of_integers)'";
"my_list_of_reals includes '$(my_list_of_reals)'";
"my_integer: '$(my_integer)'";
"my_real: '$(my_real)'";
"my_data: '$(with)'"
with => string_mustache( "", my_data );
this_file_exists::
"This file exists.";
}
bundle agent __main__
{
methods: "example_function_return_types";
}
code
R: my_string: 'Promises you cannot keep are no better than lies'
R: my_list_of_strings includes 'one'
R: my_list_of_strings includes 'two'
R: my_list_of_strings includes 'three'
R: my_list_of_strings includes '1'
R: my_list_of_strings includes '2'
R: my_list_of_strings includes '3'
R: my_list_of_strings includes '1.0'
R: my_list_of_strings includes '2.0'
R: my_list_of_strings includes '3.0'
R: my_list_of_integers includes '1'
R: my_list_of_integers includes '2'
R: my_list_of_integers includes '3'
R: my_list_of_reals includes '1'
R: my_list_of_reals includes '2'
R: my_list_of_reals includes '3'
R: my_list_of_reals includes '1.0'
R: my_list_of_reals includes '2.0'
R: my_list_of_reals includes '3.0'
R: my_integer: '48'
R: my_real: '6.000000'
R: my_data: '{
"Hello": "world!"
}'
R: This file exists.
This policy can be found in
/var/cfengine/share/doc/examples/function-return-types.cf
and downloaded directly from
github.
Boolean return type
Functions which return boolean, technically return a string any or !any.
This is for compatibility with other functions and promise attributes which
expect class expressions.
Normally, you don't need to worry about this, you use the function call to
define classes, and use classes instead of boolean values:
code
bundle agent main
{
vars:
"five" int => "5";
classes:
"is_var" if => isvariable("five");
reports:
is_var::
"Success!";
}
There is no boolean data type for vars promises.
If you want to store or print the class expression, you can use concat():
code
bundle agent main
{
vars:
"five" int => "5";
"expression" string => concat(isvariable("five"));
classes:
"is_var" if => "$(expression)"; # Will be expanded and evaluated
reports:
is_var::
"Success: expression expanded to '$(expression)' and evaluated to true!";
}
Note: the truth of a class expression or the result of a function call may
change during evaluation, but typically, a class, once defined, will stay defined.
See also: persistence in classes and decisions
Promise attributes and function calls
Promise attributes which use a class expression (string) as input, like if
and unless, can take a function call which returns string or boolean as well.
- A boolean function will be resolved to
any, which is always true, or !any
which is always false.
- A string function will be resolved, and the returned string will be
evaluated as a class expression.
code
bundle agent main
{
vars:
"five" int => "5";
"is_var_class_expression" string => concat(isvariable("$(five)"));
classes:
"five_less_than_seven" expression => islessthan("$(five)", 7);
"five_is_variable" if => "$(is_var_class_expression)";
reports:
any::
"five: $(five)";
"is_var_class_expression: $(is_var_class_expression)";
five_less_than_seven::
"$(five) is smaller than 7";
}
Function caching
During convergence, CFEngine's evaluation model will evaluate
functions multiple times, which can be a performance concern.
Some system functions are particularly expensive:
When enabled
cached functions
are not executed on every pass of convergence. Instead, the function will
only be executed once during the
agent evaluation step
and its result will be cached until the end of that agent execution.
Note: Cached functions are executed multiple times during
policy validation and pre-evaluation.
Function caching is per-process, so results will not be cached between
separate components e.g. cf-agent, cf-serverd and cf-promises.
Additionally functions are cached by hashing the function arguments. If you have
the exact same function call in two different promises (it does not matter if
they are in the same bundle or not) only the first executed function will be
cached. That cached result will be re-used for other identical function
occurrences.
Function caching can be globally disabled by setting cache_system_functions in
body common control to false or locally for a specific promise by using
ifelapsed => "0" in the action body
of the promise.
Function skipping
If a variable passed to a function is unable to be resolved the function will
be skipped. The function will be evaluated during a later pass when all
variables passed as arguments are able to be resolved. The function will never
be evaluated if any argument contains a variable that never resolves.
Collecting Functions
Some function arguments are marked as collecting which means they
can "collect" an argument from various sources. The data is normalized
into the JSON format internally, so all of the following data types
have consistent behavior.
If a key inside a data container is specified (mycontainer[key]),
the value under that key is collected. The key can be a string for
JSON objects or a number for JSON arrays.
If a single data container, CFEngine array, or slist is specified
(mycontainer or myarray or myslist), the contents of it are
collected.
If a single data container, CFEngine array, or slist is specified
with @() around it (@(mycontainer) or @(myarray) or
@(myslist)), the contents of it are collected.
If a function call that returns a data container or slist is
specified, that function call is evaluated and the results are
inserted, so you can say for instance sort(data_expand(...), "lex")
to expand a data container then sort it.
If a list (slist, ilist, or rlist) is named, its entries are collected.
If any CFEngine "classic" array (array[key]) is named, it's first
converted to a JSON key-value map, then collected.
If a literal JSON string like [ 1,2,3 ] or { "x": 500 } is
provided, it will be parsed and used.
If any of the above-mentioned ways to reference variables are used
inside a literal JSON string they will be expanded (or the
function call will fail). This is similar to the behavior of
Javascript, for instance. For example, mergedata('[ thing, { "mykey": otherthing[123] } ]')
will wrap the thing in a JSON array; then the contents of
otherthing[123] will be wrapped in a JSON map which will also go in
the array.
Delayed Evaluation Functions
Since CFEngine 3.10, some functions are marked as delayed evaluation which
means they can evaluate a function call across every element of a collection.
This makes intuitive sense for the collection traversing functions maparray(),
maplist(), and mapdata().
The practical use is for instance maplist(format("%03d", $(this)), mylist)
which will evaluate that format() call once for every element of mylist.
Before 3.10, the same call would have resulted in running the format()
function before the list is traversed, which is almost never what the user
wants.
List of all functions
There are a large number of functions built into CFEngine. The following
tables might make it easier for you to find the function you need.
Functions by Category
Functions by Return Type
accessedbefore
Prototype: accessedbefore(newer, older)
Return type: boolean
Description: Compares the atime fields of two files.
Return true if newer was accessed before older.
Arguments:
newer: string - Newer filename - in the range: "?(/.*)older: string - Older filename - in the range: "?(/.*)
Example:
Prepare:
code
touch -a -t '200102031234.56' /tmp/earlier
touch -a -t '200202031234.56' /tmp/later
Run:
code
body common control
{
bundlesequence => { "example" };
}
bundle agent example
{
classes:
"do_it" expression => accessedbefore("/tmp/earlier","/tmp/later");
reports:
do_it::
"The secret changes have been accessed after the reference time";
}
Output:
code
R: The secret changes have been accessed after the reference time
See also: changedbefore(), isnewerthan()
accumulated
Prototype: accumulated(years, months, days, hours, minutes, seconds)
Return type: int
Description: Convert an accumulated amount of time into a system representation.
The accumulated function measures total accumulated runtime. Arguments
are applied additively, so that accumulated(0,0,2,27,90,0) means "2
days, 27 hours and 90 minutes of runtime" ". However, you are strongly
encouraged to keep your usage of accumulated sensible and readable;
for example, accumulated(0,0,0,48,0,0) or accumulated(0,0,0,0,90,0).
Arguments:
years, in the range 0,1000
Years of run time. For convenience in conversion, a year of runtime is
always 365 days (one year equals 31,536,000 seconds).
month, in the range 0,1000
Months of run time. For convenience in conversion, a month of runtime is
always equal to 30 days of runtime (one month equals 2,592,000 seconds).
days, in the range 0,1000
Days of runtime (one day equals 86,400 seconds)
hours, in the range 0,1000
Hours of runtime
minutes, in the range 0,1000
Minutes of runtime 0-59
seconds, in the range 0,40000
Seconds of runtime
Example:
code
bundle agent testbundle
{
processes:
".*"
process_count => anyprocs,
process_select => proc_finder;
reports:
any_procs::
"Found processes in range";
}
body process_select proc_finder
{
ttime_range => irange(accumulated(0,0,0,0,2,0),accumulated(0,0,0,0,20,0));
process_result => "ttime";
}
body process_count anyprocs
{
match_range => "0,0";
out_of_range_define => { "any_procs" };
}
In the example we look for processes that have accumulated between 2 and
20 minutes of total run time.
See also:
ago
Prototype: ago(years, months, days, hours, minutes, seconds)
Return type: int
Description: Convert a time relative to now to an integer system representation.
The ago function measures time relative to now. Arguments are applied
in order, so that ago(0,18,55,27,0,0) means "18 months, 55 days, and 27
hours ago". However, you are strongly encouraged to keep your usage of
ago sensible and readable, e.g., ago(0,0,120,0,0,0) or
ago(0,0,0,72,0,0).
Arguments:
years, in the range 0,1000
Years of run time. For convenience in conversion, a year of runtime is
always 365 days (one year equals 31,536,000 seconds).
month, in the range 0,1000
Months of run time. For convenience in conversion, a month of runtime is
always equal to 30 days of runtime (one month equals 2,592,000 seconds).
days, in the range 0,1000
Days of runtime (one day equals 86,400 seconds)
hours, in the range 0,1000
Hours of runtime
minutes, in the range 0,1000
Minutes of runtime 0-59
seconds, in the range 0,40000
Seconds of runtime
Example:
code
body common control
{
bundlesequence => { "testbundle" };
}
bundle agent testbundle
{
processes:
".*"
process_count => anyprocs,
process_select => proc_finder;
reports:
any_procs::
"Found processes out of range";
}
body process_select proc_finder
{
# Processes started between 100 years + 5.5 hours and 1 minute ago
stime_range => irange(ago(100,0,0,5,30,0),ago(0,0,0,0,1,0));
process_result => "stime";
}
body process_count anyprocs
{
match_range => "0,0";
out_of_range_define => { "any_procs" };
}
Output:
code
R: Found processes out of range
See also:
and
Prototype: and(...)
Return type: boolean
Description: Returns any if all arguments evaluate to true and !any if
any argument evaluates to false.
Arguments: A list of classes, class expressions, or functions that return
classes.
Example:
code
commands:
"/usr/bin/generate_config $(config)"
if => and( "generating_configs",
not(fileexists("/etc/config/$(config)"))
);
Notes: Introduced primarily for use with if and unless promise attributes.
See also: or(), not()
History:
- Introduced in 3.2.0, Nova 2.1.0 (2011)
- Return type changed from
string to boolean in 3.17.0 (2020) (CFE-3470)
basename
Prototype: basename(filename, optional_extension)
Return type: string
Description: Retrieves the basename of a filename.
This function implements the same behavior of basename program on Unix and Unix-like operating systems.
Arguments:
filename: string - File path - in the range: .*optional_extension: string - Optional suffix - in the range: .*
Example:
code
bundle agent main
{
vars:
"basename" -> { "CFE-3196" }
string => basename( $(this.promise_filename) );
"basename_wo_extension" -> { "CFE-3196" }
string => basename( $(this.promise_filename), ".cf" );
reports:
"basename = '$(basename)'";
"basename without '.cf' extension = '$(basename_wo_extension)'";
}
code
R: basename = 'basename.cf'
R: basename without '.cf' extension = 'basename'
This policy can be found in
/var/cfengine/share/doc/examples/basename.cf
and downloaded directly from
github.
History:
bundlesmatching
Prototype: bundlesmatching(name, tag1, tag2, ...)
Return type: slist
Description: Return the list of defined bundles matching name and any
tags given. Both bundlename and tags are regular expressions. name is
required, tags are optional.
This function searches for the given anchored name and tag1,
tag2, ... regular expression in the list of currently defined bundles.
Every bundle is prefixed with the namespace, usually default:.
When any tags are given, only the bundles with those tags are
returned. Bundle tags are set a tags variable within a meta
promise; see the example below.
This function, used together with the findfiles function, allows you
to do dynamic inputs and a dynamic bundle call chain. The dynamic
chain is constrained by an explicit regular expression to avoid
accidental or intentional running of unwanted bundles.
Arguments:
name: string - Regular expression - in the range: .*
Example:
code
body common control
{
bundlesequence => { mefirst };
}
bundle common g
{
vars:
# Here we find all bundles in the default namespace whos name starts with
# run.
"todo" slist => bundlesmatching("default:run.*");
}
bundle agent mefirst
{
methods:
# Here, we actuate each of the bundles that were found using
# bundlesmatching in bundle common g.
"" usebundle => $(g.todo);
}
bundle agent run_deprecated
{
meta:
# This bundle is tagged with deprecated
"tags" slist => { "deprecated" };
}
bundle agent run_123_456
{
vars:
# Here we find all bundles in our policy.
"bundles" slist => bundlesmatching(".*");
# Here we find all the bundles that are tagged as deprecated.
"deprecated_bundles" slist => bundlesmatching(".*", "deprecated");
# Here we find all bundles that match 891 (none will).
"no_bundles" slist => bundlesmatching("891");
reports:
# Here we report on our findings:
"bundles = $(bundles)";
"deprecated bundles = $(deprecated_bundles)";
"no bundles = $(no_bundles)";
}
Output:
code
R: bundles = default:run_123_456
R: bundles = default:run_deprecated
R: bundles = default:mefirst
R: bundles = default:g
R: deprecated bundles = default:run_deprecated
See also: findfiles().
bundlestate
Prototype: bundlestate(bundlename)
Return type: data
Description: Returns the current evaluation data state for bundle bundlename.
The returned data container will have keys corresponding to the
variables in bundle bundlename. The value is converted to a data
container (JSON format) if necessary. So for example the variable x
holding the CFEngine slist { "1", "a", "foo" } will be converted to
the equivalent JSON array under the key x: "x": [ "1", "a", "foo" ].
Note: unlike datastate() classes are not collected.
The namespace of the bundle should not be included if it's in the
default: namespace (all CFEngine bundles are, unless you override
that). But if the bundle is in another namespace, you must prefix the
name with the namespace in the normal mynamespace:mybundle fashion.
Arguments:
bundlename: string - Bundle name - in the range: [a-zA-Z0-9_$(){}\[\].:]+
Example:
code
body common control
{
bundlesequence => { holder, test };
}
bundle common holder
{
classes:
"holderclass" expression => "any"; # will be global
vars:
"s" string => "Hello!";
"d" data => parsejson('[4,5,6]');
"list" slist => { "element1", "element2" };
}
bundle agent test
{
vars:
"bundle_state" data => bundlestate("holder");
# all the variables in bundle "holder" defined as of the execution of bundlestate() will be here
"holderstate" string => format("%S", "bundle_state");
reports:
"holder vars = $(holderstate)";
}
Output:
code
R: holder vars = {"d":[4,5,6],"list":["element1","element2"],"s":"Hello!"}
See also: getindices(), classesmatching(), variablesmatching(), mergedata(), template_method, mustache, inline_mustache, datastate()
History:
- Introduced in CFEngine 3.7.0
callstack_callers
Prototype: callstack_callers()
Return type: data
Description: Return the call stack for the current promise.
This is a call stack inspection function and the specific content may be tied
to a specific CFEngine version. Using it requires writing code that takes the
specific CFEngine version into account.
The returned data container is a list of key-value maps.
The maps all have a type key and a frame key with a counter. For different
frames along the stack frame path, the maps have additional keys:
- whenever possible,
- bodies: under key
body the entry has a full dump of the body policy as JSON, same as what cf-promises -p json would produce, using the internal C function BodyToJson(). This may include the line and sourcePath to locate the exact code line.
- bundles: under key
bundle the entry has a full dump of the bundle policy as JSON, same as what cf-promises -p json would produce, using the internal C function BundleToJson(). This may include the line and sourcePath to locate the exact code line.
- promise iteration: the
iteration_index is recorded
- promises: the
promise_type, promiser, promise_classes, and promise_comment are recorded
- promise sections (types): the
promise_type is recorded
Example:
code
vars:
"stack" data => callstack_callers();
Output:
code
[ ... call stack information ... ,
{
"depth": 2,
"frame": 9,
"promise_classes": "any",
"promise_comment": "",
"promise_type": "methods",
"promiser": "",
"type": "promise"
}, ... more call stack information ... ]
History: Introduced in CFEngine 3.9
See also: callstack_promisers()
callstack_promisers
Prototype: callstack_promisers()
Return type: slist
Description: Return the promisers along the call stack for the current promise.
This is a call stack inspection function and the specific content may be tied
to a specific CFEngine version. Using it requires writing code that takes the
specific CFEngine version into account.
The returned data container is a slist of promiser names. It's a much simpler
version of callstack_callers() intended for quick debugging.
Example:
code
vars:
"my_promisers" slist => callstack_promisers();
Output:
History: Introduced in CFEngine 3.9
See also: callstack_callers()
canonify
Prototype: canonify(text)
Return type: string
Description: Convert an arbitrary string text into a legal class name.
This function turns arbitrary text into class data.
Arguments:
text: string - String containing non-identifier characters - in the range: .*
Example:
code
body common control
{
bundlesequence => { "example" };
}
bundle agent example
{
vars:
"component" string => "/var/cfengine/bin/cf-serverd";
"canon" string => canonify("$(component)");
reports:
"canonified component == $(canon)";
}
Output:
code
R: canonified component == _var_cfengine_bin_cf_serverd
See also: classify(), canonifyuniquely().
canonifyuniquely
Prototype: canonifyuniquely(text)
Return type: string
Description: Convert an arbitrary string text into a unique legal class name.
This function turns arbitrary text into class data, appending the
SHA-1 hash for uniqueness. It is exactly equivalent to
concat(canonify($(string)), "_", hash($(string),"sha1"); for a given
$(string) but is much more convenient to write and remember.
A common use case is when you need unique array keys for each file in
a list, but files in the list may have the same name when
canonify-ed.
Arguments:
text: string - String containing non-identifier characters - in the range: .*
Example:
code
commands:
"/var/cfengine/bin/$(component)"
if => canonifyuniquely("start_$(component)");
See also: canonify()).
cf_version_after
Prototype: cf_version_after(string)
Return type: boolean
Description: Returns true if local CFEngine version is newer than specified string.
Arguments:
string: string - CFEngine version number to compare against - in the range: .*
Example:
code
bundle agent __main__
{
reports:
"This will be skipped on older or equal versions"
if => cf_version_after("3.15");
"This will be skipped on newer versions"
unless => cf_version_after("3.15");
}
Output:
code
R: This will be skipped on older or equal versions
See also: version_compare(), cf_version_maximum(), cf_version_minimum(), cf_version_before(), cf_version_at(), cf_version_between().
History:
cf_version_at
Prototype: cf_version_at(string)
Return type: boolean
Description: Returns true if local CFEngine version is the same as specified string.
Arguments:
string: string - CFEngine version number to compare against - in the range: .*
Example:
code
bundle agent __main__
{
reports:
"This will be skipped if version is not the same"
if => cf_version_at("3");
"This will be skipped if version is the same"
unless => cf_version_at("3");
}
Output:
code
R: This will be skipped if version is not the same
See also: version_compare(), cf_version_maximum(), cf_version_minimum(), cf_version_after(), cf_version_before(), cf_version_between().
History:
cf_version_before
Prototype: cf_version_before(string)
Return type: boolean
Description: Returns true if local CFEngine version is older than specified string.
Arguments:
string: string - CFEngine version number to compare against - in the range: .*
Example:
code
bundle agent __main__
{
reports:
"This will be skipped on newer or equal versions"
if => cf_version_before("3.15");
"This will be skipped on older versions"
unless => cf_version_before("3.15");
}
Output:
code
R: This will be skipped on older versions
See also: version_compare(), cf_version_maximum(), cf_version_minimum(), cf_version_after(), cf_version_at(), cf_version_between().
History:
cf_version_between
Prototype: cf_version_between(string, string)
Return type: boolean
Description: Returns true if local CFEngine version is between the first string and the second string. This function is inclusive.
Arguments:
string: string - Lower CFEngine version number to compare against - in the range: .*string: string - Upper CFEngine version number to compare against - in the range: .*
Example:
code
bundle agent __main__
{
reports:
"This will be skipped on versions outside this inclusive range"
if => cf_version_between("3.15", "4");
"This will be skipped if version is within this inclusive range"
unless => cf_version_between("3.15", "4");
}
Output:
code
R: This will be skipped on versions outside this inclusive range
See also: version_compare(), cf_version_maximum(), cf_version_minimum(), cf_version_after(), cf_version_before(), cf_version_at().
History:
cf_version_maximum
Prototype: cf_version_maximum(string)
Return type: boolean
Description: Returns true if local CFEngine version is the same or older than specified string.
Arguments:
string: string - CFEngine version number to compare against - in the range: .*
Example:
code
bundle agent __main__
{
reports:
"This will be skipped on newer versions"
if => cf_version_maximum("3.15");
"This will be skipped on older or equal versions"
unless => cf_version_maximum("3.15");
}
Output:
code
R: This will be skipped on older or equal versions
See also: version_compare(), cf_version_minimum(), cf_version_after(), cf_version_before(), cf_version_at(), cf_version_between().
History:
cf_version_minimum
Prototype: cf_version_minimum(string)
Return type: boolean
Description: Returns true if local CFEngine version is newer than or equal to specified string.
Arguments:
string: string - CFEngine version number to compare against - in the range: .*
Example:
code
bundle agent __main__
{
reports:
"This will be skipped on older versions"
if => cf_version_minimum("3.15");
"This will be skipped on newer or equal versions"
unless => cf_version_minimum("3.15");
}
Output:
code
R: This will be skipped on older versions
See also: version_compare(), cf_version_maximum(), cf_version_after(), cf_version_before(), cf_version_at(), cf_version_between().
History:
changedbefore
Prototype: changedbefore(newer, older)
Return type: boolean
Description: Compares the ctime fields of two files.
Returns true if newer was changed before older, otherwise returns false.
Change times include both file permissions and file contents.
Comparisons like this are normally used for updating files (like the
'make' command).
Arguments:
newer: string - Newer filename - in the range: "?(/.*)older: string - Older filename - in the range: "?(/.*)
Example:
code
body common control
{
bundlesequence => { "example" };
}
bundle agent example
{
classes:
"do_it" and => { changedbefore("/tmp/earlier","/tmp/later"), "linux" };
reports:
do_it::
"The derived file needs updating";
}
See also: accessedbefore(), isnewerthan()
classesmatching
Prototype: classesmatching(name, tag1, tag2, ...)
Return type: slist
Description: Return the list of set classes matching name and any tags
given. Both name and tags are regular expressions. name is required, tags
are optional.
This function searches for the given anchored name and
optionally tag1, tag2, ... regular expression in the list of currently set
classes. The search order is hard, soft, then local to the current bundle.
When any tags are given, only the classes with those tags matching the given
anchored regular expressions are returned. Class tags are set
using the meta attribute.
Example:
code
bundle agent main
{
classes:
"example_one";
"example_two"
meta => { "plus", "defined_from=$(this.bundle)" };
"example_three"
meta => { "plus", "defined_from=$(this.bundle)" };
vars:
"cfengine_classes"
slist => sort( classesmatching("cfengine"), lex);
"example_with_plus"
slist => sort( classesmatching("example.*", "plus"), lex);
reports:
# you may find this list of all classes interesting but it
# produces different output every time, so it's commented out here
# "All classes = '$(all)'";
"Classes matching 'cfengine' = '$(cfengine_classes)'";
# this should produce no output
"Classes matching 'example.*' with the 'plus' tag = $(example_with_plus)";
}
Output:
code
R: Classes matching 'cfengine' = 'cfengine'
R: Classes matching 'example.*' with the 'plus' tag = example_three
R: Classes matching 'example.*' with the 'plus' tag = example_two
See also: variablesmatching(), bundlesmatching(), classes defined via augments, classmatch(), countclassesmatching()
Note: This function replaces the allclasses.txt static file available
in older versions of CFEngine.
History: Introduced in CFEngine 3.6
classfiltercsv
Prototype: classfiltercsv(filename, has_header, class_column, optional_sort_column)
Return type: data
Description:
Parses CSV data from an RFC 4180 compliant file filename (CRLF line endings required), and returns a data variable that is
filtered by defined classes. If has_header is set to true, the columns in
the first line of the CSV file are used as keys for the data. class_column
specifies which column contains class names to filter by.
If optional_sort_column is defined, the data containers will be sorted by the
given column. Both class_column and optional_sort_column must be integer
indices starting from 0, and must be at most the total amount of columns
minus 1.
Arguments:
filename: string - File name - in the range: "?(/.*)has_header: - CSV file has heading - one of
class_column: int - Column index to filter by, contains classes - in the range: 0,99999999999optional_sort_column: int - Column index to sort by - in the range: 0,99999999999
Example:
Prepare CSV:
code
echo 'ClassExpr,Sort,Token,Value' > /tmp/classfiltercsv.csv
echo '# This is a comment' >> /tmp/classfiltercsv.csv
echo 'any,A,net.ipv4.ip_forward,ANYVALUE' >> /tmp/classfiltercsv.csv
echo 'example_class1,z,net.ipv4.ip_forward,ANYVALUE' >> /tmp/classfiltercsv.csv
echo 'example_class2,a,net.ipv4.ip_forward,127.0.0.3' >> /tmp/classfiltercsv.csv
echo 'not_defined,Z,net.ipv4.ip_forward,NOT_DEFINED' >> /tmp/classfiltercsv.csv
echo 'example_class3,1,net.ipv4.ip_forward,127.0.0.4' >> /tmp/classfiltercsv.csv
echo 'also_undefined,0,net.ipv4.ip_forward,NOT_DEFINED' >> /tmp/classfiltercsv.csv
sed -i 's/$/\r/' /tmp/classfiltercsv.csv
Policy:
code
bundle agent example_classfiltercsv
{
classes:
"example_class1";
"example_class2";
"example_class3";
vars:
"data_file" string => "/tmp/classfiltercsv.csv";
"d" data => classfiltercsv($(data_file), "true", 0, 1);
reports:
"Filtered data: $(with)" with => string_mustache("", d);
}
bundle agent __main__
{
methods:
"example_classfiltercsv";
}
Output:
code
R: Filtered data: [
{
"Sort": "1",
"Token": "net.ipv4.ip_forward",
"Value": "127.0.0.4"
},
{
"Sort": "A",
"Token": "net.ipv4.ip_forward",
"Value": "ANYVALUE"
},
{
"Sort": "a",
"Token": "net.ipv4.ip_forward",
"Value": "127.0.0.3"
},
{
"Sort": "z",
"Token": "net.ipv4.ip_forward",
"Value": "ANYVALUE"
}
]
Notes:
See also: data_expand(), readcsv(), classmatch()
History:
- Introduced in CFEngine 3.14
classify
Prototype: classify(text)
Return type: boolean
Description: Returns whether the canonicalization of text is a currently
set class.
This is useful for transforming variables into classes.
Arguments:
text: string - Input string - in the range: .*
Example:
code
classes:
"i_am_the_policy_host" expression => classify("master.example.org");
See also: canonify(), classmatch(), classesmatching()
classmatch
Prototype: classmatch(regex, tag1, tag2, ...)
Return type: boolean
Description: Tests whether regex matches any currently set class.
Returns true if the anchored regular expression matches any
currently defined class, otherwise returns false.
You can optionally restrict the search by tags, which you can list after the regular expression.
Example:
code
body common control
{
bundlesequence => { "example" };
}
bundle agent example
{
classes:
"do_it" and => { classmatch("cfengine_3.*"), "any" };
"have_hardclass_nonesuch" expression => classmatch("nonesuchclass_sodonttryit", hardclass);
reports:
do_it::
"Host matches pattern";
have_hardclass_nonesuch::
"Host has that really weird hardclass";
}
Output:
code
R: Host matches pattern
See also: canonify(), classify(), classesmatching(), classes defined via augments, countclassesmatching()
concat
Prototype: concat(...)
Return type: string
Description: Concatenates all arguments into a string.
Example:
code
commands:
"/usr/bin/generate_config $(config)"
if => concat("have_config_", canonify("$(config)"));
History: Was introduced in 3.2.0, Nova 2.1.0 (2011)
countclassesmatching
Prototype: countclassesmatching(regex, tag1, tag2, ...)
Return type: int
Description: Count the number of defined classes matching regex.
This function matches classes, using an anchored regular
expression that should match the whole line. The function returns the number
of classes matched.
You can optionally restrict the search by tags, which you can list after the regular expression.
Example:
code
body common control
{
bundlesequence => { "example" };
}
bundle agent example
{
vars:
# this is anchored, so you need .* to match multiple things
"num" int => countclassesmatching("cfengine");
"hardcount" int => countclassesmatching(".*", "hardclass");
reports:
"Found $(num) classes matching";
}
Output:
code
R: Found 1 classes matching
See also: classes defined via augments, classmatch(), classesmatching()
countlinesmatching
Prototype: countlinesmatching(regex, filename)
Return type: int
Description: Count the number of lines in file filename matching
regex.
This function matches lines in the named file, using an anchored
regular expression that should match the whole line, and returns the number of
lines matched.
Arguments:
regex: regular expression - Regular expression - in the range: .*filename: string - Filename - in the range: "?(/.*)
Example:
code
body common control
{
bundlesequence => { "example" };
}
bundle agent example
{
vars:
# typically there is only one root user
"no" int => countlinesmatching("root:.*","/etc/passwd");
reports:
"Found $(no) lines matching";
}
Output:
code
R: Found 1 lines matching
data_expand
Prototype: data_expand(data_container)
Return type: data
Description: Transforms a data container to expand all variable references.
This function will take a data container and expand variable
references once in all keys and values.
This function can accept many types of data parameters.
Any compound (arrays or maps) data structures will be expanded
recursively, so for instance data in a map inside another map will be
expanded.
This function is chiefly useful if you want to read data from an
external source and it can contain variable references.
Arguments:
data_container: string - CFEngine variable identifier or inline JSON - in the range: .*
Example:
Prepare to run the example policy:
code
echo '{ "$(main.x)": "$(main.y)" }' > /tmp/expand.json
Policy:
code
bundle agent main
{
vars:
"x" string => "the expanded x";
"y" string => "the expanded y";
"read" data => readjson("/tmp/expand.json", inf);
"expanded" data => data_expand(read);
"expanded_str" string => format("%S", expanded);
reports:
"$(this.bundle): the x and y references expanded to $(expanded_str)";
}
Output:
code
R: main: the x and y references expanded to {"the expanded x":"the expanded y"}
Notes:
History: Was introduced in version 3.7.0 (2015). The collecting functions behavior was added in 3.9.
See also: readcsv(), readjson(), readyaml(), mergedata(), readenvfile(), classfiltercsv(), about collecting functions, and data documentation.
data_readstringarray
Prototype: data_readstringarray(filename, comment, split, maxentries, maxbytes)
Return type: data
Description: Returns a data container (map) with up to
maxentries-1 fields from the first maxbytes bytes of file
filename. The first field becomes the key in the map.
One dimension is separated by the regex split, the other by the
lines in the file. The array key (the first field) must be unique; if
you need to allow duplicate lines use data_readstringarrayidx().
The comment field is a multiline regular expression and will strip out
unwanted patterns from the file being read, leaving unstripped characters to be
split into fields. Using the empty string ("") indicates no comments.
Arguments:
filename: string - File name to read - in the range: "?(/.*)comment: string - Regex matching comments - in the range: .*split: string - Regex to split data - in the range: .*maxentries: int - Maximum number of entries to read - in the range: 0,99999999999maxbytes: int - Maximum bytes to read - in the range: 0,99999999999
Example:
Prepare:
code
echo a,b,c > /tmp/cfe_array
echo "# This is a comment" >> /tmp/cfe_array
echo d,e,f >> /tmp/cfe_array
echo g,h,i >> /tmp/cfe_array
echo "# This is another comment" >> /tmp/cfe_array
echo j,k,l >> /tmp/cfe_array
Run:
code
body common control
{
bundlesequence => { "example" };
}
bundle agent example
{
vars:
# The comment regex warrents an explination:
# # matches the character # literally
# [^\n]* match a single character not including the newline character
# between zero and unlimited times, as many times as possible
"bykey" data => data_readstringarray("/tmp/cfe_array","#[^\n]*",",",10,400);
"byint" data => data_readstringarrayidx("/tmp/cfe_array","#[^\n]*",",",10,400);
"bykey_str" string => format("%S", bykey);
"byint_str" string => format("%S", byint);
reports:
"By key: $(bykey_str)";
"specific element by key a, offset 0: '$(bykey[a][0])'";
"By int offset: $(byint_str)";
"specific element by int offset 2, 0: '$(byint[2][0])'";
}
Output:
code
R: By key: {"a":["b","c"],"d":["e","f"],"g":["h","i"],"j":["k","l"]}
R: specific element by key a, offset 0: 'b'
R: By int offset: [["a","b","c"],["d","e","f"],["g","h","i"],["j","k","l"]]
R: specific element by int offset 2, 0: 'g'
See also: data_readstringarrayidx(), data
History:
data_readstringarrayidx
Prototype: data_readstringarrayidx(filename, comment, split, maxentries, maxbytes)
Return type: data
Description: Returns a data container (array) with up to
maxentries fields from the first maxbytes bytes of file filename.
One dimension is separated by the regex split, the other by the lines in
the file. The array arguments are both integer indexes, allowing for
non-identifiers at first field (e.g. duplicates or names with spaces), unlike
data_readstringarray().
The comment field will strip out unwanted patterns from the file being read, leaving unstripped characters to be split into fields. Using the empty string ("") indicates no comments.
Arguments:
filename: string - File name to read - in the range: "?(/.*)comment: string - Regex matching comments - in the range: .*split: string - Regex to split data - in the range: .*maxentries: int - Maximum number of entries to read - in the range: 0,99999999999maxbytes: int - Maximum bytes to read - in the range: 0,99999999999
Example:
Prepare:
code
echo a,b,c > /tmp/cfe_array
echo "# This is a comment" >> /tmp/cfe_array
echo d,e,f >> /tmp/cfe_array
echo g,h,i >> /tmp/cfe_array
echo "# This is another comment" >> /tmp/cfe_array
echo j,k,l >> /tmp/cfe_array
Run:
code
body common control
{
bundlesequence => { "example" };
}
bundle agent example
{
vars:
# The comment regex warrents an explination:
# # matches the character # literally
# [^\n]* match a single character not including the newline character
# between zero and unlimited times, as many times as possible
"bykey" data => data_readstringarray("/tmp/cfe_array","#[^\n]*",",",10,400);
"byint" data => data_readstringarrayidx("/tmp/cfe_array","#[^\n]*",",",10,400);
"bykey_str" string => format("%S", bykey);
"byint_str" string => format("%S", byint);
reports:
"By key: $(bykey_str)";
"specific element by key a, offset 0: '$(bykey[a][0])'";
"By int offset: $(byint_str)";
"specific element by int offset 2, 0: '$(byint[2][0])'";
}
Output:
code
R: By key: {"a":["b","c"],"d":["e","f"],"g":["h","i"],"j":["k","l"]}
R: specific element by key a, offset 0: 'b'
R: By int offset: [["a","b","c"],["d","e","f"],["g","h","i"],["j","k","l"]]
R: specific element by int offset 2, 0: 'g'
See also: data_readstringarray(), data
History:
Prototype: data_regextract(regex, string)
Return type: data
Description: Returns a data container filled with backreferences
and named captures if the multiline anchored regex matches the
string.
This function is significantly better than regextract() because it
doesn't create classic CFEngine array variables and supports named
captures.
If there are any back reference matches from the regular expression,
then the data container will be populated with the values, in the
manner:
code
$(container[0]) = entire string
$(container[1]) = back reference 1, etc
Note 0 and 1 are string keys in a map, not offsets.
If named captures are used, e.g. (?<name1>...) to capture three
characters under name1, then that will be the key instead of the
numeric position of the backreference.
PCRE named captures are described in http://pcre.org/pcre.txt and several syntaxes are supported:
code
(?<name>...) named capturing group (Perl)
(?'name'...) named capturing group (Perl)
(?P<name>...) named capturing group (Python)
Since the regular expression is run with /dotall/ and /multiline/ modes, to match the end of a line, use [^\n]* instead of $.
Arguments:
regex: regular expression - Regular expression - in the range: .*string: string - Match string - in the range: .*
Example:
code
bundle agent main
{
vars:
# the returned data container is a key-value map:
# the whole matched string is put in key "0"
# the first three characters are put in key "name1"
# the next three characters go into key "2" (the capture has no name)
# the next two characters go into key "3" (the capture has no name)
# then the dash is ignored
# then three characters are put in key "name2"
# then another dash is ignored
# the next three characters go into key "5" (the capture has no name)
# anything else is ignored
"parsed" data => data_regextract("^(?<name1>...)(...)(..)-(?<name2>...)-(..).*", "abcdef12-345-67andsoon");
"parsed_str" string => format("%S", parsed);
# Illustrating multiline regular expression
"instance_guid_until_end_of_string"
data => data_regextract( "^guid\s?+=\s?+(?<value>.*)$",
readfile( "/tmp/instance.cfg", 200));
"instance_guid"
data => data_regextract( "^guid\s+=\s+(?<value>[^\n]*)",
readfile( "/tmp/instance.cfg", 200));
"instance_port"
data => data_regextract( "^port\s?+=\s?+(?<value>[^\n]*)",
readfile( "/tmp/instance.cfg", 200));
reports:
"$(this.bundle): parsed[0] '$(parsed[0])' parses into: $(parsed_str)";
"$(this.bundle): instance_guid_until_end_of_string[value] '$(instance_guid_until_end_of_string[value])'";
"$(this.bundle): instance_guid[value] '$(instance_guid[value])'";
"$(this.bundle): instance_port[value] '$(instance_port[value])'";
}
Output:
code
R: main: parsed[0] 'abcdef12-345-67andsoon' parses into: {"0":"abcdef12-345-67andsoon","2":"def","3":"12","5":"67","name1":"abc","name2":"345"}
R: main: instance_guid_until_end_of_string[value] '9CB197F0-4569-446A-A987-1DDEC1205F6B
port=5308'
R: main: instance_guid[value] '9CB197F0-4569-446A-A987-1DDEC1205F6B'
R: main: instance_port[value] '5308'
Notes:
History: Was introduced in version 3.7.0 (2015)
See also: regextract(), regex_replace(), pcre regular expression syntax summary
data_sysctlvalues
Prototype: data_sysctlvalues()
Return type: data
Description: Returns all sysctl values using /proc/sys.
Example:
Policy:
code
bundle agent inventory_sysctl
{
vars:
# Get the complete set of sysctl variables and values as a data structure
"_sysctl_d"
data => data_sysctlvalues(),
unless => isvariable( _sysctl_d );
# Get the sysctl variable names
"_sysctl_i"
slist => getindices( "_sysctl_d" );
# Define a variable tagged for inventory for each sysctl variable
"sysctl[$(_sysctl_i)]"
string => "$(_sysctl_d[$(_sysctl_i)])",
meta => { "inventory", "attribute_name=Kernel Tunable $(_sysctl_i)" };
reports:
# Show what data_sysctlvalues() returned.
"data_sysctlvalues() returned:$(with)"
with => storejson( @(_sysctl_d) );
}
bundle agent __main__
{
methods: "inventory_sysctl";
}
This policy can be found in
/var/cfengine/share/doc/examples/data_sysctlvalues.cf
and downloaded directly from
github.
Output:
code
R: data_sysctlvalues() returned:{
"abi.vsyscall32": "1",
"crypto.fips_enabled": "0",
"debug.exception-trace": "1",
"debug.kprobes-optimization": "1",
"debug.panic_on_rcu_stall": "0",
"dev.hpet.max-user-freq": "64",
"dev.mac_hid.mouse_button2_keycode": "97",
"dev.mac_hid.mouse_button3_keycode": "100",
"dev.mac_hid.mouse_button_emulation": "0",
"dev.parport.default.spintime": "500",
"dev.parport.default.timeslice": "200",
"dev.raid.speed_limit_max": "200000",
"dev.raid.speed_limit_min": "1000",
"dev.scsi.logging_level": "0",
"fs.aio-max-nr": "65536",
"fs.aio-nr": "0",
"fs.binfmt_misc.status": "enabled",
"fs.dentry-state": "43676\t27378\t45\t0\t479\t0",
"fs.dir-notify-enable": "1",
"fs.epoll.max_user_watches": "99020",
"fs.file-max": "47380",
"fs.file-nr": "1472\t0\t47380",
"fs.inode-nr": "47116\t21990",
"fs.inode-state": "47116\t21990\t0\t0\t0\t0\t0",
"fs.inotify.max_queued_events": "16384",
"fs.inotify.max_user_instances": "128",
"fs.inotify.max_user_watches": "8192",
"fs.lease-break-time": "45",
"fs.leases-enable": "1",
"fs.may_detach_mounts": "0",
"fs.mount-max": "100000",
"fs.mqueue.msg_default": "10",
"fs.mqueue.msg_max": "10",
"fs.mqueue.msgsize_default": "8192",
"fs.mqueue.msgsize_max": "8192",
"fs.mqueue.queues_max": "256",
"fs.negative-dentry-limit": "0",
"fs.nr_open": "1048576",
"fs.overflowgid": "65534",
"fs.overflowuid": "65534",
"fs.pipe-max-size": "1048576",
"fs.pipe-user-pages-hard": "0",
"fs.pipe-user-pages-soft": "16384",
"fs.protected_hardlinks": "1",
"fs.protected_symlinks": "1",
"fs.quota.allocated_dquots": "0",
"fs.quota.cache_hits": "0",
"fs.quota.drops": "0",
"fs.quota.free_dquots": "0",
"fs.quota.lookups": "0",
"fs.quota.reads": "0",
"fs.quota.syncs": "0",
"fs.quota.warnings": "1",
"fs.quota.writes": "0",
"fs.suid_dumpable": "0",
"fs.xfs.age_buffer_centisecs": "1500",
"fs.xfs.error_level": "3",
"fs.xfs.filestream_centisecs": "3000",
"fs.xfs.inherit_noatime": "1",
"fs.xfs.inherit_nodefrag": "1",
"fs.xfs.inherit_nodump": "1",
"fs.xfs.inherit_nosymlinks": "0",
"fs.xfs.inherit_sync": "1",
"fs.xfs.irix_sgid_inherit": "0",
"fs.xfs.irix_symlink_mode": "0",
"fs.xfs.panic_mask": "0",
"fs.xfs.rotorstep": "1",
"fs.xfs.speculative_prealloc_lifetime": "300",
"fs.xfs.stats_clear": "0",
"fs.xfs.xfsbufd_centisecs": "100",
"fs.xfs.xfssyncd_centisecs": "3000",
"kernel.acct": "4\t2\t30",
"kernel.acpi_video_flags": "0",
"kernel.auto_msgmni": "0",
"kernel.bootloader_type": "114",
"kernel.bootloader_version": "2",
"kernel.cad_pid": "1",
"kernel.cap_last_cap": "36",
"kernel.compat-log": "1",
"kernel.core_pattern": "core",
"kernel.core_pipe_limit": "0",
"kernel.core_uses_pid": "1",
"kernel.ctrl-alt-del": "0",
"kernel.dmesg_restrict": "0",
"kernel.domainname": "(none)",
"kernel.ftrace_dump_on_oops": "0",
"kernel.ftrace_enabled": "1",
"kernel.hardlockup_all_cpu_backtrace": "0",
"kernel.hardlockup_panic": "1",
"kernel.hostname": "hub.example.com",
"kernel.hotplug": "",
"kernel.hung_task_check_count": "4194304",
"kernel.hung_task_panic": "0",
"kernel.hung_task_timeout_secs": "120",
"kernel.hung_task_warnings": "10",
"kernel.io_delay_type": "0",
"kernel.kexec_load_disabled": "0",
"kernel.keys.gc_delay": "300",
"kernel.keys.maxbytes": "20000",
"kernel.keys.maxkeys": "200",
"kernel.keys.persistent_keyring_expiry": "259200",
"kernel.keys.root_maxbytes": "25000000",
"kernel.keys.root_maxkeys": "1000000",
"kernel.kptr_restrict": "0",
"kernel.max_lock_depth": "1024",
"kernel.modprobe": "/sbin/modprobe",
"kernel.modules_disabled": "0",
"kernel.msg_next_id": "-1",
"kernel.msgmax": "8192",
"kernel.msgmnb": "16384",
"kernel.msgmni": "32000",
"kernel.ngroups_max": "65536",
"kernel.nmi_watchdog": "1",
"kernel.ns_last_pid": "3240",
"kernel.numa_balancing": "0",
"kernel.numa_balancing_scan_delay_ms": "1000",
"kernel.numa_balancing_scan_period_max_ms": "60000",
"kernel.numa_balancing_scan_period_min_ms": "1000",
"kernel.numa_balancing_scan_size_mb": "256",
"kernel.numa_balancing_settle_count": "4",
"kernel.osrelease": "3.10.0-1127.el7.x86_64",
"kernel.ostype": "Linux",
"kernel.overflowgid": "65534",
"kernel.overflowuid": "65534",
"kernel.panic": "0",
"kernel.panic_on_io_nmi": "0",
"kernel.panic_on_oops": "1",
"kernel.panic_on_stackoverflow": "0",
"kernel.panic_on_unrecovered_nmi": "0",
"kernel.panic_on_warn": "0",
"kernel.perf_cpu_time_max_percent": "25",
"kernel.perf_event_max_sample_rate": "100000",
"kernel.perf_event_mlock_kb": "516",
"kernel.perf_event_paranoid": "2",
"kernel.pid_max": "32768",
"kernel.poweroff_cmd": "/sbin/poweroff",
"kernel.print-fatal-signals": "0",
"kernel.printk": "7\t4\t1\t7",
"kernel.printk_delay": "0",
"kernel.printk_ratelimit": "5",
"kernel.printk_ratelimit_burst": "10",
"kernel.pty.max": "4096",
"kernel.pty.nr": "1",
"kernel.pty.reserve": "1024",
"kernel.random.boot_id": "422886c9-8219-4749-9610-981bdeb5e509",
"kernel.random.entropy_avail": "3071",
"kernel.random.poolsize": "4096",
"kernel.random.read_wakeup_threshold": "64",
"kernel.random.urandom_min_reseed_secs": "60",
"kernel.random.uuid": "f9544436-b0a1-43b7-a36b-3b8da50e066a",
"kernel.random.write_wakeup_threshold": "896",
"kernel.randomize_va_space": "2",
"kernel.real-root-dev": "0",
"kernel.sched_autogroup_enabled": "0",
"kernel.sched_cfs_bandwidth_slice_us": "5000",
"kernel.sched_child_runs_first": "0",
"kernel.sched_domain.cpu0.domain0.busy_factor": "32",
"kernel.sched_domain.cpu0.domain0.busy_idx": "2",
"kernel.sched_domain.cpu0.domain0.cache_nice_tries": "1",
"kernel.sched_domain.cpu0.domain0.flags": "559",
"kernel.sched_domain.cpu0.domain0.forkexec_idx": "0",
"kernel.sched_domain.cpu0.domain0.idle_idx": "0",
"kernel.sched_domain.cpu0.domain0.imbalance_pct": "117",
"kernel.sched_domain.cpu0.domain0.max_interval": "4",
"kernel.sched_domain.cpu0.domain0.max_newidle_lb_cost": "37143",
"kernel.sched_domain.cpu0.domain0.min_interval": "2",
"kernel.sched_domain.cpu0.domain0.name": "MC",
"kernel.sched_domain.cpu0.domain0.newidle_idx": "0",
"kernel.sched_domain.cpu0.domain0.wake_idx": "0",
"kernel.sched_domain.cpu1.domain0.busy_factor": "32",
"kernel.sched_domain.cpu1.domain0.busy_idx": "2",
"kernel.sched_domain.cpu1.domain0.cache_nice_tries": "1",
"kernel.sched_domain.cpu1.domain0.flags": "559",
"kernel.sched_domain.cpu1.domain0.forkexec_idx": "0",
"kernel.sched_domain.cpu1.domain0.idle_idx": "0",
"kernel.sched_domain.cpu1.domain0.imbalance_pct": "117",
"kernel.sched_domain.cpu1.domain0.max_interval": "4",
"kernel.sched_domain.cpu1.domain0.max_newidle_lb_cost": "16770",
"kernel.sched_domain.cpu1.domain0.min_interval": "2",
"kernel.sched_domain.cpu1.domain0.name": "MC",
"kernel.sched_domain.cpu1.domain0.newidle_idx": "0",
"kernel.sched_domain.cpu1.domain0.wake_idx": "0",
"kernel.sched_latency_ns": "12000000",
"kernel.sched_migration_cost_ns": "500000",
"kernel.sched_min_granularity_ns": "10000000",
"kernel.sched_nr_migrate": "32",
"kernel.sched_rr_timeslice_ms": "100",
"kernel.sched_rt_period_us": "1000000",
"kernel.sched_rt_runtime_us": "950000",
"kernel.sched_schedstats": "0",
"kernel.sched_shares_window_ns": "10000000",
"kernel.sched_time_avg_ms": "1000",
"kernel.sched_tunable_scaling": "1",
"kernel.sched_wakeup_granularity_ns": "15000000",
"kernel.seccomp.actions_avail": "kill trap errno trace allow",
"kernel.seccomp.actions_logged": "kill trap errno trace",
"kernel.sem": "250\t32000\t32\t128",
"kernel.sem_next_id": "-1",
"kernel.shm_next_id": "-1",
"kernel.shm_rmid_forced": "0",
"kernel.shmall": "18446744073692774399",
"kernel.shmmax": "18446744073692774399",
"kernel.shmmni": "4096",
"kernel.softlockup_all_cpu_backtrace": "0",
"kernel.softlockup_panic": "0",
"kernel.stack_tracer_enabled": "0",
"kernel.sysctl_writes_strict": "1",
"kernel.sysrq": "16",
"kernel.tainted": "0",
"kernel.threads-max": "3777",
"kernel.timer_migration": "1",
"kernel.traceoff_on_warning": "0",
"kernel.unknown_nmi_panic": "0",
"kernel.usermodehelper.bset": "4294967295\t31",
"kernel.usermodehelper.inheritable": "4294967295\t31",
"kernel.version": "#1 SMP Tue Mar 31 23:36:51 UTC 2020",
"kernel.watchdog": "1",
"kernel.watchdog_cpumask": "0-1",
"kernel.watchdog_thresh": "10",
"kernel.yama.ptrace_scope": "0",
"net.core.bpf_jit_enable": "1",
"net.core.bpf_jit_harden": "1",
"net.core.bpf_jit_kallsyms": "0",
"net.core.busy_poll": "0",
"net.core.busy_read": "0",
"net.core.default_qdisc": "pfifo_fast",
"net.core.dev_weight": "64",
"net.core.dev_weight_rx_bias": "1",
"net.core.dev_weight_tx_bias": "1",
"net.core.message_burst": "10",
"net.core.message_cost": "5",
"net.core.netdev_budget": "300",
"net.core.netdev_max_backlog": "1000",
"net.core.netdev_rss_key": "00:00:00:00:00:00:00:00:00:00:00:00:00:00:00:00:00:00:00:00:00:00:00:00:00:00:00:00:00:00:00:00:00:00:00:00:00:00:00:00:00:00:00:00:00:00:00:00:00:00:00:00",
"net.core.netdev_tstamp_prequeue": "1",
"net.core.optmem_max": "20480",
"net.core.rmem_default": "212992",
"net.core.rmem_max": "212992",
"net.core.rps_sock_flow_entries": "0",
"net.core.somaxconn": "128",
"net.core.warnings": "1",
"net.core.wmem_default": "212992",
"net.core.wmem_max": "212992",
"net.core.xfrm_acq_expires": "30",
"net.core.xfrm_aevent_etime": "10",
"net.core.xfrm_aevent_rseqth": "2",
"net.core.xfrm_larval_drop": "1",
"net.ipv4.cipso_cache_bucket_size": "10",
"net.ipv4.cipso_cache_enable": "1",
"net.ipv4.cipso_rbm_optfmt": "0",
"net.ipv4.cipso_rbm_strictvalid": "1",
"net.ipv4.conf.all.accept_local": "0",
"net.ipv4.conf.all.accept_redirects": "1",
"net.ipv4.conf.all.accept_source_route": "0",
"net.ipv4.conf.all.arp_accept": "0",
"net.ipv4.conf.all.arp_announce": "0",
"net.ipv4.conf.all.arp_filter": "0",
"net.ipv4.conf.all.arp_ignore": "0",
"net.ipv4.conf.all.arp_notify": "0",
"net.ipv4.conf.all.bootp_relay": "0",
"net.ipv4.conf.all.disable_policy": "0",
"net.ipv4.conf.all.disable_xfrm": "0",
"net.ipv4.conf.all.force_igmp_version": "0",
"net.ipv4.conf.all.forwarding": "0",
"net.ipv4.conf.all.igmpv2_unsolicited_report_interval": "10000",
"net.ipv4.conf.all.igmpv3_unsolicited_report_interval": "1000",
"net.ipv4.conf.all.log_martians": "0",
"net.ipv4.conf.all.mc_forwarding": "0",
"net.ipv4.conf.all.medium_id": "0",
"net.ipv4.conf.all.promote_secondaries": "1",
"net.ipv4.conf.all.proxy_arp": "0",
"net.ipv4.conf.all.proxy_arp_pvlan": "0",
"net.ipv4.conf.all.route_localnet": "0",
"net.ipv4.conf.all.rp_filter": "1",
"net.ipv4.conf.all.secure_redirects": "1",
"net.ipv4.conf.all.send_redirects": "1",
"net.ipv4.conf.all.shared_media": "1",
"net.ipv4.conf.all.src_valid_mark": "0",
"net.ipv4.conf.all.tag": "0",
"net.ipv4.conf.default.accept_local": "0",
"net.ipv4.conf.default.accept_redirects": "1",
"net.ipv4.conf.default.accept_source_route": "0",
"net.ipv4.conf.default.arp_accept": "0",
"net.ipv4.conf.default.arp_announce": "0",
"net.ipv4.conf.default.arp_filter": "0",
"net.ipv4.conf.default.arp_ignore": "0",
"net.ipv4.conf.default.arp_notify": "0",
"net.ipv4.conf.default.bootp_relay": "0",
"net.ipv4.conf.default.disable_policy": "0",
"net.ipv4.conf.default.disable_xfrm": "0",
"net.ipv4.conf.default.force_igmp_version": "0",
"net.ipv4.conf.default.forwarding": "0",
"net.ipv4.conf.default.igmpv2_unsolicited_report_interval": "10000",
"net.ipv4.conf.default.igmpv3_unsolicited_report_interval": "1000",
"net.ipv4.conf.default.log_martians": "0",
"net.ipv4.conf.default.mc_forwarding": "0",
"net.ipv4.conf.default.medium_id": "0",
"net.ipv4.conf.default.promote_secondaries": "1",
"net.ipv4.conf.default.proxy_arp": "0",
"net.ipv4.conf.default.proxy_arp_pvlan": "0",
"net.ipv4.conf.default.route_localnet": "0",
"net.ipv4.conf.default.rp_filter": "1",
"net.ipv4.conf.default.secure_redirects": "1",
"net.ipv4.conf.default.send_redirects": "1",
"net.ipv4.conf.default.shared_media": "1",
"net.ipv4.conf.default.src_valid_mark": "0",
"net.ipv4.conf.default.tag": "0",
"net.ipv4.conf.eth0.accept_local": "0",
"net.ipv4.conf.eth0.accept_redirects": "1",
"net.ipv4.conf.eth0.accept_source_route": "0",
"net.ipv4.conf.eth0.arp_accept": "0",
"net.ipv4.conf.eth0.arp_announce": "0",
"net.ipv4.conf.eth0.arp_filter": "0",
"net.ipv4.conf.eth0.arp_ignore": "0",
"net.ipv4.conf.eth0.arp_notify": "0",
"net.ipv4.conf.eth0.bootp_relay": "0",
"net.ipv4.conf.eth0.disable_policy": "0",
"net.ipv4.conf.eth0.disable_xfrm": "0",
"net.ipv4.conf.eth0.force_igmp_version": "0",
"net.ipv4.conf.eth0.forwarding": "0",
"net.ipv4.conf.eth0.igmpv2_unsolicited_report_interval": "10000",
"net.ipv4.conf.eth0.igmpv3_unsolicited_report_interval": "1000",
"net.ipv4.conf.eth0.log_martians": "0",
"net.ipv4.conf.eth0.mc_forwarding": "0",
"net.ipv4.conf.eth0.medium_id": "0",
"net.ipv4.conf.eth0.promote_secondaries": "1",
"net.ipv4.conf.eth0.proxy_arp": "0",
"net.ipv4.conf.eth0.proxy_arp_pvlan": "0",
"net.ipv4.conf.eth0.route_localnet": "0",
"net.ipv4.conf.eth0.rp_filter": "1",
"net.ipv4.conf.eth0.secure_redirects": "1",
"net.ipv4.conf.eth0.send_redirects": "1",
"net.ipv4.conf.eth0.shared_media": "1",
"net.ipv4.conf.eth0.src_valid_mark": "0",
"net.ipv4.conf.eth0.tag": "0",
"net.ipv4.conf.eth1.accept_local": "0",
"net.ipv4.conf.eth1.accept_redirects": "1",
"net.ipv4.conf.eth1.accept_source_route": "0",
"net.ipv4.conf.eth1.arp_accept": "0",
"net.ipv4.conf.eth1.arp_announce": "0",
"net.ipv4.conf.eth1.arp_filter": "0",
"net.ipv4.conf.eth1.arp_ignore": "0",
"net.ipv4.conf.eth1.arp_notify": "0",
"net.ipv4.conf.eth1.bootp_relay": "0",
"net.ipv4.conf.eth1.disable_policy": "0",
"net.ipv4.conf.eth1.disable_xfrm": "0",
"net.ipv4.conf.eth1.force_igmp_version": "0",
"net.ipv4.conf.eth1.forwarding": "0",
"net.ipv4.conf.eth1.igmpv2_unsolicited_report_interval": "10000",
"net.ipv4.conf.eth1.igmpv3_unsolicited_report_interval": "1000",
"net.ipv4.conf.eth1.log_martians": "0",
"net.ipv4.conf.eth1.mc_forwarding": "0",
"net.ipv4.conf.eth1.medium_id": "0",
"net.ipv4.conf.eth1.promote_secondaries": "1",
"net.ipv4.conf.eth1.proxy_arp": "0",
"net.ipv4.conf.eth1.proxy_arp_pvlan": "0",
"net.ipv4.conf.eth1.route_localnet": "0",
"net.ipv4.conf.eth1.rp_filter": "1",
"net.ipv4.conf.eth1.secure_redirects": "1",
"net.ipv4.conf.eth1.send_redirects": "1",
"net.ipv4.conf.eth1.shared_media": "1",
"net.ipv4.conf.eth1.src_valid_mark": "0",
"net.ipv4.conf.eth1.tag": "0",
"net.ipv4.conf.lo.accept_local": "0",
"net.ipv4.conf.lo.accept_redirects": "1",
"net.ipv4.conf.lo.accept_source_route": "1",
"net.ipv4.conf.lo.arp_accept": "0",
"net.ipv4.conf.lo.arp_announce": "0",
"net.ipv4.conf.lo.arp_filter": "0",
"net.ipv4.conf.lo.arp_ignore": "0",
"net.ipv4.conf.lo.arp_notify": "0",
"net.ipv4.conf.lo.bootp_relay": "0",
"net.ipv4.conf.lo.disable_policy": "1",
"net.ipv4.conf.lo.disable_xfrm": "1",
"net.ipv4.conf.lo.force_igmp_version": "0",
"net.ipv4.conf.lo.forwarding": "0",
"net.ipv4.conf.lo.igmpv2_unsolicited_report_interval": "10000",
"net.ipv4.conf.lo.igmpv3_unsolicited_report_interval": "1000",
"net.ipv4.conf.lo.log_martians": "0",
"net.ipv4.conf.lo.mc_forwarding": "0",
"net.ipv4.conf.lo.medium_id": "0",
"net.ipv4.conf.lo.promote_secondaries": "0",
"net.ipv4.conf.lo.proxy_arp": "0",
"net.ipv4.conf.lo.proxy_arp_pvlan": "0",
"net.ipv4.conf.lo.route_localnet": "0",
"net.ipv4.conf.lo.rp_filter": "0",
"net.ipv4.conf.lo.secure_redirects": "1",
"net.ipv4.conf.lo.send_redirects": "1",
"net.ipv4.conf.lo.shared_media": "1",
"net.ipv4.conf.lo.src_valid_mark": "0",
"net.ipv4.conf.lo.tag": "0",
"net.ipv4.fib_multipath_hash_policy": "0",
"net.ipv4.fwmark_reflect": "0",
"net.ipv4.icmp_echo_ignore_all": "0",
"net.ipv4.icmp_echo_ignore_broadcasts": "1",
"net.ipv4.icmp_errors_use_inbound_ifaddr": "0",
"net.ipv4.icmp_ignore_bogus_error_responses": "1",
"net.ipv4.icmp_msgs_burst": "50",
"net.ipv4.icmp_msgs_per_sec": "1000",
"net.ipv4.icmp_ratelimit": "1000",
"net.ipv4.icmp_ratemask": "6168",
"net.ipv4.igmp_max_memberships": "20",
"net.ipv4.igmp_max_msf": "10",
"net.ipv4.igmp_qrv": "2",
"net.ipv4.inet_peer_maxttl": "600",
"net.ipv4.inet_peer_minttl": "120",
"net.ipv4.inet_peer_threshold": "65664",
"net.ipv4.ip_default_ttl": "64",
"net.ipv4.ip_dynaddr": "0",
"net.ipv4.ip_early_demux": "1",
"net.ipv4.ip_forward": "0",
"net.ipv4.ip_forward_use_pmtu": "0",
"net.ipv4.ip_local_port_range": "32768\t60999",
"net.ipv4.ip_local_reserved_ports": "",
"net.ipv4.ip_no_pmtu_disc": "0",
"net.ipv4.ip_nonlocal_bind": "0",
"net.ipv4.ipfrag_high_thresh": "4194304",
"net.ipv4.ipfrag_low_thresh": "3145728",
"net.ipv4.ipfrag_max_dist": "64",
"net.ipv4.ipfrag_secret_interval": "600",
"net.ipv4.ipfrag_time": "30",
"net.ipv4.neigh.default.anycast_delay": "100",
"net.ipv4.neigh.default.app_solicit": "0",
"net.ipv4.neigh.default.base_reachable_time": "30",
"net.ipv4.neigh.default.base_reachable_time_ms": "30000",
"net.ipv4.neigh.default.delay_first_probe_time": "5",
"net.ipv4.neigh.default.gc_interval": "30",
"net.ipv4.neigh.default.gc_stale_time": "60",
"net.ipv4.neigh.default.gc_thresh1": "128",
"net.ipv4.neigh.default.gc_thresh2": "512",
"net.ipv4.neigh.default.gc_thresh3": "1024",
"net.ipv4.neigh.default.locktime": "100",
"net.ipv4.neigh.default.mcast_solicit": "3",
"net.ipv4.neigh.default.proxy_delay": "80",
"net.ipv4.neigh.default.proxy_qlen": "64",
"net.ipv4.neigh.default.retrans_time": "100",
"net.ipv4.neigh.default.retrans_time_ms": "1000",
"net.ipv4.neigh.default.ucast_solicit": "3",
"net.ipv4.neigh.default.unres_qlen": "31",
"net.ipv4.neigh.default.unres_qlen_bytes": "65536",
"net.ipv4.neigh.eth0.anycast_delay": "100",
"net.ipv4.neigh.eth0.app_solicit": "0",
"net.ipv4.neigh.eth0.base_reachable_time": "30",
"net.ipv4.neigh.eth0.base_reachable_time_ms": "30000",
"net.ipv4.neigh.eth0.delay_first_probe_time": "5",
"net.ipv4.neigh.eth0.gc_stale_time": "60",
"net.ipv4.neigh.eth0.locktime": "100",
"net.ipv4.neigh.eth0.mcast_solicit": "3",
"net.ipv4.neigh.eth0.proxy_delay": "80",
"net.ipv4.neigh.eth0.proxy_qlen": "64",
"net.ipv4.neigh.eth0.retrans_time": "100",
"net.ipv4.neigh.eth0.retrans_time_ms": "1000",
"net.ipv4.neigh.eth0.ucast_solicit": "3",
"net.ipv4.neigh.eth0.unres_qlen": "31",
"net.ipv4.neigh.eth0.unres_qlen_bytes": "65536",
"net.ipv4.neigh.eth1.anycast_delay": "100",
"net.ipv4.neigh.eth1.app_solicit": "0",
"net.ipv4.neigh.eth1.base_reachable_time": "30",
"net.ipv4.neigh.eth1.base_reachable_time_ms": "30000",
"net.ipv4.neigh.eth1.delay_first_probe_time": "5",
"net.ipv4.neigh.eth1.gc_stale_time": "60",
"net.ipv4.neigh.eth1.locktime": "100",
"net.ipv4.neigh.eth1.mcast_solicit": "3",
"net.ipv4.neigh.eth1.proxy_delay": "80",
"net.ipv4.neigh.eth1.proxy_qlen": "64",
"net.ipv4.neigh.eth1.retrans_time": "100",
"net.ipv4.neigh.eth1.retrans_time_ms": "1000",
"net.ipv4.neigh.eth1.ucast_solicit": "3",
"net.ipv4.neigh.eth1.unres_qlen": "31",
"net.ipv4.neigh.eth1.unres_qlen_bytes": "65536",
"net.ipv4.neigh.lo.anycast_delay": "100",
"net.ipv4.neigh.lo.app_solicit": "0",
"net.ipv4.neigh.lo.base_reachable_time": "30",
"net.ipv4.neigh.lo.base_reachable_time_ms": "30000",
"net.ipv4.neigh.lo.delay_first_probe_time": "5",
"net.ipv4.neigh.lo.gc_stale_time": "60",
"net.ipv4.neigh.lo.locktime": "100",
"net.ipv4.neigh.lo.mcast_solicit": "3",
"net.ipv4.neigh.lo.proxy_delay": "80",
"net.ipv4.neigh.lo.proxy_qlen": "64",
"net.ipv4.neigh.lo.retrans_time": "100",
"net.ipv4.neigh.lo.retrans_time_ms": "1000",
"net.ipv4.neigh.lo.ucast_solicit": "3",
"net.ipv4.neigh.lo.unres_qlen": "31",
"net.ipv4.neigh.lo.unres_qlen_bytes": "65536",
"net.ipv4.ping_group_range": "1\t0",
"net.ipv4.route.error_burst": "5000",
"net.ipv4.route.error_cost": "1000",
"net.ipv4.route.gc_elasticity": "8",
"net.ipv4.route.gc_interval": "60",
"net.ipv4.route.gc_min_interval": "0",
"net.ipv4.route.gc_min_interval_ms": "500",
"net.ipv4.route.gc_thresh": "-1",
"net.ipv4.route.gc_timeout": "300",
"net.ipv4.route.max_size": "2147483647",
"net.ipv4.route.min_adv_mss": "256",
"net.ipv4.route.min_pmtu": "552",
"net.ipv4.route.mtu_expires": "600",
"net.ipv4.route.redirect_load": "20",
"net.ipv4.route.redirect_number": "9",
"net.ipv4.route.redirect_silence": "20480",
"net.ipv4.tcp_abort_on_overflow": "0",
"net.ipv4.tcp_adv_win_scale": "1",
"net.ipv4.tcp_allowed_congestion_control": "cubic reno",
"net.ipv4.tcp_app_win": "31",
"net.ipv4.tcp_autocorking": "1",
"net.ipv4.tcp_available_congestion_control": "cubic reno",
"net.ipv4.tcp_base_mss": "512",
"net.ipv4.tcp_challenge_ack_limit": "1000",
"net.ipv4.tcp_congestion_control": "cubic",
"net.ipv4.tcp_dsack": "1",
"net.ipv4.tcp_early_retrans": "3",
"net.ipv4.tcp_ecn": "2",
"net.ipv4.tcp_fack": "1",
"net.ipv4.tcp_fastopen": "0",
"net.ipv4.tcp_fastopen_key": "00000000-00000000-00000000-00000000",
"net.ipv4.tcp_fin_timeout": "60",
"net.ipv4.tcp_frto": "2",
"net.ipv4.tcp_invalid_ratelimit": "500",
"net.ipv4.tcp_keepalive_intvl": "75",
"net.ipv4.tcp_keepalive_probes": "9",
"net.ipv4.tcp_keepalive_time": "7200",
"net.ipv4.tcp_limit_output_bytes": "262144",
"net.ipv4.tcp_low_latency": "0",
"net.ipv4.tcp_max_orphans": "2048",
"net.ipv4.tcp_max_ssthresh": "0",
"net.ipv4.tcp_max_syn_backlog": "128",
"net.ipv4.tcp_max_tw_buckets": "2048",
"net.ipv4.tcp_mem": "11517\t15356\t23034",
"net.ipv4.tcp_min_snd_mss": "48",
"net.ipv4.tcp_min_tso_segs": "2",
"net.ipv4.tcp_moderate_rcvbuf": "1",
"net.ipv4.tcp_mtu_probing": "0",
"net.ipv4.tcp_no_metrics_save": "0",
"net.ipv4.tcp_notsent_lowat": "-1",
"net.ipv4.tcp_orphan_retries": "0",
"net.ipv4.tcp_reordering": "3",
"net.ipv4.tcp_retrans_collapse": "1",
"net.ipv4.tcp_retries1": "3",
"net.ipv4.tcp_retries2": "15",
"net.ipv4.tcp_rfc1337": "0",
"net.ipv4.tcp_rmem": "4096\t87380\t3868000",
"net.ipv4.tcp_sack": "1",
"net.ipv4.tcp_slow_start_after_idle": "1",
"net.ipv4.tcp_stdurg": "0",
"net.ipv4.tcp_syn_retries": "6",
"net.ipv4.tcp_synack_retries": "5",
"net.ipv4.tcp_syncookies": "1",
"net.ipv4.tcp_thin_dupack": "0",
"net.ipv4.tcp_thin_linear_timeouts": "0",
"net.ipv4.tcp_timestamps": "1",
"net.ipv4.tcp_tso_win_divisor": "3",
"net.ipv4.tcp_tw_recycle": "0",
"net.ipv4.tcp_tw_reuse": "0",
"net.ipv4.tcp_window_scaling": "1",
"net.ipv4.tcp_wmem": "4096\t16384\t3868000",
"net.ipv4.tcp_workaround_signed_windows": "0",
"net.ipv4.udp_mem": "11331\t15109\t22662",
"net.ipv4.udp_rmem_min": "4096",
"net.ipv4.udp_wmem_min": "4096",
"net.ipv4.xfrm4_gc_thresh": "32768",
"net.ipv6.anycast_src_echo_reply": "0",
"net.ipv6.bindv6only": "0",
"net.ipv6.conf.all.accept_dad": "0",
"net.ipv6.conf.all.accept_ra": "1",
"net.ipv6.conf.all.accept_ra_defrtr": "1",
"net.ipv6.conf.all.accept_ra_pinfo": "1",
"net.ipv6.conf.all.accept_ra_rt_info_max_plen": "0",
"net.ipv6.conf.all.accept_ra_rtr_pref": "1",
"net.ipv6.conf.all.accept_redirects": "1",
"net.ipv6.conf.all.accept_source_route": "0",
"net.ipv6.conf.all.autoconf": "1",
"net.ipv6.conf.all.dad_transmits": "1",
"net.ipv6.conf.all.disable_ipv6": "0",
"net.ipv6.conf.all.enhanced_dad": "1",
"net.ipv6.conf.all.force_mld_version": "0",
"net.ipv6.conf.all.force_tllao": "0",
"net.ipv6.conf.all.forwarding": "0",
"net.ipv6.conf.all.hop_limit": "64",
"net.ipv6.conf.all.keep_addr_on_down": "0",
"net.ipv6.conf.all.max_addresses": "16",
"net.ipv6.conf.all.max_desync_factor": "600",
"net.ipv6.conf.all.mc_forwarding": "0",
"net.ipv6.conf.all.mldv1_unsolicited_report_interval": "10000",
"net.ipv6.conf.all.mldv2_unsolicited_report_interval": "1000",
"net.ipv6.conf.all.mtu": "1280",
"net.ipv6.conf.all.ndisc_notify": "0",
"net.ipv6.conf.all.optimistic_dad": "0",
"net.ipv6.conf.all.proxy_ndp": "0",
"net.ipv6.conf.all.regen_max_retry": "3",
"net.ipv6.conf.all.router_probe_interval": "60",
"net.ipv6.conf.all.router_solicitation_delay": "1",
"net.ipv6.conf.all.router_solicitation_interval": "4",
"net.ipv6.conf.all.router_solicitations": "3",
"net.ipv6.conf.all.temp_prefered_lft": "86400",
"net.ipv6.conf.all.temp_valid_lft": "604800",
"net.ipv6.conf.all.use_optimistic": "0",
"net.ipv6.conf.all.use_tempaddr": "0",
"net.ipv6.conf.default.accept_dad": "1",
"net.ipv6.conf.default.accept_ra": "1",
"net.ipv6.conf.default.accept_ra_defrtr": "1",
"net.ipv6.conf.default.accept_ra_pinfo": "1",
"net.ipv6.conf.default.accept_ra_rt_info_max_plen": "0",
"net.ipv6.conf.default.accept_ra_rtr_pref": "1",
"net.ipv6.conf.default.accept_redirects": "1",
"net.ipv6.conf.default.accept_source_route": "0",
"net.ipv6.conf.default.autoconf": "1",
"net.ipv6.conf.default.dad_transmits": "1",
"net.ipv6.conf.default.disable_ipv6": "0",
"net.ipv6.conf.default.enhanced_dad": "1",
"net.ipv6.conf.default.force_mld_version": "0",
"net.ipv6.conf.default.force_tllao": "0",
"net.ipv6.conf.default.forwarding": "0",
"net.ipv6.conf.default.hop_limit": "64",
"net.ipv6.conf.default.keep_addr_on_down": "0",
"net.ipv6.conf.default.max_addresses": "16",
"net.ipv6.conf.default.max_desync_factor": "600",
"net.ipv6.conf.default.mc_forwarding": "0",
"net.ipv6.conf.default.mldv1_unsolicited_report_interval": "10000",
"net.ipv6.conf.default.mldv2_unsolicited_report_interval": "1000",
"net.ipv6.conf.default.mtu": "1280",
"net.ipv6.conf.default.ndisc_notify": "0",
"net.ipv6.conf.default.optimistic_dad": "0",
"net.ipv6.conf.default.proxy_ndp": "0",
"net.ipv6.conf.default.regen_max_retry": "3",
"net.ipv6.conf.default.router_probe_interval": "60",
"net.ipv6.conf.default.router_solicitation_delay": "1",
"net.ipv6.conf.default.router_solicitation_interval": "4",
"net.ipv6.conf.default.router_solicitations": "3",
"net.ipv6.conf.default.temp_prefered_lft": "86400",
"net.ipv6.conf.default.temp_valid_lft": "604800",
"net.ipv6.conf.default.use_optimistic": "0",
"net.ipv6.conf.default.use_tempaddr": "0",
"net.ipv6.conf.eth0.accept_dad": "1",
"net.ipv6.conf.eth0.accept_ra": "1",
"net.ipv6.conf.eth0.accept_ra_defrtr": "1",
"net.ipv6.conf.eth0.accept_ra_pinfo": "1",
"net.ipv6.conf.eth0.accept_ra_rt_info_max_plen": "0",
"net.ipv6.conf.eth0.accept_ra_rtr_pref": "1",
"net.ipv6.conf.eth0.accept_redirects": "1",
"net.ipv6.conf.eth0.accept_source_route": "0",
"net.ipv6.conf.eth0.autoconf": "1",
"net.ipv6.conf.eth0.dad_transmits": "1",
"net.ipv6.conf.eth0.disable_ipv6": "0",
"net.ipv6.conf.eth0.enhanced_dad": "1",
"net.ipv6.conf.eth0.force_mld_version": "0",
"net.ipv6.conf.eth0.force_tllao": "0",
"net.ipv6.conf.eth0.forwarding": "0",
"net.ipv6.conf.eth0.hop_limit": "64",
"net.ipv6.conf.eth0.keep_addr_on_down": "0",
"net.ipv6.conf.eth0.max_addresses": "16",
"net.ipv6.conf.eth0.max_desync_factor": "600",
"net.ipv6.conf.eth0.mc_forwarding": "0",
"net.ipv6.conf.eth0.mldv1_unsolicited_report_interval": "10000",
"net.ipv6.conf.eth0.mldv2_unsolicited_report_interval": "1000",
"net.ipv6.conf.eth0.mtu": "1500",
"net.ipv6.conf.eth0.ndisc_notify": "0",
"net.ipv6.conf.eth0.optimistic_dad": "0",
"net.ipv6.conf.eth0.proxy_ndp": "0",
"net.ipv6.conf.eth0.regen_max_retry": "3",
"net.ipv6.conf.eth0.router_probe_interval": "60",
"net.ipv6.conf.eth0.router_solicitation_delay": "1",
"net.ipv6.conf.eth0.router_solicitation_interval": "4",
"net.ipv6.conf.eth0.router_solicitations": "3",
"net.ipv6.conf.eth0.temp_prefered_lft": "86400",
"net.ipv6.conf.eth0.temp_valid_lft": "604800",
"net.ipv6.conf.eth0.use_optimistic": "0",
"net.ipv6.conf.eth0.use_tempaddr": "0",
"net.ipv6.conf.eth1.accept_dad": "1",
"net.ipv6.conf.eth1.accept_ra": "0",
"net.ipv6.conf.eth1.accept_ra_defrtr": "0",
"net.ipv6.conf.eth1.accept_ra_pinfo": "0",
"net.ipv6.conf.eth1.accept_ra_rt_info_max_plen": "0",
"net.ipv6.conf.eth1.accept_ra_rtr_pref": "0",
"net.ipv6.conf.eth1.accept_redirects": "1",
"net.ipv6.conf.eth1.accept_source_route": "0",
"net.ipv6.conf.eth1.autoconf": "1",
"net.ipv6.conf.eth1.dad_transmits": "1",
"net.ipv6.conf.eth1.disable_ipv6": "0",
"net.ipv6.conf.eth1.enhanced_dad": "1",
"net.ipv6.conf.eth1.force_mld_version": "0",
"net.ipv6.conf.eth1.force_tllao": "0",
"net.ipv6.conf.eth1.forwarding": "0",
"net.ipv6.conf.eth1.hop_limit": "64",
"net.ipv6.conf.eth1.keep_addr_on_down": "0",
"net.ipv6.conf.eth1.max_addresses": "16",
"net.ipv6.conf.eth1.max_desync_factor": "600",
"net.ipv6.conf.eth1.mc_forwarding": "0",
"net.ipv6.conf.eth1.mldv1_unsolicited_report_interval": "10000",
"net.ipv6.conf.eth1.mldv2_unsolicited_report_interval": "1000",
"net.ipv6.conf.eth1.mtu": "1500",
"net.ipv6.conf.eth1.ndisc_notify": "0",
"net.ipv6.conf.eth1.optimistic_dad": "0",
"net.ipv6.conf.eth1.proxy_ndp": "0",
"net.ipv6.conf.eth1.regen_max_retry": "3",
"net.ipv6.conf.eth1.router_probe_interval": "60",
"net.ipv6.conf.eth1.router_solicitation_delay": "1",
"net.ipv6.conf.eth1.router_solicitation_interval": "4",
"net.ipv6.conf.eth1.router_solicitations": "3",
"net.ipv6.conf.eth1.temp_prefered_lft": "86400",
"net.ipv6.conf.eth1.temp_valid_lft": "604800",
"net.ipv6.conf.eth1.use_optimistic": "0",
"net.ipv6.conf.eth1.use_tempaddr": "0",
"net.ipv6.conf.lo.accept_dad": "-1",
"net.ipv6.conf.lo.accept_ra": "1",
"net.ipv6.conf.lo.accept_ra_defrtr": "1",
"net.ipv6.conf.lo.accept_ra_pinfo": "1",
"net.ipv6.conf.lo.accept_ra_rt_info_max_plen": "0",
"net.ipv6.conf.lo.accept_ra_rtr_pref": "1",
"net.ipv6.conf.lo.accept_redirects": "1",
"net.ipv6.conf.lo.accept_source_route": "0",
"net.ipv6.conf.lo.autoconf": "1",
"net.ipv6.conf.lo.dad_transmits": "1",
"net.ipv6.conf.lo.disable_ipv6": "0",
"net.ipv6.conf.lo.enhanced_dad": "1",
"net.ipv6.conf.lo.force_mld_version": "0",
"net.ipv6.conf.lo.force_tllao": "0",
"net.ipv6.conf.lo.forwarding": "0",
"net.ipv6.conf.lo.hop_limit": "64",
"net.ipv6.conf.lo.keep_addr_on_down": "0",
"net.ipv6.conf.lo.max_addresses": "16",
"net.ipv6.conf.lo.max_desync_factor": "600",
"net.ipv6.conf.lo.mc_forwarding": "0",
"net.ipv6.conf.lo.mldv1_unsolicited_report_interval": "10000",
"net.ipv6.conf.lo.mldv2_unsolicited_report_interval": "1000",
"net.ipv6.conf.lo.mtu": "65536",
"net.ipv6.conf.lo.ndisc_notify": "0",
"net.ipv6.conf.lo.optimistic_dad": "0",
"net.ipv6.conf.lo.proxy_ndp": "0",
"net.ipv6.conf.lo.regen_max_retry": "3",
"net.ipv6.conf.lo.router_probe_interval": "60",
"net.ipv6.conf.lo.router_solicitation_delay": "1",
"net.ipv6.conf.lo.router_solicitation_interval": "4",
"net.ipv6.conf.lo.router_solicitations": "3",
"net.ipv6.conf.lo.temp_prefered_lft": "86400",
"net.ipv6.conf.lo.temp_valid_lft": "604800",
"net.ipv6.conf.lo.use_optimistic": "0",
"net.ipv6.conf.lo.use_tempaddr": "-1",
"net.ipv6.fwmark_reflect": "0",
"net.ipv6.icmp.ratelimit": "1000",
"net.ipv6.idgen_delay": "1",
"net.ipv6.idgen_retries": "3",
"net.ipv6.ip6frag_high_thresh": "4194304",
"net.ipv6.ip6frag_low_thresh": "3145728",
"net.ipv6.ip6frag_secret_interval": "600",
"net.ipv6.ip6frag_time": "60",
"net.ipv6.ip_nonlocal_bind": "0",
"net.ipv6.mld_max_msf": "64",
"net.ipv6.mld_qrv": "2",
"net.ipv6.neigh.default.anycast_delay": "100",
"net.ipv6.neigh.default.app_solicit": "0",
"net.ipv6.neigh.default.base_reachable_time": "30",
"net.ipv6.neigh.default.base_reachable_time_ms": "30000",
"net.ipv6.neigh.default.delay_first_probe_time": "5",
"net.ipv6.neigh.default.gc_interval": "30",
"net.ipv6.neigh.default.gc_stale_time": "60",
"net.ipv6.neigh.default.gc_thresh1": "128",
"net.ipv6.neigh.default.gc_thresh2": "512",
"net.ipv6.neigh.default.gc_thresh3": "1024",
"net.ipv6.neigh.default.locktime": "0",
"net.ipv6.neigh.default.mcast_solicit": "3",
"net.ipv6.neigh.default.proxy_delay": "80",
"net.ipv6.neigh.default.proxy_qlen": "64",
"net.ipv6.neigh.default.retrans_time": "1000",
"net.ipv6.neigh.default.retrans_time_ms": "1000",
"net.ipv6.neigh.default.ucast_solicit": "3",
"net.ipv6.neigh.default.unres_qlen": "31",
"net.ipv6.neigh.default.unres_qlen_bytes": "65536",
"net.ipv6.neigh.eth0.anycast_delay": "100",
"net.ipv6.neigh.eth0.app_solicit": "0",
"net.ipv6.neigh.eth0.base_reachable_time": "30",
"net.ipv6.neigh.eth0.base_reachable_time_ms": "30000",
"net.ipv6.neigh.eth0.delay_first_probe_time": "5",
"net.ipv6.neigh.eth0.gc_stale_time": "60",
"net.ipv6.neigh.eth0.locktime": "0",
"net.ipv6.neigh.eth0.mcast_solicit": "3",
"net.ipv6.neigh.eth0.proxy_delay": "80",
"net.ipv6.neigh.eth0.proxy_qlen": "64",
"net.ipv6.neigh.eth0.retrans_time": "1000",
"net.ipv6.neigh.eth0.retrans_time_ms": "1000",
"net.ipv6.neigh.eth0.ucast_solicit": "3",
"net.ipv6.neigh.eth0.unres_qlen": "31",
"net.ipv6.neigh.eth0.unres_qlen_bytes": "65536",
"net.ipv6.neigh.eth1.anycast_delay": "100",
"net.ipv6.neigh.eth1.app_solicit": "0",
"net.ipv6.neigh.eth1.base_reachable_time": "30",
"net.ipv6.neigh.eth1.base_reachable_time_ms": "30000",
"net.ipv6.neigh.eth1.delay_first_probe_time": "5",
"net.ipv6.neigh.eth1.gc_stale_time": "60",
"net.ipv6.neigh.eth1.locktime": "0",
"net.ipv6.neigh.eth1.mcast_solicit": "3",
"net.ipv6.neigh.eth1.proxy_delay": "80",
"net.ipv6.neigh.eth1.proxy_qlen": "64",
"net.ipv6.neigh.eth1.retrans_time": "1000",
"net.ipv6.neigh.eth1.retrans_time_ms": "1000",
"net.ipv6.neigh.eth1.ucast_solicit": "3",
"net.ipv6.neigh.eth1.unres_qlen": "31",
"net.ipv6.neigh.eth1.unres_qlen_bytes": "65536",
"net.ipv6.neigh.lo.anycast_delay": "100",
"net.ipv6.neigh.lo.app_solicit": "0",
"net.ipv6.neigh.lo.base_reachable_time": "30",
"net.ipv6.neigh.lo.base_reachable_time_ms": "30000",
"net.ipv6.neigh.lo.delay_first_probe_time": "5",
"net.ipv6.neigh.lo.gc_stale_time": "60",
"net.ipv6.neigh.lo.locktime": "0",
"net.ipv6.neigh.lo.mcast_solicit": "3",
"net.ipv6.neigh.lo.proxy_delay": "80",
"net.ipv6.neigh.lo.proxy_qlen": "64",
"net.ipv6.neigh.lo.retrans_time": "1000",
"net.ipv6.neigh.lo.retrans_time_ms": "1000",
"net.ipv6.neigh.lo.ucast_solicit": "3",
"net.ipv6.neigh.lo.unres_qlen": "31",
"net.ipv6.neigh.lo.unres_qlen_bytes": "65536",
"net.ipv6.route.gc_elasticity": "9",
"net.ipv6.route.gc_interval": "30",
"net.ipv6.route.gc_min_interval": "0",
"net.ipv6.route.gc_min_interval_ms": "500",
"net.ipv6.route.gc_thresh": "1024",
"net.ipv6.route.gc_timeout": "60",
"net.ipv6.route.max_size": "16384",
"net.ipv6.route.min_adv_mss": "1220",
"net.ipv6.route.mtu_expires": "600",
"net.ipv6.xfrm6_gc_thresh": "32768",
"net.netfilter.nf_log.0": "NONE",
"net.netfilter.nf_log.1": "NONE",
"net.netfilter.nf_log.10": "NONE",
"net.netfilter.nf_log.11": "NONE",
"net.netfilter.nf_log.12": "NONE",
"net.netfilter.nf_log.2": "NONE",
"net.netfilter.nf_log.3": "NONE",
"net.netfilter.nf_log.4": "NONE",
"net.netfilter.nf_log.5": "NONE",
"net.netfilter.nf_log.6": "NONE",
"net.netfilter.nf_log.7": "NONE",
"net.netfilter.nf_log.8": "NONE",
"net.netfilter.nf_log.9": "NONE",
"net.netfilter.nf_log_all_netns": "0",
"net.unix.max_dgram_qlen": "512",
"sunrpc.max_resvport": "1023",
"sunrpc.min_resvport": "665",
"sunrpc.nfs_debug": "0x0000",
"sunrpc.nfsd_debug": "0x0000",
"sunrpc.nlm_debug": "0x0000",
"sunrpc.rpc_debug": "0x0000",
"sunrpc.tcp_fin_timeout": "15",
"sunrpc.tcp_max_slot_table_entries": "65536",
"sunrpc.tcp_slot_table_entries": "2",
"sunrpc.transports": "tcp 1048576\nudp 32768",
"sunrpc.udp_slot_table_entries": "16",
"user.max_ipc_namespaces": "1888",
"user.max_mnt_namespaces": "1888",
"user.max_net_namespaces": "1888",
"user.max_pid_namespaces": "1888",
"user.max_user_namespaces": "0",
"user.max_uts_namespaces": "1888",
"vm.admin_reserve_kbytes": "8192",
"vm.block_dump": "0",
"vm.dirty_background_bytes": "0",
"vm.dirty_background_ratio": "10",
"vm.dirty_bytes": "0",
"vm.dirty_expire_centisecs": "3000",
"vm.dirty_ratio": "30",
"vm.dirty_writeback_centisecs": "500",
"vm.drop_caches": "0",
"vm.extfrag_threshold": "500",
"vm.hugepages_treat_as_movable": "0",
"vm.hugetlb_shm_group": "0",
"vm.laptop_mode": "0",
"vm.legacy_va_layout": "0",
"vm.lowmem_reserve_ratio": "256\t256\t32",
"vm.max_map_count": "65530",
"vm.memory_failure_early_kill": "0",
"vm.memory_failure_recovery": "1",
"vm.min_free_kbytes": "2816",
"vm.min_slab_ratio": "5",
"vm.min_unmapped_ratio": "1",
"vm.mmap_min_addr": "4096",
"vm.mmap_rnd_bits": "28",
"vm.mmap_rnd_compat_bits": "8",
"vm.nr_hugepages": "0",
"vm.nr_hugepages_mempolicy": "0",
"vm.nr_overcommit_hugepages": "0",
"vm.nr_pdflush_threads": "0",
"vm.numa_zonelist_order": "default",
"vm.oom_dump_tasks": "1",
"vm.oom_kill_allocating_task": "0",
"vm.overcommit_kbytes": "0",
"vm.overcommit_memory": "0",
"vm.overcommit_ratio": "50",
"vm.page-cluster": "3",
"vm.panic_on_oom": "0",
"vm.percpu_pagelist_fraction": "0",
"vm.stat_interval": "1",
"vm.swappiness": "30",
"vm.user_reserve_kbytes": "14160",
"vm.vfs_cache_pressure": "100",
"vm.zone_reclaim_mode": "0"
}
Notes:
History: Was introduced in version 3.11.0 (2017)
See also: sysctlvalue()
datastate
Prototype: datastate()
Return type: data
Description: Returns the current evaluation data state.
The returned data container will have the keys classes and vars.
Under classes you'll find a map with the class name as the key and
true as the value. Namespaced classes will be prefixed as usual.
Under vars you'll find a map with the bundle name as the key
(namespaced if necessary). Under the bundle name you'll find another
map with the variable name as the key. The value is converted to a
data container (JSON format) if necessary. The example should make it
clearer.
Mustache templates (see template_method), if not given a
template_data, will use the output of datastate() as their input.
Example:
code
body common control
{
bundlesequence => { holder, test };
}
bundle common holder
{
classes:
"holderclass" expression => "any"; # will be global
vars:
"s" string => "Hello!";
"d" data => parsejson('[4,5,6]');
"list" slist => { "element1", "element2" };
}
bundle agent test
{
vars:
"state" data => datastate();
# all the variables in bundle "holder" defined as of the execution of datastate() will be here
"holderstate" string => format("%S", "state[vars][holder]");
# all the classes defined as of the execution of datastate() will be here
"allclasses" slist => getindices("state[classes]");
classes:
"have_holderclass" expression => some("holderclass", allclasses);
reports:
"holder vars = $(holderstate)";
have_holderclass::
"I have the holder class";
}
Output:
code
R: holder vars = {"d":[4,5,6],"list":["element1","element2"],"s":"Hello!"}
R: I have the holder class
See also: getindices(), classesmatching(), variablesmatching(), mergedata(), template_method, mustache, inline_mustache, bundlestate()
Notes:
- Beware, when assigning
datastate() to a variable, multiple passes will result in recursive growth of the data structure. Consider guarding against re-definition of a variable populated by datastate().
Example illustrating how to prevent recursive growth of variable populated by datastate().
code
bundle agent main
{
vars:
"_state"
data => datastate(),
unless => isvariable( $(this.promiser) );
}
History:
- Introduced in CFEngine 3.6.0
difference
Prototype: difference(list1, list2)
Return type: slist
Description: Returns the unique elements in list1 that are not in
list2.
This function can accept many types of data parameters.
Arguments:
list1: string - CFEngine base variable identifier or inline JSON - in the range: .*list2: string - CFEngine filter variable identifier or inline JSON - in the range: .*
Example:
code
body common control
{
bundlesequence => { "test" };
}
bundle agent test
{
vars:
"a" slist => { 1,2,3,"x" };
"b" slist => { "x" };
# normal usage
"diff_between_a_and_b" slist => difference(a, b);
"diff_between_a_and_b_str" string => join(",", diff_between_a_and_b);
# NOTE: advanced usage!
"mylist1" slist => { "a", "b" };
"mylist2" slist => { "a", "b" };
"$(mylist1)_str" string => join(",", $(mylist1));
# Here we're going to really call difference(a,a) then difference(a,b) then difference(b,a) then difference(b,b)
# We create a new variable for each difference!!!
"diff_$(mylist1)_$(mylist2)" slist => difference($(mylist1), $(mylist2));
"diff_$(mylist1)_$(mylist2)_str" string => join(",", "diff_$(mylist1)_$(mylist2)");
reports:
# normal usage
"The difference between lists a and b is '$(diff_between_a_and_b_str)'";
# NOTE: advanced usage results!
"The difference of list '$($(mylist1)_str)' with '$($(mylist2)_str)' is '$(diff_$(mylist1)_$(mylist2)_str)'";
}
Output:
code
R: The difference between lists a and b is '1,2,3'
R: The difference of list '1,2,3,x' with '1,2,3,x' is ''
R: The difference of list '1,2,3,x' with 'x' is '1,2,3'
R: The difference of list 'x' with '1,2,3,x' is ''
R: The difference of list 'x' with 'x' is ''
History: The collecting function behavior was added in 3.9.
See also: About collecting functions, intersection().
dirname
Prototype: dirname(path)
Return type: string
Description: Return the parent directory name for given path.
This function returns the directory name for path. If path is a
directory, then the name of its parent directory is returned.
Arguments:
path: string - File path - in the range: .*
Example:
code
body common control
{
bundlesequence => { "example" };
}
bundle agent example
{
vars:
"apache_dir" string => dirname("/etc/apache2/httpd.conf");
reports:
"apache conf dir = $(apache_dir)";
}
Output:
code
R: apache conf dir = /etc/apache2
Notes:
History: Was introduced in 3.3.0, Nova 2.2.0 (2011)
See also: lastnode(), filestat(),
splitstring().
diskfree
Prototype: diskfree(path)
Return type: int
Descriptions: Return the free space (in KB) available on the current
partition of path.
If path is not found, this function returns 0.
Arguments:
path: string - File system directory - in the range: "?(/.*)
Example:
code
body common control
{
bundlesequence => { "example" };
}
bundle agent example
{
classes:
"has_space" expression => isgreaterthan($(free), 0);
vars:
"free" int => diskfree("/tmp");
reports:
has_space::
"The filesystem has free space";
!has_space::
"The filesystem has NO free space";
}
Output:
code
R: The filesystem has free space
escape
Prototype: escape(text)
Return type: string
Description: Escape regular expression characters in text.
This function is useful for making inputs readable when a regular
expression is required, but the literal string contains special
characters. The function simply 'escapes' all the regular expression
characters, so that you do not have to.
Arguments:
path: string - IP address or string to escape - in the range: .*
Example:
code
body common control
{
bundlesequence => { "example" };
}
bundle agent example
{
vars:
"ip" string => "10.123.321.250";
"escaped" string => escape($(ip));
reports:
"escaped $(ip) = $(escaped)";
}
Output:
code
R: escaped 10.123.321.250 = 10\.123\.321\.250
In this example, the string "192.168.2.1" is "escaped" to be equivalent to
"192\.168\.2\.1", because without the backslashes, the regular expression
"192.168.2.1" will also match the IP ranges "192.168.201", "192.168.231", etc
(since the dot character means "match any character" when used in a regular
expression).
Notes:
History: This function was introduced in CFEngine version 3.0.4 (2010)
eval
Prototype: eval(expression, mode, options)
Return type: string
Description: Returns expression evaluated according to mode
and options. Currently only the math and class modes with
infix option are supported for evaluating traditional math
expressions.
All the math is done with the C double type internally. The results are returned as a string. When the mode is math the returned value is a floating-point value formatted to 6 decimal places as a string.
mode and options are optional and default to math and infix,
respectively.
Example:
code
vars:
# returns 20.000000
"result" string => eval("200/10", "math", "infix");
When the mode is class, the returned string is either false for 0 (!any) or true for anything else (any) so it can be used in a class expression under classes. The == operator (see below) is very convenient for this purpose. The actual accepted values for false allow a tiny margin around 0, just like ==.
Example:
code
classes:
# the class will be set
"they_are_equal" expression => eval("20 == (200/10)", "class", "infix");
The supported infix mathematical syntax, in order of precedence, is:
( and ) parentheses for grouping expressions^ operator for exponentiation* and / operators for multiplication and division% operators for modulo operation+ and - operators for addition and subtraction== "close enough" operator to tell if two expressions evaluate to the same number, with a tiny margin to tolerate floating point errors. It returns 1 or 0.>= "greater or close enough" operator with a tiny margin to tolerate floating point errors. It returns 1 or 0.> "greater than" operator. It returns 1 or 0.<= "less than or close enough" operator with a tiny margin to tolerate floating point errors. It returns 1 or 0.< "less than" operator. It returns 1 or 0.
The numbers can be in any format acceptable to the C scanf function with the %lf format specifier, followed by the k, m, g, t, or p SI units. So e.g. -100 and 2.34m are valid numbers.
In addition, the following constants are recognized:
e: 2.7182818284590452354log2e: 1.4426950408889634074log10e: 0.43429448190325182765ln2: 0.69314718055994530942ln10: 2.30258509299404568402pi: 3.14159265358979323846pi_2: 1.57079632679489661923 (pi over 2)pi_4: 0.78539816339744830962 (pi over 4)1_pi: 0.31830988618379067154 (1 over pi)2_pi: 0.63661977236758134308 (2 over pi)2_sqrtpi: 1.12837916709551257390 (2 over square root of pi)sqrt2: 1.41421356237309504880 (square root of 2)sqrt1_2: 0.70710678118654752440 (square root of 1/2)
The following functions can be used, with parentheses:
ceil and floor: the next highest or the previous highest integerlog10, log2, logsqrtsin, cos, tan, asin, acos, atanabs: absolute valuestep: 0 if the argument is negative, 1 otherwise
Arguments:
expression: string - Input string - in the range: .*mode: - Evaluation type - one of
options: - Evaluation options - one of
Example:
code
body common control
{
bundlesequence => { run };
}
body agent control
{
inform => "true";
}
bundle agent run
{
vars:
"values[0]" string => "x"; # bad
"values[1]" string => "+ 200"; # bad
"values[2]" string => "200 + 100";
"values[3]" string => "200 - 100";
"values[4]" string => "- - -"; # bad
"values[5]" string => "2 + 3 - 1";
"values[6]" string => ""; # 0
"values[7]" string => "3 / 0"; # inf but not an error
"values[8]" string => "3^3";
# "values[9]" string => "-1^2.1"; # 'nan' or '-nan' (on some platforms)
"values[10]" string => "sin(20)";
"values[11]" string => "cos(20)";
"values[19]" string => "20 % 3"; # remainder
"values[20]" string => "sqrt(0.2)";
"values[21]" string => "ceil(3.5)";
"values[22]" string => "floor(3.4)";
"values[23]" string => "abs(-3.4)";
"values[24]" string => "-3.4 == -3.4";
"values[25]" string => "-3.400000 == -3.400001";
"values[26]" string => "e";
"values[27]" string => "pi";
"values[28]" string => "100m"; # 100 million
"values[29]" string => "100k"; # 100 thousand
"indices" slist => sort( getindices("values"), int);
"eval[$(indices)]" string => eval("$(values[$(indices)])", "math", "infix");
reports:
"math/infix eval('$(values[$(indices)])') = '$(eval[$(indices)])'";
}
code
info: eval error: expression could not be parsed (input 'x')
info: eval error: expression could not be parsed (input '+ 200')
info: eval error: expression could not be parsed (input '- - -')
R: math/infix eval('x') = ''
R: math/infix eval('+ 200') = ''
R: math/infix eval('200 + 100') = '300.000000'
R: math/infix eval('200 - 100') = '100.000000'
R: math/infix eval('- - -') = ''
R: math/infix eval('2 + 3 - 1') = '4.000000'
R: math/infix eval('') = '0.000000'
R: math/infix eval('3 / 0') = 'inf'
R: math/infix eval('3^3') = '27.000000'
R: math/infix eval('sin(20)') = '0.912945'
R: math/infix eval('cos(20)') = '0.408082'
R: math/infix eval('20 % 3') = '2.000000'
R: math/infix eval('sqrt(0.2)') = '0.447214'
R: math/infix eval('ceil(3.5)') = '4.000000'
R: math/infix eval('floor(3.4)') = '3.000000'
R: math/infix eval('abs(-3.4)') = '3.400000'
R: math/infix eval('-3.4 == -3.4') = '1.000000'
R: math/infix eval('-3.400000 == -3.400001') = '0.000000'
R: math/infix eval('e') = '2.718282'
R: math/infix eval('pi') = '3.141593'
R: math/infix eval('100m') = '100000000.000000'
R: math/infix eval('100k') = '100000.000000'
info: eval error: expression could not be parsed (input 'x')
info: eval error: expression could not be parsed (input '+ 200')
info: eval error: expression could not be parsed (input '- - -')
info: eval error: expression could not be parsed (input 'x')
info: eval error: expression could not be parsed (input '+ 200')
info: eval error: expression could not be parsed (input '- - -')
This policy can be found in
/var/cfengine/share/doc/examples/eval.cf
and downloaded directly from
github.
History:
- Function added in 3.6.0.
mode and options optional and default to math and infix, respectively in 3.9.0.- comparison
<, <=, >, >= operators added in 3.10.0
every
Prototype: every(regex, list)
Return type: boolean
Description: Returns whether every element in the variable list matches
the unanchored regex.
This function can accept many types of data parameters.
Arguments:
regex : Regular expression to find, in the range .*
list : The name of the list variable to check, in the range
[a-zA-Z0-9_$(){}\[\].:]+. It can be a data container or a regular
list.
Example:
code
body common control
{
bundlesequence => { "test" };
}
bundle agent test
{
classes:
"every_dot_star" expression => every(".*", test);
"every_dot" expression => every(".", test);
"every_number" expression => every("[0-9]", test);
"every2_dot_star" expression => every(".*", test2);
"every2_dot" expression => every(".", test2);
"every2_number" expression => every("[0-9]", test2);
vars:
"test" slist => {
1,2,3,
"one", "two", "three",
"long string",
"four", "fix", "six",
"one", "two", "three",
};
"test2" data => parsejson('[1,2,3,
"one", "two", "three",
"long string",
"four", "fix", "six",
"one", "two", "three",]');
reports:
"The test list is $(test)";
every_dot_star::
"every() test passed: every element matches '.*'";
!every_dot_star::
"every() test failed: not every element matches '.*'";
every_number::
"every() test failed: every element matches '[0-9]'";
!every_number::
"every() test passed: not every element matches '[0-9]'";
every_dot::
"every() test failed: every element matches '.'";
!every_dot::
"every() test passed: not every element matches '.'";
"The test2 list is $(test2)";
every2_dot_star::
"every() test2 passed: every element matches '.*'";
!every2_dot_star::
"every() test2 failed: not every element matches '.*'";
every2_number::
"every() test2 failed: every element matches '[0-9]'";
!every2_number::
"every() test2 passed: not every element matches '[0-9]'";
every2_dot::
"every() test2 failed: every element matches '.'";
!every2_dot::
"every() test2 passed: not every element matches '.'";
}
Output:
code
R: The test list is 1
R: The test list is 2
R: The test list is 3
R: The test list is one
R: The test list is two
R: The test list is three
R: The test list is long string
R: The test list is four
R: The test list is fix
R: The test list is six
R: every() test passed: every element matches '.*'
R: every() test passed: not every element matches '[0-9]'
R: every() test passed: not every element matches '.'
R: The test2 list is 1
R: The test2 list is 2
R: The test2 list is 3
R: The test2 list is one
R: The test2 list is two
R: The test2 list is three
R: The test2 list is long string
R: The test2 list is four
R: The test2 list is fix
R: The test2 list is six
R: every() test2 passed: every element matches '.*'
R: every() test2 passed: not every element matches '[0-9]'
R: every() test2 passed: not every element matches '.'
History: The collecting function behavior was added in 3.9.
See also: About collecting functions, filter(), some(), and none().
execresult
Prototype: execresult(command, shell, output)
Return type: string
The return value is cached.
Description: Execute command and return output (both stdout and stderr) as string.
If the command is not found, the result will be the empty string.
The shell argument decides whether a shell will be used to encapsulate the
command. This is necessary in order to combine commands with pipes etc, but
remember that each command requires a new process that reads in files beyond
CFEngine's control. Thus using a shell is both a performance hog and a
potential security issue.
The optional output argument allows you to select which output will be
included, betweeen stdout, stderr, or both. The default is both.
Arguments:
command: string - Fully qualified command path - in the range: .+shell: - Shell encapsulation option - one of
noshelluseshellpowershell
output: - Which output to return; stdout or stderr - one of
Example:
Prepare:
code
rm -rf /tmp/testhere
mkdir -p /tmp/testhere
touch /tmp/testhere/a
touch /tmp/testhere/b
touch /tmp/testhere/c
touch /tmp/testhere/d
touch /tmp/testhere/e
echo "#!/usr/bin/env sh" >/tmp/testhere/echo-stdout-and-stderr
echo "echo stderr >&2" >>/tmp/testhere/echo-stdout-and-stderr
echo "echo stdout" >>/tmp/testhere/echo-stdout-and-stderr
chmod +x /tmp/testhere/echo-stdout-and-stderr
Policy:
code
body common control
{
bundlesequence => { "example" };
}
bundle agent example
{
vars:
"my_result"
string => execresult("/bin/ls /tmp/testhere", noshell);
"my_result_with_stdout_and_stderr"
string => execresult("/tmp/testhere/echo-stdout-and-stderr", noshell);
"my_result_with_stdout"
string => execresult("/tmp/testhere/echo-stdout-and-stderr 2>/dev/null", useshell);
"my_result_with_stderr"
string => execresult("/tmp/testhere/echo-stdout-and-stderr 1>/dev/null", useshell);
reports:
"/bin/ls /tmp/testhere returned '$(my_result)'";
"my_result_with_stdout_and_stderr == '$(my_result_with_stdout_and_stderr)'";
"my_result_with_stdout == '$(my_result_with_stdout)'";
"my_result_with_stderr == '$(my_result_with_stderr)'";
}
Output:
code
R: /bin/ls /tmp/testhere returned 'a
b
c
d
e
echo-stdout-and-stderr'
R: my_result_with_stdout_and_stderr == 'stderr
stdout'
R: my_result_with_stdout == 'stdout'
R: my_result_with_stderr == 'stderr'
Notes: you should never use this function to execute commands that
make changes to the system, or perform lengthy computations. Such an
operation is beyond CFEngine's ability to guarantee convergence, and
on multiple passes and during syntax verification these function calls
are executed, resulting in system changes that are covert. Calls
to execresult should be for discovery and information extraction
only. Effectively calls to this function will be also repeatedly
executed by cf-promises when it does syntax checking, which is
highly undesirable if the command is expensive. Consider using
commands promises instead, which have locking and are not evaluated
by cf-promises.
See also: returnszero(), execresult_as_data().
History:
- 3.0.5 Newlines no longer replaced with spaces in stored output.
- 3.17.0 Introduced optional parameter
output added allowing selection of stderr, stdout or both.
execresult_as_data
Prototype: execresult_as_data(command, shell, output)
Return type: data
The return value is cached.
Description: Execute command and return a data container including command output and exit code.
Functions in the same way as execresult(), and takes the same parameters.
Unlike execresult(), and returnszero(), this function allows
you to test, store, or inspect both exit code and output from the same command execution.
Arguments:
command: string - Fully qualified command path - in the range: .+shell: - Shell encapsulation option - one of
noshelluseshellpowershell
output: - Which output to return; stdout or stderr - one of
Example:
Policy:
code
body common control
{
bundlesequence => { "example" };
}
bundle agent example
{
vars:
"my_data"
data => execresult_as_data("echo 'hello'", "useshell", "both");
"my_json_string"
string => storejson(my_data);
reports:
"echo 'hello' returned '$(my_json_string)'";
}
Output:
code
R: echo 'hello' returned '{
"exit_code": 0,
"output": "hello"
}'
Notes: you should never use this function to execute commands that
make changes to the system, or perform lengthy computations. Consider using
commands promises instead, which have locking and are not evaluated
by cf-promises.
See also: execresult().
History:
expandrange
Prototype: expandrange(string_template, stepsize)
Return type: slist
Description: Generates a list based on an ordered list of numbers selected from a
range of integers, in steps specified by the second argument.
The function is the inverse of functions like iprange() which match patterns of numerical ranges that cannot
be represented as regular expressions. The list of strings is composed from the text as quoted
in the first argument, and a numerical range in square brackets is replaced by successive numbers
from the range.
Arguments:
string_template: string - String containing numerical range e.g. string[13-47] - in the range: .*stepsize: int - Step size of numerical increments - in the range: 0,99999999999
code
vars:
"int_group1" slist => {
"swp10",
"swp11",
"swp12",
expandrange("swp[13-15]", 1)
};
interfaces:
"$(int_group)"
tagged_vlans => { "100", "145" },
untagged_vlan => "1",
link_state => up;
History: Introduced in CFEngine 3.7
file_hash
Prototype: file_hash(file, algorithm)
Return type: string
Description: Return the hash of file using the hash algorithm.
This function is much more efficient that calling hash() on a string
with the contents of file.
Hash functions are extremely sensitive to input. You should not expect
to get the same answer from this function as you would from every other
tool, since it depends on how whitespace and end of file characters are
handled.
Arguments:
file: string - File object name - in the range: "?(/.*)algorithm: - Hash or digest algorithm - one of
md5sha1sha256sha384sha512
Example:
Prepare:
code
echo 1234567890 > FILE.txt
chmod 0755 FILE.txt
chown 0 FILE.txt
chgrp 0 FILE.txt
Run:
code
body common control
{
bundlesequence => { "example" };
}
bundle agent example
{
vars:
"md5" string => file_hash("/tmp/1","md5");
"sha256" string => file_hash("/tmp/2","sha256");
"sha384" string => hash("/tmp/3","sha384");
"sha512" string => hash("/tmp/3","sha512");
reports:
"'1\n' hashed to: md5 $(md5)";
"'2\n' hashed to: sha256 $(sha256)";
"'3\n' hashed to: sha384 $(sha384)";
"'3\n' hashed to: sha512 $(sha512)";
}
Output:
code
R: '1\n' hashed to: md5 b026324c6904b2a9cb4b88d6d61c81d1
R: '2\n' hashed to: sha256 53c234e5e8472b6ac51c1ae1cab3fe06fad053beb8ebfd8977b010655bfdd3c3
R: '3\n' hashed to: sha384 54f7379844b41bf513c0557a7195ca96a8ac90d0f8cc87d3607ef7ab593a7c61732759387afaabaf72ca2c0bd599373e
R: '3\n' hashed to: sha512 48b3c46b24db82059b5c87603066cf8d2165837d66e268286feb384644c808c06edf99aeaca0d879f4ee6ec70ebfaa0b98d5b77c12f7c0a68de3f7302dec6e21
History: Introduced in CFEngine 3.7.0
See also: hash()
fileexists
Prototype: fileexists(filename)
Return type: boolean
Description: Returns whether the file filename can be accessed.
The file must exist, and the user must have access permissions to the file for
this function to return true.
Notes:
fileexists() does not resolve symlinks. If a broken symlink exists, the
file is seen to exist. For this functionality use filestat("myfile", "link target")
to see if a file resolves to a the expected target, and check if the
link target exists. Alternatively use test with returnszero(), for example
returnszero("/bin/test -f myfile").
Arguments:
filename: string - File object name - in the range: "?(/.*)
Example:
code
body common control
{
bundlesequence => { "example" };
}
bundle agent example
{
classes:
# this.promise_filename has the currently-executed file, so it
# better exist!
"exists" expression => fileexists($(this.promise_filename));
"exists_etc_passwd" expression => fileexists("/etc/passwd");
reports:
exists::
"I exist! I mean, file exists!";
}
Output:
code
R: I exist! I mean, file exists!
See also: filestat(), isdir(), islink(), isplain(), returnszero()
filesexist
Prototype: filesexist(list)
Return type: boolean
Description: Returns whether all the files in list can be accessed.
All files must exist, and the user must have access permissions to them for
this function to return true.
This function can accept many types of data parameters.
Arguments:
- list : The name of the list variable or data container to check, in the range
[a-zA-Z0-9_$(){}\[\].:]+
Example:
code
body common control
{
bundlesequence => { "example" };
}
bundle agent example
{
vars:
"mylist" slist => { "/tmp/a", "/tmp/b", "/tmp/c" };
classes:
"exists" expression => filesexist("@(mylist)");
reports:
exists::
"All files exist";
!exists::
"Not all files exist";
}
Output:
code
R: Not all files exist
History: The collecting function behavior was added in 3.12.
See also: About collecting functions, grep(), every(), some(), and none().
filesize
Prototype: filesize(filename)
Return type: int
Description: Returns the size of the file filename in bytes.
If the file object does not exist, the function call fails and the
variable does not expand.
Arguments:
filename: string - File object name - in the range: "?(/.*)
Example:
Run:
code
body common control
{
bundlesequence => { example };
}
bundle agent example
{
vars:
# my own size!
"exists" int => filesize("$(this.promise_filename)");
"nexists" int => filesize("/etc/passwdx");
reports:
"File size $(exists)";
"Does not exist: $(nexists)";
}
Output:
code
R: File size 301
R: Does not exist: $(nexists)
History: Was introduced in version 3.1.3, Nova 2.0.2 (2010).
filestat
Prototype: filestat(filename, field)
Return type: string
Description: Returns the requested file field field for the file object
filename.
If the file object does not exist, the function call fails and the
variable does not expand.
Arguments:
filename : the file or directory name to inspect, in the range: "?(/.*)field : the requested field, with the following allowed values:
size : size in bytesgid : group IDuid : owner IDino : inode numbernlink : number of hard linksctime : time of last change in Unix epoch formatatime : last access time in Unix epoch formatmtime : last modification time in Unix epoch formatmode : file mode as a decimal numbermodeoct : file mode as an octal number, e.g. 10777permstr : permission string, e.g. -rwx---rwx (not available on Windows)permoct : permissions as an octal number, e.g. 644 (not available on Windows)type : file type (not available on Windows): block device,character device, directory, FIFO/pipe, symlink, regular file, socket, or unknowndevno : device number (drive letter on Windows, e.g. C:)dev_minor : minor device number (not available on Windows)dev_major : major device number (not available on Windows)basename : the file name minus the directorydirname : the directory portion of the file namelinktarget : if the file is a symlink, its final target. The target is chased up to 32 levels of recursion. On Windows, this returns the file name itself.linktarget_shallow : if the file is a symlink, its first target. On Windows, this returns the file name itself.xattr : a string with newline-separated extended attributes and SELinux contexts in key=value<NEWLINE>key2=value2<NEWLINE>tag1<NEWLINE>tag2 format.
On Mac OS X, you can list and set extended attributes with the xattr utility.
On SELinux, the contexts are the same as what you see with ls -Z.
Example:
Prepare:
code
echo 1234567890 > FILE.txt
chmod 0755 FILE.txt
chown 0 FILE.txt
chgrp 0 FILE.txt
Run:
code
body common control
{
bundlesequence => { "example" };
}
bundle agent example
{
vars:
"file" string => "$(this.promise_filename).txt";
methods:
"fileinfo" usebundle => fileinfo("$(file)");
}
bundle agent fileinfo(f)
{
vars:
# use the full list if you want to see all the attributes!
# "fields" slist => splitstring("size,gid,uid,ino,nlink,ctime,atime,mtime,mode,modeoct,permstr,permoct,type,devno,dev_minor,dev_major,basename,dirname,linktarget,linktarget_shallow", ",", 999);
# ino (inode number), ctime (creation time),
# devno/dev_minor/dev_major (device numbers) were omitted but
# they are all integers
"fields" slist => splitstring("size,gid,uid,nlink,mode,modeoct,permstr,permoct,type,basename", ",", 999);
"stat[$(f)][$(fields)]" string => filestat($(f), $(fields));
reports:
"$(this.bundle): file $(stat[$(f)][basename]) has $(fields) = $(stat[$(f)][$(fields)])";
}
Output:
code
R: fileinfo: file filestat.cf.txt has size = 11
R: fileinfo: file filestat.cf.txt has gid = 0
R: fileinfo: file filestat.cf.txt has uid = 0
R: fileinfo: file filestat.cf.txt has nlink = 1
R: fileinfo: file filestat.cf.txt has mode = 33261
R: fileinfo: file filestat.cf.txt has modeoct = 100755
R: fileinfo: file filestat.cf.txt has permstr = -rwxr-xr-x
R: fileinfo: file filestat.cf.txt has permoct = 755
R: fileinfo: file filestat.cf.txt has type = regular file
R: fileinfo: file filestat.cf.txt has basename = filestat.cf.txt
Notes:
linktarget will prepend the directory name to relative symlink targets, in order to be able to resolve them. Use linktarget_shallow to get the exact link as-is in case it is a relative link.- The list of fields may be extended as needed by CFEngine.
History:
- function introduced in version 3.5.0.
linktarget and linktarget_shallow field options added in 3.6.0.
See also: dirname(), fileexists(), isdir(), islink(), isplain(), lastnode(), returnszero(), splitstring().
filter
Prototype: filter(filter, list, is_regex, invert, max_return)
Return type: slist
Description: Transforms a list or data container into a list subset thereof.
This is a generic filtering function that returns a list of up to max_return
elements in list that match the filtering rules specified in filter,
is_regex and invert.
This function can accept many types of data parameters.
Arguments:
- filter : Anchored regular expression or static string to find, in the range
.*
- list : The name of the list variable or data container to check, in the range
[a-zA-Z0-9_$(){}\[\].:]+
- is_regex_ : Boolean
Treat filter as a regular expression or as a static string.
Invert filter.
max_return : Maximum number of elements to return in the range 0,999999999
Example:
code
body common control
{
bundlesequence => { "test" };
}
bundle agent test
{
vars:
"test" slist => {
1,2,3,
"one", "two", "three",
"long string",
"one", "two", "three",
};
"test2" data => parsejson('[1,2,3, "ab", "c"]');
"test_filtergrep" slist => filter("[0-9]", test, "true", "false", 999);
"test_exact1" slist => filter("one", test, "false", "false", 999);
"test_exact2" slist => filter(".", test, "false", "false", 999);
"test_invert" slist => filter("[0-9]", test, "true", "true", 999);
"test_max2" slist => filter(".*", test, "true", "false", 2);
"test_max0" slist => filter(".*", test, "true", "false", 0);
"test_grep" slist => grep("[0-9]", test);
"test2_filtergrep" slist => filter("[0-9]", test2, "true", "false", 999);
"test2_exact1" slist => filter("one", test2, "false", "false", 999);
"test2_exact2" slist => filter(".", test2, "false", "false", 999);
"test2_invert" slist => filter("[0-9]", test2, "true", "true", 999);
"test2_max2" slist => filter(".*", test2, "true", "false", 2);
"test2_max0" slist => filter(".*", test2, "true", "false", 0);
"test2_grep" slist => grep("[0-9]", test2);
"todo" slist => { "test", "test2", "test_filtergrep", "test_exact1",
"test_exact2", "test_invert", "test_max2",
"test_max0", "test_grep", "test2_filtergrep",
"test2_exact1", "test2_exact2",
"test2_invert", "test2_max2", "test2_max0",
"test2_grep"};
"$(todo)_str" string => format("%S", $(todo));
"tests" slist => { "test", "test2" };
reports:
"The $(tests) list is $($(tests)_str)";
"The grepped list (only single digits from $(tests)) is $($(tests)_grep_str)";
"The filter-grepped list (only single digits from $(tests)) is $($(tests)_grep_str)";
"The filter-exact list, looking for only 'one' in $(tests), is $($(tests)_exact1_str)";
"This list should be empty, the '.' is not literally in the list $(tests): $($(tests)_exact2_str)";
"The filter-invert list, looking for non-digits in $(tests), is $($(tests)_invert_str)";
"The filter-bound list, matching at most 2 items from the whole list $(tests), is $($(tests)_max2_str)";
"This list should be empty because 0 elements of $(tests) were requested: $($(tests)_max0_str)";
}
Output:
code
R: The test list is { "1", "2", "3", "one", "two", "three", "long string", "one", "two", "three" }
R: The test2 list is [1,2,3,"ab","c"]
R: The grepped list (only single digits from test) is { "1", "2", "3" }
R: The grepped list (only single digits from test2) is { "1", "2", "3" }
R: The filter-grepped list (only single digits from test) is { "1", "2", "3" }
R: The filter-grepped list (only single digits from test2) is { "1", "2", "3" }
R: The filter-exact list, looking for only 'one' in test, is { "one", "one" }
R: The filter-exact list, looking for only 'one' in test2, is { }
R: This list should be empty, the '.' is not literally in the list test: { }
R: This list should be empty, the '.' is not literally in the list test2: { }
R: The filter-invert list, looking for non-digits in test, is { "one", "two", "three", "long string", "one", "two", "three" }
R: The filter-invert list, looking for non-digits in test2, is { "ab", "c" }
R: The filter-bound list, matching at most 2 items from the whole list test, is { "1", "2" }
R: The filter-bound list, matching at most 2 items from the whole list test2, is { "1", "2" }
R: This list should be empty because 0 elements of test were requested: { }
R: This list should be empty because 0 elements of test2 were requested: { }
History: The collecting function behavior was added in 3.9.
See also: About collecting functions, grep(), every(), some(), and none().
findfiles
Prototype: findfiles(glob1, glob2, ...)
Return type: slist
Description: Return the list of files that match any of the given glob patterns.
This function searches for the given glob patterns in the local
filesystem, returning files or directories that match. Note that glob
patterns are not regular expressions. They match like Unix shells:
* matches any filename or directory at one level, e.g. *.cf will
match all files in one directory that end in .cf but it won't search
across directories. */*.cf on the other hand will look two levels
deep.** recursively matches up to six subdirectories.? matches a single letter.[abc] matches a, b or c.[!abc] matches any letters other than a, b or c.[a-z] matches any letter from a to z.[!a-z] matches any letter not from a to z.{foo,bar} matches foo or bar.
This function, used together with the bundlesmatching function,
allows you to do dynamic inputs and a dynamic bundle call chain.
History:
- Brace expression (i.e., {foo,bar}) and negative bracket expressions (i.e., [!abc]) were introduced in 3.24.
Example:
code
body common control
{
bundlesequence => { run };
}
bundle agent run
{
vars:
"findtmp" slist => findfiles("/[tT][mM][pP]");
# or find all .txt files under /tmp, up to 6 levels deep...
# "findtmp" slist => findfiles("/tmp/**/*.txt");
reports:
"All files that match '/[tT][mM][pP]' = $(findtmp)";
}
Output:
code
R: All files that match '/[tT][mM][pP]' = /tmp
See also: bundlesmatching(), findfiles_up().
findfiles_up
Prototype: findfiles_up(path, glob, level)
Return type: data
Description: Return a data array of files that match a given glob pattern
by searching up the directory tree.
This function searches for files matching a given glob pattern glob in the
local filesystem by searching up the directory tree from a given absolute
path path. The function searches at most level levels of directories or
until the root directory is reached. Argument level defaults to inf if
not specified. The function returns a list of files as a data array where
the first element (element 0) and the last element (element N) is first
and last file or directory found respectively.
Note that glob patterns are not regular expressions. They match like Unix
shells:
* matches any filename or directory at one level, e.g. *.cf will
match all files in one directory that end in .cf but it won't search
across directories. */*.cf on the other hand will look two levels
deep.** recursively matches up to six subdirectories.? matches a single letter.[abc] matches a, b or c.[!abc] matches any letters other than a, b or c.[a-z] matches any letter from a to z.[!a-z] matches any letter not from a to z.{foo,bar} matches foo or bar.
History:
- Brace expression (i.e., {foo,bar}) and negative bracket expressions (i.e., [!abc]) were introduced in 3.24.
Arguments:
path: string - Path to search from - in the range: "?(/.*)glob: string - Glob pattern to match files - in the range: .+level: int - Number of levels to search - in the range: 0,99999999999
Example:
code
bundle agent __main__
{
vars:
"path" # path to search up from
string => "/tmp/repo/submodule/some/place/deep/within/my/repo/";
"glob" # glob pattern matching filename
string => ".git/config";
"level" # how far to search
int => "inf";
"configs"
data => findfiles_up("$(path)", "$(glob)", "$(level)");
reports:
"Submodules '$(glob)' is located in '$(configs[0])'";
"Parents '$(glob)' is located in '$(configs[1])'";
}
Output:
code
R: Submodules '.git/config' is located in '/tmp/repo/submodule/.git/config'
R: Parents '.git/config' is located in '/tmp/repo/.git/config'
History: Introduced in 3.18.
See also: findfiles().
findprocesses
Prototype: findprocesses(regex)
Return type: data
The return value is cached.
Description: Return the list of processes that match the given regular
expression regex.
This function searches for the given regular expression in the process
table. Use .*sherlock.* to find all the processes that match
sherlock. Use .*\bsherlock\b.* to exclude partial matches like
sherlock123 (\b matches a word boundary).
Arguments:
regex: regular expression - Regular expression to match process name - in the range: .*
The returned data container is a list of key-value maps. Each one is
guaranteed to have the key pid with the process ID. The key line
will also be available with the raw process table contents.
The process table is usually obtained with something like ps -eo
user,pid,ppid,pgid,%cpu,%mem,vsize,ni,rss,stat,nlwp,stime,time,args, and the
CMD or COMMAND field (args) is used to match against. However the exact
data used may change per platform and per CFEngine release.
Example:
code
vars:
"holmes" data => findprocesses(".*sherlock.*");
Output:
code
[ { "pid": "2378", "line": "...the ps output here" }, ... ]
History: Introduced in CFEngine 3.9
See also: processes processexists().
Prototype: format(string, ...)
Return type: string
Description: Applies sprintf-style formatting to a given string.
This function will format numbers (o, x, d and f) or strings (s) but
not potentially dangerous things like individual characters or pointer
offsets.
The %S specifier is special and non-standard. When you use it on a
slist or a data container, the data will be packed into a one-line
string you can put in a log message, for instance.
This function will fail if it doesn't have enough arguments; if any
format specifier contains the modifiers hLqjzt; or if any format
specifier is not one of doxfsS.
Example:
code
body common control
{
bundlesequence => { "run" };
}
bundle agent run
{
vars:
"v" string => "2.5.6";
"vlist" slist => splitstring($(v), "\.", 3);
"padded" string => format("%04d%04d%04d", nth("vlist", 0), nth("vlist", 1), nth("vlist", 2));
"a" string => format("%10.10s", "x");
"b" string => format("%-10.10s", "x");
"c" string => format("%04d", 1);
"d" string => format("%07.2f", 1);
"e" string => format("hello my name is %s %s", "Inigo", "Montoya");
"container" data => parsejson('{ "x": "y", "z": true }');
"packed" string => format("slist = %S, container = %S", vlist, container);
reports:
"version $(v) => padded $(padded)";
"%10.10s on 'x' => '$(a)'";
"%-10.10s on 'x' => '$(b)'";
"%04d on '1' => '$(c)'";
"%07.2f on '1' => '$(d)'";
"you killed my father... => '$(e)'";
"$(packed)";
}
Output:
code
R: version 2.5.6 => padded 000200050006
R: %10.10s on 'x' => ' x'
R: %-10.10s on 'x' => 'x '
R: %04d on '1' => '0001'
R: %07.2f on '1' => '0001.00'
R: you killed my father... => 'hello my name is Inigo Montoya'
R: slist = { "2", "5", "6" }, container = {"x":"y","z":true}
Note: the underlying sprintf system call may behave differently on some platforms for some formats. Test carefully. For example, the format %08s will use spaces to fill the string up to 8 characters on libc platforms, but on Darwin (Mac OS X) it will use zeroes. According to SUSv4 the behavior is undefined for this specific case.
History:
Prototype: getclassmetatags(classname, optional_tag)
Return type: slist
Description: Returns the list of meta tags for class classname.
Arguments:
classname: string - Class identifier - in the range: [a-zA-Z0-9_$(){}\[\].:]+
The optional_tag can be used to look up a specific tag's value. If you format
your tags like meta => { "mykey=myvalue1", "mykey=myvalue2"} then the
optional_tag of mykey will fetch you a list with two entries, { "myvalue1",
"myvalue2" }.
Example:
code
body common control
{
bundlesequence => { "example" };
}
bundle agent example
{
classes:
"c" expression => "any", meta => { "mytag", "other=once", "other=twice" };
vars:
"ctags" slist => getclassmetatags("c");
"othertag_values" slist => getclassmetatags("c", "other");
reports:
"Found tags: $(ctags)";
"Found tags for key 'other': $(othertag_values)";
}
Output:
code
R: Found tags: source=promise
R: Found tags: mytag
R: Found tags: other=once
R: Found tags: other=twice
R: Found tags for key 'other': once
R: Found tags for key 'other': twice
Notes:
See also: getvariablemetatags()
History:
- Function added in 3.6.0.
optional_tag added in 3.10.0
getenv
Prototype: getenv(variable, maxlength)
Return type: string
Description: Return the environment variable variable, truncated at
maxlength characters
Returns an empty string if the environment variable is not defined.
maxlength is used to avoid unexpectedly large return values, which could
lead to security issues. Choose a reasonable value based on the environment
variable you are querying.
Arguments:
variable: string - Name of environment variable - in the range: [a-zA-Z0-9_$(){}\[\].:]+maxlength: int - Maximum number of characters to read - in the range: 0,99999999999
Example:
code
body common control
{
bundlesequence => { "example" };
}
bundle agent example
{
vars:
"myvar" string => getenv("EXAMPLE","2048");
classes:
"isdefined" not => strcmp("$(myvar)","");
reports:
isdefined::
"The EXAMPLE environment variable is $(myvar)";
!isdefined::
"The environment variable EXAMPLE does not exist";
}
Output:
code
R: The EXAMPLE environment variable is getenv.cf
Notes:
History: This function was introduced in CFEngine version 3.0.4
(2010)
getfields
Prototype: getfields(regex, filename, split, array_lval)
Return type: int
Description: Fill array_lval with fields in the lines from file filename that match regex, split on split.
The function returns the number of lines matched. This function is most
useful when you want only the first matching line (e.g., to mimic the
behavior of the getpwnam(3) on the file /etc/passwd). If you want to
examine all lines, use readstringarray() instead.
Arguments:
regex : Regular expression to match line, in the range .*
A regular expression matching one or more lines. The regular expression
is anchored, meaning it must match the entire line.
filename : Filename to read, in the range "?(/.*)
The name of the file to be examined.
split : Regular expression to split fields, in the range .*
A regex pattern that is used to parse the field separator(s) to split up
the file into items
array_lval : Return array name, in the range .*
The base name of the array that returns the values.
Example:
code
body common control
{
bundlesequence => { "example" };
}
bundle agent example
{
vars:
"no" int => getfields("root:.*","/etc/passwd",":","userdata");
reports:
"Found $(no) lines matching";
"root's handle = $(userdata[1])";
"root's passwd = ... forget it!";
"root's uid = $(userdata[3])";
# uncomment this if you want to see the HOMEDIR field
#"root's homedir = $(userdata[6])";
# uncomment this if you want to see the GID field
#"root's gid = $(userdata[4])";
# uncomment this if you want to see the GECOS field
#"root's name = $(userdata[5])";
}
Output:
code
R: Found 1 lines matching
R: root's handle = root
R: root's passwd = ... forget it!
R: root's uid = 0
Notes:
This function matches lines (using a regular expression) in the named
file, and splits the first matched line into fields (using a second
regular expression), placing these into a named array whose elements are
array[1],array[2],... This is useful for examining user data in the
Unix password or group files.
getgid
Prototype: getgid(groupname)
Return type: int
Description: Return the integer group id of the group groupname on this
host.
If the named group does not exist, the function will fail and the variable
will not be defined.
Arguments:
groupname: string - Group name in text - in the range: .*
Example:
code
body common control
{
bundlesequence => { "example" };
}
bundle agent example
{
vars:
linux|solaris|hpux::
"gid" int => getgid("root");
freebsd|darwin|openbsd::
"gid" int => getgid("wheel");
aix::
"gid" int => getgid("system");
reports:
"root's gid is $(gid)";
}
Output:
Notes:
On Windows, which does not support group ids, the variable will not be
defined.
getindices
Prototype: getindices(varref)
Return type: slist
Description: Returns the list of keys in varref which can be
the name of an array or container.
This function can accept many types of data parameters.
Make sure you specify the correct scope when supplying the name of the
variable.
Note:
The function always returns a list. If called on something that has no
index (for example, an undefined variable) an empty list is returned.
The list which getindices returns is not guaranteed to be in any specific
order.
In the case of a doubly-indexed array (such as parsestringarrayidx() and
friends produce), the primary keys are returned; i.e. if varref[i][j] exist
for various i, j and you ask for the keys of varref, you get the i
values. For each such i you can then ask for getindices("varref[i]") to
get a list of the j values (and so on, for higher levels of indexing).
Arguments:
varref: string - CFEngine variable identifier or inline JSON - in the range: .*
Example:
code
body common control
{
bundlesequence => { "example" };
}
bundle agent example
{
vars:
"ps[relayhost]" string => "[mymailrelay]:587";
"ps[mydomain]" string => "iu.hio.no";
"ps[smtp_sasl_auth_enable]" string => "yes";
"ps[smtp_sasl_password_maps]" string => "hash:/etc/postfix/sasl-passwd";
"ps[smtp_sasl_security_options]" string => "";
"ps[smtp_use_tls]" string => "yes";
"ps[default_privs]" string => "mailman";
"ps[inet_protocols]" string => "all";
"ps[inet_interfaces]" string => "127.0.0.1";
"parameter_name" slist => getindices("ps");
"parameter_name_sorted" slist => sort(parameter_name, lex);
reports:
"Found key $(parameter_name_sorted)";
}
Output:
code
R: Found key default_privs
R: Found key inet_interfaces
R: Found key inet_protocols
R: Found key mydomain
R: Found key relayhost
R: Found key smtp_sasl_auth_enable
R: Found key smtp_sasl_password_maps
R: Found key smtp_sasl_security_options
R: Found key smtp_use_tls
History:
See also: getvalues(), about collecting functions, and data documentation.
getuid
Prototype: getuid(username)
Return type: int
Description: Return the integer user id of the named user on this host
If the named user is not registered the variable will not be defined.
Arguments:
username: string - User name in text - in the range: .*
Example:
code
body common control
{
bundlesequence => { "example" };
}
bundle agent example
{
vars:
"uid" int => getuid("root");
reports:
"root's uid is $(uid)";
}
Output:
Notes:
On Windows, which does not support user ids, the variable will not
be defined.
getuserinfo
Prototype: getuserinfo(optional_uidorname)
Return type: data
Description: Return information about the current user or any other, looked up by user ID (UID) or user name.
This function searches for a user known to the system. If the
optional_uidorname parameter is omitted, the current user (that is currently
running the agent) is retrieved. If optional_uidorname is specified, the user
entry is looked up by name or ID, using the standard getpwuid() and
getpwnam() POSIX functions (but note that these functions may in turn talk to
LDAP, for instance).
On platforms that don't support these POSIX functions, the function simply fails.
Arguments:
optional_uidorname: string - User name in text - in the range: .*
Example:
code
body common control
{
bundlesequence => { "example" };
}
bundle agent example
{
vars:
# note the results here will vary depending on your platform
"me" data => getuserinfo(); # the current user's info
"root" data => getuserinfo("root"); # the "root" user's info (usually UID 0)
"uid0" data => getuserinfo(0); # lookup user info for UID 0 (usually "root")
# sys.user_data has the information for the user that started the agent
"out" string => format("I am '%s', root shell is '%s', and the agent was started by %S", "$(me[description])", "$(root[shell])", "sys.user_data");
reports:
"$(out)";
}
Typical Results:
code
R: I am 'Mr. Current User', root shell is '/bin/bash', and the agent was started by {"description":"Mr. Current User","gid":1000,"home_dir":"/home/theuser","shell":"/bin/sh","uid":1000,"username":"theuser"}
And variable contents:
"me": {
"description": "Mr. Current User",
"gid": 1000,
"home_dir": "/home/theuser",
"shell": "/bin/sh",
"uid": 1000,
"username": "theuser"
}
"root": {
"description": "root",
"gid": 0,
"home_dir": "/root",
"shell": "/bin/bash",
"uid": 0,
"username": "root"
}
"uid0": {
"description": "root",
"gid": 0,
"home_dir": "/root",
"shell": "/bin/bash",
"uid": 0,
"username": "root"
}
History: Introduced in CFEngine 3.10
See also: getusers(), users.
getusers
Prototype: getusers(exclude_names, exclude_ids)
Return type: slist
Description: Returns a list of all users defined, except those names in the comma separated string of exclude_names and the comma separated string of uids in exclude_ids
Arguments:
exclude_names: string - Comma separated list of User names - in the range: .*exclude_ids: string - Comma separated list of UserID numbers - in the range: .*
Example:
code
body common control
{
bundlesequence => { "example" };
}
bundle agent example
{
vars:
# The getusers function takes two filtering arguments: exclude_names and
# exclude_ids, both a comma separated list of usernames and user IDs
# respectively.
# To get users with a uid 1000 and greater we generate a list of uids from
# 0 to 999 and convert it into a comma separated string used to filter the
# list of users.
"users_with_uid_gt_999"
slist => getusers( "", join( ",", expandrange( "[0-999]", 1 ) ) );
# Here we get a list of users except usernames nfsnobody and vagrant as
# well as any users with uid 8 or 9
"users_except_nfsnobody_and_vagrant_and_uid_8_and_9"
slist => getusers( "nfsnobody,vagrant", "8,9" );
# Here we get a list of all users by not filtering any
"allusers" slist => getusers("","");
"root_list" slist => { "root" };
# this will get just the root users out of the full user list
"justroot" slist => intersection(allusers, root_list);
reports:
"Found just the root user: $(justroot)";
}
Output:
code
R: Found just the root user: root
Notes:
- This function is currently only available on Unix-like systems.
- This function will return both local and remote (for example, users defined in an external directory like LDAP) users on a system.
History:
- Introduced in CFEngine 3.1.0b1, CFEngine Nova/Enterprise 2.0.0b1 (2010).
See also: getuserinfo(), users.
getvalues
Prototype: getvalues(varref)
Return type: slist
Description: Returns the list of values in varref which can be
the name of an array or container.
This function can accept many types of data parameters.
If the array contains list values, then all of the list elements are flattened
into a single list to make the return value a list.
If the data container contains non-scalar values (e.g. nested
containers) they are skipped. The special values true, false, and
null are serialized to their string representations. Numerical
values are serialized to their string representations.
You can specify a path inside the container. For example, below you'll
look at the values of d[k], not at the top level of d.
Make sure you specify the correct scope when supplying the name of the
variable.
Arguments:
varref: string - CFEngine variable identifier or inline JSON - in the range: .*
Example:
code
body common control
{
bundlesequence => { "example" };
}
bundle agent example
{
vars:
"v[index_1]" string => "value_1";
"v[index_2]" string => "value_2";
"values" slist => getvalues("v");
"values_sorted" slist => sort(values, lex);
# works with data containers too
"d" data => parsejson('{ "k": [ 1, 2, 3, "a", "b", "c" ] }');
"cvalues" slist => getvalues("d[k]");
"cvalues_sorted" slist => sort(cvalues, lex);
reports:
"Found values: $(values_sorted)";
"Found container values: $(cvalues_sorted)";
}
Output:
code
R: Found values: value_1
R: Found values: value_2
R: Found container values: 1
R: Found container values: 2
R: Found container values: 3
R: Found container values: a
R: Found container values: b
R: Found container values: c
History: The collecting function behavior was added in 3.9.
See also: getindices(), about collecting functions, and data documentation.
Prototype: getvariablemetatags(varname, optional_tag)
Return type: slist
Description: Returns the list of meta tags for variable varname.
Make sure you specify the correct scope when supplying the name of the
variable.
Arguments:
varname: string - Variable identifier - in the range: [a-zA-Z0-9_$(){}\[\].:]+
The optional_tag can be used to look up a specific tag's value. If you format
your tags like meta => { "mykey=myvalue1", "mykey=myvalue2"} then the
optional_tag of mykey will fetch you a list with two entries, { "myvalue1",
"myvalue2" }.
Example:
code
body common control
{
bundlesequence => { "example" };
}
bundle agent example
{
vars:
"v" string => "myvalue", meta => { "mytag", "other=once", "other=twice" };
"vtags" slist => getvariablemetatags("example.v");
"othertag_values" slist => getvariablemetatags("example.v", "other");
reports:
"Found tags: $(vtags)";
"Found tags for key 'other': $(othertag_values)";
}
Output:
code
R: Found tags: source=promise
R: Found tags: mytag
R: Found tags: other=once
R: Found tags: other=twice
R: Found tags for key 'other': once
R: Found tags for key 'other': twice
Notes:
See also: getclassmetatags()
History:
- Introduced in CFEngine 3.6.0
optional_tag added in 3.10.0
grep
Prototype: grep(regex, list)
Return type: slist
Description: Returns the sub-list if items in list matching the
anchored regular expression regex.
This function can accept many types of data parameters.
Arguments:
regex: regular expression - Regular expression - in the range: .*list: string - CFEngine variable identifier or inline JSON - in the range: .*
Example:
code
body common control
{
bundlesequence => { "test" };
}
bundle agent test
{
vars:
"mylist" slist => { "One", "Two", "Three", "Four", "Five" };
"Tlist" slist => grep("T.*","mylist");
"empty_list" slist => grep("ive","mylist");
"datalist" data => parsejson('[1,2,3, "Tab", "chive"]');
"data_Tlist" slist => grep("T.*","datalist");
"data_empty_list" slist => grep("ive","datalist");
"todo" slist => { "mylist", "Tlist", "empty_list", "datalist", "data_Tlist", "data_empty_list" };
"$(todo)_str" string => format("%S", $(todo));
reports:
"$(todo): $($(todo)_str)";
}
Output:
code
R: mylist: { "One", "Two", "Three", "Four", "Five" }
R: Tlist: { "Two", "Three" }
R: empty_list: { }
R: datalist: [1,2,3,"Tab","chive"]
R: data_Tlist: { "Tab" }
R: data_empty_list: { }
History: The collecting function behavior was added in 3.9.
See also: About collecting functions, filter(), every(), some(), and none().
groupexists
Prototype: groupexists(group)
Return type: boolean
Description: Returns whether a group group exists on this host.
The group may be specified by name or identifier.
Arguments:
group: string - Group name or identifier - in the range: .*
Example:
code
body common control
{
bundlesequence => { "example" };
}
bundle agent example
{
classes:
"gname" expression => groupexists("sys");
"gid" expression => groupexists("0");
reports:
gname::
"Group exists by name";
gid::
"Group exists by id";
}
Output:
code
R: Group exists by name
R: Group exists by id
hash
Prototype: hash(input, algorithm)
Return type: string
Description: Return the hash of input using the hash algorithm.
Hash functions are extremely sensitive to input. You should not expect
to get the same answer from this function as you would from every other
tool, since it depends on how whitespace and end of file characters are
handled.
Arguments:
input: string - Input text - in the range: .*algorithm: - Hash or digest algorithm - one of
md5sha1sha256sha384sha512
Example:
code
body common control
{
bundlesequence => { "example" };
}
bundle agent example
{
vars:
"md5" string => hash("Cfengine is not cryptic","md5");
"sha256" string => hash("Cfengine is not cryptic","sha256");
"sha384" string => hash("Cfengine is not cryptic","sha384");
"sha512" string => hash("Cfengine is not cryptic","sha512");
reports:
"Hashed to: md5 $(md5)";
"Hashed to: sha256 $(sha256)";
"Hashed to: sha384 $(sha384)";
"Hashed to: sha512 $(sha512)";
}
Output:
code
R: Hashed to: md5 2036af0ee58d6d9dffcc6507af92664f
R: Hashed to: sha256 e2fb1927976bfe1ea3987c1a731c75e8ac1453d22a21811dc352db5e62d3f73c
R: Hashed to: sha384 b348c0b83ccd9ee12673f5daaba3ee5f49c42906540936bb16cf9d2001ed502b8c56f6e36b8389ab596febb529aab17f
R: Hashed to: sha512 29ce0883afbe7740bb2a016735499ae5a0a9b067539018ce6bb2c309a7e885c2d7da64744956e9f151bc72ec8dc19f85efd85eb0a73cbf1e829a15ac9ac35358
See also: file_hash()
hash_to_int
Prototype: hash_to_int(lower, upper, string)
Return type: int
Description: Generates an integer between lower and upper range based on hash of string.
Notes:
This function is similar to splayclass() but more widely usable. Anything that
involves orchestration of many hosts could use this function, either for evenly
spreading out the scheduling, or even for static load balancing. The result
would may be coupled with an ifelse() clause of some sort, or just used
directly.
Arguments:
lower (inclusive): int - Lower inclusive bound - in the range: -99999999999,99999999999upper (exclusive): int - Upper exclusive bound - in the range: -99999999999,99999999999string: string - Input string to hash - in the range: .*
Example:
code
body common control
{
bundlesequence => { "example" };
}
bundle agent example
{
vars:
"hello" int => hash_to_int(0, 1000, "hello");
"world" int => hash_to_int(0, 1000, "world");
# Hash can vary on hostkey or policy hub:
"hour" int => hash_to_int(0, 24, "$(sys.key_digest)");
"minute" int => hash_to_int(0, 60, "$(sys.policy_hub)");
reports:
"'hello' hashed to: $(hello)";
"'world' hashed to: $(world)";
}
Output:
code
R: 'hello' hashed to: 172
R: 'world' hashed to: 760
History:
See also: splayclass()
hashmatch
Prototype: hashmatch(filename, algorithm, hash)
Return type: boolean
Description: Compute the hash of file filename using the hash algorithm and test if it matches hash.
This function may be used to determine whether a system has a particular
version of a binary file (e.g. software patch).
Arguments:
filename: string - Filename to hash - in the range: "?(/.*)algorithm: - Hash or digest algorithm - one of
md5sha1sha256sha384sha512
hash: string - ASCII representation of hash for comparison - in the range: [a-zA-Z0-9_$(){}\[\].:]+
hash is an ASCII representation of the hash for comparison.
Example:
code
bundle agent example
{
classes:
"matches" expression => hashmatch("/etc/passwd","md5","c5068b7c2b1707f8939b283a2758a691");
reports:
matches::
"File has correct version";
}
host2ip
Prototype: host2ip(hostname)
Return type: string
The return value is cached.
Description: Returns the primary name-service IP address for the named host hostname.
If resolution fails, the input hostname is returned (for compatibility reasons).
Uses whatever configured name service is used by the resolver library to
translate hostname into an IP address. It will return an IPv6 address
by preference if such an address exists. This function uses the standard
lookup procedure for a name, so it mimics internal processes and can
therefore be used not only to cache multiple lookups in the configuration, but
to debug the behavior of the resolver.
Arguments:
hostname: string - Host name in ascii - in the range: .*
Example:
code
bundle server control
{
allowconnects => { escape(host2ip("www.example.com")) };
}
See also: ip2host(), isipinsubnet(), iprange()
History: This function was introduced in CFEngine version 3.0.4
(2010)
hostinnetgroup
Prototype: hostinnetgroup(netgroup)
Return type: boolean
Description: True if the current host is in the named netgroup.
Arguments:
netgroup: string - Netgroup name - in the range: .*
Example:
code
classes:
"ingroup" expression => hostinnetgroup("my_net_group");
hostrange
Prototype: hostrange(prefix, range)
Return type: boolean
Description: Returns whether the unqualified name of the current host lies
in the range of enumerated hostnames specified with prefix.
This is a pattern matching function for non-regular (enumerated)
expressions. The range specification is in the format A-B (using a minus
character -) where A and B are decimal integers, optionally prefixed with
zeroes (e.g. 01). The unqualified name of the current host used in this
function is the same as the contents of the sys.uqhost
variable. The function is using integer comparison on range and the last
numeric part of the unqualified host name and string comparison of prefix
(lowercase) with the part of the unqualified host name until the last numeric
part.
Arguments:
prefix: string - Hostname prefix - in the range: .*range: string - Enumerated range - in the range: .*
Example:
code
bundle agent main
{
vars:
"range" string => "1-32";
"hostname_f" string => execresult( "hostname -f", useshell);
"hostname_s" string => execresult( "hostname -s", useshell);
"hostname" string => execresult( "hostname", useshell);
classes:
"hostgroup_alpha_no_leading_zeros" expression => hostrange("host", $(range) );
"hostgroup_alpha_leading_zeros" expression => hostrange("host", "00$(range)" );
"hostgroup_alpha_UPPERCASE_prefix" expression => hostrange("HOST", "0$(range)" );
reports:
"sys.fqhost = '$(sys.fqhost)'";
"sys.uqhost = '$(sys.uqhost)'";
"hostname -f = '$(hostname_f)'";
"hostname -s = '$(hostname_s)'";
"hostname = '$(hostname)'";
hostgroup_alpha_no_leading_zeros::
"This host is within the alpha host group range (host$(range))";
hostgroup_alpha_leading_zeros::
"This host is within the alpha host group range (host00$(range)) (NOTE: Leading zeros and prefix capitalization is insignificant)";
hostgroup_alpha_UPPERCASE_prefix::
"This host is within the alpha host group range (HOST0$(range)) (NOTE: Leading zeros and prefix capitalization is insignificant)";
}
This policy can be found in
/var/cfengine/share/doc/examples/hostrange.cf
and downloaded directly from
github.
Example Output:
code
R: sys.fqhost = 'host001.example.com'
R: sys.uqhost = 'host001'
R: hostname -f = 'HOST001.example.com'
R: hostname -s = 'HOST001'
R: hostname = 'HOST001'
R: This host is within the alpha host group range (host1-32)
R: This host is within the alpha host group range (host001-32) (NOTE: Leading zeros and prefix capitalization is insignificant)
R: This host is within the alpha host group range (HOST01-32) (NOTE: Leading zeros and prefix capitalization is insignificant)
This policy can be found in
/var/cfengine/share/doc/examples/hostrange.cf
and downloaded directly from
github.
hostsseen
Prototype: hostsseen(horizon, seen, field)
Return type: slist
Description: Returns a list with the information field of hosts that were
seen or not seen within the last horizon hours up to lastseenexpireafter.
Finds a list of hosts seen by a CFEngine remote connection on the current host
within the number of hours specified in horizon. The argument seen may be
lastseen or notseen, the latter selecting all hosts not observed to have
connected within the specified time.
Arguments:
horizon: int - Horizon since last seen in hours - in the range: 0,99999999999seen: - Complements for selection policy - one of
field: - Type of return value desired - one of
Example:
code
bundle agent test
{
vars:
"myhosts" slist => { hostsseen("inf","lastseen","address") };
reports:
"Found client/peer: $(myhosts)";
}
See also: lastseenexpireafter in body common control
hostswithclass
This function is only available in CFEngine Enterprise.
Prototype: hostswithclass(class, field)
Return type: slist
Description: Returns a list from the CFEngine Database with the information
field of hosts on which classs is set.
On CFEngine Enterprise, this function can be used to return a list of
hostnames or ip-addresses of hosts that have a given class.
Note: This function only works locally on the hub, but allows the hub to construct custom
configuration files for (classes of) hosts. Hosts are selected based on the
classes set during the most recently collected agent run.
Arguments:
class: string - Class name to look for - in the range: [a-zA-Z0-9_]+field: - Type of return value desired - one of
Example:
code
bundle agent debian_hosts
{
vars:
am_policy_hub::
"host_list" slist => hostswithclass( "debian", "name" );
files:
am_policy_hub::
"/tmp/master_config.cfg"
edit_line => insert_lines("host=$(host_list)"),
create => "true";
}
History: Was introduced in 3.3.0, Nova 2.2.0 (2012)
See also: hubknowledge(), remotescalar(), remoteclassesmatching()
hubknowledge
This function is only available in CFEngine Enterprise.
Prototype: hubknowledge(id)
Return type: string
The return value is cached.
Description: Read global knowledge from the CFEngine Database host by
id.
This function allows for is intended for use in distributed orchestration.
If the identifier matches a persistent scalar variable (such as is used to
count distributed processes in CFEngine Enterprise) then this will be returned
preferentially. If no such variable is found, then the server will look for a
literal string in a server bundle with a handle that matches the requested object.
It is recommended that you use this function sparingly, using classes as guards,
as it contributes to network traffic and depends on the network for its function.
Unlike remotescalar(), the result of hubknowledge() is not stored locally.
This function behaves similarly to the remotescalar() function, except that it
always gets its information from the CFEngine Enterprise Database by an encrypted
connection. It is designed for spreading globally calibrated information about
a CFEngine system back to the client machines. The data available through this
channel are generated automatically by discovery, unlike remotescalar which
accesses user defined data.
Arguments:
id: string - Variable identifier - in the range: [a-zA-Z0-9_$(){}\[\].:]+
Example:
code
vars:
guard::
"global_number" string => hubknowledge("number_variable");
See also: remotescalar(), remoteclassesmatching(), hostswithclass()
ifelse
Prototype: ifelse(...)
Return type: string
Description: Evaluate each pair of arguments up to the last one as a (class, value) tuple, returning value if class is set.
If none are set, returns the last argument.
Arguments:
The ifelse function is like a multi-level if-else statement. It was
inspired by Oracle's DECODE function. It must have an odd number of
arguments (from 1 to N). The last argument is the default value, like
the else clause in standard programming languages. Every pair of
arguments before the last one are evaluated as a pair. If the first
one evaluates true then the second one is returned, as if you had used
the first one in a class expression. So the first item in the pair
can be more than just a class name, it's a whole context like
Tuesday.linux.!verbose)
Generally, if ifelse were called with arguments (a1, a2, b1,
b2, c), the behavior expressed as pseudo-code is:
code
if a1 then return a2
else-if b1 then return b2
else return c
(But again, note that any odd number of arguments is supported.)
The ifelse function is extremely useful when you want to avoid
explicitly stating the negative of all the expected cases; this
problem is commonly seen like so:
code
class1.class2::
"myvar" string => "x";
class3.!class2::
"myvar" string => "y";
!((class1.class2)||class3.!class2)::
"myvar" string => "z";
That's hard to read and error-prone (do you know how class2 will
affect the default case?). Here's the alternative with ifelse:
code
"myvar" string => ifelse("class1.class2", "x",
"class3.!class2", "y",
"z");
Example:
code
bundle agent example
{
classes:
"myclass" expression => "any";
"myclass2" expression => "any";
"secondpass" expression => "any";
vars:
# we need to use the secondpass class because on the first pass,
# myclass and myclass2 are not defined yet
secondpass::
# result: { "1", "single string parameter", "hardclass OK", "bundle class OK", "5 parameters OK" }
"mylist" slist => {
ifelse(1),
ifelse("single string parameter"),
ifelse("cfengine", "hardclass OK", "hardclass broken"),
ifelse("myclass.myclass2", "bundle class OK", "bundle class broken"),
ifelse("this is not true", "5 parameters broken",
"this is also not true", "5 parameters broken 2",
"5 parameters OK"),
};
reports:
"ifelse result list: $(mylist)";
}
Note: As a general rule function evaluation is skipped when undefined
variables are used. However this function has special behavior when exactly
three arguments are used, allowing it to be evaluated even if it contains undefined variables. For example:
code
bundle agent example
{
vars:
"passwd_path"
string => ifelse( isvariable("def.passwd_path"), "$(def.passwd_path)",
"/etc/passwd"),
comment => "Use the user provided path for the passwd file if its defined
in the def scope, else use a sane default. This can allow for
easier policy testing and default overrides.";
}
History:
- Special behavior actuating function with undefined variable references when 3
parameters are in use added in
3.7.4 and 3.9.1.
int
Prototype: int(string)
Return type: int
Description: Convert numeric string to int.
Arguments:
string: string - Numeric string to convert to integer - in the range: .*
If string represents a floating point number then the decimals are truncated.
Example:
code
bundle agent main
{
vars:
"data" data => '{"acft_name": "A320neo",
"engine_num": "2",
"price_in_USD": "123.456789k"}';
"engines" int => int("$(data[engine_num])");
"ballpark_price" int => int("$(data[price_in_USD])");
reports:
"A320neo has $(engines) engines and costs about $(ballpark_price) USD.";
}
code
R: A320neo has 2 engines and costs about 123456 USD.
This policy can be found in
/var/cfengine/share/doc/examples/int.cf
and downloaded directly from
github.
See also: string()
History:
intersection
Prototype: intersection(list1, list2)
Return type: slist
Description: Returns the unique elements in list1 that are also in list2.
This function can accept many types of data parameters.
Arguments:
list1: string - CFEngine base variable identifier or inline JSON - in the range: .*list2: string - CFEngine filter variable identifier or inline JSON - in the range: .*
Example:
code
body common control
{
bundlesequence => { "test" };
}
bundle agent test
{
vars:
"a" slist => { 1,2,3,"x" };
"b" slist => { "x" };
"mylist1" slist => { "a", "b" };
"mylist2" slist => { "a", "b" };
"$(mylist1)_str" string => join(",", $(mylist1));
"int_$(mylist1)_$(mylist2)" slist => intersection($(mylist1), $(mylist2));
"int_$(mylist1)_$(mylist2)_str" string => join(",", "int_$(mylist1)_$(mylist2)");
reports:
"The intersection of list '$($(mylist1)_str)' with '$($(mylist2)_str)' is '$(int_$(mylist1)_$(mylist2)_str)'";
}
Output:
code
R: The intersection of list '1,2,3,x' with '1,2,3,x' is '1,2,3,x'
R: The intersection of list '1,2,3,x' with 'x' is 'x'
R: The intersection of list 'x' with '1,2,3,x' is 'x'
R: The intersection of list 'x' with 'x' is 'x'
See also: About collecting functions, difference().
ip2host
Prototype: ip2host(ip)
Return type: string
The return value is cached.
Description: Returns the primary name-service host name for the IP address
ip.
Uses whatever configured name service is used by the resolver library to
translate an IP address to a hostname. IPv6 addresses will also resolve,
if supported by the resolver library.
Note that DNS lookups may take time and thus cause CFEngine agents to
wait for responses, slowing their progress significantly.
Arguments:
ip: string - IP address (IPv4 or IPv6) - in the range: .*
Example:
code
body common control
{
bundlesequence => { "reverse_lookup" };
}
bundle agent reverse_lookup
{
vars:
"local4" string => ip2host("127.0.0.1");
# this will be localhost on some systems, ip6-localhost on others...
"local6" string => ip2host("::1");
reports:
_cfe_output_testing::
"we got local4" if => isvariable("local4");
!_cfe_output_testing::
"local4 is $(local4)";
"local6 is $(local6)";
}
Output:
See also: host2ip(), iprange(), isipinsubnet()
History: Was introduced in version 3.1.3, Nova 2.0.2 (2010)
iprange
Prototype: iprange(range, optional_interface)
Return type: boolean
Description: Returns whether the current host lies in the range of
IP addresses specified, optionally checking only interface.
Pattern matching based on IP addresses.
Arguments:
range: string - IP address range syntax - in the range: .*
Example:
code
bundle agent example
{
classes:
"dmz_1" expression => iprange("128.39.89.10-15");
"lab_1" expression => iprange("128.39.74.1/23");
"dmz_1_eth0" expression => iprange("128.39.89.10-15", "eth0");
"lab_1_eth0" expression => iprange("128.39.74.1/23", "eth0");
reports:
dmz_1::
"DMZ 1 subnet";
lab_1::
"Lab 1 subnet";
}
See also: isipinsubnet(), host2ip(), ip2host()
History:
- Optional
interface parameter introduced in CFEngine 3.9.
irange
Prototype: irange(arg1, arg2)
Return type: irange
Description: Define a range of integer values for CFEngine internal use.
Used for any scalar attribute which requires an integer range. You can
generally interchangeably say "1,10" or irange("1","10"). However, if
you want to create a range of dates or times, you must use irange() if you
also use the functions ago(), now(), accumulated(), etc.
Arguments:
arg1: int - Integer start of range - in the range: -99999999999,99999999999arg2: int - Integer end of range - in the range: -99999999999,99999999999
Example:
code
irange("1","100");
irange(ago(0,0,0,1,30,0), "0");
See also:
- Functions commonly used with
irange()
- Attributes of type irange
isdir
Prototype: isdir(filename)
Return type: boolean
Description: Returns whether the named object filename is a directory.
The CFEngine process must have access to filename in order for this to work.
Arguments:
filename: string - File object name - in the range: "?(/.*)
Example:
code
body common control
{
bundlesequence => { "example" };
}
bundle agent example
{
classes:
"isdir" expression => isdir("/");
reports:
isdir::
"Directory exists..";
}
Output:
code
R: Directory exists..
See also: fileexists(), filestat(), islink(), isplain(), returnszero()
isexecutable
Prototype: isexecutable(filename)
Return type: boolean
Description: Returns whether the named object filename has execution rights for the current user.
Arguments:
filename: string - File object name - in the range: "?(/.*)
Example:
code
body common control
{
bundlesequence => { "example" };
}
bundle agent example
{
classes:
"yes" expression => isexecutable("/bin/ls");
reports:
yes::
"/bin/ls is an executable file";
}
Output:
code
R: /bin/ls is an executable file
History: Was introduced in version 3.1.0b1,Nova 2.0.0b1 (2010)
isgreaterthan
Prototype: isgreaterthan(value1, value2)
Return type: boolean
Description: Returns whether value1 is greater than value2.
The comparison is made numerically if possible. If the values are
strings, the comparison is lexical (based on C's strcmp()).
Arguments:
value1: string - Larger string or value - in the range: .*value2: string - Smaller string or value - in the range: .*
Example:
code
body common control
{
bundlesequence => { "example" };
}
bundle agent example
{
classes:
"ok" expression => isgreaterthan("1","0");
reports:
ok::
"Assertion is true";
!ok::
"Assertion is false";
}
Output:
code
R: Assertion is true
isipinsubnet
Prototype: isipinsubnet(range, ip_address1, ip_address2, ...)
Return type: boolean
Description: Returns whether the given range contains any of the following IP addresses.
Arguments:
range: string - IP address range syntax - in the range: .*
Example:
Run:
code
bundle agent main
{
classes:
"in_192" expression => isipinsubnet("192.0.0.0/8", "192.1.2.3");
"in_192_2_2_2" expression => isipinsubnet("192.2.2.0/24", "192.1.2.3");
reports:
in_192::
"The address 192.1.2.3 is in the 192/8 subnet";
!in_192_2_2_2::
"The address 192.1.2.3 is not in the 192.2.2/24 subnet";
}
Output:
code
R: The address 192.1.2.3 is in the 192/8 subnet
R: The address 192.1.2.3 is not in the 192.2.2/24 subnet
See also: iprange(), host2ip(), ip2host()
History: Was introduced in CFEngine 3.10.
islessthan
Prototype: islessthan(value1, value2)
Return type: boolean
Description: Returns whether value1 is less than value2.
The comparison is made numerically if possible. If the values are
strings, the comparison is lexical (based on C's strcmp()).
Arguments:
value1: string - Smaller string or value - in the range: .*value2: string - Larger string or value - in the range: .*
Example:
code
body common control
{
bundlesequence => { "test" };
}
bundle agent test
{
classes:
"ok" expression => islessthan("0","1");
reports:
ok::
"Assertion is true";
!ok::
"Assertion is false";
}
Output:
code
R: Assertion is true
See also: isgreaterthan().
islink
Prototype: islink(filename)
Return type: boolean
Description: Returns whether the named object filename is a symbolic
link.
The link node must both exist and be a symbolic link. Hard links cannot
be detected using this function.
Notes:
islink() does not resolve symlinks as part of it's test. If a broken
symlink exists, the file is still seen to be a symlink. Use
filestat("myfile", "link target") to see if a file resolves to a the
expected target, and check if the link target exists. Alternatively use test
with returnszero(), for example returnszero("/bin/test -f myfile").
Arguments:
filename: string - File object name - in the range: "?(/.*)
Example:
Prepare:
code
ln -fs /tmp/cfe_testhere.txt /tmp/link
Run:
code
body common control
{
bundlesequence => { "example" };
}
bundle agent example
{
classes:
"islink" expression => islink("/tmp/link");
reports:
islink::
"It's a link.";
}
Output:
See also: fileexists(), filestat(), isdir(), isplain(), returnszero()
isnewerthan
Prototype: isnewerthan(newer, older)
Return type: boolean
Description: Returns whether the file newer is newer (modified later)
than the file older.
This function compares the modification time (mtime) of the files, referring
to changes of content only.
Arguments:
newer: string - Newer file name - in the range: "?(/.*)older: string - Older file name - in the range: "?(/.*)
Example:
Prepare:
code
touch -t '200102031234.56' /tmp/earlier
touch -t '200202031234.56' /tmp/later
Run:
code
body common control
{
bundlesequence => { "example" };
}
bundle agent example
{
classes:
"do_it" and => { isnewerthan("/tmp/later","/tmp/earlier"), "cfengine" };
reports:
do_it::
"/tmp/later is older than /tmp/earlier";
}
Output:
code
R: /tmp/later is older than /tmp/earlier
See also: accessedbefore(), changedbefore()
isplain
Prototype: isplain(filename)
Return type: boolean
Description: Returns whether the named object filename is a
plain/regular file.
Arguments:
filename: string - File object name - in the range: "?(/.*)
Example:
code
body common control
{
bundlesequence => { "example" };
}
bundle agent example
{
classes:
"fileisplain" expression => isplain("/etc/passwd");
"dirisnotplain" not => isplain("/");
reports:
fileisplain::
"/etc/passwd is plain..";
dirisnotplain::
"/ is not plain..";
}
Output:
code
R: /etc/passwd is plain..
R: / is not plain..
See also: fileexists(), filestat(), isdir(), islink(), returnszero()
isreadable
Prototype: isreadable(path, timeout)
Return type: boolean
Description: Check if a file is readable.
This function checks if the file specified by the path parameter is readable
by trying to read 1 Byte from it. If the file is not ready for I/O, and the
timeout parameter is not set to 0, the read operation will block for at most
timeout number of seconds.
The timeout parameter is optional and defaults to 3 seconds, if it is not
specified. If the timeout parameter is set to 0, the read operation may block
indefinetly.
The function evaluates to false if the time limit expires or the read operation
fails for any other reason (e.g. permission denied).
Notes:
When the timeout parameter is set to 0, the agent will try to open and read
the file in the main thread, which can cause the agent to block indefinetly.
When the timeout parameter is not 0, the agent will spawn a separate thread
in a detached state, that will try to open and read the file. The agent will
wait for at most N number of seconds for the spawned thread to finish. If the
thread does not finish in time, the agent will consider the file unreadable.
If the file is of size 0, the function will return true, if it successfully
reads 0 bytes (reaches end-of-file).
Please note that the agent will evaluate this policy function multiple times,
meaning that the use of this function can cause a significant performance
penalty.
Example:
code
bundle agent __main__
{
vars:
"filename"
string => "/tmp/foo.txt";
"timeout"
int => "3";
reports:
"File '$(filename)' is readable"
if => isreadable("$(filename)", "$(timeout)");
}
Output:
code
R: File '/tmp/foo.txt' is readable
History: Introduced in 3.22.
See also: filestat(), isexecutable(), isdir(), isplain().
isvariable
Prototype: isvariable(var)
Return type: boolean
Description: Returns whether a variable named var is defined.
The variable need only exist. This says nothing about its value. Use
regcmp to check variable values. Variable references like foo[bar]
are also checked, so this is a way to check if a classic CFEngine
array or a data container has a specific key or element.
Arguments:
var: string - Variable identifier - in the range: .*
Example:
code
body common control
{
bundlesequence => { "example" };
}
bundle agent example
{
vars:
"bla" string => "xyz..";
classes:
"exists" expression => isvariable("bla");
reports:
exists::
"Variable exists: \"$(bla)\"..";
}
Output:
code
R: Variable exists: "xyz.."..
join
Prototype: join(glue, list)
Return type: string
Description: Join the items of list into a string, using the conjunction in glue.
Converts a list or data container into a scalar variable using the
join string in first argument.
This function can accept many types of data parameters.
Arguments:
glue: string - Join glue-string - in the range: .*list: string - CFEngine variable identifier or inline JSON - in the range: .*
Example:
code
body common control
{
bundlesequence => { "test" };
}
bundle agent test
{
vars:
"mylist" slist => { "one", "two", "three", "four", "five" };
"datalist" data => parsejson('[1,2,3,
"one", "two", "three",
"long string",
"four", "fix", "six",
"one", "two", "three",]');
"mylist_str" string => format("%S", mylist);
"datalist_str" string => format("%S", datalist);
"myscalar" string => join("->", mylist);
"datascalar" string => join("->", datalist);
reports:
"Concatenated $(mylist_str): $(myscalar)";
"Concatenated $(datalist_str): $(datascalar)";
}
Output:
code
R: Concatenated { "one", "two", "three", "four", "five" }: one->two->three->four->five
R: Concatenated [1,2,3,"one","two","three","long string","four","fix","six","one","two","three"]: 1->2->3->one->two->three->long string->four->fix->six->one->two->three
History: The collecting function behavior was added in 3.9.
See also: string_split(), about collecting functions.
lastnode
Prototype: lastnode(string, separator)
Return type: string
Description: Returns the part of string after the last separator.
This function returns the final node in a chain, given a regular
expression to split on. This is mainly useful for finding leaf-names of
files, from a fully qualified path name.
Arguments:
string: string - Input string - in the range: .*separator: string - Link separator, e.g. /,: - in the range: .*
Example:
code
body common control
{
bundlesequence => { "yes" };
}
bundle agent yes
{
vars:
"path1" string => "/one/two/last1";
"path2" string => "one:two:last2";
"path4" string => "/one/two/";
"last1" string => lastnode("$(path1)","/");
"last2" string => lastnode("$(path2)",":");
"last3" string => lastnode("$(path2)","/");
"last4" string => lastnode("$(path4)","/");
reports:
"Last / node in / path '$(path1)' = '$(last1)'";
"Last : node in : path '$(path2)' = '$(last2)'";
"Last / node in : path '$(path2)' = '$(last3)'";
"Last / node in /-terminated path '$(path4)' = '$(last4)'";
}
Output:
code
R: Last / node in / path '/one/two/last1' = 'last1'
R: Last : node in : path 'one:two:last2' = 'last2'
R: Last / node in : path 'one:two:last2' = 'one:two:last2'
R: Last / node in /-terminated path '/one/two/' = ''
See also: filestat(), dirname(),
splitstring().
laterthan
Prototype: laterthan(year, month, day, hour, minute, second)
Return type: boolean
Description: Returns whether the current time is later than the given
date and time.
The specified date/time is an absolute date in the local timezone.
Note that, unlike some other functions, the month argument is 1-based (i.e. 1 corresponds to January).
Arguments:
year: int - Years - in the range: 0,10000month: int - Months - in the range: 0,1000day: int - Days - in the range: 0,1000hour: int - Hours - in the range: 0,1000minute: int - Minutes - in the range: 0,1000second: int - Seconds - in the range: 0,40000
Example:
code
bundle agent example
{
classes:
"after_deadline" expression => laterthan(2000,1,1,0,0,0);
reports:
after_deadline::
"deadline has passed";
}
See also: on()
ldaparray
This function is only available in CFEngine Enterprise.
Prototype: ldaparray(array, uri, dn, filter, scope, security)
Return type: boolean
Description: Fills array with the entire LDAP record, and returns
whether there was a match for the search.
This function retrieves an entire record with all elements and populates
an associative array with the entries. It returns a class that is true
if there was a match for the search, and false if nothing was retrieved.
Arguments:
array: string - Array name - in the range: .*uri: string - URI - in the range: .*dn: string - Distinguished name - in the range: .*filter: string - Filter - in the range: .*scope: - Search scope policy - one of
security: - Security level - one of
dn specifies the distinguished name, an ldap formatted name built from
components, e.g. "dc=cfengine,dc=com". filter is an ldap search, e.g.
"(sn=User)". Which security values are supported depends on machine and
server capabilities.
Example:
code
classes:
"gotdata" expression => ldaparray(
"myarray",
"ldap://ldap.example.org",
"dc=cfengine,dc=com",
"(uid=mark)",
"subtree",
"none");
ldaplist
This function is only available in CFEngine Enterprise.
Prototype: ldaplist(uri, dn, filter, record, scope, security)
Return type: slist
The return value is cached.
Description: Returns a list with all named values from multiple ldap records.
This function retrieves a single field from all matching LDAP records
identified by the search parameters.
Arguments:
uri: string - URI - in the range: .*dn: string - Distinguished name - in the range: .*filter: string - Filter - in the range: .*record: string - Record name - in the range: .*scope: - Search scope policy - one of
security: - Security level - one of
dn specifies the distinguished name, an ldap formatted name built from
components, e.g. "dc=cfengine,dc=com". filter is an ldap search, e.g.
"(sn=User)", and record is the name of the single record to be retrieved,
e.g. uid. Which security values are supported depends on machine and
server capabilities.
Example:
code
vars:
# Get all matching values for "uid" - should be a single record match
"list" slist => ldaplist(
"ldap://ldap.example.org",
"dc=cfengine,dc=com",
"(sn=User)",
"uid",
"subtree",
"none"
);
ldapvalue
This function is only available in CFEngine Enterprise.
Prototype: ldapvalue(uri, dn, filter, record, scope, security)
Return type: string
The return value is cached.
Description: Returns the first matching named value from ldap.
This function retrieves a single field from a single LDAP record
identified by the search parameters. The first matching value it taken.
Arguments:
uri: string - URI - in the range: .*dn: string - Distinguished name - in the range: .*filter: string - Filter - in the range: .*record: string - Record name - in the range: .*scope: - Search scope policy - one of
security: - Security level - one of
dn specifies the distinguished name, an ldap formatted name built from
components, e.g. "dc=cfengine,dc=com". filter is an ldap search, e.g.
"(sn=User)", and record is the name of the single record to be retrieved,
e.g. uid. Which security values are supported depends on machine and
server capabilities.
Example:
code
vars:
# Get the first matching value for "uid" in schema
"value" string => ldapvalue(
"ldap://ldap.example.org",
"dc=cfengine,dc=com",
"(sn=User)",
"uid",
"subtree",
"none"
);
length
Prototype: length(list)
Return type: int
Description: Returns the length of list.
This function can accept many types of data parameters.
Arguments:
list: string - CFEngine variable identifier or inline JSON - in the range: .*
Example:
code
body common control
{
bundlesequence => { "test" };
}
bundle agent test
{
vars:
"test" slist => {
1,2,3,
"one", "two", "three",
"long string",
"four", "fix", "six",
"one", "two", "three",
};
"length" int => length("test");
"test_str" string => join(",", "test");
reports:
"The test list is $(test_str)";
"The test list has $(length) elements";
}
Output:
code
R: The test list is 1,2,3,one,two,three,long string,four,fix,six,one,two,three
R: The test list has 13 elements
History: The collecting function behavior was added in 3.9.
See also: nth(), mergedata(), about collecting functions, and data documentation.
lsdir
Prototype: lsdir(path, regex, include_base)
Return type: slist
Description: Returns a list of files in the directory path matching the regular expression regex.
If include_base is true, full paths are returned, otherwise only names
relative to the directory are returned.
Arguments:
path: string - Path to base directory - in the range: .+regex: regular expression - Regular expression to match files or blank - in the range: .*include_base: - Include the base path in the list - one of
Example:
code
body common control
{
bundlesequence => { "example" };
}
bundle agent example
{
vars:
"listfiles" slist => lsdir("/etc", "(p.sswd|gr[ou]+p)", "true");
"sorted_listfiles" slist => sort(listfiles, "lex");
reports:
"files in list: $(sorted_listfiles)";
}
Output:
code
R: files in list: /etc/group
R: files in list: /etc/passwd
Tips:
- Filter out the current (
.) and parent (..)directories with a
negative look ahead. lsdir( "/tmp", "^(?!(\.$|\.\.$)).*", false ).
Notes:
History: Was introduced in 3.3.0, Nova 2.2.0 (2011)
makerule
Prototype: makerule(target, sources)
Return type: string
Description: Evaluates whether a target file needs to be built or
rebuilt from one or more sources files.
This function can accept many types of data parameters.
The function is provided to emulate the semantics of the Unix make program.
In a traditional Makefile, rules take the form
code
target: source1 source2 ..
(tab) commands
The top line evaluates to a predicate for executing a number of commands, which is true
if the target file does not exist, or if any of the sources dependencies
in the list has been changed since the target was last built.
The makerule function emulates the same semantics and sets a class if
the target needs to be built or rebuit, i.e. if the top line of an
equivalent makefile is true.
Arguments:
target: string - Target filename - in the range: "?(/.*)sources: string - Source filename or CFEngine variable identifier or inline JSON - in the range: .*
The sources argument may be either a scalar (indicating a single
source) or a list reference or a data container. If the sources
argument specifies a list, then the entire list of sources is used to
determine whether the target needs rebuilding.
Example:
code
classes:
"build_me" expression => makerule("/tmp/target", "/tmp/source.c");
"build_me_ab" expression => makerule("/tmp/target", '["/tmp/source.a","/tmp/source.b"]' );
commands:
build_me::
"/usr/bin/gcc -o /tmp/target /tmp/source.c";
History: The collecting function behavior was added in 3.9.
See also: About collecting functions.
maparray
Prototype: maparray(pattern, array_or_container)
Return type: slist
Description: Returns a list with each array_or_container element
modified by a pattern.
This function can accept many types of data parameters.
This function can delay the evaluation of its first parameter, which can therefore be a function call.
The $(this.k) and $(this.v) variables expand to the key and value
of the current element, similar to the way this is available for
maplist.
If the array has two levels, you'll also be able to use the
$(this.k[1]) variable for the key at the second level. See the
example below for an illustration.
If a value in the array is an slist, you'll get one result for each
value (implicit looping).
The order of the array keys is not guaranteed. Use the sort
function if you need order in the resulting output.
Arguments:
pattern: string - Pattern based on $(this.k) and $(this.v) as original text - in the range: .*array_or_container: string - CFEngine variable identifier or inline JSON, the array variable to map - in the range: .*
Example:
code
body common control
{
bundlesequence => { "run" };
}
bundle agent run
{
vars:
"static[2]" string => "lookup 2";
"static[two]" string => "lookup two";
"static[big]" string => "lookup big";
"static[small]" string => "lookup small";
"todo[1]" string => "2";
"todo[one]" string => "two";
"todo[3999]" slist => { "big", "small" };
"map" slist =>
maparray("key='$(this.k)', static lookup = '$(static[$(this.v)])', value='$(this.v)'",
todo);
"map_sorted" slist => sort(map, lex);
"mycontainer" data => parsejson('
{
"top":
{
"x": 2,
"y": "big"
}
}');
"mapc" slist =>
maparray("key='$(this.k)', key2='$(this.k[1])', static lookup = '$(static[$(this.v)])', value='$(this.v)'",
mycontainer);
"mapc_str" string => format("%S", mapc);
reports:
"mapped array: $(map_sorted)";
"mapped container: $(mapc_str)";
}
Output:
code
R: mapped array: key='1', static lookup = 'lookup 2', value='2'
R: mapped array: key='3999', static lookup = 'lookup big', value='big'
R: mapped array: key='3999', static lookup = 'lookup small', value='small'
R: mapped array: key='one', static lookup = 'lookup two', value='two'
R: mapped container: { "key='top', key2='x', static lookup = 'lookup 2', value='2'", "key='top', key2='y', static lookup = 'lookup big', value='big'" }
History: The collecting function behavior was added in 3.9. The delayed evaluation behavior was introduced in 3.10.
See also: maplist(), mapdata(), about collecting functions, and data documentation.
mapdata
Prototype: mapdata(interpretation, pattern, array_or_container)
Return type: data
Description: Returns a data container holding a JSON array. The
array is a map across each element of array_or_container, modified by
a pattern. The map is either collected literally when interpretation
is none, or canonified when interpretation is canonify,
or parsed as JSON when interpretation is json, or collected from pattern,
invoked as a program, when interpretation is json_pipe.
This function can accept many types of data parameters.
This function can delay the evaluation of its second parameter, which can therefore be a function call.
The $(this.k) and $(this.v) variables expand to the key and value
of the current element, similar to the way this is available for
maplist.
If the array or data container has two levels, you'll also be able to
use the $(this.k[1]) variable for the key at the second level. See
the example below for an illustration.
The order of the keys is not guaranteed. Use the sort() function if
you need order in the resulting output.
Arguments:
interpretation: - Conversion to apply to the mapped string - one of
nonecanonifyjsonjson_pipe
pattern: string - Pattern based on $(this.k) and $(this.v) as original text - in the range: .*array_or_container: string - CFEngine variable identifier or inline JSON - in the range: .*
Example:
code
body common control
{
bundlesequence => { "run" };
}
bundle agent run
{
vars:
"myarray[lookup][big]" string => "lookup big";
"myarray[lookup][small]" string => "lookup small";
# every item must parse as valid JSON when the interpretation is `json`
"mapa_json" data => mapdata("json", '{ "key": "$(this.k)", "key2": "$(this.k[1])", "value": "$(this.v)" }', myarray);
"mapa_json_str" string => format("%S", mapa_json);
# every item is just a string when the interpretation is `none`
"mapa_none" data => mapdata("none", 'key=$(this.k), level 2 key = $(this.k[1]), value=$(this.v)', myarray);
"mapa_none_str" string => format("%S", mapa_none);
"mycontainer" data => parsejson('
{
"top":
{
"x": 100,
"y": 200
}
}');
# every item must parse as valid JSON when the interpretation is `json`
"mapc_json" data => mapdata("json", '{ "key": "$(this.k)", "key2": "$(this.k[1])", "value": "$(this.v)" }', mycontainer);
"mapc_json_str" string => format("%S", mapc_json);
# every item is just a string when the interpretation is `none`
"mapc_none" data => mapdata("none", 'key=$(this.k), level 2 key = $(this.k[1]), value=$(this.v)', mycontainer);
"mapc_none_str" string => format("%S", mapc_none);
reports:
show_example::
"mapdata/json on classic CFEngine array result: $(mapa_json_str)";
"mapdata/none on classic CFEngine array result: $(mapa_none_str)";
"mapdata/json on data container result: $(mapc_json_str)";
"mapdata/none on data container result: $(mapc_none_str)";
any::
"Note that the output of the above reports is not deterministic,";
"because the order of the keys returned by mapdata() is not guaranteed.";
}
Output: (when show_example is defined)
code
R: mapdata/json on classic CFEngine array result: [{"key":"lookup","key2":"big","value":"lookup big"},{"key":"lookup","key2":"small","value":"lookup small"}]
R: mapdata/none on classic CFEngine array result: ["key=lookup, level 2 key = big, value=lookup big","key=lookup, level 2 key = small, value=lookup small"]
R: mapdata/json on data container result: [{"key":"top","key2":"x","value":"100"},{"key":"top","key2":"y","value":"200"}]
R: mapdata/none on data container result: ["key=top, level 2 key = x, value=100","key=top, level 2 key = y, value=200"]
json_pipe
The json_pipe interpretation is intended to work with programs that take JSON
as input and produce JSON as output. This is a standard tool convention in the
Unix world. See the example below for the typical usage.
jq has a powerful programming language that
fits the json_pipe interpretation well. It will take JSON input and product
JSON output. Please read the jq manual and
cookbook to get a feel for the power of this tool. When available,
jq will offer tremendous data manipulation
power for advanced cases where the built-in CFEngine functions are not enough.
Example with json_pipe:
code
body common control
{
bundlesequence => { "run" };
}
bundle agent run
{
vars:
"tester" data => '{ "x": 100, "y": [ true, "a", "b" ] }';
# "jq ." returns the same thing that was passed in
"pipe_passthrough" data => mapdata("json_pipe", '$(def.jq) .', tester);
"pipe_passthrough_str" string => format("%S", pipe_passthrough);
# "jq .x" returns what was under x wrapped in an array: [100]
"pipe_justx" data => mapdata("json_pipe", '$(def.jq) .x', tester);
"pipe_justx_str" string => format("%S", pipe_justx);
# "jq .y" returns what was under y wrapped in an array: [[true,"a","b"]]
"pipe_justy" data => mapdata("json_pipe", '$(def.jq) .y', tester);
"pipe_justy_str" string => format("%S", pipe_justy);
# "jq .y[]" returns each entry under y *separately*: [true,"a","b"]
"pipe_yarray" data => mapdata("json_pipe", '$(def.jq) .y[]', tester);
"pipe_yarray_str" string => format("%S", pipe_yarray);
# "jq .z" returns null because the key "z" is missing: [null]
"pipe_justz" data => mapdata("json_pipe", '$(def.jq) .z', tester);
"pipe_justz_str" string => format("%S", pipe_justz);
# "jq" can do math too! and much more!
"pipe_jqmath" data => mapdata("json_pipe", '$(def.jq) 1+2+3', tester);
"pipe_jqmath_str" string => format("%S", pipe_jqmath);
reports:
"mapdata/json_pipe passthrough result: $(pipe_passthrough_str)";
"mapdata/json_pipe just x result: $(pipe_justx_str)";
"mapdata/json_pipe just y result: $(pipe_justy_str)";
"mapdata/json_pipe array under y result: $(pipe_yarray_str)";
"mapdata/json_pipe just z result: $(pipe_justz_str)";
"mapdata/json_pipe math expression result: $(pipe_jqmath_str)";
}
Output:
code
R: mapdata/json_pipe passthrough result: [{"x":100,"y":[true,"a","b"]}]
R: mapdata/json_pipe just x result: [100]
R: mapdata/json_pipe just y result: [[true,"a","b"]]
R: mapdata/json_pipe array under y result: [true,"a","b"]
R: mapdata/json_pipe just z result: [null]
R: mapdata/json_pipe math expression result: [6]
History: Was introduced in 3.7.0. canonify mode was introduced in 3.9.0. The collecting function behavior was added in 3.9. The json_pipe mode was added in 3.9. The delayed evaluation behavior was introduced in 3.10.
See also: maplist(), maparray(), canonify(), about collecting functions, and data documentation.
maplist
Prototype: maplist(pattern, list)
Return type: slist
Description: Return a list with each element in list modified by a
pattern.
This function can accept many types of data parameters.
This function can delay the evaluation of its first parameter, which can therefore be a function call.
The $(this) variable expands to the currently processed entry from list.
This is essentially like the map() function in Perl, and applies to
lists.
Arguments:
pattern: string - Pattern based on $(this) as original text - in the range: .*list: string - CFEngine variable identifier or inline JSON - in the range: .*
Example:
code
body common control
{
bundlesequence => { "example" };
}
bundle common g
{
vars:
"otherlist" slist => { "x", "y", "z" };
}
bundle agent example
{
vars:
"oldlist" slist => { "a", "b", "c" };
"newlist1" slist => maplist("Element ($(this))","@(g.otherlist)");
"newlist2" slist => maplist("Element ($(this))",@(oldlist));
reports:
"Transform: $(newlist1)";
"Transform: $(newlist2)";
}
Output:
code
R: Transform: Element (x)
R: Transform: Element (y)
R: Transform: Element (z)
R: Transform: Element (a)
R: Transform: Element (b)
R: Transform: Element (c)
History: Was introduced in 3.3.0, Nova 2.2.0 (2011). The collecting function behavior was added in 3.9. The delayed evaluation behavior was introduced in 3.10.
See also: maplist(), maparray(), about collecting functions, and data documentation.
max
Prototype: max(list, sortmode)
Return type: string
Description: Return the maximum of the items in list according to sortmode (same sort modes as in sort()).
This function can accept many types of data parameters.
Arguments:
list: string - CFEngine variable identifier or inline JSON - in the range: .*sortmode: - Sorting method: lex or int or real (floating point) or IPv4/IPv6 or MAC address - one of
lexintrealIPipMACmac
Example:
code
body common control
{
bundlesequence => { "test" };
}
bundle agent test
{
vars:
# the behavior will be the same whether you use a data container or a list
# "mylist" slist => { "foo", "1", "2", "3000", "bar", "10.20.30.40" };
"mylist" data => parsejson('["foo", "1", "2", "3000", "bar", "10.20.30.40"]');
"mylist_str" string => format("%S", mylist);
"max_int" string => max(mylist, "int");
"max_lex" string => max(mylist, "lex");
"max_ip" string => max(mylist, "ip");
"min_int" string => min(mylist, "int");
"min_lex" string => min(mylist, "lex");
"min_ip" string => min(mylist, "ip");
"mean" real => mean(mylist);
"variance" real => variance(mylist);
reports:
"my list is $(mylist_str)";
"mean is $(mean)";
"variance is $(variance) (use eval() to get the standard deviation)";
"max int is $(max_int)";
"max IP is $(max_ip)";
"max lexicographically is $(max_lex)";
"min int is $(min_int)";
"min IP is $(min_ip)";
"min lexicographically is $(min_lex)";
}
Output:
code
R: my list is ["foo","1","2","3000","bar","10.20.30.40"]
R: mean is 502.200000
R: variance is 1497376.000000 (use eval() to get the standard deviation)
R: max int is 3000
R: max IP is 10.20.30.40
R: max lexicographically is foo
R: min int is bar
R: min IP is 1
R: min lexicographically is 1
History: Was introduced in version 3.6.0 (2014). canonify mode was introduced in 3.9.0. The collecting function behavior was added in 3.9.
See also: sort(), variance(), sum(), mean(), min(), about collecting functions, and data documentation.
mean
Prototype: mean(list)
Return type: real
Description: Return the mean of the numbers in list.
This function can accept many types of data parameters.
Arguments:
list: string - CFEngine variable identifier or inline JSON - in the range: .*
Example:
code
body common control
{
bundlesequence => { "test" };
}
bundle agent test
{
vars:
# the behavior will be the same whether you use a data container or a list
# "mylist" slist => { "foo", "1", "2", "3000", "bar", "10.20.30.40" };
"mylist" data => parsejson('["foo", "1", "2", "3000", "bar", "10.20.30.40"]');
"mylist_str" string => format("%S", mylist);
"max_int" string => max(mylist, "int");
"max_lex" string => max(mylist, "lex");
"max_ip" string => max(mylist, "ip");
"min_int" string => min(mylist, "int");
"min_lex" string => min(mylist, "lex");
"min_ip" string => min(mylist, "ip");
"mean" real => mean(mylist);
"variance" real => variance(mylist);
reports:
"my list is $(mylist_str)";
"mean is $(mean)";
"variance is $(variance) (use eval() to get the standard deviation)";
"max int is $(max_int)";
"max IP is $(max_ip)";
"max lexicographically is $(max_lex)";
"min int is $(min_int)";
"min IP is $(min_ip)";
"min lexicographically is $(min_lex)";
}
Output:
code
R: my list is ["foo","1","2","3000","bar","10.20.30.40"]
R: mean is 502.200000
R: variance is 1497376.000000 (use eval() to get the standard deviation)
R: max int is 3000
R: max IP is 10.20.30.40
R: max lexicographically is foo
R: min int is bar
R: min IP is 1
R: min lexicographically is 1
History: Was introduced in version 3.6.0 (2014). The collecting function behavior was added in 3.9.
See also: sort(), variance(), sum(), max(), min(), about collecting functions, and data documentation.
mergedata
Prototype: mergedata(one, two, etc)
Return type: data
Description: Returns the merger of any named data containers or lists. Can
also wrap and unwrap data containers.
The returned data container will have the keys from each of the named
data containers, arrays, or lists.
If all the data containers are JSON arrays, they are merged into a
single array, as you'd expect from merging two arrays.
If any of the data containers are JSON objects, all the containers are
treated as JSON objects (for arrays, the key is the element's offset).
This function can accept many types of data parameters.
mergedata() is thus a convenient way, together with getindices() and
getvalues(), to bridge the gap between data container and the
traditional list and array data types in CFEngine.
Notes:
- Bare values try to expand a named CFEngine data container
- It is only possible to wrap data containers in the current namespace.
- true and false are reserved bare values
- In the event of key collision the last key merged wins
Example:
code
body common control
{
bundlesequence => { "test", "test2", "test3" };
}
bundle agent test
{
vars:
"d1" data => parsejson('{ "a": [1,2,3], "b": [] }');
"d2" data => parsejson('{ "b": [4,5,6] }');
"d3" data => parsejson('[4,5,6]');
"list1" slist => { "element1", "element2" };
"array1[mykey]" slist => { "array_element1", "array_element2" };
"array2[otherkey]" string => "hello";
"merged_d1_d2" data => mergedata("d1", "d2");
"merged_d1_d3" data => mergedata("d1", "d3");
"merged_d3_list1" data => mergedata("d3", "list1");
"merged_d1_array1" data => mergedata("d1", "array1");
"merged_d2_array2" data => mergedata("d2", "array2");
"merged_d1_wrap_array_d2" data => mergedata("d1", "[ d2 ]");
"merged_d1_wrap_map_d2" data => mergedata("d1", '{ "newkey": d2 }');
"merged_d1_d2_str" string => format("merging %S with %S produced %S", d1, d2, merged_d1_d2);
"merged_d1_wrap_array_d2_str" string => format("merging %S with wrapped [ %S ] produced %S", d1, d2, merged_d1_wrap_array_d2);
"merged_d1_wrap_map_d2_str" string => format('merging %S with wrapped { "newkey": %S produced %S', d1, d2, merged_d1_wrap_map_d2);
"merged_d1_d3_str" string => format("merging %S with %S produced %S", d1, d3, merged_d1_d3);
"merged_d3_list1_str" string => format("merging %S with %S produced %S", d3, list1, merged_d3_list1);
"merged_d1_array1_str" string => format("merging %S with %s produced %S", d1, array1, merged_d1_array1);
"merged_d2_array2_str" string => format("merging %S with %s produced %S", d2, array2, merged_d2_array2);
reports:
"$(merged_d1_d2_str)";
"$(merged_d1_wrap_array_d2_str)";
"$(merged_d1_wrap_map_d2_str)";
"$(merged_d1_d3_str)";
"$(merged_d3_list1_str)";
"$(merged_d1_array1_str)";
"$(merged_d2_array2_str)";
}
bundle agent test2
{
vars:
"a" data => parsejson('{ "a": "1" }'), meta => { "mymerge" };
"b" data => parsejson('{ "b": "2" }'), meta => { "mymerge" };
"c" data => parsejson('{ "c": "3" }'), meta => { "mymerge" };
"d" data => parsejson('{ "d": "4" }'), meta => { "mymerge" };
"todo" slist => variablesmatching(".*", "mymerge");
methods:
"go" usebundle => cmerge(@(todo)); # a, b, c, d
reports:
"$(this.bundle): merged containers with cmerge = $(cmerge.all_str)";
}
bundle agent cmerge(varlist)
{
vars:
"all" data => parsejson('[]'), policy => "free";
"all" data => mergedata(all, $(varlist)), policy => "free";
"all_str" string => format("%S", all), policy => "free";
}
bundle agent test3
{
vars:
"dest_files" slist => { "/tmp/default.json", "/tmp/epel.json" };
"template_file" string => "repository.mustache";
"process_templates" data => mergedata('{ "$(template_file)" : dest_files }');
"process__templates_str" string => format("%S", "process_templates");
reports:
"$(this.bundle) $(process__templates_str)";
"$(this.bundle) $(process_templates[$(template_file)])";
}
Output:
code
R: merging {"a":[1,2,3],"b":[]} with {"b":[4,5,6]} produced {"a":[1,2,3],"b":[4,5,6]}
R: merging {"a":[1,2,3],"b":[]} with wrapped [ {"b":[4,5,6]} ] produced {"0":{"b":[4,5,6]},"a":[1,2,3],"b":[]}
R: merging {"a":[1,2,3],"b":[]} with wrapped { "newkey": {"b":[4,5,6]} produced {"a":[1,2,3],"b":[],"newkey":{"b":[4,5,6]}}
R: merging {"a":[1,2,3],"b":[]} with [4,5,6] produced {"0":4,"1":5,"2":6,"a":[1,2,3],"b":[]}
R: merging [4,5,6] with { "element1", "element2" } produced [4,5,6,"element1","element2"]
R: merging {"a":[1,2,3],"b":[]} with array1 produced {"a":[1,2,3],"b":[],"mykey":["array_element1","array_element2"]}
R: merging {"b":[4,5,6]} with array2 produced {"b":[4,5,6],"otherkey":"hello"}
R: test2: merged containers with cmerge = {"a":"1","b":"2","c":"3","d":"4"}
R: test3 {"repository.mustache":["/tmp/default.json","/tmp/epel.json"]}
R: test3 /tmp/default.json
R: test3 /tmp/epel.json
Example:
code
bundle agent mergedata_last_key_wins
{
vars:
"one" data => '{ "color": "red", "stuff": [ "one", "two" ], "thing": "one" }';
"two" data => '{ "color": "blue", "stuff": [ "three" ] }';
reports:
"$(with)" with => storejson( mergedata( one, two ) );
}
bundle agent __main__
{
methods: "mergedata_last_key_wins";
}
Output:
code
R: {
"color": "blue",
"stuff": [
"three"
],
"thing": "one"
}
History:
See also: data_expand(), getindices(), getvalues(), readjson(), parsejson(), readyaml(), parseyaml(), about collecting functions, and data documentation.
min
Prototype: min(list, sortmode)
Return type: string
Description: Return the minimum of the items in list according to sortmode (same sort modes as in sort()).
This function can accept many types of data parameters.
Arguments:
list: string - CFEngine variable identifier or inline JSON - in the range: .*sortmode: - Sorting method: lex or int or real (floating point) or IPv4/IPv6 or MAC address - one of
lexintrealIPipMACmac
Example:
code
body common control
{
bundlesequence => { "test" };
}
bundle agent test
{
vars:
# the behavior will be the same whether you use a data container or a list
# "mylist" slist => { "foo", "1", "2", "3000", "bar", "10.20.30.40" };
"mylist" data => parsejson('["foo", "1", "2", "3000", "bar", "10.20.30.40"]');
"mylist_str" string => format("%S", mylist);
"max_int" string => max(mylist, "int");
"max_lex" string => max(mylist, "lex");
"max_ip" string => max(mylist, "ip");
"min_int" string => min(mylist, "int");
"min_lex" string => min(mylist, "lex");
"min_ip" string => min(mylist, "ip");
"mean" real => mean(mylist);
"variance" real => variance(mylist);
reports:
"my list is $(mylist_str)";
"mean is $(mean)";
"variance is $(variance) (use eval() to get the standard deviation)";
"max int is $(max_int)";
"max IP is $(max_ip)";
"max lexicographically is $(max_lex)";
"min int is $(min_int)";
"min IP is $(min_ip)";
"min lexicographically is $(min_lex)";
}
Output:
code
R: my list is ["foo","1","2","3000","bar","10.20.30.40"]
R: mean is 502.200000
R: variance is 1497376.000000 (use eval() to get the standard deviation)
R: max int is 3000
R: max IP is 10.20.30.40
R: max lexicographically is foo
R: min int is bar
R: min IP is 1
R: min lexicographically is 1
History: Was introduced in version 3.6.0 (2014). The collecting function behavior was added in 3.9.
See also: sort(), variance(), sum(), max(), mean(), about collecting functions, and data documentation.
network_connections
Prototype: network_connections()
Return type: data
Description: Return the list of current network connections.
The returned data container has four keys:
tcp has all the TCP connections over IPv4tcp6 has all the TCP connections over IPv6udp has all the UDP connections over IPv4udp6 has all the UDP connections over IPv6
Under each key, there's an array of connection objects that all look like this:
code
{
"local": {
"address": "...source address...",
"port": "...source port..."
},
"remote": {
"address": "...remote address...",
"port": "...remote port..."
},
"state": "...connection state..."
}
The address will be either IPv4 or IPv6 as appropriate. The port will
be an integer stored as a string. The state will be a string like
UNKNOWN.
Note: This function is supported on Linux.
On Linux, usually a state of UNKNOWN and a remote address 0.0.0.0
or 0:0:0:0:0:0:0:0 with port 0 mean this is a listening IPv4 and
IPv6 server. In addition, usually a local address of 0.0.0.0 or
0:0:0:0:0:0:0:0 means the server is listening on every IPv4 or IPv6
interface, while 127.0.0.1 (the IPv4 localhost address) or
0:100:0:0:0:0:0:0 means the server is only listening to connections
coming from the same machine.
A state of ESTABLISHED usually means you're looking at a live
connection.
On Linux, all the data is collected from the files /proc/net/tcp,
/proc/net/tcp6, /proc/net/udp, and /proc/net/udp6.
Example:
code
vars:
"connections" data => network_connections();
Output:
The SSH daemon:
code
{
"tcp": [
{
"local": {
"address": "0.0.0.0",
"port": "22"
},
"remote": {
"address": "0.0.0.0",
"port": "0"
},
"state": "UNKNOWN"
}
]
}
The printer daemon listening only to local IPv6 connections on port 631:
code
"tcp6": [
{
"local": {
"address": "0:100:0:0:0:0:0:0",
"port": "631"
},
"remote": {
"address": "0:0:0:0:0:0:0:0",
"port": "0"
},
"state": "UNKNOWN"
}
]
An established connection on port 2200:
code
"tcp": [
{
"local": {
"address": "192.168.1.33",
"port": "2200"
},
"remote": {
"address": "1.2.3.4",
"port": "8533"
},
"state": "ESTABLISHED"
}
]
History: Introduced in CFEngine 3.9
See also: sys.inet, sys.inet6.
none
Prototype: none(regex, list)
Return type: boolean
Description: Returns whether no element in list matches the regular
expression regex.
This function can accept many types of data parameters.
Arguments:
regex: regular expression - Regular expression or string - in the range: .*list: string - CFEngine variable identifier or inline JSON - in the range: .*
The regular expression is unanchored.
Example:
code
body common control
{
bundlesequence => { "example" };
}
bundle agent example
{
classes:
"none11" expression => none("jebadiah", test1);
"none12" expression => none("2", test1);
"none21" expression => none("jebadiah", test2);
"none22" expression => none("2", test2);
vars:
"test1" slist => {
1,2,3,
"one", "two", "three",
"long string",
"four", "fix", "six",
"one", "two", "three",
};
"test2" data => parsejson('[1,2,3,
"one", "two", "three",
"long string",
"four", "fix", "six",
"one", "two", "three",]');
reports:
"The test1 list is $(test1)";
none11::
"none() test1 1 passed";
!none11::
"none() test1 1 failed";
none12::
"none() test1 2 failed";
!none12::
"none() test1 2 passed";
"The test2 list is $(test2)";
none21::
"none() test2 1 passed";
!none21::
"none() test2 1 failed";
none22::
"none() test2 2 failed";
!none22::
"none() test2 2 passed";
}
Output:
code
R: The test1 list is 1
R: The test1 list is 2
R: The test1 list is 3
R: The test1 list is one
R: The test1 list is two
R: The test1 list is three
R: The test1 list is long string
R: The test1 list is four
R: The test1 list is fix
R: The test1 list is six
R: none() test1 1 passed
R: none() test1 2 passed
R: The test2 list is 1
R: The test2 list is 2
R: The test2 list is 3
R: The test2 list is one
R: The test2 list is two
R: The test2 list is three
R: The test2 list is long string
R: The test2 list is four
R: The test2 list is fix
R: The test2 list is six
R: none() test2 1 passed
R: none() test2 2 passed
History: The collecting function behavior was added in 3.9.
See also: About collecting functions, filter(), every(), and some().
not
Prototype: not(expression)
Return type: boolean
Description: Returns any if all arguments evaluate to false and !any if
any argument evaluates to true.
Arguments:
expression: string - Class value - in the range: .*
Argument Descriptions:
expression - Class, class expression, or function that returns a class
Example:
code
commands:
"/usr/bin/generate_config $(config)"
if => not( fileexists("/etc/config/$(config)") );
Notes: Introduced primarily for use with if and unless promise attributes.
See also: and(), or()
History:
- Introduced in 3.2.0, Nova 2.1.0 (2011)
- Return type changed from
string to boolean in 3.17.0 (2020) (CFE-3470)
now
Prototype: now()
Return type: int
Description: Return the time at which this agent run started
in system representation.
In order to provide an immutable environment against which to converge,
this value does not change during the execution of an agent.
Examples:
Reporting the system time of agent start and calculating what yesterday was.
code
bundle agent example_now
{
vars:
"epoch" int => now();
"24_hours_ago"
string => format( "%d",
eval( "$(epoch)-86400", math, infix ));
reports:
"Today is $(with) or in unix format '$(epoch)'"
with => strftime( gmtime, "%Y-%m-%d %T", $(epoch) );
"24 hours ago was $(with) or in unix format '$(epoch)'"
with => strftime( gmtime, "%Y-%m-%d %T", $(24_hours_ago) );
}
bundle agent __main__
{
methods:
"example_now";
}
Output:
code
R: Today is 2019-06-12 20:40:00 or in unix format '1560372000'
R: 24 hours ago was 2019-06-11 20:40:00 or in unix format '1560372000'
files type promises using file_select to limit recursive file selection
based on a time relative to the agent start can make use of this function.
code
bundle agent gzip_recent_pdfs
{
files:
# Ensure that any file ending in .pdf that has been
# modified in the last year is compressed
"/tmp/"
file_select => pdf_modified_within_last_year,
transformer => '/bin/gzip $(this.promiser)';
}
body file_select pdf_modified_within_last_year
# @brief Sllect files that have been modified in the last year AND end in .pdf
{
mtime => irange(ago(1,0,0,0,0,0),now);
leaf_name => { ".*\.pdf" };
file_result => "mtime.leaf_name";
}
processes type promises using process_select can use this function to
select processes based on relative execution time.
code
bundle agent main
{
processes:
"init"
process_count => any_count("booted_over_1_day_ago"),
process_select => days_older_than(1),
comment => "Define a class indicating we found an init process running
for more than 1 day.";
reports:
booted_over_1_day_ago::
"This system was booted over 1 days ago since there is an init process
that is older than 1 day.";
!booted_over_1_day_ago::
"This system has been rebooted recently as the init process has been
running for less than a day";
}
body process_count any_count(cl)
{
match_range => "0,0";
out_of_range_define => { "$(cl)" };
}
body process_select days_older_than(d)
{
stime_range => irange(ago(0,0,"$(d)",0,0,0),now);
process_result => "!stime";
}
This policy can be found in
/var/cfengine/share/doc/examples/processes_define_class_based_on_process_runtime.cf
and downloaded directly from
github.
See also:
nth
Prototype: nth(list_or_container, position_or_key)
Return type: string
Description: Returns the element of list_or_container at zero-based position_or_key.
If an invalid position (above the size of the list minus 1) or missing key is
requested, this function does not return a valid value.
This function can accept many types of data parameters.
list_or_container can be an slist or a data container. If it's a
slist, the offset is simply the position in the list. If it's a data
container, the meaning of the position_or_key depends on its
top-level contents: for a list like [1,2,3,4] you will get the list
element at position_or_key. For a key-value map like
{ a: 100, b: 200 }, a position_or_key of a returns 100.
Since 3.15, Nth supports negative indices when indexing lists, starting from
the other end of the list. With a position_or_key of -1, you will get 4
from the list [1,2,3,4].
Arguments:
list_or_container: string - CFEngine variable identifier or inline JSON - in the range: .*position_or_key: string - Offset or key of element to return - in the range: .*
Example:
code
body common control
{
bundlesequence => { "test" };
}
bundle agent test
{
vars:
"test" slist => {
1,2,3,
"one", "two", "three",
"long string",
"four", "fix", "six",
"one", "two", "three",
};
"test_str" string => format("%S", test);
"test2" data => parsejson("[1, 2, 3, null]");
"test2_str" string => format("%S", test2);
"test3" data => parsejson('{ "x": true, "y": "z" }');
"test3_str" string => format("%S", test3);
"nth" slist => { 1, 2, 6, 10, 11, 1000 };
"nth2" slist => getindices(test2);
"nth3" slist => getindices(test3);
"access[$(nth)]" string => nth(test, $(nth));
"access[0]" string => nth(test, 0);
"access2[$(nth2)]" string => nth(test2, $(nth2));
"access3[$(nth3)]" string => nth(test3, $(nth3));
"nth_neg1" string => nth(test, "-1");
"nth_neg100" string => nth(test, "-100"); # invalid index position requested
reports:
"The test list is $(test_str)";
"element #$(nth) of the test list: $(access[$(nth)])";
"element #0 of the test list: $(access[0])";
"The test2 data container is $(test2_str)";
"element #$(nth2) of the test2 data container: $(access2[$(nth2)])";
"The test3 data container is $(test3_str)";
"element #$(nth3) of the test3 data container: $(access3[$(nth3)])";
"The last element of test is $(nth_neg1)";
"nth_neg100 is not defined, because an invalid index was requested"
if => not( isvariable( nth_neg100 ));
}
Output:
code
R: The test list is { "1", "2", "3", "one", "two", "three", "long string", "four", "fix", "six", "one", "two", "three" }
R: element #1 of the test list: 2
R: element #2 of the test list: 3
R: element #6 of the test list: long string
R: element #10 of the test list: one
R: element #11 of the test list: two
R: element #0 of the test list: 1
R: The test2 data container is [1,2,3,null]
R: element #0 of the test2 data container: 1
R: element #1 of the test2 data container: 2
R: element #2 of the test2 data container: 3
R: element #3 of the test2 data container: null
R: The test3 data container is {"x":true,"y":"z"}
R: element #x of the test3 data container: true
R: element #y of the test3 data container: z
R: The last element of test is three
R: nth_neg100 is not defined, because an invalid index was requested
History:
The collecting function behavior was added in 3.9.
The ability to use negative indices was added in 3.15.
See also: length(), about collecting functions, and data documentation.
"on"
Prototype: on(year, month, day, hour, minute, second)
Return type: int
Description: Returns the specified date/time in integer system representation.
The specified date/time is an absolute date in the local timezone.
Arguments:
year: int - Year - in the range: 1970,3000month: int - Month (January = 0) - in the range: 0,1000day: int - Day (First day of month = 0) - in the range: 0,1000hour: int - Hour - in the range: 0,1000minute: int - Minute - in the range: 0,1000second: int - Second - in the range: 0,1000
Example:
code
body file_select zero_age
{
mtime => irange(on(2000,1,1,0,0,0),now);
file_result => "mtime";
}
Notes:
In process matching, dates could be wrong by an hour depending on Daylight
Savings Time / Summer Time. This is a known bug to be fixed.
or
Prototype: or(...)
Return type: boolean
Description: Returns any if any argument evaluates to true and !any if
any argument evaluates to false.
Arguments: A list of classes, class expressions, or functions that return
classes.
Example:
code
commands:
"/usr/bin/generate_config $(config)"
if => or( "force_configs",
not(fileexists("/etc/config/$(config)"))
);
Notes: Introduced primarily for use with if and unless promise attributes.
See also: and(), not()
History:
- Introduced in 3.2.0, Nova 2.1.0 (2011)
- Return type changed from
string to boolean in 3.17.0 (2020) (CFE-3470)
packagesmatching
Prototype: packagesmatching(package_regex, version_regex, arch_regex, method_regex)
Return type: data
Description: Return a data container with the list of installed packages
matching the parameters.
This function searches for the anchored regular expressions in the
list of currently installed packages.
The return is a data container with a list of package descriptions, looking like
this:
code
[
{
"arch":"default",
"method":"dpkg",
"name":"zsh-common",
"version":"5.0.7-5ubuntu1"
}
]
Arguments:
package_regex: string - Regular expression (unanchored) to match package name - in the range: .*version_regex: string - Regular expression (unanchored) to match package version - in the range: .*arch_regex: string - Regular expression (unanchored) to match package architecture - in the range: .*method_regex: string - Regular expression (unanchored) to match package method - in the range: .*
IMPORTANT: The data source used when querying depends on policy configuration.
When package_inventory in body common control is configured, CFEngine will record the packages installed and the package updates available for the configured package modules.
In the Masterfiles Policy Framework package_inventory will be configured to the default for the hosts platform.
Since only one body common control can be present in a policy set any bundles which use these functions will typically need to execute in the context of a full policy run.
However, the packagesmatching and packageupdatesmatching policy functions will look for and use the existing software inventory databases (available in $(sys.statedir)), even if the default package inventory is not configured.
This enables the usage of these policy functions in standalone policy files. But please note that you still need the default package inventory attribute specified in the policy framework for the software inventory databases to exist in the first place and for them to be maintained/updated.
If there is no package_inventory attribute (such as on package module unsupported platforms) and there are no software inventory databases available in $(sys.statedir) then the legacy package methods data will be used instead.
At no time will both the standard and the legacy data be available to these functions simultaneously.
Example:
The following code extracts just the package names, then looks for
some desired packages, and finally reports if they are installed.
code
body common control
{
bundlesequence => { "missing_packages" };
}
bundle agent missing_packages
{
vars:
# List of desired packages
"desired" slist => { "mypackage1", "mypackage2" };
# Get info on all installed packages
"installed" data => packagesmatching(".*",".*",".*",".*");
"installed_indices" slist => getindices(installed);
# Build a simple array of the package names so that we can use
# getvalues to pull a unified list of package names that are installed.
"installed_name[$(installed_indices)]"
string => "$(installed[$(installed_indices)][name])";
# Get unified list of installed packages
"installed_names" slist => getvalues("installed_name");
# Determine packages that are missing my differencing the list of
# desired packages, against the list of installed packages
"missing_list" slist => difference(desired,installed_names);
reports:
# Report on packages that are missing, installed
# and what we were looking for
"Missing packages = $(missing_list)";
"Installed packages = $(installed_names)";
"Desired packages = $(desired)";
}
This policy can be found in
/var/cfengine/share/doc/examples/packagesmatching.cf
and downloaded directly from
github.
Refresh rules:
* installed packages cache used by packagesmatching() is refreshed at the end of each agent run in accordance with constraints defined in the relevant package module body.
* installed packages cache is refreshed after installing or removing a package.
* installed packages cache is refreshed if no local cache exists.
This means a reliable way to force a refresh of CFEngine's internal package cache is to simply delete the local cache:
code
$(sys.statedir)/packages_installed_<package_module>.lmdb*
Or in the case of legacy package methods:
code
$(sys.statedir)/software_packages.csv
History:
Introduced in CFEngine 3.6
Function started using package_module based data sources by default, even if
there is no package_inventory attribute defined in body common control if
available in 3.23.0
See also: packageupdatesmatching(), Package information cache tunables in the MPF
packageupdatesmatching
Prototype: packageupdatesmatching(package_regex, version_regex, arch_regex, method_regex)
Return type: data
Description: Return a data container with the list of available packages
matching the parameters.
This function searches for the anchored regular expressions in the
list of currently available packages.
The return is a data container with a list of package descriptions, looking like
this:
code
[
{
"arch":"default",
"method":"dpkg",
"name":"syncthing",
"version":"0.12.8"
}
]
Arguments:
package_regex: string - Regular expression (unanchored) to match package name - in the range: .*version_regex: string - Regular expression (unanchored) to match package version - in the range: .*arch_regex: string - Regular expression (unanchored) to match package architecture - in the range: .*method_regex: string - Regular expression (unanchored) to match package method - in the range: .*
IMPORTANT: The data source used when querying depends on policy configuration.
When package_inventory in body common control is configured, CFEngine will record the packages installed and the package updates available for the configured package modules.
In the Masterfiles Policy Framework package_inventory will be configured to the default for the hosts platform.
Since only one body common control can be present in a policy set any bundles which use these functions will typically need to execute in the context of a full policy run.
However, the packagesmatching and packageupdatesmatching policy functions will look for and use the existing software inventory databases (available in $(sys.statedir)), even if the default package inventory is not configured.
This enables the usage of these policy functions in standalone policy files. But please note that you still need the default package inventory attribute specified in the policy framework for the software inventory databases to exist in the first place and for them to be maintained/updated.
If there is no package_inventory attribute (such as on package module unsupported platforms) and there are no software inventory databases available in $(sys.statedir) then the legacy package methods data will be used instead.
At no time will both the standard and the legacy data be available to these functions simultaneously.
Example:
code
vars:
"all_package_updates"
data => packageupdatesmatching(".*", # Package name regex
".*", # Version regex
".*", # Arch regex
".*"); # Method regex
Refresh rules:
* updates cache used by packageupdatesmatching() is refreshed at the end of each agent run in accordance with constraints defined in the relevant package module body.
* updates cache is refreshed every time repo type package is installed or removed
* updates cache is refreshed if no local cache exists.
This means a reliable way to force a refresh of CFEngine's internal package cache is to simply delete the local cache:
code
$(sys.statedir)/packages_updates_<package_module>.lmdb*
Or in the case of legacy package methods:
code
$(sys.statedir)/software_patches_avail.csv
History:
Introduced in CFEngine 3.6
Function started using package_module based data sources by default, even if
there is no package_inventory attribute defined in body common control if
available in 3.23.0
See also: packagesmatching(), Package information cache tunables in the MPF
"parseintarray"
Prototype: parseintarray(array, input, comment, split, maxentries, maxbytes)
Return type: int
Description: Parses up to maxentries values from the first maxbytes
bytes in string input and populates array. Returns the dimension.
This function mirrors the exact behavior of
readintarray(), but reads data from a variable
instead of a file. By making data readable from a variable, data driven
policies can be kept inline.
The comment field is a multiline regular expression and will strip out
unwanted patterns from the file being read, leaving unstripped characters to be
split into fields. Using the empty string ("") indicates no comments.
Arguments:
array : Array identifier to populate, in the range [a-zA-Z0-9_$(){}\[\].:]+input : A string to parse for input data, in the range "?(/.*)comment : Unanchored regex matching comments, in the range .*split : Unanchored regex to split data, in the range .*maxentries : Maximum number of entries to read, in the range
0,99999999999maxbytes : Maximum bytes to read, in the range 0,99999999999
Example:
code
body common control
{
bundlesequence => { "test" };
}
bundle agent test(f)
{
vars:
# Define data inline for convenience
"table" string =>
"1:2
3:4
5:6";
"dim" int => parseintarray(
"items",
"$(table)",
"\s*#[^\n]*",
":",
"1000",
"200000"
);
"keys" slist => sort(getindices("items"));
reports:
"$(keys)";
}
Output:
History: Was introduced in version 3.1.5a1, Nova 2.1.0 (2011**
See also: parsestringarray(), parserealarray(), readstringarray(), readintarray(), readrealarray()
parsejson
Prototype: parsejson(json_data)
Return type: data
Description: Parses JSON data directly from an inlined string and
returns the result as a data variable
Arguments:
json_data: string - JSON string to parse - in the range: .*
Please note that because JSON uses double quotes, it's usually most
convenient to use single quotes for the string (CFEngine allows both
types of quotes around a string).
This function can accept many types of data parameters.
Example:
code
vars:
"loadthis"
data => parsejson('{ "key": "value" }');
# inline syntax since 3.7
"loadthis_inline"
data => '{ "key": "value" }';
Notes:
- This functions does not parse primitives.
History:
See also: readjson(), parseyaml(), readyaml(), mergedata(), Inline YAML and JSON data, about collecting functions, and data documentation.
"parserealarray"
Prototype: parserealarray(array, input, comment, split, maxentries, maxbytes)
Return type: int
Description: Parses up to maxentries values from the first maxbytes
bytes in string input and populates array. Returns the dimension.
This function mirrors the exact behavior of
readrealarray(), but read data from a variable
instead of a file. By making data readable from a variable, data driven
policies can be kept inline.
The comment field is a multiline regular expression and will strip out
unwanted patterns from the file being read, leaving unstripped characters to be
split into fields. Using the empty string ("") indicates no comments.
Arguments:
array : Array identifier to populate, in the range [a-zA-Z0-9_$(){}\[\].:]+input : A string to parse for input data, in the range "?(/.*)comment : Unanchored regex matching comments, in the range .*split : Unanchored regex to split data, in the range .*maxentries : Maximum number of entries to read, in the range
0,99999999999maxbytes : Maximum bytes to read, in the range 0,99999999999
Example:
code
bundle agent __main__
{
vars:
# Define data inline for convenience
"table"
string => "1.0:2.718
3:4.6692
5.0:6.82";
"dim"
int => parserealarray(
"items",
"$(table)",
"\s*#[^\n]*",
":",
"1000",
"200000"
);
"keys" slist => sort(getindices("items"));
reports:
"$(keys) - $(items[$(keys)][1])";
}
Output:
code
R: 1.0 - 2.718
R: 3 - 4.6692
R: 5.0 - 6.82
History: Was introduced in version 3.1.5a1, Nova 2.1.0 (2011)
See also: parsestringarray(), parseintarray(), readstringarray(), readintarray(), readrealarray()
"parsestringarray"
Prototype: parsestringarray(array, input, comment, split, maxentries, maxbytes)
Return type: int
Description: Parses up to maxentries values from the first maxbytes
bytes in string input and populates array. Returns the dimension.
These functions mirrors the exact behavior of
readstringarray(), but read data from a variable
instead of a file. By making data readable from a variable, data driven
policies can be kept inline.
The comment field is a multiline regular expression and will strip out
unwanted patterns from the file being read, leaving unstripped characters to be
split into fields. Using the empty string ("") indicates no comments.
Arguments:
array : Array identifier to populate, in the range [a-zA-Z0-9_$(){}\[\].:]+input : A string to parse for input data, in the range "?(/.*)comment : Unanchored regex matching comments, in the range .*split : Unanchored regex to split data, in the range .*maxentries : Maximum number of entries to read, in the range
0,99999999999maxbytes : Maximum bytes to read, in the range 0,99999999999
Example:
code
bundle agent __main__
{
vars:
#######################################
# Define data inline for convenience
#######################################
"table"
string => "Eulers Number:2.718
A Feigenbaum constant:4.6692
Tau (2pi):6.28";
#######################################
"dim" int => parsestringarray(
"items",
"$(table)",
"\s*#[^\n]*",
":",
"1000",
"200000"
);
"keys" slist => sort(getindices("items"));
reports:
"$(keys) - $(items[$(keys)][1])";
}
Output:
code
R: A Feigenbaum constant - 4.6692
R: Eulers Number - 2.718
R: Tau (2pi) - 6.28
History: Was introduced in version 3.1.5a1, Nova 2.1.0 (2011)
See also: parserealarray(), parseintarray(), readstringarray(), readintarray(), readrealarray()
parsestringarrayidx
Prototype: parsestringarrayidx(array, input, comment, split, maxentries, maxbytes)
Return type: int
Description: Populates the two-dimensional array array with up to
maxentries fields from the first maxbytes bytes of the string input.
This function mirrors the exact behavior of readstringarrayidx(), but
reads data from a variable instead of a file. By making data readable from a variable, data driven policies can be kept inline.
The comment field is a multiline regular expression and will strip out
unwanted patterns from the file being read, leaving unstripped characters to be
split into fields. Using the empty string ("") indicates no comments.
Arguments:
array: string - Array identifier to populate - in the range: [a-zA-Z0-9_$(){}\[\].:]+input: string - A string to parse for input data - in the range: .*comment: string - Regex matching comments - in the range: .*split: string - Regex to split data - in the range: .*maxentries: int - Maximum number of entries to read - in the range: 0,99999999999maxbytes: int - Maximum bytes to read - in the range: 0,99999999999
Example:
code
body common control
{
bundlesequence => { "test" };
}
bundle agent test(f)
{
vars:
# Define data inline for convenience
"table" string => "one: a
two: b
three: c";
#######################################
"dim" int => parsestringarrayidx(
"items",
"$(table)",
"\s*#[^\n]*",
":",
"1000",
"200000"
);
"keys" slist => getindices("items");
"sorted_keys" slist => sort(keys, "int");
reports:
"item $(sorted_keys) has column 0 = $(items[$(sorted_keys)][0]) and column 1 = $(items[$(sorted_keys)][1])";
}
Output:
code
R: item 0 has column 0 = one and column 1 = a
R: item 1 has column 0 = two and column 1 = b
R: item 2 has column 0 = three and column 1 = c
History: Was introduced in version 3.1.5, Nova 2.1.0 (2011)
parseyaml
Prototype: parseyaml(yaml_data)
Return type: data
Description: Parses YAML data directly from an inlined string and
returns the result as a data variable
Arguments:
yaml_data: string - JSON string to parse - in the range: .*
Please note that it's usually most convenient to use single quotes for
the string (CFEngine allows both types of quotes around a string).
Example:
code
vars:
"loadthis"
data => parseyaml('
- arrayentry1
- arrayentry2
- key1: 1
key2: 2
');
# inline syntax since 3.7
# note the --- preamble is required with inline data
"loadthis_inline"
data => '---
- arrayentry1
- arrayentry2
- key1: 1
key2: 2
';
See also: readjson(), readyaml(), mergedata(), Inline YAML and JSON data, and data documentation.
peerleader
Prototype: peerleader(filename, regex, groupsize)
Return type: string
Description: Returns the current host's partition peer leader.
So given groupsize 3 and the file
code
a
b
c
# this is a comment d
e
The peer leader of host b will be host a.
Given a list of host names in filename, one per line, and excluding
comment lines starting with the unanchored regular
expression regex, CFEngine partitions the host list into groups of
up to groupsize. Each group's peer leader is the first host in the
group.
The comment field is a multiline regular expression and will strip out
unwanted patterns from the file being read, leaving unstripped characters to be
split into fields. Using the empty string ("") indicates no comments.
The current host (unqualified or fully qualified) should belong to
this file if it is expected to interact with the others. The function
fails otherwise.
If the current host name (fully qualified or unqualified) is the peer
leader, the string localhost is used instead of the host name.
Arguments:
filename: string - File name of host list - in the range: "?(/.*)regex: regular expression - Comment regex pattern - in the range: .*groupsize: int - Peer group size - in the range: 2,64
groupsize must be between 2 and 64 to avoid nonsensical promises.
Example:
Prepare:
code
echo alpha > /tmp/cfe_hostlist
echo beta >> /tmp/cfe_hostlist
echo gamma >> /tmp/cfe_hostlist
echo "Set HOSTNAME appropriately beforehand"
echo "$(hostname -f)" | tr 'A-Z' 'a-z' >> /tmp/cfe_hostlist
echo "Delta Delta Delta may I help ya help ya help ya"
echo delta1 >> /tmp/cfe_hostlist
echo delta2 >> /tmp/cfe_hostlist
echo delta3 >> /tmp/cfe_hostlist
echo may1.I.help.ya >> /tmp/cfe_hostlist
echo may2.I.help.ya >> /tmp/cfe_hostlist
echo may3.I.help.ya >> /tmp/cfe_hostlist
Run:
code
body common control
{
bundlesequence => { "peers" };
}
bundle agent peers
{
vars:
"mygroup" slist => peers("/tmp/cfe_hostlist","#.*",4);
"myleader" string => peerleader("/tmp/cfe_hostlist","#.*",4);
"all_leaders" slist => peerleaders("/tmp/cfe_hostlist","#.*",4);
reports:
# note that the current host name is fourth in the host list, so
# its peer group is the first 4-host group, minus the host itself.
"/tmp/cfe_hostlist mypeer $(mygroup)";
# note that the current host name is fourth in the host list, so
# the peer leader is "alpha"
"/tmp/cfe_hostlist myleader $(myleader)";
"/tmp/cfe_hostlist another leader $(all_leaders)";
"Unable to find my fully qualified hostname $(sys.fqhost) in /tmp/cfe_hostlist. Can't determine peers."
if => not( regline( $(sys.fqhost), "/tmp/cfe_hostlist" ) );
}
Output:
code
R: /tmp/cfe_hostlist mypeer alpha
R: /tmp/cfe_hostlist mypeer beta
R: /tmp/cfe_hostlist mypeer gamma
R: /tmp/cfe_hostlist myleader alpha
R: /tmp/cfe_hostlist another leader alpha
R: /tmp/cfe_hostlist another leader delta1
R: /tmp/cfe_hostlist another leader may2.I.help.ya
peerleaders
Prototype: peerleaders(filename, regex, groupsize)
Return type: slist
Description: Returns a list of partition peer leaders from a file of host names.
Given a list of host names in filename, one per line, and excluding
comment lines starting with the unanchored regular
expression regex, CFEngine partitions the host list into groups of
up to groupsize. Each group's peer leader is the first host in the
group.
So given groupsize 2 and the file
code
a
b
c
# this is a comment d
e
The peer leaders will be a and c.
The current host name does not need to belong to this file. If it's
found (fully qualified or unqualified), the string localhost is used
instead of the host name.
The comment field is a multiline regular expression and will strip out
unwanted patterns from the file being read, leaving unstripped characters to be
split into fields. Using the empty string ("") indicates no comments.
Arguments:
filename: string - File name of host list - in the range: "?(/.*)regex: regular expression - Comment regex pattern - in the range: .*groupsize: int - Peer group size - in the range: 2,64
groupsize must be between 2 and 64 to avoid nonsensical promises.
Example:
Prepare:
code
echo alpha > /tmp/cfe_hostlist
echo beta >> /tmp/cfe_hostlist
echo gamma >> /tmp/cfe_hostlist
echo "Set HOSTNAME appropriately beforehand"
echo "$(hostname -f)" | tr 'A-Z' 'a-z' >> /tmp/cfe_hostlist
echo "Delta Delta Delta may I help ya help ya help ya"
echo delta1 >> /tmp/cfe_hostlist
echo delta2 >> /tmp/cfe_hostlist
echo delta3 >> /tmp/cfe_hostlist
echo may1.I.help.ya >> /tmp/cfe_hostlist
echo may2.I.help.ya >> /tmp/cfe_hostlist
echo may3.I.help.ya >> /tmp/cfe_hostlist
Run:
code
body common control
{
bundlesequence => { "peers" };
}
bundle agent peers
{
vars:
"mygroup" slist => peers("/tmp/cfe_hostlist","#.*",4);
"myleader" string => peerleader("/tmp/cfe_hostlist","#.*",4);
"all_leaders" slist => peerleaders("/tmp/cfe_hostlist","#.*",4);
reports:
# note that the current host name is fourth in the host list, so
# its peer group is the first 4-host group, minus the host itself.
"/tmp/cfe_hostlist mypeer $(mygroup)";
# note that the current host name is fourth in the host list, so
# the peer leader is "alpha"
"/tmp/cfe_hostlist myleader $(myleader)";
"/tmp/cfe_hostlist another leader $(all_leaders)";
"Unable to find my fully qualified hostname $(sys.fqhost) in /tmp/cfe_hostlist. Can't determine peers."
if => not( regline( $(sys.fqhost), "/tmp/cfe_hostlist" ) );
}
Output:
code
R: /tmp/cfe_hostlist mypeer alpha
R: /tmp/cfe_hostlist mypeer beta
R: /tmp/cfe_hostlist mypeer gamma
R: /tmp/cfe_hostlist myleader alpha
R: /tmp/cfe_hostlist another leader alpha
R: /tmp/cfe_hostlist another leader delta1
R: /tmp/cfe_hostlist another leader may2.I.help.ya
peers
Prototype: peers(filename, regex, groupsize)
Return type: slist
Description: Returns the current host's partition peers (excluding it).
So given groupsize 3 and the file
code
a
b
c
# this is a comment d
e
The peers of host b will be a and c.
Given a list of host names in filename, one per line, and excluding
comment lines starting with the unanchored regular
expression regex, CFEngine partitions the host list into groups of
up to groupsize. Each group's peer leader is the first host in the
group.
The comment field is a multiline regular expression and will strip out
unwanted patterns from the file being read, leaving unstripped characters to be
split into fields. Using the empty string ("") indicates no comments.
The current host (unqualified or fully qualified) should belong to
this file if it is expected to interact with the others. The function
returns an empty list otherwise.
Arguments:
filename: string - File name of host list - in the range: "?(/.*)regex: regular expression - Comment regex pattern - in the range: .*groupsize: int - Peer group size - in the range: 2,64
groupsize must be between 2 and 64 to avoid nonsensical promises.
Example:
Prepare:
code
echo alpha > /tmp/cfe_hostlist
echo beta >> /tmp/cfe_hostlist
echo gamma >> /tmp/cfe_hostlist
echo "Set HOSTNAME appropriately beforehand"
echo "$(hostname -f)" | tr 'A-Z' 'a-z' >> /tmp/cfe_hostlist
echo "Delta Delta Delta may I help ya help ya help ya"
echo delta1 >> /tmp/cfe_hostlist
echo delta2 >> /tmp/cfe_hostlist
echo delta3 >> /tmp/cfe_hostlist
echo may1.I.help.ya >> /tmp/cfe_hostlist
echo may2.I.help.ya >> /tmp/cfe_hostlist
echo may3.I.help.ya >> /tmp/cfe_hostlist
Run:
code
body common control
{
bundlesequence => { "peers" };
}
bundle agent peers
{
vars:
"mygroup" slist => peers("/tmp/cfe_hostlist","#.*",4);
"myleader" string => peerleader("/tmp/cfe_hostlist","#.*",4);
"all_leaders" slist => peerleaders("/tmp/cfe_hostlist","#.*",4);
reports:
# note that the current host name is fourth in the host list, so
# its peer group is the first 4-host group, minus the host itself.
"/tmp/cfe_hostlist mypeer $(mygroup)";
# note that the current host name is fourth in the host list, so
# the peer leader is "alpha"
"/tmp/cfe_hostlist myleader $(myleader)";
"/tmp/cfe_hostlist another leader $(all_leaders)";
"Unable to find my fully qualified hostname $(sys.fqhost) in /tmp/cfe_hostlist. Can't determine peers."
if => not( regline( $(sys.fqhost), "/tmp/cfe_hostlist" ) );
}
Output:
code
R: /tmp/cfe_hostlist mypeer alpha
R: /tmp/cfe_hostlist mypeer beta
R: /tmp/cfe_hostlist mypeer gamma
R: /tmp/cfe_hostlist myleader alpha
R: /tmp/cfe_hostlist another leader alpha
R: /tmp/cfe_hostlist another leader delta1
R: /tmp/cfe_hostlist another leader may2.I.help.ya
processexists
Prototype: processexists(regex)
Return type: boolean
The return value is cached.
Description: Return whether a process matches the given anchored regular expression
regex.
This function searches for the given regular expression in the process
table. Use .*sherlock.* to find all the processes that match
sherlock. Use .*\bsherlock\b.* to exclude partial matches like
sherlock123 (\b matches a word boundary).
Arguments:
regex: regular expression - Regular expression to match process name - in the range: .*
The process table is usually obtained with something like ps -eo
user,pid,ppid,pgid,%cpu,%mem,vsize,ni,rss,stat,nlwp,stime,time,args, and the
CMD or COMMAND field (args) is used to match against. However the exact
data used may change per platform and per CFEngine release.
Example:
code
classes:
# the class "holmes" will be set if a process line contains the word "sherlock"
"holmes" expression => processexists(".*sherlock.*");
History: Introduced in CFEngine 3.9
See also: processes findprocesses().
product
Prototype: product(list)
Return type: real
Description: Returns the product of the reals in list.
This function might be used for simple ring computation. Of course, you could
easily combine product with readstringarray or readreallist etc., to
collect summary information from a source external to CFEngine.
This function can accept many types of data parameters.
Arguments:
list: string - CFEngine variable identifier or inline JSON - in the range: .*
Example:
code
body common control
{
bundlesequence => { "test" };
}
bundle agent test
{
vars:
"series" rlist => { "1.1", "2.2", "3.3", "5.5", "7.7" };
"prod" real => product("series");
"sum" real => sum("series");
reports:
"Product result: $(prod) > $(sum)";
}
Output:
code
R: Product result: 338.207100 > 19.800000
History: Was introduced in version 3.1.0b1,Nova 2.0.0b1 (2010). The collecting function behavior was added in 3.9.
See also: sort(), variance(), sum(), max(), min(), about collecting functions, and data documentation.
randomint
Prototype: randomint(lower, upper)
Return type: int
Description: Returns a random integer between lower and up to but not including upper.
The limits must be integer values and the resulting numbers are based on
the entropy of the md5 algorithm.
The upper limit is excluded from the range. Thus randomint(0, 100)
will return 100 possible values, not 101.
The function will be re-evaluated on each pass if it is not restricted with a
context class expression as shown in the example.
NOTE: The randomness produced by randomint is not safe for cryptographic usage.
Arguments:
lower: int - Lower inclusive bound - in the range: -99999999999,99999999999upper: int - Upper exclusive bound - in the range: -99999999999,99999999999
Example:
code
bundle agent main
{
vars:
"low" string => "4";
"high" string => "60";
"random" int => randomint($(low), $(high));
classes:
"isabove" expression => isgreaterthan($(random), 3);
reports:
isabove::
"The generated random number was above 3";
show_random::
"Randomly generated '$(random)'";
}
Output: (when show_random is defined)
code
R: The generated random number was above 3
R: Randomly generated '9'
R: Randomly generated '52'
R: Randomly generated '26'
read_module_protocol
Prototype: read_module_protocol(file_path)
Return type: boolean
Description: Interprets file_path as module protocol output.
This function is useful for reducing overhead by caching and then reading module protocol results from a file.
Arguments:
file_path: string - File name to read and parse from - in the range: "?(/.*)
Example:
code
bundle agent cache_maintenance
{
vars:
"file"
string => "$(this.promise_dirname)/cached_module";
classes:
"cache_refresh"
if => not(fileexists("$(file)"));
Min30_35::
"cache_refresh";
files:
cache_refresh::
"$(file)"
create => "true",
edit_template_string => "=my_variable=$(sys.date)",
template_data => "{}",
template_method => "inline_mustache";
}
bundle agent demo
{
classes:
"cache_was_read"
if => read_module_protocol("$(cache_maintenance.file)");
reports:
cache_was_read::
"Module cache was read!";
"cached_module.my_variable = $(cached_module.my_variable)";
}
bundle agent __main__
{
methods:
"cache_maintenance"
handle => "cache_maintenance_done";
"demo"
depends_on => { "cache_maintenance_done" };
}
This policy can be found in
/var/cfengine/share/doc/examples/read_module_protocol.cf
and downloaded directly from
github.
See also: usemodule(), Module Protocol
History:
readcsv
Prototype: readcsv(filename, optional_maxbytes)
Return type: data
Description:
Parses CSV data from the file filename and returns the result as a data variable.
maxbytes is optional, if specified, only the first maxbytes bytes are read from filename.
While it may seem similar to data_readstringarrayidx() and
data_readstringarray(), the readcsv() function is more capable
because it follows RFC 4180,
especially regarding quoting. This is not possible if you just split
strings on a regular expression delimiter.
The returned data is in the same format as
data_readstringarrayidx(), that is, a data container that holds a
JSON array of JSON arrays.
Arguments:
filename: string - File name - in the range: "?(/.*)optional_maxbytes: int - Maximum number of bytes to read - in the range: 0,99999999999
Example:
Prepare:
code
echo -n 1,2,3 > /tmp/csv
Run:
code
bundle agent main
{
vars:
# note that the CSV file has to have ^M (DOS) EOL terminators
# thus the prep step uses `echo -n` and just one line, so it will work on Unix
"csv" data => readcsv("/tmp/csv");
"csv_str" string => format("%S", csv);
reports:
"From /tmp/csv, got data $(csv_str)";
}
Output:
code
R: From /tmp/csv, got data [["1","2","3"]]
Note: CSV files formatted according to RFC 4180 must end with the CRLF
sequence. Thus a text file created on Unix with standard Unix tools
like vi will not, by default, have those line endings.
See also: data_expand(), readdata(), data_readstringarrayidx(),data_readstringarray(), parsejson(), storejson(), mergedata(), and data documentation.
History: Was introduced in 3.7.0.
readdata
Prototype: readdata(filename, filetype)
Return type: data
Description: Parses CSV, JSON, or YAML data from file filename
and returns the result as a data variable.
When filetype is auto, the file type is guessed from the extension
(ignoring case): .csv means CSV; .json means JSON; .yaml or .yml means
YAML. If the file doesn't match any of those names, JSON is used.
When filetype is CSV,JSON,YAML or ENV,
this function behaves like readcsv(), readjson(), readyaml() or readenvfile() respectively.
These functions have an optional parameter maxbytes (default: inf).
maxbytes can not be set using readdata(), if needed use one of the mentioned functions instead.
Arguments:
filename: string - File name to read - in the range: "?(/.*)filetype: - Type of data to read - one of
Example:
Prepare:
code
echo -n 1,2,3 > /tmp/file.csv
echo -n '{ "x": 200 }' > /tmp/file.json
echo '- a' > /tmp/file.yaml
echo '- b' >> /tmp/file.yaml
Run:
code
bundle agent main
{
vars:
"csv" data => readdata("/tmp/file.csv", "auto"); # or file type "CSV"
"json" data => readdata("/tmp/file.json", "auto"); # or file type "JSON"
"csv_str" string => format("%S", csv);
"json_str" string => format("%S", json);
feature_yaml:: # we can only test YAML data if libyaml is compiled in
"yaml" data => readdata("/tmp/file.yaml", "auto"); # or file type "YAML"
"yaml_str" string => format("%S", yaml);
reports:
"From /tmp/file.csv, got data $(csv_str)";
"From /tmp/file.json, got data $(json_str)";
feature_yaml::
"From /tmp/file.yaml, we would get data $(yaml_str)";
!feature_yaml:: # show the output anyway
'From /tmp/file.yaml, we would get data ["a","b"]';
}
Output:
code
R: From /tmp/file.csv, got data [["1","2","3"]]
R: From /tmp/file.json, got data {"x":200}
R: From /tmp/file.yaml, we would get data ["a","b"]
See also: data_expand(), readcsv(), readyaml(), readjson(), readenvfile(), validdata(), data documentation.
History: Was introduced in 3.7.0.
readenvfile
Prototype: readenvfile(filename, optional_maxbytes)
Return type: data
Description:
Parses key-value pairs from the file filename in env file format (man os-release).
Returns the result as a data variable.
Keys and values are interpreted as strings.
maxbytes is optional, if specified, only the first maxbytes bytes are read from filename.
Details of the os-release/env file format on freedesktop.org
Arguments:
filename: string - File name - in the range: "?(/.*)otpional_maxbytes: int - Maximum number of bytes to read - in the range: 0,99999999999
Syntax example:
code
vars:
"loadthis"
data => readenvfile("/etc/os-release");
Complete example:
Prepare:
code
echo 'PRETTY_NAME="Ubuntu 14.04.5 LTS"' > /tmp/os-release
Run:
code
body edit_defaults empty
{
empty_file_before_editing => "true";
edit_backup => "false";
}
bundle edit_line insert_lines(lines)
{
insert_lines:
"$(lines)";
}
body printfile cat(file)
{
file_to_print => "$(file)";
number_of_lines => "inf";
}
bundle agent main
{
classes:
"file_found" expression => fileexists("/tmp/os-release");
# Use readenvfile() to load /tmp/os-release, then convert to json:
vars:
file_found::
"envdata"
data => readenvfile("/tmp/os-release");
"jsonstring"
string => storejson(envdata);
# Print input(os-release) and output(json) files:
reports:
file_found::
"/tmp/os-release :"
printfile => cat("/tmp/os-release");
"/tmp/os-release converted to json:";
"$(jsonstring)";
"(The data for this system is available in sys.os_release)";
!file_found::
"/tmp/os-release doesn't exist, run this command:";
"echo 'PRETTY_NAME=\"Ubuntu 14.04.5 LTS\"' > /tmp/os-release";
}
Output:
code
R: /tmp/os-release :
R: PRETTY_NAME="Ubuntu 14.04.5 LTS"
R: /tmp/os-release converted to json:
R: {
"PRETTY_NAME": "Ubuntu 14.04.5 LTS"
}
R: (The data for this system is available in sys.os_release)
Notes:
This function is used internally to load /etc/os-release into sys.os_release.
See also: data_expand(), readdata(), parsejson(), parseyaml(), storejson(), mergedata(), and data documentation.
History:
readfile
Prototype: readfile(filename, optional_maxbytes)
Return type: string
Description:
Returns the first maxbytes bytes from file filename.
maxbytes is optional, if specified, only the first maxbytes bytes are read from filename.
When maxbytes is 0, inf or not specified, the whole file will be read (but see Notes below).
Arguments:
filename: string - File name - in the range: "?(/.*)optional_maxbytes: int - Maximum number of bytes to read - in the range: 0,99999999999
Example:
Prepare:
code
echo alpha > /tmp/cfe_hostlist
echo beta >> /tmp/cfe_hostlist
echo gamma >> /tmp/cfe_hostlist
Run:
code
body common control
{
bundlesequence => { "example" };
}
bundle agent example
{
vars:
"xxx"
string => readfile( "/tmp/cfe_hostlist" , "5" );
reports:
"first 5 characters of /tmp/cfe_hostlist: $(xxx)";
}
Output:
code
R: first 5 characters of /tmp/cfe_hostlist: alpha
Notes:
- On Windows, the file will be read in text mode, which means that
CRLF line endings will be converted to LF line endings in the
resulting variable. This can make the variable length shorter than the
size of the file being read.
History:
- Warnings about the size limit and the special
0 value were introduced in 3.6.0
- 4095 bytes limitation removed in 3.6.3
"readintarray"
Prototype: readintarray(array, filename, comment, split, maxentries, maxbytes)
Return type: int
Description: Populates array with up to maxentries values, parsed from
the first maxbytes bytes in file filename.
Reads a two dimensional array from a file. One dimension is separated by the
regex split, the other by the lines in the file. The first field of the
lines names the first array argument.
The comment field is a multiline regular expression and will strip out
unwanted patterns from the file being read, leaving unstripped characters to be
split into fields. Using the empty string ("") indicates no comments.
Returns the number of keys in the array, i.e., the number of
lines matched.
Arguments:
array : Array identifier to populate, in the range
[a-zA-Z0-9_$(){}\[\].:]+filename : File name to read, in the range "?(/.*)comment : Unanchored regex matching comments, in the range .*split : Unanchored regex to split lines into fields, in the range .*maxentries : Maximum number of entries to read, in the range
0,99999999999maxbytes : Maximum bytes to read, in the range 0,99999999999
Example:
Prepare:
code
echo 1: 5:7:21:13 > /tmp/readintarray.txt
echo 2:19:8:14:14 >> /tmp/readintarray.txt
echo 3:45:1:78:22 >> /tmp/readintarray.txt
echo 4:64:2:98:99 >> /tmp/readintarray.txt
Run:
code
bundle agent main
{
vars:
"lines" int => readintarray("array_name",
"/tmp/readintarray.txt",
"#[^\n]*",
":",
10,
4000);
reports:
"array_name contains $(lines) keys$(const.n)$(with)"
with => string_mustache("", "array_name");
}
Output:
code
R: array_name contains 4 keys
{
"1": {
"0": "1",
"1": "5",
"2": "7",
"3": "21",
"4": "13"
},
"2": {
"0": "2",
"1": "19",
"2": "8",
"3": "14",
"4": "14"
},
"3": {
"0": "3",
"1": "45",
"2": "1",
"3": "78",
"4": "22"
},
"4": {
"0": "4",
"1": "64",
"2": "2",
"3": "98",
"4": "99"
}
}
See also: readstringarray(), readrealarray(), parseintarray(), parserealarray(), parsestringarray()
readintlist
Prototype: readintlist(filename, comment, split, maxentries, maxbytes)
Return type: ilist
Description: Splits the file filename into separated
values and returns the list.
The comment field is a multiline regular expression and will strip out
unwanted patterns from the file being read, leaving unstripped characters to be
split into fields. Using the empty string ("") indicates no comments.
Arguments:
filename: string - File name to read - in the range: "?(/.*)comment: string - Regex matching comments - in the range: .*split: string - Regex to split data - in the range: .*maxentries: int - Maximum number of entries to read - in the range: 0,99999999999maxbytes: int - Maximum bytes to read - in the range: 0,99999999999
Example:
Prepare:
code
printf "one\ntwo\nthree\n" > /tmp/list.txt
printf "1\n2\n3\n" >> /tmp/list.txt
printf "1.0\n2.0\n3.0" >> /tmp/list.txt
Run:
code
bundle agent example_readintlist
{
vars:
"my_list_of_integers"
ilist => readintlist( "/tmp/list.txt", # File to read
"^(\D+)|(\d+[^\n]+)", # Ignore any lines that are not integers
"\n", # Split on newlines
inf, # Maximum number of entries
inf); # Maximum number of bytes to read
reports:
"my_list_of_integers includes '$(my_list_of_integers)'";
}
bundle agent __main__
{
methods: "example_readintlist";
}
Output:
code
R: my_list_of_integers includes '1'
R: my_list_of_integers includes '2'
R: my_list_of_integers includes '3'
See also: readstringlist(), readreallist()
readjson
Prototype: readjson(filename, optional_maxbytes)
Return type: data
Description: Parses JSON data from the file filename and returns the
result as a data variable. maxbytes is optional, if specified, only the
first maxbytes bytes are read from filename.
Arguments:
filename: string - File name - in the range: "?(/.*)optional_maxbytes: int - Maximum number of bytes to read - in the range: 0,99999999999
Example:
code
vars:
"loadthis"
data => readjson("/tmp/data.json", 4000);
See also: data_expand(), readdata(), parsejson(), storejson(), parseyaml(), readyaml(), mergedata(), validjson(), and data documentation.
History:
- Introduced in CFEngine 3.6.0
"readrealarray"
Prototype: readrealarray(array, filename, comment, split, maxentries, maxbytes)
Return type: int
Description: Populates array with up to maxentries values, parsed from
the first maxbytes bytes in file filename.
Reads a two dimensional array from a file. One dimension is separated by the
regex split, the other by the lines in the file. The first field of the
lines names the first array argument.
The comment field is a multiline regular expression and will strip out
unwanted patterns from the file being read, leaving unstripped characters to be
split into fields. Using the empty string ("") indicates no comments.
Returns the number of keys in the array, i.e., the number of
lines matched.
Arguments:
array : Array identifier to populate, in the range
[a-zA-Z0-9_$(){}\[\].:]+filename : File name to read, in the range "?(/.*)comment : Unanchored regex matching comments, in the range .*split : Unanchored regex to split lines into fields, in the range .*maxentries : Maximum number of entries to read, in the range
0,99999999999maxbytes : Maximum bytes to read, in the range 0,99999999999
Example:
code
readintarray("array_name","/tmp/array","#[^\n]*",":",10,4000);
Input:
code
1: 5.0:7:21:13
2:19:8.1:14:14
3:45:1:78.2:22
4:64:2:98:99.3
Results in:
code
array_name[1][0] 1
array_name[1][1] 5
array_name[1][2] 7
array_name[1][3] 21
array_name[1][4] 13
array_name[2][0] 2
array_name[2][1] 19
array_name[2][2] 8
array_name[2][3] 14
array_name[2][4] 14
array_name[3][0] 3
array_name[3][1] 45
array_name[3][2] 1
array_name[3][3] 78
array_name[3][4] 22
array_name[4][0] 4
array_name[4][1] 64
array_name[4][2] 2
array_name[4][3] 98
array_name[4][4] 99
code
readstringarray("array_name","/tmp/array","\s*#[^\n]*",":",10,4000);
Input:
code
at:x:25:25:Batch jobs daemon:/var/spool/atjobs:/bin/bash
avahi:x:103:105:User for Avahi:/var/run/avahi-daemon:/bin/false # Disallow login
beagleindex:x:104:106:User for Beagle indexing:/var/cache/beagle:/bin/bash
bin:x:1:1:bin:/bin:/bin/bash
# Daemon has the default shell
daemon:x:2:2:Daemon:/sbin:
Results in a systematically indexed map of the file:
code
...
array_name[daemon][0] daemon
array_name[daemon][1] x
array_name[daemon][2] 2
array_name[daemon][3] 2
array_name[daemon][4] Daemon
array_name[daemon][5] /sbin
array_name[daemon][6] /bin/bash
...
array_name[at][3] 25
array_name[at][4] Batch jobs daemon
array_name[at][5] /var/spool/atjobs
array_name[at][6] /bin/bash
...
array_name[games][3] 100
array_name[games][4] Games account
array_name[games][5] /var/games
array_name[games][6] /bin/bash
...
Prepare:
code
echo "1: 5.0:7:21:13" > /tmp/readrealarray.txt
echo "2:19:8.1:14:14" >> /tmp/readrealarray.txt
echo "3:45:1:78.2:22" >> /tmp/readrealarray.txt
echo "4:64:2:98:99.3" >> /tmp/readrealarray.txt
Run:
code
bundle agent main
{
vars:
"lines" int => readrealarray("array_name",
"/tmp/readrealarray.txt",
"#[^\n]*",
":",
10,
4000);
reports:
"array_name contains $(lines) keys$(const.n)$(with)"
with => string_mustache("", "array_name");
}
Output:
code
R: array_name contains 4 keys
{
"1": {
"0": "1",
"1": " 5.0",
"2": "7",
"3": "21",
"4": "13"
},
"2": {
"0": "2",
"1": "19",
"2": "8.1",
"3": "14",
"4": "14"
},
"3": {
"0": "3",
"1": "45",
"2": "1",
"3": "78.2",
"4": "22"
},
"4": {
"0": "4",
"1": "64",
"2": "2",
"3": "98",
"4": "99.3"
}
}
See also: readstringarray(), readintarray(), parserealarray(), parserealarray(), parsestringarray()
readreallist
Prototype: readreallist(filename, comment, split, maxentries, maxbytes)
Return type: rlist
Description: Splits the file filename into separated
values and returns the list.
The comment field is a multiline regular expression and will strip out
unwanted patterns from the file being read, leaving unstripped characters to be
split into fields. Using the empty string ("") indicates no comments.
Arguments:
filename : File name to read, in the range "?(/.*)comment : Unanchored regex matching comments, in the range .*split : Unanchored regex to split data, in the range .*maxentries : Maximum number of entries to read, in the range
0,99999999999maxbytes : Maximum bytes to read, in the range 0,99999999999
Example:
Prepare:
code
printf "one\ntwo\nthree\n" > /tmp/list.txt
printf "1\n2\n3\n" >> /tmp/list.txt
printf "1.0\n2.0\n3.0" >> /tmp/list.txt
Run:
code
bundle agent example_readreallist
{
vars:
"my_list_of_reals"
rlist => readreallist( "/tmp/list.txt", # File to read
"^(\D+)", # Ignore any non-digits
"\n", # Split on newlines
inf, # Maximum number of entries
inf ); # Maximum number of bytes to read
reports:
"my_list_of_reals includes '$(my_list_of_reals)'";
}
bundle agent __main__
{
methods: "example_readreallist";
}
Output:
code
R: my_list_of_reals includes '1'
R: my_list_of_reals includes '2'
R: my_list_of_reals includes '3'
R: my_list_of_reals includes '1.0'
R: my_list_of_reals includes '2.0'
R: my_list_of_reals includes '3.0'
See also: readstringlist(), readintlist()
"readstringarray"
Prototype: readstringarray(array, filename, comment, split, maxentries, maxbytes)
Return type: int
Description: Populates array with up to maxentries values, parsed from
the first maxbytes bytes in file filename.
Reads a two dimensional array from a file. One dimension is separated by the
regex split, the other by the lines in the file. The first field of the
lines names the first array argument.
The comment field is a multiline regular expression and will strip out
unwanted patterns from the file being read, leaving unstripped characters to be
split into fields. Using the empty string ("") indicates no comments.
Returns the number of keys in the array, i.e., the number of
lines matched.
Arguments:
array : Array identifier to populate, in the range
[a-zA-Z0-9_$(){}\[\].:]+filename : File name to read, in the range "?(/.*)comment : Unanchored regex matching comments, in the range .*split : Unanchored regex to split lines into fields, in the range .*maxentries : Maximum number of entries to read, in the range
0,99999999999maxbytes : Maximum bytes to read, in the range 0,99999999999
Example:
code
readintarray("array_name","/tmp/array","#[^\n]*",":",10,4000);
Input:
code
1: 5:7:21:13
2:19:8:14:14
3:45:1:78:22
4:64:2:98:99
Results in:
code
array_name[1][0] 1
array_name[1][1] 5
array_name[1][2] 7
array_name[1][3] 21
array_name[1][4] 13
array_name[2][0] 2
array_name[2][1] 19
array_name[2][2] 8
array_name[2][3] 14
array_name[2][4] 14
array_name[3][0] 3
array_name[3][1] 45
array_name[3][2] 1
array_name[3][3] 78
array_name[3][4] 22
array_name[4][0] 4
array_name[4][1] 64
array_name[4][2] 2
array_name[4][3] 98
array_name[4][4] 99
code
readstringarray("array_name","/tmp/array","\s*#[^\n]*",":",10,4000);
Input:
code
at:x:25:25:Batch jobs daemon:/var/spool/atjobs:/bin/bash
avahi:x:103:105:User for Avahi:/var/run/avahi-daemon:/bin/false # Disallow login
beagleindex:x:104:106:User for Beagle indexing:/var/cache/beagle:/bin/bash
bin:x:1:1:bin:/bin:/bin/bash
# Daemon has the default shell
daemon:x:2:2:Daemon:/sbin:
Results in a systematically indexed map of the file:
code
...
array_name[daemon][0] daemon
array_name[daemon][1] x
array_name[daemon][2] 2
array_name[daemon][3] 2
array_name[daemon][4] Daemon
array_name[daemon][5] /sbin
array_name[daemon][6] /bin/bash
...
array_name[at][3] 25
array_name[at][4] Batch jobs daemon
array_name[at][5] /var/spool/atjobs
array_name[at][6] /bin/bash
...
array_name[games][3] 100
array_name[games][4] Games account
array_name[games][5] /var/games
array_name[games][6] /bin/bash
...
Prepare:
code
echo "1: 5.0:7:21:13" > /tmp/readrealarray.txt
echo "2:19:8.1:14:14" >> /tmp/readrealarray.txt
echo "3:45:1:78.2:22" >> /tmp/readrealarray.txt
echo "4:64:2:98:99.3" >> /tmp/readrealarray.txt
Run:
code
bundle agent main
{
vars:
"lines" int => readrealarray("array_name",
"/tmp/readrealarray.txt",
"#[^\n]*",
":",
10,
4000);
reports:
"array_name contains $(lines) keys$(const.n)$(with)"
with => string_mustache("", "array_name");
}
Output:
code
R: array_name contains 4 keys
{
"1": {
"0": "1",
"1": " 5.0",
"2": "7",
"3": "21",
"4": "13"
},
"2": {
"0": "2",
"1": "19",
"2": "8.1",
"3": "14",
"4": "14"
},
"3": {
"0": "3",
"1": "45",
"2": "1",
"3": "78.2",
"4": "22"
},
"4": {
"0": "4",
"1": "64",
"2": "2",
"3": "98",
"4": "99.3"
}
}
See also: readrealarray(), readintarray(), parserealarray(), parserealarray(), parsestringarray()
readstringarrayidx
Prototype: readstringarrayidx(array, filename, comment, split, maxentries, maxbytes)
Return type: int
Description: Populates the two-dimensional array array with up to
maxentries fields from the first maxbytes bytes of file filename.
One dimension is separated by the regex split, the other by the lines in
the file. The array arguments are both integer indexes, allowing for
non-identifiers at first field (e.g. duplicates or names with spaces), unlike
readstringarray.
The comment field is a multiline regular expression and will strip out
unwanted patterns from the file being read, leaving unstripped characters to be
split into fields. Using the empty string ("") indicates no comments.
Returns an integer number of keys in the array (i.e., the number of lines
matched). If you only want the fields in the first matching line (e.g., to
mimic the behavior of the getpwnam(3) on the file /etc/passwd), use
getfields(), instead.
Arguments:
array: string - Array identifier to populate - in the range: [a-zA-Z0-9_$(){}\[\].:]+filename: string - File name to read - in the range: "?(/.*)comment: string - Regex matching comments - in the range: .*split: string - Regex to split data - in the range: .*maxentries: int - Maximum number of entries to read - in the range: 0,99999999999maxbytes: int - Maximum bytes to read - in the range: 0,99999999999
Example:
code
vars:
"dim_array"
int => readstringarrayidx("array_name","/tmp/array","\s*#[^\n]*",":",10,4000);
Input example:
code
at spaced:x:25:25:Batch jobs daemon:/var/spool/atjobs:/bin/bash
duplicate:x:103:105:User for Avahi:/var/run/avahi-daemon:/bin/false # Disallow login
beagleindex:x:104:106:User for Beagle indexing:/var/cache/beagle:/bin/bash
duplicate:x:1:1:bin:/bin:/bin/bash
# Daemon has the default shell
daemon:x:2:2:Daemon:/sbin:
Results in a systematically indexed map of the file:
code
array_name[0][0] at spaced
array_name[0][1] x
array_name[0][2] 25
array_name[0][3] 25
array_name[0][4] Batch jobs daemon
array_name[0][5] /var/spool/atjobs
array_name[0][6] /bin/bash
array_name[1][0] duplicate
array_name[1][1] x
array_name[1][2] 103
array_name[1][3] 105
array_name[1][4] User for Avahi
array_name[1][5] /var/run/avahi-daemon
array_name[1][6] /bin/false
...
readstringlist
Prototype: readstringlist(filename, comment, split, maxentries, maxbytes)
Return type: slist
Description: Splits the file filename into separated
values and returns the list.
The comment field is a multiline regular expression and will strip out
unwanted patterns from the file being read, leaving unstripped characters to be
split into fields. Using the empty string ("") indicates no comments.
Arguments:
filename : File name to read, in the range "?(/.*)comment : Unanchored regex matching comments, in the range .*split : Unanchored regex to split data, in the range .*maxentries : Maximum number of entries to read, in the range
0,99999999999maxbytes : Maximum bytes to read, in the range 0,99999999999
Example:
Prepare:
code
printf "one\ntwo\nthree\n" > /tmp/list.txt
printf " # commented line\n" >> /tmp/list.txt
printf "1\n2\n3\n" >> /tmp/list.txt
printf "# another commented line\n" >> /tmp/list.txt
printf "Not a commented # line\n" >> /tmp/list.txt
printf "1.0\n2.0\n3.0" >> /tmp/list.txt
Run:
code
bundle agent example_readstringlist
{
vars:
"my_list_of_strings"
slist => readstringlist( "/tmp/list.txt", # File to read
"^\s*#[^\n]*", # Exclude hash comment lines lines
"\n", # Split on newlines
inf, # Maximum number of entries
inf); # Maximum number of bytes to read
reports:
"my_list_of_strings includes '$(my_list_of_strings)'";
}
bundle agent __main__
{
methods: "example_readstringlist";
}
Output:
code
R: my_list_of_strings includes 'one'
R: my_list_of_strings includes 'two'
R: my_list_of_strings includes 'three'
R: my_list_of_strings includes '1'
R: my_list_of_strings includes '2'
R: my_list_of_strings includes '3'
R: my_list_of_strings includes 'Not a commented # line'
R: my_list_of_strings includes '1.0'
R: my_list_of_strings includes '2.0'
R: my_list_of_strings includes '3.0'
See also: readintlist(), readreallist()
readtcp
Prototype: readtcp(hostnameip, port, sendstring, maxbytes)
Return type: string
The return value is cached.
Description: Connects to tcp port of hostnameip, sends sendstring,
reads at most maxbytes from the response and returns those.
If the send string is empty, no data are sent or received from the
socket. Then the function only tests whether the TCP port is alive and
returns an empty string.
Not all Unix TCP read operations respond to signals for interruption, so
poorly formed requests can block the cf-agent process. Always test TCP
connections fully before deploying.
Arguments:
host: string - Host name or IP address of server socket - in the range: .*port: string - Port number or service name - in the range: .*sendstring: string - Protocol query string - in the range: .*maxbytes: int - Maximum number of bytes to read - in the range: 0,99999999999
Example:
code
body common control
{
bundlesequence => { "example" };
}
bundle agent example
{
vars:
"my80" string => readtcp("myserver.com","80","GET /index.html HTTP/1.1$(const.r)$(const.n)Host: myserver.com$(const.r)$(const.n)$(const.r)$(const.n)",20);
classes:
"server_ok" expression => regcmp("[^\n]*200 OK.*\n.*","$(my80)");
reports:
server_ok::
"Server is alive";
!server_ok::
"Server is not responding - got $(my80)";
}
Output:
Notes: Note that on some systems the timeout mechanism does not seem to
successfully interrupt the waiting system calls so this might hang if you send
an incorrect query string. This should not happen, but the cause has yet to be
diagnosed.
readyaml
Prototype: readyaml(filename, optional_maxbytes)
Return type: data
Description: Parses YAML data from the file filename and returns the
result as a data variable. maxbytes is optional, if specified, only the
first maxbytes bytes are read from filename.
Arguments:
filename: string - File name - in the range: "?(/.*)optional_maxbytes: int - Maximum number of bytes to read - in the range: 0,99999999999
Example:
code
vars:
"loadthis"
data => readyaml("/tmp/data.yaml", 4000);
See also: data_expand(), readdata(), parsejson(), parseyaml(), storejson(), mergedata(), and data documentation.
regarray
Prototype: regarray(array, regex)
Return type: boolean
Description: Returns whether array contains elements matching the
anchoredregular expression regex.
Arguments:
array: string - CFEngine variable identifier or inline JSON - in the range: .*regex: regular expression - Regular expression - in the range: .*
Example:
code
body common control
{
bundlesequence => { "example" };
}
bundle agent example
{
vars:
"myarray[0]" string => "bla1";
"myarray[1]" string => "bla2";
"myarray[3]" string => "bla";
classes:
"ok" expression => regarray("myarray","b.*2");
reports:
ok::
"Found in list";
!ok::
"Not found in list";
}
Output:
regcmp
Prototype: regcmp(regex, string)
Return type: boolean
Description: Returns whether the anchored regular expression
regex matches the string.
Arguments:
regex: regular expression - Regular expression - in the range: .*string: string - Match string - in the range: .*
Example:
code
body common control
{
bundlesequence => { subtest("mark") };
}
bundle agent subtest(user)
{
classes:
"invalid" not => regcmp("[a-z]{4}","$(user)");
reports:
!invalid::
"User name $(user) is valid at exactly 4 letters";
invalid::
"User name $(user) is invalid";
}
Output:
code
R: User name mark is valid at exactly 4 letters
If the string contains multiple lines, then it is necessary to code these
explicitly, as regular expressions do not normally match the end of line
as a regular character (they only match end of string). You can do this
using either standard regular expression syntax or using the additional
features of PCRE (where (?ms) changes the way that ., ^ and $ behave), e.g.
See also: regline(), strcmp()
regex_replace
Prototype: regex_replace(string, regex, replacement, options)
Return type: string
Description: In a given string, replaces a regular expression with something else.
Arguments:
string: string - Source string - in the range: .*regex: regular expression - Regular expression pattern - in the range: .*replacement: string - Replacement string - in the range: .*options: string - sed/Perl-style options: gmsixUT - in the range: .*
The supported options are single letters you place in the options
string in any order. Consult http://pcre.org/pcre.txt for the exact
meaning of the uppercase options, and note that some can be turned on
inside the regular expression, e.g. (?s).
g: global, replace all matchesi: case-insensitivem: multiline (PCRE_MULTILINE)s: dot matches newlines too (PCRE_DOTALL)x: extended regular expressions (PCRE_EXTENDED, very nice for readability)U: ungreedy (PCRE_UNGREEDY)T: disables special characters and backreferences in the replacement string
In the replacement, $1 and \1 refer to the first capture group.
$2 and \2 refer to the second, and so on, except there is no \10
or higher, you have to use $10 etc.
In addition, $+ is replaced with the capture count. $' (dollar
sign + single quote) is the part of the string after the regex match.
$` (dollar sign + backtick) is the part of the string before the
regex match. $& holds the entire regex match.
Example:
code
bundle agent main
{
vars:
# global regex replace A with B
"AB" string => regex_replace("This has AAA rating", "A", "B", "g");
# global regex replace [Aa] with B (case insensitive)
"AaB" string => regex_replace("This has AAA rating", "A", "B", "gi");
# global replace every three characters with [cap=thecharacters] using $1
"cap123" string => regex_replace("abcdefghijklmn", "(...)", "[cap=$1]", "g");
# multiple captures using \1 \2 (just like $1 $2 but can only go up to \9)
"path_breakdown" string => regex_replace("/a/b/c/example.txt", "(.+)/(.+)", "dirname = \1 file basename = \2", "");
reports:
# in order, the above...
"AB replacement = '$(AB)'";
"AaB replacement = '$(AaB)'";
"cap123 replacement = '$(cap123)'";
"path_breakdown replacement = '$(path_breakdown)'";
}
Output:
code
R: AB replacement = 'This has BBB rating'
R: AaB replacement = 'This hBs BBB rBting'
R: cap123 replacement = '[cap=abc][cap=def][cap=ghi][cap=jkl]mn'
R: path_breakdown replacement = 'dirname = /a/b/c file basename = example.txt'
History: Was introduced in version 3.8.0 (2015)
See also: data_regextract() regextract()
Prototype: regextract(regex, string, backref)
Return type: boolean
Description: Returns whether the anchored regex matches the
string, and fills the array backref with back-references.
This function should be avoided in favor of data_regextract()
because it creates classic CFEngine array variables and does not
support named captures.
If there are any back reference matches from the regular expression, then the array will be populated with the values, in the manner:
code
$(backref[0]) = entire string
$(backref[1]) = back reference 1, etc
Arguments:
regex: regular expression - Regular expression - in the range: .*string: string - Match string - in the range: .*backref: string - Identifier for back-references - in the range: [a-zA-Z0-9_$(){}\[\].:]+
Example:
code
body common control
{
bundlesequence => { "example" };
}
bundle agent example
{
classes:
# Extract regex backreferences and put them in an array
"ok" expression => regextract(
"xx ([^\s]+) ([^\s]+).* xx",
"xx one two three four xx",
"myarray"
);
reports:
ok::
"ok - \"$(myarray[0])\" = xx + \"$(myarray[1])\" + \"$(myarray[2])\" + .. + xx";
}
Output:
code
R: ok - "xx one two three four xx" = xx + "one" + "two" + .. + xx
See also: data_regextract() regex_replace()
registryvalue
Prototype: registryvalue(key, valueid)
Return type: string
Description: Returns the value of valueid in the Windows registry key
key.
This function applies only to Windows-based systems. The value is parsed as a
string.
Arguments:
key: string - Windows registry key - in the range: .*valueid: string - Windows registry value-id - in the range: .*
Example:
code
body common control
{
bundlesequence => { "reg" };
}
bundle agent reg
{
vars:
windows::
"value" string => registryvalue("HKEY_LOCAL_MACHINE\SOFTWARE\Northern.tech AS\CFEngine","value3");
!windows::
"value" string => "Sorry, no registry data is available";
reports:
"Value extracted: $(value)";
}
Output:
code
R: Value extracted: Sorry, no registry data is available
Notes: Currently values of type REG_SZ (string), REG_EXPAND_SZ
(expandable string) and REG_DWORD (double word) are supported.
regldap
This function is only available in CFEngine Enterprise.
Prototype: regldap(uri, dn, filter, record, scope, regex, security)
Return type: boolean
The return value is cached.
Description: Returns whether the regular expression regex matches a
value item in the LDAP search.
This function retrieves a single field from all matching LDAP records
identified by the search parameters and compares it to the regular
expression regex.
Arguments:
uri: string - URI - in the range: .*dn: string - Distinguished name - in the range: .*filter: string - Filter - in the range: .*record: string - Record name - in the range: .*scope: - Search scope policy - one of
regex: regular expression - Regex to match results - in the range: .*security: - Security level - one of
dn specifies the distinguished name, an ldap formatted name built from
components, e.g. "dc=cfengine,dc=com". filter is an ldap search, e.g.
"(sn=User)", and record is the name of the single record to be retrieved
and matched against regex, e.g. uid. Which security values are supported
depends on machine and server capabilities.
Example:
code
classes:
"found" expression => regldap(
"ldap://ldap.example.org",
"dc=cfengine,dc=com",
"(sn=User)",
"uid",
"subtree",
"jon.*",
"none"
);
regline
Prototype: regline(regex, filename)
Return type: boolean
Description: Returns whether the anchored regular expression
regex matches a line in file filename.
Note that regex must match an entire line of the file in order to give a
true result.
Arguments:
regex: regular expression - Regular expression - in the range: .*filename: string - Filename to search - in the range: .*
Examples:
This example shows a way to determine if IPV4 forwarding is enabled or not.
code
bundle agent main
{
vars:
linux::
"file" string => "/proc/sys/net/ipv4/ip_forward";
"reg_enabled" string => "^1$";
"reg_disabled" string => "^0$";
classes:
linux::
"ipv4_forwarding_enabled" -> { "SecOps" }
expression => regline( $(reg_enabled) , $(file) ),
comment => "We want to know if ip forwarding is enabled because it is a
potential security issue.";
"ipv4_forwarding_disabled" -> { "SecOps" }
expression => regline( $(reg_disabled) , $(file) );
reports:
ipv4_forwarding_enabled::
"I found that IPv4 forwarding is enabled!";
ipv4_forwarding_disabled::
"I found that IPv4 forwarding is disabled.";
}
code
R: I found that IPv4 forwarding is disabled.
For edit_line applications it may be useful to set a class for detecting the
presence of a string that does not exactly match one being inserted. For
example:
code
bundle edit_line upgrade_cfexecd
{
classes:
# Check there is not already a crontab line, not identical to
# the one proposed below...
"exec_fix"
not => regline(".*cf-execd.*","$(edit.filename)"),
scope => "bundle"; # Unless you need the class outside of the bundle you
# should always scope it to the bundle. This can
# prevent issues when the bundle is used multiple
# times, and the classes promise is expected to be
# re-evaluated. If the class is namespace scoped the
# class will be available to other bundles and persist
# until it is explicitly canceled or until the end of
# the agent run.
insert_lines:
exec_fix::
"0,5,10,15,20,25,30,35,40,45,50,55 * * * * /var/cfengine/bin/cf-execd -F";
reports:
exec_fix::
"Added a 5 minute schedule to crontabs";
}
See also: regcmp(), strcmp()
reglist
Prototype: reglist(list, regex)
Return type: boolean
Description: Returns whether the anchored regular expression
regex matches any item in list.
This function can accept many types of data parameters.
Arguments:
list: string - CFEngine variable identifier or inline JSON - in the range: .*regex: regular expression - Regular expression - in the range: .*
Example:
code
body common control
{
bundlesequence => { "example" };
}
bundle agent example
{
vars:
"nameservers" slist => {
"128.39.89.10",
"128.39.74.16",
"192.168.1.103",
"10.132.51.66"
};
classes:
"am_name_server" expression => reglist(@(nameservers), "127\.0\.0\.1");
reports:
am_name_server::
"127.0.0.1 is currently set as a nameserver";
!am_name_server::
"127.0.0.1 is NOT currently set as a nameserver";
}
Output:
code
R: 127.0.0.1 is NOT currently set as a nameserver
In the example above, the IP address in $(sys.ipv4[eth0]) must be escaped,
so that the (.) characters in the IP address are not interpreted as the
regular expression "match any" characters.
History: The collecting function behavior was added in 3.9.
See also: getindices(), getvalues(), about collecting functions, and data documentation.
remoteclassesmatching
This function is only available in CFEngine Enterprise.
Prototype: remoteclassesmatching(regex, server, encrypt, prefix)
Return type: boolean
Description: Reads persistent classes matching regular expression regex
from a remote CFEngine server server and adds them into local context with
prefix prefix.
The return value is true (sets the class) if communication with the server was
successful and classes were populated in the current bundle.
This function contacts a remote cf-serverd and requests access to defined
persistent classes on that system. Access must be granted by making an
access promise with resource_type set to context.
Arguments:
regex: regular expression - Regular expression - in the range: .*server: string - Server name or address - in the range: .*encrypt: - Use encryption - one of
prefix: string - Return class prefix - in the range: [a-zA-Z0-9_$(){}\[\].:]+
Example:
code
"succeeded" expression => remoteclassesmatching("regex","server","yes","myprefix");
Notes: Note that this function assumes that you have already performed a
successful key exchange between systems, (e.g. using either a remote
copy or cf-runagent connection). It contains no mechanism for trust
establishment and will fail if there is no trust relationship
pre-established.
See also: hubknowledge(), remotescalar(), hostswithclass()
remotescalar
This function is only available in CFEngine Enterprise.
Prototype: remotescalar(id, server, encrypt)
Return type: string
The return value is cached.
Description: Returns a scalar value identified by id from a remote CFEngine
server. Communication is encrytped depending on encrypt.
If the identifier matches a persistent scalar variable then this will be returned
preferentially. If no such variable is found, then the server will look for a
literal string in a server bundle with a handle that matches the requested object.
The remote system's cf-serverd must accept the query for the requested
variable from the host that is requesting it. Access must be granted by making
an access promise with resource_type set to literal.
CFEngine stores the value of this function on the calling host, so that, if the
network is unavailable, the last known value will be used. Hence use of this
function is fault tolerant. Care should be taken in attempting to access
remote variables that are not available, as the repeated connections
needed to resolve the absence of a value can lead to undesirable
behavior. As a general rule, users are recommended to refrain from
relying on the availability of network resources.
Arguments:
id: string - Variable identifier - in the range: [a-zA-Z0-9_$(){}\[\].:]+server: string - Hostname or IP address of server - in the range: .*encrypt: - Use enryption - one of
Example:
code
vars:
"remote" string => remotescalar("test_scalar","127.0.0.1","yes");
code
bundle server access
{
access:
"value of my test_scalar, can expand variables here - $(sys.host)"
handle => "test_scalar",
comment => "Grant access to contents of test_scalar VAR",
resource_type => "literal",
admit => { "127.0.0.1" };
}
Notes: Note that this function assumes that you have already performed a
successful key exchange between systems, (e.g. using either a remote
copy or cf-runagent connection). It contains no mechanism for trust
establishment and will fail if there is no trust relationship
established in advance.
See also: hubknowledge(), remoteclassesmatching(), hostswithclass()
returnszero
Prototype: returnszero(command, shell)
Return type: boolean
The return value is cached.
Description: Runs command and returns whether it has returned with exit
status zero.
This is the complement of execresult(), but it returns a class result
rather than the output of the command.
Arguments:
command: string - Command path - in the range: .+shell: - Shell encapsulation option - one of
noshelluseshellpowershell
Example:
code
body common control
{
bundlesequence => { "example" };
}
bundle agent example
{
classes:
"my_result" expression => returnszero("/usr/local/bin/mycommand","noshell");
reports:
!my_result::
"Command failed";
}
Output:
code
2014-08-18T14:13:28+0100 error: Proposed executable file '/usr/local/bin/mycommand' doesn't exist
2014-08-18T14:13:28+0100 error: returnszero '/usr/local/bin/mycommand' is assumed to be executable but isn't
R: Command failed
Notes: you should never use this function to execute commands that
make changes to the system, or perform lengthy computations. Such an
operation is beyond CFEngine's ability to guarantee convergence, and
on multiple passes and during syntax verification these function calls
are executed, resulting in system changes that are covert. Calls
to execresult should be for discovery and information extraction
only. Effectively calls to this function will be also repeatedly
executed by cf-promises when it does syntax checking, which is
highly undesirable if the command is expensive. Consider using
commands promises instead, which have locking and are not evaluated
by cf-promises.
See also: execresult().
reverse
Prototype: reverse(list)
Return type: slist
Description: Reverses a list.
This is a simple function to reverse a list.
This function can accept many types of data parameters.
Arguments:
- list : The name of the list variable to check, in the range
[a-zA-Z0-9_$(){}\[\].:]+
Example:
code
body common control
{
bundlesequence => { "test" };
}
bundle agent test
{
vars:
"test" slist => {
1,2,3,
"one", "two", "three",
"long string",
"one", "two", "three",
};
"reversed" slist => reverse("test");
reports:
"Original list is $(test)";
"The reversed list is $(reversed)";
}
Output:
code
R: Original list is 1
R: Original list is 2
R: Original list is 3
R: Original list is one
R: Original list is two
R: Original list is three
R: Original list is long string
R: The reversed list is three
R: The reversed list is two
R: The reversed list is one
R: The reversed list is long string
R: The reversed list is 3
R: The reversed list is 2
R: The reversed list is 1
History: The collecting function behavior was added in 3.9.
See also: filter(), grep(), every(), some(), none(), about collecting functions, and data documentation.
rrange
Prototype: rrange(arg1, arg2)
Return type: rrange
Description: Define a range of real numbers for CFEngine internal use.
Arguments:
arg1: real - Real number, start of range - in the range: -9.99999E100,9.99999E100arg2: real - Real number, end of range - in the range: -9.99999E100,9.99999E100
Notes:
This is not yet used.
selectservers
Prototype: selectservers(hostlist, port, query, regex, maxbytes, array)
Return type: int
Description: Returns the number of tcp servers from hostlist which
respond with a reply matching regex to a query send to port, and
populates array with their names.
The regular expression is anchored. If query is empty, then no
reply checking is performed (any server reply is deemed to be satisfactory),
otherwise at most maxbytes bytes are read from the server and matched.
This function allows discovery of all the TCP ports that are active and
functioning from an ordered list, and builds an array of their names. This
allows maintaining a list of pretested failover alternatives.
Arguments:
hostlist: string - CFEngine list identifier, the list of hosts or addresses to contact - in the range: @[(][a-zA-Z0-9_$(){}\[\].:]+[)]port: string - Port number or service name. - in the range: .*query: string - A query string - in the range: .*regex: regular expression - A regular expression to match success - in the range: .*maxbyes: int - Maximum number of bytes to read from server - in the range: 0,99999999999array: string - Name for array of results - in the range: [a-zA-Z0-9_$(){}\[\].:]+
Example:
code
bundle agent example
{
vars:
"hosts" slist => { "slogans.iu.hio.no", "eternity.iu.hio.no", "nexus.iu.hio.no" };
"fhosts" slist => { "www.cfengine.com", "www.cfengine.org" };
"up_servers" int => selectservers("@(hosts)","80","","","100","alive_servers");
"has_favicon" int =>
selectservers(
"@(hosts)", "80",
"GET /favicon.ico HTTP/1.0$(const.n)Host: www.cfengine.com$(const.n)$(const.n)",
"(?s).*OK.*",
"200", "favicon_servers");
classes:
"someone_alive" expression => isgreaterthan("$(up_servers)","0");
"has_favicon" expression => isgreaterthan("$(has_favicon)","0");
reports:
"Number of active servers $(up_servers)";
someone_alive::
"First server $(alive_servers[0]) fails over to $(alive_servers[1])";
has_favicon::
"At least $(favicon_servers[0]) has a favicon.ico";
}
If there is a multi-line response from the server, special care must be
taken to ensure that newlines are matched, too. Note the use of (?s)
in the example, which allows . to also match newlines in the
multi-line HTTP response.
shuffle
Prototype: shuffle(list, seed)
Return type: slist
Description: Return list shuffled with seed.
This function can accept many types of data parameters.
The same seed will produce the same shuffle every time. For a random shuffle,
provide a random seed with the randomint function.
Arguments:
list: string - CFEngine variable identifier or inline JSON - in the range: .*seed: string - Any seed string - in the range: .*
Example:
code
body common control
{
bundlesequence => { "test" };
}
bundle agent test
{
vars:
"mylist" slist => { "b", "c", "a" };
"seeds" slist => { "xx", "yy", "zz" };
"shuffled_$(seeds)" slist => shuffle(mylist, $(seeds));
"joined_$(seeds)" string => join(",", "shuffled_$(seeds)");
reports:
"shuffled RANDOMLY by $(seeds) = '$(joined_$(seeds))'";
}
Output:
code
R: shuffled RANDOMLY by xx = 'b,a,c'
R: shuffled RANDOMLY by yy = 'a,c,b'
R: shuffled RANDOMLY by zz = 'c,b,a'
History: The collecting function behavior was added in 3.9.
See also: sort(), about collecting functions, and data documentation.
some
Prototype: some(regex, list)
Return type: boolean
Description: Return whether any element of list matches the
Unanchored regular expression regex.
This function can accept many types of data parameters.
Arguments:
regex: regular expression - Regular expression or string - in the range: .*list: string - CFEngine variable identifier or inline JSON - in the range: .*
some() will return as soon as any element matches.
It's convenient to set a class to not => some(".*", mylist) in order
to check if mylist is empty. Since some() returns as soon as
possible, that is better than using length() or every() or
none() which must traverse the entire list.
Example:
code
body common control
{
bundlesequence => { "test" };
}
bundle agent test
{
classes:
# This is an easy way to check if a list is empty, better than
# expression => strcmp(length(x), "0")
# Note that if you use length() or none() or every() they will
# go through all the elements!!! some() returns as soon as any
# element matches.
"empty_x" not => some(".*", x);
"empty_y" not => some(".*", y);
"some11" expression => some("long string", test1);
"some12" expression => some("none", test1);
"some21" expression => some("long string", test2);
"some22" expression => some("none", test2);
vars:
"x" slist => { "a", "b" };
"y" slist => { };
"test1" slist => {
1,2,3,
"one", "two", "three",
"long string",
"four", "fix", "six",
"one", "two", "three",
};
"test2" data => parsejson('[1,2,3,
"one", "two", "three",
"long string",
"four", "fix", "six",
"one", "two", "three",]');
reports:
empty_x::
"x has no elements";
empty_y::
"y has no elements";
any::
"The test1 list is $(test1)";
some11::
"some() test1 1 passed";
!some11::
"some() test1 1 failed";
some12::
"some() test1 2 failed";
!some12::
"some() test1 2 passed";
"The test2 list is $(test2)";
some21::
"some() test2 1 passed";
!some21::
"some() test2 1 failed";
some22::
"some() test2 2 failed";
!some22::
"some() test2 2 passed";
}
Output:
code
R: y has no elements
R: The test1 list is 1
R: The test1 list is 2
R: The test1 list is 3
R: The test1 list is one
R: The test1 list is two
R: The test1 list is three
R: The test1 list is long string
R: The test1 list is four
R: The test1 list is fix
R: The test1 list is six
R: some() test1 1 passed
R: some() test1 2 passed
R: The test2 list is 1
R: The test2 list is 2
R: The test2 list is 3
R: The test2 list is one
R: The test2 list is two
R: The test2 list is three
R: The test2 list is long string
R: The test2 list is four
R: The test2 list is fix
R: The test2 list is six
R: some() test2 1 passed
R: some() test2 2 passed
History: The collecting function behavior was added in 3.9.
See also: About collecting functions, filter(), every(), and none().
sort
Prototype: sort(list, mode)
Return type: slist
Description: Returns list sorted according to mode.
This function can accept many types of data parameters.
Lexicographical, integer, real, IP, and MAC address sorting is
supported currently. The example below will show each sorting mode in
action. mode is optional, and defaults to lex.
Note IPv6 addresses can not use uppercase hexadecimal characters
(A-Z) but must use lowercase (a-z) instead.
Arguments:
list: string - CFEngine variable identifier or inline JSON - in the range: .*mode: - Sorting method: lex or int or real (floating point) or IPv4/IPv6 or MAC address - one of
lexintrealIPipMACmac
Example:
code
body common control
{
bundlesequence => { test };
}
bundle agent test
{
vars:
"a" slist => { "b", "c", "a" };
"b" slist => { "100", "9", "10", "8.23" };
"c" slist => { };
"d" slist => { "", "a", "", "b" };
"e" slist => { "a", "1", "b" };
"ips" slist => { "100.200.100.0", "1.2.3.4", "9.7.5.1", "9", "9.7", "9.7.5", "", "-1", "where are the IP addresses?" };
"ipv6" slist => { "FE80:0000:0000:0000:0202:B3FF:FE1E:8329",
"FE80::0202:B3FF:FE1E:8329",
"::1",
# the following should all be parsed as the same address and sorted together
"2001:db8:0:0:1:0:0:1",
"2001:0db8:0:0:1:0:0:1",
"2001:db8::1:0:0:1",
"2001:db8::0:1:0:0:1",
"2001:0db8::1:0:0:1",
"2001:db8:0:0:1::1",
"2001:db8:0000:0:1::1",
"2001:DB8:0:0:1::1", # note uppercase IPv6 addresses are invalid
# examples from https://www.ripe.net/lir-services/new-lir/ipv6_reference_card.pdf
"8000:63bf:3fff:fdd2",
"::ffff:192.0.2.47",
"fdf8:f53b:82e4::53",
"fe80::200:5aee:feaa:20a2",
"2001:0000:4136:e378:",
"8000:63bf:3fff:fdd2",
"2001:0002:6c::430",
"2001:10:240:ab::a",
"2002:cb0a:3cdd:1::1",
"2001:db8:8:4::2",
"ff01:0:0:0:0:0:0:2",
"-1", "where are the IP addresses?" };
"macs" slist => { "00:14:BF:F7:23:1D", "0:14:BF:F7:23:1D", ":14:BF:F7:23:1D", "00:014:BF:0F7:23:01D",
"00:14:BF:F7:23:1D", "0:14:BF:F7:23:1D", ":14:BF:F7:23:1D", "00:014:BF:0F7:23:01D",
"01:14:BF:F7:23:1D", "1:14:BF:F7:23:1D",
"01:14:BF:F7:23:2D", "1:14:BF:F7:23:2D",
"-1", "where are the MAC addresses?" };
"ja" string => join(",", "a");
"jb" string => join(",", "b");
"jc" string => join(",", "c");
"jd" string => join(",", "d");
"je" string => join(",", "e");
"jips" string => join(",", "ips");
"jipv6" string => join(",", "ipv6");
"jmacs" string => join(",", "macs");
"sa" slist => sort("a", "lex");
"sb" slist => sort("b", "lex");
"sc" slist => sort("c", "lex");
"sd" slist => sort("d", "lex");
"se" slist => sort("e", "lex");
"sb_int" slist => sort("b", "int");
"sb_real" slist => sort("b", "real");
"sips" slist => sort("ips", "ip");
"sipv6" slist => sort("ipv6", "ip");
"smacs" slist => sort("macs", "mac");
"jsa" string => join(",", "sa");
"jsb" string => join(",", "sb");
"jsc" string => join(",", "sc");
"jsd" string => join(",", "sd");
"jse" string => join(",", "se");
"jsb_int" string => join(",", "sb_int");
"jsb_real" string => join(",", "sb_real");
"jsips" string => join(",", "sips");
"jsipv6" string => join(",", "sipv6");
"jsmacs" string => join(",", "smacs");
reports:
"sorted lexicographically '$(ja)' => '$(jsa)'";
"sorted lexicographically '$(jb)' => '$(jsb)'";
"sorted lexicographically '$(jc)' => '$(jsc)'";
"sorted lexicographically '$(jd)' => '$(jsd)'";
"sorted lexicographically '$(je)' => '$(jse)'";
"sorted integers '$(jb)' => '$(jsb_int)'";
"sorted reals '$(jb)' => '$(jsb_real)'";
"sorted IPs '$(jips)' => '$(jsips)'";
"sorted IPv6s '$(jipv6)' => '$(jsipv6)'";
"sorted MACs '$(jmacs)' => '$(jsmacs)'";
}
Output:
code
2013-09-05T14:05:04-0400 notice: R: sorted lexicographically 'b,c,a' => 'a,b,c'
2013-09-05T14:05:04-0400 notice: R: sorted lexicographically '100,9,10,8.23' => '10,100,8.23,9'
2013-09-05T14:05:04-0400 notice: R: sorted lexicographically '' => ''
2013-09-05T14:05:04-0400 notice: R: sorted lexicographically ',a,,b' => ',,a,b'
2013-09-05T14:05:04-0400 notice: R: sorted lexicographically 'a,1,b' => '1,a,b'
2013-09-05T14:05:04-0400 notice: R: sorted integers '100,9,10,8.23' => '8.23,9,10,100'
2013-09-05T14:05:04-0400 notice: R: sorted reals '100,9,10,8.23' => '8.23,9,10,100'
2013-09-05T14:05:04-0400 notice: R: sorted IPs '100.200.100.0,1.2.3.4,9.7.5.1,9,9.7,9.7.5,,-1,where are the IP addresses?' => ',-1,9,9.7,9.7.5,where are the IP addresses?,1.2.3.4,9.7.5.1,100.200.100.0'
2013-09-05T14:05:04-0400 notice: R: sorted IPv6s 'FE80:0000:0000:0000:0202:B3FF:FE1E:8329,FE80::0202:B3FF:FE1E:8329,::1,2001:db8:0:0:1:0:0:1,2001:0db8:0:0:1:0:0:1,2001:db8::1:0:0:1,2001:db8::0:1:0:0:1,2001:0db8::1:0:0:1,2001:db8:0:0:1::1,2001:db8:0000:0:1::1,2001:DB8:0:0:1::1,8000:63bf:3fff:fdd2,::ffff:192.0.2.47,fdf8:f53b:82e4::53,fe80::200:5aee:feaa:20a2,2001:0000:4136:e378:,8000:63bf:3fff:fdd2,2001:0002:6c::430,2001:10:240:ab::a,2002:cb0a:3cdd:1::1,2001:db8:8:4::2,ff01:0:0:0:0:0:0:2,-1,where are the IP addresses?' => '-1,2001:0000:4136:e378:,2001:DB8:0:0:1::1,8000:63bf:3fff:fdd2,8000:63bf:3fff:fdd2,::ffff:192.0.2.47,FE80:0000:0000:0000:0202:B3FF:FE1E:8329,FE80::0202:B3FF:FE1E:8329,where are the IP addresses?,::1,2001:0002:6c::430,2001:10:240:ab::a,2001:db8:0000:0:1::1,2001:db8:0:0:1::1,2001:0db8::1:0:0:1,2001:db8::0:1:0:0:1,2001:db8::1:0:0:1,2001:0db8:0:0:1:0:0:1,2001:db8:0:0:1:0:0:1,2001:db8:8:4::2,2002:cb0a:3cdd:1::1,fdf8:f53b:82e4::53,fe80::200:5aee:feaa:20a2,ff01:0:0:0:0:0:0:2'
2013-09-05T14:05:04-0400 notice: R: sorted MACs '00:14:BF:F7:23:1D,0:14:BF:F7:23:1D,:14:BF:F7:23:1D,00:014:BF:0F7:23:01D,00:14:BF:F7:23:1D,0:14:BF:F7:23:1D,:14:BF:F7:23:1D,00:014:BF:0F7:23:01D,01:14:BF:F7:23:1D,1:14:BF:F7:23:1D,01:14:BF:F7:23:2D,1:14:BF:F7:23:2D,-1,where are the MAC addresses?' => '-1,:14:BF:F7:23:1D,:14:BF:F7:23:1D,where are the MAC addresses?,00:014:BF:0F7:23:01D,0:14:BF:F7:23:1D,00:14:BF:F7:23:1D,00:014:BF:0F7:23:01D,0:14:BF:F7:23:1D,00:14:BF:F7:23:1D,1:14:BF:F7:23:1D,01:14:BF:F7:23:1D,1:14:BF:F7:23:2D,01:14:BF:F7:23:2D'
History:
- Function added in 3.6.0.
- Collecting function behavior added in 3.9.0.
- Optional mode defaulting to lex behavior added in 3.9.0.
See also: shuffle(), about collecting functions, and data documentation.
splayclass
Prototype: splayclass(input, policy)
Return type: boolean
Description: Returns whether input's time-slot has arrived,
according to a policy.
The function returns true if the system clock lies within a scheduled
time-interval that maps to a hash of input (which may be any arbitrary
string). Different strings will hash to different time intervals, and thus one
can map different tasks to time-intervals.
This function may be used to distribute a task, typically on multiple hosts, in time over a day or an hourly period, depending on the policy (that must be either daily or hourly). This is useful for copying resources to multiple hosts from a single server, (e.g. large software updates), when simultaneous scheduling would lead to a bottleneck and/or server overload.
The function is similar to the splaytime feature in cf-execd, except that it allows you to base the decision on any string-criterion on a given host.
Arguments:
input: string - Input string for classification - in the range: .*policy: - Splay time policy - one of
The variation in input determines how effectively CFEngine will be able to
distribute tasks. CFEngine instances with the same input will yield a true
result at the same time, and different input will yield a true result at
different times. Thus tasks could be scheduled according to group names for
predictability, or according to IP addresses for distribution across the
policy interval.
The times at which the splayclass will be defined depends on the policy.
If it is hourly then the class will be defined for a 5-minute interval every
hour. If the policy daily, then the class will be defined for one 5-minute
interval every day. This means that splayclass assumes that you are running
CFEngine with the default schedule of "every 5 minutes". If you change the
executor schedule control variable, you may prevent the splayclass from
ever being defined (that is, if the hashed 5-minute interval that is selected
by the splayclass is a time when you have told CFEngine not to run).
Example:
code
bundle agent example
{
classes:
"my_turn" expression => splayclass("$(sys.host)$(sys.ipv4)","daily");
reports:
my_turn::
"Load balanced class activated";
}
See also: hash_to_int()
splitstring
Prototype: splitstring(string, regex, maxent)
Return type: slist
Description: Splits string into at most maxent substrings wherever
regex occurs, and returns the list with those strings.
The regular expression is unanchored.
If the maximum number of substrings is insufficient to accommodate all the
entries, the rest of the un-split string is thrown away.
Arguments:
string: string - A data string - in the range: .*regex: regular expression - Regex to split on - in the range: .*maxent: int - Maximum number of pieces - in the range: 0,99999999999
Example:
code
body common control
{
bundlesequence => { "test" };
}
bundle agent test
{
vars:
"split1" slist => splitstring("one:two:three",":","10");
"split2" slist => splitstring("one:two:three",":","1");
"split3" slist => splitstring("alpha:xyz:beta","xyz","10");
reports:
"split1: $(split1)"; # will list "one", "two", and "three"
"split2: $(split2)"; # will list "one", "two:three" will be thrown away.
"split3: $(split3)"; # will list "alpha:" and ":beta"
}
Output:
code
R: split1: one
R: split1: two
R: split1: three
R: split2: one
R: split3: alpha:
R: split3: :beta
History: Deprecated in CFEngine 3.6 in favor of string_split
See also: string_split()
storejson
Prototype: storejson(data_container)
Return type: string
Description: Converts a data container to a JSON string.
This function can accept many types of data parameters.
Arguments:
data_container: string - CFEngine variable identifier or inline JSON - in the range: .*
Example:
code
bundle common globals
{
vars:
"example_data" data => '{ "msg": "Hello from $(this.bundle)" }';
}
bundle agent example_storejson
{
vars:
"example_data" data => '{ "msg": "Hello from $(this.bundle)" }';
# Using storejson with data from remote bundle
# "json_string_zero" -> { "CFEngine 3.16.0"}
# string => storejson( globals.example_data )
# comment => "Unquoted with . (dot) present will cause the parser to error";
"json_string_one" string => storejson( @(globals.example_data) );
"json_string_two" string => storejson( "globals.example_data" );
# Using storejson with data from this bundle
"json_string_three" string => storejson( @(example_storejson.example_data) );
"json_string_four" string => storejson( "example_storejson.example_data");
"json_string_five" string => storejson( example_data );
"json_string_six" string => storejson( "$(this.bundle).example_data");
"json_string_seven" string => storejson( @(example_data) );
reports:
"json_string_one and json_string_two are identical:$(const.n)$(json_string_one)"
if => strcmp( $(json_string_one), $(json_string_two) );
"json_string_{one,two,three,four,five,six,seven} are identical:$(const.n)$(json_string_three)"
if => and(
strcmp( $(json_string_three), $(json_string_four) ),
strcmp( $(json_string_four), $(json_string_five) ),
strcmp( $(json_string_five), $(json_string_six) ),
strcmp( $(json_string_six), $(json_string_seven) )
);
}
bundle agent __main__
{
methods: "example_storejson";
}
code
R: json_string_one and json_string_two are identical:
{
"msg": "Hello from globals"
}
R: json_string_{one,two,three,four,five,six,seven} are identical:
{
"msg": "Hello from example_storejson"
}
This policy can be found in
/var/cfengine/share/doc/examples/storejson.cf
and downloaded directly from
github.
History:
See also: readjson(), readyaml(), parsejson(), parseyaml(), about collecting functions, and data documentation.
strcmp
Prototype: strcmp(string1, string2)
Return type: boolean
Description: Returns whether the two strings string1 and string2 match
exactly.
Arguments:
string1: string - String - in the range: .*string2: string - String - in the range: .*
Example:
code
body common control
{
bundlesequence => { "example" };
}
bundle agent example
{
classes:
"same" expression => strcmp("test","test");
reports:
same::
"Strings are equal";
!same::
"Strings are not equal";
}
Output:
code
R: Strings are equal
See also: regcmp(), regline()
strftime
Prototype: strftime(mode, template, time)
Return type: string
Description: Interprets a time and date format string at a particular
point in GMT or local time using Unix epoch time.
Arguments:
mode: - Use GMT or local time - one of
template: string - A format string - in the range: .*time: int - The time as a Unix epoch offset - in the range: 0,99999999999
The mode is either gmtime (to get GMT times and dates) or
localtime (to get times and dates according to the local
timezone, usually specified by the TZ environment variable).
The conversion specifications that can appear in the format template
are specialized for printing components of the date and time according to the system locale.
Example:
code
The templates used here are from the documentation of the standard strftime
implementation in the [glibc manual](http://www.gnu.org/software/libc/manual/html_node/Formatting-Calendar-Time.html#Formatting-Calendar-Time).
```cf3
body agent control
{
environment => { "LC_ALL=en_US.UTF-8", "TZ=GMT" };
}
bundle agent main
{
vars:
"time" int => "1234567890";
"template[%a]" string => "The abbreviated weekday name according to the current locale.";
"template[%A]" string => "The full weekday name according to the current locale.";
"template[%b]" string => "The abbreviated month name according to the current locale.";
"template[%B]" string => "The full month name according to the current locale.";
"template[%c]" string => "The preferred calendar time representation for the current locale.";
"template[%C]" string => "The century of the year. This is equivalent to the greatest integer not greater than the year divided by 100.";
"template[%d]" string => "The day of the month as a decimal number (range 01 through 31).";
"template[%D]" string => "The date using the format %m/$d/%y.";
"template[%e]" string => "The day of the month like with %d, but padded with blank (range 1 through 31).";
"template[%F]" string => "The date using the format %Y-%m-%d. This is the form specified in the ISO 8601 standard and is the preferred form for all uses.";
"template[%g]" string => "The year corresponding to the ISO week number, but without the century (range 00 through 99). This has the same format and value as %y, except that if the ISO week number (see %V) belongs to the previous or next year, that year is used instead.";
"template[%G]" string => "The year corresponding to the ISO week number. This has the same format and value as %Y, except that if the ISO week number (see %V) belongs to the previous or next year, that year is used instead.";
"template[%h]" string => "The abbreviated month name according to the current locale. The action is the same as for %b.";
"template[%H]" string => "The hour as a decimal number, using a 24-hour clock (range 00 through 23).";
"template[%I]" string => "The hour as a decimal number, using a 12-hour clock (range 01 through 12).";
"template[%j]" string => "The day of the year as a decimal number (range 001 through 366).";
"template[%k]" string => "The hour as a decimal number, using a 24-hour clock like %H, but padded with blank (range 0 through 23).";
"template[%l]" string => "The hour as a decimal number, using a 12-hour clock like %I, but padded with blank (range 1 through 12).";
"template[%m]" string => "The month as a decimal number (range 01 through 12).";
"template[%M]" string => "The minute as a decimal number (range 00 through 59).";
"template[%n]" string => "A single \n (newline) character.";
"template[%p]" string => "Either AM or PM, according to the given time value; or the corresponding strings for the current locale. Noon is treated as PM and midnight as AM. In most locales AM/PM format is not supported, in such cases %p yields an empty string.";
"template[%P]" string => "Either am or pm, according to the given time value; or the corresponding strings for the current locale, printed in lowercase characters. Noon is treated as pm and midnight as am. In most locales AM/PM format is not supported, in such cases %P yields an empty string.";
"template[%r]" string => "The complete calendar time using the AM/PM format of the current locale.";
"template[%R]" string => "The hour and minute in decimal numbers using the format %H:%M.";
"template[%S]" string => "The seconds as a decimal number (range 00 through 60).";
"template[%t]" string => "A single \t (tabulator) character.";
"template[%T]" string => "The time of day using decimal numbers using the format %H:%M:%S.";
"template[%u]" string => "The day of the week as a decimal number (range 1 through 7), Monday being 1.";
"template[%U]" string => "The week number of the current year as a decimal number (range 00 through 53), starting with the first Sunday as the first day of the first week. Days preceding the first Sunday in the year are considered to be in week 00.";
"template[%V]" string => "The *ISO 8601:1988* week number as a decimal number (range 01 through 53). ISO weeks start with Monday and end with Sunday. Week 01 of a year is the first week which has the majority of its days in that year; this is equivalent to the week containing the year's first Thursday, and it is also equivalent to the week containing January 4. Week 01 of a year can contain days from the previous year. The week before week 01 of a year is the last week (52 or 53) of the previous year even if it contains days from the new year.";
"template[%w]" string => "The day of the week as a decimal number (range 0 through 6), Sunday being 0.";
"template[%w]" string => "The day of the week as a decimal number (range 0 through 6), Sunday being 0.";
"template[%x]" string => "The preferred date representation for the current locale.";
"template[%X]" string => "The preferred time of day representation for the current locale.";
"template[%y]" string => "The year without a century as a decimal number (range 00 through 99). This is equivalent to the year modulo 100.";
"template[%Y]" string => "The year as a decimal number, using the Gregorian calendar. Years before the year 1 are numbered 0, -1, and so on.";
"template[%z]" string => "*RFC 822*/*ISO 8601:1988* style numeric time zone (e.g., -0600 or +0100), or nothing if no time zone is determinable.";
"template[%Z]" string => "The time zone abbreviation (empty if the time zone can't be determined).";
"template[%%]" string => "A literal % character.";
# Since %s is ever changing resulting in unstable output, causing a test failure in CI
# it's not used unless show_seconds_since_epoch is defined
"template[%s]" string => "The number of seconds since the epoch, i.e., since 1970-01-01 00:00:00 UTC. Leap seconds are not counted unless leap second support is available.", if => "show_seconds_since_epoch";
"_i" slist => sort(getindices(template), lex);
reports:
"$(_i) :: $(template[$(_i)])$(const.n)$(const.t)For example: '$(with)'"
with => strftime(gmtime, $(_i), $(time));
}
Output:
code
R: %% :: A literal % character.
For example: '%'
R: %A :: The full weekday name according to the current locale.
For example: 'Friday'
R: %B :: The full month name according to the current locale.
For example: 'February'
R: %C :: The century of the year. This is equivalent to the greatest integer not greater than the year divided by 100.
For example: '20'
R: %D :: The date using the format %m/$d/%y.
For example: '02/13/09'
R: %F :: The date using the format %Y-%m-%d. This is the form specified in the ISO 8601 standard and is the preferred form for all uses.
For example: '2009-02-13'
R: %G :: The year corresponding to the ISO week number. This has the same format and value as %Y, except that if the ISO week number (see %V) belongs to the previous or next year, that year is used instead.
For example: '2009'
R: %H :: The hour as a decimal number, using a 24-hour clock (range 00 through 23).
For example: '23'
R: %I :: The hour as a decimal number, using a 12-hour clock (range 01 through 12).
For example: '11'
R: %M :: The minute as a decimal number (range 00 through 59).
For example: '31'
R: %P :: Either am or pm, according to the given time value; or the corresponding strings for the current locale, printed in lowercase characters. Noon is treated as pm and midnight as am. In most locales AM/PM format is not supported, in such cases %P yields an empty string.
For example: 'pm'
R: %R :: The hour and minute in decimal numbers using the format %H:%M.
For example: '23:31'
R: %S :: The seconds as a decimal number (range 00 through 60).
For example: '30'
R: %T :: The time of day using decimal numbers using the format %H:%M:%S.
For example: '23:31:30'
R: %U :: The week number of the current year as a decimal number (range 00 through 53), starting with the first Sunday as the first day of the first week. Days preceding the first Sunday in the year are considered to be in week 00.
For example: '06'
R: %V :: The *ISO 8601:1988* week number as a decimal number (range 01 through 53). ISO weeks start with Monday and end with Sunday. Week 01 of a year is the first week which has the majority of its days in that year; this is equivalent to the week containing the year's first Thursday, and it is also equivalent to the week containing January 4. Week 01 of a year can contain days from the previous year. The week before week 01 of a year is the last week (52 or 53) of the previous year even if it contains days from the new year.
For example: '07'
R: %X :: The preferred time of day representation for the current locale.
For example: '23:31:30'
R: %Y :: The year as a decimal number, using the Gregorian calendar. Years before the year 1 are numbered 0, -1, and so on.
For example: '2009'
R: %Z :: The time zone abbreviation (empty if the time zone can't be determined).
For example: 'GMT'
R: %a :: The abbreviated weekday name according to the current locale.
For example: 'Fri'
R: %b :: The abbreviated month name according to the current locale.
For example: 'Feb'
R: %c :: The preferred calendar time representation for the current locale.
For example: 'Fri Feb 13 23:31:30 2009'
R: %d :: The day of the month as a decimal number (range 01 through 31).
For example: '13'
R: %e :: The day of the month like with %d, but padded with blank (range 1 through 31).
For example: '13'
R: %g :: The year corresponding to the ISO week number, but without the century (range 00 through 99). This has the same format and value as %y, except that if the ISO week number (see %V) belongs to the previous or next year, that year is used instead.
For example: '09'
R: %h :: The abbreviated month name according to the current locale. The action is the same as for %b.
For example: 'Feb'
R: %j :: The day of the year as a decimal number (range 001 through 366).
For example: '044'
R: %k :: The hour as a decimal number, using a 24-hour clock like %H, but padded with blank (range 0 through 23).
For example: '23'
R: %l :: The hour as a decimal number, using a 12-hour clock like %I, but padded with blank (range 1 through 12).
For example: '11'
R: %m :: The month as a decimal number (range 01 through 12).
For example: '02'
R: %n :: A single \n (newline) character.
For example: '
'
R: %p :: Either AM or PM, according to the given time value; or the corresponding strings for the current locale. Noon is treated as PM and midnight as AM. In most locales AM/PM format is not supported, in such cases %p yields an empty string.
For example: 'PM'
R: %r :: The complete calendar time using the AM/PM format of the current locale.
For example: '11:31:30 PM'
R: %t :: A single \t (tabulator) character.
For example: ' '
R: %u :: The day of the week as a decimal number (range 1 through 7), Monday being 1.
For example: '5'
R: %w :: The day of the week as a decimal number (range 0 through 6), Sunday being 0.
For example: '5'
R: %x :: The preferred date representation for the current locale.
For example: '02/13/09'
R: %y :: The year without a century as a decimal number (range 00 through 99). This is equivalent to the year modulo 100.
For example: '09'
R: %z :: *RFC 822*/*ISO 8601:1988* style numeric time zone (e.g., -0600 or +0100), or nothing if no time zone is determinable.
For example: '+0000'
Notes: Note that strftime is a standard C function and you should consult
its
reference
to be sure of the specifiers allowed.
string
Prototype: string(arg)
Return type: string
Description: Convert arg to string.
Arguments:
arg: string - Convert argument to string - in the range: .*
If arg is a container reference it will be serialized to a string.
The reference must be indicated with @(some_container).
Strings are not interpreted as references.
Example:
code
bundle agent main
{
classes:
"classA";
"classB";
vars:
"some_string" string => "cba";
"class_expressions" slist => {"classA.classB",
string(and("classA", strcmp("$(some_string)", "abc")))
};
reports:
"$(class_expressions)";
}
code
R: classA.classB
R: !any
This policy can be found in
/var/cfengine/share/doc/examples/string.cf
and downloaded directly from
github.
See also: int()
History:
string_downcase
Prototype: string_downcase(data)
Return type: string
Description: Returns data in lower case.
Arguments:
data: string - Input string - in the range: .*
Example:
code
body common control
{
bundlesequence => { "example" };
}
bundle agent example
{
vars:
"downcase" string => string_downcase("ABC"); # will contain "abc"
reports:
"downcased ABC = $(downcase)";
}
Output:
code
R: downcased ABC = abc
History: Introduced in CFEngine 3.6
See also: string_upcase().
string_head
Prototype: string_head(data, max)
Return type: string
Description: Returns the first max bytes of data.
If max is negative, then everything but the last max bytes is returned.
Arguments:
data: string - Input string - in the range: .*max: int - Maximum number of characters to return - in the range: -99999999999,99999999999
Example:
code
body common control
{
bundlesequence => { "example" };
}
bundle agent example
{
vars:
"start" string => string_head("abc", "1"); # will contain "a"
reports:
"start of abc = $(start)";
}
Output:
History: Introduced in CFEngine 3.6
See also: string_tail(), string_length(), string_reverse().
string_length
Prototype: string_length(data)
Return type: int
Description: Returns the byte length of data.
Arguments:
data: string - Input string - in the range: .*
Example:
code
body common control
{
bundlesequence => { "example" };
}
bundle agent example
{
vars:
"length" int => string_length("abc"); # will contain "3"
reports:
"length of string abc = $(length)";
}
Output:
code
R: length of string abc = 3
History: Introduced in CFEngine 3.6
See also: string_head(), string_tail(), string_reverse().
string_mustache
Prototype: string_mustache(template_string, optional_data_container)
Return type: string
Description: Formats a Mustache string template into a string, using either the system datastate() or an explicitly provided data container.
The usual Mustache facilities like conditional evaluation and loops are available, see the example below.
Example:
code
body common control
{
bundlesequence => { "config", "example" };
}
bundle agent config
{
vars:
"deserts" data => parsejson('{ "deserts": {
"Africa": "Sahara",
"Asia": "Gobi"
} }');
}
bundle agent example
{
vars:
# {{@}} is the current key during an iteration in 3.7 with Mustache
"with_data_container" string => string_mustache("from container: deserts = {{%deserts}}
from container: {{#deserts}}The desert {{.}} is in {{@}}. {{/deserts}}", "config.deserts");
# you can dump an entire data structure with {{%myvar}} in 3.7 with Mustache
"with_system_state" string => string_mustache("from datastate(): deserts = {{%vars.config.deserts.deserts}}
from datastate(): {{#vars.config.deserts.deserts}}The desert {{.}} is in {{@}}. {{/vars.config.deserts.deserts}}"); # will use datastate()
reports:
"With an explicit data container: $(with_data_container)";
"With the system datastate(): $(with_system_state)";
}
Output:
code
R: With an explicit data container: from container: deserts = {
"Africa": "Sahara",
"Asia": "Gobi"
}
from container: The desert Sahara is in Africa. The desert Gobi is in Asia.
R: With the system datastate(): from datastate(): deserts = {
"Africa": "Sahara",
"Asia": "Gobi"
}
from datastate(): The desert Sahara is in Africa. The desert Gobi is in Asia.
History: Introduced in CFEngine 3.7
See also: datastate(), readjson(), parsejson(), data.
string_replace
Prototype: string_replace(string, match, replacement)
Return type: string
Description: In a given string, replaces a substring with another string.
Arguments:
string: string - Source string - in the range: .*match: string - String to replace - in the range: .*replacement: string - Replacement string - in the range: .*
Reads a string from left to right, replacing the occurences of the second
argument with the third argument in order.
All characters in the string to replace in, the substring to match for and the
replacement are read literally. This means that ., *, \ and similar
characters will be read and replaced as they are. If you are looking for more
advanced replace functionality, check out regex_replace().
Example:
code
bundle agent main
{
vars:
# replace one occurence
"replace_once" string => string_replace("This is a string", "string", "thing");
# replace several occurences
"replace_several" string => string_replace("This is a string", "i", "o");
# replace nothing
"replace_none" string => string_replace("This is a string", "boat", "no");
# replace ambiguous order
"replace_ambiguous" string => string_replace("aaaaa", "aaa", "b");
reports:
# in order, the above...
"replace_once = '$(replace_once)'";
"replace_several = '$(replace_several)'";
"replace_none = '$(replace_none)'";
"replace_ambiguous = '$(replace_ambiguous)'";
}
Output:
code
R: replace_once = 'This is a thing'
R: replace_several = 'Thos os a strong'
R: replace_none = 'This is a string'
R: replace_ambiguous = 'baa'
History: Introduced in 3.12.1 (2018) as a simpler version of regex_replace()
See also: regex_replace()
string_reverse
Prototype: string_reverse(data)
Return type: string
Description: Returns data reversed.
Arguments:
data: string - Input string - in the range: .*
Example:
code
body common control
{
bundlesequence => { "example" };
}
bundle agent example
{
vars:
"reversed"
string => string_reverse("abc"); # will contain "cba"
reports:
"reversed abs = $(reversed)";
}
Output:
code
R: reversed abs = cba
History: Introduced in CFEngine 3.6
See also: string_head(), string_tail(), string_length().
string_split
Prototype: string_split(string, regex, maxent)
Return type: slist
Description: Splits string into at most maxent substrings wherever
regex occurs, and returns the list with those strings.
The regular expression is unanchored.
If the maximum number of substrings is insufficient to accommodate all
the entries, the generated slist will have maxent items and the
last one will contain the rest of the string starting with the
maxent-1-th delimiter. This is standard behavior in many languages
like Perl or Ruby, and different from the splitstring() behavior.
Arguments:
string: string - A data string - in the range: .*regex: regular expression - Regex to split on - in the range: .*maxent: int - Maximum number of pieces - in the range: 0,99999999999
Example:
code
body common control
{
bundlesequence => { "test" };
}
bundle agent test
{
vars:
"split1" slist => string_split("one:two:three", ":", "10");
"split2" slist => string_split("one:two:three", ":", "1");
"split3" slist => string_split("alpha:xyz:beta", "xyz", "10");
reports:
"split1: $(split1)"; # will list "one", "two", and "three"
"split2: $(split2)"; # will list "one:two:three"
"split3: $(split3)"; # will list "alpha:" and ":beta"
}
Output:
code
R: split1: one
R: split1: two
R: split1: three
R: split2: one:two:three
R: split3: alpha:
R: split3: :beta
History: Introduced in CFEngine 3.6; deprecates splitstring().
See also: splitstring()
string_tail
Prototype: string_tail(data, max)
Return type: string
Description: Returns the last max bytes of data.
If max is negative, then everything but the first max bytes is returned.
Arguments:
data: string - Input string - in the range: .*max: int - Maximum number of characters to return - in the range: -99999999999,99999999999
Example:
code
body common control
{
bundlesequence => { "example" };
}
bundle agent example
{
vars:
"end" string => string_tail("abc", "1"); # will contain "c"
reports:
"end of abc = $(end)";
}
Output:
History: Introduced in CFEngine 3.6
See also: string_head(), string_length(), string_reverse().
string_trim
Prototype: string_trim(string)
Return type: string
Description: Trim whitespace from beginning and end of string.
Arguments:
string: string - Input string - in the range: .*
Example:
code
bundle agent example_trim
{
vars:
"my_string_one" string => string_trim( " Trim spaces please ");
"my_string_two" string => string_trim( "
Trim newlines also please
");
reports:
"my_string_one: '$(my_string_one)'";
"my_string_two: '$(my_string_two)'";
}
bundle agent __main__
{
methods: "example_trim";
}
code
R: my_string_one: 'Trim spaces please'
R: my_string_two: 'Trim newlines also please'
This policy can be found in
/var/cfengine/share/doc/examples/string_trim.cf
and downloaded directly from
github.
History: Introduced in CFEngine 3.16
See also: string_head(), string_tail() string_length(), string_reverse().
string_upcase
Prototype: string_upcase(data)
Return type: string
Description: Returns data in uppercase.
Arguments:
data: string - Input string - in the range: .*
Example:
code
body common control
{
bundlesequence => { "example" };
}
bundle agent example
{
vars:
"upcase" string => string_upcase("abc"); # will contain "ABC"
reports:
"upcased abc: $(upcase)";
}
Output:
History: Introduced in CFEngine 3.6
See also: string_downcase().
sublist
Prototype: sublist(list, head_or_tail, max_elements)
Return type: slist
Description: Returns list of up to max_elements of list, obtained from head or tail depending on head_or_tail.
This function can accept many types of data parameters.
Arguments:
list: string - CFEngine variable identifier or inline JSON - in the range: .*head_or_tail: - Whether to return elements from the head or from the tail of the list - one of
max_elements: int - Maximum number of elements to return - in the range: 0,99999999999
Example:
code
body common control
{
bundlesequence => { "test" };
}
bundle agent test
{
vars:
"test" slist => {
1,2,3,
"one", "two", "three",
"long string",
"four", "fix", "six",
};
"test_head9999" slist => sublist("test", "head", 9999);
"test_head1" slist => sublist("test", "head", 1);
"test_head0" slist => sublist("test", "head", 0);
"test_tail9999" slist => sublist("test", "tail", 9999);
"test_tail10" slist => sublist("test", "tail", 10);
"test_tail2" slist => sublist("test", "tail", 2);
"test_tail1" slist => sublist("test", "tail", 1);
"test_tail0" slist => sublist("test", "tail", 0);
reports:
"The test list is $(test)";
"This line should not appear: $(test_head0)";
"The head(1) of the test list is $(test_head1)";
"The head(9999) of the test list is $(test_head9999)";
"This line should not appear: $(test_tail0)";
"The tail(1) of the test list is $(test_tail1)";
"The tail(10) of the test list is $(test_tail10)";
"The tail(2) of the test list is $(test_tail2)";
"The tail(9999) of the test list is $(test_tail9999)";
}
Output:
code
R: The test list is 1
R: The test list is 2
R: The test list is 3
R: The test list is one
R: The test list is two
R: The test list is three
R: The test list is long string
R: The test list is four
R: The test list is fix
R: The test list is six
R: The head(1) of the test list is 1
R: The head(9999) of the test list is 1
R: The head(9999) of the test list is 2
R: The head(9999) of the test list is 3
R: The head(9999) of the test list is one
R: The head(9999) of the test list is two
R: The head(9999) of the test list is three
R: The head(9999) of the test list is long string
R: The head(9999) of the test list is four
R: The head(9999) of the test list is fix
R: The head(9999) of the test list is six
R: The tail(1) of the test list is six
R: The tail(10) of the test list is 1
R: The tail(10) of the test list is 2
R: The tail(10) of the test list is 3
R: The tail(10) of the test list is one
R: The tail(10) of the test list is two
R: The tail(10) of the test list is three
R: The tail(10) of the test list is long string
R: The tail(10) of the test list is four
R: The tail(10) of the test list is fix
R: The tail(10) of the test list is six
R: The tail(2) of the test list is fix
R: The tail(2) of the test list is six
R: The tail(9999) of the test list is 1
R: The tail(9999) of the test list is 2
R: The tail(9999) of the test list is 3
R: The tail(9999) of the test list is one
R: The tail(9999) of the test list is two
R: The tail(9999) of the test list is three
R: The tail(9999) of the test list is long string
R: The tail(9999) of the test list is four
R: The tail(9999) of the test list is fix
R: The tail(9999) of the test list is six
History: The collecting function behavior was added in 3.9.
See also: nth(), filter(), about collecting functions, and data documentation.
sum
Prototype: sum(list)
Return type: real
Description: Return the sum of the reals in list.
This function can accept many types of data parameters.
This function might be used for simple ring computation. Of course, you could
easily combine sum with readstringarray or readreallist etc., to collect
summary information from a source external to CFEngine.
Arguments:
list: string - CFEngine variable identifier or inline JSON - in the range: .*
Example:
code
body common control
{
bundlesequence => { "test" };
}
bundle agent test
{
vars:
"adds_to_six" ilist => { "1", "2", "3" };
"six" real => sum("adds_to_six");
"adds_to_zero" rlist => { "1.0", "2", "-3e0" };
"zero" real => sum("adds_to_zero");
reports:
"six is $(six), zero is $(zero)";
}
Output:
code
R: six is 6.000000, zero is 0.000000
Because $(six) and $(zero) are both real numbers, the report that is
generated will be:
code
six is 6.000000, zero is 0.000000
Notes:
History: Was introduced in version 3.1.0b1,Nova 2.0.0b1 (2010). The collecting function behavior was added in 3.9.
See also: product(), about collecting functions, and data documentation.
sysctlvalue
Prototype: sysctlvalue(key)
Return type: string
Description: Returns the sysctl value of key using /proc/sys.
Arguments:
key: string - sysctl key - in the range: .*
Example:
code
vars:
"tested" slist => { "net.ipv4.tcp_mem", "net.unix.max_dgram_qlen" };
"values[$(tested)]" string => sysctlvalue($(tested));
Output:
code
"values[net.ipv4.tcp_mem]" = "383133\t510845\t766266"
"values[net.unix.max_dgram_qlen]" = "512"
Notes:
History: Was introduced in version 3.11.0 (2017)
See also: data_sysctlvalues()
translatepath
Prototype: translatepath(path)
Return type: string
Description: Translate separators in path from Unix style to the host's
native style and returns the result.
Takes a string argument with slashes as path separators and translate
these to the native format for path separators on the host. For example
translatepath("a/b/c") would yield "a/b/c" on Unix platforms, but
"a\b\c" on Windows.
Arguments:
path: string - Unix style path - in the range: "?(/.*)
Example:
code
body common control
{
bundlesequence => { "test" };
}
bundle agent test
{
vars:
"inputs_dir" string => translatepath("/a/b/c/inputs");
reports:
windows::
"The path has backslashes: $(inputs_dir)";
!windows::
"The path has slashes: $(inputs_dir)";
}
Output:
code
R: The path has slashes: /a/b/c/inputs
Notes: Be careful when using this function in combination with regular
expressions, since backslash is also used as escape character in
regex's. For example, in the regex dir/.abc, the dot represents the
regular expression "any character", while in the regex dir\.abc, the
backslash-dot represents a literal dot character.
type
Prototype: type(var, detail)
Return type: string
Description: Returns a variables type description.
Arguments:
var: string - Variable identifier - in the range: .*detail: - Enable detailed type decription - one of
This function returns a variables type description as a string. The function
expects a variable identifier as the first argument var. An optional second
argument detail may be used to enable detailed description. When set to
"true" the returned string comes in a two word format including type and
subtype. This lets us easily
differentiate between policy- and data primitives. Argument detail defaults
to "false" when not specified.
If argument var is not a valid variable identifier, the function returns
"none" or "policy none" based on whether the detail argument is
set to "false" or "true" respectively.
The following table demonstrates the strings you can expect to be returned
with different combinations of the arguments type and detail.
| type |
detail |
return |
| string |
false |
string |
| string |
true |
policy string |
| int |
false |
int |
| int |
true |
policy int |
| real |
false |
real |
| real |
true |
policy real |
| slist |
false |
slist |
| slist |
true |
policy slist |
| ilist |
false |
ilist |
| ilist |
true |
policy ilist |
| rlist |
false |
rlist |
| rlist |
true |
policy rlist |
| data object |
false |
data |
| data object |
true |
data object |
| data array |
false |
data |
| data array |
true |
data array |
| data string |
false |
data |
| data string |
true |
data string |
| data int |
false |
data |
| data int |
true |
data int |
| data real |
false |
data |
| data real |
true |
data real |
| data boolean |
false |
data |
| data boolean |
true |
data boolean |
| data null |
false |
data |
| data null |
true |
data null |
| undefined |
false |
none |
| undefined |
true |
policy none |
Example:
code
body common control
{
bundlesequence => { "example" };
}
bundle agent example
{
vars:
"foo"
data => '{ "bar": true, "baz": [1, 2, 3] }';
"_foo" string => type("foo", "true");
"_foobar" string => type("foo[bar]", "false");
"_foobaz" string => type("foo[baz]", "true");
"a" string => "hello";
"b" int => "123";
"c" rlist => { "1.1", "2.2", "3.3" };
"_a" string => type("a");
"_b" string => type("b", "true");
"_c" string => type("c", "false");
reports:
"'foo' is of type '$(_foo)' (detail)";
"'foo[bar]' is of type '$(_foobar)' (no detail)";
"'foo[baz]' is of type '$(_foobaz)' (detail)";
"'a' is of type '$(_a)' (no detail)";
"'b' is of type '$(_b)' (detail)";
"'c' is of type '$(_c)' (no detail)";
}
Output:
code
R: 'foo' is of type 'data object' (detail)
R: 'foo[bar]' is of type 'data' (no detail)
R: 'foo[baz]' is of type 'data array' (detail)
R: 'a' is of type 'string' (no detail)
R: 'b' is of type 'policy int' (detail)
R: 'c' is of type 'rlist' (no detail)
History:
unique
Prototype: unique(list)
Return type: slist
Description: Returns list of unique elements from list.
This function can accept many types of data parameters.
Arguments:
list: string - CFEngine variable identifier or inline JSON - in the range: .*
Example:
code
body common control
{
bundlesequence => { "test" };
}
bundle agent test
{
vars:
"test" slist => {
1,2,3,
"one", "two", "three",
"long string",
"four", "fix", "six",
"one", "two", "three",
};
"test_str" string => join(",", "test");
"test_unique" slist => unique("test");
"unique_str" string => join(",", "test_unique");
reports:
"The test list is $(test_str)";
"The unique elements of the test list: $(unique_str)";
}
Output:
code
R: The test list is 1,2,3,one,two,three,long string,four,fix,six,one,two,three
R: The unique elements of the test list: 1,2,3,one,two,three,long string,four,fix,six
History: The collecting function behavior was added in 3.9.
See also: filter(), about collecting functions, and data documentation.
url_get
Prototype: url_get(url, options_container)
Return type: data
Description: Retrieves the contents of a url using options from
a data container. The data is returned in a
data container.
NOTE that the options_container can be specified as inline JSON
This function can accept many types of data parameters.
Currently only file, http, and ftp URLs are supported.
Internally, libcurl is used.
url_get() caches its results. To invalidate the cache, use a
different set of options, e.g. by modifying an unused key with the
system time.
If the libcurl integration is not available, the function will exit
with an error and the variable will remain undefined. If the libcurl
initialization fails, the function will also exit with an error. In
every other normal case, the function will return a valid data
container. In official CFEngine packages, libcurl integration is
always provided.
The available options currently are:
url.max_content: if present, specifies the maximum number of content bytes to retrieve ( default 4096 ).url.max_headers: if present, specifies the maximum number of response headers to retrieve ( default 4096 ).url.verbose: if 1, libcurl will be more verbose while retrieving the content ( default 0 ).url.timeout: if present, libcurl will time out the request after that many seconds ( default 3 ).url.referer: if present, libcurl will set the Referer to this ( default unset ).url.user-agent: if present, libcurl will set the User-Agent to this ( default unset ).url.headers: an array of strings in the format Foo: bar specifying headers for the request ( default [Host: host , Accept: \*/\*] ).
The returned data container will have the following keys:
returncode: the HTTP response code, e.g. 200.rc: the libcurl integer result code, either 0 for success or something else for failureerror_message: when present, indicates the request was unsuccessful and explains whysuccess: a boolean. When success is false, the result code was not 0 and the request was unsuccessful.content: the response content as a stringheaders: the response headers as a string
Arguments:
url: string - URL to retrieve - in the range: .*options_container: string - CFEngine variable identifier or inline JSON, can be blank - in the range: .*
Example:
This example retrieves two URLs using one set of options. The options
are specified in JSON and parsed into a data container options. That
data container is then passed to each invocation of url_get.
code
bundle agent main
{
vars:
"options_str" string => '
{
"url.max_content": 512,
"url.verbose": 0,
"url.headers": [ "Foo: bar" ]
}';
"options" data => parsejson($(options_str));
"url" string => "http://cfengine.com";
"res" data => url_get($(url), options);
"out" string => format("%S", res);
"url2" string => "http://nosuchcfenginehost.com";
"res2" data => url_get($(url2), options);
"out2" string => format("%S", res2);
reports:
"$(this.bundle): from $(url) with options $(options_str) we got $(out)";
"$(this.bundle): from $(url2) with options $(options_str) we got $(out2)";
}
Output:
code
R: main: from http://cfengine.com with options
{
"cfengine.max_content": 512,
"curl.verbose": 0,
"curl.headers": [ "Foo: bar" ]
} we got {"returncode":200,"rc":0,"success":true,"content":"\n<!DOCTYPE html>\n<!--[if lt IE 7]>\n<html class=\"no-js lt-ie9 lt-ie8 lt-ie7\" lang=\"en-US\" prefix=\"og: http://ogp.me/ns#\"> <![endif]-->\n<!--[if IE 7]>\n<html class=\"no-js lt-ie9 lt-ie8\" lang=\"en-US\" prefix=\"og: http://ogp.me/ns#\"> <![endif]-->\n<!--[if IE 8]>\n<html class=\"no-js lt-ie9\" lang=\"en-US\" prefix=\"og: http://ogp.me/ns#\"> <![endif]-->\n<!--[if gt IE 8]><!-->\n<html class=\"no-js\" lang=\"en-US\" prefix=\"og: http://ogp.me/ns#\"> <!--<![endif]-->\n<head>\n\n \n <meta charset=\"utf-8\">\n\n <title>\n CFEng","headers":"HTTP/1.1 200 OK\r\nDate: Fri, 27 Mar 2015 18:13:01 GMT\r\nServer: Apache\r\nX-Powered-By: PHP/5.3.3\r\nX-Pingback: http://cfengine.com/xmlrpc.php\r\nConnection: close\r\nTransfer-Encoding: chunked\r\nContent-Type: text/html; charset=UTF-8\r\n\r\n"}
R: main: from http://nosuchcfenginehost.com with options
{
"cfengine.max_content": 512,
"curl.verbose": 0,
"curl.headers": [ "Foo: bar" ]
} we got {"returncode":0,"rc":6,"success":false,"content":"","headers":""}
History: Introduced in CFEngine 3.8. The collecting function behavior was added in 3.9.
See also: readtcp(), mergedata(), parsejson(), about collecting functions, and data documentation.
usemodule
Prototype: usemodule(module, args)
Return type: boolean
Description: Execute CFEngine module script module with args, and
return whether successful.
The module script is expected to be located in the registered modules
directory, WORKDIR/modules.
Arguments:
module: string - Name of module command - in the range: .*args: string - Argument string for the module - in the range: .*
Example:
code
bundle agent test
{
classes:
# returns $(user)
"done" expression => usemodule("getusers","");
commands:
"/bin/echo" args => "test $(user)";
}
See also: read_module_protocol(), Module Protocol
userexists
Prototype: userexists(user)
Return type: boolean
Description: Return whether user name or numerical id exists on this
host.
Checks whether the user is in the password database for the current host. The
argument must be a user name or user id.
Arguments:
user: string - User name or identifier - in the range: .*
Example:
code
body common control
{
bundlesequence => { "example" };
}
bundle agent example
{
classes:
"ok" expression => userexists("root");
reports:
ok::
"Root exists";
!ok::
"Root does not exist";
}
Output:
validdata
Prototype: validdata(data_container, type)
Return type: boolean
Description: Validates a JSON container from data_container and returns
true if the contents are valid JSON.
This function is intended to be expanded with functionality for validating
CSV and YAML files eventually, mirroring readdata(). If type is JSON,
it behaves the same as validjson().
Arguments:
data_container: string - String to validate as JSON - in the range: .*type: - Type of data to validate - one of
Example:
Run:
code
bundle agent main
{
vars:
"json_string" string => '{"test": [1, 2, 3]}';
reports:
"This JSON string is valid!"
if => validdata("$(json_string)", "JSON");
"This JSON string is not valid."
unless => validdata("$(json_string)", "JSON");
}
Output:
code
R: This JSON string is valid!
See also: readdata(), validjson()
History: Was introduced in 3.16.0.
validjson
Prototype: validjson(string)
Return type: boolean
Description: Validates a JSON container from string and returns
true if the contents are valid JSON.
Arguments:
string: string - String to validate as JSON - in the range: .*
Example:
Run:
code
bundle agent main
{
vars:
"json_string" string => '{"test": [1, 2, 3]}';
reports:
"This JSON string is valid!"
if => validjson("$(json_string)");
"This JSON string is not valid."
unless => validjson("$(json_string)");
}
Output:
code
R: This JSON string is valid!
See also: readjson(), validdata()
History: Was introduced in 3.16.0.
variablesmatching
Prototype: variablesmatching(name, tag1, tag2, ...)
Return type: slist
Description: Return the list of variables matching name and any tags
given. Both name and tags are regular expressions.
This function searches for the given anchored name and
tag1, tag2, ... regular expressions in the list of currently defined
variables.
When one or more tags are given, the variables with tags matching any
of the given anchored regular expressions are returned (logical OR semantics).
For example, if one variable has tag inventory, a second variable has tag time_based
but not inventory, both are returned by variablesmatching(".*", "inventory", "time_based").
If you want logical AND semantics instead, you can make two calls to the function
with one tag in each call and use the intersection function on the return values.
Variable tags are set using the meta attribute.
This function behaves exactly like variablesmatching_as_data() but returns
just the list of all the variables. If you want their contents as well, see that
function.
Example:
code
body common control
{
bundlesequence => { run };
}
bundle agent run
{
vars:
"all" slist => variablesmatching(".*");
"v" slist => variablesmatching("default:sys.cf_version.*");
"v_sorted" slist => sort(v, lex);
reports:
"Variables matching 'default:sys.cf_version.*' = $(v_sorted)";
}
Output:
code
R: Variables matching 'default:sys.cf_version.*' = default:sys.cf_version
R: Variables matching 'default:sys.cf_version.*' = default:sys.cf_version_major
R: Variables matching 'default:sys.cf_version.*' = default:sys.cf_version_minor
R: Variables matching 'default:sys.cf_version.*' = default:sys.cf_version_patch
R: Variables matching 'default:sys.cf_version.*' = default:sys.cf_version_release
See also: classesmatching(), bundlesmatching(), variablesmatching_as_data()
History: Introduced in CFEngine 3.6
variablesmatching_as_data
Prototype: variablesmatching_as_data(name, tag1, tag2, ...)
Return type: data
Description: Return a data container with the map of variables matching
name and any tags given to the variable contents. Both name and tags are
regular expressions.
This function searches for the given anchored name and
tag1, tag2, ... regular expressions in the list of currently defined
variables.
When one or more tags are given, the variables with tags matching any
of the given anchored regular expressions are returned (logical OR semantics).
For example, if one variable has tag inventory, a second variable has tag time_based
but not inventory, both are returned by variablesmatching_as_data(".*", "inventory", "time_based").
If you want logical AND semantics instead, you can make two calls to the function
with one tag in each call and use the intersection function on the return values.
Variable tags are set using the meta attribute.
This function behaves exactly like variablesmatching() but returns a data
container with the full contents of all the variables instead of just their
names.
Example:
code
body common control
{
bundlesequence => { run };
}
bundle agent run
{
vars:
"all" data => variablesmatching_as_data(".*"); # this is huge
"v" data => variablesmatching_as_data("default:sys.cf_version_major.*");
"v_dump" string => format("%S", v);
reports:
"Variables matching 'default:sys.cf_version.*' = $(v_dump)";
}
Output:
code
R: Variables matching 'default:sys.cf_version.*' = {"default:sys.cf_version_major":"3"}
See also: classesmatching(), bundlesmatching(), variablesmatching()
History: Introduced in CFEngine 3.10
variance
Prototype: variance(list)
Return type: real
Description: Return the variance of the numbers in list.
This function can accept many types of data parameters.
Arguments:
list: string - CFEngine variable identifier or inline JSON - in the range: .*
Use the eval() function to easily get the standard deviation (square root of the variance).
This is not part of a full statistical package but a convenience function.
Example:
code
body common control
{
bundlesequence => { "test" };
}
bundle agent test
{
vars:
# the behavior will be the same whether you use a data container or a list
# "mylist" slist => { "foo", "1", "2", "3000", "bar", "10.20.30.40" };
"mylist" data => parsejson('["foo", "1", "2", "3000", "bar", "10.20.30.40"]');
"mylist_str" string => format("%S", mylist);
"max_int" string => max(mylist, "int");
"max_lex" string => max(mylist, "lex");
"max_ip" string => max(mylist, "ip");
"min_int" string => min(mylist, "int");
"min_lex" string => min(mylist, "lex");
"min_ip" string => min(mylist, "ip");
"mean" real => mean(mylist);
"variance" real => variance(mylist);
reports:
"my list is $(mylist_str)";
"mean is $(mean)";
"variance is $(variance) (use eval() to get the standard deviation)";
"max int is $(max_int)";
"max IP is $(max_ip)";
"max lexicographically is $(max_lex)";
"min int is $(min_int)";
"min IP is $(min_ip)";
"min lexicographically is $(min_lex)";
}
Output:
code
R: my list is ["foo","1","2","3000","bar","10.20.30.40"]
R: mean is 502.200000
R: variance is 1497376.000000 (use eval() to get the standard deviation)
R: max int is 3000
R: max IP is 10.20.30.40
R: max lexicographically is foo
R: min int is bar
R: min IP is 1
R: min lexicographically is 1
History: Was introduced in version 3.6.0 (2014). The collecting function behavior was added in 3.9.
See also: sort(), mean(), sum(), max(), min(), about collecting functions, and data documentation.
version_compare
Prototype: version_compare(version1, comparison, version2)
Return type: boolean
Description: Returns true if the specified version comparison expression is true.
Arguments:
version1: string - First version to compare - in the range: .*comparison: - Operator to use in comparison - one of
version2: string - Second version to compare - in the range: .*
The version_compare() function can be used to compare 2 arbitrary semver version numbers.
This can be useful if you have 2 versions of a package and you want to know if they are the same version, if one is newer than the other etc.
Example:
code
bundle agent __main__
{
reports:
"This will be skipped because the version comparison is false"
if => version_compare("3.21.0", "<", "3.20.99");
"This will be printed because the version comparison is true"
if => version_compare("3.24.1", ">=", "3.24.1");
}
Output:
code
R: This will be printed because the version comparison is true
Notes:
Internally, version_compare uses the same version comparison logic as other version functions (cf_version_minimum, etc.).
This means that only the **major.minor.patch** parts of the version string are compared, everything after patch is ignored so 1.2.3, 1.2.3-1, 1.2.3-2, 1.2.3+git1234, 1.2.3a are all considered the same version.
In policy you can combine version_compare() and strcmp() to get more info if desirable:
code
bundle agent main
{
reports:
"Same patch version, but not exactly the same version string"
if => and(
version_compare("$(a)", "=", "$(b)"),
not(strcmp("$(a)", "$(b)"))
);
}
CFEngine's version comparison functions also support partial version numbers, so if you supply only a major version, or a major and minor version, but no patch version, only the provided parts are compared:
code
bundle agent main
{
vars:
"patch_a"
string => "3.21.1";
"patch_b"
string => "4.0.1";
reports:
"patch_a is a part of the 3.21 series: 3.21 == $(patch_a)"
if => version_compare("3.21", "==", "$(patch_a)");
"patch_b is in major version 4: 4 == $(patch_b)"
if => version_compare("4", "==", "$(patch_b)");
}
Beware that using partial version numbers can lead to situations with surprising results, the >, <, =, != operators may not behave exactly as the policy writer expects:
code
bundle agent main
{
reports:
"3.22.1 > 3.22" # No, won't be printed
if => version_compare("3.22.1", ">", "3.22");
"3.22.1 >= 3.22" # Yes, will be printed
if => version_compare("3.22.1", ">=", "3.22");
}
Since 3.22 is less specific than 3.22.1 they are considered equal - all of the parts which can be compared are the same.
For the version comparison logic, if you are asking if something is greater than 3.22, it must be at least 3.23, 3.22.1 is not enough.
Thus, it is often more intuitive to use the >= operator to mean all versions at or after the specified version (regardless of how specific the version numbers are).
See also: cf_version_minimum(), cf_version_maximum(), cf_version_after(), cf_version_before(), cf_version_at(), cf_version_between().
History:
Language concepts
There is only one grammatical form for statements in the language:
code
bundle bundle_type name
{
promise_type:
classes::
"promiser" -> { "promisee1", "promisee2", ... }
attribute_1 => value_1,
attribute_2 => value_2,
...
attribute_n => value_n;
}
In addition, CFEngine bodies can be defined and used as attribute values. Here's a real-life example of a body and its usage.
code
body edit_defaults no_backup
{
edit_backup => "false";
}
... and elsewhere, noting the attribute name matches the body type ...
files:
"myfile" edit_defaults => no_backup;
You can recognize everything in CFEngine from just those few concepts.
A declaration about the state we desire to maintain (e.g., the permissions
or contents of a file, the availability or absence of a service, the
(de)installation of a package).
A collection of promises.
A part of a promise which details and constrains its nature, possibly in
separate and re-usable parts. Effectively a body is like a promise attribute that has several parameters.
CFEngine's boolean classifiers that describe context.
An association of the form "LVALUE represents RVALUE", where RVALUE may be a
scalar value or a list of scalar values: a string, integer or real number.
This documentation about the language concepts introduces in addition
Syntax, identifiers and names
The CFEngine 3 language has a few simple rules:
- CFEngine built-in words, names of variables, bundles, body templates and classes may only contain the usual alphanumeric and underscore characters (
a-zA-Z0-9_)
- All other 'literal' data must be quoted.
Declarations of promise bundles in the form:
code
bundle agent-type identifier
{
...
}
where agent-type is the CFEngine component responsible for maintaining the promise.
Declarations of promise body-parts in the form:
code
body constraint_type template_identifier
{
...
}
matching and expanding on a reference inside a promise of the form constraint_type => template_identifier
attribute expressions in the body of a promise take the form
code
left-hand-side (CFEngine_word) => right-hand-side (user defined data).
This can take several forms:
code
cfengine_word => user_defined_template(parameters)
user_defined_template
builtin_function()
"quoted literal scalar"
{ list }
In each of these cases, the right hand side is a user choice.
CFEngine uses many constraint expressions as part of the body of a promise. These take the form: left-hand-side (CFEngine word) '=>' right-hand-side (user defined data). This can take several forms:
code
cfengine_word => user_defined_template(parameters)
user_defined_template
builtin_function()
"quoted literal scalar"
{ list }
In each of these cases, the right hand side is a user choice.
Filenames and paths
Filenames in Unix-like operating systems use the forward slash '/'
character for their directory separator. All references to file
locations must be absolute pathnames in CFEngine, i.e. they must
begin with a complete specification of which directory they are in or with a variable reference that resolves to that.
For example:
code
/etc/passwd
/var/cfengine/masterfiles/distfile
$(sys.masterdir)/distfile # usually the same thing in 3.6
The only place where it makes sense to refer to a file without a
complete directory specification is when searching through
directories for different kinds of file, e.g. in pattern matching
code
leaf_name => { "tmp_.*", "output_file", "core" };
Here, one can write core without a path, because one is looking for
any file of that name in a number of directories.
The Windows operating systems traditionally use a different
filename convention. The following are all valid absolute file
names under Windows:
code
c:\winnt
"c:\spaced name"
c:/winnt
/var/cfengine/inputs
//fileserver/share2/dir
The 'drive' name "C:" in Windows refers to a partition or device.
Unlike Unix, Windows does not integrate these seamlessly into a
single file-tree. This is not a valid absolute filename:
code
\var\cfengine\inputs
Paths beginning with a backslash are assumed to be win32 paths.
They must begin with a drive letter or double-slash server name.
Note that in many cases, you have sys.inputdir and other
Special variables that work equally well on Windows and non-Windows
system.
Note in recent versions of Cygwin you can decide to use the
/cygdrive to specify a path to windows file E.g
/cygdrive/c/myfile means c:\myfile or you can do it straight away
in CFEngine as c:\myfile.
Modules
Modules allow users to extend the capabilities of CFEngine in a modular way, they can be easily added and upgraded independently of when you upgrade your CFEngine version. Several different types of modules are available.
Promise modules
Promise modules allow for the implementation of custom promise types, extending the CFEngine Language. They communicate with cf-agent using the Promise Module Protocol.
History:
Package modules
Package modules implement the logic behind packages type promises, superseding the package_method based implementation. They interact with package managers like yum, apt, msiexec, and pip to determine which packages are currently installed or have updates available as well as installing, upgrading or un-installing packages.
Package modules communicate with cf-agent via the Package Module Protocol.
History:
Variables and classes modules
Variables and classes modules are the original way to extend CFEngine. The Variable and Class Module Protocol allows for variables and classes to be defined. The protocol can be interpreted by functions like usemodule() and read_module_protocol() as well as output from commands type promises with the module => "true" attribute.
The choice of interpretation can depend on many factors but a primary differentiate between functions and classes relate to CFEngine's evaluation details. Functions are evaluated early during policy execution unless they are explicitly guarded to delay execution. Commands promises are not executed until the bundle is actuated for it's three pass evaluation.
Variables and classes modules are intended for use as system probes rather than additional configuration promises, especially now that promise modules are available.
Specification
The protocol is line based. Lines that begin with ^ apply to all following lines.
-
^context=BundleName: Sets the bundle scope in which variables will be defined
-
^meta=Tag1,Tag2: Sets a comma separated list of tags that are applied to defined variables and classes
-
^persistence=X: Sets the number of minutes for which classes should persist
-
+ClassName: Defines a namespace scoped class
-
-ClassName: Undefines a class
-
=VariableName=: Defines a string variable
-
VariableName[KEY]=: Defines an associative array key value
-
@VariableName=: Defines a list of strings
-
%VariableName=: Must be valid JSON and defines a data container
Notes:
- It is not possible to define variables or classes in a namespace other than the default (
default).
- If no context is provided, the context is the canonified leaf name of the module. For example, if the module is
/tmp/path/my-module.sh the default context would be my_module_sh in the default namespace (default:my_module_sh).
- All variables and classes will be tagged with
source=module in addition to any specified tags.
- All lines of output that do not match the module protocol are treated as errors.
- Variable names defined by the module protocol are limited to alphanumeric characters and
_, ., -, [, ], @, and /.
Examples:
A Variables and Classes module written in shell:
code
#!/bin/sh
/bin/echo "@mylist= { \"one\", \"two\", \"three\" }"
/bin/echo "=myscalar= scalar val"
/bin/echo "=myarray[key]= array key val"
/bin/echo "%mydata=[1,2,3]"
/bin/echo "+module_class"
/bin/echo "^persistence=10"
/bin/echo "+persistent_10_minute_class"
History:
- Introduced in 3.0.0
-
^context, ^meta Added in 3.6.0
-
^persistence Added in 3.8.0
-
@ allowed in variables (intended for keys in classic array) 3.15.0, 3.12.3, 3.10.7 (2019)
-
/ allowed in variables (intended for keys in classic array) 3.14.0, 3.12.2, 3.10.6 (2019)
Package modules
Package modules are back-ends that enable the package promise to work
with different types of platform package managers.
See the packages promises documentation for a
comprehensive reference on the body types and attributes used here.
The CFEngine side
CFEngine never calls any package manager commands, it only ever calls the
package module. The information that CFEngine deals in is:
These two lists are everything that CFEngine needs to know to decide whether its
package promises are fulfilled or not. In addition to this it will carry out
package operations by asking the package module to do certain tasks, but in the
end, the result of the operation is always determined by comparing the promise
against those two lists. Therefore it is very important that the package module
has a robust and deterministic way of returning these lists.
To take one example: When a package is installed, CFEngine does not really care
what the return code of the operation is, the reason being that not all package
managers can be trusted to return the correct return code (yum has a tendency to
always report success, for instance). Instead, it ignores the return code, and
instead asks for the list of currently installed packages after the
installation, and if the package we tried to install has not appeared, it knows
that the promise failed.
In the same fashion, if we try to install an update, that update is expected to
disappear from the list of available updates after the operation.
The package module
The package module itself is simply an executable, and can be in any executable
format, whether than is Python, Perl, Shell script or native binary.
The package module resides in the /var/cfengine/modules/packages both on the hub
and the clients, and out of the box CFEngine is set up to synchronize this
directory among its clients. For this reason it is advised to avoid native
binary formats for package modules, to reduce the burden of distribution to
different platforms, but the API does not forbid it, and it may be useful in
some circumstances.
The API
The API consists of commands which are passed in the module arguments, combined
with a simple text protocol that will be fed on the module's standard input, and
replies are expected on its standard output.
In the examples below we use simple "Here Documents" to show how standard input
can be passed to a package module in order to produce the intented output or
effect. If you don't know about Here Documents, the man page for bash is a good
place to read about them. During actual execution, the input will come from
CFEngine itself.
The API commands are listed roughly in the order that they should be
implemented, in order to facilitate a nice debugging cycle during development.
options attribute
All the API commands listed below, except supports-api-version, support the
options attribute. This attribute will contain the contents from the options
attribute in the promise, or the default_options in the package module body,
if the former is unspecified. It may appear more than once if the options list
has more than one element.
This attribute has no inherent meaning to CFEngine. It is meant as a mechanism
to communicate special attributes to the package module that are not covered
by the main API. For example, for certain package modules it may be used to
pass a repository URL, or pass options to the command line of the underlying
package tool. The behavior on an options attribute is entirely
dependent on the module, and should not be assumed to be portable between
modules.
The options attribute is valid in all of the commands except
supports-api-version, even when the description reads "no input".
supports-api-version
The very first command that any package module must implement is
supports-api-version. This command takes no input, and is expected to print
a single digit followed by a newline. This is simply a way for CFEngine and the
package module to agree on which version of the protocol to use. For now there
is only one such version, and the expected output is simply "1".
This is the only command which does not support the options attribute.
Example:
code
$ ./package-module supports-api-version < /dev/null
1
$
get-package-data
CFEngine uses this command to determine what kind of promise has been
made. Currently two types are supported: "file" and "repo".
The input is expected to be a triplet of File/Version/Architecture, where
File is the promiser string from the promise, and Version and Architecture
contain the strings from the corresponding promise attributes, if they were
specified. This implies that either one of Version and Architecture may not
be included, so some entries may only contain File or File with one more
attribute.
What the module should do is figure out whether the string passed in File is
referring to a file based or a repository based package. Exactly what identifies
each one is up to the package module, but generally it means that file based
packages should refer to actual files on the file system, whereas repository
based packages should refer to package names that a "smart" package manager can
resolve, such as for instance "apt". There are exceptions to this rule however,
for example if a string is a URL referring to a downloadable package file, the
type of package would still be file based, since it refers to a single package
file which is not part of a repository.
The module should start by returning one attribute PackageType, which should
be either file or repo. Next, it should return the proper name of the
package in a Name attribute. Proper name means the name that will be displayed
in package listings, so for example, /home/johndoe/zip-3.0-4.el5.x86_64.rpm
would resolve to simply zip. For repository based package name, in most cases
the returned Name will be the same as what what passed in, but this may not be
the case for all package managers.
Next, for file based package name it should return Version and Architecture
if it is able to determine these, but it is allowed to omit them if the module
doesn't know (if the resource is remote, for instance).
For repository based package names the module should not return Version and
Architecture, since they are often ambiguous in repository situations, and any
discrepancies will be handled at the install stage instead.
Example 1:
code
$ ./package-module get-package-data <<EOF
File=zip
Version=3.0-4
Architecture=amd64
EOF
PackageType=repo
Name=zip
$
Example 2:
code
$ ./package-module get-package-data <<EOF
File=zip
EOF
PackageType=repo
Name=zip
$
Example 3:
code
$ ./package-module get-package-data <<EOF
File=/home/johndoe/zip-3.0-4.el5.x86_64.rpm
Version=3.0-4
Architecture=amd64
EOF
PackageType=file
Name=zip
Version=3.0-4
Architecture=amd64
$
Example 4:
code
$ ./package-module get-package-data <<EOF
File=/home/johndoe/zip-3.0-4.el5.x86_64.rpm
EOF
PackageType=file
Name=zip
Version=3.0-4
Architecture=amd64
$
list-installed
This command is expected to return a list of all currently installed packages on
the system. It takes no input, and the output is expected to be a list of
triplets of Name/Version/Architecture.
Example:
code
$ ./package-module list-installed < /dev/null
Name=zip
Version=3.0-4
Architecture=amd64
Name=libc6
Version=2.15
Architecture=amd64
Name=libc6
Version=2.15
Architecture=i386
...
$
list-updates
This command is expected to return a list of all the available updates for
currently installed updates. The command takes no input, and the output is
expected to be a list of triplets of Name/Version/Architecture.
It is not an error to include updates to packages that are not installed, but
this information will not be used, and it is therefore recommended to omit it
for performance purposes.
If the available updates come from an external source, such as an online
repository service or a remote file server, this command is expected to fetch
the information from there. CFEngine will make sure that this command is not
called too often, so there is no need to try to limit the online resource usage
in this command. See more about caching and list-updates-local below.
Example:
code
$ ./package-module list-updates < /dev/null
Name=zip
Version=3.0-4
Architecture=amd64
Name=libc6
Version=2.15
Architecture=amd64
Name=libc6
Version=2.15
Architecture=i386
...
$
list-updates-local
This command is expected to return a list of all the available updates for
currently installed updates. The command takes no input, and the output is
expected to be a list of triplets of Name/Version/Architecture.
It is not an error to include updates to packages that are not installed, but
this information will not be used, and it is therefore recommended to omit it
for performance purposes.
Unlike list-updates, this command is not expected to use the network to
fetch information from external sources, but should fetch all the information
from local storage. This command exists precisely to limit such expensive
operations.
Example:
code
$ ./package-module list-updates-local < /dev/null
Name=zip
Version=3.0-4
Architecture=amd64
Name=libc6
Version=2.15
Architecture=amd64
Name=libc6
Version=2.15
Architecture=i386
...
$
repo-install
This command is used by CFEngine to ask the package module to install packages
from the package repository. Note that CFEngine itself has no notion of which
package repository it should come from. This is up to the package module, and
may either be a platform configured default, such as is the case for for example
yum, or a specific repository which is passed in via the options
attribute. The command will be called for promises where get-package-data
returned PackageType=repo.
The command takes a list of triplets, Name, Version and Architecture,
where the last two may be omitted. In this case the module is expected to
provide some default, which is usually the latest version and the native
platform architecture.
No output is expected.
Example:
code
$ ./package-module repo-install <<EOF
Option=-o
Option=APT::Install-Recommends=0
Name=zip
Name=libc6
Version=2.15
Architecture=amd64
Name=libc6
Version=2.15
Architecture=i386
EOF
$
file-install
This command is used by CFEngine to ask the package module to install a specific
package file. The command will be called for promises where get-package-data
returned PackageType=file.
The command takes a list of triplets, File, Version and Architecture,
where the last two may be omitted. For package files that can contain more than
one package, the last two attributes may be used to select the correct one. The
command should never be called with attributes that are not present in the
package, since this will already have been detected after querying
get-package-data.
No output is expected.
Example:
code
$ ./package-module file-install <<EOF
File=/mnt/storage/zip-3.0-4.el5.x86_64.rpm
File=/mnt/storage/libc6-2.15.el5.i386.rpm
Version=2.15
Architecture=i386
EOF
$
remove
To remove packages, CFEngine will call the package module with the remove
command.
The command takes a list of triplets, Name, Version and Architecture,
where the last two may be omitted. If so, the module is expected to remove all
packages matching the other attribute(s). Note that Name is the basename of
the package, the same format that get-package-data returns in Name.
No output is expected.
Example:
code
$ ./package-module remove <<EOF
Name=zip
Name=libc6
Version=2.15
Architecture=amd64
Option=--noplugins
Name=libc6
Version=2.15
Architecture=i386
EOF
$
Error messages
All of the package module commands except supports-api-version have the option
of returning error messages. The error messages are simply an attribute
ErrorMessage with a string, which may optionally be preceded by whatever
Name or File triplet was given to the command initially, in order to tie it
to a specific promise.
Example:
code
$ ./package-module file-install <<EOF
File=/mnt/storage/zip-3.0-4.el5.x86_64.rpm
File=/mnt/storage/libc6-2.15.el5.i386.rpm
Version=2.15
Architecture=i386
EOF
File=/mnt/storage/zip-3.0-4.el5.x86_64.rpm
ErrorMessage=File not found
File=/mnt/storage/libc6-2.15.el5.i386.rpm
Version=2.15
Architecture=x86_64
ErrorMessage=Doesn't contain architecture 'x86_64'
$
Other output
CFEngine does not expect any other output on the package module's standard
output, so the module should make sure it silences the output from its sub
commands. Alternatively, it may redirect their output to standard error instead,
but this will not be formatted using CFEngine's normal log formatting and is not
recommended.
Caching
For performance reasons, CFEngine will cache the list of packages returned from
list-packages and the list of updates from either of list-updates or
list-updates-local. The exact circumstances where each is called is:
Whenever one is called its result is cached by CFEngine and will be used
internally. It is a good idea to set the two policy attributes,
query_installed_ifelapsed and query_updates_ifelapsed to zero during module
development to avoid any issues with caching during debugging, but they should
be set back when deploying in production.
Bundles
A bundle is a collection of promises. They allow to group related promises
together into named building blocks that can be thought of as "subroutines" in
the CFEngine promise language. A bundle that groups a number of promises
related to configuring a web server or a file system would be named
"webserver" or "filesystem," respectively.
NOTE: Bundles are not functions. They maintain state across actuations
within the same agent run.
- Classic arrays are cleared at the beginning of a bundle actuation.
- Lists, strings, ints, reals, and data-containers are preserved but can be
re-defined if not guarded with
if => isvariable().
bundle scoped classes are cleared at the end of the bundles executionnamespace scoped classes are not cleared automatically, though they can be
explicitly undefined.
Most promise types are specific to a particular kind of interpretation that
requires a typed interpreter - the bundle type. Bundles belong to the agent
that is used to keep the promises in the bundle. So cf-agent has bundles
declared as:
code
bundle agent my_name
{
}
while cf-serverd has bundles declared as:
code
bundle server my_name
{
}
and cf-monitord has bundles declared as
code
bundle monitor my_name
{
}
A number of promises can be made in any kind of bundle since they are of a
generic input/output nature. These are vars, classes, defaults,
meta and reports promises.
Common Bundles
Bundles of type common may only contain the promise types that are common to
all bodies. Their main function is to define cross-component global
definitions.
code
bundle common globals
{
vars:
"global_var" string => "value";
classes:
"global_class" expression => "value";
}
Common bundles are observed by every agent, whereas the agent
specific bundle types are ignored by components other than the intended
recipient.
Rules for evaluation of common bundles
These are the specific evaluation differences between common and agent bundles:
- common bundles are automatically evaluated even if they are not in the bundlesequence, as long as they have no parameters
- auto-evaluated common bundles (not in the bundlesequence explicitly) don't evaluate their
reports promises, so their reports won't be printed.
- when common bundles define a class, it's global (
scope is namespace) by default; the classes in agent bundles are local (scope is bundle) by default.
- common bundles can only contain
meta, default, vars, classes, and reports promises
Bundle Parameters
Bundles can be parameterized, allowing for code re-use. If you need to do the
same thing over and over again with slight variations, using a promise bundle
is an easy way to avoid unnecessary duplication in your promises.
code
bundle agent hello_world
{
vars:
"myfiles" => "/tmp/world.txt";
"desired_content" string => "hello";
"userinfo" data => parsejson('{ "mark": 10, "jeang":20, "jonhenrik":30, "thomas":40, "eben":-1 }');
methods:
"Hello World"
usebundle => ensure_file_has_content("$(myfiles)", "$(desired_content)");
"report" usebundle => subtest_c(@(userinfo));
}
bundle agent ensure_file_has_content(file, content)
{
files:
"$(file)"
handle => "$(this.bundle)_file_content",
create => "true",
edit_defaults => empty,
edit_line => append_if_no_line("$(content)"),
comment => "Ensure that the given parameter for file '$(file)' has only
the contents of the given parameter for content '$(content)'";
}
bundle agent subtest_c(info)
{
reports:
"user ID of mark is $(info[mark])";
}
You can pass slist and data variables to other bundles with
the @(var) notation. You do NOT need to qualify the variable name
with the current bundle name.
Scope
All variables in CFEngine are globally accessible. If you
refer to a variable by $(unqualified), then it is assumed to belong
to the current bundle. To access any other (scalar) variable, you must
qualify the name, using the name of the bundle in which it is defined:
code
$(bundle_name.qualified)
The value of the variable depends on evaluation order, which is not
controllable by the user. Thus you should not assume that you can
evaluate a bundle twice with different variables and get variables
from it that correspond to the second evaluation. In other words, if you have:
code
bundle agent mybundle(x)
{
vars:
"y" string => $(x);
}
and call mybundle(1) and mybundle(2), the variable y could be 1 or 2.
By default classes defined by classes type promises
inside agent bundles are not visible outside those bundles, they are bundle
scoped. Classes defined by classes type promises in
common bundles have a namespace scope, so they are visible everywhere.
Note that namespaced bundles work exactly the same way as
non-namespaced bundles (which are actually in the default
namespace). You just say namespace:bundle_name instead of
bundle_name. See Namespaces for more details.
Main bundles and bundlesequence
When running cf-agent, the order of bundles to evaluate is determined by the bundlesequence.
The default bundlesequence contains main for convenience, so this example works:
code
bundle agent main
{
reports:
"Hello, $(this.bundle) bundle.";
}
The policy promises to report the name of the current bundle, and produces this output:
code
R: Hello, main bundle.
This policy can be found in
/var/cfengine/share/doc/examples/main.cf
and downloaded directly from
github.
Custom bundle sequences
You can specify a custom bundlesequence from the command line using --bundlesequence, or in policy:
code
body common control
{
bundlesequence => { "hello" };
}
bundle agent hello
{
reports:
"Hello, $(this.bundle) bundle.";
}
The policy promises to report the name of the current bundle, and produces this output:
code
R: Hello, hello bundle.
This policy can be found in
/var/cfengine/share/doc/examples/bundlesequence.cf
and downloaded directly from
github.
In this example, cf-agent will not look for a main bundle, since it is not in the bundlesequence.
Library main bundles
Bundles must be unique within a namespace, so you cannot have main bundles in different files which include each other.
Because of this, bundles which are called __main__ have special behavior.
If the entry point (the file specified at command line) has a __main__ bundle, it will be the main bundle.
__main__ bundles from all other files will be ignored (removed before evaluation).
This is especially useful when writing libraries.
Each file can include its own testsuite or some default behavior in a __main__ bundle.
All parts of the library will then be runnable directly, but also easy to include from other policy:
main_library.cf:
code
bundle agent libprint(message)
{
reports:
"Library: $(message).";
}
bundle agent __main__
{
methods:
"test" usebundle => libprint( "ok 1 - libprint works" );
}
The policy promises to call libprint to report that it works when the policy file is the main entry.
code
R: Library: ok 1 - libprint works
This policy can be found in
/var/cfengine/share/doc/examples/main_library.cf
and downloaded directly from
github.
main_entry_point.cf:
code
body file control
{
inputs => { "$(sys.policy_entry_dirname)/main_library.cf" };
}
bundle agent __main__
{
methods:
"a" usebundle => libprint("Hello from $(sys.policy_entry_basename)");
}
code
R: Hello from policy.cf
This policy can be found in
/var/cfengine/share/doc/examples/main_entry_point.cf
and downloaded directly from
github.
Both of these policy files can be run directly, the included library policy will not have a main bundle.
Bodies
While the idea of a promise is very simple, the definition of a promise can
grow complicated. Complex promises are best understood by breaking them down
into independent, re-usable components. The CFEngine reserved word body is
used to encapsulate the details of complex promise attribute values. Bodies
can optionally have parameters.
code
bundle agent example
{
files:
!windows::
"/etc/passwd"
handle => "example_files_not_windows_passwd",
perms => system;
"/home/bill/id_rsa.pub"
handle => "example_files_not_windows_bills_priv_ssh_key",
perms => mog("600", "bill", "sysop"),
create => "true";
}
The promisers in this example are the files /etc/passwd and
/home/bill/id_rsa.pub. The promise is that the perms attribute type is
associated with a named, user-defined promise body system and mog
respectively.
code
body perms system
{
mode => "644";
owners => { "root" };
groups => { "root" };
}
body perms mog(mode,user,group)
{
owners => { "$(user)" };
groups => { "$(group)" };
mode => "$(mode)";
}
Like bundles, bodies have a type. The type of the body has to match the left-hand side of the promise attribute in which it is used. In this case, files promises have an attribute perms that can be associated with any body of type perms.
The attributes within the body are then type specific. Bodies of type perms consist of the file permissions, the file owner, and the file group, which the instance system sets to 644, root and root, respectively.
Such bodies can be reused in multiple promises. Like bundles, bodies can have parameters. The body mog also consists of the file permissions, file owner, and file group, but the values of those attributes are passed in as parameters.
Body Inheritance
CFEngine 3.8 introduced body inheritance via the inherit_from
attribute. It's a parameterized single-inheritance system, so a body
can only inherit from one other body, and it can apply parameters. The
two bodies must have the same type.
Let's see it with the system and mog bodies from earlier:
code
body perms system
{
mode => "644";
owners => { "root" };
groups => { "root" };
}
body perms system_inherited
{
inherit_from => mog("644", "root", "root");
}
The earlier system body and this system_inherited body have the
same effect, eventually applying mode 644, owner root, and group
root. But they are created differently: the first by explicitly
listing the parameters; the other by applying parameters to the
inherit_from chain of inheritance.
Which one is better? Usually, inheriting from a more generic
specification is considered a better design pattern because it reduces
horizontal complexity. But it's less explicit and some users and sites
will prefer a more explicit listing of body attributes and their
values, as in the system body. CFEngine will accomodate either.
Body parameters can be used in the inheritance chain. Here's another
body that inherits from mog but takes a mode. All its other
parameters are specified inside the body. So
system_inherited_mode("234") is exactly like mog("234", "root",
"root").
code
body perms system_inherited_mode(mode)
{
inherit_from => mog($(mode), "root", "root");
}
Again, whether you prefer this or directly calling the mog body is
your choice. Keep in mind that if you want to maintain compatibility
with 3.7 and earlier, inherit_from is not available.
Body inheritance simply copies attributes down the chain to the newest
body. The latest wins. Let's see an example with a chain of
inheritance from the system body from earlier:
code
body perms system
{
mode => "644";
owners => { "root" };
groups => { "root" };
}
body perms system_once(x)
{
inherit_from => system;
owners => { $(x) };
mode => "645";
}
body perms system_twice
{
inherit_from => system_once("mark");
mode => "646";
}
The inheritance chain goes from system to system_once to
system_twice. The owners attribute in system_once will be
whatever $(x) is, overwriting the value from system. Then
system_twice will inherit that same owners value which is now "mark".
The mode attribute will be overwritten to 645 in system_once
and then overwritten to 646 in system_twice.
If this gets complicated, just think "latest wins".
Implicit, Control Bodies
A special case for bodies are the implicit promises that configure the basic
operation of CFEngine. These are hard-coded to CFEngine and control the basic
operation of the agents, such as cf-agent and cf-serverd. Each agent has a
special body whose name is control.
code
body agent control
{
bundlesequence => { "test" };
}
This promise bodies configures the bundlesequence to execute on a cf-agent.
code
body server control
{
allowconnects => { "127.0.0.1" , "::1", @(def.acl) };
}
This promise body defines the clients allowed to connect to a cf-serverd.
For more information, see the reference documentation about the CFEngine
Agents
Default bodies
CFEngine 3.9 introduced a way to create default bodies. It allows defining, for given
promise and body types, a body that will be used each time no body is defined.
To use a body as default, name it <promise_type>_<body_type> and put it
in the bodydefault namespace. For example, a default action body for files
promises will be named files_action, and in each files promise, if no
action attribute is set, the files_action action will be used.
Note: The default bodies only apply to promises in the default namespace.
In the following example, we define a default action body for files
promises, that specifies an action_policy => "warn" to prevent actually modifying files
and to only warn about considered modifications. We define it once,
and don't have to explicitly put this body in all our files promises.
code
body file control
{
namespace => "bodydefault";
}
body action files_action
{
action_policy => "warn";
}
body file control
{
namespace => "default";
}
Promises
One concept in CFEngine should stand out from the rest as being the most
important: promises. Everything else is just an abstraction that allows us to
declare promises and model the various actors in the system.
Everything is a promise
Everything in CFEngine 3 can be interpreted as a promise. Promises can be made
about all kinds of different subjects, from file attributes, to the execution
of commands, to access control decisions and knowledge relationships. If you
are managing a system that serves web pages you may define a promise that port
80 needs to be open on a web server. This same web server may also define a
promise that a particular directory has a particular set of permissions and
the proper owner to serve web pages via Apache.
This simple but powerful idea allows a very practical uniformity in CFEngine
syntax.
Promise types
The promise_type defines what kind of object is making the promise. The type
dictates how CFEngine interprets the promise body. These promise types are
straightforward: The files promise type deals with file permissions and file
content, and the packages promise type allows you to work with packaging
systems such as rpm and apt.
Some promise types are common to all CFEngine components, while others can
only be executed by one of them. cf-serverd cannot keep packages promises,
and cf-agent cannot keep access promises. See the
Promise type reference for a comprehensive
list of promise types.
The promiser
The promiser is an object affected by a promise, and this can be anything: a
file, a port on a network. It is the entity that is making a promise that a
certain fact will be true. These facts are listed in the form of
attributes and values. A file could promise that a permission
attribute has a particular value (i.e. 775 permission value) and that an owner
attribute has another value (i.e. "root").
When a promise is made in CFEngine it is made to another entity - a
promisee. A promisee is an optional part of a promise declaration. The
promisee can help provide insight into the system's configuration, and may
become relevant as your system grows in complexity.
The classes in a promise control the conditions that make the promise
valid. Examples are the operating system on which the policy is executed, or
the day of the week. More about that in the classes and decision
making section.
Not all of these elements are necessary every time, but when you combine them
they enable a wide range of behavior.
Promise example
code
# Promise type
files:
"/home/mark/tmp/test_plain" -> "system blue team",
create => "true",
perms => owner("@(usernames)"),
comment => "Hello World";
In this example, the promise is about a file named test_plain in the
directory /home/mark/tmp, and the promise is made to some entity named
system blue team. The create attribute instructs CFEngine to create the
file if it doesn't exist. It has a list of owners that is defined by a
variable named "usernames" (see the documentation about
Bodies for more details on this last
expression).
The comment attribute in this example can be added to any promise. It has no
actual function other than to provide more information to the user in error
tracing and auditing.
This is a promise that will affect the state of a file on the filesystem. In
CFEngine you can do this without having to execute the touch, chmod, and
chown commands. CFEngine is declarative: you declare a contract (or a
promise) that you want CFEngine to keep and you leave the details up to the
tool.
Promise locking
When a promise is validated (has an outcome of kept or repaired) it is locked
for body agent control ifelapsed minutes (1 by default). Locks are based on a
hash of the promise (promiser, associated attributes, and context).
Promise locks can be useful for controlling frequency.
access, classes, defaults, meta, roles and vars type promises do not
participate in locking.
See also: ifelapsed in body agent control, ifelapsed action body attribute
Promise attributes
Promise attributes have a type and a value. The type can be any of the
datatypes that are allowed for variables, and in addition
Boolean - allowed input values are
"true"/"false""on"/"off""yes"/"no"
irange[min, max] and rrange[min, max] - a range of integer or real
values, created via the irange() and rrange()
functions
clist - a list of classes or class expressions. Note that these
attributes can take both strings (which are evaluated as class expressions)
and functions that return type class
Menu option - one value from a list of values
body type - a complex set of
attributes expressed in a separate, reusable block
bundle type - a separate bundle
that is used as a sub-routine or a sub-set of promises
Note: The language does not specifically disallow the use of the same
attribute multiple times within a given promise. As a general rule the last
definition wins but the behavior is not clearly defined and this should be
avoided.
For example, the following promises use the same attribute multiple times.
code
bundle agent bad_example
{
classes:
"myclass"
expression => "cfengine",
expression => "my_other_class";
files:
"/tmp/example"
perms => m( 600 ),
perms => owner( "root" ),
perms => group( "root" );
}
Implicit promises
Some promise types can have implicit behavior. For example, the following
promise simply prints out a log message "hello world".
code
reports:
"hello world";
The same promise could be implemented using the commands type, invoking the
echo command:
code
commands:
"/bin/echo hello world";
These two promises have default attributes for everything except the
promiser. Both promises simply cause CFEngine to print a message.
Normal ordering
CFEngine takes a pragmatic point of view to ordering. When promising scalar
attributes and properties, ordering is irrelevant and should not be considered.
More complex patterned data structures require ordering to be preserved, e.g.
editing in files. CFEngine solves this in a two-part strategy:
CFEngine maintains a default order of promise-types. This is based on a simple
logic of what needs to come first, e.g. it makes no sense to create something
and then delete it, but it could make sense to delete and then create (an
equilibrium). This is called normal ordering and is described below. You can
override normal ordering in exceptional circumstances by making a promise in a
class context and defining that class based on the outcome of another promise,
or using the depends_on promise attribute.
Agent normal ordering
CFEngine tries to keep variable and class promises before starting to consider
any other kind of promise. In this way, global variables and classes can be set.
If you set variables based on classes that are determined by other variables,
then you introduce an order dependence to the resolution that might be
non-unique. Since CFEngine starts trying to converge values as soon as
possible, it is best to define variables in bundles before using them, i.e.
as early as possible in your configuration. In order to make sure all global
variables and classes are available early enough policy pre-evaluation step was
introduced.
Policy evaluation overview
CFEngine policy evaluation is done in several steps:
- Classes provided as a command line argument (-D option) are read and set.
- Environment detection and hard classes discovery is done.
- Persistent classes are loaded.
- Policy sanity check using cf-promises -c (full-check) is performed.
- Pre-evaluation step is taking place.
- Exact policy evaluation is done.
For more information regarding each step please see the detailed description
below.
Policy evaluation details
Before exact evaluation of promises takes place first command line parameters
are read and all classes defined using -D parameter are set. Next,
environment detection takes place and hard classes are discovered. When
environment detection is complete all the persistent classes are loaded and a
policy sanity check is performed using cf-promises.
cf-promises policy validation step
In this step policy is validated and classes and vars promises are
evaluated. Note that cached functions are executed here, and then again during
the normal agent execution. Variables and classes resolved in this step do not
persist into the following evaluation step, so all functions will run again
during Agent pre-evaluation.
Agent pre-evaluation step
In order to support expansion of variables in body common control inputs and
make sure all needed classes and variables are determined before they are
needed in normal evaluation, pre-evaluation takes place immediately before
policy evaluation.
During pre-evaluation files are loaded based on ordering in body common control
(first) and body file control (after body common control). This means that
files included in body common control are loaded and parsed before files
placed in body file control. This is important from a common bundles
evaluation perspective as bundles placed in files included in body common
control inputs will be evaluated before bundles from file control inputs.
The following steps are executed per-bundle for each file parsed, in this order:
1. if it's a common bundle, evaluate vars promises
2. if it's a common bundle, evaluate classes promises
3. evaluate vars promises
(for details see PolicyResolve() in the C code)
This is done because classes placed in common bundles
are global whereas classes placed in agent bundles are local (by default) to
the bundle where those are defined. This means that common bundles
classes need these extra steps in order to be resolved for the next steps.
After all policy files are parsed and pre-evaluated, the above pre-evaluation
sequence runs once again in
order to help resolve dependencies between classes and vars placed in
different files.
Agent evaluation step
After pre-evaluation is complete normal evaluation begins.
In this step CFEngine executes agent promise bundles in the strict order
defined by the bundlesequence (possibly overridden by the -b or
--bundlesequence command line option). If the bundlesequence is not provided
via command line argument or is not present in body common control agent will
attempt to execute a bundle named main. If bundle main is not defined, the
agent will error and exit.
Within a bundle, the promise types are executed in a round-robin fashion
according to so-called normal ordering (essentially deletion first, followed
by creation). The actual sequence continues for up to three iterations of the
following, converging towards a final state:
- meta
- vars
- defaults
- classes
- users
- files
- packages
- guest_environments
- methods
- processes
- services
- commands
- storage
- databases
- reports
- Custom promise types, in written order
Within edit_line bundles in files promises,
the normal ordering is:
- meta
- vars
- defaults
- classes
- delete_lines
- field_edits
- insert_lines
- replace_patterns
- reports
The order of promises within one of the above types follows their top-down
ordering within the bundle itself. In vars this can be used to override the
value of a variable, if you have two vars promises with the same name, the
last one will override the first one. The order may be overridden by making a
promise depend on a class that is set by another promise, or by using the
depends_on attribute in the promise.
Note: The evaluation order of common bundles are classes, then
variables and finally reports. All common bundles are evaluated regardless
if they are placed in bundlesequence or not. Placing common bundles in
bundlesequence will cause classes and variables to be evaluated again, and is
generally good practice to make sure evaluation works properly.
Server normal ordering
As with the agent, common bundles are executed before any server bundles;
following this all server bundles are executed (the bundlesequence is only
used for cf-agent). Within a server bundle, the promise types are unambiguous.
Variables and classes are resolved in the same way as the agent. On
connection, access control must be handled first, then a role request might be
made once access has been granted. Thus ordering is fully constrained by
process with no additional freedoms.
Within a server bundle, the normal ordering is:
- vars
- classes
- roles
- access
Monitor normal ordering
As with the agent, common bundles are executed before any monitor bundles;
following this all monitor bundles are executed (the bundlesequence is only
used for cf-agent). Variables and classes are resolved in the same way as the
agent.
Within a monitor bundle, the normal ordering is:
- vars
- classes
- measurements
- reports
Classes and decisions
Classes are used to apply promises only to particular environments, depending
on context. A promise might only apply to Linux systems, or should only be
applied on Sundays, or only when a
variable has a certain value.
Classes are simply facts that represent the current state or context of a
system. The list of set classes classifies the environment at time of
execution.
Classes are either set or not set, depending on context. Classes fall into
hard classes that are discovered by CFEngine, and soft classes that are
user-defined.
Classes have either a namespace or bundle scoped. namespace scoped classes
are visible from any bundle. bundle scoped classes can only be checked within
that bundle or from a bundle called with inheritance. Hard classes always have a
namespace scope.
In CFEngine Enterprise, classes that are defined can be reported to the
CFEngine Database Server and can be used there for reporting, grouping of hosts
and inventory management. For more information about how this is configured please read the documentation on Enterprise reporting.
Listing classes
To see the first order of hard classes and soft classes run cf-promises
--show-classes as a privileged user. Alternatively run cf-agent
--show-evaluated-classes to get the listing of classes at the end of the agent
execution. This will show additional namespace scoped classes that were defined
over the course of the agent execution. This output can be convenient for policy
testing.
Example:
code
[root@hub masterfiles]# cf-promises --show-classes
Class name Meta tags
10_0_2_15 inventory,attribute_name=none,source=agent,hardclass
127_0_0_1 inventory,attribute_name=none,source=agent,hardclass
192.168.56_2 inventory,attribute_name=none,source=agent,hardclass
1_cpu source=agent,derived-from=sys.cpus,hardclass
64_bit source=agent,hardclass
Afternoon time_based,source=agent,hardclass
Day22 time_based,source=agent,hardclass
...
Note that some of the classes are set only if a trusted link can be established
with cf-monitord, i.e. if both are running with privilege, and
the /var/cfengine/state/env_data file is secure.
The classesmatching() function searches using a regular expression for classes
matching a given name and or tag.
See also: The --show-vars option for cf-promises and the
--show-evaluated-vars option for cf-agent.
Classes and variables have tags that describe their provenance (who
created them) and purpose (why were they created).
While you can provide your own tags for soft classes in policy with
the meta attribute, there are some tags applied to hard classes and
other special cases. This list may change in future versions of
CFEngine.
source=agent: this hard class or variable was created by the agent in the C code. This tag is useful when you need to find classes or variables that don't match the other sources below. e.g. linux.source=environment: this hard class or variable was created by the agent in the C code. It reflects something about the environment like a command-line option, e.g. -d sets debug_mode, -v sets verbose_mode, and -I sets inform_mode. Another useful option, -n, sets opt_dry_run.source=bootstrap: this hard class or variable was created by the agent in the C code based on bootstrap parameters. e.g. policy_server is set based on the IP address or host name you provided when you ran cf-agent -B host-or-ip.source=module: this class or variable was created through the module protocol.source=persistent: this persistent class was loaded from storage.source=body: this variable was created by a body with side effects.source=function: this class or variable was created by a function as a side effect, e.g. see the classes that selectservers() sets or the variables that regextract() sets. These classes or variables will also have a function=FUNCTIONNAME tag.source=promise: this soft class was created from policy.inventory: related to the system inventory, e.g. the network interfaces
attribute_name=none: has no visual attribute name (ignored by Mission Portal)attribute_name=X: has visual attribute name X (used by Mission Portal)
monitoring: related to the monitoring (cf-monitord usually).time_based: based on the system date, e.g. Afternoonderived-from=varname: for a class, this tells you it was derived from a variable name, e.g. if the special variable sys.fqhost is xyz, the resulting class xyz will have the tag derived-from=sys.fqhost.cfe_internal: internal utility classes and variables
Enterprise only:
source=ldap: this soft class or variable was created from an LDAP lookup.source=observation: this class or variable came from a measurements system observation and will also have the monitoring tag.
Hard classes
Hard classes are discovered by CFEngine. Each time it wakes up, it discovers
and reads properties of the environment or context in which it runs.It turns
these properties of the environment into classes. This information is
effectively cached and may be used to make decisions about configuration.
You can see all of the hard classes defined on a particular host by running the
following command as a privileged user.
code
$ cf-promises --show-classes|grep hardclass
These are classes that describe your operating system, the time of
day, the week of the year, etc. Time-varying classes (tagged with
time_based) will change if you do this a few times over the course
of a week.
Notes:
Hard classes can not be undefined. If you try to undefine or cancel a hard
class an error will be emitted, for example error: You cannot cancel a
reserved hard class 'cfengine' in post-condition classes.
CFEngine-specific classes
any: this class is always setam_policy_hub, policy_server: set when the file
$(workdir)/state/am_policy_hub exists. When a host is bootstrapped, if
the agent detects that it is bootstrapping to itself the file is created.bootstrap_mode: set when bootstrapping a hostinform_mode, verbose_mode, debug_mode: log verbosity levels in order of noisinessopt_dry_run: set when the --dry-run option is givenfailsafe_fallback: set when the base policy is invalid and the built-in failsafe.cf (see bootstrap.c) is invoked- (
community, community_edition) and (enterprise, enterprise_edition): the two different CFEngine products, Community and Enterprise, can be distinguished by these mutually exclusive sets of hard classes
- Component Specific Classes (each component has a class that is always considered defined by that component):
Operating System Classes (note that the presence of these classes doesn't imply platform support)
- Operating System Architecture -
arista, big_ip, debian, eos, fedora, Mandrake, Mandriva, oracle, redhat, slackware, smartmachine, smartos, solarisx86, sun4, SuSE, ubuntu, ultrix, the always-favorite unknown_ostype, etc.
- VM or hypervisor specific:
VMware, virt_guest_vz, virt_host_vz, virt_host_vz_vzps, xen, xen_dom0, xen_domu_hv, xen_domu_pv, oraclevmserver, etc.
- On Solaris-10 systems, the zone name (in the form
zone_global, zone_foo, zone_baz).
- Windows-specific:
DomainController, Win2000, WinServer, WinServer2003, WinServer2008, WinVista, WinWorkstation, WinXP
have_aptitude, powershell, systemd: based on the detected capabilities of the platform or the compiled-in options- See also:
sys.arch, sys.class, sys.flavor, sys.os, sys.ostype.
Network Classes
- Unqualified Name of Host. CFEngine truncates it at the first dot.
Note:
www.sales.company.com and www.research.company.com have the
same unqualified name - www
- The IPv4 address octets of any active interface (in the form
ipv4_192_0_0_1, ipv4_192_0_0, ipv4_192_0, ipv4_192)
- The IPv6 addresses of all active interfaces (with dots replaced by
underscores, e.g.
ipv6_fe80__a410_6072_21eb_d3fa) added in 3.7.8, 3.10.3, 3.12.0
- User-defined Group of Hosts
mac_unknown: set when the MAC address can't be found- See also:
sys.domain, sys.hardware_addresses, sys.sys.host, sys.interface, sys.interfaces, sys.interface_flags, sys.ipv4, sys.ip_addresses, sys.fqhost, sys.uqhost.
Time Classes
- note ALL of these have a local and a GMT version. The GMT classes are consistent the world over, in case you need global change coordination.
- Day of the Week -
Monday, Tuesday, Wednesday,...GMT_Monday, GMT_Tuesday, GMT_Wednesday,...
- Hour of the Day in Current Time Zone -
Hr00, Hr01,... Hr23 and Hr0, Hr1,... Hr23
- Hour of the Day in GMT -
GMT_Hr00, GMT_Hr01, ...GMT_Hr23 and GMT_Hr0, GMT_Hr1, ...GMT_Hr23.
- Minutes of the Hour -
Min00, Min17,... Min45,... and GMT_Min00, GMT_Min17,... GMT_Min45,...
- Five Minute Interval of the Hour -
Min00_05, Min05_10,... Min55_00 and GMT_Min00_05, GMT_Min05_10,... GMT_Min55_00. Note the second number indicates up to what minute the interval extends and does not include that minute.
- Quarter of the Hour -
Q1, Q2, Q3, Q4 and GMT_Q1, GMT_Q2, GMT_Q3, GMT_Q4
- An expression of the current quarter hour -
Hr12_Q3 and GMT_Hr12_Q3
- Day of the Month -
Day1, Day2,... Day31 and GMT_Day1, GMT_Day2,... GMT_Day31
- Month -
January, February,... December and GMT_January, GMT_February,... GMT_December
- Year -
Yr1997, Yr2004 and GMT_Yr1997, GMT_Yr2004
- Period of the Day -
Night, Morning, Afternoon, Evening and GMT_Night, GMT_Morning, GMT_Afternoon, GMT_Evening (six hour blocks starting at 00:00 hours).
- Lifecycle Index -
Lcycle_0, Lcycle_1, Lcycle_2 and GMT_Lcycle_0, GMT_Lcycle_1, GMT_Lcycle_2 (the year number modulo 3, used in long term resource memory).
- See also:
sys.cdate, sys.date.
The unqualified name of a particular host (e.g., www). If
your system returns a fully qualified domain name for your host
(e.g., www.iu.hio.no), CFEngine will also define a hard class for
the fully qualified name, as well as the partially-qualified
component names iu.hio.no, hio.no, and no.
An arbitrary user-defined string (as specified in the -D
command line option, or defined in a classes promise promise or
classes body,
restart_class in a processes promise, etc).
The IP address octets of any active interface (in the form ipv4_192_0_0_1,
ipv4_192_0_0, ipv4_192_0, ipv4_192), provided they are not excluded by
a regular expression in the file WORKDIR/ignore_interfaces.rx or WORKDIR/inputs/ignore_interfaces.rx.
- Note: Support and preference for
WORKDIR/ignore_interfaces.rx was added
and is present in version 3.23.0 and later and in version 3.21.4 and later.
The names of the active interfaces (in the form
net_iface_xl0, net_iface_vr0).
System status and entropy information reported by
cf-monitord.
Soft classes
Soft classes are user-defined classes which you can use to implement your own
classifications.
Soft classes can be set by using the -D or --define options wihtout having
to edit the policy. Multiple classes can be defined by separating them with
commas (no spaces).
or
code
$ cf-agent --define class1,class2,class3
This can be especially useful when requesting a remote host to run its policy
by using cf-runagent to activate policy that is normally dormant.
code
$ cf-runagent -Demergency_evacuation -H remoteclient
If you're using dynamic inputs this can be useful in combination with
cf-promises to ensure that various input combinations syntax is validated
correctly. Many people will have this run by pre-commit hooks or as part of a
continuous build system like Jenkins or
Bamboo.
code
$ cf-promises -f ./promises.cf -D prod
$ cf-promises -f ./promises.cf -D dev
./promises.cf:10:12: error: syntax error
"global1" expression => "any";
^
./promises.cf:10:12: error: Check previous line, Expected ';', got '"global1"'
"global1" expression => "any";
^
./promises.cf:10:23: error: Expected promiser string, got 'expression'
"global1" expression => "any";
^
./promises.cf:10:26: error: Expected ';', got '=>'
"global1" expression => "any";
^
2014-05-22T13:46:05+0000 error: There are syntax errors in policy files
Note: Classes, once defined, will stay defined either for as long as the
bundle is evaluated (for classes with a bundle scope) or until the agent
exits (for classes with a namespace scope). See cancel_kept,
cancel_repaired, and cancel_notkept in classes body.
This example defines a few soft classes local to the myclasses bundle.
code
bundle agent myclasses
{
classes:
"always";
"always2" expression => "any";
"solinux" expression => "linux||solaris";
"alt_class" or => { "linux", "solaris", fileexists("/etc/fstab") };
"oth_class" and => { fileexists("/etc/shadow"), fileexists("/etc/passwd") };
reports:
alt_class::
# This will only report "Boo!" on linux, solaris, or any system
# on which the file /etc/fstab exists
"Boo!";
}
The always and always2 soft classes are always defined.
The solinux soft class is defined as a combination of the linux or the
solaris hard classes. This class will be set if the operating
system family is either of these values.
The alt_class soft class is defined as a combination of linux,
solaris, or the presence of a file named /etc/fstab. If one of the two
hard classes evaluate to true, or if there is a file named /etc/fstab, the
alt_class class will also be set.
The oth_class soft class is defined as the combination of two fileexists
functions - /etc/shadow and /etc/passwd. If both of these files are
present the oth_class class will also be set.
Negative knowledge
If a class is set, then it is certain that the corresponding fact is true.
However, that a class is not set could mean that something is not the case, or
that something is simply not known. This is only a problem with soft classes,
where the state of a class can change during the execution of a policy,
depending on the order in which bundles and promises are
evaluated.
Making decisions based on classes
Class guards are the most common way to restrict a promise to a specific context. Once stated the restriction applies until a new context is specified. A new promise type automatically resets to an unrestricted context (the unrestricted context is typically referred to as any).
This example illustrates how a class guard applies (to multiple promises) until a new context is specified.
code
bundle agent __main__
{
reports:
"This promise is not restricted.";
any::
"Neither is this promise restricted, 'any' is always defined.";
linux::
"This promise is restricted to hosts that have the class 'linux' defined.";
"This promise is also restricted to hosts that have the class 'linux' defined.";
linux.cfengine_4::
"This promise is restricted to hosts that have both the 'linux' class AND the 'cfengine_4' class.";
!any::
"This promise will never be actuated.";
vars:
"Message" string => "Hello World!";
reports:
"And this promise is again unrestricted";
}
code
R: This promise is not restricted.
R: Neither is this promise restricted, 'any' is always defined.
R: This promise is restricted to hosts that have the class 'linux' defined.
R: This promise is also restricted to hosts that have the class 'linux' defined.
R: And this promise is again unrestricted
This policy can be found in
/var/cfengine/share/doc/examples/classes_context_applies_multiple_promises.cf
and downloaded directly from
github.
Another Example:
code
bundle agent greetings
{
reports:
Morning::
"Good morning!";
Evening::
"Good evening!";
"! any"::
"This report won't ever be seen.";
# whitespace allowed only in 3.8 and later
Friday . Evening::
"It's Friday evening, TGIF!";
"Monday . Evening"::
"It's Monday evening.";
}
In this example, the report "Good morning!" is only printed if the class
Morning is set, while the report "Good evening!" is only printed when the
class Evening is set.
The "! any" context will never be evaluated. Note that since
CFEngine 3.8 context expressions can contain spaces for legibility.
The "Monday . Evening" context will only be true on Monday evenings.
The Friday . Evening context will only be true on Friday evenings.
See below for more on context operators.
Variable class expressions
Sometimes it's convenient to put class names in variables. Variables can be used
in quoted class expressions as well as the if and unless promise attributes.
Variables used in quoted class expressions apply to all promises following the
quoted class expression until the end of the promise type or until a new class
expression is stated.
Note: The double colon (::) at the end of the class expression should
remain outside of the quoted string.
This example shows two ways to execute code conditionally based on such
variables:
code
bundle agent greetings
{
vars:
"myclassname" string => "Evening";
reports:
"$(myclassname)"::
"Good evening!";
"What a wonderful sunset";
any::
"Good evening too!" if => "$(myclassname)";
}
As you saw above, the class predicate if (unless is also available)
can be used if variable class expressions are required.
It is ANDed with the normal class expression, and is
evaluated together with the promise. Both may contain variables as long
as the resulting expansion is a legal class expression.
code
bundle agent example
{
vars:
"french_cities" slist => { "toulouse", "paris" };
"german_cities" slist => { "berlin" };
"italian_cities" slist => { "milan" };
"usa_cities" slist => { "lawrence" };
"all_cities" slist => { @(french_cities), @(german_cities), @(italian_cities), @(usa_cities) };
classes:
"italy" or => { @(italian_cities) };
"germany" or => { @(german_cities) };
"france" or => { @(french_cities) };
reports:
"It's $(sys.date) here";
Morning.italy::
"Good morning from Italy",
if => "$(all_cities)";
Afternoon.germany::
"Good afternoon from Germany",
if => "$(all_cities)";
france::
"Hello from France",
if => "$(all_cities)";
france::
"IMPOSSSIBLE! THIS WILL NOT PRINT!!!",
unless => "france";
"$(all_cities)"::
"Hello from $(all_cities)";
"Hello from $(all_cities), if edition",
if => "$(all_cities)";
}
Example Output:
code
cf-agent -Kf example.cf -D lawrence -b example
R: It's Tue May 28 16:47:33 2013 here
R: Hello from lawrence
R: Hello from lawrence, if edition
cf-agent -Kf example.cf -D paris -b example
R: It's Tue May 28 16:48:18 2013 here
R: Hello from France
R: Hello from paris
R: Hello from paris, if edition
cf-agent -Kf example.cf -D milan -b example
R: It's Tue May 28 16:48:40 2013 here
R: Hello from milan
R: Hello from milan, if edition
cf-agent -Kf example.cf -D germany -b example
R: It's Tue May 28 16:49:01 2013 here
cf-agent -Kf example.cf -D berlin -b example
R: It's Tue May 28 16:51:53 2013 here
R: Good afternoon from Germany
R: Hello from berlin
R: Hello from berlin, if edition
In this example, lists of cities are defined in the vars section and these
lists are combined into a list of all cities. These variable lists are used to
qualify the greetings and to make the policy more concise. In the classes
section a country class is defined if a class described on the right hand side
evaluates to true. In the reports section the current time is always reported
but only agents found to have the Morning and italy classes defined will
report "Good morning from Italy", this is further qualified by ensuring that
the report is only generated if one of the known cities also has a class
defined.
Automatic canonification on class definition
Classes are automatically canonified when they are defined. Classes
are not automatically canonified when they are checked.
This example shows how classes are automatically canonified when they are
defined and that you must explicitly canonify when verifying classes.
code
bundle agent main
{
classes:
"my-illegal-class";
reports:
# We search to see what class was defined:
"$(with)" with => join( " ", classesmatching( "my.illegal.class" ) );
# We see that the illegal class is explicitly not defined.
"my-illegal-class is NOT defined (as expected, its invalid)"
unless => "my-illegal-class";
# We see the canonified form of the illegal class is defined.
"my_illegal_class is defined"
if => canonify("my-illegal-class");
# Note, if takes expressisons, you couldn't do that if it were
# automatically canonified. Here I canonify the string using with, and use
# it as part of the expression which contains an invalid classcharacter, but
# its desireable for constructing expressions.
"Slice and dice using `with`"
with => canonify( "my-illegal-class" ),
if => "linux|$(with)";
}
First we promise to define my-illegal-class. When the promise is actuated
it is automatically canonified and defined. This automatic canonification is
logged in verbose logs (verbose: Class identifier 'my-illegal-class' contains illegal characters - canonifying).
Next several reports prove which form of the class was defined. The last
report shows how if takes a class expression, and if you are checking a class
that contains invalid characters you must canonify it.
code
R: my_illegal_class
R: my-illegal-class is NOT defined (as expected, its invalid)
R: my_illegal_class is defined
R: Slice and dice using `with`
This policy can be found in
/var/cfengine/share/doc/examples/class-automatic-canonificiation.cf
and downloaded directly from
github.
Operators and precedence
Classes promises define new classes based on combinations of old ones. This is
how to make complex decisions in CFEngine, with readable results. It is like
defining aliases for class combinations. Such class 'aliases' may be specified
in any kind of bundle.
Since CFEngine 3.8, whitespace is allowed between operators. It
was not allowed up to 3.7.
For example a . b is equivalent to a.b and perhaps more readable.
Classes may be combined with the operators listed here in order from highest
to lowest precedence:
'()'::
~ The parenthesis group operator.
'!'::
~ The NOT operator.
'.'::
~ The AND operator.
'&'::
~ The AND operator (alternative).
'|'::
~ The OR operator.
'||'::
~ The OR operator (alternative).
These operators can be combined to form complex expressions. For example, the
following expression would be only true on Mondays or Wednesdays from 2:00pm
to 2:59pm on Windows XP systems:
code
(Monday|Wednesday).Hr14.WinXP::
Operands that are functions
If an operand is another function and the return value of the function is
undefined, the result of the logical operation will also be undefined.
For this reason, when using functions as operators, it is safer to collapse
the functions down to scalar values and to test if the values are either
true or false before using them as operands in a logical expression.
e.g.
code
...
classes:
"variable_1"
expression => fileexists("/etc/aliases.db");
...
"result"
or => { isnewerthan("/etc/aliases", "/etc/aliases.db"),
"!variable_1" };
The function, isnewerthan can return "undefined" if one or other of the files
does not exist. In that case, result would also be undefined. By checking the
validity of the return value before using it as an operand in a logical expression,
unpredictable results are avoided. i.e negative knowledge does not necessarily
imply that something is not the case, it could simply be unknown. Checking if
each file exists before calling isnewerthan would avoid this problem.
Operands that are JSON booleans
If an operand is true it will succeed, even though there doesn't have to be
a class named true. If an operand is false it will fail, even though
there may be a class named false. This allows JSON booleans from data
containers to be used in context expressions:
code
bundle agent main
{
vars:
"checks" data => '[true, false]';
# find all classes named
"classes_named_true" slist => classesmatching('true');
classes:
# always defined
"first_check" expression => "$(checks[0])";
# never defined
"second_check" expression => "$(checks[1])";
reports:
# prints nothing, there are no classes named 'true'
"Classes named 'true': $(classes_named_true)";
first_check::
"The class was defined from '$(checks[0])'";
!first_check::
"The class was NOT defined from '$(checks[0])'";
second_check::
"The class was defined from '$(checks[1])'";
!second_check::
"The class was NOT defined from '$(checks[1])'";
}
Output:
code
R: The class was defined from 'true'
R: The class was NOT defined from 'false'
Class scope
Classes defined by classes type promises in bundles of type common are
namespace scoped by default (globally available, can be seen from any bundle),
whereas classes defined in all other bundle types are local aka bundle scoped
(they can not be seen from other bundles). Classes are evaluated when the bundle
is evaluated (and the bundles are evaluated in the order specified in the
bundlesequence).
Note that any class promise must have one - and only one - value constraint.
That is, you may not leave expression in the example
above and add and or xor constraints to the
single promise.
Additionally classes can be defined or undefined as the result of a promise by
using a classes body. To set a class if
a promise is repaired, one might write:
code
"promiser..."
...
classes => if_repaired("signal_class");
These classes are namespace scoped by default. The
scope attribute can be used to make them
local to the bundle.
It is recommended to use bundle scoped classes whenever possible. This example
will define signal_class prefixed classes with a suffix matching the
promise outcome (_kept, _repaired, _notkept).
code
"promiser..."
...
classes => results("bundle", "signal_class");
reports:
signal_class_repaired::
"Some aspect of the promise was repaired.";
"The agent made a change to take us closer to the desired state";
signal_class_kept::
"Some aspect of the promise was kept";
signal_class_notkept::
"Some aspect of the promise was unable to be repaired";
signal_class_kept.signal_class_notkept::
"All promise aspects were as desired";
Classes defined by the module protocol are namespace
scoped.
Finally, restart_class classes in processes are global.
Class scopes: A more complex example
code
body common control
{
bundlesequence => { "global","local_one", "local_two" };
}
#####################################
bundle common global
{
classes:
# The soft class "zero" is always satisfied,
# and is global in scope
"zero" expression => "any";
}
#####################################
bundle agent local_one
{
classes:
# The soft class "one" is always satisfied,
# and is local in scope to local_one
"one" expression => "any";
}
#####################################
bundle agent local_two
{
classes:
# The soft class "two" is always satisfied,
# and is local in scope to ls_2
"two" expression => "any";
reports:
zero.!one.two::
# This report will be generated
"Success";
}
In this example, there are three bundles. One common bundle named global
with a global scope. Two agent bundles define classes one and two which
are local to those bundles.
The local_two bundle promises a report "Success" which applies only if
zero.!one.two evaluates to true. Within the local_two scope this evaluates
to true because the one class is not set.
Persistence
By default classes are re-computed on each agent execution. Once a class has
been defined, it persists until the end of that agent execution. Persistent classes
are always global and can not be set to local by scope directive. Classes can
persist for a period of time. This can be useful to avoid the expense of
re-evaluation, communicate states across multiple agent runs on the same host.
The standard library in the Masterfiles Policy Framework contains
the feature bundle which implements a useful model for
defining classes for a period of time as well as canceling them on demand.
See also: persistance classes attribute, persist_time in classes body, lib/event.cf in the MPF, lib/feature.cf in the MPF
Canceling classes
You can cancel a class with a classes body.
See the cancel_kept, cancel_notkept, and cancel_repaired attributes.
Variables
Just like classes are defined as
promises, variables (or "variable definitions") are also promises. Variables
can be defined in any promise bundle. This bundle name can be used
as a context when using variables outside of the bundle they are defined in.
CFEngine variables have three high-level types: scalars, lists, and
data containers.
- A scalar is a single value,
- a list is a collection of scalars.
- a data container is a lot like a JSON document, it can be a key-value map or an array or anything else allowed by the JSON standard with unlimited nesting.
Scalar variables
Each scalar may have one of three types: string, int or real. String scalars
are sequences of characters, integers are whole numbers, and reals are float
pointing numbers.
code
vars:
"my_scalar" string => "String contents...";
"my_int" int => "1234";
"my_real" real => "567.89";
Integer constants may use suffixes to represent large numbers. The following
suffixes can be used to create integer values for common powers of 1000.
- 'k' = value times 1000
- 'm' = value times 10002
- 'g' = value times 10003
Since computing systems such as storage and memory are based on binary values,
CFEngine also provide the following uppercase suffixes to create integer
values for common powers of 1024.
- 'K' = value times 1024.
- 'M' = value times 10242
- 'G' = value times 10243
However, the values must have an integer numeric part (e.g. 1.5M is not
allowed).
In some contexts, % can be used a special suffix to denote percentages.
Lastly, there is a reserved value which can be used to specify a parameter as
having no limit at all.
'inf' = a constant representing an unlimited value.
inf is a special value that in the code corresponds to the magic number of 999999999 (nine nines). Thus any function that accepts a number, can accept inf without a problem. Keep in mind though that you can get a higher number if you set the upper limit manually, but that's almost never a problem.
For a few functions inf is being treated specially and truly means "there is no limit" instead of "nine nines limit". This is the case for the maxbytes parameter and applies to most read* functions.
CFEngine typing is mostly dynamic, and CFEngine will try to coerce string
values into int and real types, and if it cannot it will report an error.
However, arguments to built-in functions check the
defined argument type for consistency.
Scalar referencing and expansion
Scalar variables are referenced by $(my_scalar) (or ${my_scalar}) and
expand to the single value they hold at that time. If you refer to a variable
by $(unqualified), then it is assumed to belong to the current bundle. To
access any other (scalar) variable, you must qualify the name, using the name
of the bundle in which it is defined:
code
$(bundle_name.qualified)
Quoting
When quoting strings CFEngine allows the use of ', ", and or `. This
allows flexibilty when defining strings that contain quotes. Single or double
quotes can be escaped with \ however, please note that backticks (`) can not
be escaped.
code
bundle agent main
{
vars:
'single' string => 'single quotes';
`backtick` string => `backtick quotes`;
"double" string => "double";
'single_escape' string => 'You can \'escape\' single quotes';
"double_escape" string => "You can \"escape\" double quotes";
`backtick_escape` string => `Note: You can't escape backtick quotes`;
reports:
"$(single)";
`$(backtick)`;
`$(double)`;
'$(single_escape)';
"$(double_escape)";
`$(backtick_escape)`;
}
code
R: single quotes
R: backtick quotes
R: double
R: You can 'escape' single quotes
R: You can "escape" double quotes
R: Note: You can't escape backtick quotes
This policy can be found in
/var/cfengine/share/doc/examples/quoting.cf
and downloaded directly from
github.
Scalar size limitations
At the moment, up to 4095 bytes can fit into a scalar variable. This
limitation may be removed in the future.
If you try to expand strings in a variable or string context that add
up to more that 4095 bytes, you will notice this limitation as well.
The functions eval() to do math, string_head() and string_tail()
to extract a certain number of characters from either end of a string,
and string_length() to find a string's length may be helpful.
See readfile() for more detail on reading values from a file.
See data_readstringarray() and data_readstringarrayidx() for a way
to read large files' contents into a data container without going
through scalar variables or arrays.
Lists
List variables can be of type slist, ilist or rlist to hold lists of
strings, integers or reals, respectively.
Every element of a list is subject to the same size limitations as a
regular scalar.
They are declared as follows:
code
vars:
"my_slist" slist => { "list", "of", "strings" };
"my_ilist" ilist => { "1234", "5678" };
"my_rlist" rlist => { "567.89" };
List substitution and expansion
An entire list is referenced with the symbol '@' and can be passed in their
entirety in any context where a list is expected as @(list). For example,
the following variable definition references a list named "shortlist":
code
vars:
"shortlist" slist => { "you", "me" };
"longlist" slist => { @(shortlist), "plus", "plus" };
The declaration order does not matter - CFEngine will understand the
dependency, and execute the promise to assign the variable @(shortlist)
before the promise to assign the variable @(longlist).
Using the @ symbol in a string scalar will not result in list substitution.
For example, the string value "My list is @(mylist)" will not expand this
reference.
Using the scalar reference to a local list variable, will cause CFEngine to
iterate over the values in the list. E.g. suppose we have local list variable
@(list), then the scalar $(list) implies an iteration over every value of
the list.
In some function calls, listname instead of @(listname) is
expected. See the specific function's documentation to be sure.
Data container variables
The data containers can contain several levels of data structures,
e.g. list of lists of key-value arrays. They are used to store
structured data, such as data read from JSON or YAML files. The
variable type is data.
Data containers are obtained from functions that return data types,
such as readjson() or parsejson(), readyaml() or parseyaml(),
or from merging existing containers.
They can NOT be modified, once created, but they can be re-defined.
Data containers do not have the size limitations of regular scalar
variables.
code
bundle agent example_reference_values_inside_data
{
vars:
"data" data => '{
"Key1": "Value1",
"Key2": "Value2",
"Key3": [
"Value3",
"Value4"
]
}';
reports:
"Key1 contains '$(data[Key1])'";
"Key2 contains '$(data[Key2])'";
"Key3 iterates and contains '$(data[Key3])'";
}
bundle agent __main__
{
methods: "example_reference_values_inside_data";
}
code
R: Key1 contains 'Value1'
R: Key2 contains 'Value2'
R: Key3 iterates and contains 'Value3'
R: Key3 iterates and contains 'Value4'
This policy can be found in
/var/cfengine/share/doc/examples/reference_values_inside_data.cf
and downloaded directly from
github.
Associative arrays
Associative arrays in CFEngine are fundamentally a collection of individual
variables that together represent a data structure with key value pairs. They
can be built up, dynamically one key at a time and individual keys can be
re-defined.
While in many cases associative arrays can be used interchangeably with data
variables (e.g. as input to a function) if there is not explicit need to use an
associative array for it's ability to be built up dynamically or for managing
the size of individual variables use of a data variable is recommended.
Every value in an associative array is subject to the same size
limitations as a regular scalar.
Associative array variables are written with [ and ] brackets that enclose
an arbitrary key.
Arrays are associative and may be of type scalar or list. Enumerated arrays
are simply treated as a special case of associative arrays, since there are no
numerical loops in CFEngine. Special functions exist to extract lists of keys
from array variables for iteration purposes.
Example:
code
bundle common g
{
vars:
"array[key1]" string => "one";
"array[key2]" string => "two";
}
bundle agent __main__
{
vars:
"thing[1][color]" string => "red";
"thing[1][name]" string => "one";
"thing[2][color]" string => "blue";
"thing[2][name]" string => "two";
"_thing_idx"
slist => sort( getindices( thing ), lex );
reports:
"Keys in default:g.array = $(with)"
with => join( ", ", sort( getindices( "default:g.array" ), lex));
"Keys of default:main.thing[1] = $(with)"
with => join( ", ", sort( getindices( "default:main.thing[1]" ), lex));
"Thing $(thing[$(_thing_idx)][name]) is $(thing[$(_thing_idx)][color])";
}
code
R: Keys in default:g.array = key1, key2
R: Keys of default:main.thing[1] = color, name
R: Thing one is red
R: Thing two is blue
This policy can be found in
/var/cfengine/share/doc/examples/arrays.cf
and downloaded directly from
github.
See also: getindices(), getvalues()
Augments
Augments files can be used to define variables and classes for use by
all CFEngine components before any parsing or evaluation happen. Augments are fundamentally
JSON data files, so you should view and edit them with a JSON-aware editor if
possible. This is a convenient way to override defaults defined in the default policy,
the Masterfiles Policy Framework (MPF), without modifying the shipped policy files.
Using the MPF without maintaining your own patches to it
As an example, you can add your own policy file to inputs and bundle name to the
bundle sequence, without editing promises.cf, by adding the Augments file below
(/var/cfengine/masterfiles/def.json):
code
{
"inputs": ["services/my_policy_file.cf"],
"vars":
{
"control_common_bundlesequence_end": ["my_bundle_name"]
}
}
In this case, the contents of the policy file, /var/cfengine/masterfiles/services/my_policy_file.cf, could look something like this:
code
bundle agent my_bundle_name
{
files:
"/tmp/hello"
create => "true",
content => "cfengine";
}
You can ensure the file is deleted and use the info log output to confirm that the policy is actually being run:
code
$ cf-agent -Kf update.cf && cf-agent -K
$ rm /tmp/hello ; cf-agent -KI
info: Created file '/tmp/hello', mode 0600
info: Updated content of '/tmp/hello' with content 'cfengine'
In this example, control_common_bundlesequence_end is a special variable, handled by the Masterfiles Policy Framework (MPF).
To learn about more variables like this and ways to interact with the MPF without editing it, see the MPF Reference documentation.
The rest of this documentation page below focuses on the specifics of how augments files work, independently of everything they can be used for in the MPF.
Augments files
There are two canonical augments files, host_specific.json, and def.json which may load additional Augments
as specified by the augments key.
Notes:
- CFEngine variables are not expanded unless otherwise noted.
host_specific.json
If $(sys.workdir)/data/host_specific.json (typically /var/cfengine/data/host_specific.json) is the first augments file that is loaded. Any variables defined as a result of processing this file
are automatically tagged with source=cmdb. Variables defined from this file can not be overridden by subsequently processed augments files. Policy always wins and thus can overwrite the variable.
Notes:
def.json
The file def.json is found based on the location of the policy entry (the first policy file read by the agent):
- with no arguments, it's in
$(sys.inputdir)/def.json because
$(sys.inputdir)/promises.cf is used
- with
-f /dirname/myfile.cf, it's in /dirname/def.json
- with
-f ./myfile.cf, it's in ./def.json
Notes:
sys variables are expanded in def.json and all subsequently loaded augments as specified by the augments key.def_preferred.json will be used instead of def.json if it is present. This preferential loading can be disabled by providing the --ignore-preferred-augments option to the agent.
Augments keys
An augments file can contain the following keys:
This key is supported in def.json, def_preferred.json, and augments loaded by the augments key.
Filenames entered here will appear in the def.augments_inputs variable.
Notes:
Files are loaded relative to sys.policy_entry_dirname.
The inputs key has precedence over the vars key.
If both the inputs key and vars.augments_inputs are populated concurrently,
the variable def.augments_inputs will hold the value set by the inputs
key. The def.augments_inputs variable is part of the default inputs in the
Masterfiles Policy Framework.
Examples:
code
{
"inputs": [ "services/hello-world.cf", "example.cf", "/tmp/my_policy.cf" ],
"vars": {
"augments_inputs": [ "goodbye.cf" ]
}
}
The above Augments results in $(sys.policy_entry_dirname)/services/hello-world.cf, $(sys.policy_entry_dirname)/example.cf and /tmp/my_policy.cf being added to inputs.
code
{
"vars": {
"augments_inputs": [ "goodbye.cf" ]
}
}
The above Augments results in $(sys.policy_entry_dirname)/goodbye.cf being added to inputs.
variables
This key is supported in both host_specific.json, def.json, def_preferred.json, and augments loaded by the augments key.
Variables defined here can target a namespace and or bundle scope explicitly. When defined from host_specific.json, variables default to the variables bundle in the data namespace ($(data:variables.MyVariable)).
For example:
code
{
"variables": {
"VariableWithImplicitNamespaceAndBundle": {
"value": "value"
}
}
}
Variables can target the implicit namespace while specifying the bundle.
For example:
code
{
"variables": {
"my_bundle.VariableWithImplicitNamespace": {
"value": "value"
}
}
}
Variables can also target a namespace explicitly.
For example:
code
{
"variables": {
"MyNamespace:my_bundle.Variable": {
"value": "value"
}
}
}
The comment key is optional, if supplied, the comment will be associated with the variable definition as if you had applied the comment attribute to a vars type promise.
For example, this JSON:
code
{
"variables": {
"MyNamespace:my_bundle.Variable": {
"value": "value",
"comment": "An optional note about why this variable is important"
}
}
}
Is equivalent to this policy:
code
body file control
{
namespace => "MyNamespace";
}
bundle agent my_bundle
{
vars:
"Variable"
string => "value",
comment => "An optional note about why this variable is important";
}
The tags key is optional, if supplied, the tags will be associated with the variable definition as if you had applied the meta attribute to a vars type promise.
For example, this JSON:
code
{
"variables": {
"MyNamespace:my_bundle.Variable": {
"value": "value",
"tags": [ "inventory", "attribute_name=My Inventory" ]
}
}
}
Is equivalent to this policy:
code
body file control
{
namespace => "MyNamespace";
}
bundle agent my_bundle
{
vars:
"Variable"
string => "value",
meta => { "inventory", "attribute_name=My Inventory" };
}
Notes:
* vars and variables keys are allowed concurrently in the same file.
* If vars and variables keys in the same augments file define the same variable, the definition provided by the variables key wins.
History:
vars
This key is supported in both host_specific.json, def.json, and def_preferred.json and augments loaded by the augments key.
Variables defined here can target a namespace and or bundle scope
explicitly. When defined from def.json, variables default to the def
bundle in the default namespace ($(default:def.MyVariable)).
Thus:
code
{
"vars": {
"phone": "22-333-4444",
"myplatform": "$(sys.os)",
"MyBundle.MyVariable": "MyValue in MyBundle.MyVariable",
"MyNamespace:MyBundle.MyVariable": "MyValue in MyNamespace:MyBundle.MyVariable"
}
}
results in the variable default:def.phone with value 22-333-4444,
default:def.myplatform with the value of your current OS,
default:MyBundle.MyVariable with the value MyValue in MyBundle.MyVariable
and MyNamespace:MyBundle.MyVariable with the value MyValue in
MyNamespace:MyBundle.MyVariable.
Again, note that this happens before policy is parsed or evaluated.
You can see the list of variables thus defined in the output of cf-promises
--show-vars (see Components). They will be tagged with
the tag source=augments_file. For instance, the above two variables (assuming
you placed the data in $(sys.inputdir)/def.json) result in
code
cf-promises --show-vars=default:def
...
default:def.myplatform linux source=augments_file
default:def.phone 22-333-4444 source=augments_file
Variables of other types than string can be defined too, like in this example
code
"vars" : {
"str1" : "string 1",
"num1" : 5,
"num2" : 3.5
"slist1" : ["sliststr1", "sliststr2"]
"array1" : {
"idx1" : "val1",
"idx2" : "val2"
}
}
Notes:
* vars and variables keys are allowed concurrently in the same file.
* If vars and variables keys in the same augments file define the same variable, the definition provided by the variables key wins.
History:
- 3.18.0 gained ability to specify the namespace and bundle the variable should be defined in.
classes
This key is supported in both host_specific.json, def.json, def_preferred.json, and augments loaded by the augments key.
Any class defined via augments will be evaluated and installed as
soft classes. This key supports both
array and dict formats.
For an array each element of the array is tested against currently defined
classes as an anchored regular expression unless the string ends with :: indicating it should be interpreted as a
class expression.
For example:
code
{
"classes": {
"augments_class_from_regex_my_always": [ "any" ],
"augments_class_from_regex_my_other_apache": [ "server[34]", "debian.*" ],
"augments_class_from_regex_my_other_always": [ "augments_class_from_regex_my_always" ],
"augments_class_from_regex_when_MISSING_not_defined": [ "^(?!MISSING).*" ],
"augments_class_from_regex": [ "cfengine_\\d+" ],
"augments_class_from_single_class_as_regex": [ "cfengine" ],
"augments_class_from_single_class_as_expression": [ "cfengine::" ],
"augments_class_from_classexpression_and": [ "cfengine.cfengine_3::" ],
"augments_class_from_classexpression_not": [ "!MISSING::" ],
"augments_class_from_classexpression_or": [ "cfengine|cfengine_3::" ],
"augments_class_from_classexpression_complex": [ "(cfengine|cfengine_3).!MISSING::" ]
}
}
The tags, comment, and the mutually exclusive class_expressions, and regular_expressions subkeys
are supported when using the dict structure.
For example:
code
{
"classes": {
"myclass_defined_by_augments_in_def_json_3_18_0_v0": {
"class_expressions": [ "linux.redhat::", "cfengine|linux::" ],
"comment": "Optional description about why this class is important",
"tags": [ "optional", "tags" ]
},
"myclass_defined_by_augments_in_def_json_3_18_0_v1": {
"regular_expressions": [ "linux.*", "cfengine.*" ],
"tags": [ "optional", "tags" ]
}
}
}
Note that augments is processed at the very beginning of agent evaluation. You
can use any hard classes, persistent classes
, or classes defined earlier in the augments list. Test carefully,
custom soft classes may not be defined early enough
for use. Thus:
code
{
"classes": {
"augments_class_from_regex_my_always": [ "any" ],
"augments_class_from_regex_my_other_apache": [ "server[34]", "debian.*" ],
"augments_class_from_regex_my_other_always": [ "augments_class_from_regex_my_always" ],
"augments_class_from_regex_when_MISSING_not_defined": [ "^(?!MISSING).*" ],
"augments_class_from_regex": [ "cfengine_\\d+" ],
"augments_class_from_single_class_as_regex": [ "cfengine" ],
"augments_class_from_single_class_as_expression": [ "cfengine::" ],
"augments_class_from_classexpression_and": [ "cfengine.cfengine_3::" ],
"augments_class_from_classexpression_not": [ "!MISSING::" ],
"augments_class_from_classexpression_or": [ "cfengine|cfengine_3::" ],
"augments_class_from_classexpression_complex": [ "(cfengine|cfengine_3).!MISSING::" ],
"myclass_defined_by_augments_in_def_json_3_18_0_v0": {
"class_expressions": [ "linux.redhat::", "cfengine|linux::" ],
"comment": "Optional description about why this class is important",
"tags": [ "optional", "tags" ]
},
"myclass_defined_by_augments_in_def_json_3_18_0_v1": {
"regular_expressions": [ "linux.*", "cfengine.*" ],
"tags": [ "optional", "tags" ]
}
}
}
results in
* augments_class_from_rgex_my_always being always defined.
augments_class_from_regex_my_other_apache will be defined if the classes
server3 or server4 are defined, or if any class starting with debian is
defined.
augments_class_from_regex_my_other_always will be defined because
augments_class_from_regex_my_always is listed first and always defined.
augments_class_from_regex_when_MISSING_not_defined will be defined if the
class MISSING is not defined.
augments_class_from_single_class_as_regex will be defined because the class
cfengine is always defined.
augments_class_from_single_class_as_expression will be defined because
cfengine is defined when interpreted as a class expression.
augments_class_from_classexpression_and will be defined because the class
cfengine and the class cfengine_3 are defined and the class expression
cfengine.cfengine_3:: evaluates to true.
augments_class_from_classexpression_not will be defined because the class
expression !MISSING:: evaluates to false since the class MISSING is not
defined.
augments_class_from_classexpression_or will be defined because the class
expression cfengine|cfengine_3:: evaluates to true since at least one of
cfengine or cfengine_3 will always be defined by cfengine 3 agents.
augments_class_from_classexpression_complex will be defined because the
class expression (cfengine|cfengine_3).!MISSING:: evaluates to true since at
least one of cfengine or cfengine_3 will always be defined by cfengine 3
agents and MISSING is not defined.
myclass_defined_by_augments_in_def_json_3_18_0_v0 will be defined because
the class expression cfengine|linux:: will always be true since there is
always a cfengine class defined.
myclass_defined_by_augments_in_def_json_3_18_0_v1 will be defined because the expression cfengine.** will match at least one defined class, cfengine
You can see the list of classes thus defined through def.json in the output
of cf-promises --show-classes (see Components). They
will be tagged with the tags source=augments_file. For instance:
code
% cf-promises --show-classes=my
Class name Meta tags Comment
augments_class_from_regex_my_always source=augments_file
augments_class_from_regex_my_other_always source=augments_file
augments_class_from_regex_my_other_apache source=augments_file
myclass_defined_by_augments_in_def_json_3_18_0_v0 optional,tags,source=augments_file Optional description about why this class is important
myclass_defined_by_augments_in_def_json_3_18_0_v1 optional,tags,source=augments_file
See also:
History:
- 3.18.0
- Support for dict structure for classes and support for metadata (
comment, tags) added.
- Classes are defined as soft classes instead of hard classes.
augments
This key is supported in def.json, def_preferred.json, and augments loaded by the augments key.
A list of file names that should be merged using mergedata() semantic
Example:
Here we merge a platform specific augments on to the def.json loaded next to
the policy entry and see what the resulting variable values will
be.
The def.json next to the policy entry:
code
{
"vars":{
"my_var": "defined in def.json",
"my_other_var": "Defined ONLY in def.json"
},
"augments": [
"/var/cfengine/augments/$(sys.flavor).json"
]
}
The platform specific augments on a CentOS 6 host:
/var/cfengine/augments/centos_6.json:
code
{
"vars": {
"my_var": "Overridden in centos_6.json",
"centos_6_var": "Defined ONLY in centos_6.json"
}
}
The expected values of the variables defined in the def bundle scope:
code
R: def.my_var == Overridden in centos_6.json
R: def.my_other_var == Defined ONLY in def.json
R: def.centos_6_var == Defined ONLY in centos_6.json
History
- 3.18.0
- Introduced
variables key with support for metadata (comment, tags) and targeting the namespace and bundle.
- Introduced ability for
vars to target namespace and bundle variables key with support for metadata (comment, tags).
- Introduced metadata (
comment, tags) support for classes key.
- Introduced
def_preferred.json and --ignore-preferred-augments to disable it.
- Classes defined from augments are now soft classes and not hard classes.
- Introduced parsing of
$(sys.workdir)/data/host_specific.json
- 3.12.2, 3.14.0 introduced class expression interpretation (
:: suffix) to classes key
- 3.12.0 introduced the
augments key
- 3.7.3 back port
def.json parsing in core agent and load def.json if present next to policy entry
- 3.8.2 removed core support for
inputs key, load def.json if present next to policy entry
- 3.8.1
def.json parsing moved from policy to core agent for resolution of classes and variables to be able to affect control bodies
- 3.7.0 introduced augments concept into the Masterfiles Policy Framework
Loops
There are no explicit loops in CFEngine, instead there are lists. To make a
loop, you simply refer to a list as a scalar and CFEngine will assume a loop
over all items in the list.
It's as if you said "I know three colors: red green blue. Let's talk
about color."
code
body common control
{
bundlesequence => { "color_example" };
}
bundle agent color_example
{
vars:
"color" slist => { "red", "green", "blue" };
reports:
"Let's talk about $(color)";
}
CFEngine will implicitly loop over each $(color):
code
% cf-agent -K -f ./test_colors.cf
R: Let's talk about red
R: Let's talk about green
R: Let's talk about blue
Here's a more complex example.
code
body common control
{
bundlesequence => { "example" };
}
bundle agent example
{
vars:
"component" slist => { "cf-monitord", "cf-serverd", "cf-execd" };
"array[cf-monitord]" string => "The monitor";
"array[cf-serverd]" string => "The server";
"array[cf-execd]" string => "The executor, not executionist";
reports:
"$(component) is $(array[$(component)])";
}
In this example, the list component has three elements. The list as a whole
may be referred to as @(component), in order to pass the whole list to a
promise where a list is expected. However, if we write $(component),
i.e. the scalar variable, then CFEngine will substitute each scalar from the
list in turn, and thus iterate over the list elements using a loop.
The output looks something like this:
code
$ cf-agent unit_loops.cf
2013-06-12T18:56:01+0200 notice: R: cf-monitord is The monitor
2013-06-12T18:56:01+0200 notice: R: cf-serverd is The server
2013-06-12T18:56:01+0200 notice: R: cf-execd is The executor, not executionist
You see from this that, if we refer to a list variable using the scalar
reference operator $(), CFEngine interprets this to mean "please iterate
over all values of the list". Thus, we have effectively a foreach loop,
without the attendant syntax.
If a variable is repeated, its value is tied throughout the expression; so the
output of:
code
body common control
{
bundlesequence => { "example" };
}
bundle agent example
{
vars:
"component" slist => { "cf-monitord", "cf-serverd", "cf-execd" };
"array[cf-monitord]" string => "The monitor";
"array[cf-serverd]" string => "The server";
"array[cf-execd]" string => "The executor, not executioner";
commands:
"/bin/echo $(component) is"
args => "$(array[$(component)])";
}
is as follows:
code
2013-06-12T18:57:34+0200 notice: Q: ".../bin/echo cf-mo": cf-monitord is The monitor
2013-06-12T18:57:34+0200 notice: Q: ".../bin/echo cf-se": cf-serverd is The server
2013-06-12T18:57:34+0200 notice: Q: ".../bin/echo cf-ex": cf-execd is The executor, not executioner
Iterating Across Multiple Lists
CFEngine can iterate across multiple lists simultaneously.
code
bundle agent iteration
{
vars:
"stats" slist => { "value", "av", "dev" };
"monvars" slist => {
"rootprocs",
"otherprocs",
"diskfree",
"loadavg"
};
reports:
"mon.$(stats)_$(monvars) is $(mon.$(stats)_$(monvars))";
}
This example uses two lists, stats and monvars. We can now iterate over both lists in the same promise. The reports that we thus generate will report on value_rootprocs, av_rootprocs, and dev_rootprocs, followed next by value_otherprocs, av_otherprocs, etc, ending finally with dev_loadavg.
The order of iteration is an implementation detail and should not be expected to be consistent. Use the sort() function if you need to sort a list in a predictable way.
Pattern matching and referencing
One of the strengths of CFEngine 3 is the ability to recognize and exploit
patterns. All string patterns in CFEngine 3 are matched using PCRE regular
expressions.
CFEngine has the ability to extract back-references from pattern matches. This
makes sense in two cases. Back references are fragments of a string that match
parenthetic expressions. For instance, suppose we have the string:
code
Mary had a little lamb ...
and apply the regular expression
code
"Mary ([^l]+)little (.*)"
The pattern matches the entire string, and it contains two parenthesized
subexpressions, which respectively match the fragments had a and lamb
.... The regular expression libraries assign three matches to this result,
labelled 0, 1 and 2.
The zeroth value is the entire string matched by the total expression. The
first value is the fragment matched by the first parenthesis, and so on.
Each time CFEngine matches a string, these values are assigned to a special
variable context $(match.n). The fragments can be referred to in the remainder
of the promise. There are two places where this makes sense. One is in pattern
replacement during file editing, and the other is in searching for files.
Consider the examples below:
code
bundle agent testbundle
{
files:
# This might be a dangerous pattern - see explanation in the next section
# on "Runaway change warning"
"/home/mark/tmp/cf([23])?_(.*)"
edit_line => myedit("second backref: $(match.2)");
}
There are other filenames that could match this pattern, but if, for example,
there were to exist a file /home/mark/tmp/cf3_test, then we would have:
code
'$(match.0)'
equal to `/home/mark/tmp/cf3_test'
'$(match.1)'
equal to `3`
'$(match.2)'
equal to `test`
Note that because the pattern allows for an optional '2' or '3' to follow the
letters cf, it is possible that $(match.1) would contain the empty string.
For example, if there was a file named /home/mark/tmp/cf_widgets, then we
would have
code
'$(match.0)'
equal to `/home/mark/tmp/cf_widgets'
'$(match.1)'
equal to `'
'$(match.2)'
equal to `widgets`
Now look at the edit bundle. This takes a parameter (which is the
back-reference from the filename match), but it also uses back references to
replace shell comment lines with C comment lines (the same approach is used to
hash-comment lines in files). The back-reference variables $(match.n) refer
to the most recent pattern match, and so in the C_comment body, they do not
refer to the filename components, but instead to the hash-commented line in
the replace_patterns promise.
code
bundle edit_line myedit(parameter)
{
vars:
"edit_variable" string => "private edit variable is $(parameter)";
insert_lines:
"$(edit_variable)";
replace_patterns:
# replace shell comments with C comments
"#(.*)"
replace_with => C_comment,
select_region => MySection("New section");
}
########################################
# Bodies
########################################
body replace_with C_comment
{
replace_value => "/* $(match.1) */"; # backreference from replace_patterns
occurrences => "all"; # first, last, or all
}
########################################################
body select_region MySection(x)
{
select_start => "\[$(x)\]";
select_end => "\[.*\]";
}
Try this example on the file
code
[First section]
one
two
three
[New section]
four
#five
six
[final]
seven
eleven
The resulting file is edited like this:
code
[First section]
one
two
three
[New section]
four
/* five */
six
[final]
seven
eleven
private edit variable is second backref: test
Runaway change warning
Be careful when using patterns to search for files that are altered by
CFEngine if you are not using a file repository. Each time CFEngine makes a
change it saves an old file into a copy like cf3_test.cf-before-edit. These
new files then get matched by the same expression above - because it ends in
the generic.*), or does not specify a tail for the expression. Thus CFEngine
will happily edit backups of the edit file too, and generate a recursive
process, resulting in something like the following:
code
cf3_test cf3_test.cf-before-edit
cf3_test~ cf3_test~.cf-before-edit.cf-before-edit
cf3_test~.cf-before-edit cf3_test~.cf-before-edit.cf-before-edit.cf-before-edit
Always try to be as specific as possible when specifying patterns. A lazy
approach will often come back to haunt you.
The following example shows how you would hash-comment lines in a file using
CFEngine.
code
######################################################################
#
# HashCommentLines implemented in CFEngine 3
#
######################################################################
body common control
{
version => "1.2.3";
bundlesequence => { "testbundle" };
}
########################################################
bundle agent testbundle
{
files:
"/home/mark/tmp/comment_test"
create => "true",
edit_line => comment_lines_matching;
}
########################################################
bundle edit_line comment_lines_matching
{
vars:
"regexes" slist => { "one.*", "two.*", "four.*" };
replace_patterns:
"^($(regexes))$"
replace_with => comment("# ");
}
########################################
# Bodies
########################################
body replace_with comment(c)
{
replace_value => "$(c) $(match.1)";
occurrences => "all";
}
Regular expressions in paths
When applying regular expressions in paths, the path will first be split at
the path separators, and each element matched independently. For example, this
makes it possible to write expressions like /home/.*/file to match a single
file inside a lot of directories - the .* does not eat the whole string.
Note that whenever regular expressions are used in paths, the / is always
used as the path separator, even on Windows. However, on Windows, if the
pathname is interpreted literally (no regular expressions), then the backslash
is also recognized as the path separator. This is because the backslash has a
special (and potentially ambiguous) meaning in regular expressions (a \d
means the same as [0-9], but on Windows it could also be a path separator
and a directory named d).
The pathtype attribute allows you to force a specific behavior when
interpreting pathnames. By default, CFEngine looks at your pathname and makes
an educated guess as to whether your pathname contains a regular expression.
The values literal and regex explicitly force CFEngine to interpret the
pathname either one way or another. (see the pathtype attribute).
code
body common control
{
bundlesequence => { "wintest" };
}
########################################
bundle agent wintest
{
files:
"c:/tmp/file/f.*" # "best guess" interpretation
delete => nodir;
"c:\tmp\file"
delete => nodir,
pathtype => "literal"; # force literal string interpretation
"C:/windows/tmp/f\d"
delete => nodir,
pathtype => "regex"; # force regular expression interpretation
}
########################################
body delete nodir
{
rmdirs => "false";
}
Note that the path /tmp/gar.* will only match filenames like /tmp/gar,
/tmp/garbage and /tmp/garden. It will not match filename like
/tmp/gar/baz (because even though the .* in a regular expression means
"zero or more of any character", CFEngine restricts that to mean "zero or more
of any character in a path component"). Correspondingly, CFEngine also
restricts where you can use the / character (you can't use it in a character
class like [^/] or in a parenthesized or repeated regular expression
component.
This means that regular expressions which include "optional directory
components" won't work. You can't have a files promise to tidy the directory
(/usr)?/tmp. Instead, you need to be more verbose and specify
/usr/tmp|/tmp, or even better, think declaratively and create an slist
that contains both the strings /tmp and /usr/tmp, and then allow CFEngine
to iterate over the list!
This also means that the path /tmp/.*/something will match files like
/tmp/abc/something or /tmp/xyzzy/something. However, even though the
pattern .* means "zero or more of any character (except /)", CFEngine
matches files bounded by directory separators. So even though the pathname
/tmp//something is technically the same as the pathname /tmp/something,
the regular expression /tmp/.*/something will not match on the degenerate
case of /tmp//something (or /tmp/something).
Anchored vs. unanchored regular expressions
CFEngine uses the full power of regular expressions, but there are two
"flavors" of regex. Because they behave somewhat differently (while still
utilizing the same syntax), it is important to know which one is used for a
particular component of CFEngine:
An "anchored" regular expression will only successfully match an entire
string, from start to end. An anchored regular expression behaves as if it
starts with ^ and ends with $, whether you specify them yourself or not.
Furthermore, an anchored regular expression cannot have these automatic
anchors removed.
An "unanchored" regular expression may successfully match anywhere in a
string. An unanchored regex may use anchors (such as ^, $, \A, \Z,
\b, etc.) to restrict where in the string it may match. That is, an
unanchored regular expression may be easily converted into a partially- or
fully-anchored regex.
For example, the comment parameter in readstringarray()
is an unanchored regex. If you specify the regular expression as #.*, then
on any line which contains a pound sign, everything from there until the end
of the line will be removed as a comment. However, if you specify the regular
expression as ^#.* (note the ^ anchor at the start of the regex), then
only lines which start with a # will be removed as a comment! If you want to
ignore C-style comment in a multi-line string, then you have to a bit more
clever, and use this regex: (?s)/\*.*?\*/
Conversely, delete_lines promises use anchored regular expressions to delete
lines. If our promise uses bob:\d* as a line-matching regex, then only the
second line of this file will be deleted (because only the second line starts
with bob: and is then followed exclusively by digits, all the way to the end
of the string).
code
bobs:your:uncle
bob:111770
thingamabob:1234
robert:bob:xyz
i:am:not:bob
If CFEngine expects an unanchored regular expression, then finding every line
that contains the letters bob is easy. You just use the regex bob. But if
CFEngine expects an anchored regular expression, then you must use .*bob.*.
If you want to find every line that has a field which is exactly bob with no
characters before or after, then it is only a little more complicated if
CFEngine expects an unanchored regex: (^|:)bob(:|$). But if CFEngine expects
an anchored regular expression, then it starts getting ugly, and you'd need to
use bob:.*|.*:bob:.*|.*:bob.
Special topics on Regular Expressions
Regular expressions are a complicated subject, and really are beyond the scope
of this document. However, it is worth mentioning a couple of special topics
that you might want to know of when using regular expressions.
The first is how to not get a back reference. If you want to have a
parenthesized expression that does not generate a back reference, there is a
special PCRE syntax to use. Instead of using () to bracket the piece of a
regular expression, use (?:) instead. For example, this will match the
filenames foolish, foolishly, bearish, bearishly, garish, and garishly in the
/tmp directory. The variable $match.0 will contain the full filename, and
$match.1 will either contain the string ly or the empty string. But the
(?:expression) which matches foo, bear, or gar does not create a
back-reference:
code
files:
"/tmp/(?:foo|bear|gar)ish(ly)?"
Note that sometimes multi-line strings are subject to be matched by regular
expressions. CFEngine internally matches all regular expressions using
PCRE_DOTALL option, so . matches newlines. If you want to match any
character except newline you could use \N escape sequence.
Another thing you might want to do is ignore capitalization. CFEngine is
case-sensitive (in all things), so the files promise /tmp/foolish will not
match the files /tmp/Foolish or /tmp/fOoLish, etc. There are two ways to
achieve case-insensitivity. The first is to use character classes:
code
files:
"/tmp/[Ff][Oo][Oo][Ll][Ii][Ss][Hh]"
While this is certainly correct, it can also lead to unreadability. The PCRE
patterns in CFEngine have another way of introducing case-insensitivity into a
pattern:
code
files:
"/tmp/(?i:foolish)"
The (?i:) brackets impose case-insensitive matching on the text that it
surrounds, without creating a sub-expression. You could also write the regular
expression like this (but be aware that the two expressions are different, and
work slightly differently, so check the documentation for the specifics):
code
files:
"/tmp/(?i)foolish"
The /s, /m, and /x switches from PCRE are also available, but use them
with great care!
Namespaces
By default all promises are made in the default namespace. Specifying a namespace
places the bundle or body in a different namespace to allow re-use of common
names. Using namespaces makes it easier to share and consume policy from other
authors.
Like bundle names and classes, namespaces may only contain alphanumeric and
underscore characters (a-zA-Z0-9_).
Declaration
Namespaces are declared with body file control. A
namespace applies within a single file to all subsequently defined bodies and bundles
following the namespace declaration until a different namespace has been
declared or until the end of the file.
code
bundle agent __main__
{
methods:
"Main in my_namespace namespace"
usebundle => my_namespace:main;
"Main in your_namespace namespace"
usebundle => your_namespace:main;
"my_bundle in default namespace"
usebundle => my_bundle;
reports:
"Inside $(this.namespace):$(this.bundle)";
}
body file control
{
namespace => "my_namespace";
}
bundle agent main
{
reports:
"Inside $(this.namespace):$(this.bundle)";
}
body file control
{
namespace => "your_namespace";
}
bundle agent main
{
reports:
"Inside $(this.namespace):$(this.bundle)";
}
body file control
{
namespace => "default";
}
bundle agent my_bundle
{
reports:
"Inside $(this.namespace):$(this.bundle)";
}
code
R: Inside my_namespace:main
R: Inside your_namespace:main
R: Inside default:my_bundle
R: Inside default:main
This policy can be found in
/var/cfengine/share/doc/examples/namespace_declaration.cf
and downloaded directly from
github.
Notes:
- Multiple namespaces can be declared within the same file
- The same namespace can be declared in multiple files
- The same namespace can be declared in the same file multiple times
Methods|usebundle
Methods promises assume you are referring to a bundle in the same namespace as
the promiser. To refer to a bundle in another namespace you must specify the
namespace by prefixing the bundle name with the namespace followed by a colon
(:).
code
bundle agent __main__
{
methods:
# Call the bundle named main within the example_space namespace.
"example_space:main";
}
body file control
{
namespace => "example_space";
}
bundle agent main
{
methods:
# Call the bundle 'my_bundle' within the current namespace
"When not specified, we assume you are refering to a bundle or body within the same namespace"
usebundle => my_bundle( "Called 'my_bundle' from $(this.namespace):$(this.bundle) (the same namespace).");
# Call the bundle 'my_bundle' from the 'example_space' namespace
"When explicitly specified, the policy reader has less congnitive burden"
usebundle => example_space:my_bundle( "Called 'example_space:my_bundle' $(this.namespace):$(this.bundle) (the same namespace).");
}
bundle agent my_bundle(string)
{
reports:
"In $(this.namespace):$(this.bundle)"
handle => "$(string)";
"$(string)";
}
code
R: In example_space:my_bundle
R: Called 'my_bundle' from example_space:main (the same namespace).
R: In example_space:my_bundle
R: Called 'example_space:my_bundle' example_space:main (the same namespace).
This policy can be found in
/var/cfengine/share/doc/examples/namespace_methods-usebundle.cf
and downloaded directly from
github.
Bodies
Bodies are assumed to be within the same namespace as the promiser. To use a body from another namespace the namespace must be specified by prefixing the body name with the namespace followed by a colon (:).
A common mistake is forgetting to specify default: when using bodies from the standard library which resides in the default namespace.
code
bundle agent __main__
{
methods:
"example_space:main";
}
body file control
{
namespace => "example_space";
}
bundle agent main
{
reports:
# Use the 'first_line' printfile body from the current namespace
"Specifying a body without explict namespace assumes the same namespace.$(const.n)Show me the first 1 line of this file"
printfile => first_line( $(this.promise_filename) );
# Use the 'first_two_lines' printfile body from the 'default' namespace
"Forgetting to prefix bodies with 'default:' is a common mistake when using the standard library.$(const.n)Show me the first 2 line of this file"
printfile => default:first_two_lines( $(this.promise_filename) );
}
body printfile first_line(file)
{
file_to_print => "$(file)";
number_of_lines => "1";
}
body file control
{
namespace => "default";
}
body printfile first_two_lines(file)
{
file_to_print => "$(file)";
number_of_lines => "2";
}
code
R: Specifying a body without explict namespace assumes the same namespace.
Show me the first 1 line of this file
R: bundle agent __main__
R: Forgetting to prefix bodies with 'default:' is a common mistake when using the standard library.
Show me the first 2 line of this file
R: bundle agent __main__
R: {
This policy can be found in
/var/cfengine/share/doc/examples/namespace_bodies.cf
and downloaded directly from
github.
Variables
Variables (except for Special variables) are assumed to be within the same scope
as the promiser but can also be referenced fully qualified with the namespace.
code
bundle agent __main__
{
methods: "example:demo";
}
body file control
{
namespace => "example";
}
bundle agent demo
{
vars:
"color" string => "#f5821f";
reports:
"Unqualified: The color is $(color)";
# ENT-8817 "Bundle-qualified: The color is $(demo.color)";
"Fully-qualified: The color is $(example:demo.color)";
}
code
R: Unqualified: The color is #f5821f
R: Fully-qualified: The color is #f5821f
This policy can be found in
/var/cfengine/share/doc/examples/namespace_variable_references.cf
and downloaded directly from
github.
Special variables are always accessible without a namespace
prefix. For example, this, mon, sys, and const fall in this category.
code
bundle agent __main__
{
methods: "special_variables_example:demo";
}
body file control
{
namespace => "special_variables_example";
}
bundle agent demo
{
reports:
"Special Variables live in the default namespace but don't have to be fully qualified when referenced ...";
"In $(this.namespace):$(this.bundle) $(const.dollar)(sys.cf_version_major) == $(sys.cf_version_major)";
"In $(this.namespace):$(this.bundle) $(default:const.dollar)(default:sys.cf_version_major) == $(default:sys.cf_version_major)";
}
code
R: Special Variables live in the default namespace but don't have to be fully qualified when referenced ...
R: In special_variables_example:demo $(sys.cf_version_major) == 3
R: In special_variables_example:demo $(default:sys.cf_version_major) == 3
This policy can be found in
/var/cfengine/share/doc/examples/namespace_special_var_exception.cf
and downloaded directly from
github.
Notes:
- The
variables Augments key defines variables in the
main bundle of the data namespace by default but supports seeding variable
values in any specified namespace.
Classes
Promises can only define classes within the current namespace. Classes are
understood to refer to classes in the current namespace if a namespace is not
specified (except for Hard classes). To refer to a
class in a different namespace prefix the class with the namespace suffixed by a
colon (:).
code
bundle agent __main__
{
methods:
"mynamespace:my_bundle";
reports:
a_bundle_scoped_class_in_my_namespaced_bundle::
"In $(this.namespace):$(this.bundle) I see 'a_bundle_scoped_class_in_my_namespaced_bundle::'";
!a_bundle_scoped_class_in_my_namespaced_bundle::
"In $(this.namespace):$(this.bundle) I do not see 'a_bundle_scoped_class_in_my_namespaced_bundle::'";
a_namespace_scoped_class_in_my_namespaced_bundle::
"In $(this.namespace):$(this.bundle) I see 'a_namespace_scoped_class_in_my_namespaced_bundle::'";
!a_namespace_scoped_class_in_my_namespaced_bundle::
"In $(this.namespace):$(this.bundle) I do not see 'a_namespace_scoped_class_in_my_namespaced_bundle::'";
mynamespace:a_bundle_scoped_class_in_my_namespaced_bundle::
"In $(this.namespace):$(this.bundle) I see 'mynamespace:a_bundle_scoped_class_in_my_namespaced_bundle::'";
!mynamespace:a_bundle_scoped_class_in_my_namespaced_bundle::
"In $(this.namespace):$(this.bundle) I do not see 'mynamespace:a_bundle_scoped_class_in_my_namespaced_bundle::'";
mynamespace:a_namespace_scoped_class_in_my_namespaced_bundle::
"In $(this.namespace):$(this.bundle) I see 'mynamespace:a_namespace_scoped_class_in_my_namespaced_bundle::'";
}
body file control
{
namespace => "mynamespace";
}
bundle agent my_bundle
{
classes:
"a_bundle_scoped_class_in_my_namespaced_bundle";
"a_namespace_scoped_class_in_my_namespaced_bundle"
scope => "namespace";
reports:
a_bundle_scoped_class_in_my_namespaced_bundle::
"In $(this.namespace):$(this.bundle) I see 'a_bundle_scoped_class_in_my_namespaced_bundle::'";
!a_bundle_scoped_class_in_my_namespaced_bundle::
"In $(this.namespace):$(this.bundle) I do not see 'a_bundle_scoped_class_in_my_namespaced_bundle::'";
a_namespace_scoped_class_in_my_namespaced_bundle::
"In $(this.namespace):$(this.bundle) I see 'a_namespace_scoped_class_in_my_namespaced_bundle::'";
!a_namespace_scoped_class_in_my_namespaced_bundle::
"In $(this.namespace):$(this.bundle) I do not see 'a_namespace_scoped_class_in_my_namespaced_bundle::'";
mynamespace:a_bundle_scoped_class_in_my_namespaced_bundle::
"In $(this.namespace):$(this.bundle) I see 'mynamespace:a_bundle_scoped_class_in_my_namespaced_bundle::'";
!mynamespace:a_bundle_scoped_class_in_my_namespaced_bundle::
"In $(this.namespace):$(this.bundle) I do not see 'mynamespace:a_bundle_scoped_class_in_my_namespaced_bundle::'";
mynamespace:a_namespace_scoped_class_in_my_namespaced_bundle::
"In $(this.namespace):$(this.bundle) I see 'mynamespace:a_namespace_scoped_class_in_my_namespaced_bundle::'";
}
code
R: In mynamespace:my_bundle I see 'a_bundle_scoped_class_in_my_namespaced_bundle::'
R: In mynamespace:my_bundle I see 'a_namespace_scoped_class_in_my_namespaced_bundle::'
R: In mynamespace:my_bundle I see 'mynamespace:a_bundle_scoped_class_in_my_namespaced_bundle::'
R: In mynamespace:my_bundle I see 'mynamespace:a_namespace_scoped_class_in_my_namespaced_bundle::'
R: In default:main I do not see 'a_bundle_scoped_class_in_my_namespaced_bundle::'
R: In default:main I do not see 'a_namespace_scoped_class_in_my_namespaced_bundle::'
R: In default:main I do not see 'mynamespace:a_bundle_scoped_class_in_my_namespaced_bundle::'
R: In default:main I see 'mynamespace:a_namespace_scoped_class_in_my_namespaced_bundle::'
This policy can be found in
/var/cfengine/share/doc/examples/namespace_classes.cf
and downloaded directly from
github.
Hard classes exist in all namespaces and
thus can be referred to from any namespace without qualification.
code
bundle agent __main__
{
methods:
"example:my_bundle";
reports:
cfengine::
"From the '$(this.namespace)' namespace the class expression 'cfengine::' evaluates true";
default:cfengine::
"From the '$(this.namespace)' namespace the class expression 'default:cfengine::' evaluates true";
"The class 'cfengine' has tags: $(with)"
with => join( ", ", getclassmetatags( "cfengine" ) );
}
body file control
{
namespace => "example";
}
bundle agent my_bundle
{
reports:
cfengine::
"From the '$(this.namespace)' namespace the class expression 'cfengine::' evaluates true";
default:cfengine::
"From the '$(this.namespace)' namespace the class expression 'default:cfengine::' evaluates true";
}
code
R: From the 'example' namespace the class expression 'cfengine::' evaluates true
R: From the 'example' namespace the class expression 'default:cfengine::' evaluates true
R: From the 'default' namespace the class expression 'cfengine::' evaluates true
R: From the 'default' namespace the class expression 'default:cfengine::' evaluates true
R: The class 'cfengine' has tags: inventory, attribute_name=none, source=agent, hardclass
This policy can be found in
/var/cfengine/share/doc/examples/namespace_hard_classes.cf
and downloaded directly from
github.
Special variables
Variables are promises that can be defined in any promise bundle. Users can create their
own variables.
To see variables defined on a particular host during pre-evaluation run
cf-promises --show-vars as a privileged user. To see all variables defined
over the course of an agent execution run cf-agent --show-evaluated-vars. Note
cf-promises shows variables resolved during pre-evaluation while cf-agent can
show variables resolved during actual execution where the system may be
modified.
See Classes for an explanation of the tags.
CFEngine includes the following special variables:
connection
Variables defined for embedding unprintable values or values with special meanings
in strings.
const
Variables defined for embedding unprintable values or values with special meanings
in strings.
edit
Variables used to access information about editing promises during their execution.
match
Variable used in string matching.
mon
Variables defined in a monitoring context.
sys
Variables defined in order to automate discovery of system values.
def
Variables with some default value that can be defined by augments file or in policy.
this
Variables used to access information about promises during their execution.
connection
The context connection is used by the shortcut attribute in access
promises to access information about the remote agent requesting access.
code
access:
"/var/cfengine/cmdb/$(connection.key).json"
shortcut => "me.json",
admit_keys => { "$(connection.key)" };
Note: The usage of the connection variables is strictly limited to
literal strings within the promiser and admit/deny lists of access promise
types; they cannot be passed into functions or stored in other variables. These
variables can only be used with incoming connections that use
protocol_version >=2 ( or "latest" ).
connection.key
This variable contains the public key sha of the connecting client in the form 'SHA=...'.
code
access:
"/var/cfengine/cmdb/$(connection.key).json"
shortcut => "me.json",
admit_keys => { "$(connection.key)" };
connection.ip
This variable contains the IP address of the connecting remote agent.
code
access:
"/var/cfengine/cmdb/$(connection.ip).json"
shortcut => "myip.json",
admit_keys => { "$(connection.key)" };
connection.hostname
This variable contains the hostname of the connecting client as determined by a
reverse DNS lookup from cf-serverd.
code
access:
"/var/cfengine/cmdb/$(connection.hostname).json"
shortcut => "myhostname.json",
admit_keys => { "$(connection.key)" };
Note: Reverse lookups are only performed when necessary. To avoid the
performance impact of reverse dns lookups for each connection avoid using
admit_hostnames, using hostnames in your admit rules, and these
connection variables.
const
CFEngine defines a number of variables for embedding unprintable values
or values with special meanings in strings.
code
bundle agent __main__
{
vars:
"example_file"
string => "/tmp/const-vars.txt";
files:
"$(example_file)"
create => "true",
content => concat("CFEngine const vars$(const.n)",
"before const.at $(const.at) after const.at$(const.n)",
"before const.dollar $(const.dollar) after const.dollar$(const.n)",
"before const.dirsep $(const.dirsep) after const.dirsep$(const.n)",
"before const.linesep $(const.linesep) after const.linesep$(const.n)",
"before const.endl$(const.endl) after const.endl$(const.n)",
"before const.n$(const.n) after const.n$(const.n)",
"before const.r $(const.r) after const.r$(const.n)",
"before const.t $(const.t) after const.t$(const.n)");
reports:
"const vars available: $(with)"
with => storejson( variablesmatching_as_data( "default:const\..*" ) );
"$(example_file):"
printfile => cat( "$(example_file)" );
}
body printfile cat(file)
{
file_to_print => "$(file)";
number_of_lines => "inf";
}
code
R: const vars available: {
"default:const.at": "@",
"default:const.dirsep": "/",
"default:const.dollar": "$",
"default:const.endl": "\n",
"default:const.linesep": "\n",
"default:const.n": "\n",
"default:const.r": "\r",
"default:const.t": "\t"
}
R: /tmp/const-vars.txt:
R: CFEngine const vars
R: before const.at @ after const.at
R: before const.dollar $ after const.dollar
R: before const.dirsep / after const.dirsep
R: before const.linesep
R: after const.linesep
R: before const.endl
R: after const.endl
R: before const.n
R: after const.n
R: before const.r
```cf3
after const.r
R: before const.t after const.t
```
This policy can be found in
/var/cfengine/share/doc/examples/const.cf
and downloaded directly from
github.
const.at
code
reports:
"The value of $(const.at) is @";
History:
- Added in CFEngine 3.19.0, 3.18.1
const.dollar
code
reports:
# This will report: The value of $(const.dollar) is $
"The value of $(const.dollar)(const.dollar) is $(const.dollar)";
# This will report: But the value of $(dollar) is $(dollar)
"But the value of $(dollar) is $(dollar)";
const.dirsep
code
reports:
# On Unix hosts this will report: The value of $(const.dirsep) is /
# On Windows hosts this will report: The value of $(const.dirsep) is \\
"The value of $(const.dollar)(const.dirsep) is $(const.dirsep)";
const.linesep
code
reports:
# On Unix hosts this will report: The value of $(const.linesep) is \n
# On Windows hosts this will report: The value of $(const.linesep) is \r\n
"The value of $(const.dollar)(const.linesep) is $(const.linesep)";
History: Introduced in CFEngine 3.23.0
const.endl
code
reports:
"A newline with either $(const.n) or with $(const.endl) is ok";
"But a string with \n in it does not have a newline!";
Note: The variable const.endl is an alias for const.n and nothing more.
It is commonly mistaken to be a platform agnostic line separator. But this has
never been the case. However, since CFEngine 3.23 we introduced const.linesep
which is exactly that.
const.n
code
reports:
"A newline with either $(const.n) or with $(const.endl) is ok";
"But a string with \n in it does not have a newline!";
const.r
code
reports:
"A carriage return character is $(const.r)";
const.t
code
reports:
"A report with a$(const.t)tab in it";
def
The context def is populated by the
Masterfiles Policy Framework and can also be populated
by the augments file.
Note: Variables defined from policy in a bundle named def will
override the variables defined by the augments file unless the policy
explicitly guards against it.
For example mailto is only defined from policy if it is not yet defined by the
augments file.:
code
bundle common def
{
vars:
# ...
"mailto"
string => "root@$(def.domain)",
if => not(isvariable("mailto"));
# ...
}
def.jq
This variable gives a convenient way to invoke
jq for the mapdata() function in json_pipe
mode and elsewhere. Note the below is the default value defined in the C
code that you can override in the vars section of the
augments file or in policy as described above.
code
# def.jq = jq --compact-output --monochrome-output --ascii-output --unbuffered --sort-keys
edit
This context is used to access information about editing promises during
their execution. It is context dependent and not universally meaningful or
available.
edit.filename
This variable points to the filename of the file currently making an
edit promise. If the file has been arrived at through a search, this
could be different from the files promiser.
code
bundle agent __main__
{
files:
"/tmp/example-edit.filename.txt" content => "Hello World!";
"/tmp/example-edit.filename.txt"
edit_line => show_edit_filename;
}
bundle edit_line show_edit_filename
{
reports:
"$(with)"
with => concat( "I found the string 'World' in the file being ",
"edited ('$(edit.filename)')"),
if => strcmp( "false", "$(edit.empty_before_use)"); # It's probably
# useless to probe
# the content of the
# file if you are
# ignoring
# pre-existing
# content.
"$(with)"
with => concat( "It's probably not very useful to inspect content",
"that is being thrown away." ),
if => strcmp( "true", "$(edit.empty_before_use)");
"$(with)"
with => concat ( "This version of CFEngine does not know if the",
"edit operation is expected to ignore pre-existing ",
"content the variable 'edit.empty_before_use' does ",
"not exist"),
unless => isvariable ( "edit.empty_before_use" );
}
body edit_defaults my_empty_file_before_editing
{
empty_file_before_editing => "true"; # The variable
# edit.empty_before_use allows this
# to be known from within an
# edit_line bundle.
}
code
R: I found the string 'World' in the file being edited ('/tmp/example-edit.filename.txt')
This policy can be found in
/var/cfengine/share/doc/examples/edit.filename.cf
and downloaded directly from
github.
edit.empty_before_use
This variable holds the value of empty_file_before_editing from
edit_defaults bodies. It's useful for altering behavior within an edit_line
bundle depending if the files prior content will or won't have any effect.
code
bundle agent __main__
{
files:
"/tmp/example-edit.empty_before_use.one" create => "true";
"/tmp/example-edit.empty_before_use.two" create => "true";
"/tmp/example-edit.empty_before_use.one"
edit_line => show_edit_empty_before_use,
edit_defaults => my_empty_file_before_editing;
"/tmp/example-edit.empty_before_use.two"
edit_line => show_edit_empty_before_use;
}
bundle edit_line show_edit_empty_before_use
{
reports:
"$(with)"
with => concat( "The promise to edit '$(edit.filename)' was ",
"instructed to ignore any pre-existing content." ),
if => strcmp( "true", "$(edit.empty_before_use)");
"$(with)"
with => concat( "The promise to edit '$(edit.filename)' was ",
"not instructed to ignore any pre-existing content."),
if => strcmp( "false", "$(edit.empty_before_use)");
"$(with)"
with => concat ( "This version of CFEngine does not know if the",
"edit operation is expected to ignore pre-existing ",
"content the variable 'edit.empty_before_use' does ",
"not exist"),
unless => isvariable ( "edit.empty_before_use" );
}
body edit_defaults my_empty_file_before_editing
{
empty_file_before_editing => "true"; # The variable
# edit.empty_before_use allows this
# to be known from within an
# edit_line bundle.
}
code
R: The promise to edit '/tmp/example-edit.empty_before_use.one' was instructed to ignore any pre-existing content.
R: The promise to edit '/tmp/example-edit.empty_before_use.two' was not instructed to ignore any pre-existing content.
This policy can be found in
/var/cfengine/share/doc/examples/edit.empty_before_use.cf
and downloaded directly from
github.
See also:
History:
match
Each time CFEngine matches a string, these values are assigned to a special
variable context $(match.*n*). The fragments can be referred to in the
remainder of the promise. There are two places where this makes sense. One is
in pattern replacement during file editing, and the other is in searching for
files.
code
bundle agent testbundle
{
files:
"/home/mark/tmp/(cf[23])_(.*)"
create => "true",
edit_line => myedit("second $(match.2)");
# but more specifically...
"/home/mark/tmp/cf3_(test)"
create => "true",
edit_line => myedit("second $(match.1)");
}
match.0
A string matching the complete regular expression whether or not
back-references were used in the pattern.
mon
The variables discovered by cf-monitord are placed in this monitoring
context. Monitoring variables are expected to be changing rapidly - values are
typically updated or added every 2.5 minutes.
In CFEngine Enterprise, custom defined monitoring targets also become
variables in this context, named by the handle of the promise that defined
them.
mon.listening_ports
All of the TCP and UDP ports for both IPV4 and IPv6 that cf-monitord has
observed listening.
mon.listening_udp4_ports
Port numbers that were observed to be set up to receive connections on the
host concerned.
mon.listening_tcp4_ports
Port numbers that were observed to be set up to receive connections on the
host concerned.
mon.listening_udp6_ports
Port numbers that were observed to be set up to receive connections on the
host concerned.
mon.listening_tcp6_ports
port numbers that were observed
to be set up to receive connections on the host concerned.
mon.value_users
Users with active processes, including system users.
mon.av_users
Observational measure collected every 2.5 minutes from cf-monitord.
Description: Users with active processes, including system users.
mon.dev_users
Users with active processes, including system users.
mon.value_rootprocs
Sum privileged system processes.
mon.av_rootprocs
Sum privileged system processes.
mon.dev_rootprocs
Sum privileged system processes.
mon.value_otherprocs
Sum non-privileged process.
mon.av_otherprocs
Sum non-privileged process.
mon.dev_otherprocs
Sum non-privileged process.
mon.value_diskfree
Last checked percentage Free disk on / partition.
mon.av_diskfree
Average percentage Free disk on / partition.
mon.dev_diskfree
Standard deviation of percentage Free disk on / partition.
mon.value_loadavg
Kernel load average utilization (sum over cores).
mon.av_loadavg
Kernel load average utilization (sum over cores).
mon.dev_loadavg
Kernel load average utilization (sum over cores).
mon.value_netbiosns_in
netbios name lookups (in).
mon.av_netbiosns_in
netbios name lookups (in).
mon.dev_netbiosns_in
netbios name lookups (in).
mon.value_netbiosns_out
netbios name lookups (out).
mon.av_netbiosns_out
netbios name lookups (out).
mon.dev_netbiosns_out
netbios name lookups (out).
mon.value_netbiosdgm_in
netbios name datagrams (in).
mon.av_netbiosdgm_in
netbios name datagrams (in).
mon.dev_netbiosdgm_in
netbios name datagrams (in).
mon.value_netbiosdgm_out
netbios name datagrams (out).
mon.av_netbiosdgm_out
netbios name datagrams (out).
mon.dev_netbiosdgm_out
netbios name datagrams (out).
mon.value_netbiosssn_in
Samba/netbios name sessions (in).
mon.av_netbiosssn_in
Samba/netbios name sessions (in).
mon.dev_netbiosssn_in
Samba/netbios name sessions (in).
mon.value_netbiosssn_out
Samba/netbios name sessions (out).
mon.av_netbiosssn_out
Samba/netbios name sessions (out).
mon.dev_netbiosssn_out
Samba/netbios name sessions (out).
mon.value_imap_in
imap mail client sessions (in).
mon.av_imap_in
imap mail client sessions (in).
mon.dev_imap_in
imap mail client sessions (in).
mon.value_imap_out
imap mail client sessions (out).
mon.av_imap_out
imap mail client sessions (out).
mon.dev_imap_out
imap mail client sessions (out).
mon.value_cfengine_in
cfengine connections (in).
mon.av_cfengine_in
cfengine connections (in).
mon.dev_cfengine_in
cfengine connections (in).
mon.value_cfengine_out
cfengine connections (out).
mon.av_cfengine_out
cfengine connections (out).
mon.dev_cfengine_out
cfengine connections (out).
mon.value_nfsd_in
nfs connections (in).
mon.av_nfsd_in
nfs connections (in).
mon.dev_nfsd_in
nfs connections (in).
mon.value_nfsd_out
nfs connections (out).
mon.av_nfsd_out
nfs connections (out).
mon.dev_nfsd_out
nfs connections (out).
mon.value_smtp_in
smtp connections (in).
mon.av_smtp_in
smtp connections (in).
mon.dev_smtp_in
smtp connections (in).
mon.value_smtp_out
smtp connections (out).
mon.av_smtp_out
smtp connections (out).
mon.dev_smtp_out
smtp connections (out).
mon.value_www_in
www connections (in).
mon.av_www_in
www connections (in).
mon.dev_www_in
www connections (in).
mon.value_www_out
www connections (out).
mon.av_www_out
www connections (out).
mon.dev_www_out
www connections (out).
mon.value_ftp_in
ftp connections (in).
mon.av_ftp_in
ftp connections (in).
mon.dev_ftp_in
ftp connections (in).
mon.value_ftp_out
ftp connections (out).
mon.av_ftp_out
ftp connections (out).
mon.dev_ftp_out
ftp connections (out).
mon.value_ssh_in
ssh connections (in).
mon.av_ssh_in
ssh connections (in).
mon.dev_ssh_in
ssh connections (in).
mon.value_ssh_out
ssh connections (out).
mon.av_ssh_out
ssh connections (out).
mon.dev_ssh_out
ssh connections (out).
mon.value_wwws_in
wwws connections (in).
mon.av_wwws_in
wwws connections (in).
mon.dev_wwws_in
wwws connections (in).
mon.value_wwws_out
wwws connections (out).
mon.av_wwws_out
wwws connections (out).
mon.dev_wwws_out
wwws connections (out).
mon.value_icmp_in
ICMP packets (in).
mon.av_icmp_in
ICMP packets (in).
mon.dev_icmp_in
ICMP packets (in).
mon.value_icmp_out
ICMP packets (out).
mon.av_icmp_out
ICMP packets (out).
mon.dev_icmp_out
ICMP packets (out).
mon.value_udp_in
UDP dgrams (in).
mon.av_udp_in
UDP dgrams (in).
mon.dev_udp_in
UDP dgrams (in).
mon.value_udp_out
UDP dgrams (out).
mon.av_udp_out
UDP dgrams (out).
mon.dev_udp_out
UDP dgrams (out).
mon.value_dns_in
DNS requests (in).
mon.av_dns_in
DNS requests (in).
mon.dev_dns_in
DNS requests (in).
mon.value_dns_out
DNS requests (out).
mon.av_dns_out
DNS requests (out).
mon.dev_dns_out
DNS requests (out).
mon.value_tcpsyn_in
TCP sessions (in).
mon.av_tcpsyn_in
TCP sessions (in).
mon.dev_tcpsyn_in
TCP sessions (in).
mon.value_tcpsyn_out
TCP sessions (out).
mon.av_tcpsyn_out
TCP sessions (out).
mon.dev_tcpsyn_out
TCP sessions (out).
mon.value_tcpack_in
TCP acks (in).
mon.av_tcpack_in
TCP acks (in).
mon.dev_tcpack_in
TCP acks (in).
mon.value_tcpack_out
TCP acks (out).
mon.av_tcpack_out
TCP acks (out).
mon.dev_tcpack_out
TCP acks (out).
mon.value_tcpfin_in
TCP finish (in).
mon.av_tcpfin_in
TCP finish (in).
mon.dev_tcpfin_in
TCP finish (in).
mon.value_tcpfin_out
TCP finish (out).
mon.av_tcpfin_out
TCP finish (out).
mon.dev_tcpfin_out
TCP finish (out).
mon.value_tcpmisc_in
TCP misc (in).
mon.av_tcpmisc_in
TCP misc (in).
mon.dev_tcpmisc_in
TCP misc (in).
mon.value_tcpmisc_out
TCP misc (out).
mon.av_tcpmisc_out
TCP misc (out).
mon.dev_tcpmisc_out
TCP misc (out).
mon.value_webaccess
Webserver hits.
mon.av_webaccess
Webserver hits.
mon.dev_webaccess
Webserver hits.
mon.value_weberrors
Webserver errors.
mon.av_weberrors
Webserver errors.
mon.dev_weberrors
Webserver errors.
mon.value_syslog
New log entries (Syslog).
mon.av_syslog
New log entries (Syslog).
mon.dev_syslog
New log entries (Syslog).
mon.value_messages
New log entries (messages).
mon.av_messages
New log entries (messages).
mon.dev_messages
New log entries (messages).
mon.value_temp0
CPU Temperature 0.
mon.av_temp0
CPU Temperature 0.
mon.dev_temp0
CPU Temperature 0.
mon.value_temp1
CPU Temperature 1.
mon.av_temp1
CPU Temperature 1.
mon.dev_temp1
CPU Temperature 1.
mon.value_temp2
CPU Temperature 2.
mon.av_temp2
CPU Temperature 2.
mon.dev_temp2
CPU Temperature 2.
mon.value_temp3
CPU Temperature 3.
mon.av_temp3
CPU Temperature 3.
mon.dev_temp3
CPU Temperature 3.
mon.value_cpu
%CPU utilization (all).
mon.av_cpu
%CPU utilization (all).
mon.dev_cpu
%CPU utilization (all).
mon.value_cpu0
%CPU utilization 0.
mon.av_cpu0
%CPU utilization 0.
mon.dev_cpu0
%CPU utilization 0.
mon.value_cpu1
%CPU utilization 1.
mon.av_cpu1
%CPU utilization 1.
mon.dev_cpu1
%CPU utilization 1.
mon.value_cpu2
%CPU utilization 2.
mon.av_cpu2
%CPU utilization 2.
mon.dev_cpu2
%CPU utilization 2.
mon.value_cpu3
%CPU utilization 3.
mon.av_cpu3
%CPU utilization 3.
mon.dev_cpu3
%CPU utilization 3.
mon.value_microsoft_ds_in
Samba/MS_ds name sessions (in).
mon.av_microsoft_ds_in
Samba/MS_ds name sessions (in).
mon.dev_microsoft_ds_in
Samba/MS_ds name sessions (in).
mon.value_microsoft_ds_out
Samba/MS_ds name sessions (out).
mon.av_microsoft_ds_out
Samba/MS_ds name sessions (out).
mon.dev_microsoft_ds_out
Samba/MS_ds name sessions (out).
mon.value_www_alt_in
Alternative web service connections (in).
mon.av_www_alt_in
Alternative web service connections (in).
mon.dev_www_alt_in
Alternative web service connections (in).
mon.value_www_alt_out
Alternative web client connections (out).
mon.av_www_alt_out
Alternative web client connections (out).
mon.dev_www_alt_out
Alternative web client connections (out).
mon.value_imaps_in
encrypted imap mail service sessions (in).
mon.av_imaps_in
encrypted imap mail service sessions (in).
mon.dev_imaps_in
encrypted imap mail service sessions (in).
mon.value_imaps_out
encrypted imap mail client sessions (out).
mon.av_imaps_out
encrypted imap mail client sessions (out).
mon.dev_imaps_out
encrypted imap mail client sessions (out).
mon.value_ldap_in
LDAP directory service service sessions (in).
mon.av_ldap_in
LDAP directory service service sessions (in).
mon.dev_ldap_in
LDAP directory service service sessions (in).
mon.value_ldap_out
LDAP directory service client sessions (out).
mon.av_ldap_out
LDAP directory service client sessions (out).
mon.dev_ldap_out
LDAP directory service client sessions (out).
mon.value_ldaps_in
LDAP directory service service sessions (in).
mon.av_ldaps_in
LDAP directory service service sessions (in).
mon.dev_ldaps_in
LDAP directory service service sessions (in).
mon.value_ldaps_out
LDAP directory service client sessions (out).
mon.av_ldaps_out
LDAP directory service client sessions (out).
mon.dev_ldaps_out
LDAP directory service client sessions (out).
mon.value_mongo_in
Mongo database service sessions (in).
mon.av_mongo_in
Mongo database service sessions (in).
mon.dev_mongo_in
Mongo database service sessions (in).
mon.value_mongo_out
Mongo database client sessions (out).
mon.av_mongo_out
Mongo database client sessions (out).
mon.dev_mongo_out
Mongo database client sessions (out).
mon.value_mysql_in
MySQL database service sessions (in).
mon.av_mysql_in
MySQL database service sessions (in).
mon.dev_mysql_in
MySQL database service sessions (in).
mon.value_mysql_out
MySQL database client sessions (out).
mon.av_mysql_out
MySQL database client sessions (out).
mon.dev_mysql_out
MySQL database client sessions (out).
mon.value_postgres_in
PostgreSQL database service sessions (in).
mon.av_postgres_in
PostgreSQL database service sessions (in).
mon.dev_postgres_in
PostgreSQL database service sessions (in).
mon.value_postgres_out
PostgreSQL database client sessions (out).
mon.av_postgres_out
PostgreSQL database client sessions (out).
mon.dev_postgres_out
PostgreSQL database client sessions (out).
mon.value_ipp_in
Internet Printer Protocol (in).
mon.av_ipp_in
Internet Printer Protocol (in).
mon.dev_ipp_in
Internet Printer Protocol (in).
mon.value_ipp_out
Internet Printer Protocol (out).
mon.av_ipp_out
Internet Printer Protocol (out).
mon.dev_ipp_out
Internet Printer Protocol (out).
sys
System variables are derived from CFEngine's automated discovery of system
values. They are provided as variables in order to make automatically adaptive
rules for configuration.
code
files:
"$(sys.resolv)"
create => "true",
edit_line => doresolv("@(this.list1)","@(this.list2)"),
edit_defaults => reconstruct;
sys.arch
The variable gives the kernel's short architecture description.
sys.bindir
The name of the directory where CFEngine looks for its binaries..
code
# bindir = /var/cfengine/bin
History: Introduced in CFEngine 3.6
sys.cdate
The date of the system in canonical form, i.e. in the form of a class, from when the agent initialized.
code
# cdate = Sun_Dec__7_10_39_53_2008_
sys.cf_promises
A variable containing the path to the CFEngine syntax analyzer
cf-promises on the platform you are using.
code
classes:
"syntax_ok" expression => returnszero("$(sys.cf_promises)");
sys.cf_version
The variable gives the version of the running CFEngine Core.
code
# cf_version = 3.0.5
sys.cf_version_major
The variable gives the major version of the running CFEngine Core.
code
# cf_version = 3.0.5
# cf_version_major = 3
History: Was introduced in 3.5.1, Enterprise 3.5.1.
sys.cf_version_minor
The variable gives the minor version of the running CFEngine Core.
code
# cf_version = 3.0.5
# cf_version_minor = 0
History: Was introduced in 3.5.1, Enterprise 3.5.1.
sys.cf_version_patch
The variable gives the patch version of the running CFEngine Core.
code
# cf_version = 3.0.5
# cf_version_patch = 5
History: Was introduced in 3.5.1, Enterprise 3.5.1.
sys.cf_version_release
The variable gives the release number of the running CFEngine Core.
code
# cf_version_release = 1
History: Was introduced in 3.16.0.
sys.class
This variable contains the name of the hard-class category for this host
(i.e. its top level operating system type classification).
See also: sys.os
sys.cpus
A variable containing the number of CPU cores detected. On systems which
provide virtual cores, it is set to the total number of virtual, not
physical, cores. In addition, on a single-core system the class 1_cpu
is set, and on multi-core systems the class n_cpus is set, where
n is the number of cores identified.
code
reports:
"Number of CPUS = $(sys.cpus)";
8_cpus::
"This system has 8 processors.";
History: Was introduced in 3.3.0, Enterprise 2.2.0 (2012)
sys.crontab
The variable gives the location of the current users's master crontab
directory.
code
# crontab = /var/spool/crontab/root
sys.date
The date of the system as a text string, from when the agent initialized.
code
# date = Sun Dec 7 10:39:53 2008
sys.doc_root
A scalar variable containing the default path for the document root of
the standard web server package.
History: Was introduced in 3.1.0, Enterprise 2.0.
sys.domain
The domain name as discovered by CFEngine. If the DNS is in use, it could
be possible to derive the domain name from its DNS registration, but in
general there is no way to discover this value automatically. The
common control body permits the ultimate specification of this value.
code
# domain = example.org
sys.enterprise_version
The variable gives the version of the running CFEngine Enterprise
Edition.
code
# enterprise_version = 3.0.0
History: Was introduced in 3.5.0, Enterprise 3.0.0.
sys.expires
History:
- Removed 3.5.0
- Introduced in version 3.1.4, Enterprise 2.0.2 (2011).
sys.exports
The location of the system NFS exports file.
code
# exports = /etc/exports
# exports = /etc/dfs/dfstab
sys.failsafe_policy_path
The name of the failsafe policy file.
code
# failsafe_policy_path = /var/cfengine/inputs/failsafe.cf
History: Introduced in CFEngine 3.6
sys.flavor, sys.flavour
A variable containing an operating system identification string that is
used to determine the current release of the operating system in a form
that can be used as a label in naming. This is used, for instance, to
detect which package name to choose when updating software binaries for
CFEngine.
These two variables are synonyms for each other.
History: Was introduced in 3.2.0, Enterprise 2.0
See also: sys.ostype
sys.fqhost
The fully qualified name of the host. In order to compute this value
properly, the domain name must be defined.
code
# fqhost = host.example.org
See also: sys.uqhost
sys.fstab
The location of the system filesystem (mount) table.
code
# fstab = /etc/fstab
sys.hardware_addresses
This is a list variable containing a list of all known MAC addresses for
system interfaces.
History: Was introduced in 3.3.0, Enterprise 2.2.0 (2011)
sys.hardware_mac[interface_name]
This contains the MAC address of the named interface. For example:
code
reports:
"Tell me $(sys.hardware_mac[eth0])";
Note: The keys in this array are canonified. For example, the entry for wlan0.1 would be found under the wlan0_1 key. Ref: CFE-4174.
History: Was introduced in 3.3.0, Enterprise 2.2.0 (2011)
sys.host
The name of the current host, according to the kernel. It is undefined
whether this is qualified or unqualified with a domain name.
sys.inet
The available information about the IPv4 network stack, from when the agent initialized. This is currently available only on Linux systems with the special /proc/net/* information files.
From the route table, the default_gateway is extracted. From the list of routes in routes, the default_route is copied to the top level for convenience.
Each route's flags are extracted in a convenient list format.
The stats key contains all the TCP and IP counters provided by the system in /proc/net/netstat.
History: Was introduced in 3.9.0.
See also: sys.inet6, sys.interfaces_data
code
% cat /proc/net/route
Iface Destination Gateway Flags RefCnt Use Metric Mask MTU Window IRTT
enp4s0 00000000 0102A8C0 0003 0 0 100 00000000 0 0 0
enp4s0 0000FEA9 00000000 0001 0 0 1000 0000FFFF 0 0 0
enp4s0 0002A8C0 00000000 0001 0 0 100 00FFFFFF 0 0 0
% cat /proc/net/netstat
TcpExt: SyncookiesSent SyncookiesRecv SyncookiesFailed EmbryonicRsts PruneCalled RcvPruned OfoPruned OutOfWindowIcmps LockDroppedIcmps ArpFilter TW TWRecycled TWKilled PAWSPassive PAWSActive PAWSEstab DelayedACKs DelayedACKLocked DelayedACKLost ListenOverflows ListenDrops TCPPrequeued TCPDirectCopyFromBacklog TCPDirectCopyFromPrequeue TCPPrequeueDropped TCPHPHits TCPHPHitsToUser TCPPureAcks TCPHPAcks TCPRenoRecovery TCPSackRecovery TCPSACKReneging TCPFACKReorder TCPSACKReorder TCPRenoReorder TCPTSReorder TCPFullUndo TCPPartialUndo TCPDSACKUndo TCPLossUndo TCPLostRetransmit TCPRenoFailures TCPSackFailures TCPLossFailures TCPFastRetrans TCPForwardRetrans TCPSlowStartRetrans TCPTimeouts TCPLossProbes TCPLossProbeRecovery TCPRenoRecoveryFail TCPSackRecoveryFail TCPSchedulerFailed TCPRcvCollapsed TCPDSACKOldSent TCPDSACKOfoSent TCPDSACKRecv TCPDSACKOfoRecv TCPAbortOnData TCPAbortOnClose TCPAbortOnMemory TCPAbortOnTimeout TCPAbortOnLinger TCPAbortFailed TCPMemoryPressures TCPSACKDiscard TCPDSACKIgnoredOld TCPDSACKIgnoredNoUndo TCPSpuriousRTOs TCPMD5NotFound TCPMD5Unexpected TCPSackShifted TCPSackMerged TCPSackShiftFallback TCPBacklogDrop TCPMinTTLDrop TCPDeferAcceptDrop IPReversePathFilter TCPTimeWaitOverflow TCPReqQFullDoCookies TCPReqQFullDrop TCPRetransFail TCPRcvCoalesce TCPOFOQueue TCPOFODrop TCPOFOMerge TCPChallengeACK TCPSYNChallenge TCPFastOpenActive TCPFastOpenActiveFail TCPFastOpenPassive TCPFastOpenPassiveFail TCPFastOpenListenOverflow TCPFastOpenCookieReqd TCPSpuriousRtxHostQueues BusyPollRxPackets TCPAutoCorking TCPFromZeroWindowAdv TCPToZeroWindowAdv TCPWantZeroWindowAdv TCPSynRetrans TCPOrigDataSent TCPHystartTrainDetect TCPHystartTrainCwnd TCPHystartDelayDetect TCPHystartDelayCwnd TCPACKSkippedSynRecv TCPACKSkippedPAWS TCPACKSkippedSeq TCPACKSkippedFinWait2 TCPACKSkippedTimeWait TCPACKSkippedChallenge TCPWinProbe TCPKeepAlive
TcpExt: 0 0 0 19896 7 0 0 9 0 0 560727 0 0 0 0 3575 2049614 302 313016 0 0 17283401 130554 186252521 0 126381259 21978 34307113 42386136 481 386568 7 175 316 11 822 2028 483 20959 148926 16709 267 271328 38869 512579 72057 281202 375133 561590 150370 23 59420 0 106 391776 9062 174837 4389 211213 13931 0 14556 0 0 0 585 594 65103 100117 0 0 0 0 2199955 0 0 0 0 0 0 0 15 36402752 5236349 0 7020 7132 4057 0 0 0 0 0 0 70 0 17925237 24 30 71 693624 275201738 33 992 2253 49843 136 484 21848 0 25 218 10478 503111
IpExt: InNoRoutes InTruncatedPkts InMcastPkts OutMcastPkts InBcastPkts OutBcastPkts InOctets OutOctets InMcastOctets OutMcastOctets InBcastOctets OutBcastOctets InCsumErrors InNoECTPkts InECT1Pkts InECT0Pkts InCEPkts
IpExt: 0 0 1304886 130589 3784495 6 437612883789 422416538003 334973818 8189234 817859007 284 1 487495405 18258 4804476 543340
# sys.inet = {
"default_gateway": "192.168.2.1",
"default_route": {
"active_default_gateway": true,
"dest": "0.0.0.0",
"flags": [
"up",
"net",
"default",
"gateway"
],
"gateway": "192.168.2.1",
"interface": "enp4s0",
"irtt": 0,
"mask": "0.0.0.0",
"metric": 100,
"mtu": 0,
"refcnt": 0,
"use": 0,
"window": 0
},
"routes": [
{
"active_default_gateway": true,
"dest": "0.0.0.0",
"flags": [
"up",
"net",
"default",
"gateway"
],
"gateway": "192.168.2.1",
"interface": "enp4s0",
"irtt": 0,
"mask": "0.0.0.0",
"metric": 100,
"mtu": 0,
"refcnt": 0,
"use": 0,
"window": 0
},
{
"active_default_gateway": false,
"dest": "169.254.0.0",
"flags": [
"up",
"net",
"not_default",
"local"
],
"gateway": "0.0.0.0",
"interface": "enp4s0",
"irtt": 0,
"mask": "255.255.0.0",
"metric": 1000,
"mtu": 0,
"refcnt": 0,
"use": 0,
"window": 0
},
{
"active_default_gateway": false,
"dest": "192.168.2.0",
"flags": [
"up",
"net",
"not_default",
"local"
],
"gateway": "0.0.0.0",
"interface": "enp4s0",
"irtt": 0,
"mask": "255.255.255.0",
"metric": 100,
"mtu": 0,
"refcnt": 0,
"use": 0,
"window": 0
}
],
"stats": {
"IpExt": {
"InBcastOctets": "817859007",
"InBcastPkts": "3784495",
"InCEPkts": "543340",
"InCsumErrors": "1",
"InECT0Pkts": "4804476",
"InECT1Pkts": "18258",
"InMcastOctets": "334973818",
"InMcastPkts": "1304886",
"InNoECTPkts": "487495405",
"InNoRoutes": "0",
"InOctets": "437612883789",
"InTruncatedPkts": "0",
"OutBcastOctets": "284",
"OutBcastPkts": "6",
"OutMcastOctets": "8189234",
"OutMcastPkts": "130589",
"OutOctets": "422416538003"
},
"TcpExt": {
"ArpFilter": "0",
"BusyPollRxPackets": "0",
"DelayedACKLocked": "302",
"DelayedACKLost": "313016",
"DelayedACKs": "2049614",
"EmbryonicRsts": "19896",
"IPReversePathFilter": "0",
"ListenDrops": "0",
"ListenOverflows": "0",
"LockDroppedIcmps": "0",
"OfoPruned": "0",
"OutOfWindowIcmps": "9",
"PAWSActive": "0",
"PAWSEstab": "3575",
"PAWSPassive": "0",
"PruneCalled": "7",
"RcvPruned": "0",
"SyncookiesFailed": "0",
"SyncookiesRecv": "0",
"SyncookiesSent": "0",
"TCPACKSkippedChallenge": "218",
"TCPACKSkippedFinWait2": "0",
"TCPACKSkippedPAWS": "484",
"TCPACKSkippedSeq": "21848",
"TCPACKSkippedSynRecv": "136",
"TCPACKSkippedTimeWait": "25",
"TCPAbortFailed": "0",
"TCPAbortOnClose": "13931",
"TCPAbortOnData": "211213",
"TCPAbortOnLinger": "0",
"TCPAbortOnMemory": "0",
"TCPAbortOnTimeout": "14556",
"TCPAutoCorking": "17925237",
"TCPBacklogDrop": "0",
"TCPChallengeACK": "7132",
"TCPDSACKIgnoredNoUndo": "65103",
"TCPDSACKIgnoredOld": "594",
"TCPDSACKOfoRecv": "4389",
"TCPDSACKOfoSent": "9062",
"TCPDSACKOldSent": "391776",
"TCPDSACKRecv": "174837",
"TCPDSACKUndo": "20959",
"TCPDeferAcceptDrop": "0",
"TCPDirectCopyFromBacklog": "130554",
"TCPDirectCopyFromPrequeue": "186252521",
"TCPFACKReorder": "175",
"TCPFastOpenActive": "0",
"TCPFastOpenActiveFail": "0",
"TCPFastOpenCookieReqd": "0",
"TCPFastOpenListenOverflow": "0",
"TCPFastOpenPassive": "0",
"TCPFastOpenPassiveFail": "0",
"TCPFastRetrans": "512579",
"TCPForwardRetrans": "72057",
"TCPFromZeroWindowAdv": "24",
"TCPFullUndo": "2028",
"TCPHPAcks": "42386136",
"TCPHPHits": "126381259",
"TCPHPHitsToUser": "21978",
"TCPHystartDelayCwnd": "49843",
"TCPHystartDelayDetect": "2253",
"TCPHystartTrainCwnd": "992",
"TCPHystartTrainDetect": "33",
"TCPKeepAlive": "503111",
"TCPLossFailures": "38869",
"TCPLossProbeRecovery": "150370",
"TCPLossProbes": "561590",
"TCPLossUndo": "148926",
"TCPLostRetransmit": "16709",
"TCPMD5NotFound": "0",
"TCPMD5Unexpected": "0",
"TCPMemoryPressures": "0",
"TCPMinTTLDrop": "0",
"TCPOFODrop": "0",
"TCPOFOMerge": "7020",
"TCPOFOQueue": "5236349",
"TCPOrigDataSent": "275201738",
"TCPPartialUndo": "483",
"TCPPrequeueDropped": "0",
"TCPPrequeued": "17283401",
"TCPPureAcks": "34307113",
"TCPRcvCoalesce": "36402752",
"TCPRcvCollapsed": "106",
"TCPRenoFailures": "267",
"TCPRenoRecovery": "481",
"TCPRenoRecoveryFail": "23",
"TCPRenoReorder": "11",
"TCPReqQFullDoCookies": "0",
"TCPReqQFullDrop": "0",
"TCPRetransFail": "15",
"TCPSACKDiscard": "585",
"TCPSACKReneging": "7",
"TCPSACKReorder": "316",
"TCPSYNChallenge": "4057",
"TCPSackFailures": "271328",
"TCPSackMerged": "0",
"TCPSackRecovery": "386568",
"TCPSackRecoveryFail": "59420",
"TCPSackShiftFallback": "2199955",
"TCPSackShifted": "0",
"TCPSchedulerFailed": "0",
"TCPSlowStartRetrans": "281202",
"TCPSpuriousRTOs": "100117",
"TCPSpuriousRtxHostQueues": "70",
"TCPSynRetrans": "693624",
"TCPTSReorder": "822",
"TCPTimeWaitOverflow": "0",
"TCPTimeouts": "375133",
"TCPToZeroWindowAdv": "30",
"TCPWantZeroWindowAdv": "71",
"TCPWinProbe": "10478",
"TW": "560727",
"TWKilled": "0",
"TWRecycled": "0"
}
}
}
sys.inet6
The available information about the IPv6 network stack, from when the agent initialized. This is currently available only on Linux systems with the special /proc/net/* information files.
The configured devices with IPv6 addresses from /proc/net/if_inet6 are collected under addresses.
The routes from /proc/net/ipv6_route are collected but not analyzed for default route etc. as with IPv4 routes in sys.inet.
The network statistics from /proc/net/snmp6 are converted to a convenient key-value format under stats.
History: Was introduced in 3.9.0.
See also: sys.inet, sys.interfaces_data
code
% cat /proc/net/if_inet6
00000000000000000000000000000001 01 80 10 80 lo
fe80000000000000004249fffebdd7b4 04 40 20 80 docker0
fe80000000000000c27cd1fffe3eada6 02 40 20 80 enp4s0
% cat /proc/net/ipv6_route
fe800000000000000000000000000000 40 00000000000000000000000000000000 00 00000000000000000000000000000000 00000100 00000001 00000004 00000001 enp4s0
00000000000000000000000000000000 00 00000000000000000000000000000000 00 00000000000000000000000000000000 ffffffff 00000001 0007e26c 00200200 lo
00000000000000000000000000000001 80 00000000000000000000000000000000 00 00000000000000000000000000000000 00000000 00000009 0000020b 80200001 lo
fe80000000000000c27cd1fffe3eada6 80 00000000000000000000000000000000 00 00000000000000000000000000000000 00000000 00000002 00000004 80200001 lo
ff000000000000000000000000000000 08 00000000000000000000000000000000 00 00000000000000000000000000000000 00000100 00000008 0003ffc5 00000001 enp4s0
00000000000000000000000000000000 00 00000000000000000000000000000000 00 00000000000000000000000000000000 ffffffff 00000001 0007e26c 00200200 lo
% cat /proc/net/snmp6
Ip6InReceives 492189
Ip6InHdrErrors 0
Ip6InTooBigErrors 0
Ip6InNoRoutes 0
Ip6InAddrErrors 0
Ip6InUnknownProtos 0
Ip6InTruncatedPkts 0
Ip6InDiscards 0
Ip6InDelivers 490145
Ip6OutForwDatagrams 0
Ip6OutRequests 12145
Ip6OutDiscards 6
Ip6OutNoRoutes 249070
Ip6ReasmTimeout 0
Ip6ReasmReqds 0
Ip6ReasmOKs 0
Ip6ReasmFails 0
Ip6FragOKs 0
Ip6FragFails 0
Ip6FragCreates 0
Ip6InMcastPkts 488766
Ip6OutMcastPkts 10304
Ip6InOctets 132343220
Ip6OutOctets 1522724
Ip6InMcastOctets 131896014
Ip6OutMcastOctets 1076616
Ip6InBcastOctets 0
Ip6OutBcastOctets 0
Ip6InNoECTPkts 492196
Ip6InECT1Pkts 0
Ip6InECT0Pkts 0
Ip6InCEPkts 0
Icmp6InMsgs 275
Icmp6InErrors 0
Icmp6OutMsgs 1815
Icmp6OutErrors 0
Icmp6InCsumErrors 0
Icmp6InDestUnreachs 0
Icmp6InPktTooBigs 0
Icmp6InTimeExcds 0
Icmp6InParmProblems 0
Icmp6InEchos 0
Icmp6InEchoReplies 0
Icmp6InGroupMembQueries 0
Icmp6InGroupMembResponses 1
Icmp6InGroupMembReductions 1
Icmp6InRouterSolicits 0
Icmp6InRouterAdvertisements 0
Icmp6InNeighborSolicits 5
Icmp6InNeighborAdvertisements 268
Icmp6InRedirects 0
Icmp6InMLDv2Reports 0
Icmp6OutDestUnreachs 0
Icmp6OutPktTooBigs 0
Icmp6OutTimeExcds 0
Icmp6OutParmProblems 0
Icmp6OutEchos 0
Icmp6OutEchoReplies 0
Icmp6OutGroupMembQueries 0
Icmp6OutGroupMembResponses 0
Icmp6OutGroupMembReductions 0
Icmp6OutRouterSolicits 396
Icmp6OutRouterAdvertisements 0
Icmp6OutNeighborSolicits 206
Icmp6OutNeighborAdvertisements 5
Icmp6OutRedirects 0
Icmp6OutMLDv2Reports 1208
Icmp6InType131 1
Icmp6InType132 1
Icmp6InType135 5
Icmp6InType136 268
Icmp6OutType133 396
Icmp6OutType135 206
Icmp6OutType136 5
Icmp6OutType143 1208
Udp6InDatagrams 486201
Udp6NoPorts 0
Udp6InErrors 0
Udp6OutDatagrams 7273
Udp6RcvbufErrors 0
Udp6SndbufErrors 0
Udp6InCsumErrors 0
Udp6IgnoredMulti 0
UdpLite6InDatagrams 0
UdpLite6NoPorts 0
UdpLite6InErrors 0
UdpLite6OutDatagrams 0
UdpLite6RcvbufErrors 0
UdpLite6SndbufErrors 0
UdpLite6InCsumErrors 0
# sys.inet6 = {
"addresses": {
"docker0": {
"address": "d7b4:febd:49ff:42:0:0:0:fe80",
"device_number": 4,
"interface": "docker0",
"prefix_length": 64,
"raw_flags": "80",
"scope": 32
},
"enp4s0": {
"address": "ada6:fe3e:d1ff:c27c:0:0:0:fe80",
"device_number": 2,
"interface": "enp4s0",
"prefix_length": 64,
"raw_flags": "80",
"scope": 32
},
"lo": {
"address": "1:0:0:0:0:0:0:0",
"device_number": 1,
"interface": "lo",
"prefix_length": 128,
"raw_flags": "80",
"scope": 16
}
},
"routes": [
{
"dest": "0:0:0:0:0:0:0:0",
"dest_prefix": "40",
"flags": [
"up",
"net",
"local"
],
"interface": "enp4s0",
"metric": 256,
"next_hop": "0:0:0:0:0:0:0:0",
"refcnt": 1,
"source_prefix": "00",
"use": 4
},
{
"dest": "0:0:0:0:0:0:0:0",
"dest_prefix": "80",
"flags": [
"up",
"net",
"local"
],
"interface": "lo",
"metric": 0,
"next_hop": "0:0:0:0:0:0:0:0",
"refcnt": 2,
"source_prefix": "00",
"use": 4
}
],
"stats": {
"Icmp6InCsumErrors": 0,
"Icmp6InDestUnreachs": 0,
"Icmp6InEchoReplies": 0,
"Icmp6InEchos": 0,
"Icmp6InErrors": 0,
"Icmp6InGroupMembQueries": 0,
"Icmp6InGroupMembReductions": 1,
"Icmp6InGroupMembResponses": 1,
"Icmp6InMLDv2Reports": 0,
"Icmp6InMsgs": 275,
"Icmp6InNeighborAdvertisements": 268,
"Icmp6InNeighborSolicits": 5,
"Icmp6InParmProblems": 0,
"Icmp6InPktTooBigs": 0,
"Icmp6InRedirects": 0,
"Icmp6InRouterAdvertisements": 0,
"Icmp6InRouterSolicits": 0,
"Icmp6InTimeExcds": 0,
"Icmp6InType131": 1,
"Icmp6InType132": 1,
"Icmp6InType135": 5,
"Icmp6InType136": 268,
"Icmp6OutDestUnreachs": 0,
"Icmp6OutEchoReplies": 0,
"Icmp6OutEchos": 0,
"Icmp6OutErrors": 0,
"Icmp6OutGroupMembQueries": 0,
"Icmp6OutGroupMembReductions": 0,
"Icmp6OutGroupMembResponses": 0,
"Icmp6OutMLDv2Reports": 1208,
"Icmp6OutMsgs": 1815,
"Icmp6OutNeighborAdvertisements": 5,
"Icmp6OutNeighborSolicits": 206,
"Icmp6OutParmProblems": 0,
"Icmp6OutPktTooBigs": 0,
"Icmp6OutRedirects": 0,
"Icmp6OutRouterAdvertisements": 0,
"Icmp6OutRouterSolicits": 396,
"Icmp6OutTimeExcds": 0,
"Icmp6OutType133": 396,
"Icmp6OutType135": 206,
"Icmp6OutType136": 5,
"Icmp6OutType143": 1208,
"Ip6FragCreates": 0,
"Ip6FragFails": 0,
"Ip6FragOKs": 0,
"Ip6InAddrErrors": 0,
"Ip6InBcastOctets": 0,
"Ip6InCEPkts": 0,
"Ip6InDelivers": 490145,
"Ip6InDiscards": 0,
"Ip6InECT0Pkts": 0,
"Ip6InECT1Pkts": 0,
"Ip6InHdrErrors": 0,
"Ip6InMcastOctets": 131896014,
"Ip6InMcastPkts": 488766,
"Ip6InNoECTPkts": 492196,
"Ip6InNoRoutes": 0,
"Ip6InOctets": 132343220,
"Ip6InReceives": 492189,
"Ip6InTooBigErrors": 0,
"Ip6InTruncatedPkts": 0,
"Ip6InUnknownProtos": 0,
"Ip6OutBcastOctets": 0,
"Ip6OutDiscards": 6,
"Ip6OutForwDatagrams": 0,
"Ip6OutMcastOctets": 1076616,
"Ip6OutMcastPkts": 10304,
"Ip6OutNoRoutes": 249070,
"Ip6OutOctets": 1522724,
"Ip6OutRequests": 12145,
"Ip6ReasmFails": 0,
"Ip6ReasmOKs": 0,
"Ip6ReasmReqds": 0,
"Ip6ReasmTimeout": 0,
"Udp6IgnoredMulti": 0,
"Udp6InCsumErrors": 0,
"Udp6InDatagrams": 486201,
"Udp6InErrors": 0,
"Udp6NoPorts": 0,
"Udp6OutDatagrams": 7273,
"Udp6RcvbufErrors": 0,
"Udp6SndbufErrors": 0,
"UdpLite6InCsumErrors": 0,
"UdpLite6InDatagrams": 0,
"UdpLite6InErrors": 0,
"UdpLite6NoPorts": 0,
"UdpLite6OutDatagrams": 0,
"UdpLite6RcvbufErrors": 0,
"UdpLite6SndbufErrors": 0
}
}
The name of the inputs directory where CFEngine looks for its policy files.
code
# inputdir = /var/cfengine/inputs
History: Introduced in CFEngine 3.6
sys.interface
The assumed (default) name of the main system interface on this host.
sys.interfaces
Displays a system list of configured interfaces currently active in use
by the system. This list is detected at runtime and it passed in the
variables report to the CFEngine Enterprise Database.
Example:
code
bundle agent example_sys_interfaces
{
reports:
"Address: $(sys.ip_addresses)";
"Interface: $(sys.interfaces)";
"Address of '$(sys.interfaces)' is '$(sys.ipv4[$(sys.interfaces)])'";
}
bundle agent __main__
{
methods:
"example_sys_interfaces";
}
Example Output:
code
R: Address: 127.0.0.1
R: Address: 192.168.42.189
R: Address: 192.168.122.1
R: Address: 172.17.0.1
R: Address: 192.168.33.1
R: Address: 172.27.224.211
R: Address: 192.168.69.1
R: Interface: wlan0
R: Interface: virbr0
R: Interface: docker0
R: Interface: vboxnet3
R: Interface: tun0
R: Interface: vboxnet13
R: Address of 'wlan0' is '192.168.42.189'
R: Address of 'virbr0' is '192.168.122.1'
R: Address of 'docker0' is '172.17.0.1'
R: Address of 'vboxnet3' is '192.168.33.1'
R: Address of 'tun0' is '172.27.224.211'
R: Address of 'vboxnet13' is '192.168.69.1'
History: Was introduced in 3.3.0, Enterprise 2.2.0 (2011)
sys.interfaces_data
The network statistics of the system interfaces, from when the agent initialized. This is currently available only on Linux systems with the special /proc/net/dev file.
History: Was introduced in 3.9.0.
See also: sys.inet6, sys.inet
code
% cat /proc/net/dev
Inter-| Receive | Transmit
face |bytes packets errs drop fifo frame compressed multicast|bytes packets errs drop fifo colls carrier compressed
enp4s0: 446377831179 492136556 0 0 0 0 0 0 428200856331 499195545 0 0 0 0 0 0
lo: 1210580426 1049790 0 0 0 0 0 0 1210580426 1049790 0 0 0 0 0 0
wlp3s0: 0 0 0 0 0 0 0 0 0 0 0 0 0 0 0 0
# sys.interfaces_data = {
"enp4s0": {
"device": "enp4s0",
"receive_bytes": "446377831179",
"receive_compressed": "0",
"receive_drop": "0",
"receive_errors": "0",
"receive_fifo": "0",
"receive_frame": "0",
"receive_multicast": "0",
"receive_packets": "492136556",
"transmit_bytes": "428200856331",
"transmit_compressed": "0",
"transmit_drop": "0",
"transmit_errors": "0",
"transmit_fifo": "0",
"transmit_frame": "0",
"transmit_multicast": "0",
"transmit_packets": "499195545"
},
"lo": {
"device": "lo",
"receive_bytes": "1210580426",
"receive_compressed": "0",
"receive_drop": "0",
"receive_errors": "0",
"receive_fifo": "0",
"receive_frame": "0",
"receive_multicast": "0",
"receive_packets": "1049790",
"transmit_bytes": "1210580426",
"transmit_compressed": "0",
"transmit_drop": "0",
"transmit_errors": "0",
"transmit_fifo": "0",
"transmit_frame": "0",
"transmit_multicast": "0",
"transmit_packets": "1049790"
},
"wlp3s0": {
"device": "wlp3s0",
"receive_bytes": "0",
"receive_compressed": "0",
"receive_drop": "0",
"receive_errors": "0",
"receive_fifo": "0",
"receive_frame": "0",
"receive_multicast": "0",
"receive_packets": "0",
"transmit_bytes": "0",
"transmit_compressed": "0",
"transmit_drop": "0",
"transmit_errors": "0",
"transmit_fifo": "0",
"transmit_frame": "0",
"transmit_multicast": "0",
"transmit_packets": "0"
}
}
sys.interface_flags
Contains a space separated list of the flags of the named interface. e.g.
code
reports:
"eth0 flags: $(sys.interface_flags[eth0])";
Outputs:
code
R: eth0 flags: up broadcast running multicast
The following device flags are supported:
- up
- broadcast
- debug
- loopback
- pointopoint
- notrailers
- running
- noarp
- promisc
- allmulti
- multicast
History: Was introduced in 3.5.0 (2013)
sys.ip_addresses
Displays a system list of IP addresses currently in use by the system.
This list is detected at runtime and passed in the variables report to the
CFEngine Enterprise Database.
To use this list in a policy, you will need a local copy since only
local variables can be iterated.
code
bundle agent test
{
vars:
# To iterate, we need a local copy
"i1" slist => { @(sys.ip_addresses)} ;
"i2" slist => { @(sys.interfaces)} ;
reports:
"Addresses: $(i1)";
"Interfaces: $(i2)";
"Addresses of the interfaces: $(sys.ipv4[$(i2)])";
}
History: Was introduced in 3.3.0, Enterprise 2.2.0 (2011)
sys.ip2iface
A map of full IPv4 addresses (key) to the system interface (value),
e.g. $(sys.ip2iface[1.2.3.4]).
code
# If the IPv4 address on the interfaces are
# le0 = 192.168.1.101
# xr1 = 10.12.7.254
#
# Then you will have
# sys.ip2iface[192.168.1.101] = le0
# sys.ip2iface[10.12.7.254] = xr1
Notes:
The list of addresses may be acquired with getindices("sys.ip2iface") (or
from any of the other associative arrays). Only those interfaces which are
marked as "up" and have an IP address will have entries.
The values in this array are canonified. For example, the entry for wlan0.1 would be wlan0_1. Ref: CFE-4174.
History: Was introduced in 3.9.
sys.ipv4
All four octets of the IPv4 address of the first system interface.
Note:
If your system has a single ethernet interface, $(sys.ipv4) will contain
your IPv4 address. However, if your system has multiple interfaces, then
$(sys.ipv4) will simply be the IPv4 address of the first interface in the
list that has an assigned address, Use $(sys.ipv4[interface_name]) for
details on obtaining the IPv4 addresses of all interfaces on a system.
sys.ipv4[interface_name]
The full IPv4 address of the system interface named as the associative
array index, e.g. $(sys.ipv4[le0]) or $(sys.ipv4[xr1]).
code
# If the IPv4 address on the interfaces are
# le0 = 192.168.1.101
# xr1 = 10.12.7.254
#
# Then the octets of all interfaces are accessible as an associative array
# sys.ipv4_1[le0] = 192
# sys.ipv4_2[le0] = 192.168
# sys.ipv4_3[le0] = 192.168.1
# sys.ipv4[le0] = 192.168.1.101
# sys.ipv4_1[xr1] = 10
# sys.ipv4_2[xr1] = 10.12
# sys.ipv4_3[xr1] = 10.12.7
# sys.ipv4[xr1] = 10.12.7.254
Note:
The list of interfaces may be acquired with getindices("sys.ipv4") (or
from any of the other associative arrays). Only those interfaces which
are marked as "up" and have an IP address will be listed.
sys.ipv4_1[interface_name]
The first octet of the IPv4 address of the system interface named as the
associative array index, e.g. $(ipv4_1[le0]) or $(ipv4_1[xr1]).
Note: The keys in this array are canonified. For example, the entry for wlan0.1 would be found under the wlan0_1 key. Ref: CFE-4174.
sys.ipv4_2[interface_name]
The first two octets of the IPv4 address of the system interface named as the associative array index, e.g. $(ipv4_2[le0]) or $(ipv4_2[xr1]).
Note: The keys in this array are canonified. For example, the entry for wlan0.1 would be found under the wlan0_1 key. Ref: CFE-4174.
sys.ipv4_3[interface_name]
The first three octets of the IPv4 address of the system interface named as the associative array index, e.g. $(ipv4_3[le0]) or $(ipv4_3[xr1]).
Note: The keys in this array are canonified. For example, the entry for wlan0.1 would be found under the wlan0_1 key. Ref: CFE-4174.
sys.key_digest
The digest of the host's cryptographic public key.
code
# sys.key_digest = MD5=bc230448c9bec14b9123443e1608ac07
sys.last_policy_update
Timestamp when last policy change was seen by host
sys.libdir
The name of the directory where CFEngine looks for its libraries.
code
# libdir = /var/cfengine/inputs/lib
History: Introduced in CFEngine 3.6, version based sub directory removed in
CFEngine 3.8.
sys.local_libdir
The name of the directory where CFEngine looks for its libraries, without any prefixes.
code
# local_libdir = lib
History: Introduced in CFEngine 3.6, version based sub directory removed in
CFEngine 3.8.
sys.logdir
The name of the directory where CFEngine log files are saved
code
# logdir = /var/cfengine/
History: Introduced in CFEngine 3.6
sys.license_owner
History:
- Removed 3.5.0
- Introduced in version 3.1.4, Enterprise 2.0.2 (2011).
sys.licenses_granted
History:
- Removed 3.5.0
- Was introduced in version 3.1.4, Enterprise 2.0.2 (2011).
sys.long_arch
The long architecture name for this system kernel. This name is
sometimes quite unwieldy but can be useful for logging purposes.
code
# long_arch = linux_x86_64_2_6_22_19_0_1_default__1_SMP_2008_10_14_22_17_43__0200
See also: sys.ostype
sys.maildir
The name of the system email spool directory.
code
# maildir = /var/spool/mail
sys.masterdir
The name of the directory on the hub where CFEngine looks for inputs to be validated and copied into sys.inputdir.
code
# masterdir = /var/cfengine/masterfiles
History: Introduced in CFEngine 3.6
sys.nova_version
The variable gives the version of the running CFEngine Enterprise Edition.
code
# nova_version = 1.1.3
sys.os
The name of the operating system according to the kernel.
See also: sys.ostype
sys.os_name_human
A human friendly version of the operating system that's running.
Example policy:
code
bundle agent __main__
{
reports:
"$(sys.os_name_human)";
}
Example policy output:
History:
sys.os_release
Information parsed from /etc/os-release if present.
code
bundle agent main
{
reports:
"$(with)"
with => string_mustache("", @(sys.os_release) );
}
Policy Output:
code
R: {
"BUG_REPORT_URL": "https://bugs.launchpad.net/ubuntu/",
"HOME_URL": "https://www.ubuntu.com/",
"ID": "ubuntu",
"ID_LIKE": "debian",
"NAME": "Ubuntu",
"PRETTY_NAME": "Ubuntu 17.10",
"PRIVACY_POLICY_URL": "https://www.ubuntu.com/legal/terms-and-policies/privacy-policy",
"SUPPORT_URL": "https://help.ubuntu.com/",
"UBUNTU_CODENAME": "artful",
"VERSION": "17.10 (Artful Aardvark)",
"VERSION_CODENAME": "artful",
"VERSION_ID": "17.10"
}
History:
sys.os_version_major
The major version of the operating system that's running.
Example policy:
code
bundle agent __main__
{
reports:
"$(sys.os_version_major)";
}
Example policy output:
History:
sys.ostype
Another name for the operating system.
code
# ostype = linux_x86_64
See also: sys.class
sys.piddir
The name of the directory where CFEngine saves the daemon pid files.
code
# piddir = /var/cfengine/
History: Introduced in CFEngine 3.6
sys.policy_entry_basename
The basename of the first policy file read by the agent. For example
promises.cf or update.cf.
See also: sys.policy_entry_dirname sys.policy_entry_filename
History:
sys.policy_entry_dirname
The full path to the directory containing the first policy file read by the agent. For example
/var/cfengine/inputs or ~/.cfagent/inputs.
See also: sys.policy_entry_basename sys.policy_entry_filename
History:
sys.policy_entry_filename
The full path to the first policy file read by the agent. For example
/var/cfengine/inputs/promises.cf or ~/.cfagent/inputs/promises.cf.
See also: sys.policy_entry_basename sys.policy_entry_dirname
History:
sys.policy_hub
IP of the machine acting as the policy server.
$(sys.workdir)/policy_server.dat stores bootstrap information. If bootstrapped to a hostname, the value is the current IP the hostname resolves to. If bootstrapped to an IP, the value is the stored IP. The variable is undefined if $(sys.workdir)/policy_server.dat does not exist or is empty.
code
reports:
"Policy hub is $(sys.policy_hub)";
History:
- Introduced in version 3.1.0b1,Enterprise 2.0.0b1 (2010).
- Available in Community since 3.2.0
sys.policy_hub_port
The default port which cf-agent will use by default when making outbound
connections to cf-serverd. This defaults to 5308 but can be
overridden based on the data provided during bootstrap stored in
$(sys.workdir)/policy_server.dat.
History:
- Introduced in version 3.10.0 (2016).
sys.release
The kernel release of the operating system.
code
##### release = 2.6.22.19-0.1-default
sys.resolv
The location of the system resolver file.
code
##### resolv = /etc/resolv.conf
sys.statedir
The name of the state directory where CFEngine looks for its embedded database files.
code
##### statedir = /var/cfengine/state
History: Introduced in CFEngine 3.7
sys.sysday
A variable containing the time since the UNIX Epoch (00:00:00 UTC, January 1,
1970), measured in days. It is equivalent to $(sys.systime) divided by the
number of seconds in a day, expressed as an integer. No time zone conversion
is performed, the direct result of the time() system call is used. This value
is most commonly used in the /etc/shadow file.
code
##### sysday = 15656
Corresponds to Monday, November 12, 2012.
History: Introduced in CFEngine 3.6
sys.systime
A variable containing the result of the time() system call, which is the
time since the UNIX Epoch (00:00:00 UTC, January 1, 1970), measured in
seconds. See also $(sys.sysday).
code
##### systime = 1352754900
Corresponds to Mon Nov 12 21:15:00 2012 UTC.
History: Introduced in CFEngine 3.6
sys.update_policy_path
The name of the update policy file.
code
##### update_policy_path = /var/cfengine/inputs/update.cf
History: Introduced in CFEngine 3.6
sys.uptime
A variable containing the number of minutes which the system has been
online. (Not implemented on the Windows platform.)
code
##### uptime = 69735
Equivalent uptime command output:
16:24:52 up 48 days, 10:15, 1 user, load average: 0.00, 0.00, 0.00
History: Introduced in CFEngine 3.6
sys.user_data
A data container with the user information of the user that started the agent.
code
##### user_data = {
"description": "root",
"gid": 0,
"home_dir": "/root",
"shell": "/bin/bash",
"uid": 0,
"username": "root"
}
History: Introduced in CFEngine 3.10
sys.uqhost
The unqualified name of the current host.
code
##### uqhost = myhost
See also: sys.fqhost
sys.version
The version of the running kernel. On Linux, this corresponds to the
output of uname -v.
code
##### version = #55-Ubuntu SMP Mon Jan 10 23:42:43 UTC 2011
History: Was introduced in version 3.1.4,Enterprise 2.0.2 (2011)
sys.windir
On the Windows version of CFEngine Enterprise, this is the path to the Windows
directory of this system.
code
##### windir = C:\WINDOWS
sys.winprogdir
On the Windows version of CFEngine Enterprise, this is the path to the program
files directory of the system.
code
##### winprogdir = C:\Program Files
sys.winprogdir86
On 64 bit Windows versions of CFEngine Enterprise, this is the path to the 32
bit (x86) program files directory of the system.
code
##### winprogdir86 = C:\Program Files (x86)
sys.winsysdir
On the Windows version of CFEngine Enterprise, this is the path to the Windows
system directory.
code
##### winsysdir = C:\WINDOWS\system32
sys.workdir
The location of the CFEngine work directory and cache.
For the system privileged user this is normally:
code
##### workdir = /var/cfengine
For non-privileged users it is in the user's home directory:
code
##### workdir = /home/user/.cfagent
On the Windows version of CFEngine Enterprise, it is normally under program
files (the directory name may change with the language of Windows):
code
##### workdir = C:\Program Files\CFEngine
this
The context this is used to access information about promises during
their execution. It is context dependent and not universally meaningful
or available, but provides a context for variables where one is needed
(such as when passing the value of a list variable into a parameterized
edit_line promise from a files promise).
code
bundle agent resolver(s,n)
{
files:
"$(sys.resolv)"
create => "true",
edit_line => doresolv("@(this.s)","@(this.n)"),
edit_defaults => reconstruct;
}
Note that every unqualified variable is automatically considered to be
in context this, so that a reference to the variable $(foo) is
identical to referencing $(this.foo). You are strongly encouraged to
not take advantage of this behavior, but simply to be aware that if
you attempt to declare a variable name with one of the following special
reserved names, CFEngine will issue a warning (and you can reference
your variable by qualifying it with the bundle name in which it is
declared).
this.bundle
This variable contains the current bundle name.
this.handle
This variable points to the promise handle of the currently handled
promise; it is useful for referring to the intention in log messages.
this.namespace
This variable contains the current namespace name.
this.promise_filename
This variable reveals the name of the file in which the current promise
is defined.
this.promise_dirname
This variable contains the directory name of the file in which the
current promise is defined.
this.promise_linenumber
This variable reveals the line number in the file at which it is used.
It is useful to differentiate otherwise identical reports promises.
this.promiser
The special variable $(this.promiser) is used to refer to the current
value of the promiser itself.
In files promises, where it is practical to use patterns or depth_search
to match multiple objects, the variable refers to the file that is currently
making the promise. However, the variable can only be used in selected
attributes:
For example:
code
bundle agent find666
{
files:
"/home"
file_select => world_writeable,
transformer => "/bin/echo DETECTED $(this.promiser)",
depth_search => recurse("inf");
"/etc/.*"
file_select => world_writeable,
transformer => "/bin/echo DETECTED $(this.promiser)";
}
body file_select world_writeable
{
search_mode => { "o+w" };
file_result => "mode";
}
this.promiser_uid
This variable refers to the uid (user ID) of the user running the cf-agent program.
Note: This variable is reported by the platform dependent getuid function,
and is always an integer.
this.promiser_gid
This variable refers to the gid (group ID) of the user running the cf-agent program.
Note: This variable is reported by the platform dependent getgid function,
and is always an integer.
this.promiser_pid
This variable refers to the pid (process ID) of the cf-agent program.
Note: This variable is reported by the platform dependent getpid function,
and is always an integer.
this.promiser_ppid
This variable refers to the ppid (parent process ID) of the cf-agent program.
Note: This variable is reported by the platform dependent getpid function,
and is always an integer. On the Windows platform it's always 0.
this.service_policy
In a service_method used by a services type promise, this variable is set to
the value of the service_policy promise attribute . For example:
code
bundle agent example
{
services:
"www"
service_policy => "start";
service_method => non_standard_services;
}
body service_method non_standard_services
{
service_bundle => non_standard_services( $(this.service_policy) );
}
This is typically used in the adaptations for custom services bundles in
the service methods.
See also:
Services Bundles and Bodies in the Masterfiles Policy Framework standard
library
this.this
From version 3.3.0 on, this variable is reserved. It is used by
functions like maplist() to represent the current object in a
transformation map.
Masterfiles Policy Framework
The Masterfiles Policy Framework or MPF also commonly reffered to as simply
masterfiles is the policy framework that ships with CFEngine.
The Masterfiles Policy Framework (MPF) is the default policy
that ships with both the CFEngine Enterprise and
Community editions. The MPF includes policy to manage
CFEngine itself, the standard library (stdlib), and policy
to inventory various aspects of the system.
Overview
The MPF is continually updated. You can track its development
on github.
Configuration
The most common controls reference variables in the def bundle in order to
keep the modifications to the distributed policy contained within a single
place. The recommended way to set classes and define variables in the def
bundle is using an augments file. Keeping the modifications to the
distributed policy set makes policy framework upgrades significantly easier.
Note: If you need to make modification to a shipped file consider opening a pull
request to expose the tunable into the def bundle.
Note: controls/def.cf contains the defaults and settings for promises.cf
and controls/update_def.cf contains the defaults and settings for update.cf.
History:
- In 3.7.8, 3.10.4, and 3.12.0 the class
cf_runagent_initiated is defined by
default in the MPF for agent executions initiated by cf-runagent through
cf-serverd. Previously the class cfruncommand was defined. See body server
control cfruncommand in controls/cf_serverd.cf.
Update policy (update.cf)
Synchronizing clients with the policy server happens here, in
update.cf. Its main job is to copy all the files on the policy
server (usually the hub) under $(sys.masterdir) (usually
/var/cfengine/masterfiles) to the local host into $(sys.inputdir)
(usually /var/cfengine/inputs).
This file should rarely if ever change. Should you ever change it (or
when you upgrade CFEngine), take special care to ensure the old and
the new CFEngine can parse and execute this file successfully. If not,
you risk losing control of your system (that is, if CFEngine cannot
successfully execute update.cf, it has no mechanism for distributing
new policy files).
By default, the policy defined in update.cf is executed at the
beginning of a cf-execd scheduled agent run (see schedule and
exec_command as defined in body executor control in
controls/cf_execd.cf). When the update policy completes
(regardless of success or failure) the policy defined in promises.cf
is activated.
This is a standalone policy file. You can actually run it with
cf-agent -KI -f ./update.cf but if you don't understand what that
command does, please hold off until you've gone through the CFEngine
documentation. The contents of update.cf duplicate other things
under lib sometimes, in order to be completely standalone.
To repeat, when update.cf is broken, things go bonkers. CFEngine
will try to run a backup failsafe.cf you can find in the C core
under libpromises/failsafe.cf (that .cf file is written into the C
code and can't be modified). If things get to that point, you probably
have to look at why corrupted policies made it into production.
As is typical for CFEngine, the policy and the configuration are mixed. In
controls/update_def.cf you'll find some very useful settings. Keep referring
to controls/update_def.cf as you read this. We are skipping the nonessential
ones.
Want to get your policy from a place other than /var/cfengine/masterfiles on
sys.policy_hub?
With an augments like this:
code
{
"variables": {
"default:def.house": {
"value": "Gryffindor"
},
"default:def.mpf_update_policy_master_location": {
"value": "/srv/cfengine/$(default:sys.flavor)/$(default:def.house)"
}
}
}
A CentOS 7 host would copy policy from /srv/cfengine/centos_6/Gryffindor to
$(sys.inputdir) (commonly /var/cfengine/inputs).
History:
You can append to the inputs used by the update policy via augments by defining
vars.update_inputs. The following example will add the policy file
my_updatebundle1.cf to the list of policy file inputs during the update policy.
code
{
"variables": {
"default:def.update_inputs": {
"value": [
"my_updatebundle1.cf"
]
}
}
}
Evaluate additional bundles during update (bundlesequence)
You can specify bundles which should be run at the end of the default update
policy bundlesequence by defining control_common_update_bundlesequence_end
in the vars of an augments file.
For example:
code
{
"variables": {
"default:def.control_common_update_bundlesequence_end": {
"value": [
"my_updatebundle1",
"mybundle2"
]
}
}
}
Notes:
- The order in which bundles are actuates is not guaranteed.
- The agent will error if a named bundle is not part of inputs.
Specify the agent bundle used for policy update
The MPF uses cfe_internal_update_policy_cpv to update inputs and modules on
remote agents. When new policy is verified by the agent
/var/cfengine/masterfiles/cf_promises_validated is updated with the current
timestamp. This file is used by remote agents to avoid unnecessary inspection of
all files each time the update policy is triggered.
Override this bundle by setting def.mpf_update_policy_bundle via augments:
code
{
"variables": {
"default:def.mpf_update_policy_bundle": {
"value": "MyCustomPolicyUpdateBundle"
}
}
}
History:
Ignore missing bundles
This option allows you to ignore errors when a bundle specified in body common control bundlesequence is not found.
This example illustrates enabling the option via augments.
code
{
"variables": {
"default:def.control_common_ignore_missing_bundles": {
"value": "true"
}
}
}
NOTE: The same augments key is used for both update.cf and promsies.cf entries.
History:
This option allows you to ignore errors when a file specified in body common control inputs is not found.
This example illustrates enabling the option via augments.
code
{
"variables": {
"default:def.control_common_ignore_missing_inputs": {
"value": "true"
}
}
}
NOTE: The same augments key is used for both update.cf and promsies.cf entries.
History:
Verify update transfers
Enable additional verrification after file transfers during policy update by
defining the class cfengine_internal_verify_update_transfers. When this
class is defined, the update policy will hash the transfered file and compare it
against the hash given by the server
This augments file will enable this behavior for all clients.
code
{
"classes": {
"default:cfengine_internal_verify_update_transfers": {
"regular_expressions": [
"any"
]
}
}
}
Encrypted transfers
Note: When using protocol version 2 or greater all communications are
encapsulated within a TLS session. This configuration option is only relevant
for clients using protocol version 1 (default for versions 3.6 and prior).
To enable encryption during policy updates define the class
cfengine_internal_encrypt_transfers.
Preserve permissions
By default the MPF does not enforce permissions of inputs. When
masterfiles are copied to inputs, new files are created with default
restrictive permissions. If the class
cfengine_internal_preserve_permissions is defined the permissions of the
policy server's masterfiles will be preserved when they are copied.
Enable CFEngine Enterprise HA
When the enable_cfengine_enterprise_hub_ha class is defined the policy to
manage High Availability of Enterprise Hubs is enabled.
Note: This class is not defined by default.
Disable plain HTTP for CFEngine Enterprise Mission Portal
By default Mission Portal listens for HTTP requests on port 80, redirecting to HTTPS on port 443. To prevent the web server from listening on port 80 at all define default:cfe_cfengine_enterprise_disable_plain_http.
For example:
code
{
"classes": {
"default:cfe_enterprise_disable_plain_http": {
"class_expressions": [ "am_policy_hub|policy_server::" ]
}
}
}
Notes:
- If this class (
default:cfe_enterprise_disable_http_redirect_to_https) is defined the class default:cfe_enterprise_disable_plain_http is defined is automatically defined.
History:
- Added in CFEngine 3.23.0, 3.21.3
Disable plain HTTP redirect to HTTPS for CFEngine Enterprise Mission Portal
By default Mission Portal listens for HTTP requests on port 80, redirecting to HTTPS on port 443. To prevent redirection of requests on HTTP to HTTPS define default:cfe_enterprise_disable_http_redirect_to_https.
For example:
code
{
"classes": {
"default:cfe_enterprise_disable_http_redirect_to_https": {
"class_expressions": [ "(am_policy_hub|policy_server).test_server::" ]
}
}
}
Notes:
- If
default:cfe_enterprise_disable_plain_http is defined, this class (default:cfe_enterprise_disable_http_redirect_to_https) is automatically defined.
History:
- Added in CFEngine 3.6.0
- Class renamed from
cfe_cfengine_enterprise_enable_plain_http to cfe_enterprise_disable_http_redirect_to_https in CFEngine 3.23.0, 3.21.3
Disable cf_promises_validated check
For non policy hubs the default update policy only performs a full scan of
masterfiles if cf_promises_validated is repaired. This repair indicates
that the hub has validated new policy that the client needs to refresh.
To disable this check define the
cfengine_internal_disable_cf_promises_validated class.
It not recommended to disable this check as it both removes a safety mechanism
that checks for policy to be valid before allowing clients to download updates,
and the increased load on the hub will affect scalability.
If you want to periodically perform a full scan consider adding custom policy to
simply remove $(sys.inputdir)/cf_promises_validated. This will cause the
file to be repaired during the next update run triggering a full scan.
Disable automatically removing files not present upstream (SYNC masterfiles)
By default, the MPF will keep inputdir in sync with masterfiles on the hub. If
the class cfengine_internal_purge_policies_disabled is defined the update
behavior will only keep files that exist on the remote up to date locally, files
that exist locally that do not exist upstream will be left behind. Note, if this
is disabled and a policy file that is dynamically loaded based on it's presence
is renamed, duplicate definition errors may occur, preventing policy execution.
This augments file will enable this behavior for all clients.
code
{
"classes": {
"default:cfengine_internal_purge_policies_disabled": {
"regular_expressions": [
"any"
]
}
}
}
History:
- Introduced in 3.18.0, previously, the default behavior was opposite and the class
cfengine_internal_purge_policies had to be enabled to keep inputs in sync with masterfiles.
Disable limiting robot agents
By default the MPF (Masterfiles Policy Framework) contains active policy that is intended to remediate a pathological condition where multiple agent component daemons (like cf-execd) are running concurrently.
Define the class mpf_disable_cfe_internal_limit_robot_agents to disable this automatic remediation.
code
{
"classes": {
"default:mpf_disable_cfe_internal_limit_robot_agents": {
"regular_expressions": [
"any"
]
}
}
}
History:
- Introduced in 3.15.0, 3.12.3, 3.10.7
Automatically deploy policy from version control
On a CFEngine Enterprise Hub during the update policy if the class
cfengine_internal_masterfiles_update is defined masterfiles will be
automatically deployed from an upstream version control repository using
the
settings defined via Mission Portal or
directly in /opt/cfengine/dc-scripts.
Note: Any policy in the distribution location (/var/cfengine/masterfiles)
will be deleted the first time this tooling runs. Be wary of local modifications
before enabling.
Exclude files in policy analyzer
When the policy analyzer is enabled, a copy of the policy is made available for viewing from Mission Portal. To exclude files from this view you can define def.cfengine_enterprise_policy_analyzer_exclude_files as a list of regular expressions matching files that you do not want to be viewable from Policy Analyzer.
This augments file will prevent any files named please-no-copy and any file names that contain no-copy-me from being copied and visible from Policy Analyzer.
code
{
"variables": {
"default:def.cfengine_enterprise_policy_analyzer_exclude_files": {
"value": [ "please-no-copy", ".*no-copy-me.*" ]
}
}
}
History:
Policy permissions
By default the policy enforces permissions of 0600 meaning that inputs are
only readable by their owner. If you are distributing scripts with your
masterfiles, be sure there is a policy to ensure they are executable when you
expect them to be.
Agent binary upgrades
Remote agents can upgrade their own binaries using the built in binary upgrade
policy. Packages must be placed in /var/cfengine/master_software_updates in
the appropriate platform directory. Clients will automatically download and
install packages when the trigger_upgrade class is defined during a run of
update.cf.
By default self upgrade targets the binary version running on the hub. Specify a specific version by defining default:def.cfengine_software_pkg_version.
This augments file will defines trigger_upgrade on hosts that are not policy servers that are also not running CFEngine version 3.21.3.
code
{
"classes": {
"default:trigger_upgrade": {
"class_expressions": [
"!(am_policy_hub|policy_server).!cfengine_3_21_3::"
],
"comment": "We want clients to self upgrade their binary version if they aren't running the desired version."
}
},
"variables": {
"default:def.cfengine_software_pkg_version": {
"value": "3.21.3",
"comment": "When self upgrading, this is the binary version we want to be installed."
}
}
}
Notes:
- This policy is specific to CFEngine Enterprise.
- If using a regular expression based on CFEngine version, use a negative look ahead to disable self upgrade when the host reaches the desired version. e.g.
cfengine_3_18_(?!2$)\\d+ matches hosts running CFEngine 3.18 but not 3.18.2 specifically.
History:
- Changed default binary version from policy version to hub binary version in 3.23.0
def.master_software_updates defines the path that cfengine policy servers
share software updates from. Remote agents access this path via the
master_software_updates shortcut. By default this path is
$(sys.workdir)/master_software_updates. This path can be overridden via
vars.dir_master_software_updates in augments.
For example:
code
{
"variables": {
"default:def.dir_master_software_updates": {
"value": "/srv/cfengine-software-updates/"
}
}
}
History:
- Introduced 3.15.0, 3.12.3, 3.10.8
Disable seeding binaries on hub
By default when trigger_upgrade is defined on a hub, the hub will download
packages for agents to use during self upgrade. This automatic download behavior
is disabled when the class mpf_disable_hub_masterfiles_software_update_seed is
defined.
For example:
code
{
"classes": {
"default:mpf_disable_hub_masterfiles_software_update_seed": {
"class_expressions": [ "policy_server::" ]
}
}
}
History:
- Introduced 3.19.0, 3.18.1
Override files considered for copy during policy updates
The default update policy only copies files that match regular expressions
listed in def.input_name_patterns.
This augments file ensures that only files ending in .cf, .dat,
.mustache, .json, .yaml and the file
cf_promises_release_id will be considered by the default update policy.
code
{
"variables": {
"default:def.input_name_patterns": {
"value": [
".*\\.cf", ".*\\.dat", ".*\\.txt", ".*\\.conf",
".*\\.mustache", ".*\\.sh", ".*\\.pl", ".*\\.py", ".*\\.rb",
".*\\.sed", ".*\\.awk", "cf_promises_release_id", ".*\\.json",
".*\\.yaml", ".*\\.csv"
]
}
}
}
Note: This filter does not apply to bootstrap operations. During
bootstrap the
embedded
failsafe policy is
used and it decides which files should be copied.
Extend files considered for copy during policy updates
The default update policy only copies files that match regular expressions
listed in default:def.input_name_patterns. The variable
default:update_def.input_name_patterns allows the definition of additional
filename patterns without having to maintain the full set of defaults.
This augments file additionally ensures that files ending in
.tpl, .md, and .org are also copied.
code
{
"variables": {
"default:update_def.input_name_patterns_extra": {
"value": [ ".*\\.tpl", ".*\\.md", ".*\\.org" ],
"comment": "We use classic CFEngine templates suffixed with .tpl so they should be copied along with documentation."
}
}
}
Note: This filter does not apply to bootstrap operations. During
bootstrap the embedded
failsafe policy
is used and it decides which files should be copied.
History:
- Introduced in CFEngine 3.23.0, 3.21.3
Configuring component management
The Masterfiles Policy Framework ships with policy to manage the components of CFEngine.
By default, for hosts without systemd, this policy defaults to ensuring that components are running.
On systemd hosts, the policy to manage component units is disabled by default.
Enable management of components on systemd hosts
To allow the Masterfiles Policy Framework to actively manage cfengine systemd units and state define the mpf_enable_cfengine_systemd_component_management.
This example illustrates enabling management of components on systemd hosts having a class matching redhat_8 via augments.
code
{
"classes": {
"default:mpf_enable_cfengine_systemd_component_management": {
"regular_expressions": [ "redhat_8" ]
}
}
}
When enabled, the policy will render systemd unit files in /etc/systemd/system for managed services. Mustache templates for service units are in the templates directory in the root of the Masterfiles Policy Framework.
When enabled, the policy will make sure that all units are enabled, unless they have been disabled by a persistent class or are explicitly listed as an agent to be disabled.
Class: default:persistent_disable_*DAEMON*
Description: Disable a CFEngine Enterprise daemon component persistently.
DAEMON can be one of cf_execd, cf_monitord or cf_serverd.
This will stop the AGENT from starting automatically.
This augments file will ensure that cf-monitord is disabled on hosts that have
server1 or the redhat class defined.
code
{
"classes": {
"default:persistent_disable_cf_monitord": {
"regular_expressions": [ "server1", "redhat" ]
}
}
}
Class: clear_persistent_disable_*DAEMON*
Description: Re-enable a previously disabled CFEngine Enterprise daemon
component.
DAEMON can be one of cf_execd, cf_monitord or cf_serverd.
This augments file will ensure that cf-monitord is not disabled on redhat
hosts.
code
{
"classes": {
"default:clear_persistent_disable_cf_monitord": {
"regular_expressions": [ "redhat" ]
}
}
}
Variable: default:def.agents_to_be_disabled
Description: list of agents to disable.
This augments file is a way to specify that cf-monitord should be disabled on all hosts.
code
{
"variables": {
"default:def.agents_to_be_disabled": {
"value": [ "cf-monitord" ]
}
}
}
Main policy (promises.cf)
The following settings are defined in controls/def.cf can be set from an
augments file.
Automatically migrate ignore_interfaces.rx to workdir
ignore_interfaces.rx defines regular expressions matching network interfaces that CFEngine should ignore.
Prior to 3.23.0 this file was expected to be found in
$(sys.inputdir)/ignore_interfaces.rx. Beginning with 3.23.0 preference is
given to $(sys.workdir)/ignore_interfaces.rx if it is found. A WARNING is
emitted by cfengine if the file is found only in $(sys.inputdir).
When the class default:mpf_auto_migrate_ignore_interfaces_rx_to_workdir is
defined (not defined by default) $(sys.workdir)/ignore_interfaces.rx is
maintained as a copy of $(sys.inputdir)/ignore_interfaces.rx.
code
{
"classes": {
"default:mpf_auto_migrate_ignore_interfaces_rx_to_workdir": {
"class_expressions": [ "cfengine_3_23|cfengine_3_24::" ],
"comment": "Automatically migrate ignore_interfaces.rx to workdir."
}
}
}
Additionally, to disable reports about the presence of
$(sys.inputdir)/ignore_interfaces.rx define the class
default:mpf_auto_migrate_ignore_interfaces_rx_to_workdir_reports_disabled.
When this class is not defined, cf-agent will emit reports indicating it's
presence and state in relation to $(sys.workdir)/ignore_interfaces.rx.
code
{
"classes": {
"default:mpf_auto_migrate_ignore_interfaces_rx_to_workdir_reports_disabled": {
"class_expressions": [ "cfengine_3_23|cfengine_3_24::" ],
"comment": "We don't want reports about legacy ignore_interfaces.rx to be emitted."
}
}
}
History:
- Introduced
default:mpf_auto_migrate_ignore_interfaces_rx_to_workdir and default:mpf_auto_migrate_ignore_interfaces_rx_to_workdir_reports_disabled in 3.23.0, 3.21.4
dmidecode inventory
When dmidecode is present, some key system attributes are inventoried. The
inventoried attributes can be overridden by defining
def.cfe_autorun_inventory_demidecode[dmidefs] via augments. dmidecode queries
each key in dmidefs and tags the result with the value prefixed with
attribute_name= Note, as the dmidefs are overridden, you must supply all
desired inventory attributes.
For example:
code
{
"variables": {
"default:def.cfe_autorun_inventory_dmidecode": {
"value": {
"dmidefs": {
"bios-vendor": "BIOS vendor",
"bios-version": "BIOS version",
"system-serial-number": "System serial number",
"system-manufacturer": "System manufacturer",
"system-version": "System version",
"system-product-name": "System product name",
"bios-release-date": "BIOS release date",
"chassis-serial-number": "Chassis serial number",
"chassis-asset-tag": "Chassis asset tag",
"baseboard-asset-tag": "Baseboard asset tag"
}
}
}
}
}
History:
- Introduced 3.13.0, 3.12.1, 3.10.5
By default the MPF inventories consoles, cpuinfo, modules, partitions, and version from /proc.
This can be adjusted by defining default:cfe_autorun_inventory_proc.basefiles.
For example:
code
{
"variables": {
"default:cfe_autorun_inventory_proc.basefiles": {
"value": [
"consoles",
"cpuinfo",
"version"
],
"comment": "We do not need the extra variables this produces since we get the info differently",
"tags": [
"Custom override MPF default"
]
}
}
}
History:
To configure the syslog facility used by cf-agent configure agentfacility by
setting default:def.control_agent_agentfacility via augments to one of the
allowed values (LOG_USER, LOG_DAEMON, LOG_LOCAL0, LOG_LOCAL1,
LOG_LOCAL2, LOG_LOCAL3, LOG_LOCAL4, LOG_LOCAL5, LOG_LOCAL6,
LOG_LOCAL7)
code
{
"variables": {
"default:def.control_agent_agentfacility": {
"value": "LOG_USER"
}
}
}
History:
mailto
The address that cf-execd should email agent output to. Defaults to root@$(default:def.domain).
This setting can be customized via Augments, for example:
code
{
"variables": {
"default:def.mailto": {
"value": "cfengine-maintainers@example.com",
"comment": "When output differs from the prior execution cf-execd will deliver the output to this Email address for review."
}
}
}
mailfrom
The address that output mailed from cf-execd should come from. Defaults to root@$(sys.uqhost).$(def.domain).
This setting can be customized via Augments, for example:
code
{
"variables": {
"default:def.mailfrom": {
"value": "cfengine@example.com",
"comment": "Email sent from cf-execd should come from this address."
}
}
}
smtpserver
The SMTP server that cf-execd should use to send emails. Defaults to localhost.
This setting can be customized via Augments, for example:
code
{
"variables": {
"default:def.smtpserver": {
"value": "smtp.example.com",
"comment": "The smtp server that should be used when sending email from cf-execd."
}
}
}
mailmaxlines
The maximum number of lines of output that cf-execd will email. Defaults to 30.
This setting can be customized via Augments, for example:
code
{
"variables": {
"default:def.mailmaxlines": {
"value": "50",
"comment": "The maximum number of lines cf-execd should email."
}
}
}
domain
The domain the host is configured for. Defaults to domain configured on system, e.g. the output from hostname -d. This setting influences sys.domain and mailfrom if not customized.
This setting can be customized via Augments, for example:
code
{
"variables": {
"default:def.domain": {
"comment": "Override domain as configured on the host.",
"value": "exmaple.net"
}
}
}
History:
- Added in CFEngine 3.22.0, 3.21.1, 3.18.4
See also: mailmaxlines
When enabled cf-execd emails output that differs from previous executions. The subject of the email can be configured by setting mailsubject in body executor control. This will use the value of default:def.control_executor_mailsubject if it is a non-empty string.
code
{
"variables": {
"default:def.control_executor_mailsubject": {
"value": "CFEngine output from $(sys.fqhost)"
}
}
}
History:
When enabled cf-execd emails output that differs from previous executions.
Lines matching regular expressions in mailfilter_exclude in body executor
control are stripped before sending. The MPF will use the value of
default:def.control_executor_mailfilter_exclude if it is a non-empty list.
code
{
"variables": {
"default:def.control_executor_mailfilter_exclude": {
"value": [ ".*ps output line.*", ".*regline.*" ]
}
}
}
History:
When enabled cf-execd emails output that differs from previous executions.
Lines matching regular expressions in mailfilter_include in body executor
control are stripped before sending. The MPF will use the value of
default:def.control_executor_mailfilter_include if it is a non-empty list.
code
{
"variables": {
"default:def.control_executor_mailfilter_include": {
"value": [ ".*EMAIL.*" ]
}
}
}
History:
acl
def.acl is a list of of network ranges that should be allowed to connect to cf-serverd. It is also used in the default access promises to allow hosts access to policy and modules that should be distributed.
Here is an example setting the acl from augments:
code
{
"variables": {
"default:def.acl": {
"value": [ "24.124.0.0/16", "192.168.33.0/24" ]
}
}
}
Notes:
- Unless the class
default:disable_always_accept_policy_server_acl is defined the value of $(sys.policy_hub) server is automatically added to this producing def.acl_derived which is used by the default access promises.
See also: Configure networks allowed to make collect calls (client initiated reporting)
History:
- Automatic inclusion of
$(sys.policy_hub) added in 3.23.0
allowconnects is a list of IP addresses or subnets in body server control which restricts hosts that are allowed to connect to cf-serverd. This is the first layer of access control in cf-serverd, a client coming from a host not covered by this list will not be able to connect to cf-serverd at all.
In the MPF this defaults to include localhost and the value defined for default:def.acl.
allowconnects can be customized by configuring default:def.control_server_allowconnects via Augments. Note, this will overwrite the default value which includes 127.0.0.1 , ::1, and @(def.acl) that you may want to include.
For example, this configuration allows any IPv4 client to connect to cf-serverd.
code
{
"variables": {
"default:def.control_server_allowconnects": {
"value": [
"0.0.0.0/0"
]
}
}
}
Notes:
- The value of
$(sys.policy_hub) server is automatically included in the value used by allowconnects in body server control unless the class default:disable_always_accept_policy_server_allowconnects is defined.
- Alternatively define
default:disable_always_accept_policy_server to disable this behavior for allowconnects, allowallconnects and def.acl concurrently.
History:
- Added in 3.22.0
- Automatic inclusion of
$(sys.policy_hub) added in 3.23.0
allowallconnects is a list of IP addresses or subnets in body server control specifying hosts that are allowed to have more than one connection to cf-serverd.
In the MPF this defaults to include localhost and the value defined for default:def.acl.
allowallconnects can be customized by configuring default:def.control_server_allowallconnects via Augments.
For example, this configuration allows any IPv4 client from the 192.168.56.0/24 subnet to have multiple concurrent connections to cf-serverd.
code
{
"variables": {
"default:def.control_server_allowallconnects": {
"value": [
"192.168.56.0/24"
]
}
}
}
Notes:
- The value of
$(sys.policy_hub) is automatically included in the value used by allowallconnects in body server control unless the class default:disable_always_accept_policy_server_allowallconnects is defined.
- Alternatively define
default:disable_always_accept_policy_server to disable this behavior for allowconnects, allowallconnects and def.acl concurrently.
History:
- Added in 3.22.0
- Automatic inclusion of
$(sys.policy_hub) added in 3.23.0
Ignore missing bundles
This option allows you to ignore errors when a bundle specified in body common control bundlesequence is not found.
This example illustrates enabling the option via augments.
code
{
"variables": {
"default:def.control_common_ignore_missing_bundles": {
"value": "true"
}
}
}
NOTE: The same augments key is used for both update.cf and promises.cf entries.
History:
This option allows you to ignore errors when a file specified in body common control inputs is not found.
This example illustrates enabling the option via augments.
code
{
"variables": {
"default:def.control_common_ignore_missing_inputs": {
"value": "true"
}
}
}
NOTE: The same augments key is used for both update.cf and promises.cf entries.
History:
lastseenexpireafter
This option configures the number of minutes after which last-seen entries in
cf_lastseen.lmdb are purged. If not specified, the MPF defaults to the binary
default of 1 week (10080 minutes).
code
{
"variables": {
"default:def.control_common_lastseenexpireafter": {
"value": "30240",
"comment": "We want to retain history of hosts in the last-seen database for 21 days"
}
}
}
History:
- Introduced in 3.23.0, 3.21.3
Automatic bootstrap - Trusting keys from new hosts with trustkeysfrom
The list of network ranges that cf-serverd should trust keys from. This is
should only be open on policy servers while new hosts are expected to be
bootstrapped. It should be empty after your hosts have been bootstrapped to
avoid unwanted hosts from being able to bootstrap.
By default the MPF configures cf-serverd to trust keys from any host. This is
convenient for simplified bootstrapping. After initial deployment it is
recommended that this setting be reviewed and adjusted appropriately according
to the needs of your infrastructure.
The augments file (def.json) can be used to override the
default setting. For example it can be restricted to 127.0.0.1 to prevent
keys from any foreign host from being automatically accepted.
code
{
"variables": {
"default:def.trustkeysfrom": {
"value": [
"127.0.0.1"
]
}
}
}
Prevent automatic trust for any host by specifying an empty value:
code
{
"variables": {
"default:def.trustkeysfrom": {
"value": [
""
]
}
}
}
Append to inputs used by main policy
The inputs key in augments can be used to add additional custom policy files.
See also: Append to inputs used by update policy
History:
- Introduced in CFEngine 3.7.3, 3.12.0
Enabling autorun: services_autorun
See the documentation in services/autorun.
postgresql_full_maintenance
On CFEngine Enterprise policy hubs this class is defined by default on Sundays
at 2am. To adjust when postgres maintenance operations run edit
controls/def.cf directly.
postgresql_vacuum
On CFEngine Enterprise policy hubs this class is defined by default at 2am when
postgresql_maintenance_supported is defined except for Sundays.
To adjust when postgres maintenance operations run edit controls/def.cf
directly.
enable_cfengine_enterprise_hub_ha
Set this class when you want to enable the CFEngine Enterprise HA policies.
This class can be defined by an augments file. For example:
code
{
"classes": {
"default:enable_cfengine_enterprise_hub_ha": {
"regular_expressions": [
"hub001"
]
}
}
}
enable_cfe_internal_cleanup_agent_reports
This class enables policy that cleans up report diffs when they exceed
def.max_client_history_size. By default is is off unless a CFEngine
Enterprise agent is detected.
splaytime is the maximum number of minutes exec_commad should wait before executing.
Note: splaytime should be less than the scheduled interval plus agent run time. So for example if your agent run time is over 1 minute and you are running the default execution schedule of 5 minutes your splay time should be set to 3.
Configure it via augments by defining control_executor_splaytime:
code
{
"variables": {
"default:def.control_executor_splaytime": {
"value": "3"
}
}
}
cf-agents spawned by cf-execd are killed after this number of minutes of not returning data.
Example configuration via augments:
code
{
"variables": {
"default:def.control_executor_agent_expireafter": {
"value": "15"
}
}
}
The execution scheduled is expressesd as a list of classes. If any of the classes are defined when cf-execd wakes up then exec_command is triggered. By default this is set to a list of time based classes for every 5th minute. This results in a 5 minute execution schedule.
Example configuration via augments:
code
{
"variables": {
"default:def.control_executor_schedule": {
"value": [
"Min00",
"Min30"
]
}
}
}
The above configuration would result in exec_command being triggered at the top and half hour and sleeping for up to splaytime before agent execution.
On Enterprise hubs, access to cf-execd sockets can be configured as a list of users who should be allowed by defining vars.control_executor_runagent_socket_allow_users. By default on Enterprise Hubs, cfapache is allowed to access runagent sockets.
code
{
"variables": {
"default:def.control_executor_runagent_socket_allow_users": {
"value": [
"cfapache",
"vpodzime"
]
}
}
}
History:
Allow connections from the classic/legacy protocol
By default since 3.9.0 cf-serverd disallows connections from the classic protocol by default. To allow clients using the legacy protocol (versions prior to 3.7.0 by default) define control_server_allowlegacyconnects as a list of networks.
Example definition in augments file:
code
{
"variables": {
"default:def.control_server_allowlegacyconnects": {
"value": [
"0.0.0.0/0"
]
}
}
}
When default:def.control_server_allowciphers is defined cf-serverd will use the ciphers specified instead of the binary defaults.
Example definition in augments file:
code
{
"variables": {
"default:def.control_server_allowciphers": {
"value": "AES256-GCM-SHA384:AES256-SHA",
"comment": "Restrict the ciphers that cf-serverd is allowed to use for better security"
}
}
}
Notes:
- Be careful changing this setting. A setting that is not well aligned between all clients and the server could result in clients not being able to communicate with the hub preventing further policy updates.
History:
When default:def.control_common_tls_ciphers is defined cf-agent will use the ciphers specified instead of the binary defaults for outgoing connections.
Example definition in augments file:
code
{
"variables": {
"default:def.control_common_tls_ciphers": {
"value": "AES256-GCM-SHA384:AES256-SHA",
"comment": "Restrict the ciphers that are used for outgoing connections."
}
}
}
Notes:
- Be careful changing this setting. A setting that is not well aligned between all clients and the server could result in clients not being able to communicate with the hub preventing further policy updates.
- This setting is instrumented in all of the default entry points (
promises.cf, update.cf, standalone_self_upgrade.cf).
History:
When default:def.control_server_allowtlsversion is defined cf-serverd will use the minimum TLS version specified instead of the binary defaults.
Example definition in augments file:
code
{
"variables": {
"default:def.control_server_allowtlsversion": {
"value": "1.0",
"comment": "We want to allow old (<3.7.0) clients to connect."
}
}
}
Notes:
- Be careful changing this setting. A setting that is not well aligned between all clients and the server could result in clients not being able to communicate with the hub preventing further policy updates.
History:
When default:def.control_common_tls_min_version is defined cf-agent will use the minimum TLS version specified instead of the binary defaults for outgoing connections.
Example definition in augments file:
code
{
"variables": {
"default:def.control_common_tls_min_version": {
"value": "1.0",
"comment": "We want to connect to old (<3.7.0) servers."
}
}
}
Notes:
- Be careful changing this setting. A setting that is not well aligned between all clients and the server could result in clients not being able to communicate with the hub preventing further policy updates.
- This setting is instrumented in all of the default entry points (
promises.cf, update.cf, standalone_self_upgrade.cf).
History:
cf-serverd only allows specified users to request unscheduled execution remotely via cf-runagent.
By default the MPF allows root to request unscheduled execution of non policy servers and does not allow any users to request unscheduled execution from policy servers.
To configure the list of users allowed to request unscheduled execution define vars.control_server_allowusers.
code
{
"variables": {
"default:def.control_server_allowusers": {
"value": [
"root",
"nickanderson",
"cfapache"
]
}
}
}
It's possible to configure different users that are allowed for policy servers versus non policy servers via vars.control_server_allowusers_non_policy_server and vars.control_server_allowusers_policy_server. However, if vars.control_server_allowusers is defined, it has precedence.
This example allows the users hubmanager and cfoperator to request unscheduled execution from policy servers and no users are allowed to request unscheduled runs from non policy servers.
code
{
"variables": {
"default:def.control_server_allowusers_non_policy_server": {
"value": []
},
"default:def.control_server_allowusers_policy_server": {
"value": [
"hubmanager",
"cfoperator"
]
}
}
}
History:
- Added in 3.13.0, 3.12.1
- Added
vars.control_server_allowusers in 3.18.0
See also: Configure hosts allowed to initiate execution via cf-runagent
cf-serverd only allows specified hosts to request unscheduled execution remotely via cf-runagent.
By default the MPF allows policy servers (as defined by def.policy-servers) to initiate agent runs via cf-runagent.
To configure the list of hosts allowed to request unscheduled execution define vars.mpf_admit_cf_runagnet_shell. This example allows the IPv4 address 192.168.42.10, the host bastion.example.com, and the host with identity SHA=43c979e264924d0b4a2d3b568d71ab8c768ef63487670f2c51cd85e8cec63834 and policy servers the ability to initiate agent runs via cf-runagent.
code
{
"variables": {
"default:def.mpf_admit_cf_runagent_shell": {
"value": [
"192.168.42.10",
"bastion.example.com",
"SHA=43c979e264924d0b4a2d3b568d71ab8c768ef63487670f2c51cd85e8cec63834",
"@(def.policy_servers)"
]
}
}
}
See also: Configure users allowed to initiate execution via cf-runagent
History:
By default the MPF rotates managed log files when they reach 1M in size. To configure this limit via augments define vars.mpf_log_file_max_size.
For example:
code
{
"variables": {
"default:def.mpf_log_file_max_size": {
"value": "10M"
}
}
}
By default the MPF keeps up to 10 rotated log files. To configure this limit via augments define vars.mpf_log_file_retention.
For example:
code
{
"variables": {
"default:def.mpf_log_file_retention": {
"value": "5"
}
}
}
By default the MPF retains log files in log directories (outputs, reports and application logs in Enterprise) for 30 days. This can be configured by setting vars.mpf_log_dir_retention via augments.
For example:
code
{
"variables": {
"default:def.mpf_log_dir_retention": {
"value": "7"
}
}
}
By default the MPF is configured to retain reports generated by the asynchronous query api and scheduled reports generated by CFEngine Enterprise. This can be configured by setting vars.purge_scheduled_reports_older_than_days via augments.
code
{
"variables": {
"default:def.purge_scheduled_reports_older_than_days": {
"value": "30"
}
}
}
Adjust the maximum amount of client side report data to retain (CFEngine Enterprise)
Enterprise agents cache detailed information about each agent run locally. The
data is purged when the data is reported to a hub. If the volume of data exceeds
def.max_client_history_size then the client will purge the local data in order
to keep report collection from timing out.
The default 50M threshold can be configured using an augments file, for example:
code
{
"variables": {
"default:def.max_client_history_size": {
"value": "5M"
}
}
}
Enterprise hub pull collection schedule
By default Enterprise hubs initiate pull collection once every 5 minutes. This can be overridden in the MPF by defining def.control_hub_hub_schedule as a list of classes that should trigger collection when defined.
Here we set the schedule to initiate pull collection once every 30 minutes via augments.
code
{
"variables": {
"default:def.control_hub_hub_schedule": {
"value": [
"Min00",
"Min30"
]
}
}
}
History:
- MPF override introduced in 3.13.0, 3.12.2
By default cf-hub instructs clients to expire reports older than 6 hours in order to prevent a build up of reports that could cause a condition where the client is never able to send all reports within the collection window.
You can adjust this time by setting vars.control_hub_client_history_timeout
For example:
code
{
"variables": {
"default:def.control_hub_client_history_timeout": {
"value": "72"
}
}
}
History:
- MPF override introduced in 3.13.0, 3.12.2
Exclude hosts from hub initiated report collection
You may want to exclude some hosts like community agents, hosts behind NAT, and
hosts using client initiated reporting from hub initiated report collection. To
exclude hosts from hub initiated report collection define
def.control_hub_exclude_hosts in an augments file.
For example to completely disable hub initiated report collection:
code
{
"variables": {
"default:def.control_hub_exclude_hosts": {
"value": [
"0.0.0.0/0"
]
}
}
}
History:
- MPF override introduced in 3.13.0, 3.12.2
Change port used for enterprise report collection
By default cf-hub collects reports by connecting to port 5308. You can change this default by setting vars.control_hub_port in augments.
For example:
code
{
"variables": {
"default:def.control_hub_port": {
"value": "8035"
}
}
}
History:
Change hub to client connection timeout
By default, cf-hub times out a connection after 30 seconds.
This can be configured in augments.
For example:
code
{
"variables": {
"default:def.control_hub_query_timeout": {
"value": "10"
}
}
}
Note:
- A value of
"0" will cause the default to be used.
History:
Enable client initiated reporting
In the default configuration for Enterprise report collection the hub
periodically polls agents that are bootstrapped to collect reports. Sometimes it
may be desirable or necessary for the client to initiate report collection.
To enable client initiated reporting define the class
client_initiated_reporting_enabled. You may also want to configure the report
interval (how frequently an agent will try to report it's data to the hub) by default it is set to 5. The
reporting interval def.control_server_call_collect_interval and the class can
be defined in an augments file.
For example:
code
{
"classes": {
"default:client_initiated_reporting_enabled": {
"regular_expressions": [
"any"
]
}
},
"variables": {
"default:def.control_server_call_collect_interval": {
"value": "1"
}
}
}
By default cf-serverd holds an open connection for client initiated for 30
seconds. In some environments this value may need to be increased in order for
report collection to finish. Once the connection has been open for longer than
the specified seconds it is closed.
The window of time can be controled by setting def.control_server_collect_window.
For example, enable client initiated reporting for all hosts with a 10 minute
interval and hold the connection open for 90 seconds.
code
{
"classes": {
"default:client_initiated_reporting_enabled": {
"regular_expressions": [
"any"
]
}
},
"variables": {
"default:def.control_server_collect_window": {
"value": "90"
},
"default:def.control_server_call_collect_interval": {
"value": "10"
}
}
}
History:
- Added in 3.10.6, 3.12.2, 3.13.1
While the agent itself will reload its config upon notice of policy change this
bundle specifically handles changes to variables used in the MPF which may come
from external data sources which are unknown to the components themselves.
Currently only cf-serverd, cf-monitord, and cf-hub are handled. cf-execd is
NOT automatically restarted.
To enable this functionality define the class mpf_augments_control_enabled
code
{
"classes": {
"default:mpf_augments_control_enabled": {
"regular_expressions": [
"any"
]
}
}
}
Notes: In order for custom ACLs to leverage augments and support data based
restart you should use variables prefixed with control_server_.
For example changes to vars.control_server_my_access_rules
when mpf_augments_control_enabled is defined will result
in cf-serverd restarting.
code
{
"classes": {
"default:mpf_augments_control_enabled": {
"regular_expressions": [
"any"
]
}
},
"variables": {
"default:def.control_server_my_access_rules": {
"value": {
"/var/repo/": {
"admit": "def.acl"
}
}
}
}
}
History: Added 3.11.0
maxconnections in body server control configures the maximum number of
connections allowed by cf-serverd. Recommended to be set greater than the number
of hosts bootstrapped.
This can be configured via augments:
code
{
"variables": {
"default:def.control_server_maxconnections": {
"value": "1000"
}
}
}
History: Added 3.11.0
By default the hub allows collect calls (client initiated reporting) from the
networks defined in def.acl To configure which networks are allowed to
initiate report collection define
def.mpf_access_rules_collect_calls_admit_ips.
For example to allow client initiated reporting for hosts coming from
24.124.0.0/16:
code
{
"variables": {
"default:def.mpf_access_rules_collect_calls_admit_ips": {
"value": [
"24.124.0.0/16"
]
}
}
}
See also: Generic acl
Metrics recorded by measurement promises in cf-monitord are only collected by
default for policy servers. In order to collect metrics for non policy servers
simply define default_data_select_host_monitoring_include via in an augments file.
For example to collect all measurements for remote agents and only cpu and
memory related probes on policy servers:
code
{
"variables": {
"default:def.default_data_select_host_monitoring_include": {
"value": [
".*"
]
},
"default:def.default_data_select_policy_hub_monitoring_include": {
"value": [
"mem_.*",
"cpu.*"
]
}
}
}
History:
Primarily for developer convenience, this setting allows you to easily disable the enforcement that the webapp consists of the packaged files in the docroot used for Mission Portal.
code
{
"classes": {
"default:mpf_disable_mission_portal_docroot_sync_from_share_gui": {
"regular_expressions": [
"any"
]
}
}
}
This directive can be used to control which versions of the SSL/TLS protocol will be accepted in new connections.
code
{
"variables": {
"default:def.cfe_enterprise_mission_portal_apache_sslprotocol": {
"value": "-SSLv3 -TLSv1 -TLSv1.1 -TLSv1.2 +TLSv1.3"
}
}
}
History:
- Added in CFEngine 3.23.0, 3.21.3, 3.18.6
The SSLCACertificateFile for Mission Portal Apache is not configured by default. Define default:cfe_internal_hub_vars.SSLCACertificateFile directed to the path where the file can be found to configure it.
For example:
code
{
"variables": {
"default:cfe_internal_hub_vars.SSLCACertificateFile": {
"value": "/var/cfengine/httpd/ssl/certs/ca-bundle-client.crt"
}
}
}
History:
This directive can be used to control which SSL Ciphers will be accepted. The value defaults to HIGH but can be overridden as shown in the example below.
code
{
"variables": {
"default:def.cfe_enterprise_mission_portal_apache_sslciphersuite": {
"value": "EECDH+AESGCM:EDH+AESGCM:AES256+EECDH:AES256+EDH"
}
}
}
History:
Bundlesequence
Classification bundles before autorun
You can specify a list of bundles which should be run before autorun policies (if enabled).
code
{
"variables": {
"default:def.control_common_bundlesequence_classification": {
"value": [
"classification_one",
"classification_two"
]
}
},
"inputs": [
"services/my_classificaton.cf"
]
}
History:
Append to the main bundlesequence
You can specify bundles which should be run at the end of the default
bundlesequence by defining control_common_bundlesequence_end in the vars
of an augments file.
For example:
code
{
"variables": {
"default:def.control_common_bundlesequence_end": {
"value": [
"mybundle1",
"mybundle2"
]
}
},
"inputs": [
"services/mybundles.cf"
]
}
Notes:
- The order in which bundles are actuates is not guaranteed.
- The agent will error if a named bundle is not part of inputs.
History: Added in 3.10.0
Configure a list of regular expressions that result in cf-agent terminating
itself upon definition of a matching class.
For example, abort execution if any class starting with error_ or abort_ is defined:
code
{
"variables": {
"default:def.control_agent_abortclasses": {
"value": [
"error_.*",
"abort_.*"
]
}
}
}
History: Added in 3.15.0, 3.12.3
Configure a list of regular expressions that match classes which if defined lead
to termination of current bundle.
If no list is defined, then a default of abortbundle is used.
For example, abort execution if any class starting with bundle_error_ or bundle_abort_ is defined:
code
{
"variables": {
"default:def.control_agent_abortbundleclasses": {
"value": [
"bundle_error_.*",
"bundle_abort_.*"
]
}
}
}
History: Added in 3.15.0, 3.12.3
Specify a list of regular expressions that when matched will prevent the agent
from performing subsequent copy operations on the same promiser.
For example, to only allow any file to be copied a single time:
code
{
"variables": {
"default:def.control_agent_files_single_copy": {
"value": [
".*"
]
}
}
}
History: Added in 3.11.0, 3.10.2
Disable automatic policy hub detection
During bootstrap, if the executing host finds the IP address of the target on
itself it automatically classifies the host as a policy server by ensuring the
$(sys.statedir)/am_policy_hub file exists. When this file exists, the
am_policy_hub and policy_server classes are defined. To help avoid
accidental declassification, the MPF contains policy to regularly check if the
host is bootstrapped to an IP found on itself, and if so, to ensure the proper
state file exists.
To disable this check, define mpf_auto_am_policy_hub_state_disabled.
For example, to define this class via augments, place the following in your def.json.
code
{
"classes": {
"default:mpf_auto_am_policy_hub_state_disabled": {
"regular_expressions": [
"any"
]
}
}
}
History: Added in 3.15.0, 3.12.3, 3.10.7
By default the agent creates a backup of a file before it is edited in the same
directory as the edited file. Defining the
mpf_control_agent_default_repository class will cause these backups to be
placed in $(sys.workdir)/backups. Customize the backup directory by setting
def.control_agent_default_backup.
For example:
code
{
"classes": {
"default:mpf_control_agent_default_repository": {
"regular_expressions": [
"any"
]
}
},
"variables": {
"default:def.control_agent_default_repository": {
"value": "/var/cfengine/edit_backups"
}
}
}
Notes:
History:
- Introduced in CFEngine 3.10.1
By default the agent creates a backup of a file before it is edited in the same
directory as the edited file. This happens during policy update but the backup
files are culled by default as part of the default sync behavior.
Defining the default:mpf_update_control_agent_default_repository class will
cause these backups to be placed in $(sys.workdir)/backups. Customize the
backup directory by setting default:update_def.control_agent_default_backup.
For example:
code
{
"classes": {
"default:mpf_update_control_agent_default_repository": {
"class_expressions": [ "any::" ]
}
},
"variables": {
"default:update_def.control_agent_default_repository": {
"value": "/var/cfengine/policy-update-backups"
}
}
}
Notes:
History:
- Introduced in CFEngine 3.23.0
The MPF specifies the package module to use for managing packages and collecting software inventory based on the detected platform. Define default:def.default_package_module as a data structure keyed with values matching the value of sys.flavor for the platforms you wish to target.
Example:
code
{
"variables": {
"default:def.default_package_module": {
"value": {
"ubuntu_20": "snap",
"aix_7": "yum"
},
"comment": "This variable provides the ability to override the default package manager to use for a platform. Keys are based on the value of $(sys.flavor) for the targeted platform."
}
}
}
History:
- Added in CFEngine 3.24.0, 3.21.5, 3.18.8
The MPF inventories software for the default package module in use. Define default:def.additional_package_inventory_modules as a data structure keyed with values matching the value of sys.flavor for any additional package modules you wish to inventory by default.
code
{
"variables": {
"default:def.additional_package_inventory_modules": {
"value": {
"ubuntu_20": [ "snap", "flatpak" ],
"aix": [ "yum" ]
},
"comment": "This variable provides the ability to extend the default package managers to inventory for a platform. Keys are based on the value of $(sys.flavor) for the targeted platform."
}
}
}
History:
- Added in CFEngine 3.24.0, 3.21.5, 3.18.8
Note that there are currently two implementations of packages promises, package
modules and package methods. Each maintain their own cache of packages installed
and updates available.
For package modules
CFEngine refreshes software inventory when it makes changes via packages
promises. Additionally, by default, CFEngine refreshes it's
internal cache of packages installed (during each agent run) and package updates that
are available (once a day) according to the default package manager in order to
pick up changes made outside packages promises.
code
{
"variables": {
"default:def.package_module_query_installed_ifelapsed": {
"value": "5"
},
"default:def.package_module_query_updates_ifelapsed": {
"value": "60"
}
}
}
Warning: Beware of setting package_module_query_update_ifelapsed too low,
especially with public repositories or you may be banned for abuse.
See also: packagesmatching(), packageupdatesmatching()
History:
- Added in 3.15.0, 3.12.3
- 3.17.0 decreased
package_module_query_installed_ifelapsed from 60 to 0
For package methods
CFEngine refreshes it's cache of information about packages installed and
updates available when it evaluates packages promises if the cache has not been
updated in the number of minutes stored in package_list_update_ifelapsed of
the package method in use. Many package methods in the standard library use the
value of default:common_knowledge.list_updates_ifelapsed for this value which
can be customized via Augments.
code
{
"variables": {
"default:common_knowledge.list_update_ifelapsed": {
"value": "0"
}
}
}
Notes:
- Unlike many variables that can be customized via Augments this variable is
not in the
default:def bundle scope. Customizing it requires CFEngine
3.18.0 or newer which support targeting any namespace or variable.
See also:
- package methods:
pip,
npm, npm_g, brew, apt, apt_get,
apt_get_permissive, apt_get_release, dpkg_version,
rpm_version , yum, yum_rpm, yum_rpm_permissive,
yum_rpm_enable_repo , yum_group, rpm_filebased, ips,
smartos, opencsw, emerge, pacman, zypper,
generic
* package bundles: package_latest,
package_specific_present, package_specific_absent,
package_specific_latest, package_specific
History:
Enable logging of Enterprise License utilization
If the class enable_log_cfengine_enterprise_license_utilization is defined on
an enterprise hub license utilization will be logged by the hub in
$(sys.workdir)/log/license_utilization.log
Example enabling the class from an augments file:
code
{
"classes": {
"default:enable_log_cfengine_enterprise_license_utilization": {
"regular_expressions": [
"enterprise_edition"
]
}
}
}
History: Added in 3.11, 3.10.2
Enable external watchdog
Note: This feature is not enabled by default.
If the class cfe_internal_core_watchdog_enabled is defined, the feature is
enabled and the watchdog will be active. If the class
cfe_internal_core_watchdog_disabled is defined, the feature is disabled and
the watchdog will not be active.
code
{
"classes": {
"default:cfe_internal_core_watchdog_enabled": {
"class_expressions": [
"aix::"
]
},
"default:cfe_internal_core_watchdog_disabled": {
"class_expressions": [
"!cfe_internal_core_watchdog_enabled::"
]
}
}
}
See also: Watchdog documentation
Environment variables
Environment variables that should be inherited by child commands can be set using def.control_agent_environment_vars_default. The policy defaults are overridden if this is defined. This can be useful if you want to modify the default environment variables that are set.
For example:
code
{
"variables": {
"default:def.control_agent_environment_vars_default": {
"value": [
"DEBIAN_FRONTEND=noninteractive",
"XPG_SUS_ENV=ON"
]
}
}
}
The environment variables can also be extended by defining def.control_agent_environment_vars_extra. The extra environment variables defined here are combined with the defaults (if they exist).
code
{
"variables": {
"default:def.control_agent_environment_vars_extra": {
"value": [
"XPG_SUS_ENV=ON"
]
}
}
}
Notes:
- Simple augments as shown above apply to all hosts. Consider using the
augments key or host specific data if you want to set environment variables
differently across different sets of hosts. The value set via Augments takes
precedence over policy defaults, so be sure to take that into account when
configuring.
History:
- Introduced in 3.20.0, 3.18.2
Modules
Modules executed by the usemodule() function are expected to be found in
$(sys.workdir)/modules the modules are distributed to all remote agents by in
the default policy.
Templates
For convenience the templates shortcut is provided and by default the path is
set to $(sys.workdir/templates) unless $(def.template_dir) is overridden via
augments.
- NOTE: The templates directory is not currently managed by default policy.
Unlike modules templates are not distributed to all hosts by default.
Copy a template from the templates directory:
code
files:
"$(def.dir_templates)/mytemplate.mustache" -> { "myservice" }
copy_from => remote_dcp("templates/mytemplate.mustache", $(sys.policy_server) ),
comment => "mytemplate is necessary in order to render myservice configuration file.";
Override the path for $(def.dir_templates) by setting vars.dir_templates in
the augments file (def.json):
code
{
"variables": {
"default:def.dir_templates": {
"value": "/var/cfengine/mytemplates"
}
}
}
Note: When overriding the templates directory a change to the augments alone
will not cause cf-serverd to reload its configuration and update the access
control lists as necessary. cf-serverd will only automatically reload its
config when it notices a change in policy.
History: Added in 3.11.
Federated Reporting
By default feeder hubs dump data every 20 minutes. To configure the interval on which feeder hubs dump data define cfengine_enterprise_federation:config.dump_interval.
For example:
code
{
"variables": {
"cfengine_enterprise_federation:config.dump_interval": {
"value": "60",
"comment": "Dump data on feeders every 60 minutes"
}
}
}
History:
- Added in CFEngine 3.24.0, 3.18.7, 3.21.4
Debug import process
In order to get detailed logs about import failures define the class default:cfengine_mp_fr_debug_import on the superhub.
For example, to define this class via Augments:
code
{
"classes": {
"default:cfengine_mp_fr_debug_import": {
"class_expressions": [
"any::"
]
}
}
}
History:
- Added in CFEngine 3.23.0, 3.21.4, 3.18.7
Enable Federated Reporting Distributed Cleanup
Hosts that report to multiple feeders result in duplicate entries and other issues. Distributed cleanup helps to deal with this condition.
To enable this functionality define the class default:cfengine_mp_fr_enable_distributed_cleanup on the superhub.
For example, to define this class via Augments:
code
{
"classes": {
"default:cfengine_mp_fr_enable_distributed_cleanup": {
"class_expressions": [
"any::"
]
}
}
}
History:
- Added in CFEngine 3.19.0, 3.18.1
When custom certificates are in use distributed cleanup needs to know where to find them. To configure the path where certificates are found define default:def.DISTRIBUTED_CLEANUP_SSL_CERT_DIR, for example:
code
{
"variables": {
"default:def.DISTRIBUTED_CLEANUP_SSL_CERT_DIR": {
"value": "/path/to/my/cert/dir"
}
}
}
History:
- Added in CFEngine 3.20.0, 3.18.2
PostgreSQL configuration
It's not uncommon to need to configure some PostgreSQL settings differently for Federated Reporting. The settings that are exposed as tunables which can be set via augments are listed here. These do not comprise all settings that may need adjusted, only those that are most commonly adjusted.
Note: When setting parameters for the PostgreSQL configuration
file various units can be used. Valid memory units are B (bytes), kB
(kilobytes), MB (megabytes), GB (gigabytes), and TB (terabytes). The multiplier
for memory units is 1024, not 1000. Valid time units are us (microseconds), ms
(milliseconds), s (seconds), min (minutes), h (hours), and d (days).
shared_buffers
Shared buffers are the amount of memory the database server uses for shared memory buffers. Settings significantly higher than the minimum are usually needed for good performance.
The value should be set to 15% to 25% of the machine's total RAM. For example: if your machine's RAM size is 32 GB, then the recommended value for shared_buffers is 8 GB.
To adjust this set cfengine_enterprise_federation:postgres_config.shared_buffers via Augments.
For example:
code
{
"variables": {
"cfengine_enterprise_federation:postgres_config.shared_buffers": {
"value": "2560MB"
}
}
}
History:
max_locks_per_transaction
The max_locks_per_transaction value indicates the number of database objects that can be locked simultaneously. When Federated Reporting is enabled, the MPF default is 4000.
code
{
"variables": {
"cfengine_enterprise_federation:postgres_config.max_locks_per_transaction": {
"value": "4100"
}
}
}
History:
log_lock_waits
Controls whether a log message is produced when a session waits longer than deadlock_timeout to acquire a lock. This is useful in determining if lock waits are causing poor performance. When Federated Reporting is enabled, the MPF default is on.
code
{
"variables": {
"cfengine_enterprise_federation:postgres_config.log_lock_waits": {
"value": "off"
}
}
}
History:
max_wal_size
Sets the WAL size that triggers a checkpoint.
Maximum size to let the WAL grow during automatic checkpoints. This is a soft limit; WAL size can exceed max_wal_size under special circumstances, such as heavy load, a failing archive_command, or a high wal_keep_size setting. If this value is specified without units, it is taken as megabytes. The default is 1 GB (1024MB). Increasing this parameter can increase the amount of time needed for crash recovery.
code
{
"variables": {
"cfengine_enterprise_federation:postgres_config.max_wal_size": {
"value": "20G"
}
}
}
History:
checkpoint_timeout
Sets the maximum time between automatic WAL checkpoints.
Maximum time between automatic WAL checkpoints. If this value is specified without units, it is taken as seconds. The valid range is between 30 seconds and one day. The default is five minutes (5min). Increasing this parameter can increase the amount of time needed for crash recovery.
code
{
"variables": {
"cfengine_enterprise_federation:postgres_config.checkpoint_timeout": {
"value": "30min"
}
}
}
History:
Recommendations
The MPF includes policy that inspects the system and makes recommendations about
the configuration of the system. When default:cfengine_recommendations_enabled is
defined bundles tagged cfengine_recommends are executed in lexical order.
default:cfengine_recommendations_enabled is defined by default when
default:cfengine_recommendations_disabled is not defined.
To disable cfengine recommendations define default:cfengine_recommendations_disabled.
This snippet disables recommendations via augments.
code
{
"classes": {
"default:cfengine_recommendations_disabled": {
"class_expressions": [
"policy_server|am_policy_hub::"
]
}
}
}
History:
- Recommendations added in 3.12.1
cfe_internal/CFE_cfengine.cf
control
Prototype: control
Description: Include policy input dependancies
Implementation:
code
body file control
{
cfengine_recommendations_enabled::
inputs => { @(cfe_internal_management_file_control.inputs) };
}
cfe_internal_management_file_control
Prototype: cfe_internal_management_file_control
Description: Define policy input dependancies
Implementation:
code
bundle common cfe_internal_management_file_control
{
vars:
"inputs" slist => { };
cfengine_recommendations_enabled::
"input[cfengine_recommendations]"
string => "$(this.promise_dirname)/recommendations.cf";
any::
"inputs" slist => getvalues( input );
}
cfe_internal_management
Prototype: cfe_internal_management
Description: Actuate the appropriate set(s) of internal management policies
Implementation:
code
bundle agent cfe_internal_management
{
vars:
any::
"policy[cfe_internal_core_main]"
string => "cfe_internal_core_main",
comment => "Activate policies related to basic CFEngine operations";
enterprise_edition::
"policy[cfe_internal_enterprise_main]"
string => "cfe_internal_enterprise_main",
comment => "Activate policies related to CFEngine Enterprise operations";
# TODO: Scope this more tightly to mission portal role
enterprise_edition.policy_server::
"policy[cfe_internal_enterprise_mission_portal]"
string => "Activate policies related to CFEngine Enterprise Mission Portal";
any::
"bundles" slist => getindices(policy);
"recommendation_bundles"
slist => sort( bundlesmatching( ".*", "cfengine_recommends" ), lex);
methods:
#
# CFEngine internals
#
"CFEngine_Internals"
usebundle => "$(bundles)";
"CFEngine Recommendations"
usebundle => $(recommendation_bundles),
if => isvariable( recommendation_bundles );
reports:
DEBUG|DEBUG_cfe_internal_management::
"DEBUG $(this.bundle): Should actuate $(bundles)";
cfengine_recommendation_instruct_disablement::
"Note: All recommendations can be disabled by defining 'default:cfengine_recommendations_disabled'";
}
cfe_internal/core/watchdog/watchdog.cf
cfe_internal_core_watchdog
Prototype: cfe_internal_core_watchdog(state)
Description: Configure external watchdog processes to keep cf-execd running
Arguments:
state: (enabled|disabled) The state to keep the watchdog configuration in
Implementation:
code
bundle agent cfe_internal_core_watchdog(state)
{
meta:
"description"
string => "Configure external watchdog processes (like cron, or monit) to
make sure that cf-execd is always running";
vars:
"_logfile" string => "$(sys.workdir)/watchdog.log";
classes:
"invalid_state"
not => regcmp("(enabled|disabled)", "$(state)");
"have_cron_d"
expression => isdir("/etc/cron.d");
"use_cfe_internal_core_watchdog_cron_d"
expression => "have_cron_d._stdlib_path_exists_pgrep";
# We use the aix specific watchdog implementation when it's aix and we are
# not using the cron.d implementation.
"use_cfe_internal_core_watchdog_aix"
expression => "!use_cfe_internal_core_watchdog_cron_d.aix";
"use_cfe_internal_core_watchdog_windows"
expression => "windows";
methods:
use_cfe_internal_core_watchdog_cron_d::
"any" usebundle => cfe_internal_core_watchdog_cron_d( $(state) );
use_cfe_internal_core_watchdog_aix::
"any" usebundle => cfe_internal_core_watchdog_aix( $(state) );
use_cfe_internal_core_watchdog_windows::
"any" usebundle => cfe_internal_core_watchdog_windows( $(state) );
reports:
DEBUG|DEBUG_cfe_internal_core_watchdog::
"DEBUG $(this.bundle): Watchdog '$(state)'";
"DEBUG $(this.bundle): Invalid state '$(state)' only enabled|disabled allowed"
if => "invalid_state";
!(use_cfe_internal_core_watchdog_cron_d|use_cfe_internal_core_watchdog_aix|use_cfe_internal_core_watchdog_windows)::
"WARNING $(this.bundle): Currently only supports /etc/cron.d on systems that have pgrep in the the stdlib paths bundle, AIX and Windows hosts.";
}
cfe_internal_core_watchdog_windows
Prototype: cfe_internal_core_watchdog_windows(state)
Description: Manage watchdog state on windows
Arguments:
state: enabled|disabled- When enabled a scheduled task "CFEngine-watchdog" will be present and enabled
- When disabled a scheduled task named "CFEngine-watchdog" will be absent.
Implementation:
code
bundle agent cfe_internal_core_watchdog_windows(state)
{
vars:
windows::
"_requested_state" string => ifelse( regcmp( "enabled|disabled", $(state) ), "$(state)", "invalid");
"_taskname" string => "CFEngine-watchdog";
"_taskfreq" string => "1";
"_taskscript" string => "$(sys.bindir)$(const.dirsep)watchdog.ps1";
"_taskrun" string => "PowerShell";
"_taskrun_args" string => "-NoProfile -ExecutionPolicy bypass -File";
"_logfile" string => "$(cfe_internal_core_watchdog._logfile)";
# -NonInteractive?
"_cmd_task_schedule"
string => `$(sys.winsysdir)$(const.dirsep)schtasks.exe /create /tn "$(_taskname)" /tr "$(_taskrun) $(_taskrun_args) '$(_taskscript)'" /ru "System" /sc minute /mo $(_taskfreq) /rl highest /f`;
# We use XML output because it's the most portable output considering localization etc ...
"_cmd_task_query"
string => `schtasks /QUERY /TN "$(_taskname)" /XML 2> $(const.dollar)null`;
"_cmd_task_query_result"
string => execresult( $(_cmd_task_query), powershell);
# This regular expression is used to match against the XML output querying the task
# We escape _taskscript with \Q \E since it contains backslashes which we don't want to be expanded
"_scheduled_task_regex"
string => concat(".*Interval.PT$(_taskfreq)M..Interval",
".*Command.$(_taskrun)..Command",
".*Arguments.$(_taskrun_args) .\Q$(_taskscript)\E...Arguments",
".*");
classes:
windows::
"_requested_state_$(_requested_state)";
_requested_state_enabled::
"_watchdog_present_correct"
expression => regcmp( $(_scheduled_task_regex), $(_cmd_task_query_result) );
_requested_state_disabled::
"_watchdog_absent_correct"
expression => not( returnszero( 'schtasks /QUERY /TN "$(_taskname)" 2> $(const.dollar)null', powershell ));
files:
"$(_taskscript)"
create => "true",
template_method => "mustache",
edit_template => "$(this.promise_dirname)/templates/watchdog-windows.ps1.mustache",
template_data => parsejson( '{"logfile": "$(_logfile)" }' );
commands:
_requested_state_disabled.!_watchdog_absent_correct::
`schtasks /DELETE /TN "$(_taskname)" /F`
action => immediate,
contain => powershell,
classes => results( "bundle", "win_watchdog_script");
_requested_state_enabled.!_watchdog_present_correct::
`$(_cmd_task_schedule)`
action => immediate,
contain => in_shell,
classes => results( "bundle", "win_watchdog_script");
reports:
verbose_mode::
"CFEngine-watchdog desired state '$(_requested_state)'";
"CFEngine-watchdog scheduled task state '$(_requested_state)' correct"
if => "_watchdog_present_correct|_watchdog_absent_correct";
verbose_mode.(!_watchdog_present_correct._requested_state_enabled)::
"CFEngine-watchdog scheduled task state incorrect";
`Should: $(_cmd_task_schedule)`;
(inform_mode|verbose_mode).win_watchdog_script_repaired::
"CFEngine-watchdog scheduled task repaired";
}
cfe_internal_core_watchdog_aix
Prototype: cfe_internal_core_watchdog_aix(state)
Description: Manage watchdog state on aix
Arguments:
state: enabled|disabled- When enabled a cron job will be present to start cf-execd if it's not running.
- When disabled cron jobs ending with
# CFEngine watchdog will not be present.
Implementation:
code
bundle agent cfe_internal_core_watchdog_aix(state)
{
classes:
any::
# Define a class for whatever the desired state is
"$(state)"
expression => "any";
vars:
"my_statedir" string => "$(sys.statedir)/MPF/$(this.bundle)";
commands:
# We need to know about the current crontab before making any changes
"/usr/bin/crontab -l > $(my_statedir)/root-crontab"
handle => "aix_crontab_get_state",
if => isdir( "$(my_statedir)" ),
contain => in_shell_and_silent;
files:
enabled::
# We need a place to track state for processing changes to cron entries
# with proper signaling.
"$(my_statedir)/."
create => "true";
# The watchdog script takes care of detecting conditions and launching
# necessary components.
"$(sys.bindir)/watchdog"
create => "true",
template_method => "mustache",
perms => mog( "700", "root", "system" ),
edit_template => "$(this.promise_dirname)/templates/watchdog.mustache";
# When enabled we make sure there is a cron entry to execute the watchdog
# script.
# NOTE The text `# CFEngine watchdog` is used to locate the specific entry in cron when disabling
"$(my_statedir)/root-crontab"
create => "true",
edit_line => lines_present( "* * * * * $(sys.bindir)/watchdog >/dev/null 2>&1 # CFEngine watchdog"),
classes => results( "bundle", "root_crontab" ),
depends_on => { "aix_crontab_get_state" };
disabled::
"$(my_statedir)/root-crontab"
edit_line => delete_lines_matching(".*# CFEngine watchdog"),
classes => results( "bundle", "root_crontab" ),
depends_on => { "aix_crontab_get_state" };
commands:
root_crontab_repaired::
# We use crontab to load the desired entries so that crond will be
# signaled and the changes will be respected.
"/usr/bin/crontab $(my_statedir)/root-crontab";
}
cfe_internal_core_watchdog_cron_d
Prototype: cfe_internal_core_watchdog_cron_d(state)
Description: Use a cron job installed in /etc/cron.d to watch and make sure that
cf-execd is always running.
Arguments:
state: (enabled|disabled) The state to keep the watchdog configuration
in. Enabled manages the cron job, disabled removes it.
Implementation:
code
bundle agent cfe_internal_core_watchdog_cron_d(state)
{
classes:
any::
# Define a class for whatever the desired state is
"$(state)"
expression => "any";
vars:
any::
"template"
string => "$(this.promise_dirname)/../../../templates/cfengine_watchdog.mustache";
"cron_d_watchdog" string => "/etc/cron.d/cfengine_watchdog";
files:
enabled::
"$(cron_d_watchdog)"
create => "true";
"$(cron_d_watchdog)"
edit_template => "$(template)",
handle => "cfe_internal_core_watchdog_enable_cron_d_file_content",
template_method => "mustache";
disabled::
"$(cron_d_watchdog)"
delete => tidy;
}
cfe_internal/core/watchdog
The watchdog implements a process external to CFEngine which is responsible for identifying symptoms of pathology that result in CFEngine degrading into an inoperable non-recoverable state.
Note: This feature is not enabled by default.
If the class cfe_internal_core_watchdog_enabled is defined, the feature is
enabled and the watchdog will be active. If the class
cfe_internal_core_watchdog_disabled is defined, the feature is disabled and
the watchdog will not be active.
Example enable/disable via augments:
code
{
"classes": {
"cfe_internal_core_watchdog_enabled": [ "aix::" ],
"cfe_internal_core_watchdog_disabled": [ "!cfe_internal_core_watchdog_enabled::" ]
}
}
cron.d Watchdog
The generic cron.d watchdog looks for a running cf-execd processes and starts one if not found.
History:
- start cf-execd if not running (3.8.0)
- restart if processes not resulting in updated logs (3.12.0)
AIX Watchdog
The AIX watchdog is implemented as a shell script rendered via mustache template.
When enabled the policy ensures that the watchdog script is available and executed via root's crontab.
When disabled the policy ensures that the cron job as identified with a trailing string # CFEngine watchdog is not active.
The watchdog logs to /var/cfengine/watchdog.log. Note, this log file is not automatically rotated or purged.
The watchdog records observation artifacts to /var/cfengine/watchdog-archives/..
If there is less than 500MB of free space, the watchdog will clean up old archives, preserving the oldest and most recent collection.
History:
- Initially introduced with check that cf-execd is running (3.13.0)
- Introduced check for multiple instances of cf-execd (3.15.0)
- Introduced check for logged triggers of agent_expireafter (3.15.0)
- Introduced check for long running cf-agent processes (3.15.0)
- Introduced check for too many concurrent cf-agent processes (3.15.0)
- Introduced check for integrity issues identified by cf-check (3.15.0)
Windows Watchdog
The Windows watchdog is implemented as a powershell script rendered via mustache template.
When enabled the policy ensures that the watchdog script is scheduled for execution via the windows task scheduler.
When disabled the policy ensures that the there it no scheduled task named CFEngine-watchdog.
The watchdog logs to $(sys.workdir)/watchdog.log (C:\Program Files\Cfengine\watchdog.log). Note, this log file is not automatically rotated or purged.
History:
- Initially introduced with check to terminate any cf-agent processes that have been running for longer than 5 minutes. (3.17.0)
Symptoms of pathology
The following conditions are included in the watchdog checks:
/var/cfengine/bin/cf-execd is running/var/cfengine/bin/cf-execd is not running more than oncecf-execd has not timed out long-running (as defined by agent_expireafter), non-responsive cf-agent processes based on inspection of $(sys.workdir)/outputs/.*/var/cfengine/bin/cf-agent processes currently running do not exceed 300 seconds of execution time/var/cfengine/bin/cf-agent processes currently running do not exceed concurrency of 3cf-check does not observe any critical integrity issues in embedded databases
If the pathology threshold (default 0) is breached the watchdog collects observations about the environment into an archive which is intended for submission to CFEngine Support. After the archive has been prepared the watchdog terminates all CFEngine processes, purges outputs ($(sys.workdir)/outputs/*), local databases ($(sys.statedir)/*.lmdb*), and then the watchdog will try to re-start the CFEngine processes. The agent will try up to 10 times, with a delay of 10 seconds between each attempt to ensure that cf-execd, cf-serverd, and cf-monitord are all running.
cfe_internal/core/
This directory contains internal management polcies related to CFEngine
Core/Community functionality like log rotation.
cfe_internal/enterprise/federation/federation.cf
This policy file handles Federated reporting setup and ongoing operations.
control
Prototype: control
Implementation:
code
body file control
{
namespace => "cfengine_enterprise_federation";
}
cfengine_enterprise_federation:cfpostgres_user
Prototype: cfengine_enterprise_federation:cfpostgres_user
Implementation:
code
body contain cfpostgres_user
{
useshell => "useshell";
exec_owner => "cfpostgres";
exec_group => "cfpostgres";
chdir => "/tmp";
no_output => "false";
}
cfengine_enterprise_federation:contain_transport_user
Prototype: cfengine_enterprise_federation:contain_transport_user
Implementation:
code
body contain contain_transport_user
{
exec_owner => "$(cfengine_enterprise_federation:config.transport_user)";
exec_group => "$(cfengine_enterprise_federation:config.transport_user)";
chdir => "$(cfengine_enterprise_federation:config.transport_home)";
useshell => "true";
}
cfengine_enterprise_federation:psql_wrapper_exit_codes
Prototype: cfengine_enterprise_federation:psql_wrapper_exit_codes
Implementation:
code
classes => psql_wrapper_exit_codes,
{
kept_returncodes => { "0" };
repaired_returncodes => { "1" };
failed_returncodes => { "2" };
}
cfengine_enterprise_federation:control
Prototype: cfengine_enterprise_federation:control
Implementation:
code
comment => "When custom SSL certificates are used from the non default location we need to let the script know where to find them.";
{
namespace => "default";
}
cfengine_enterprise_federation:config
Prototype: cfengine_enterprise_federation:config
Description: Read/parse config JSON, define variables and classes for use later
Implementation:
code
bundle agent config
{
vars:
enterprise_edition.(policy_server|am_policy_hub)::
"federation_dir" string => "/opt/cfengine/federation";
"bin_dir" string => "$(federation_dir)/bin";
"path" string => "$(federation_dir)/cfapache/federation-config.json";
"path_setup_status" string => "$(federation_dir)/cfapache/setup-status.json";
"dump_interval" -> { "ENT-4806", "ENT-10900" }
int => "20",
if => not( isvariable( "cfengine_enterprise_federation:config.dump_interval" ) ),
comment => "Dump data on the feeders every 20 minutes";
# TODO: don't hard-code cftransport user
"transport_user" -> { "ENT-4610" } string => "cftransport";
"transport_home"
string => "$(cfengine_enterprise_federation:config.federation_dir)/cftransport";
config_present::
"data" data => readjson( $(path) );
classes:
enterprise_edition.(policy_server|am_policy_hub)::
"config_present"
expression => fileexists( $(path) );
config_present::
"enabled" expression => or(strcmp("on", "$(data[target_state])"),
strcmp("paused", "$(data[target_state])")),
scope => "namespace";
"am_off" expression => strcmp("off", "$(data[target_state])"),
scope => "namespace";
"am_on" expression => strcmp("on", "$(data[target_state])"),
scope => "namespace";
# _stdlib_path_exists_getenforce and paths.getenforce are defined by masterfiles/lib/paths.cf
default:_stdlib_path_exists_getenforce::
"selinux_enabled"
expression => strcmp("Enforcing", execresult("$(default:paths.getenforce)", useshell)),
scope => "namespace";
vars:
enabled::
"role" string => "$(data[role])";
"remotes" slist => getindices( @(data[remote_hubs]) );
"login" string => ""; # default
"login"
string => "$(data[remote_hubs][$(remotes)][transport][ssh_user])@$(data[remote_hubs][$(remotes)][transport][ssh_host])",
if => and(
# To ensure we are using a remote hub that's actually enabled
strcmp( "on", "$(data[remote_hubs][$(remotes)][target_state])" ),
# To ensure the remote we are pushing to actually needs the data (is a superhub)
strcmp( "superhub", "$(data[remote_hubs][$(remotes)][role])" ));
am_superhub::
# Public keys of enabled pushing feeders need to be trusted (on a superhub)
"pubkey[$(remotes)]" string => "$(data[remote_hubs][$(remotes)][transport][ssh_pubkey])",
if => and( strcmp( "on", "$(data[remote_hubs][$(remotes)][target_state])" ),
strcmp( "feeder", "$(data[remote_hubs][$(remotes)][role])" ),
strcmp( "push_over_rsync", "$(data[remote_hubs][$(remotes)][transport][mode])"));
am_feeder::
# List of superhub hostkeys for use with dump process
"superhubs[$(remotes)]" string => "$(data[remote_hubs][$(remotes)][hostkey])",
if => and( strcmp( "on", "$(data[remote_hubs][$(remotes)][target_state])" ),
strcmp( "superhub", "$(data[remote_hubs][$(remotes)][role])" ),
strcmp( "pull_over_rsync", "$(data[remote_hubs][$(remotes)][transport][mode])"));
"superhub_hostkeys" string => join(" ", getvalues(superhubs));
# Public key(s) of enabled pulling superhub(s) need(s) to be trusted (on a feeder)
"pubkey[$(remotes)]" string => "$(data[remote_hubs][$(remotes)][transport][ssh_pubkey])",
if => and( strcmp( "on", "$(data[remote_hubs][$(remotes)][target_state])" ),
strcmp( "superhub", "$(data[remote_hubs][$(remotes)][role])" ),
strcmp( "pull_over_rsync", "$(data[remote_hubs][$(remotes)][transport][mode])"));
am_superhub|am_feeder::
"pubkeys" slist => getvalues( pubkey );
"fingerprint[$(data[remote_hubs][$(remotes)][transport][ssh_host])]"
slist => string_split("$(data[remote_hubs][$(remotes)][transport][ssh_fingerprint])", "$(const.n)", "inf"),
# To ensure we are using a remote hub that's enabled
if => strcmp( "on", "$(data[remote_hubs][$(remotes)][target_state])" );
"fingerprints" slist => maparray("$(this.k) $(this.v)", fingerprint);
"feeder[$(remotes)]" string => "$(data[remote_hubs][$(remotes)][hostkey])",
if => strcmp( "feeder", "$(data[remote_hubs][$(remotes)][role])" );
classes:
enabled::
# Knowing if feeder or superhub is based on explicit setting of role in
# path (federation-config.json)
"am_feeder"
expression => strcmp("feeder", "$(data[role])"),
scope => "namespace";
"am_superhub"
expression => strcmp("superhub", "$(data[role])"),
scope => "namespace";
"am_pusher"
and => {strcmp("superhub", "$(data[remote_hubs][$(remotes)][role])"),
strcmp("on", "$(data[remote_hubs][$(remotes)][target_state])"),
strcmp("push_over_rsync", "$(data[remote_hubs][$(remotes)][transport][mode])")},
comment => "Has an enabled remote superhub with push as transport method, should run push transport",
scope => "namespace";
"am_puller"
and => {"am_superhub",
strcmp("on", "$(data[remote_hubs][$(remotes)][target_state])"),
strcmp("pull_over_rsync", "$(data[remote_hubs][$(remotes)][transport][mode])")},
comment => "Superhub with some enabled remote hub with pull as transport method, should run pull transport",
scope => "namespace";
"am_transporter"
or => {"am_pusher", "am_puller"},
scope => "namespace";
"am_paused"
expression => strcmp("paused", "$(data[target_state])"),
scope => "namespace";
# Note: in order to see these debugs you must either define the default DEBUG class
# or the namespace prefixed class like:
# cf-agent -KI -DDEBUG
# or
# cf-agent -KI -Dcfengine_enterprise_federation:DEBUG_config
reports:
enabled.(default:DEBUG|DEBUG_config)::
"Federation enabled!";
am_superhub.(default:DEBUG|DEBUG_config)::
"I'm a superhub!";
am_feeder.(default:DEBUG|DEBUG_config)::
"I'm a feeder!";
am_pusher.(default:DEBUG|DEBUG_config)::
"I'm pushing dumps!";
am_puller.(default:DEBUG|DEBUG_config)::
"I'm pulling dumps!";
am_transporter.(default:DEBUG|DEBUG_config)::
"I'm a transporter!";
am_paused.(default:DEBUG|DEBUG_config)::
"I'm paused so won't do any import/dump";
}
cfengine_enterprise_federation:distributed_cleanup_dependencies
Prototype: cfengine_enterprise_federation:distributed_cleanup_dependencies
Description: warn if python3 and urllib3 required dependencies are not installed
if cfengine_mp_fr_enable_distributed_cleanup class is defined
Note: these requirements are only needed on superhub to run the distributed cleanup python script.
on feeders only the shell script is run so no python dependencies needed there.
Implementation:
code
bundle agent distributed_cleanup_dependencies
{
vars:
debian|ubuntu|redhat_9|rocky_9::
"packages" slist => { "python3", "python3-urllib3" };
redhat_8|centos_8::
"packages" slist => { "python36", "python3-urllib3" };
redhat_7|centos_7::
"packages" slist => { "python3" };
classes:
(redhat_6|centos_6)::
"cfengine_mp_fr_distributed_cleanup_python3_installed"
expression => returnszero(
"$(sys.bindir)/cfengine-selected-python --version | grep -q ' 3.'",
"useshell"
);
(redhat_6|centos_6|redhat_7|centos_7)::
"cfengine_mp_fr_distributed_cleanup_urllib3_installed"
expression => returnszero(
"echo 'import urllib3' | $(sys.bindir)/cfengine-selected-python 2>/dev/null",
"useshell"
);
packages:
debian|ubuntu::
"$(packages)"
policy => "present",
classes => default:results("bundle", "cfengine_mp_fr_distributed_cleanup_packages"),
action => default:policy ( "warn" ),
package_module => default:apt_get;
redhat.!(centos_6|redhat_6)::
"$(packages)"
policy => "present",
classes => default:results("bundle", "cfengine_mp_fr_distributed_cleanup_packages"),
package_module => default:yum;
reports:
(redhat_6|centos_6).!cfengine_mp_fr_distributed_cleanup_python3_installed::
"error: python3 is required for distributed cleanup utility. On this platform it is recommened you install python3 from source (https://docs.python.org/3.10/using/unix.html#building-python)";
(redhat_6|centos_6).!cfengine_mp_fr_distributed_cleanup_urllib3_installed::
"error: python3 module urllib3 is required for distributed cleanup utility. On this platform it is recommend you install via pip3 after installing python3 from source";
(redhat_7|centos_7).!cfengine_mp_fr_distributed_cleanup_urllib3_installed::
"error: python3 module urllib3 is required for distributed cleanup utility. On this platform please install with the command `pip3 install urllib3`";
}
cfengine_enterprise_federation:semanage_installed
Prototype: cfengine_enterprise_federation:semanage_installed
Description: Install semanage utility if selinux enabled and
cfengine_mp_fr_dependencies_auto_install class is defined
if not defined then only warn
Implementation:
code
bundle agent semanage_installed
{
vars:
"semanage_action"
string => ifelse( "default:_stdlib_path_exists_semanage", "fix", "default:cfengine_mp_fr_dependencies_auto_install", "fix", "warn" ),
comment => "We only want to use semanage if it's available, or if we have
indicated it's ok to install it automatically. This variable
is subsequently used by a commands and packages promises to
warn or fix based.";
debian_6|debian_7|debian_8|ubuntu_12|ubuntu_14|ubuntu_16|rhel_5::
"semanage_package" string => "policycoreutils";
debian_9|debian_10|ubuntu_18|redhat_8|centos_8|redhat_9|rocky_9::
"semanage_package" string => "policycoreutils-python-utils";
redhat_6|centos_6|redhat_7|centos_7::
"semanage_package" string => "policycoreutils-python";
packages:
debian|ubuntu::
"$(semanage_package)"
policy => "present",
package_module => default:apt_get,
action => default:policy ( $(semanage_action) );
redhat::
"$(semanage_package)"
policy => "present",
package_module => default:yum,
action => default:policy ( $(semanage_action) );
reports:
default:DEBUG|DEBUG_semanage_installed::
"paths.semanage = $(default:paths.semanage)";
!default:_stdlib_path_exists_semanage.!default:cfengine_mp_fr_dependencies_auto_install::
"semanage command is not available at $(default:paths.semanage). Will only install needed package if cfengine_mp_fr_dependencies_auto_install class is defined in augments(def.json) or with --define cf-agent option.";
}
cfengine_enterprise_federation:ssh_keygen
Prototype: cfengine_enterprise_federation:ssh_keygen(key_path)
Arguments:
key_path: string, used in the value of attribute args of commands promiser /usr/bin/ssh-keygen
Implementation:
code
bundle agent ssh_keygen(key_path)
{
commands:
"/usr/bin/ssh-keygen"
handle => "ssh_keys_configured",
args => "-N '' -f $(key_path)",
if => not( fileexists( "$(key_path)" ));
}
cfengine_enterprise_federation:ssh_selinux_context
Prototype: cfengine_enterprise_federation:ssh_selinux_context(home, ssh_paths)
Arguments:
home: string, used to set promise attribute if of classes promiser cftransport_fcontext_missing of classes promiser incorrect_ssh_context, used as promiser of type commands
, used as promiser of type commands
of reports promiser need to fix incorrect ssh context for transport user but semanage path in $(sys.libdir)/paths.cf $(default:paths.semanage) does not resolve of reports promiser need to fix incorrect ssh context for transport user but restorecon path in $(sys.libdir)/paths.cf $(default:paths.restorecon) does not resolvessh_paths of classes promiser cftransport_fcontext_missing of classes promiser incorrect_ssh_context of commands promiser $(default:paths.semanage) fcontext -a -t ssh_home_t '$(home)/.ssh(/.)?'* of commands promiser $(default:paths.restorecon) -R -F $(home)/.ssh/ of reports promiser need to fix incorrect ssh context for transport user but semanage path in $(sys.libdir)/paths.cf $(default:paths.semanage) does not resolve of reports promiser need to fix incorrect ssh context for transport user but restorecon path in $(sys.libdir)/paths.cf $(default:paths.restorecon) does not resolve
Implementation:
code
bundle agent ssh_selinux_context(home, ssh_paths)
{
classes:
default:_stdlib_path_exists_semanage::
"cftransport_fcontext_missing"
expression => not(returnszero("$(default:paths.semanage) fcontext -l | grep '$(home)/.ssh(/.*)?'", "useshell")),
if => fileexists("$(home)");
any::
# For all the files below it must be true that if they exist they need
# to have the right context.
# IOW, the following implication: if fileexists() then correct_context.
# IOW, the following OR: not(filexists()) or correct_context.
# not( and()) means that if for one of the files the implication is false, we get a true.
"incorrect_ssh_context"
expression => not( and(
or(
not(fileexists("$(home)")),
regcmp(".*[\s:]ssh_home_t[\s:].*",
execresult("$(default:paths.ls) -dZ $(home)/.ssh", noshell))),
or(
not(fileexists("$(ssh_paths[auth_keys])")),
regcmp(".*[\s:]ssh_home_t[\s:].*",
execresult("$(default:paths.ls) -Z $(ssh_paths[auth_keys])", noshell))),
or(
not(fileexists("$(ssh_paths[priv_key])")),
regcmp(".*[\s:]ssh_home_t[\s:].*",
execresult("$(default:paths.ls) -Z $(ssh_paths[priv_key])", noshell))),
or(
not(fileexists("$(ssh_paths[pub_key])")),
regcmp(".*[\s:]ssh_home_t[\s:].*",
execresult("$(default:paths.ls) -Z $(ssh_paths[pub_key])", noshell))),
or(
not(fileexists("$(ssh_paths[config])")),
regcmp(".*[\s:]ssh_home_t[\s:].*",
execresult("$(default:paths.ls) -Z $(ssh_paths[config])", noshell)))
));
commands:
# _stdlib_path_exists_<command> and paths.<command> are defined is masterfiles/lib/paths.cf
cftransport_fcontext_missing.default:_stdlib_path_exists_semanage::
"$(default:paths.semanage) fcontext -a -t ssh_home_t '$(home)/.ssh(/.*)?'";
incorrect_ssh_context.default:_stdlib_path_exists_restorecon::
"$(default:paths.restorecon) -R -F $(home)/.ssh/";
reports:
incorrect_ssh_context.!default:_stdlib_path_exists_semanage::
"need to fix incorrect ssh context for transport user but semanage path in $(sys.libdir)/paths.cf $(default:paths.semanage) does not resolve";
incorrect_ssh_context.!default:_stdlib_path_exists_restorecon)::
"need to fix incorrect ssh context for transport user but restorecon path in $(sys.libdir)/paths.cf $(default:paths.restorecon) does not resolve";
}
cfengine_enterprise_federation:transport_user
Prototype: cfengine_enterprise_federation:transport_user
Description: Manage transport user and permissions for remote SSH access
Implementation:
code
bundle agent transport_user
{
vars:
"user"
string => "$(cfengine_enterprise_federation:config.transport_user)";
"home"
string => "$(cfengine_enterprise_federation:config.transport_home)";
"ssh_key_name" string => "id_FR";
"ssh_priv_key" string => "$(home)/.ssh/$(ssh_key_name)";
"ssh_pub_key" string => "$(ssh_priv_key).pub";
"ssh_auth_keys" string => "$(home)/.ssh/authorized_keys";
"ssh_known_hosts" string => "$(home)/.ssh/known_hosts";
"ssh_config" string => "$(home)/.ssh/config";
"create_files"
slist => {
"$(home)/.",
"$(home)/.ssh/.",
"$(home)/source/.", # Dumps from feeders are taken from here
"$(home)/destination/.", # And dropped here on superhub
"$(ssh_auth_keys)",
"$(ssh_known_hosts)",
"$(ssh_config)"
};
"ssh_paths" data => parsejson('{
"key_name": "id_FR",
"priv_key": "$(home)/.ssh/$(ssh_key_name)",
"pub_key": "$(ssh_priv_key).pub",
"auth_keys": "$(home)/.ssh/authorized_keys",
"known_hosts": "$(home)/.ssh/known_hosts",
"config": "$(home)/.ssh/config"
}');
users:
"$(user)"
policy => "present",
home_dir => "$(home)";
files:
"$(create_files)"
create => "true";
"$(home)/." -> { "CFE-951" }
depth_search => default:recurse_with_base("inf"),
file_select => default:dirs,
perms => default:mog( "700", $(user), "root" ),
comment => "The transport users home directory and children should be accessible only by the transport user itself.";
"$(home)/." -> { "CFE-951" }
depth_search => default:recurse_with_base("inf"),
file_select => default:not_dir,
perms => default:mog( "600", $(user), "root" ),
comment => "The files within the transport users home directory should be readable and writable by the transport user";
"$(ssh_auth_keys)"
create => "true",
handle => "ssh_auth_keys_configured",
edit_template_string => "}$(const.n)",
template_data => @(cfengine_enterprise_federation:config.pubkeys),
template_method => "inline_mustache";
"$(ssh_known_hosts)"
create => "true",
handle => "ssh_known_hosts_configured",
edit_template_string => "}$(const.n)",
template_data => @(cfengine_enterprise_federation:config.fingerprints),
template_method => "inline_mustache",
if => isvariable("cfengine_enterprise_federation:config.fingerprints");
"$(ssh_config)"
create => "true",
handle => "ssh_config_configured",
edit_line => default:insert_lines("IdentityFile $(ssh_priv_key)");
methods:
selinux_enabled::
"semanage_installed" usebundle => semanage_installed;
enabled.selinux_enabled::
# Ensure correct SElinux context
"ssh_selinux_context" usebundle => ssh_selinux_context("$(home)", @(ssh_paths));
enabled::
# Generate ssh keypair
"ssh_keygen" usebundle => ssh_keygen("$(ssh_priv_key)");
}
cfengine_enterprise_federation:clean_when_off
Prototype: cfengine_enterprise_federation:clean_when_off
Description: cleanup changes made for federated reporting on a feeder
NOTE: a superhub turned off by removing federation-config.json or setting
federation_manage_files will always run regardless of off or not
so as to be prepared for enablement via Mission Portal UI
Implementation:
code
bundle agent clean_when_off
{
vars:
"user" string => "$(cfengine_enterprise_federation:transport_user.user)";
"home" string => "$(cfengine_enterprise_federation:transport_user.home)";
@if minimum_version(3.15)
"remote_hubs_table_row_count"
string => execresult(`$(sys.bindir)/psql cfsettings --quiet --tuples-only --command "SELECT COUNT(*) FROM remote_hubs" 2>/dev/null`, useshell);
"federated_reporting_settings_table_row_count"
string => execresult(`$(sys.bindir)/psql cfsettings --quiet --tuples-only --command "SELECT COUNT(*) FROM federated_reporting_settings" 2>/dev/null`, useshell);
@endif
users:
"$(user)"
policy => "absent";
files:
"$(cfengine_enterprise_federation:config.path_setup_status)" -> { "ENT-7233" }
comment => "We must remove this file for Mission Portal to understand that the federation is not configured",
delete => default:tidy;
"$(cfengine_enterprise_federation:config.path)" -> { "ENT-7969" }
comment => "We must remove this file for Mission Portal to understand that the federation is not configured",
delete => default:tidy;
methods:
"rm_rf_cftransport_home_dir" usebundle => default:rm_rf("$(home)");
classes:
selinux_enabled.default:_stdlib_path_exists_semanage::
"has_cftransport_fcontext" expression => returnszero("$(default:paths.semanage) fcontext -l | grep $(home)", "useshell");
"remote_hubs_table_empty" expression => returnszero(`[ $(const.dollar)($(sys.bindir)/psql cfsettings --quiet --tuples-only --command "SELECT COUNT(*) FROM remote_hubs") -eq "0"]`, "useshell");
"federated_reporting_settings_table_empty" expression => returnszero(`[ $(const.dollar)($(sys.bindir)/psql cfsettings --quiet --tuples-only --command "SELECT COUNT(*) FROM federated_reporting_settings") -eq "0"]`, "useshell");
commands:
# Oh, the humanity! Where for art thou databases: promises for psql!
`$(sys.bindir)/psql cfsettings --quiet --command "TRUNCATE TABLE remote_hubs"` -> { "ENT-7233" }
if => isgreaterthan( "$(remote_hubs_table_row_count)", "0" );
`$(sys.bindir)/psql cfsettings --quiet --command "TRUNCATE TABLE federated_reporting_settings"` -> { "ENT-7233" }
if => isgreaterthan( "$(federated_reporting_settings_table_row_count)", "0" );
# _stdlib_path_exists_<command> and paths.<command> are defined in masterfiles/lib/paths.cf
selinux_enabled.default:_stdlib_path_exists_semanage.has_cftransport_fcontext::
"$(default:paths.semanage) fcontext -d '$(home)/.ssh(/.*)?'";
}
cfengine_enterprise_federation:federation_manage_files
Prototype: cfengine_enterprise_federation:federation_manage_files
Description: Manage files, directories and permissions in $(cfengine_enterprise_federation:config.federation_dir)
By default the import process will not prohibit the inclusion of duplicate hostkey data from feeders.
By defining the cfengine_mp_fr_handle_duplicate_hostkeys class in augments a step will be performed
during import which will find the which feeder's data is most recent for each duplicate hostkey and
use that data. Duplicate hostkey data will be moved to a dup schema for analysis.
This class only applies to superhubs.
code
{
"classes": {
"cfengine_mp_fr_handle_duplicate_hostkeys": [ "any::" ]
}
}
Implementation:
code
bundle agent federation_manage_files
{
vars:
"transport_user"
string => "$(cfengine_enterprise_federation:config.transport_user)";
"login" data => parsejson('{"login":"$(cfengine_enterprise_federation:config.login)"}');
"feeder_username" data => parsejson('{"feeder_username":"$(cfengine_enterprise_federation:config.transport_user)"}');
"superhub_hostkeys" string => ifelse( isvariable("cfengine_enterprise_federation:config.superhub_hostkeys"),
"$(cfengine_enterprise_federation:config.superhub_hostkeys)",
"" );
"this_hostkey" data => parsejson('{"this_hostkey":"$(default:sys.key_digest)"}');
"feeder" data => parsejson('{"feeder": "$(sys.key_digest)"}');
"cf_version" data => parsejson('{"cf_version":"$(sys.cf_version)"}');
"workdir" data => parsejson('{"workdir":"$(sys.workdir)"}');
"handle_duplicates_value" string => ifelse("default:cfengine_mp_fr_handle_duplicate_hostkeys", "yes", "no");
"handle_duplicates" data => parsejson('{"handle_duplicates":"$(handle_duplicates_value)"}');
"debug_import_value" string => ifelse("default:cfengine_mp_fr_debug_import", "yes", "no");
"debug_import" data => parsejson('{"debug_import":"$(debug_import_value)"}');
files:
enterprise_edition.(policy_server|am_policy_hub)::
# Both cfpache and $(transport_user) need permission so adding o+x here
"$(cfengine_enterprise_federation:config.federation_dir)/." -> { "CFE-951" }
create => "true",
perms => default:mog( "755", "root", "cfapache" );
"$(cfengine_enterprise_federation:config.federation_dir)/cfapache/."
create => "true",
perms => default:mog( "700", "cfapache", "root" );
"$(cfengine_enterprise_federation:config.federation_dir)/cfapache/." -> { "CFE-951" }
depth_search => default:recurse_with_base("inf"),
file_select => default:dirs,
perms => default:mog( "700", "cfapache", "root" ),
comment => "The cfapache home directory and children need to be accessible by the web-server";
"$(cfengine_enterprise_federation:config.federation_dir)/cfapache/." -> { "CFE-951" }
depth_search => default:recurse_with_base("inf"),
file_select => default:not_dir,
perms => default:mog( "600", "cfapache", "root" ),
comment => "Files within the cfapache home directory need to be readable and writable by the web server.";
enabled::
"$(cfengine_enterprise_federation:config.bin_dir)/." -> { "CFE-951" }
create => "true",
perms => default:mog( "0770", "root", "$(transport_user)" );
am_superhub::
"$(cfengine_enterprise_federation:config.federation_dir)/superhub/."
create => "true",
perms => default:mog( "770", "root", "$(transport_user)" );
"$(cfengine_enterprise_federation:config.federation_dir)/superhub/import/."
create => "true",
perms => default:mog( "600", "root", "root" );
"$(cfengine_enterprise_federation:config.federation_dir)/superhub/import/filters/."
create => "true",
perms => default:mog( "600", "root", "root" );
am_feeder::
"$(cfengine_enterprise_federation:config.federation_dir)/fedhub/."
create => "true",
perms => default:mog( "660", "root", "$(transport_user)" );
"$(cfengine_enterprise_federation:config.federation_dir)/fedhub/dump/."
create => "true",
perms => default:mog( "660", "root", "$(transport_user)" );
"$(cfengine_enterprise_federation:config.federation_dir)/fedhub/transport/."
create => "true",
perms => default:mog( "660", "root", "$(transport_user)" );
"$(cfengine_enterprise_federation:config.federation_dir)/fedhub/dump/filters/."
create => "true",
perms => default:mog( "600", "root", "root" );
am_feeder|am_transporter|am_superhub::
# TODO: Instrument augments
"$(cfengine_enterprise_federation:config.bin_dir)/config.sh"
create => "true",
template_method => "mustache",
edit_template => "$(this.promise_dirname)/../../../templates/federated_reporting/config.sh.mustache",
template_data => mergedata(@(login),
@(feeder_username),
@(feeder),
parsejson('{"superhub_hostkeys": "$(superhub_hostkeys)"}'),
@(debug_import),
@(this_hostkey),
@(cf_version),
@(handle_duplicates),
parsejson('{"inventory_refresh_cmd": ""}')),
perms => default:mog( "640", "root", "$(transport_user)" );
# TODO: Instrument augments
"$(cfengine_enterprise_federation:config.bin_dir)/log.sh"
create => "true",
template_method => "mustache",
edit_template => "$(this.promise_dirname)/../../../templates/federated_reporting/log.sh.mustache",
perms => default:mog( "640", "root", "$(transport_user)" );
"$(cfengine_enterprise_federation:config.bin_dir)/parallel.sh"
copy_from => default:local_dcp( "$(this.promise_dirname)/../../../templates/federated_reporting/parallel.sh" ),
perms => default:mog( "640", "root", "$(transport_user)" );
"$(cfengine_enterprise_federation:config.bin_dir)/psql_wrapper.sh" -> { "ENT-4792"}
create => "true",
edit_template => "$(this.promise_dirname)/../../../templates/federated_reporting/psql_wrapper.sh.mustache",
template_method => "mustache",
perms => default:mog( "700", "root", "root" );
am_feeder::
"$(cfengine_enterprise_federation:config.bin_dir)/dump.sh"
copy_from => default:local_dcp( "$(this.promise_dirname)/../../../templates/federated_reporting/dump.sh" ),
perms => default:mog( "700", "root", "root" );
"$(cfengine_enterprise_federation:config.federation_dir)/fedhub/dump/filters/50-merge_inserts.awk"
copy_from => default:local_dcp( "$(this.promise_dirname)/../../../templates/federated_reporting/50-merge_inserts.awk" ),
perms => default:mog( "600", "root", "root" );
am_transporter::
"$(cfengine_enterprise_federation:config.bin_dir)/transport.sh" -> { "CFE-951" }
copy_from => default:local_dcp( "$(this.promise_dirname)/../../../templates/federated_reporting/transport.sh" ),
perms => default:mog( "500", "$(transport_user)", "root" );
am_puller::
"$(cfengine_enterprise_federation:config.bin_dir)/pull_dumps_from.sh"
copy_from => default:local_dcp( "$(this.promise_dirname)/../../../templates/federated_reporting/pull_dumps_from.sh" ),
perms => default:mog( "500", "$(transport_user)", "root" );
am_superhub::
"$(cfengine_enterprise_federation:config.bin_dir)/import.sh"
copy_from => default:local_dcp( "$(this.promise_dirname)/../../../templates/federated_reporting/import.sh" ),
perms => default:mog( "700", "root", "root" );
"$(cfengine_enterprise_federation:config.bin_dir)/import_file.sh"
copy_from => default:local_dcp( "$(this.promise_dirname)/../../../templates/federated_reporting/import_file.sh" ),
perms => default:mog( "700", "root", "root" );
"$(cfengine_enterprise_federation:config.federation_dir)/superhub/import/filters/10-base_filter.sed"
copy_from => default:local_dcp( "$(this.promise_dirname)/../../../templates/federated_reporting/10-base_filter.sed" ),
perms => default:mog( "600", "root", "root" );
am_superhub.default:cfengine_mp_fr_enable_distributed_cleanup::
"$(cfengine_enterprise_federation:config.bin_dir)/transfer_distributed_cleanup_items.sh"
copy_from => default:local_dcp( "$(this.promise_dirname)/../../../templates/federated_reporting/transfer_distributed_cleanup_items.sh" ),
perms => default:mog( "500", "$(transport_user)", "root" );
"$(cfengine_enterprise_federation:config.bin_dir)/distributed_cleanup.py"
copy_from => default:local_dcp( "$(this.promise_dirname)/../../../templates/federated_reporting/distributed_cleanup.py" ),
perms => default:mog( "500", "root", "root" );
"$(cfengine_enterprise_federation:config.bin_dir)/nova_api.py"
copy_from => default:local_dcp( "$(this.promise_dirname)/../../../templates/federated_reporting/nova_api.py" ),
perms => default:mog( "500", "root", "root" );
"$(cfengine_enterprise_federation:config.bin_dir)/cfsecret.py"
copy_from => default:local_dcp( "$(this.promise_dirname)/../../../templates/federated_reporting/cfsecret.py" ),
perms => default:mog( "500", "root", "root" );
}
cfengine_enterprise_federation:postgres_config
Prototype: cfengine_enterprise_federation:postgres_config
Description: Customize postgres config for superhub
Implementation:
code
bundle agent postgres_config
{
vars:
am_superhub::
"c[shared_buffers]" -> { "ENT-8617" }
string => ifelse( isvariable( "cfengine_enterprise_federation:postgres_config.shared_buffers"),
$(cfengine_enterprise_federation:postgres_config.shared_buffers),
"1GB"),
comment => "Changing this setting requires restarting the database.";
"c[max_locks_per_transaction]" -> { "ENT-8617" }
string => ifelse( isvariable( "cfengine_enterprise_federation:postgres_config.max_locks_per_transaction"),
$(cfengine_enterprise_federation:postgres_config.max_locks_per_transaction),
"4000"),
comment => "Changing this setting requires restarting the database.";
"c[log_lock_waits]" -> { "ENT-8617" }
string => ifelse( isvariable( "cfengine_enterprise_federation:postgres_config.log_lock_waits"),
$(cfengine_enterprise_federation:postgres_config.log_lock_waits),
"on"),
comment => "Changing this setting requires restarting the database.";
"c[max_wal_size]" -> { "ENT-8617" }
string => ifelse( isvariable( "cfengine_enterprise_federation:postgres_config.max_wal_size"),
$(cfengine_enterprise_federation:postgres_config.max_wal_size),
"1GB");
"c[checkpoint_timeout]" -> { "ENT-8617" }
string => ifelse( isvariable( "cfengine_enterprise_federation:postgres_config.checkpoint_timeout"),
$(cfengine_enterprise_federation:postgres_config.checkpoint_timeout),
"5min");
files:
am_superhub::
"$(sys.statedir)/pg/data/postgresql.conf"
edit_line => default:set_line_based( "$(this.namespace):$(this.bundle).c",
"=",
"\s*=\s*",
".*",
""),
classes => default:results( "bundle", "postgresql_conf" ),
if => fileexists( "$(sys.statedir)/pg/data/postgresql.conf" );
commands:
am_superhub.postgresql_conf_repaired.!systemd::
# smart mode tries to wait for operations to finish and clients to
# disconnect, fast mode terminates open connections gracefully
"$(sys.bindir)/pg_ctl --pgdata $(sys.statedir)/pg/data --log /var/log/postgresql.log --wait --mode smart restart ||
$(sys.bindir)/pg_ctl --pgdata $(sys.statedir)/pg/data --log /var/log/postgresql.log --wait --mode fast restart"
contain => cfpostgres_user;
services:
am_superhub.postgresql_conf_repaired.systemd::
"cf-postgres"
service_method => default:standard_services,
service_policy => "restart";
}
cfengine_enterprise_federation:exported_data
Prototype: cfengine_enterprise_federation:exported_data
Description: Run script to dump pg data on feeder hub
Implementation:
code
bundle agent exported_data
{
methods:
am_feeder.!am_paused::
"Refresh Inventory"
usebundle => "default:cfe_internal_refresh_inventory_view",
handle => "fr_inventory_refresh",
comment => "Use standard inventory refresh so that we don't run it twice";
commands:
am_feeder.!am_paused::
"/bin/bash"
arglist => {"$(cfengine_enterprise_federation:config.bin_dir)/dump.sh"},
contain => default:in_shell,
depends_on => { "fr_inventory_refresh" },
comment => "Refresh Inventory must be completed before dumping data";
}
cfengine_enterprise_federation:data_transport
Prototype: cfengine_enterprise_federation:data_transport
Description: Run script to transport data from feeder to superhub
Implementation:
code
bundle agent data_transport
{
vars:
am_puller.!am_paused::
# local copies of the variables to make using them below sane
"remotes" slist => {@(cfengine_enterprise_federation:config.remotes)};
"data" data => @(cfengine_enterprise_federation:config.data);
"enabled_pull_hosts[$(remotes)]"
string => "$(data[remote_hubs][$(remotes)][transport][ssh_host])",
if => and(strcmp("on", "$(data[remote_hubs][$(remotes)][target_state])"),
strcmp("pull_over_rsync", "$(data[remote_hubs][$(remotes)][transport][mode])"));
"pull_args" -> {"ENT-4499"}
string => join(" ", getvalues(@(enabled_pull_hosts)));
commands:
am_pusher.!am_paused::
"/bin/bash"
arglist => {"$(cfengine_enterprise_federation:config.bin_dir)/transport.sh push"},
contain => contain_transport_user;
am_puller.!am_paused::
"/bin/bash"
arglist => {"$(cfengine_enterprise_federation:config.bin_dir)/transport.sh pull $(pull_args)"},
contain => contain_transport_user;
am_puller.!am_paused.default:cfengine_mp_fr_enable_distributed_cleanup::
"/bin/bash"
arglist => {"$(cfengine_enterprise_federation:config.bin_dir)/transfer_distributed_cleanup_items.sh $(pull_args)"},
contain => contain_transport_user;
}
cfengine_enterprise_federation:imported_data
Prototype: cfengine_enterprise_federation:imported_data
Description: Run script to import dumps on superhub
Implementation:
code
bundle agent imported_data
{
commands:
"/bin/bash"
arglist => {"$(cfengine_enterprise_federation:config.bin_dir)/import.sh"},
contain => default:in_shell;
}
cfengine_enterprise_federation:superhub_schema
Prototype: cfengine_enterprise_federation:superhub_schema
Description: Run SQL script to ensure schema is migrated to superhub partitioned tables architecture
Implementation:
code
bundle agent superhub_schema
{
commands:
am_superhub::
"$(cfengine_enterprise_federation:config.bin_dir)/psql_wrapper.sh"
arglist => {
"cfdb",
@if minimum_version(3.24)
"select superhub_schema('$(sys.key_digest)');",
@else
`"select superhub_schema('$(sys.key_digest)');"`,
@endif
},
classes => psql_wrapper_exit_codes;
}
cfengine_enterprise_federation:ensure_feeders
Prototype: cfengine_enterprise_federation:ensure_feeders
Description: Run SQL function to ensure that all configured feeder hubs are in __hubs table
Implementation:
code
}
{
vars:
am_superhub::
"feeders" slist => getvalues( "cfengine_enterprise_federation:config.feeder");
"feeders_arg" string => concat( "ARRAY['", join( "', '", feeders ), "']");
commands:
am_superhub::
"$(cfengine_enterprise_federation:config.bin_dir)/psql_wrapper.sh"
arglist => {
"cfdb",
@if minimum_version(3.24)
"select ensure_feeders($(feeders_arg));"
@else
`"select ensure_feeders($(feeders_arg));"`
@endif
},
classes => psql_wrapper_exit_codes,
if => isgreaterthan(length(feeders), 0);
}
cfengine_enterprise_federation:entry
Prototype: cfengine_enterprise_federation:entry
Description: Conditionally runs all federated reporting bundles
Implementation:
code
repaired_returncodes => { "1" };
{
meta:
(policy_server|am_policy_hub).enterprise_edition::
"tags" -> { "ENT-4383" }
slist => { "enterprise_maintenance" };
classes:
enterprise_edition.(policy_server|am_policy_hub)::
"config_exists"
expression => fileexists("$(cfengine_enterprise_federation:config.federation_dir)/cfapache/federation-config.json");
enterprise_edition.(policy_server|am_policy_hub)::
"config_not_exists"
expression => not(fileexists("$(cfengine_enterprise_federation:config.federation_dir)/cfapache/federation-config.json"));
methods:
config_exists::
"CFEngine Enterprise Federation Configuration"
handle => "config",
usebundle => config;
am_policy_hub.(am_off|config_not_exists)::
"CFEngine Enterprise Federation Transport Off"
handle => "clean_when_off",
usebundle => clean_when_off,
if => cf_version_minimum("3.15");
enabled.am_on::
"CFEngine Enterprise Federation Transport User"
handle => "transport_user",
usebundle => transport_user;
enterprise_edition.(policy_server|am_policy_hub)::
"federation_manage_files"
handle => "federation_manage_files",
usebundle => federation_manage_files;
enabled.am_on::
"CFEngine Enterprise Federation Postgres Configuration"
handle => "postgres_config",
usebundle => postgres_config;
"CFEngine Enterprise Federation Schema Migration"
handle => "superhub_schema",
depends_on => { "postgres_config" },
usebundle => superhub_schema;
"CFEngine Enterprise Federation Ensure Feeder Hubs in Database"
handle => "ensure_feeders",
depends_on => { "superhub_schema" },
usebundle => ensure_feeders;
"CFEngine Enterprise Federation Feeder Data Transport"
handle => "data_transport",
depends_on => { "transport_user" },
usebundle => data_transport;
"CFEngine Enterprise Federation Feeder Data Export"
usebundle => exported_data,
action => default:if_elapsed($(cfengine_enterprise_federation:config.dump_interval));
"Configuration Status"
usebundle => setup_status;
enabled.am_on.am_superhub.!am_paused::
"CFEngine Enterprise Federation Feeder Data Import"
handle => "imported_data",
depends_on => { "transport_user", "ensure_feeders" },
usebundle => imported_data;
am_policy_hub.default:cfengine_mp_fr_enable_distributed_cleanup::
"Distributed Cleanup Dependencies"
handle => "distributed_cleanup_dependencies",
if => "enabled.am_on.am_superhub.!am_paused",
usebundle => "distributed_cleanup_dependencies";
"Distributed Cleanup Setup"
handle => "distributed_cleanup_setup",
depends_on => { "transport_user", "data_transport" },
usebundle => "distributed_cleanup_setup";
"Distributed Federated Host Cleanup"
handle => "distributed_cleanup",
if => "enabled.am_on.am_superhub.!am_paused",
depends_on => { "imported_data", "distributed_cleanup_setup", "distributed_cleanup_dependencies" },
usebundle => distributed_cleanup_run;
reports:
!enterprise_edition::
"Federated reporting is only available in CFEngine Enterprise.";
enterprise_edition.!(policy_server|am_policy_hub)::
"Federated reporting is only available on the policy server / hub.";
}
cfengine_enterprise_federation:setup_status
Prototype: cfengine_enterprise_federation:setup_status
Implementation:
code
enterprise_edition.!(policy_server|am_policy_hub)::
{
vars:
"role" string => "$(cfengine_enterprise_federation:config.role)";
"ssh_pub_key"
string => readfile( "$(cfengine_enterprise_federation:transport_user.ssh_pub_key)" ),
if => fileexists( "$(cfengine_enterprise_federation:transport_user.ssh_pub_key)" );
"ssh_server_fingerprint"
# ssh-keyscan is used because it's more reliable/easy than trying to
# parse sshd config to find the file and then readfile():
string => execresult("ssh-keyscan localhost 2>/dev/null | sed 's/localhost //g' | sort", useshell);
classes:
"superhub_setup_status_complete"
expression => "any",
depends_on => {
"config",
"transport_user",
"postgres_config", # We are depending on a deep guard within this bundle
"federation_manage_files",
};
files:
superhub_setup_status_complete::
"$(cfengine_enterprise_federation:config.path_setup_status)"
create => "true",
perms => default:mog( "600", "cfapache", "root" ),
template_method => "inline_mustache",
edit_template_string => "$(const.n)",
template_data => '{
"configured": true,
"role": "$(role)",
"hostkey": "$(sys.key_digest)",
"transport_ssh_public_key": "$(ssh_pub_key)",
"transport_ssh_server_fingerprint": "$(ssh_server_fingerprint)",
}',
if => isvariable( ssh_pub_key );
}
cfengine_enterprise_federation:distributed_cleanup_setup
Prototype: cfengine_enterprise_federation:distributed_cleanup_setup
Implementation:
code
}',
{
vars:
"distributed_cleanup_dir" string => "/opt/cfengine/federation/cftransport/distributed_cleanup";
files:
am_superhub|am_feeder::
"${distributed_cleanup_dir}/."
perms => default:mog( "700", "$(cfengine_enterprise_federation:config.transport_user)", "root" ),
create => "true";
"${distributed_cleanup_dir}/${sys.fqhost}.pub"
perms => default:mog( "600", "$(cfengine_enterprise_federation:config.transport_user)", "root" ),
copy_from => default:local_cp("${sys.workdir}/ppkeys/localhost.pub");
"${distributed_cleanup_dir}/${sys.fqhost}.cert"
perms => default:mog( "600", "$(cfengine_enterprise_federation:config.transport_user)", "root" ),
copy_from => default:local_cp("${sys.workdir}/httpd/ssl/certs/${sys.fqhost}.cert");
}
cfengine_enterprise_federation:distributed_cleanup_run
Prototype: cfengine_enterprise_federation:distributed_cleanup_run
Implementation:
code
perms => default:mog( "600", "$(cfengine_enterprise_federation:config.transport_user)", "root" ),
{
vars:
"_arglist" slist => { ifelse("debug_mode", "--debug",
"inform_mode", "--inform",
"") };
commands:
am_superhub.!am_paused.default:cfengine_mp_fr_enable_distributed_cleanup::
"$(sys.bindir)/cfengine-selected-python"
args => "$(cfengine_enterprise_federation:config.bin_dir)/distributed_cleanup.py",
arglist => { @(_arglist) },
unless => isvariable( "default:def.DISTRIBUTED_CLEANUP_SSL_CERT_DIR" );
"SSL_CERT_DIR=$(default:def.DISTRIBUTED_CLEANUP_SSL_CERT_DIR) $(sys.bindir)/cfengine-selected-python" -> { "ENT-8477", "ENT-8464" }
args => "$(cfengine_enterprise_federation:config.bin_dir)/distributed_cleanup.py",
arglist => { @(_arglist) },
if => isvariable( "default:def.DISTRIBUTED_CLEANUP_SSL_CERT_DIR"),
contain => default:in_shell,
comment => "When custom SSL certificates are used from the non default location we need to let the script know where to find them.";
}
main
Prototype: __main__
Description: You can run this policy file from shell without specifying bundle
Implementation:
code
{
{
methods:
"entry" usebundle => cfengine_enterprise_federation:entry;
}
cfe_internal/enterprise/federation/
This directory contains assets related to the function and configuration of CFEngine Enterprise Federated reporting.
cfe_internal/enterprise/
This directory contains internal management polcies related to CFEngine
Enterprise functionality like Mission Portal.
cfe_internal/recommendations.cf
MPF_class_recommendations
Prototype: MPF_class_recommendations
Implementation:
code
bundle agent MPF_class_recommendations
{
meta:
(policy_server|am_policy_hub).enterprise_edition::
"tags" slist => { "cfengine_recommends" };
classes:
"cfengine_recommendation_instruct_disablement"
expression => "cfengine_recommendation_emitted",
scope => "namespace";
reports:
"`cfengine_internal_purge_policies` no longer has any effect. Please use `cfengine_internal_purge_policies_disabled` instead, to choose where you want to disable purging or remove the class completely if you want purging enabled everywhere (the new default in 3.18+)." -> { "CFE-3662" }
if => "cfengine_internal_purge_policies",
classes => results( "bundle", "cfengine_recommendation_emitted");
}
federated_reporting_superhub_recommendations
Prototype: federated_reporting_superhub_recommendations
Implementation:
code
bundle agent federated_reporting_superhub_recommendations
{
meta:
"tags" slist => { "cfengine_recommends" };
classes:
"cfengine_recommendation_instruct_disablement"
expression => "cfengine_recommendation_emitted_reached",
scope => "namespace";
reports:
cfengine_enterprise_federation:am_superhub::
"CFEngine recommends installing gnu parallel on federated reporting superhubs."
if => not(isgreaterthan(length(packagesmatching( "parallel", ".*", ".*", ".*")), 0 )),
classes => results( "bundle", "cfengine_recommendation_emitted");
}
ignore_interfaces_rx_reccomendations
Prototype: ignore_interfaces_rx_reccomendations
Description: Recommend completing migration of ignore_interfaces.rx from inputdir to workdir
Implementation:
code
bundle agent ignore_interfaces_rx_reccomendations
{
meta:
"tags" slist => { "cfengine_recommends" };
classes:
"ignore_interfaces_in_workdir_supported"
and => { cf_version_minimum( "3.21.4" ),
not( cf_version_at( "3.22" ) ) },
comment => concat( "CFEngine doesn't look for ignore_interfaces.rx in",
" workdir except for versions greater than or equal",
"to 3.21.4." );
"ignore_interfaces_in_workdir" -> { "ENT-9402" }
if => fileexists( "$(sys.workdir)/ignore_interfaces.rx" );
"ignore_interfaces_in_inputdir" -> { "ENT-9402" }
if => fileexists( "$(sys.inputdir)/ignore_interfaces.rx" );
"cfengine_recommendation_instruct_disablement"
expression => "cfengine_recommendation_emitted_reached",
scope => "namespace";
files:
ignore_interfaces_in_workdir_supported.default:mpf_auto_migrate_ignore_interfaces_rx_to_workdir.ignore_interfaces_in_inputdir::
"$(sys.workdir)/ignore_interfaces.rx" -> { "ENT-9402" }
copy_from => local_dcp( "$(sys.inputdir)/ignore_interfaces.rx"),
comment => concat( "Excluding interfaces should be done outside of the",
" policy input directory so that it's easier to",
" ignore different interfaces on different hosts.");
ignore_interfaces_in_workdir_supported::
"$(sys.inputdir)/ignore_interfaces.rx" -> { "ENT-9402" }
delete => tidy,
action => policy( "warn" ),
comment => concat( "Excluding interfaces should be done outside of the",
" policy input directory so that it's easier to",
" ignore different interfaces on different hosts.",
" This file should be deleted once it's been migrated",
" to sys.workdir");
reports:
ignore_interfaces_in_workdir_supported.(ignore_interfaces_in_inputdir.!default:mpf_auto_migrate_ignore_interfaces_rx_to_workdir_reports_disabled)::
"NOTICE: 'ignore_interfaces.rx' is present in '$(const.dollar)(sys.inputdir)' ('$(sys.inputdir)/ignore_interfaces.rx'). We recommend that it be removed and migrated to '$(const.dollar)(sys.workdir)' ('$(sys.workdir)/ignore_interfaces.rx')"
if => not( fileexists( "$(sys.workdir)/ignore_interfaces.rx" ) ),
classes => results( "bundle", "cfengine_recommendation_emitted");
ignore_interfaces_in_workdir_supported.(ignore_interfaces_in_workdir.ignore_interfaces_in_inputdir).!default:mpf_auto_migrate_ignore_interfaces_rx_to_workdir_reports_disabled::
"NOTICE: 'ignore_interfaces.rx' identical in '$(const.dollar)(sys.workdir)' and '$(const.dollar)(sys.inputdir)'. We recommend removing '$(const.dollar)(sys.inputdir)/ignore_interfaces.rx'"
if => strcmp( readfile( "$(sys.workdir)/ignore_interfaces.rx"),
readfile( "$(sys.inputdir)/ignore_interfaces.rx") ),
classes => results( "bundle", "cfengine_recommendation_emitted");
"NOTICE: 'ignore_interfaces.rx' in '$(const.dollar)(sys.workdir)' and '$(const.dollar)(sys.inputdir)' but not identical. We recommend verifying the desired content of '$(const.dollar)(sys.workdir)/ignore_interfaces.rx', correcting it if necessary and removing '$(const.dollar)(sys.inputdir)/ignore_interfaces.rx'"
if => not( strcmp( readfile( "$(sys.workdir)/ignore_interfaces.rx"),
readfile( "$(sys.inputdir)/ignore_interfaces.rx") ) ),
classes => results( "bundle", "cfengine_recommendation_emitted");
}
postgresql_conf_recommendations
Prototype: postgresql_conf_recommendations
Description: Recommendations about the configuration of postgresql.conf for CFEngine Enterprise Hubs
Implementation:
code
bundle agent postgresql_conf_recommendations
{
meta:
(policy_server|am_policy_hub).enterprise_edition::
"tags" slist => { "cfengine_recommends" };
vars:
"pgsql_conf" string => "$(sys.statedir)/pg/data/postgresql.conf";
"mem_info_source" string => "/proc/meminfo";
"mem_info_data"
data => data_readstringarray( $(mem_info_source), "", "(:|\s+)", inf, inf),
if => fileexists( $(mem_info_source) );
"upper" string => "67108864"; # 64 * 1024 * 1024 in KB
"lower" string => "3145728"; # 3 * 1024 * 1024 in KB
"conf[maintenance_work_mem]"
string => "2GB",
if => isgreaterthan( "$(mem_info_data[MemTotal][1])", $(lower) ),
comment => "If we have more than 2GB of memory available then we set the
maintenance_work_memory to 2G to improve index creation, and
vacuuming. Else we leave the default value.";
"conf[shared_buffers]"
string => "16GB",
if => isgreaterthan( "$(mem_info_data[MemTotal][1])", $(upper) );
"conf[effective_cache_size]"
string => "11GB", # 70% of 16GB
if => isgreaterthan( "$(mem_info_data[MemTotal][1])", $(upper) );
"calculated_shared_buffers_MB"
string => format( "%d0",
eval( "$(mem_info_data[MemTotal][1]) * 25 / 100 / 1024", "math", "infix"));
"conf[shared_buffers]"
string => concat( $(calculated_shared_buffers_MB), "MB"),
if => and(
not( isvariable( "conf[maintenance_work_mem]" ) ),
not( isvariable( "conf[shared_buffers]" )));
"calculated_effective_cache_size_MB"
string => format( "%d0",
eval( "$(mem_info_data[MemTotal][1]) * 70 / 100 / 1024", "math", "infix"));
"conf[effective_cache_size]"
string => concat( $(calculated_effective_cache_size_MB), "MB"),
if => and(
not( isvariable( "conf[maintenance_work_mem]" ) ),
not( isvariable( "conf[effective_cache_size]" )));
classes:
"cfengine_recommendation_instruct_disablement"
expression => "cfengine_recommendation_emitted_reached",
scope => "namespace";
files:
"$(pgsql_conf)"
edit_line => set_line_based("$(this.bundle).conf", "=", "\s*=\s*", ".*", "\s*#\s*"),
classes => results( "bundle", "psql_conf_recommendations" ),
action => policy( "warn" ),
if => fileexists( $(pgsql_conf) );
reports:
psql_conf_recommendations_not_kept::
"CFEngine Recommended Settings:";
"shared_buffers = $(conf[shared_buffers])"
if => isvariable( "conf[shared_buffers]" ),
classes => results( "bundle", "cfengine_recommendation_emitted");
"effective_cache_size = $(conf[effective_cache_size])"
if => isvariable( "conf[effective_cache_size]" ),
classes => results( "bundle", "cfengine_recommendation_emitted");
"maintenance_work_mem = $(conf[maintenance_work_mem])"
if => isvariable( "conf[maintenance_work_mem]" ),
classes => results( "bundle", "cfengine_recommendation_emitted");
}
cfe_internal/update/cfe_internal_dc_workflow.cf
cfe_internal_dc_workflow
Prototype: cfe_internal_dc_workflow
Description: Update default policy distribution point from upstream repository
Implementation:
code
bundle agent cfe_internal_dc_workflow
{
methods:
am_policy_hub.enterprise.cfengine_internal_masterfiles_update::
"Masterfiles from VCS"
usebundle => cfe_internal_update_from_repository,
handle => "cfe_internal_dc_workflow_methods_masterfiles_from_vcs",
action => u_immediate,
comment => "Update masterfiles from upstream VCS automatically
for best OOTB Enterprise experience";
}
cfe_internal/update/cfe_internal_update_from_repository.cf
control
Prototype: control
Description: Include policy needed for updating masterfiles, the default policy distribution point with content from an upstream VCS
Implementation:
code
body file control
{
inputs => { @(cfe_internal_update_from_repository_file_control.inputs) };
}
cfe_internal_update_from_repository_file_control
Prototype: cfe_internal_update_from_repository_file_control
Description: Define inputs needed for updating masterfiles, the default policy distribution point with content from an upstream VCS
Implementation:
code
bundle common cfe_internal_update_from_repository_file_control
{
vars:
"inputs" slist => { "$(this.promise_dirname)/lib.cf" };
}
cfe_internal_update_from_repository
Prototype: cfe_internal_update_from_repository
Description: Ensure masterfiles, the default policy is up to date
Implementation:
code
bundle agent cfe_internal_update_from_repository
{
methods:
am_policy_hub.cfengine_internal_masterfiles_update::
"Update staged masterfiles from VCS"
usebundle => cfe_internal_masterfiles_stage,
handle => "cfe_internal_update_from_repository_methods_masterfiles_fetch",
action => u_immediate,
comment => "Grab the latest updates from upstream VCS repo before deploying masterfiles";
}
cfe_internal_masterfiles_stage
Prototype: cfe_internal_masterfiles_stage
Description: Run masterfiles-stage.sh to update the default distribution of masterfiles
Implementation:
code
bundle agent cfe_internal_masterfiles_stage
{
commands:
"$(update_def.dc_scripts)/masterfiles-stage.sh"
classes => u_kept_successful_command_results("bundle", "masterfiles_deploy"),
handle => "masterfiles_update_stage",
action => u_immediate;
reports:
masterfiles_deploy_not_kept::
"Masterfiles deployment failed, for more info see '$(sys.workdir)/outputs/dc-scripts.log'";
(DEBUG|DEBUG_cfe_internal_masterfiles_stage).(masterfiles_deploy_kept|masterfiles_deploy_repaired)::
"DEBUG $(this.bundle): Masterfiles deployed successfully";
}
cfe_internal/update/lib.cf
u_results
Prototype: u_results(scope, class_prefix)
Description: Define classes prefixed with class_prefix and suffixed with
appropriate outcomes: _kept, _repaired, _not_kept, _error, _failed,
_denied, _timeout, _reached
Arguments:
scope: The scope in which the class should be defined (bundle or namespace)class_prefix: The prefix for the classes defined
This body can be applied to any promise and sets global
(namespace) or local (bundle) classes based on its outcome. For
instance, with class_prefix set to abc:
if the promise is to change a file's owner to nick and the file
was already owned by nick, the classes abc_reached and
abc_kept will be set.
if the promise is to change a file's owner to nick and the file
was owned by adam and the change succeeded, the classes
abc_reached and abc_repaired will be set.
This body is a simpler, more consistent version of the body
scoped_classes_generic, which see. The key difference is that
fewer classes are defined, and only for outcomes that we can know.
For example this body does not define "OK/not OK" outcome classes,
since a promise can be both kept and failed at the same time.
It's important to understand that promises may do multiple things,
so a promise is not simply "OK" or "not OK." The best way to
understand what will happen when your specific promises get this
body is to test it in all the possible combinations.
Suffix Notes:
_reached indicates the promise was tried. Any outcome will result
in a class with this suffix being defined.
_kept indicates some aspect of the promise was kept
_repaired indicates some aspect of the promise was repaired
_not_kept indicates some aspect of the promise was not kept.
error, failed, denied and timeout outcomes will result in a class
with this suffix being defined
_error indicates the promise repair encountered an error
_failed indicates the promise failed
_denied indicates the promise repair was denied
_timeout indicates the promise timed out
Example:
code
bundle agent example
{
commands:
"/bin/true"
classes => results("bundle", "my_class_prefix");
reports:
my_class_prefix_kept::
"My promise was kept";
my_class_prefix_repaired::
"My promise was repaired";
}
See also: scope, scoped_classes_generic, classes_generic
Implementation:
code
body classes u_results(scope, class_prefix)
{
scope => "$(scope)";
promise_kept => { "$(class_prefix)_reached",
"$(class_prefix)_kept" };
promise_repaired => { "$(class_prefix)_reached",
"$(class_prefix)_repaired" };
repair_failed => { "$(class_prefix)_reached",
"$(class_prefix)_error",
"$(class_prefix)_not_kept",
"$(class_prefix)_failed" };
repair_denied => { "$(class_prefix)_reached",
"$(class_prefix)_error",
"$(class_prefix)_not_kept",
"$(class_prefix)_denied" };
repair_timeout => { "$(class_prefix)_reached",
"$(class_prefix)_error",
"$(class_prefix)_not_kept",
"$(class_prefix)_timeout" };
}
u_cfe_internal_recurse
Prototype: u_cfe_internal_recurse(d)
Description: Search for files recursively to a depth of d across file system boundaries
Arguments:
d: Number of levels deep to traverse
Implementation:
code
body depth_search u_cfe_internal_recurse(d)
{
depth => "$(d)";
xdev => "true";
}
u_kept_successful_command_results
Prototype: u_kept_successful_command_results(scope, class_prefix)
Description: Set command to "kept" instead of "repaired" if it returns 0 and define
classes suffixed with the appropriate outcomes.
Arguments:
scope: The scope in which the class should be defined (bundle or namespace)class_prefix: The prefix for the classes defined
See also: scope, scoped_classes_generic, classes_generic, results
Implementation:
code
body classes u_kept_successful_command_results(scope, class_prefix)
{
inherit_from => u_results( "$(scope)", "$(class_prefix)" );
kept_returncodes => { "0" };
failed_returncodes => { "1" };
}
u_systemd_services
Prototype: u_systemd_services
Description: Define service method for systemd
Implementation:
code
body service_method u_systemd_services
{
service_autostart_policy => "none";
service_dependence_chain => "ignore";
service_type => "generic";
service_args => "";
}
u_mog
Prototype: u_mog(mode, user, group)
Description: Set the file's mode, owner and group
Arguments:
mode: The new modeuser: The username of the new ownergroup: The group name
Implementation:
code
body perms u_mog(mode,user,group)
{
owners => { "$(user)" };
groups => { "$(group)" };
mode => "$(mode)";
#+begin_ENT-951
# Remove after 3.20 is not supported
rxdirs => "true";
@if minimum_version(3.20)
rxdirs => "false";
@endif
#+end
}
u_systemd_services
Prototype: u_systemd_services(service, state)
Description: Manage standard systemd services
Arguments:
service: The name of the servicestate: The desired state the service should be in.
Implementation:
code
bundle agent u_systemd_services(service,state)
{
vars:
# We explicitly guard for systemd to avoid unnecessary agent time in
# pre-eval
systemd::
"systemctl" string => "/bin/systemctl";
"call_systemctl" string => "$(systemctl) --no-ask-password --global --system";
"systemd_properties" string => "-pLoadState,CanStop,UnitFileState,ActiveState,LoadState,CanStart,CanReload";
"systemd_service_info" slist => string_split(execresult("$(call_systemctl) $(systemd_properties) show $(service)", "noshell"), "\n", "10");
classes:
systemd::
# define a class named after the desired state
"$(state)" expression => "any";
"non_disabling" or => { "start", "stop", "restart", "reload" };
# A collection of classes to determine the capabilities of a given systemd
# service, then start, stop, etc. the service. Also supports a custom action
# for anything not supported
"service_enabled" expression => reglist(@(systemd_service_info), "UnitFileState=enabled");
"service_active" expression => reglist(@(systemd_service_info), "ActiveState=active");
"service_loaded" expression => reglist(@(systemd_service_info), "LoadState=loaded");
"service_notfound" expression => reglist(@(systemd_service_info), "LoadState=not-found");
"can_stop_service" expression => reglist(@(systemd_service_info), "CanStop=yes");
"can_start_service" expression => reglist(@(systemd_service_info), "CanStart=yes");
"can_reload_service" expression => reglist(@(systemd_service_info), "CanReload=yes");
"request_start" expression => strcmp("start", "$(state)");
"request_stop" expression => strcmp("stop", "$(state)");
"request_reload" expression => strcmp("reload", "$(state)");
"request_restart" expression => strcmp("restart", "$(state)");
"action_custom" expression => "!(request_start|request_stop|request_reload|request_restart)";
"action_start" expression => "request_start.!service_active.can_start_service";
"action_stop" expression => "request_stop.service_active.can_stop_service";
"action_reload" expression => "request_reload.service_active.can_reload_service";
"action_restart" or => {
"request_restart",
# Possibly undesirable... if a reload is
# requested, and the service "can't" be
# reloaded, then we restart it instead.
"request_reload.!can_reload_service.service_active",
};
# Starting a service implicitly enables it
"action_enable" expression => "request_start.!service_enabled";
# Respectively, stopping it implicitly disables it
"action_disable" expression => "request_stop.service_enabled";
commands:
systemd.service_loaded:: # note this class is defined in `inventory/linux.cf`
# conveniently, systemd states map to `services` states, except
# for `enable`
"$(call_systemctl) -q start $(service)" if => "action_start";
"$(call_systemctl) -q stop $(service)" if => "action_stop";
"$(call_systemctl) -q reload $(service)" if => "action_reload";
"$(call_systemctl) -q restart $(service)" if => "action_restart";
"$(call_systemctl) -q enable $(service)" if => "action_enable";
"$(call_systemctl) -q disable $(service)" if => "action_disable";
# Custom action for any of the non-standard systemd actions such a
# status, try-restart, isolate, et al.
"$(call_systemctl) $(state) $(service)" if => "action_custom";
reports:
DEBUG|DEBUG_u_systemd_service::
"DEBUG $(this.bundle): using systemd layer to $(state) $(service)";
"DEBUG $(this.bundle): Service $(service) unit file is not loaded; doing nothing"
if => "systemd.!service_loaded";
"DEBUG $(this.bundle): Could not find service: $(service)"
if => "systemd.service_notfound";
}
cfe_internal/update/systemd_units.cf
cfe_internal_systemd_unit_files
Prototype: cfe_internal_systemd_unit_files
Description: This bundle is responsible for ensuring the systemd units are in place
with the proper content and permissions. Any time a unit is repaired systemd
is reloaded and the repaired unit(s) are restarted. the
cfe_internal_systemd_unit_state bundle is responsible for making sure the
service units are in the appropriate state. So a service may be restarted
because of a change, and subsequently stopped if the desired state was for it
to not be running.
Implementation:
code
bundle agent cfe_internal_systemd_unit_files
{
vars:
systemd::
"systemctl" string => "/bin/systemctl";
"unit_dir"
string => "/etc/systemd/system",
comment => "This is the directory where the systemd units should be
placed.";
"unit_template_dir"
string => "$(this.promise_dirname)/../../templates",
comment => "This is where the templates for the units exist. In the
templates dir in the root of masterfiles.";
"service_units"
slist => { @(cfe_internal_update_processes.all_agents) },
handle => "systemd_core_units",
comment => "These are the services which should have systemd units on all systems.";
files:
systemd::
"$(unit_dir)/$(service_units).service"
create => "true",
edit_template => "$(unit_template_dir)/$(service_units).service.mustache",
template_method => "mustache",
classes => u_results( "bundle", "cfe_systemd_service_unit_$(service_units)" ),
perms => u_mog("644", "root", "root"),
comment => "We need to make each service units content is correct.";
commands:
systemd::
"$(systemctl)"
args => "daemon-reload",
handle => "cfe_internal_systemd_unit_files_reload_when_changed",
if => classmatch("cfe_systemd_service_unit_.*_repaired"),
comment => "We need to reload the systemd configuration after any unit
is changed in order for systemd to recognize the change.";
"$(systemctl)"
args => "restart $(service_units).service",
handle => "cfe_internal_systemd_unit_restart_when_changed",
if => and(classify("cfe_systemd_service_unit_$(service_units)_repaired"),
returnszero("$(systemctl) --quiet is-active $(service_units)", noshell)),
comment => "We need to restart any units which have been changed in
order for the new configuration to be in effect. But we only
want to restart them if they are currently running.";
}
cfe_internal_systemd_service_unit_state
Prototype: cfe_internal_systemd_service_unit_state
Description: This bundle is responsible for managing the various cfengine components
units state. It uses information from
cfe_internal_update_processes.agents_to_be_enabled,
cfe_internal_update_processes.agents_to_be_disabled to determine which units
should be running or not.
Implementation:
code
bundle agent cfe_internal_systemd_service_unit_state
{
vars:
"enabled" slist => { @(cfe_internal_update_processes.agents_to_be_enabled) };
"disabled"
slist => { @(cfe_internal_update_processes.agents_to_be_disabled) };
methods:
"Disabled Components"
usebundle => u_systemd_services( $(disabled), "stop");
"Enabled Components"
usebundle => u_systemd_services( $(enabled), "start" );
}
cfe_internal/update/update_bins.cf
u_empty_no_backup
Prototype: u_empty_no_backup
Description: Empty file before editing and create no backups
Implementation:
code
body edit_defaults u_empty_no_backup
{
empty_file_before_editing => "true";
edit_backup => "false";
}
u_pcp
Prototype: u_pcp(from, server)
Description: Copy from from on server using digest comparison
Arguments:
from: Path on remote server to copy fromserver: Remote host to copy from
Implementation:
code
body copy_from u_pcp(from,server)
{
source => "$(from)";
compare => "digest";
trustkey => "false";
purge => "true";
!am_policy_hub::
servers => { "$(server)" };
cfengine_internal_encrypt_transfers::
encrypt => "true";
}
u_generic
Prototype: u_generic(repo)
Arguments:
Implementation:
code
body package_method u_generic(repo)
{
debian::
package_changes => "individual";
package_list_command => "/usr/bin/dpkg -l";
# package_list_update_command => "/usr/bin/apt-get update";
package_list_update_ifelapsed => "$(u_common_knowledge.list_update_ifelapsed_now)";
package_list_name_regex => "ii\s+([^\s:]+).*";
# package_list_version_regex => "ii\s+[^\s]+\s+([^\s]+).*";
package_list_version_regex => "ii\s+[^\s]+\s+(\d+\.\d+((\.|-)\d+)+).*";
package_installed_regex => ".*"; # all reported are installed
package_file_repositories => { "$(repo)" };
package_version_equal_command => "/usr/bin/dpkg --compare-versions '$(v1)' eq '$(v2)'";
package_version_less_command => "/usr/bin/dpkg --compare-versions '$(v1)' lt '$(v2)'";
debian.x86_64::
package_name_convention => "$(name)_$(version)_amd64.deb";
debian.i686::
package_name_convention => "$(name)_$(version)_i386.deb";
debian::
package_add_command => "/usr/bin/dpkg --force-confdef --force-confnew --install";
package_delete_command => "/usr/bin/dpkg --purge";
debian::
package_update_command => "$(sys.workdir)/bin/cf-upgrade -b $(cfe_internal_update_bins.backup_script) -s $(cfe_internal_update_bins.backup_file) -i $(cfe_internal_update_bins.install_script)";
redhat|SuSE|suse|sles::
package_changes => "individual";
package_list_command => "/bin/rpm -qa --queryformat \"i | repos | %{name} | %{version}-%{release} | %{arch}\n\"";
package_list_update_ifelapsed => "$(u_common_knowledge.list_update_ifelapsed_now)";
package_list_name_regex => "[^|]+\|[^|]+\|\s+([^\s|]+).*";
package_list_version_regex => "[^|]+\|[^|]+\|[^|]+\|\s+([^\s|]+).*";
package_list_arch_regex => "[^|]+\|[^|]+\|[^|]+\|[^|]+\|\s+([^\s]+).*";
package_installed_regex => "i.*";
package_file_repositories => { "$(repo)" };
package_name_convention => "$(name)-$(version).$(arch).rpm";
package_add_command => "/bin/rpm -ivh ";
package_delete_command => "/bin/rpm -e --nodeps";
package_verify_command => "/bin/rpm -V";
package_noverify_regex => ".*[^\s].*";
package_version_less_command => "$(sys.bindir)/rpmvercmp '$(v1)' lt '$(v2)'";
package_version_equal_command => "$(sys.bindir)/rpmvercmp '$(v1)' eq '$(v2)'";
(redhat|SuSE|suse|sles)::
package_update_command => "$(sys.workdir)/bin/cf-upgrade -b $(cfe_internal_update_bins.backup_script) -s $(cfe_internal_update_bins.backup_file) -i $(cfe_internal_update_bins.install_script)";
redhat.!redhat_4::
package_list_update_command => "/usr/bin/yum --quiet check-update";
redhat_4::
package_list_update_command => "/usr/bin/yum check-update";
SuSE|suse|sles::
package_list_update_command => "/usr/bin/zypper list-updates";
windows::
package_changes => "individual";
package_list_update_ifelapsed => "$(u_common_knowledge.list_update_ifelapsed_now)";
package_file_repositories => { "$(repo)" };
package_installed_regex => ".*";
package_name_convention => "$(name)-$(version)-$(arch).msi";
package_add_command => "\"$(sys.winsysdir)\msiexec.exe\" /qn /i";
package_update_command => "\"$(sys.winsysdir)\msiexec.exe\" /qn /i";
package_delete_command => "\"$(sys.winsysdir)\msiexec.exe\" /qn /x";
freebsd::
package_changes => "individual";
package_list_command => "/usr/sbin/pkg_info";
package_list_update_command => "/usr/bin/true";
package_list_update_ifelapsed => "$(u_common_knowledge.list_update_ifelapsed_now)";
package_list_name_regex => "^(\S+)-(\d+\.?)+";
package_list_version_regex => "^\S+-((\d+\.?)+\_\d)";
package_file_repositories => { "$(repo)" };
package_installed_regex => ".*";
package_name_convention => "$(name)-$(version).tbz";
package_delete_convention => "$(name)-$(version)";
package_add_command => "/usr/sbin/pkg_add";
package_delete_command => "/usr/sbin/pkg_delete";
netbsd::
package_changes => "individual";
package_list_command => "/usr/sbin/pkg_info";
package_list_update_command => "/usr/bin/true";
package_list_update_ifelapsed => "$(u_common_knowledge.list_update_ifelapsed_now)";
package_list_name_regex => "^(\S+)-(\d+\.?)+";
package_list_version_regex => "^\S+-((\d+\.?)+\nb\d)";
package_file_repositories => { "$(repo)" };
package_installed_regex => ".*";
package_name_convention => "$(name)-$(version).tgz";
package_delete_convention => "$(name)-$(version)";
package_add_command => "/usr/sbin/pkg_add";
package_delete_command => "/usr/sbin/pkg_delete";
solarisx86|solaris::
package_changes => "individual";
package_list_command => "/usr/bin/pkginfo -l";
package_list_update_command => "/usr/bin/true";
package_list_update_ifelapsed => "$(u_common_knowledge.list_update_ifelapsed_now)";
package_multiline_start => "\s*PKGINST:\s+[^\s]+";
package_list_name_regex => "\s*PKGINST:\s+([^\s]+)";
package_list_version_regex => "\s*VERSION:\s+([^\s]+)";
package_list_arch_regex => "\s*ARCH:\s+([^\s]+)";
package_file_repositories => { "$(repo)" };
package_installed_regex => "\s*STATUS:\s*(completely|partially)\s+installed.*";
package_name_convention => "$(name)-$(version)-$(arch).pkg";
package_delete_convention => "$(name)";
# Cfengine appends path to package and package name below, respectively
package_add_command => "/bin/sh $(repo)/add_scr $(repo)/admin_file";
package_delete_command => "/usr/sbin/pkgrm -n -a $(repo)/admin_file";
(solarisx86|solaris)::
package_update_command => "$(sys.workdir)/bin/cf-upgrade -b $(cfe_internal_update_bins.backup_script) -s $(cfe_internal_update_bins.backup_file) -i $(cfe_internal_update_bins.install_script)";
aix::
package_changes => "individual";
package_list_update_command => "/usr/bin/true";
package_list_update_ifelapsed => "$(u_common_knowledge.list_update_ifelapsed_now)";
package_list_command => "/usr/bin/lslpp -lc";
package_list_name_regex => "[^:]+:([^:]+):[^:]+:.*";
package_list_version_regex => "[^:]+:[^:]+:([^:]+):.*";
package_file_repositories => { "$(repo)" };
package_installed_regex => "[^:]+:[^:]+:[^:]+:[^:]*:(COMMITTED|APPLIED):.*";
package_name_convention => "$(name)-$(version).bff";
package_delete_convention => "$(name)";
package_add_command => "/usr/bin/rm -f $(repo)/.toc && /usr/sbin/geninstall -IqacgXNY -d $(repo) cfengine-nova$";
package_update_command => "/usr/bin/rm -f $(repo)/.toc && /usr/sbin/geninstall -IqacgXNY -d $(repo) cfengine-nova$";
package_delete_command => "/usr/sbin/installp -ug cfengine-nova$";
}
cfe_internal_update_bins
Prototype: cfe_internal_update_bins
Description: Update cfengine binaries
TODO Redact this file, not in use. The policy here was migrated into
standalone self upgrade, nothing includes this policy nor references it's
bundles
Implementation:
code
bundle agent cfe_internal_update_bins
{
vars:
enterprise::
"cf_components" slist => { "cf-key", "cf-monitord", "cf-promises",
"cf-runagent", "cf-serverd", "cf-hub", },
comment => "Define cfengine robot agents",
handle => "cfe_internal_update_bins_vars_cf_components";
"master_software_location" string => "/var/cfengine/master_software_updates",
comment => "The Cfengine binary updates directory on the policy host",
handle => "cfe_internal_update_bins_vars_master_software_location";
!hpux::
"package_dir"
string => "$(sys.flavour)_$(sys.arch)",
comment => "The directory within software updates to look for packages";
hpux::
"package_dir"
string => "$(sys.class)_$(sys.arch)",
comment => "The directory within software updates to look for packages.
On HPUX sys.flavor includes versions, so we use sys.class
instead.";
enterprise::
"local_software_dir" string => translatepath("$(sys.workdir)/software_updates/$(package_dir)"),
comment => "Local directory containing binary updates for this host",
handle => "cfe_internal_update_bins_vars_local_software_dir";
"local_update_log_dir" string => translatepath("$(sys.workdir)/software_updates/update_log"),
comment => "Local directory to store update log for this host",
handle => "cfe_internal_update_bins_vars_local_update_log_dir";
!windows.enterprise::
# backup script for cf-upgrade
# the script should have 2 conditions, BACKUP and RESTORE
# BACKUP and RESTORE status is $(const.dollar)1 variable in the script
# see more details at bundle edit_line u_backup_script
"backup_script" string => "/tmp/cf-upgrade_backup.sh";
# a single compressed backup file for cf-upgrade
# this backup_file is passed to backup_script as $(const.dollar)2 variable
# cf-upgrade will extract this file if return signal of upgrade command is not 0
"backup_file" string => "/tmp/cfengine-nova-$(sys.cf_version).tar.gz";
# install script for cf-upgrade
# each distribution has its own way to upgrade a package
# see more details at bundle edit_line u_install_script
"install_script" string => "/tmp/cf-upgrade_install.sh";
(solarisx86|solaris).enterprise::
# to automatically remove or install packages on Solaris
# admin_file is a must to have to avoid pop-up interaction
# see more details at bundle edit_line u_admin_file
"admin_file" string => "/tmp/cf-upgrade_admin_file";
(solarisx86|solaris).enterprise::
"novapkg" string => "cfengine-nova",
comment => "Name convention of Nova package on Solaris",
handle => "cfe_internal_update_bins_vars_novapkg_solaris",
if => "nova_edition";
aix.enterprise::
"novapkg" string => "cfengine-nova",
comment => "Name convention of Nova package on AIX",
handle => "cfe_internal_update_bins_vars_novapkg_aix",
if => "nova_edition";
!(solarisx86|solaris|aix).enterprise::
"novapkg" string => "cfengine-nova",
comment => "Name convention of Nova package for all but not Solaris",
handle => "cfe_internal_update_bins_vars_novapkg_not_solaris_aix",
if => "nova_edition";
solaris.!sunos_i86pc.enterprise::
"pkgarch" string => "sparc",
comment => "Name convention of package arch on Solaris",
handle => "cfe_internal_update_bins_vars_pkgarch_solaris";
solarisx86.enterprise::
"pkgarch" string => "i386",
comment => "Name convention of package arch on Solaris",
handle => "cfe_internal_update_bins_vars_pkgarch_solarisx86";
redhat.i686.enterprise::
"pkgarch" string => "i386",
comment => "Name convention of package arch on 32-bit RHEL",
handle => "cfe_internal_update_bins_vars_pkgarch_redhat_32b";
redhat.(x86_64|ppc64).enterprise::
"pkgarch" string => "$(sys.arch)",
comment => "Name convention of package arch on RHEL x86_64 and ppc64",
handle => "cfe_internal_update_bins_vars_pkgarch_redhat_x86_64_and_ppc64";
(freebsd|netbsd|debian|aix).enterprise::
"pkgarch" string => "*",
comment => "Name convention of package arch on *BSD/Debian",
handle => "cfe_internal_update_bins_vars_pkgarch_bsd_debian_aix";
!(solarisx86|solaris|freebsd|netbsd|debian|aix|redhat).enterprise::
"pkgarch" string => "$(sys.arch)",
comment => "Name convention of package arch for other system except Solaris and *BSD",
handle => "cfe_internal_update_bins_vars_pkgarch_not_solaris_bsd_debian_aix_redhat_32b";
#
classes:
"have_software_dir" expression => fileexists($(local_software_dir));
#
packages:
!am_policy_hub.linux.enterprise.trigger_upgrade.!bootstrap_mode::
"$(novapkg)"
comment => "Update Nova package to a newer version (package is there)",
handle => "cfe_internal_update_bins_packages_nova_update_linux_pkg_there",
package_policy => "update",
package_select => "==", # picks the newest Nova available
package_architectures => { "$(pkgarch)" },
package_version => "$(update_def.current_version)-$(update_def.current_release)",
package_method => u_generic( "$(local_software_dir)" ),
if => "nova_edition.have_software_dir",
classes => u_if_else("bin_update_success", "bin_update_fail");
!am_policy_hub.(solaris|solarisx86).enterprise.trigger_upgrade.!bootstrap_mode::
"$(novapkg)"
comment => "Update Nova package to a newer version (package is there)",
handle => "cfe_internal_update_bins_packages_nova_update_solaris_pkg_there",
package_policy => "update",
package_select => "==", # picks the newest Nova available
package_architectures => { "$(pkgarch)" },
package_version => "$(update_def.current_version)",
package_method => u_generic( "$(local_software_dir)" ),
if => "nova_edition.have_software_dir",
classes => u_if_else("bin_update_success", "bin_update_fail");
!am_policy_hub.windows.enterprise.trigger_upgrade.!bootstrap_mode::
"$(novapkg)"
comment => "Update Nova package to a newer version (package is there)",
handle => "cfe_internal_update_bins_packages_nova_update_windows_only_pkg_there",
package_policy => "update",
package_select => "==", # picks the newest Nova available
package_architectures => { "$(pkgarch)" },
package_version => "$(update_def.current_version)",
package_method => u_generic( "$(local_software_dir)" ),
if => "nova_edition.have_software_dir",
classes => u_if_else("bin_update_success", "bin_update_fail");
!am_policy_hub.aix.enterprise.trigger_upgrade.!bootstrap_mode::
"$(novapkg)"
comment => "Update Nova package to a newer version (package is there)",
handle => "cfe_internal_update_bins_packages_nova_update_aix_only_pkg_there",
package_policy => "update",
package_select => "==", # picks the newest Nova available
package_architectures => { "$(pkgarch)" },
package_version => "$(update_def.current_version).0",
package_method => u_generic( "$(local_software_dir)" ),
if => "nova_edition.have_software_dir",
classes => u_if_else("bin_update_success", "bin_update_fail");
#
files:
enterprise::
"$(local_update_log_dir)/$(sys.nova_version)_is_running"
comment => "Create an empty file about a version that is running",
handle => "cfe_internal_update_bins_files_version_is_running",
create => "true";
am_policy_hub.enterprise::
"$(master_software_location)/cf-upgrade/linux.i386/."
comment => "Prepare a directory for cf-upgrade",
handle => "cfe_internal_update_bins_files_linux_i386",
create => "true";
"$(master_software_location)/cf-upgrade/linux.x86_64/."
comment => "Prepare a directory for cf-upgrade",
handle => "cfe_internal_update_bins_files_linux_x86_64",
create => "true";
!am_policy_hub.enterprise.trigger_upgrade::
"$(admin_file)"
comment => "Create solaris admin_file to automate remove and install packages",
handle => "cfe_internal_update_bins_files_solaris_admin_file",
create => "true",
edit_defaults => u_empty_no_backup,
edit_line => u_admin_file,
perms => u_m("0644"),
if => "solarisx86|solaris";
"$(backup_script)"
comment => "Create a backup script for cf-upgrade",
handle => "cfe_internal_update_bins_files_backup_script",
create => "true",
if => "!windows",
edit_defaults => u_empty_no_backup,
edit_line => u_backup_script,
perms => u_m("0755");
"$(install_script)"
comment => "Create an install script for cf-upgrade",
handle => "cfe_internal_update_bins_files_install_script",
create => "true",
if => "!windows",
edit_defaults => u_empty_no_backup,
edit_line => u_install_script,
perms => u_m("0755");
"$(local_software_dir)/."
create => "true",
handle => "cfe_internal_update_bins_files_local_software_dir_presence",
comment => "Ensure the local software directory exists for new binaries
to be downloaded to";
"$(local_software_dir)"
comment => "Copy binary updates from master source on policy server",
handle => "cfe_internal_update_bins_files_pkg_copy",
copy_from => u_pcp("$(master_software_location)/$(package_dir)", @(update_def.policy_servers)),
depth_search => u_recurse("1"), # Nova updates should be in root dir
action => u_immediate,
classes => u_if_repaired("bin_newpkg");
bin_update_success.enterprise.trigger_upgrade::
"$(local_update_log_dir)/upgraded_binary_from_$(sys.nova_version)"
comment => "Create an empty file after successfully upgrade the binary",
handle => "cfe_internal_update_bins_files_update_from_log",
create => "true";
reports:
DEBUG|DEBUG_cfe_internal_update_bins::
"DEBUG $(this.bundle): Evaluating binaries for upgrade using internal update mechanism"
if => "trigger_upgrade";
}
u_admin_file
Prototype: u_admin_file
Description: Admin file for automating solaris package installs
Implementation:
code
bundle edit_line u_admin_file
{
insert_lines:
sunos_5_8::
"mail=
instance=unique
partial=nocheck
runlevel=nocheck
idepend=nocheck
rdepend=nocheck
space=nocheck
setuid=nocheck
conflict=nocheck
action=nocheck
basedir=default";
solaris.!sunos_5_8::
"mail=
instance=overwrite
partial=nocheck
runlevel=nocheck
idepend=nocheck
rdepend=nocheck
space=nocheck
setuid=nocheck
conflict=nocheck
action=nocheck
networktimeout=60
networkretries=3
authentication=quit
keystore=/var/sadm/security
proxy=
basedir=default";
}
u_backup_script
Prototype: u_backup_script
Implementation:
code
bundle edit_line u_backup_script
{
insert_lines:
linux::
"#!/bin/sh
if [ $(const.dollar)1 = \"BACKUP\" ]; then
tar cfzS $(const.dollar)2 $(sys.workdir) > /dev/null
fi
if [ $(const.dollar)1 = \"RESTORE\" ]; then
tar xfz $(const.dollar)2
fi";
solarisx86|solaris::
"#!/bin/sh
if [ $(const.dollar)1 = \"BACKUP\" ]; then
tar cf $(const.dollar)2 $(sys.workdir); gzip $(const.dollar)2
fi
if [ $(const.dollar)1 = \"RESTORE\" ]; then
gunzip $(const.dollar)2.gz; tar xf $(const.dollar)2
fi";
}
u_install_script
Prototype: u_install_script
Implementation:
code
bundle edit_line u_install_script
{
insert_lines:
redhat|suse|sles::
"#!/bin/sh
/bin/rpm -U $(const.dollar)1";
debian::
"#!/bin/sh
/usr/bin/dpkg --force-confdef --force-confnew --install $(const.dollar)1 > /dev/null";
solarisx86|solaris::
"#!/bin/sh
pkgname=`pkginfo -d $(const.dollar)1 | awk '{print $(const.dollar)2}'`
/usr/sbin/pkgrm -n -a $(cfe_internal_update_bins.admin_file) $pkgname
/usr/sbin/pkgadd -n -a $(cfe_internal_update_bins.admin_file) -d $(const.dollar)1 all
$(sys.workdir)/bin/cf-execd || true
exit 0";
}
u_common_knowledge
Prototype: u_common_knowledge
Description: standalone common packages knowledge bundle
This common bundle defines general things about platforms.
Implementation:
code
bundle common u_common_knowledge
{
vars:
"list_update_ifelapsed_now" string => "10080";
}
cfe_internal/update/update_policy.cf
u_cmdb_data
Prototype: u_cmdb_data
Description: Sync CMDB data from policy server
Note: Not all hosts necessarily have CMDB data
Implementation:
code
body copy_from u_cmdb_data
{
copy_backup => "false";
trustkey => "false";
compare => "digest";
source => "hub_cmdb";
servers => { "$(sys.policy_hub)" };
purge => "true";
@if minimum_version(3.12)
missing_ok => "true";
@endif
}
u_m
Prototype: u_m(p)
Description: Ensure file mode is p
Arguments:
Implementation:
code
body perms u_m(p)
{
mode => "$(p)";
#+begin_ENT-951
# Remove after 3.20 is not supported
rxdirs => "true";
@if minimum_version(3.20)
rxdirs => "false";
@endif
#+end
}
u_mo
Prototype: u_mo(p, o)
Description: Ensure file mode is p and owner is o
Arguments:
p: Desired file owner (username or uid)o
Implementation:
code
body perms u_mo(p,o)
{
mode => "$(p)";
#+begin_ENT-951
# Remove after 3.20 is not supported
rxdirs => "true";
@if minimum_version(3.20)
rxdirs => "false";
@endif
#+end
!(windows|termux)::
owners => {"$(o)"};
}
u_shared_lib_perms
Prototype: u_shared_lib_perms
Description: Shared library permissions
Implementation:
code
body perms u_shared_lib_perms
{
#+begin_ENT-951
# Remove after 3.20 is not supported
rxdirs => "true";
@if minimum_version(3.20)
rxdirs => "false";
@endif
#+end
!hpux::
mode => "0644";
hpux::
mode => "0755"; # Mantis 1114, Redmine 1179
}
u_all
Prototype: u_all
Description: Select all file system entries
Implementation:
code
body file_select u_all
{
leaf_name => { ".*" };
file_result => "leaf_name";
}
u_cf3_files
Prototype: u_cf3_files
Description: Select files starting with cf- (cfengine binaries)
Implementation:
code
body file_select u_cf3_files
{
leaf_name => { "cf-.*" };
file_result => "leaf_name";
}
Prototype: u_input_files
Description: Select files by extension that we should include when updating inputs
Implementation:
code
body file_select u_input_files
{
leaf_name => { @(update_def.input_name_patterns),
@(update_def.input_name_patterns_extra) };
file_result => "leaf_name";
}
u_rcp
Prototype: u_rcp(from, server)
Description: Ensure file is a copy of from on server using digest comparison
Arguments:
from: The path to copy fromserver: The remote host to copy from
Implementation:
code
body copy_from u_rcp(from,server)
{
source => "$(from)";
compare => "digest";
trustkey => "false";
purge => "true"; # CFE-3662
# CFE-2932 For testing, we want to be able to avoid this local copy optimiztion
!am_policy_hub|mpf_skip_local_copy_optimizaton::
servers => { "$(server)" };
!am_policy_hub.(sys_policy_hub_port_exists|mpf_skip_local_copy_optimization)::
portnumber => "$(sys.policy_hub_port)";
cfengine_internal_encrypt_transfers::
encrypt => "true";
cfengine_internal_purge_policies_disabled::
purge => "false";
cfengine_internal_preserve_permissions::
preserve => "true";
cfengine_internal_verify_update_transfers::
verify => "true";
}
u_cp
Prototype: u_cp(from)
Description: Ensure file is a copy from from on the local server based on digest comparison
Arguments:
from: string, used in the value of attribute source
Implementation:
code
body copy_from u_cp(from)
{
source => "$(from)";
compare => "digest";
}
u_cp_nobck
Prototype: u_cp_nobck(from)
Description: copy from from locally with digest comparison and making no backups
Arguments:
from: string, used in the value of attribute source
Implementation:
code
body copy_from u_cp_nobck(from)
{
source => "$(from)";
compare => "digest";
copy_backup => "false";
}
u_cp_missing_ok
Prototype: u_cp_missing_ok(from)
Description: same as u_cp but allow from to be missing
Arguments:
Implementation:
code
body copy_from u_cp_missing_ok(from)
{
inherit_from => u_cp($(from));
missing_ok => "true";
}
u_remote_dcp_missing_ok
Prototype: u_remote_dcp_missing_ok(from, server)
Description: Download a file from a remote server if available and if differs from the local copy.
Arguments:
from: The location of the file on the remote serverserver: The hostname or IP of the server from which to download
See Also: remote_dcp()
Implementation:
code
body copy_from u_remote_dcp_missing_ok(from,server)
{
servers => { "$(server)" };
source => "$(from)";
compare => "digest";
missing_ok => "true";
}
Prototype: u_immediate
Description: Actuate the promise immediately, ignoring locks
Implementation:
code
body action u_immediate
{
ifelapsed => "0";
}
u_recurse
Prototype: u_recurse(d)
Description: Search recursively for files up to d levels excluding common version control data
Arguments:
d: Maximum depth to search recursively
Implementation:
code
body depth_search u_recurse(d)
{
depth => "$(d)";
exclude_dirs => { "\.svn", "\.git", "git-core" };
}
u_infinite_client_policy
Prototype: u_infinite_client_policy
Description: Search recursively for files excluding vcs related files and .no-distrib directories
Implementation:
code
body depth_search u_infinite_client_policy
{
depth => "inf";
exclude_dirs => { "\.svn", "\.git", "git-core", "\.no-distrib" };
}
u_recurse_basedir
Prototype: u_recurse_basedir(d)
Description: Search recursively for files up to d levels excluding common version control data and including the base directory
Arguments:
d: Maximum depth to search recursively
Implementation:
code
body depth_search u_recurse_basedir(d)
{
include_basedir => "true";
depth => "$(d)";
exclude_dirs => { "\.svn", "\.git", "git-core" };
}
u_if_repaired
Prototype: u_if_repaired(x)
Description: Define x if the promise is repaired
Arguments:
x: Class to define if promise repaired
Implementation:
code
body classes u_if_repaired(x)
{
promise_repaired => { "$(x)" };
}
u_if_repaired_then_cancel
Prototype: u_if_repaired_then_cancel(y)
Description: Cancel class x if the promise is repaired
Arguments:
Implementation:
code
body classes u_if_repaired_then_cancel(y)
{
cancel_repaired => { "$(y)" };
}
u_if_else
Prototype: u_if_else(yes, no)
Description: define yes if the promise is repaired, and no if the promise fails to repair (notkept)
Arguments:
yes: Class to define if promise repairedno: Class to undefine if promise notkept
Implementation:
code
body classes u_if_else(yes,no)
{
# promise_kept => { "$(yes)" };
promise_repaired => { "$(yes)" };
repair_failed => { "$(no)" };
repair_denied => { "$(no)" };
repair_timeout => { "$(no)" };
}
u_in_shell
Prototype: u_in_shell
Description: Run command within shell environment
Implementation:
code
body contain u_in_shell
{
useshell => "true";
}
u_in_shell_and_silent
Prototype: u_in_shell_and_silent
Description: Run command within shell environment suppressing output
Implementation:
code
body contain u_in_shell_and_silent
{
useshell => "true";
no_output => "true";
}
u_postgres
Prototype: u_postgres
Description: Run command within postgres users shell environment
Implementation:
code
body contain u_postgres
{
useshell => "useshell";
exec_owner => "cfpostgres";
exec_group => "cfpostgres";
chdir => "/tmp";
no_output => "true";
}
u_ifwin_bg
Prototype: u_ifwin_bg
Description: Run command in the background if windows is defined
Implementation:
code
body action u_ifwin_bg
{
windows::
background => "true";
}
u_bootstart
Prototype: u_bootstart
Description: Attributes for u_bootstart service method
Implementation:
code
body service_method u_bootstart
{
service_autostart_policy => "boot_time";
}
u_in_dir
Prototype: u_in_dir(s)
Description: Run command from within s
Arguments:
s: Path to change into before running command
Implementation:
code
body contain u_in_dir(s)
{
chdir => "$(s)";
}
u_silent_in_dir
Prototype: u_silent_in_dir(s)
Description: Run command from within s and suppress output
Arguments:
s: Path to change into before running command
Implementation:
code
body contain u_silent_in_dir(s)
{
chdir => "$(s)";
no_output => "true";
}
u_ln_s
Prototype: u_ln_s(x)
Description: Symlink to x, even if it does not exist
Arguments:
Implementation:
code
body link_from u_ln_s(x)
{
link_type => "symlink";
source => "$(x)";
when_no_source => "force";
}
u_tidy
Prototype: u_tidy
Description: Delete directories and symlinks
Implementation:
code
body delete u_tidy
{
dirlinks => "delete";
rmdirs => "true";
}
not_vendored_modules
Prototype: not_vendored_modules(pathname)
Arguments:
Implementation:
code
body file_select not_vendored_modules(pathname)
{
path_name => { "$(pathname)" };
file_result => "path_name";
}
u_dirs
Prototype: u_dirs
Description: Select directories
Implementation:
code
body file_select u_dirs
{
file_types => { "dir" };
file_result => "file_types";
}
u_not_dir
Prototype: u_not_dir
Description: Select all files that are not directories
Implementation:
code
body file_select u_not_dir
{
file_types => { "dir" };
file_result => "!file_types";
}
cfe_internal_update_policy
Prototype: cfe_internal_update_policy
Description: This bundle is responsible for activating the policy to update inputs.
Implementation:
code
bundle agent cfe_internal_update_policy
{
classes:
# Define classes if we see a user is requesting a custom policy update bundle
"have_user_specified_update_bundle"
expression => isvariable( "def.mpf_update_policy_bundle" );
# Define classes if we are able to find the specific bundle they requested
# (otherwise we may get an error about undefined bundle)
"have_found_user_specified_update_bundle"
expression => some(".*", "found_matching_user_specified_bundle");
"missing_user_specified_update_bundle"
not => some(".*", "found_matching_user_specified_bundle");
vars:
"default_policy_update_bundle" string => "cfe_internal_update_policy_cpv";
# Look for a bundle that matches what the user wants
"found_matching_user_specified_bundle"
slist => bundlesmatching( "$(def.mpf_update_policy_bundle)" );
methods:
# Use the user specified bundle when it's found
have_found_user_specified_update_bundle::
"User specified policy update bundle"
usebundle => $(found_matching_user_specified_bundle);
# Fall back to stock policy update bundle if we have not found one
# specified by user
!have_found_user_specified_update_bundle::
"Stock policy update"
usebundle => cfe_internal_update_policy_cpv;
any::
"CMDB data update" -> { "ENT-6788", "ENT-8847" }
usebundle => cfe_internal_update_cmdb,
action => u_immediate;
reports:
inform_mode|verbose_mode|DEBUG|DEBUG_cfe_internal_update_policy::
# Report a human readable way to understand the policy behavior
"Found user specified update bundle."
if => "have_user_specified_update_bundle";
"User specified update bundle: $(def.mpf_update_policy_bundle)"
if => "have_user_specified_update_bundle";
"User specified update bundle MISSING! Falling back to $(default_policy_update_bundle)."
if => and( "have_user_specified_update_bundle",
"missing_user_specified_update_bundle"
);
}
cfe_internal_setup_python_symlink
Prototype: cfe_internal_setup_python_symlink(symlink_path)
Description: Create the /var/cfengine/bin/python symlink pointing to some installed python (if any)
Arguments:
symlink_path of vars promiser path of vars promiser path_folders of vars promiser abs_path_folders of vars promiser abs_path_folders of vars promiser exact_version_globs of vars promiser generic_python_globs of vars promiser python_exact[$(exact_version_globs)] of vars promiser python_generic[$(generic_python_globs)] of vars promiser python_platform_fallback[/usr/libexec/platform-python] of vars promiser python_exact_sorted of vars promiser pythons of vars promiser python, used as promiser of type files
, used as promiser of type files
of files promiser $(sys.bindir)/python
Implementation:
code
bundle agent cfe_internal_setup_python_symlink(symlink_path)
{
vars:
"path" string => getenv("PATH", 1024);
"path_folders" slist => splitstring("$(path)", ":", 128);
windows::
"abs_path_folders" -> {"CFE-2309"}
slist => filter("([A-Z]|//):.*", path_folders, "true", "false", 128),
comment => "findfiles() complains about relative directories";
!windows::
"abs_path_folders" -> {"CFE-2309"}
slist => filter("/.*", path_folders, "true", "false", 128),
comment => "findfiles() complains about relative directories";
any::
"exact_version_globs" slist => maplist("$(this)/python[23]", @(abs_path_folders)),
comment => "Looking for Python 2 and/or Python 3 in the $PATH folders";
"generic_python_globs" slist => maplist("$(this)/python", @(abs_path_folders)),
comment => "Looking for the 'python' symlink/executable which can be any
version of Python (usually Python 2 for backwards compatibility)";
"python_exact[$(exact_version_globs)]" slist => findfiles("$(exact_version_globs)");
"python_generic[$(generic_python_globs)]" slist => findfiles("$(generic_python_globs)");
"python_platform_fallback[/usr/libexec/platform-python]" -> { "CFE-3291" }
slist => { "/usr/libexec/platform-python" };
"python_exact_sorted" slist => reverse(sort(getvalues(@(python_exact)), "lex")),
comment => "Prefer higher major versions of Python";
"pythons" slist => getvalues(mergedata(@(python_exact_sorted),
getvalues(@(python_generic)),
getvalues(@(python_platform_fallback)))),
comment => "Prefer exact versions over unknown";
"python" string => nth(@(pythons), 0),
if => isgreaterthan(length(@(pythons)), 0),
comment => "Taking the first item from the list (sorted by preference)";
files:
"$(symlink_path)"
delete => u_tidy,
if => not(isvariable("python"));
"$(symlink_path)"
link_from => u_ln_s("$(python)"),
move_obstructions => "true",
if => isvariable("python");
"$(sys.bindir)/python" -> { "CFE-3512", "CFE-4146" }
delete => u_tidy,
if => and( islink( "$(sys.bindir)/python" ),
strcmp( "$(sys.bindir)", "/var/cfengine/bin")),
comment => concat( "We don't want to leave a python that is potentially in $PATH ",
"after having re-named our python symlink that is used for various ",
"modules. Additionally we want to be cautious that we don't delete ",
"system python symlinks in the event the binary was built for FHS.");
}
cfe_internal_update_policy_cpv
Prototype: cfe_internal_update_policy_cpv
Description: Update inputs from masterfiles when cf_promises_validated changes
Implementation:
code
bundle agent cfe_internal_update_policy_cpv
{
vars:
"inputs_dir" string => translatepath("$(sys.inputdir)"),
comment => "Directory containing CFEngine policies",
handle => "cfe_internal_update_policy_vars_inputs_dir";
"master_location" -> { "ENT-3692" }
string => "$(update_def.mpf_update_policy_master_location)",
comment => "The path to request updates from the policy server.",
handle => "cfe_internal_update_policy_vars_master_location";
windows::
"modules_dir_source" string => "/var/cfengine/masterfiles/modules",
comment => "Directory containing CFEngine modules",
handle => "cfe_internal_update_policy_vars_modules_dir_windows";
!windows::
"modules_dir_source" string => translatepath("$(master_location)/modules"),
comment => "Directory containing CFEngine modules",
handle => "cfe_internal_update_policy_vars_modules_dir";
any::
"file_check" string => translatepath("$(inputs_dir)/promises.cf"),
comment => "Path to a policy file",
handle => "cfe_internal_update_vars_file_check";
"ppkeys_file" string => translatepath("$(sys.workdir)/ppkeys/localhost.pub"),
comment => "Path to public key file",
handle => "cfe_internal_update_policy_vars_ppkeys_file";
"postgresdb_dir" string => "$(sys.workdir)/state/pg/data",
comment => "Directory where Postgres database files will be stored on hub -",
handle => "cfe_internal_update_policy_postgresdb_dir";
"postgresdb_log" string => "/var/log/postgresql.log",
comment => "File where Postgres database files will be logging -",
handle => "cfe_internal_update_policy_postgresdb_log_file";
"python_symlink" -> { "CFE-2602", "CFE-3512" }
string => "$(sys.bindir)/cfengine-selected-python",
comment => "Symlink to Python we found (if any)",
handle => "cfe_internal_update_policy_python_symlink";
classes:
"validated_updates_ready"
expression => "cfengine_internal_disable_cf_promises_validated",
comment => "If cf_promises_validated is disabled, then updates are
always considered validated.";
any::
"local_files_ok" expression => fileexists("$(file_check)"),
comment => "Check for $(sys.masterdir)/promises.cf",
handle => "cfe_internal_update_classes_files_ok";
# create a global files_ok class
"cfe_internal_trigger" expression => "local_files_ok",
classes => u_if_else("files_ok", "files_ok");
files:
!am_policy_hub:: # policy hub should not alter inputs/ uneccessary
"$(inputs_dir)/cf_promises_validated"
comment => "Check whether a validation stamp is available for a new policy update to reduce the distributed load",
handle => "cfe_internal_update_policy_check_valid_update",
copy_from => u_rcp("$(master_location)/cf_promises_validated", @(update_def.policy_servers)),
action => u_immediate,
classes => u_if_repaired("validated_updates_ready");
am_policy_hub|validated_updates_ready:: # policy hub should always put masterfiles in inputs in order to check new policy
"$(inputs_dir)"
comment => "Copy policy updates from master source on policy server if a new validation was acquired",
handle => "cfe_internal_update_policy_files_inputs_dir",
copy_from => u_rcp("$(master_location)", @(update_def.policy_servers)),
depth_search => u_infinite_client_policy,
file_select => u_input_files,
action => u_immediate,
classes => u_results("bundle", "update_inputs"),
move_obstructions => "true";
# Note that here we do not filter with `update_def.input_name_patterns` so
# that we copy any and all modules scripts.
"$(inputs_dir)/modules"
comment => "Copy any files in modules from master source on policy server if a new validation was acquired",
handle => "cfe_internal_update_policy_files_modules_dir",
copy_from => u_rcp("$(modules_dir_source)", @(update_def.policy_servers)),
depth_search => u_recurse("inf"),
action => u_immediate;
update_inputs_not_kept::
"$(inputs_dir)/cf_promises_validated" -> { "CFE-2587" }
delete => u_tidy,
comment => "If there is any problem copying to $(inputs_dir) then purge
the cf_promises_validated file must be purged so that
subsequent agent runs will perform a full scan.";
!policy_server.enable_cfengine_enterprise_hub_ha::
"$(sys.workdir)/policy_server.dat"
comment => "Copy policy_server.dat file from server",
handle => "cfe_internal_update_ha_policy_server",
copy_from => u_rcp("$(sys.workdir)/state/master_hub.dat", @(update_def.policy_servers)),
action => u_immediate,
classes => u_if_repaired("replica_failover"); # not needed ?
am_policy_hub::
"$(master_location)/." -> { "CFE-951" }
comment => "Make sure masterfiles folder has right file permissions",
handle => "cfe_internal_update_policy_files_sys_workdir_masterfiles_dirs",
perms => u_m($(update_def.masterfiles_perms_mode_dirs)),
file_select => u_dirs,
depth_search => u_recurse_basedir("inf"),
action => u_immediate;
"$(master_location)/." -> { "CFE-951" }
comment => "Make sure masterfiles folder has right file permissions",
handle => "cfe_internal_update_policy_files_sys_workdir_masterfiles_not_dir",
perms => u_m($(update_def.masterfiles_perms_mode_not_dir)),
file_select => u_not_dir,
depth_search => u_recurse_basedir("inf"),
action => u_immediate;
methods:
debian|redhat|amazon_linux|suse|sles|opensuse::
# Only needed on distros with Python-based package modules
"setup_python_symlink" -> { "CFE-2602" }
usebundle => cfe_internal_setup_python_symlink("$(python_symlink)");
any::
# Install vendored and user provided modules to $(sys.workdir) from $(sys.inputdir)
"modules_presence";
}
cfe_internal_update_cmdb
Prototype: cfe_internal_update_cmdb
Description: Ensure local cache of CMDB data is up to date
Implementation:
code
bundle agent cfe_internal_update_cmdb
{
classes:
"have_cf_reactor" expression => fileexists("$(sys.bindir)/cf-reactor");
methods:
policy_server.enterprise_edition.(!have_cf_reactor|cmdb_data_files_updates_done_in_policy)::
"cfe_internal_update_cmdb_data_distribution";
@if feature(host_specific_data_load)
# Only hosts with this feature, introduced in 3.18.0 can use the data.
# Don't pull CMDB data on policy_hub self bootstrap because
# there will be no cf-serverd listening to serve files yet.
enterprise_edition.!(bootstrap_mode):: # ENT-6840
"cfe_internal_update_cmdb_data_consumption" -> { "ENT-8847" }
action => u_immediate;
@endif
}
cfe_internal_update_cmdb_data_distribution
Prototype: cfe_internal_update_cmdb_data_distribution
Description: Ensure data is ready for agents to download
Implementation:
code
bundle agent cfe_internal_update_cmdb_data_distribution
{
classes:
"_have_cmdb_next_request_state_file" -> { "ENT-9933" }
expression => fileexists( "$(_cmdb_next_request_state_file)" );
vars:
!bootstrap_mode.(policy_server.enterprise_edition)::
# The API response for host specific data from cmdb tells us the timestamp of the last data change
# We store this timestamp and use it for the next request.
"_cmdb_next_request_state_file"
string => "$(sys.statedir)/cmdb_next_request_from.dat";
!bootstrap_mode.(policy_server.enterprise_edition._have_cmdb_next_request_state_file)::
# If we have the timestamp from a previous response we use it, else we start from 0
"_cmdb_previous_next_request_from"
string => readfile( $(_cmdb_next_request_state_file), inf ),
if => regline( "^\d+$", $(_cmdb_next_request_state_file) );
"_cmdb_previous_next_request_from"
string => "0",
unless => regline( "^\d+$", $(_cmdb_next_request_state_file) );
!bootstrap_mode.(policy_server.enterprise_edition)::
# We need a script to call that should return the API response
"_get_cmdb_data_bin" string => "$(sys.workdir)/httpd/htdocs/scripts/get_cmdb.php";
"_get_cmdb_data_cmd" string => "/var/cfengine/httpd/php/bin/php $(_get_cmdb_data_bin) $(_cmdb_previous_next_request_from)";
# We call the script and we pass it the timestamp from the prior call
"_get_cmdb_data_response"
string => execresult( $(_get_cmdb_data_cmd), useshell ),
if => fileexists( $(_get_cmdb_data_bin) );
"_get_cmdb_data_response_d"
data => parsejson('$(_get_cmdb_data_response)'),
if => validjson( '$(_get_cmdb_data_response)' );
# So that we can write a JSON file for each host we get the indicies of data in the response
"_i" slist => getindices( "_get_cmdb_data_response_d[data]");
# We need to store the timestamp from the most recent change so that we can use that as a starting point for future requests.
"_next_request_from"
string => "$(_get_cmdb_data_response_d[meta][cmdb_epoch])";
files:
# "$(_get_cmdb_data_cmd)" perms => m( 700 );
@if minimum_version(3.18)
!bootstrap_mode.(policy_server.enterprise_edition)::
# This functionality is only present on 3.18.0+ Enterprise hubs, and this
# promise uses the /content/ attribute which was first introduced in
# 3.16.0.
# If the next request state file doesn't exist, we seed one with 0, the
# lowest epoch value possible. because we populate variables from this
# file content.
"$(_cmdb_next_request_state_file)"
content => "0$(const.n)",
handle => "cmdb_data_change_next_seed",
if => and( not(fileexists("$(_cmdb_next_request_state_file)" )),
isvariable( "_cmdb_next_request_state_file" ));
@endif
# Write out the data for each host that had a data change
"$(sys.workdir)/cmdb/$(_i)/host_specific.json"
create => "true", # CFE-2329, ENT-4792
template_data => mergedata("_get_cmdb_data_response_d[data][$(_i)]" ), # mergedata() is necessary in order to pick out a substructure, parsejson() is insufficient because expanding a key results in iteration of /values/ under that key
template_method => "inline_mustache",
edit_template_string => string_mustache( "", "_get_cmdb_data_response_d[data][$(_i)]" ),
if => isgreaterthan( $(_next_request_from), $(_cmdb_previous_next_request_from) );
@if minimum_version(3.18)
# This functionality is only present on 3.18.0+ Enterprise hubs, and this
# promise uses the /content/ attribute which was first introduced in
# 3.16.0.
# Write out the last data change timestamp so we can use it as a startring point
"$(_cmdb_next_request_state_file)"
handle => "cmdb_data_change_next_update",
content => "$(_next_request_from)$(const.n)",
unless => strcmp( $(_next_request_from), $(_cmdb_previous_next_request_from) );
@endif
reports:
DEBUG|DEBUG_cfe_internal_update_cmdb_data_distribution::
"'$(_get_cmdb_data_cmd)' response indicates '$(sys.workdir)/cmdb/$(_i)/host_specific.json' needs refreshed"
if => and( isvariable( "_i" ),
isgreaterthan( $(_next_request_from), $(_cmdb_previous_next_request_from) ));
}
cfe_internal_update_cmdb_data_consumption
Prototype: cfe_internal_update_cmdb_data_consumption
Description: Ensure data to load is up to date
Implementation:
code
bundle agent cfe_internal_update_cmdb_data_consumption
{
files:
"$(sys.workdir)/data/."
create => "true",
comment => "If a host is to load data from the CMDB, it needs to have a directory where said data is cached.";
"$(sys.workdir)/data/." -> { "ENT-6788", "ENT-8847" }
depth_search => u_recurse( inf ),
file_select => u_all,
copy_from => u_cmdb_data,
comment => "So that hosts have access to the most recent CMDB data, we make sure that it's up to date.",
action => u_immediate;
}
modules_presence
Prototype: modules_presence
Description: Render vendored and user provided modules from $(sys.inputdir) to $(sys.workdir)
Implementation:
code
bundle agent modules_presence
{
vars:
"_vendored_dir" string => "$(this.promise_dirname)/../../modules/packages/vendored/";
"_override_dir" string => "$(this.promise_dirname)/../../modules/packages/";
"_custom_template_dir" string => "$(this.promise_dirname)/../../modules/mustache/";
"_vendored_paths" slist => findfiles("$(_vendored_dir)*.mustache");
"_custom_template_paths" slist => findfiles("$(_custom_template_dir)*.mustache"), if => isdir( "$(_custom_template_dir)" );
"_package_paths" slist => filter("$(_override_dir)vendored", _package_paths_tmp, "false", "true", 999);
windows::
"_package_paths_tmp" slist => findfiles("\Q$(_override_dir)\E*");
"_vendored_modules" slist => maplist(regex_replace("$(this)", "\Q$(_vendored_dir)\E(.*).mustache", "$1", "g"), @(_vendored_paths));
"_override_modules" slist => maplist(regex_replace("$(this)", "\Q$(_override_dir)\E(.*)", "$1", "g"), @(_package_paths));
# replace single backslashes in a windows path with double-backslashes
# to avoid problems with things like `C:\Program Files` and `\promises`
# causing PCRE to try and interpret special escape sequences.
"_not_vendored_modules_pathname_regex" string => regex_replace("$(sys.inputdir)$(const.dirsep)modules$(const.dirsep)(?!packages$(const.dirsep)vendored).*","\\\\","\\\\\\\\","g");
!windows::
"_package_paths_tmp" slist => findfiles("$(_override_dir)*");
"_vendored_modules" slist => maplist(regex_replace("$(this)", "$(_vendored_dir)(.*).mustache", "$1", "g"), @(_vendored_paths));
"_override_modules" slist => maplist(regex_replace("$(this)", "$(_override_dir)(.*)", "$1", "g"), @(_package_paths));
"_custom_template_modules" slist => maplist(regex_replace("$(this)", "$(_custom_template_dir)(.*).mustache", "$1", "g"), @(_custom_template_paths));
"_not_vendored_modules_pathname_regex" string => "$(sys.inputdir)/modules/(?!(packages/vendored|mustache/)).*";
classes:
"override_vendored_module_$(_vendored_modules)" expression => fileexists("$(_override_dir)$(_vendored_modules)");
"override_module_$(_override_modules)" expression => fileexists("$(_override_dir)$(_override_modules)");
# NOTE: here we are using the .mustache extension only to
# ensure that the modules scripts are copied as part of
# update (see controls/update_def.cf input_name_patterns var.
files:
"$(sys.workdir)/modules/packages/$(_vendored_modules)"
create => "true",
perms => u_mo("755", "root"),
unless => canonify("override_vendored_module_$(_vendored_modules)"),
edit_template => "$(_vendored_dir)$(_vendored_modules).mustache",
template_method => "mustache";
"$(sys.workdir)/modules/packages/$(_override_modules)"
copy_from => u_cp_missing_ok("$(_override_dir)$(_override_modules)"),
perms => u_mo("755", "root"),
if => or (
canonify("override_vendored_module_$(_override_modules)"),
canonify("override_module_$(_override_modules)"));
"$(sys.workdir)/modules/$(_custom_template_modules)" -> { "ENT-10793" }
comment => "We want to render mustache templated modules",
handle => "cfe_internal_update_policy_files_custom_template_modules",
template_method => "mustache",
edit_template => "$(_custom_template_dir)$(_custom_template_modules).mustache",
perms => u_mo("500", "root"),
if => fileexists("$(_custom_template_dir)$(_custom_template_modules).mustache");
"$(sys.workdir)/modules"
comment => "Copy any non-packages modules",
handle => "cfe_internal_update_policy_files_nonpackages_modules",
copy_from => u_cp("$(sys.inputdir)$(const.dirsep)modules"),
if => fileexists("$(sys.inputdir)$(const.dirsep)modules"),
depth_search => u_recurse("inf"),
perms => u_mo("755", "root"),
action => u_immediate,
file_select => not_vendored_modules("$(_not_vendored_modules_pathname_regex)");
reports:
DEBUG::
"_not_vendored_modules_pathname_regex: $(_not_vendored_modules_pathname_regex)";
"_vendored_modules: $(_vendored_modules)";
"_override_modules: $(_override_modules)";
"_vendored_dir: $(_vendored_dir)";
"_vendored_paths: $(_vendored_paths)";
"_override_dir: $(_override_dir)";
"_package_paths: $(_package_paths)";
"override_vendored_module_$(_vendored_modules)"
if => "override_vendored_module_$(_vendored_modules)";
"override_module_$(_override_modules)"
if => "override_module_$(_override_modules)";
"canonified: $(with)" with => canonify("override_vendored_module_$(_vendored_modules)");
}
cfe_internal/update/update_processes.cf
u_clear_always
Prototype: u_clear_always(theclass)
Description: Undefine, theclass for as a result of the promise actuation, no matter the outcome (kept, notkept, repaired)
Arguments:
Implementation:
code
body classes u_clear_always(theclass)
{
cancel_kept => { $(theclass) };
cancel_notkept => { $(theclass) };
cancel_repaired => { $(theclass) };
}
u_always_forever
Prototype: u_always_forever(theclass)
Description: Define theclass for 999999999 minutes (1902 years) as a result of the promise actuation, no matter the outcome (kept, notkept, repaired)
Arguments:
Implementation:
code
body classes u_always_forever(theclass)
{
promise_kept => { $(theclass) };
promise_repaired => { $(theclass) };
repair_failed => { $(theclass) };
repair_denied => { $(theclass) };
repair_timeout => { $(theclass) };
persist_time => 999999999;
scope => "namespace";
}
cfe_internal_process_knowledge
Prototype: cfe_internal_process_knowledge
Description: Variables related to CFEngine's own processes used in other bundles
TODO Redact use of this bundle. It's no longer useful now that bindir variable exists. Not clear why its unset on windows.
Implementation:
code
bundle common cfe_internal_process_knowledge
{
vars:
!windows::
"bindir" string => "$(sys.bindir)",
comment => "Use a system variable";
}
cfe_internal_update_processes
Prototype: cfe_internal_update_processes
Description: Determine which cfengine components should be managed, and what their
state should be.
By default all the relevant services will run on each host. For example all
hosts will run cf-execd, cf-serverd, and cf-monitord. Individual services can
be disabled:
If persistent_disable_COMPONENT ( persistent_disable_cf_serverd,
persistent_disable_cf_monitord) is defined the service will be disabled.
If the component is found in def.agents_to_be_disabled it will be disabled.
To enable component management on hosts with systemd define the class
mpf_enable_cfengine_systemd_component_management.
Implementation:
code
bundle agent cfe_internal_update_processes
{
classes:
"systemd_supervised"
scope => "bundle",
expression => "systemd";
reports:
inform.systemd_supervised.!mpf_enable_cfengine_systemd_component_management::
"NOTE: You have defined a class to persistently disable a cfengine
component on a systemd managed host, but you have not defined
mpf_enable_cfengine_systemd_component_management in order to enable
management"
if => classmatch( "persistent_disable_cf_.*" );
"NOTE: You have explicitly listed components that should be disabled in def.agents_to_be_disabled.
This host is managed by systemd and requires the class
mpf_enable_cfengine_systemd_component_management in order to enable
active management"
if => some( ".*", @(def.agents_to_be_disabled) );
vars:
any::
# By default the core components are expected to be running in all cases.
"agent[cf_execd]" string => "cf-execd";
"agent[cf_serverd]" string => "cf-serverd";
"agent[cf_monitord]" string => "cf-monitord";
policy_server.enterprise_edition::
"agent[cf_hub]"
string => "cf-hub",
comment => "cf-hub is only relevant on Enterprise hubs";
"agent[cf_reactor]"
string => "cf-reactor",
comment => "cf-reactor is only provided on Enterprise hubs";
systemd::
# On systemd hosts the cfengine3 service acts as an umbrella for other
# services.
"agent[cfengine3]"
string => "cfengine3",
comment => "systemd hosts use the cfengine3 service as an umbrella.
systemd_supervised hosts additionally have individual units
for each managed service.";
systemd_supervised.enterprise_edition.policy_server::
# Only enterprise systemd supervised hosts these additional service
# definitions for each component.
"agent[cf_postgres]" string => "cf-postgres";
"agent[cf_apache]" string => "cf-apache";
any::
# We get a consolidated list of all agents for the executing host.
"all_agents" slist => getvalues( agent );
# We use def.agents_to_be_disabled if it exists, otherwise we default to
# no agents being disabled.
"agents_to_be_disabled"
comment => "CFE processes that should not be enabled",
handle => "cfe_internal_update_processes_vars_agents_to_be_disabled",
slist => { @(def.agents_to_be_disabled) },
if => isvariable( "def.agents_to_be_disabled" );
"agents_to_be_disabled"
comment => "The default agents that should not be enabled.",
handle => "cfe_internal_update_processes_vars_default_agents_to_be_disabled",
slist => { },
if => not( isvariable("def.agents_to_be_disabled") );
# An agent is disabled if there is a persistently defined disablement
# class OR if the agent is found in a list of agents to be specifically
# disabled.
"disabled[$(all_agents)]"
string => "$(all_agents)",
if => or( canonify( "persistent_disable_$(all_agents)" ),
some( "$(all_agents)", agents_to_be_disabled ));
systemd_supervised.policy_server.enterprise.hub_passive|(ha_replication_only_node.!failover_to_repliacation_node_enabled)::
# We want the enterprise component cf-hub to be disabled if running on a
# passive hub or replication only hub.
"disabled[cf_hub]" string => "cf-hub";
any::
# First we get the consolidated list of agents to be disabled.
"agents_to_be_disabled" slist => getvalues( disabled );
# Any agent that is not explicitly disabled should be enabled.
"agents_to_be_enabled" slist => difference( all_agents, agents_to_be_disabled );
methods:
systemd.!systemd_supervised::
# TODO Remove from policy.
# This makes sure the cfengine3 (umbrella) unit is active. It does not
# make any assertions about individual components. Furthermore, since
# commit 6a7fe6b3fa466e55b29eca75cd53ff8b2883ff0e (introduced in 3.14)
# this policy won't be run because systemd_supervised is defined any time
# systemd is defined.
"CFENGINE systemd service"
usebundle => maintain_cfe_systemd,
comment => "Call a bundle to maintain CFEngine with systemd",
handle => "cfe_internal_update_processes_methods_maintain_systemd";
systemd_supervised.mpf_enable_cfengine_systemd_component_management::
"CFEngine systemd Unit Definitions"
usebundle => cfe_internal_systemd_unit_files;
"CFEngine systemd Unit States"
usebundle => cfe_internal_systemd_service_unit_state;
am_policy_hub.enterprise.!systemd_supervised::
"TAKING CARE CFE HUB PROCESSES"
usebundle => maintain_cfe_hub_process,
comment => "Call a bundle to maintian HUB processes",
handle => "cfe_internal_update_processes_methods_maintain_hub";
!windows.!systemd_supervised::
"DISABLING CFE AGENTS"
usebundle => disable_cfengine_agents("$(agents_to_be_disabled)"),
comment => "Call a bundle to disable CFEngine given processes",
handle => "cfe_internal_update_processes_methods_disabling_cfe_agents";
"CHECKING FOR PERSISTENTLY DISABLED CFE AGENTS"
usebundle => disable_cfengine_agents($(all_agents)),
if => canonify("persistent_disable_$(all_agents)"),
comment => "Call a bundle to disable CFEngine given processes if persistent_disable_x is set",
handle => "cfe_internal_update_processes_methods_maybe_disabling_cfe_agents";
"ENABLING CFE AGENTS"
usebundle => enable_cfengine_agents("$(agents_to_be_enabled)"),
comment => "Call a bundle to enable CFEngine given processes",
handle => "cfe_internal_update_processes_methods_enabling_cfe_agents";
windows::
"CFENGINE on Windows"
usebundle => maintain_cfe_windows,
comment => "Call a bundle to maintain CFEngine on Windows",
handle => "cfe_internal_update_processes_methods_maintain_windows";
}
maintain_cfe_hub_process
Prototype: maintain_cfe_hub_process
Description: Ensure the proper processes are running on Enterprise hubs.
Implementation:
code
bundle agent maintain_cfe_hub_process
{
vars:
am_policy_hub::
"file_check" string => translatepath("$(cfe_internal_update_policy_cpv.inputs_dir)/promises.cf"),
comment => "Path to a policy file",
handle => "cfe_internal_maintain_cfe_hub_process_vars_file_check";
#
classes:
am_policy_hub::
"files_ok" expression => fileexists("$(file_check)"),
comment => "Check for $(sys.workdir)/inputs/promises.cf",
handle => "cfe_internal_maintain_cfe_hub_process_classes_files_ok";
am_policy_hub.enable_cfengine_enterprise_hub_ha::
"ha_run_hub_process"
or => { "!ha_replication_only_node",
"ha_replication_only_node.failover_to_replication_node_enabled" };
"ha_kill_hub_process"
or => { "ha_replication_only_node.!failover_to_replication_node_enabled" };
#
processes:
am_policy_hub::
"$(cfe_internal_process_knowledge.bindir)/vacuumdb"
restart_class => "no_vacuumdb",
comment => "Monitor vacuumdb process",
handle => "cfe_internal_maintain_cfe_hub_process_processes_check_vacuumdb",
if => "nova|enterprise";
am_policy_hub.!enable_cfengine_enterprise_hub_ha::
"$(cfe_internal_process_knowledge.bindir)/postgres"
restart_class => "start_postgres_server",
comment => "Monitor postgres process",
handle => "cfe_internal_maintain_cfe_hub_process_processes_postgres",
if => "nova|enterprise";
am_policy_hub.!enable_cfengine_enterprise_hub_ha.files_ok.!windows|ha_run_hub_process::
"cf-hub" restart_class => "start_hub",
comment => "Monitor cf-hub process",
handle => "cfe_internal_maintain_cfe_hub_process_processes_cf_hub",
if => and( "(nova|enterprise).no_vacuumdb",
"!persistent_disable_cf_hub" ); # Don't start it if it's persistently disabled
am_policy_hub.ha_kill_hub_process::
"cf-hub" signals => { "term" },
comment => "Terminate cf-hub on backup HA node outside cluster",
handle => "cfe_internal_kill_hub_process_on_inactive_ha_node";
#
files:
"/var/log/postgresql.log"
comment => "Ensure postgres.log file is there with right permissions",
handle => "cfe_internal_maintain_cfe_hub_process_files_create_postgresql_log",
create => "true",
perms => u_mo("0600","cfpostgres");
#
commands:
!windows.am_policy_hub.!enable_cfengine_enterprise_hub_ha.start_postgres_server::
"$(cfe_internal_process_knowledge.bindir)/pg_ctl -D $(cfe_internal_update_policy_cpv.postgresdb_dir) -l $(cfe_internal_update_policy_cpv.postgresdb_log) start"
contain => u_postgres,
comment => "Start postgres process",
classes => u_kept_successful_command,
handle => "cfe_internal_maintain_cfe_hub_process_commands_start_postgres";
!windows.am_policy_hub.start_hub::
"$(sys.cf_hub)"
comment => "Start cf-hub process",
classes => u_kept_successful_command,
handle => "cfe_internal_maintain_cfe_hub_process_commands_start_cf_hub";
}
disable_cfengine_agents
Prototype: disable_cfengine_agents(process)
Description: Ensure cfengine component is not running
Arguments:
process: The name of the cfengine component binary to ensure not running. [cf-agent, cf-serverd, cf-monitord, cf-hub]
Implementation:
code
bundle agent disable_cfengine_agents(process)
{
vars:
!windows::
"cprocess" string => canonify("$(process)"),
comment => "Canonify a given process",
handle => "cfe_internal_disable_cfengine_agents_vars_cprocess";
#
classes:
!windows::
"disable_$(cprocess)" expression => strcmp("$(process)","$(process)"),
comment => "Create a class to disable a given process",
handle => "cfe_internal_disable_cfengine_agents_classes_disable_process";
#
processes:
!windows::
"$(cfe_internal_process_knowledge.bindir)/$(process)"
signals => { "term" },
comment => "Terminate $(process)",
handle => "cfe_internal_disable_cfengine_agents_processes_terminate_process",
if => "disable_$(cprocess)";
}
enable_cfengine_agents
Prototype: enable_cfengine_agents(process)
Description: Ensure cfengine component is running
Arguments:
process: The name of the cfengine component binary to ensure running. [cf-agent, cf-serverd, cf-monitord, cf-hub]
Implementation:
code
bundle agent enable_cfengine_agents(process)
{
vars:
!windows::
"cprocess" string => canonify("$(process)"),
comment => "Canonify a given process",
handle => "cfe_internal_enable_cfengine_agents_vars_cprocess";
classes:
!windows::
"enable_$(cprocess)" expression => "!persistent_disable_$(cprocess)",
comment => "Create a class to enable a given process",
handle => "cfe_internal_enable_cfengine_agents_classes_enable_process";
#
processes:
!windows::
"$(cfe_internal_process_knowledge.bindir)/$(process)"
restart_class => "restart_$(cprocess)",
comment => "Create a class to restart a process",
handle => "cfe_internal_enable_cfengine_agents_processes_restart_process",
if => "enable_$(cprocess)";
#
commands:
!windows::
"$(sys.$(cprocess))"
comment => "Restart a process",
handle => "cfe_internal_enable_cfengine_agents_commands_restart_process",
classes => u_kept_successful_command,
if => and( "restart_$(cprocess)",
isvariable( "sys.$(cprocess)" ) );
reports:
"The process $(process) is persistently disabled. Run with '-Dclear_persistent_disable_$(cprocess)' to re-enable it."
if => and( "persistent_disable_$(cprocess)",
isvariable( "sys.$(cprocess)" ));
"The process $(process) has been re-enabled. Run with '-Dset_persistent_disable_$(cprocess)' to disable it persistently again."
if => and( "clear_persistent_disable_$(cprocess)",
isvariable( "sys.$(cprocess)" )),
classes => u_clear_always("persistent_disable_$(cprocess)");
"The process $(process) has been disabled persistently. Run with '-Dclear_persistent_disable_$(cprocess)' to re-enable it."
if => "set_persistent_disable_$(cprocess)",
classes => u_always_forever("persistent_disable_$(cprocess)");
}
maintain_cfe_windows
Prototype: maintain_cfe_windows
Description: Ensure cfengine components are running
Implementation:
code
bundle agent maintain_cfe_windows
{
vars:
windows::
"file_check" string => translatepath("$(cfe_internal_update_policy_cpv.inputs_dir)/promises.cf"),
comment => "Path to a policy file",
handle => "cfe_internal_maintain_cfe_windows_vars_file_check";
#
classes:
windows::
"files_ok" expression => fileexists("$(file_check)"),
comment => "Check for /var/cfengine/masterfiles/promises.cf",
handle => "cfe_internal_maintain_cfe_windows_classes_files_ok";
#
processes:
files_ok::
"cf-serverd" restart_class => "start_server",
comment => "Monitor cf-serverd process",
handle => "cfe_internal_maintain_cfe_windows_processes_cf_serverd";
"cf-monitord" restart_class => "start_monitor",
comment => "Monitor cf-monitord process",
handle => "cfe_internal_maintain_cfe_windows_processes_cf_monitord";
#
services:
files_ok.windows::
"CfengineNovaExec"
service_policy => "start",
service_method => u_bootstart,
comment => "Start the executor windows service now and at boot time",
handle => "cfe_internal_maintain_cfe_windows_services_windows_executor";
#
commands:
start_server::
"$(sys.cf_serverd)"
action => u_ifwin_bg,
comment => "Start cf-serverd process",
classes => u_kept_successful_command,
handle => "cfe_internal_maintain_cfe_windows_commands_start_cf_serverd";
start_monitor|restart_monitor::
"$(sys.cf_monitord)"
action => u_ifwin_bg,
comment => "Start cf-monitord process",
classes => u_kept_successful_command,
handle => "cfe_internal_maintain_cfe_windows_commands_start_cf_monitord";
}
maintain_cfe_systemd
Prototype: maintain_cfe_systemd
Description: Ensure cfengine components are running
Implementation:
code
bundle agent maintain_cfe_systemd
{
classes:
systemd::
"restart_cfe"
not => returnszero("/bin/systemctl -q is-active cfengine3", "noshell"),
comment => "Check running status of CFEngine using systemd",
handle => "cfe_internal_maintain_cfe_systemd_classes_restart_cfe";
commands:
restart_cfe::
"/bin/systemctl -q start cfengine3"
comment => "Start CFEngine using systemd",
handle => "cfe_internal_maintain_cfe_systemd_commands_start_cfe";
}
cfe_internal/update/
This directory contains internal management polcies related to the default
update policy like ensuring inputs is a copy of masterfiles from your policy
server and ensuring the CFEngine components are running. Some policies
contained in this directory are only aplicable to CFEngine Enterprise and
others are used in both Community and Enterprise editions.
cfe_internal/
This directory contains policy related to the internal control and functioning
of CFEngine and its various components. This directory provides policeis that
function at a higher level than those found in controls. For example, policy
related to log rotation can be found here, while settings related to access
control rules are organized under controls.
Note: Many of the tuneables specified in these files have been exposed in the
def bundle for use via the augments file. It is reccomended that direct
modifications to these files be limited in order to ease policy framework
upgrades. If you are altering one of these files, please consider making a pull
request to expose the tunable.
controls/cf_hub.cf
This is where body hub control is defined. body hub control is where
various settings related to cf-hub can be tuned.
Note: cf-hub is only available in CFEngine Enterprise.
hub bodies
control
Prototype: control
Description: Control attributes for cf-hub
Implementation:
code
body hub control
{
enterprise_edition.policy_server::
exclude_hosts => { @(def.control_hub_exclude_hosts) };
# exclude_hosts => { "192.168.12.21", "10.10", "10.12.*" };
# cf-hub initiates a pull collection round if one of the listed classes is defined.
hub_schedule => { @(def.control_hub_hub_schedule) };
# port => "5308";
@if minimum_version(3.15)
query_timeout => "$(def.control_hub_query_timeout)";
@endif
# Hub will discard accumulated reports on the clients
# and download only information about current state of the client
# in case of not successfully downloading the reports for defined
# period of time. Default value is 6 hours.
# Was introduced in CFEngine 3.6.4
# client_history_timeout => 6; # [hours]
}
controls/cf_agent.cf
This is where body agent control is defined. body agent control is where
various settings related to cf-agent can be tuned.
control
Prototype: control
Implementation:
code
body agent control
{
# Global default for time that must elapse before promise will be rechecked.
# Don't keep any promises.
any::
# Minimum time (in minutes) which should have passed since the last time
# the promise was verified before it is checked again.
ifelapsed => "1";
# Do not send IP/name during server connection if address resolution is broken.
# Comment it out if you do NOT have a problem with DNS
skipidentify => "true";
# explicitly not supported (but they should break long before)
abortclasses => { "cfengine_3_3", "cfengine_3_4", @(def.control_agent_abortclasses) };
# The abortbundleclasses slist contains regular expressions that match
# classes which if defined lead to termination of current bundle.
abortbundleclasses => { @(def.control_agent_abortbundleclasses) };
# Maximum number of outgoing connections to a remote cf-serverd.
maxconnections => "$(def.control_agent_maxconnections)";
# Environment variables of the agent process.
# The values of environment variables are inherited by child commands
# EMPTY list is not valid for environment attribute Ref: CFE-3927. So, we
# do some validation on it so we can apply it selectively.
_control_agent_environment_vars_validated::
environment => { @(def.control_agent_environment_vars) };
_have_control_agent_files_single_copy::
# CFE-3622
# File patterns which allow a file to be copied over only a single time
# per agent run.
files_single_copy => { @(def.control_agent_files_single_copy) };
mpf_control_agent_default_repository::
# Location to backup files before they are edited by cfengine
default_repository => "$(def.control_agent_default_repository)";
# Environment variables based on Distro
control_agent_agentfacility_configured::
agentfacility => "$(default:def.control_agent_agentfacility)";
}
controls/cf_execd.cf
This is where body executor control is defined. body executor control is where
various settings related to cf-execd can be tuned.
control
Prototype: control
Description: Settings that determine the behavior of cf-execd
Implementation:
code
body executor control
{
any::
splaytime => "$(def.control_executor_splaytime)"; # activity will be spread over this many time slices
agent_expireafter => "$(def.control_executor_agent_expireafter)";
@if minimum_version(3.18.0)
_have_control_executor_runagent_socket_allow_users::
runagent_socket_allow_users => { @(def.control_executor_runagent_socket_allow_users) };
@endif
cfengine_internal_agent_email.!cfengine_internal_disable_agent_email::
mailto => "$(def.mailto)";
mailfrom => "$(def.mailfrom)";
smtpserver => "$(def.smtpserver)";
mailmaxlines => "$(default:def.control_executor_mailmaxlines)";
control_executor_mailsubject_configured.cfengine_internal_agent_email.!cfengine_internal_disable_agent_email::
mailsubject => "$(default:def.control_executor_mailsubject)";
control_executor_mailfilter_exclude_configured.cfengine_internal_agent_email.!cfengine_internal_disable_agent_email::
mailfilter_exclude => { "@(default:def.control_executor_mailfilter_exclude)" };
control_executor_mailfilter_include_configured.cfengine_internal_agent_email.!cfengine_internal_disable_agent_email::
mailfilter_include => { "@(default:def.control_executor_mailfilter_include)" };
any::
# Default:
#
# schedule => { "Min00", "Min05", "Min10", "Min15", "Min20",
# "Min25", "Min30", "Min35", "Min40", "Min45",
# "Min50", "Min55" };
schedule => { @(def.control_executor_schedule_value) };
# The full path and command to the executable run by default (overriding builtin).
windows::
exec_command => "$(sys.cf_agent) -Dfrom_cfexecd,cf_execd_initiated -f \"$(sys.update_policy_path)\" & $(sys.cf_agent) -Dfrom_cfexecd,cf_execd_initiated";
!windows::
exec_command => "$(sys.cf_agent) -Dfrom_cfexecd,cf_execd_initiated -f \"$(sys.update_policy_path)\" ; $(sys.cf_agent) -Dfrom_cfexecd,cf_execd_initiated";
}
controls/cf_monitord.cf
This is where body monitor control is defined. body monitor control is where
various settings related to cf-monitord can be tuned.
control
Prototype: control
Description: Attributes controlling cf-monitord
Implementation:
code
body monitor control
{
any::
forgetrate => "0.7";
histograms => "true";
# tcpdump => "false";
# tcpdumpcommand => "/usr/sbin/tcpdump -t -n -v";
}
controls/cf_runagent.cf
This is where body runagent control is defined. body runagent control is where
various settings related to cf-runagent can be tuned.
See also: Run agent on multiple hosts sharing a class
control
Prototype: control
Implementation:
code
body runagent control
{
# A list of hosts to contact when using cf-runagent
any::
hosts => { "127.0.0.1" };
# , "myhost.example.com:5308", ...
}
controls/cf_serverd.cf
This is where body server control is defined. body server control is where
various settings related to cf-serverd can be tuned.
control
Prototype: control
Description: Control attributes for cf-serverd
Implementation:
code
body server control
{
# List of hosts that may connect (change the ACL in def.cf)
allowconnects => { @(default:def.control_server_allowconnects_derived) };
# Out of them, which ones should be allowed to have more than one
# connection established at the same time?
allowallconnects => { @(default:def.control_server_allowallconnects_derived) };
# Out of the hosts in allowconnects, trust new keys only from the
# following ones. SEE COMMENTS IN def.cf
trustkeysfrom => { @(def.trustkeysfrom) };
## List of the hosts not using the latest protocol that we'll accept connections from
## (absence of this option or empty list means allow none)
allowlegacyconnects => { @(def.control_server_allowlegacyconnects) };
# Maximum number of concurrent connections.
# Suggested value >= total number of hosts
maxconnections => "$(def.control_server_maxconnections)";
# Allow connections from nodes which are out-of-sync
denybadclocks => "false";
control_server_allowtlsversion_defined::
# Minimum required version of TLS. Set to "1.0" if you need clients
# running CFEngine in a version lower than 3.7.0 to connect.
#
# Example:
# allowtlsversion => "1.0";
allowtlsversion => "$(default:def.control_server_allowtlsversion)"; # See also: tls_min_version in body common control
control_server_allowciphers_defined::
# List of ciphers the server accepts. For Syntax help see man page for
# "openssl-ciphers" (man:openssl-ciphers(1ssl)). The 'TLS_'-prefixed
# ciphers are for TLS 1.3 and later.
#
# Example setting:
# allowciphers => "AES256-GCM-SHA384:AES256-SHA:TLS_AES_256_GCM_SHA384";
allowciphers => "$(default:def.control_server_allowciphers)"; # See also: tls_ciphers in body common control
enterprise_edition.client_initiated_reporting_enabled::
# How often cf-serverd should try to establish a reverse tunnel for report
# collection
call_collect_interval => "$(def.control_server_call_collect_interval)";
# The time in seconds that a collect-call tunnel will remain open for hub
# to complete report transfer.
collect_window => "$(def.control_server_collect_window)";
any::
# The remote user accounts which are allowed to initiate cf-agent via
# cf-runagent.
allowusers => { @(def.control_server_allowusers) };
windows::
cfruncommand => "$(sys.cf_agent) -I -D cf_runagent_initiated -f \"$(sys.update_policy_path)\" &
$(sys.cf_agent) -I -D cf_runagent_initiated";
!windows::
# In 3.10 the quotation is properly closed when EOF is reached. It is left
# open so that arguments (like -K and --remote-bundles) can be appended.
# 3.10.x does not automatically append -I -Dcfruncommand
cfruncommand => "$(def.cf_runagent_shell) -c \'
$(sys.cf_agent) -I -D cf_runagent_initiated -f $(sys.update_policy_path) ;
$(sys.cf_agent) -I -D cf_runagent_initiated";
# Use bindtointerface to specify interface to bind to, the default is :: +
# 0.0.0.0/0 if IPV6 is supported or 0.0.0.0/0 if IPV6 is not supported. On
# Windows, binding to :: means only IPV6 connections will be accepted.
# !windows::
# bindtointerface => "::";
}
mpf_default_access_rules
Prototype: mpf_default_access_rules
Description: Defines access to common resources
Implementation:
code
bundle server mpf_default_access_rules()
{
access:
any::
"$(def.dir_masterfiles)/"
handle => "server_access_grant_access_policy",
shortcut => "masterfiles",
comment => "Grant access to the policy updates",
if => isdir( "$(def.dir_masterfiles)/" ),
admit => { @(def.acl_derived) };
"$(def.dir_masterfiles)/.no-distrib" -> { "ENT-8079" }
handle => "prevent_distribution_of_top_level_dot_no_distrib",
deny => { "0.0.0.0/0" };
"$(def.dir_bin)/"
handle => "server_access_grant_access_binary",
comment => "Grant access to binary for cf-runagent",
if => isdir( "$(def.dir_bin)/" ),
admit => { @(def.acl_derived) };
"$(def.dir_data)/"
handle => "server_access_grant_access_data",
shortcut => "data",
comment => "Grant access to data directory",
if => isdir( "$(def.dir_data)/" ),
admit => { @(def.acl_derived) };
"$(def.dir_modules)/"
handle => "server_access_grant_access_modules",
shortcut => "modules",
comment => "Grant access to modules directory",
if => isdir( "$(def.dir_modules)/" ),
admit => { @(def.acl_derived) };
# TODO: Remove after 3.15 is no longer supported (December 18th 2022)
"$(def.dir_plugins)/" -> { "CFE-3618" }
handle => "server_access_grant_access_plugins",
comment => "Grant access to plugins directory",
if => isdir( "$(def.dir_plugins)/" ),
admit => { @(def.acl_derived) };
"$(def.dir_templates)/"
handle => "server_access_grant_access_templates",
shortcut => "templates",
comment => "Grant access to templates directory",
if => isdir( "$(def.dir_templates)/" ),
admit => { @(def.acl_derived) };
policy_server|am_policy_hub::
"$(def.dir_master_software_updates)/" -> { "ENT-4953" }
handle => "server_access_grant_access_master_software_updates",
shortcut => "master_software_updates",
comment => "Grant access for hosts to download cfengine packages for self upgrade",
if => isdir( "$(sys.workdir)/master_software_updates" ),
admit => { @(def.acl_derived) };
"$(sys.statedir)/cf_version.txt" -> { "ENT-10664" }
handle => "server_access_grant_access_state_cf_version",
shortcut => "hub-cf_version",
comment => concat( "We want remote hosts to default their target binary",
" version to that of the hubs binary version, so we",
" need to share this state with remote clients." ),
admit => { @(def.acl_derived) };
enterprise_edition.policy_server::
"collect_calls"
resource_type => "query",
admit_ips => { @(def.mpf_access_rules_collect_calls_admit_ips) };
"$(sys.workdir)/cmdb/$(connection.key)/" -> { "ENT-6788" }
handle => "server_access_grant_access_cmdb",
comment => "Grant access to host specific CMDB data",
shortcut => "hub_cmdb",
admit_keys => { $(connection.key) };
!windows::
"$(def.cf_runagent_shell)" -> { "ENT-6673" }
handle => "server_access_grant_access_shell_cmd",
comment => "Grant access to shell for cfruncommand",
admit => { @(def.mpf_admit_cf_runagent_shell_selected) };
policy_server.enable_cfengine_enterprise_hub_ha::
"$(sys.workdir)/ppkeys/"
handle => "server_access_grant_access_ppkeys_hubs",
comment => "Grant access to ppkeys for HA hubs",
if => isdir( "$(sys.workdir)/ppkeys/" ),
admit => { @(def.policy_servers) };
# Allow slave hub to synchronize cf_robot and appsettings, application
# config config, ldap config settings, and ldap api config settings.
# Files are containing configuration that must be the same on all hubs.
"$(sys.workdir)/httpd/htdocs/application/config/cf_robot.php"
handle => "server_access_grant_access_cf_robot",
comment => "Grant access to cf_robot file for HA hubs",
admit => { @(def.policy_servers) };
"$(sys.workdir)/httpd/htdocs/application/config/appsettings.php"
handle => "server_access_grant_access_appsettings",
comment => "Grant access to appsettings for HA hubs",
admit => { @(def.policy_servers) };
"$(sys.workdir)/httpd/htdocs/application/config/config.php" -> { "ENT-4944" }
handle => "server_access_grant_access_application_config_config_php",
comment => "Grant access to application config for HA hubs",
admit => { @(def.policy_servers) };
"$(sys.workdir)/httpd/htdocs/ldap/config/settings.php" -> { "ENT-4944" }
handle => "server_access_grant_access_ldap_config_settings_php",
comment => "Grant access to ldap config settings for HA hubs",
admit => { @(def.policy_servers) };
"$(sys.workdir)/httpd/htdocs/api/config/config.php" -> { "ENT-4944" }
handle => "server_access_grant_access_api_config_settings_php",
comment => "Grant access to LDAP api config for HA hubs",
admit => { @(def.policy_servers) };
# Allow access to notification_scripts directory so passive hub
# will be able to synchronize its content. Once passive hub will
# be promoted to act as a master all the custom scripts will be
# accessible.
"/opt/cfengine/notification_scripts/"
handle => "server_access_grant_access_notification scripts",
comment => "Grant access to notification scripts",
if => isdir( "/opt/cfengine/notification_scripts/" ),
admit => { @(def.policy_servers) };
# When HA is enabled clients are updating active hub IP address
# using data stored in master_hub.dat file.
"$(ha_def.master_hub_location)"
handle => "server_access_grant_access_policy_server_dat",
comment => "Grant access to policy_server.dat",
admit => { @(def.acl_derived) };
# Hubs keys working in HA configuration are stored in ppkeys_hubs directory.
# In order to perform failover while active hub is down clients needs to
# have all hubs keys. This gives ability to connect to slave hub promoted to active role
# once active is down.
"$(ha_def.hubs_keys_location)/"
handle => "server_access_grant_access_to_clients",
comment => "Grant access to hubs' keys to clients",
if => isdir("$(ha_def.hubs_keys_location)/"),
admit => { @(def.acl_derived) };
windows::
"c:\program files\cfengine\bin\cf-agent.exe"
handle => "server_access_grant_access_agent",
comment => "Grant access to the agent (for cf-runagent)",
admit => { @(def.policy_servers) };
roles:
# Use roles to allow specific remote cf-runagent users to
# define certain soft-classes when running cf-agent on this host
".*" authorize => { "root" };
}
controls/def.cf
This is where most common variables and classes are defined. Note its variable scope can be augmented with def.json.
def
Prototype: def
Description: Common settings for the Masterfiles Policy Framework
Implementation:
code
bundle common def
{
vars:
any::
"augments_inputs"
slist => {},
if => not( isvariable( "augments_inputs" ) ),
comment => "It's important that we define this list, even if it's empty
or we get errors about the list being unresolved.";
# Your domain name, for use in access control
# Note: this default may be inaccurate!
"domain"
string => "$(sys.domain)",
comment => "Define a global domain for all hosts",
handle => "common_def_vars_domain",
if => not(isvariable("domain"));
# Mail settings used by body executor control found in controls/cf_execd.cf
"mailto"
string => "root@$(def.domain)",
if => not(isvariable("mailto"));
"mailfrom"
string => "root@$(sys.uqhost).$(def.domain)",
if => not(isvariable("mailfrom"));
"smtpserver"
string => "localhost",
if => not(isvariable("smtpserver"));
"control_executor_mailmaxlines" -> { "ENT-9614" }
int => "30",
if => not( isvariable( "control_executor_mailmaxlines" ));
"control_executor_mailsubject" -> { "ENT-10210" }
string => "",
if => not( isvariable( "control_executor_mailsubject" ) );
"control_executor_mailfilter_exclude" -> { "ENT-10210" }
slist => {},
if => not( isvariable( "control_executor_mailfilter_exclude" ) );
"control_executor_mailfilter_include" -> { "ENT-10210" }
slist => {},
if => not( isvariable( "control_executor_mailfilter_include" ) );
# List here the IP masks that we grant access to on the server
"acl"
slist => {
# Allow everything in my own domain.
# Note that this:
# 1. requires def.domain to be correctly set
# 2. will cause a DNS lookup for every access
# ".*$(def.domain)",
# Assume /16 LAN clients to start with
"$(sys.policy_hub)/16",
# Uncomment below if HA is used
#"@(def.policy_servers)"
# "2001:700:700:3.*",
# "217.77.34.18",
# "217.77.34.19",
},
comment => "Define an acl for the machines to be granted accesses",
handle => "common_def_vars_acl",
if => and(not(isvariable("override_data_acl")), not(isvariable("acl"))),
meta => { "defvar" };
!disable_always_accept_policy_server_acl::
"acl_derived" -> { "ENT-10951" }
slist => {
@(def.acl),
"$(sys.policy_hub)"
},
comment => "Define an acl for the machines to be granted accesses";
disable_always_accept_policy_server_acl::
"acl_derived" -> { "ENT-10951" }
slist => {
@(def.acl)
},
comment => "Define an acl for the machines to be granted accesses";
any::
"control_server_allowconnects" -> { "ENT-10212" }
slist => { "127.0.0.1" , "::1", @(def.acl) },
if => not( isvariable( "control_server_allowconnects" ) ),
comment => concat( "We want to define the default setting for",
" allowconnects in body server control if not",
" already specified" );
!disable_always_accept_policy_server_allowconnects::
"control_server_allowconnects_derived" -> { "ENT-10951" }
slist => { "$(sys.policy_hub)", @(def.control_server_allowconnects) },
comment => concat( "We want to define the default setting for",
" allowconnects in body server control if not",
" already specified. Since not explicitly excluded",
" we want the policy server itself to be allowed." );
disable_always_accept_policy_server_allowconnects::
"control_server_allowconnects_derived" -> { "ENT-10951" }
slist => { @(def.control_server_allowconnects) },
comment => concat( "We want to define the default setting for",
" allowconnects in body server control if not",
" already specified. Since explicitly excluded",
" we don't automatically include the policy server itself." );
any::
"control_server_allowallconnects" -> { "ENT-10212" }
slist => { "127.0.0.1" , "::1", @(def.acl) },
if => not( isvariable( "control_server_allowallconnects" ) ),
comment => concat( "We want to define the default setting for",
" allowallconnects in body server control if not",
" already specified" );
!disable_always_accept_policy_server_allowallconnects::
"control_server_allowallconnects_derived" -> { "ENT-10951" }
slist => { @(def.control_server_allowallconnects), "$(sys.policy_hub)" },
comment => concat( "We want to define the default setting for",
" allowallconnects in body server control if not",
" already specified" );
disable_always_accept_policy_server_allowallconnects::
"control_server_allowallconnects_derived" -> { "ENT-10951" }
slist => { @(def.control_server_allowallconnects) },
comment => concat( "We want to define the default setting for",
" allowallconnects in body server control if not",
" already specified" );
any::
# Out of the hosts in allowconnects, trust new keys only from the
# following ones. This is open by default for bootstrapping.
"trustkeysfrom"
slist => {
# COMMENT THE NEXT LINE OUT AFTER ALL MACHINES HAVE BEEN BOOTSTRAPPED.
"0.0.0.0/0", # allow any IP
},
comment => "Define from which machines keys can be trusted",
if => and(not(isvariable("override_data_trustkeysfrom")),
not(isvariable("trustkeysfrom"))),
meta => { "defvar" };
## List of the hosts not using the latest protocol that we'll accept connections from
## (absence of this option or empty list means allow none)
"control_server_allowlegacyconnects"
slist => {},
if => not( isvariable( "control_server_allowlegacyconnects" ) );
# Users authorized to request executions via cf-runagent
"control_server_allowusers_non_policy_server"
slist => { "root" },
if => not( isvariable( "control_server_allowusers_non_policy_server" ) );
"control_server_allowusers_policy_server"
slist => {},
if => not( isvariable( "control_server_allowusers_policy_server" ) );
policy_server::
"control_server_allowusers" -> { "CFE-3544", "ENT-6666" }
handle => "def_control_server_allowusers_policy_server",
slist => { @(control_server_allowusers_policy_server) },
meta => { "inventory", "attribute_name=Allowed users for cf-runagent" },
if => not(isvariable("control_server_allowusers"));
!policy_server::
"control_server_allowusers" -> { "CFE-3544", "ENT-6666" }
handle => "def_control_server_allowusers_non_policy_server",
slist => { @(control_server_allowusers_non_policy_server) },
meta => { "inventory", "attribute_name=Allowed users for cf-runagent" },
if => not(isvariable("control_server_allowusers"));
# Executor controls
any::
"mpf_admit_cf_runagent_shell_selected" -> { "ENT-6673", "ENT-6666" }
handle => "mpf_admit_cf_runagent_shell_default",
if => not( isvariable( "mpf_admit_cf_runagent_shell" )),
slist => { @(def.policy_servers) },
meta => { "inventory", "attribute_name=Allowed hosts for cf-runagent", "derived-from=def.policy_servers" },
comment => concat( "By default we admit our policy servers to initiate",
"agent runs via cf-runagent");
"mpf_admit_cf_runagent_shell_selected" -> { "ENT-6673", "ENT-6666" }
handle => "mpf_admit_cf_runagent_shell_augments",
if => isvariable( "mpf_admit_cf_runagent_shell" ),
slist => { @(def.mpf_admit_cf_runagent_shell) },
meta => { "inventory", "attribute_name=Allowed hosts for cf-runagent", "derived-from=def.mpf_admit_cf_runagent_shell" },
comment => concat( "Users can override the default set of hosts that ",
"can initiate agent runs via cf-runagent.");
# Executor Controls
## Default splaytime to 4 unless it's already defined (via augments)
"control_executor_splaytime"
string => "4",
if => not( isvariable( "control_executor_splaytime" ) ),
comment => "Splaytime controls the number of minutes hosts execution
should be splayed over. This value should be less than the
number of minutes between scheduled executions";
## Default agent_expireafter to 120 unless it's already defined (via augments)
"control_executor_agent_expireafter" -> { "ENT-4208" }
string => "120",
if => not( isvariable( "control_executor_agent_expireafter" ) ),
comment => "This controls the number of minutes after no data has been
recieved by cf-execd from a cf-agent process before that
cf-agent process is killed.";
## Default schedule unless it's already defined (via augments)
"control_executor_schedule_value"
slist => {
"Min00", "Min05", "Min10", "Min15",
"Min20", "Min25", "Min30", "Min35",
"Min40", "Min45", "Min50", "Min55",
},
if => not( isvariable( control_executor_schedule) ),
comment => "This variable defines the list of classes that should
trigger exec_command if any of them are defined.";
# schedule cant use a data structure directly, so we must use an
# intermediary variable to convert it to list
"control_executor_schedule_value"
slist => getvalues(control_executor_schedule),
if => not( isvariable( control_executor_schedule_value) ),
comment => "This variable defines the list of classes that should
trigger exec_command if any of them are defined.";
# Users allowed on sockets
# Set the users allowed by default, if not already set (e.g. via augments)
"control_executor_runagent_socket_allow_users"
slist => { "cfapache" },
unless => isvariable( $(this.promiser) ),
if => and( "enterprise_edition", "am_policy_hub");
# Agent Controls
"control_agent_abortclasses" -> { "ENT-4823" }
slist => { },
comment => "The control body has a variable, so a valid list must be defined or the agent will error",
if => not( isvariable( $(this.promiser) ));
"control_agent_agentfacility" -> { "ENT-10209" }
string => "",
if => not( isvariable ( $(this.promiser) ));
"control_agent_abortbundleclasses" -> { "ENT-4823" }
slist => { "abortbundle" },
comment => "The control body has a variable, so a valid list must be defined or the agent will error",
if => not( isvariable( $(this.promiser) ));
"control_agent_default_repository"
string => ifelse( isvariable( "control_agent_default_repository"),
$(control_agent_default_repository),
"$(sys.workdir)/backups"),
if => "mpf_control_agent_default_repository";
"control_agent_maxconnections"
int => "30",
if => not( isvariable( "control_agent_maxconnections" ) );
# Because in some versions of cfengine bundlesequence in body common
# control does not support does not support iteration over data containers
# we must first pick out the bundles into a shallow container that we can
# then get a regular list from using getvalues().
"tbse" data => mergedata( "def.control_common_bundlesequence_end" );
"bundlesequence_end" slist => getvalues( tbse );
"tbse" data => mergedata( "def.control_common_bundlesequence_classification" );
"bundlesequence_classification" slist => getvalues( tbse );
"control_common_ignore_missing_bundles" -> { "CFE-2773" }
string => ifelse( strcmp( $(control_common_ignore_missing_bundles), "true" ),
"true",
"false");
"control_common_ignore_missing_inputs" -> { "CFE-2773" }
string => ifelse( strcmp( $(control_common_ignore_missing_inputs), "true" ),
"true",
"false");
"control_common_lastseenexpireafter" -> { "ENT-10414" }
string => "10080", # 10080 minutes is 1 week
if => not( isvariable( "default:def.control_common_lastseenexpireafter") ),
comment => concat( "Since lastseenexpireafter is not defined, we default to",
" the binary default of 10080 minutes (1 week)" );
# Agent controls
@if minimum_version(3.18.0)
# TODO When 3.18 is the oldest supported LTS, redact this macro and associated protections
"control_agent_files_single_copy" -> { "CFE-3622" }
slist => { },
if => not( isvariable( "control_agent_files_single_copy" ) ),
comment => "Default files_single_copy to an empty list if it is not
defined. It is expected that users can override the default
by setting this value from the augments file (def.json).";
@endif
"control_server_maxconnections"
int => "200",
if => not( isvariable( "control_server_maxconnections" ) );
#+begin_src def.control_agent_environment_vars
# This configures environment_vars in body agent control
# It's configurable without having to modify policy, so the default values
# are only applied if the variable is not already defined (via augments).
# Platform defaults are set first, and the global default is set last so
# that global default does not override a platform specific setting since
# the promises are only applied if the variable is not already defined
# which is reverse of what you might normally do in CFEngine since
# typically the last promise wins.
classes:
"disable_always_accept_policy_server_acl" -> { "ENT-10951" }
expression => "disable_always_accept_policy_server";
"disable_always_accept_policy_server_allowconnects" -> { "ENT-10951" }
expression => "disable_always_accept_policy_server";
"disable_always_accept_policy_server_allowallconnects" -> { "ENT-10951" }
expression => "disable_always_accept_policy_server";
"control_agent_agentfacility_configured" -> { "ENT-10209" }
expression => regcmp( "LOG_(USER|DAEMON|LOCAL[0-7])",
$(control_agent_agentfacility) ),
comment => concat( "If default:def.control_agent_agentfacility is a",
" valid setting, we want to use it in body agent",
" control for setting agentfacility" );
"_control_agent_environment_vars_validated" -> { "CFE-3927" }
and => {
# The variable must be defined
isvariable( "default:def.control_agent_environment_vars" ),
# The length of the variable must be greater than 0 (can't be an empty list)
isgreaterthan( length( "default:def.control_agent_environment_vars" ), 0),
# Each element of the list must be of the form KEY=VALUE
every( ".+=.+", "default:def.control_agent_environment_vars"),
# In 3.18 and greater we can validate the type of variable in use
@if minimum_version(3.18.0)
regcmp( "(policy slist|data array)", type( "default:def.control_agent_environment_vars", "true" ) ),
@endif
};
"control_executor_mailsubject_configured" -> { "ENT-10210" }
expression => regcmp( ".+", "$(control_executor_mailsubject)"),
comment => concat( "If default:def.control_executor_mailsubject is not",
" an empty string, we want to use it's value for",
" emails sent by cf-execd.");
"control_executor_mailfilter_exclude_configured" -> { "ENT-10210" }
expression => isgreaterthan( length( "control_executor_mailfilter_exclude" ), 0 ),
comment => concat( "If default:def.control_executor_mailfilter_exclude is not",
" an empty list, we want to use it's value for",
" stripping lines from emails sent by cf-execd.");
"control_executor_mailfilter_include_configured" -> { "ENT-10210" }
expression => isgreaterthan( length( "control_executor_mailfilter_include" ), 0 ),
comment => concat( "If default:def.control_executor_mailfilter_include is not",
" an empty list, we want to use it's value for",
" including lines from emails sent by cf-execd.");
"control_server_allowciphers_defined" -> { "ENT-10182" }
expression => isvariable( "default:def.control_server_allowciphers"),
comment => concat( "If default:def.control_server_allowciphers is defined then",
" it's value will be used for allowciphers in body server",
" control. Else the binary default will be used.");
"control_server_allowtlsversion_defined" -> { "ENT-10182" }
expression => isvariable( "default:def.control_server_allowtlsversion"),
comment => concat( "If default:def.control_server_allowtlsversion is defined then",
" it's value will be used for allowtlsversion in body server",
" control. Else the binary default will be used.");
vars:
debian::
"control_agent_environment_vars_default" -> { "CFE-3925" }
handle => "common_def_vars_debian_control_agent_environment_vars_default",
if => not( isvariable( "control_agent_environment_vars_default" ) ),
comment => "Set default environment variables for using Debian non-interactively",
slist => {
"DEBIAN_FRONTEND=noninteractive",
# "APT_LISTBUGS_FRONTEND=none",
# "APT_LISTCHANGES_FRONTEND=none",
};
any::
# Resolve the final state for environment vars if there is a default var
# or if there is a user extra and merge the defined entities
"control_agent_environment_vars" -> { "CFE-3925" }
slist => { @(def.control_agent_environment_vars_default),
@(def.control_agent_environment_vars_extra) },
policy => "ifdefined",
if => or( isvariable( "def.control_agent_environment_vars_default" ), # Protect against defining
isvariable( "def.control_agent_environment_vars_extra" )); # an empty variable
#+end_src Agent Environment Variables
any::
"dir_masterfiles" string => translatepath("$(sys.masterdir)"),
comment => "Define masterfiles path",
handle => "common_def_vars_dir_masterfiles";
"dir_reports" string => translatepath("$(sys.workdir)/reports"),
comment => "Define reports path",
handle => "common_def_vars_dir_reports";
"dir_bin" string => translatepath("$(sys.bindir)"),
comment => "Define binary path",
handle => "common_def_vars_dir_bin";
"dir_data"
string => ifelse( isvariable( "def.dir_data"),
$(def.dir_data),
"$(sys.workdir)/data"),
comment => "Define data path",
handle => "common_def_vars_dir_data";
"dir_modules" string => translatepath("$(sys.workdir)/modules"),
comment => "Define modules path",
handle => "common_def_vars_dir_modules";
# TODO: Remove after 3.15 is no longer supported (December 18th 2022)
"dir_plugins" -> { "CFE-3618" }
string => translatepath("$(sys.workdir)/plugins"),
comment => "Define plugins path",
handle => "common_def_vars_dir_plugins";
"dir_templates"
string => ifelse( isvariable( "def.dir_templates"),
$(def.dir_templates),
"$(sys.workdir)/templates"),
comment => "Define templates path",
handle => "common_def_vars_dir_templates";
"cf_apache_user" string => "cfapache",
comment => "User that CFEngine Enterprise webserver runs as",
handle => "common_def_vars_cf_cfapache_user";
"cf_apache_group" string => "cfapache",
comment => "Group that CFEngine Enterprise webserver runs as",
handle => "common_def_vars_cf_cfapache_group";
policy_server|am_policy_hub::
# Only hubs serve software updates
"dir_master_software_updates" -> { "ENT-4953" }
string => "$(sys.workdir)/master_software_updates",
handle => "common_def_vars_dir_serve_master_software_updates",
comment => "Path where software updates are served from the policy hub.
This variable is overridable via augments as
vars.dir_master_software_updates. All remote agents request this path
via the master_software_updates shortcut.",
if => not( isvariable( "def.dir_master_software_updates" ));
enterprise_edition.(policy_server|am_policy_hub)::
# Only enterprise hubs have Mission Portal
"cfe_enterprise_mission_portal_apache_sslprotocol" -> { "ENT-10412" }
string => "all -SSLv2 -SSLv3 -TLSv1", # We disable some versions of SSL
# as they are known to be insecure
if => not( isvariable( "default:def.cfe_enterprise_mission_portal_apache_sslprotocol" ) ),
comment => "The SSL protocol versions that are allowed by Apache for Mission Portal";
"cfe_enterprise_mission_portal_apache_sslciphersuite" -> { "ENT-11393" }
string => "HIGH",
if => not( isvariable( "default:def.cfe_enterprise_mission_portal_apache_sslciphersuite" ) ),
comment => "The SSL cipher suites that are allowed by Apache for Mission Portal";
solaris::
"cf_runagent_shell"
string => "/usr/bin/sh",
comment => "Define path to shell used by cf-runagent",
handle => "common_def_vars_solaris_cf_runagent_shell";
!(windows|solaris)::
"cf_runagent_shell"
string => "/bin/sh",
comment => "Define path to shell used by cf-runagent",
handle => "common_def_vars_cf_runagent_shell";
any::
"base_log_files" slist =>
{
"$(sys.workdir)/cf3.$(sys.uqhost).runlog",
"$(sys.workdir)/promise_summary.log",
};
"enterprise_log_files" slist =>
{
"$(sys.workdir)/cf_notkept.log",
"$(sys.workdir)/cf_repair.log",
"$(sys.workdir)/state/cf_value.log",
"$(sys.workdir)/outputs/dc-scripts.log",
"$(sys.workdir)/state/promise_log.jsonl",
"$(sys.workdir)/state/classes.jsonl",
};
"hub_log_files" slist =>
{
"$(cfe_internal_hub_vars.access_log)", # Mission Portal
"$(cfe_internal_hub_vars.error_log)", # Mission Portal
"$(cfe_internal_hub_vars.ssl_request_log)", # Mission Portal
"/var/log/postgresql.log", # PostgreSQL
};
"max_client_history_size" -> { "cf-hub", "CFEngine Enterprise" }
int => "50M",
unless => isvariable(max_client_history_size),
comment => "The threshold of report diffs which will trigger purging of
diff files.";
enterprise.!am_policy_hub::
# CFEngine's own log files
"cfe_log_files" slist => { @(base_log_files), @(enterprise_log_files) };
enterprise.am_policy_hub::
# CFEngine's own log files
"cfe_log_files" slist => { @(base_log_files), @(enterprise_log_files), @(hub_log_files) };
!enterprise::
# CFEngine's own log files
"cfe_log_files" slist => { @(base_log_files) };
# Directories where logs are rotated and old files need to be purged.
any::
"log_dir[outputs]" string => "$(sys.workdir)/outputs";
"log_dir[reports]" string => "$(sys.workdir)/reports";
# TODO ENT-6845 - move package module logs to $(sys.workdir)/log/something
windows::
"log_dir[package_logs]" string => "$(const.dirsep)cfengine_package_logs";
enterprise.am_policy_hub::
"log_dir[application]" string => "$(sys.workdir)/httpd/htdocs/application/logs";
any::
"cfe_log_dirs" slist => getvalues( log_dir );
# MPF controls
"mpf_log_dir_retention"
string => "30",
if => not( isvariable ( mpf_log_dir_retention ) ),
comment => "The default log file retention in cfe_log_dirs is 30 days
unless it's already been defined (augments).";
"mpf_log_file_retention"
string => "10",
if => not( isvariable( mpf_log_file_retention) ),
comment => "This is the number of rotated versions of mpf log files to
save";
"mpf_log_file_max_size"
string => "1M",
if => not( isvariable( mpf_log_file_max_size) ),
comment => "When individual mpf log files reach this size they should be
rotated so that we don't fill up the disk";
"purge_scheduled_reports_older_than_days" -> { "ENT-4404" }
string => "30",
if => not( isvariable( purge_scheduled_reports_older_than_days ) ),
comment => "This controls the maximum age of artifacts generated by the
asynchronous query API and scheduled reports.";
"mpf_extra_autorun_inputs" -> { "CFE-3524" }
slist => {},
unless => isvariable( $(this.promiser) );
# Enterprise HA Related configuration
# enable_cfengine_enterprise_hub_ha is defined below
# Disabled by default
enable_cfengine_enterprise_hub_ha::
"standby_servers" slist => filter("$(sys.policy_hub)", "ha_def.ips", false, true, 10);
"policy_servers" slist => { "$(sys.policy_hub)", "@(standby_servers)" };
!enable_cfengine_enterprise_hub_ha::
"policy_servers" slist => {"$(sys.policy_hub)"};
enterprise_edition.policy_server::
"control_hub_exclude_hosts"
slist => { "" },
unless => isvariable(control_hub_exclude_hosts);
"control_hub_hub_schedule"
comment => "By default Enterprise hubs initiate pull collection once every 5 minutes.",
slist => { "Min00", "Min05", "Min10", "Min15", "Min20",
"Min25", "Min30", "Min35", "Min40", "Min45",
"Min50", "Min55" },
unless => isvariable(control_hub_hub_schedule);
"control_hub_query_timeout"
comment => "Configurable timeout for cf-hub outgoing connections",
string => "0", # 0 = default is set by cf-hub binary
unless => isvariable(control_hub_query_timeout);
"control_hub_port"
comment => "cf-hub performs pull collection on port 5308, unless
overridden by augments",
string => "5308",
unless => isvariable(control_hub_port);
"control_hub_client_history_timeout"
comment => "cf-hub instructs clients to discard reports older than this
many hours to avoid a condition where a build up of reports
causes a client to never be fully collected from",
string => "6",
unless => isvariable(control_hub_port);
"mpf_access_rules_collect_calls_admit_ips"
slist => { @(def.acl_derived) },
unless => isvariable(mpf_access_rules_collect_calls_admit_ips);
enterprise_edition.client_initiated_reporting_enabled::
"control_server_call_collect_interval"
string => "5",
unless => isvariable(control_server_call_collect_interval);
"control_server_collect_window" -> { "ENT-4102" }
string => "30",
unless => isvariable(control_server_collect_window);
enterprise_edition.policy_server::
"default_data_select_host_monitoring_include"
comment => "Most people have monitoring systems, so instead of collecting data people won't use we save the work unless its requested.",
slist => { },
unless => isvariable( default_data_select_host_monitoring_include );
"default_data_select_policy_hub_monitoring_include"
comment => "Collect all the monitoring data from the hub itself. It can be useful in diagnostics.",
slist => { ".*" },
unless => isvariable( default_data_select_policy_hub_monitoring_include );
classes:
"_have_control_agent_files_single_copy" -> { "CFE-3622"}
expression => isvariable( "def.control_agent_files_single_copy" );
"_have_control_executor_runagent_socket_allow_users"
expression => some( ".+", "def.control_executor_runagent_socket_allow_users" );
"cfengine_recommendations_enabled"
expression => "!cfengine_recommendations_disabled";
### Enable special features policies. Set to "any" to enable.
# Auto-load files in "services/autorun" and run bundles tagged "autorun".
# Disabled by default!
"services_autorun" -> { "jira:CFE-2135" }
comment => "This class enables the automatic parsing running of bundles
tagged with 'autorun'. Evaluation limitations require that
this class is set at the beginning of the agent run, so it
must be defined in the augments file (def.json), or as an
option to the agent with --define or -D. Changing the
expression here will *NOT* work correctly. Setting the class
here will result in an error due to the autorun bundle not
being found.",
expression => "!any";
# Internal CFEngine log files rotation
"cfengine_internal_rotate_logs" expression => "any";
# Enable or disable agent email output (also see mailto, mailfrom and
# smtpserver)
"cfengine_internal_agent_email" expression => "any";
"cfengine_internal_disable_agent_email" expression => "!any";
# Enable or disable external watchdog to ensure cf-execd is running
"cfe_internal_core_watchdog_enabled" expression => "!any";
"cfe_internal_core_watchdog_disabled" expression => "!any";
# Transfer policies and binaries with encryption
# you can also request it from the command line with
# -Dcfengine_internal_encrypt_transfers
# NOTE THAT THIS CLASS ALSO NEEDS TO BE SET IN update.cf
"cfengine_internal_encrypt_transfers" expression => "!any";
# Do not purge policies that don't exist on the server side.
# you can also request it from the command line with
# -Dcfengine_internal_purge_policies_disabled
# NOTE THAT THIS CLASS ALSO NEEDS TO BE SET IN update.cf
"cfengine_internal_purge_policies_disabled" expression => "!any";
# Preserve permissions of the policy server's masterfiles.
# you can also request it from the command line with
# -Dcfengine_internal_preserve_permissions
# NOTE THAT THIS CLASS ALSO NEEDS TO BE SET IN update.cf
"cfengine_internal_preserve_permissions" expression => "!any";
# Class defining which versions of cfengine are (not) supported
# by this policy version.
# Also note that this policy will only be run on enterprise policy_server
"postgresql_maintenance_supported"
expression => "(policy_server.enterprise.!enable_cfengine_enterprise_hub_ha)|(policy_server.enterprise.enable_cfengine_enterprise_hub_ha.hub_active)";
# This class is for PosgreSQL maintenance
# pre-defined to every Sunday at 2 a.m.
# This can be changed later on.
"postgresql_full_maintenance" expression => "postgresql_maintenance_supported.Sunday.Hr02.Min00_05";
# Run vacuum job on database
# pre-defined to every night except Sunday when full cleanup is executed.
"postgresql_vacuum" expression => "postgresql_maintenance_supported.!Sunday.Hr02.Min00_05";
# Enable CFEngine Enterprise HA Policy
"enable_cfengine_enterprise_hub_ha" expression => "!any";
#"enable_cfengine_enterprise_hub_ha" expression => "enterprise_edition";
# Enable failover to node which is outside cluster
#"failover_to_replication_node_enabled" expression => "enterprise_edition";
# Enable cleanup of agent report diffs when they exceed
# `def.max_client_history_size`
"enable_cfe_internal_cleanup_agent_reports" -> { "cf-hub", "CFEngine Enterprise" }
expression => "enterprise_edition",
comment => "If reports are not collected for an extended period of time
the disk may fill up or cause additional collection
issues.";
# Enable paths to POSIX tools instead of native tools when possible.
"mpf_stdlib_use_posix_utils" expression => "any";
enterprise_edition.(policy_server|am_policy_hub)::
"cfe_enterprise_disable_http_redirect_to_https"
scope => "namespace",
expression => "cfe_cfengine_enterprise_enable_plain_http";
"cfe_enterprise_disable_http_redirect_to_https"
expression => "cfe_enterprise_disable_plain_http",
comment => "If plain http is disabled, it makes no sense to redirect to it, so we disable that as well.";
reports:
"Warning: the 'cfe_cfengine_enterprise_enable_plain_http' class has been deprecated in favor of 'cfe_enterprise_disable_http_redirect_to_https', please adjust accordingly. The 'cfe_enterprise_disable_http_redirect_to_https' class has been set automatically."
if => "cfe_enterprise_disable_http_redirect_to_https.cfe_cfengine_enterprise_enable_plain_http";
"Warning: the 'cfe_cfengine_enterprise_enable_plain_http' class has been deprecated in favor of 'cfe_enterprise_disable_http_redirect_to_https', please adjust accordingly."
if => "cfe_cfengine_enterprise_enable_plain_http.!cfe_enterprise_disable_http_redirect_to_https";
}
inventory_control
Prototype: inventory_control
Description: Inventory control bundle
This common bundle is for controlling whether some inventory bundles
are disabled.
Implementation:
code
bundle common inventory_control
{
vars:
"lldpctl_exec" string => ifelse(fileexists("/usr/sbin/lldpctl"), "/usr/sbin/lldpctl",
fileexists("/usr/local/bin/lldpctl"), "/usr/local/bin/lldpctl",
"/usr/sbin/lldpctl");
"lldpctl_json" string => "$(lldpctl_exec) -f json",
unless => isvariable("def.lldpctl_json");
"lldpctl_json" string => "$(def.lldpctl_json)",
if => isvariable("def.lldpctl_json");
"lsb_exec" string => "/usr/bin/lsb_release";
"mtab" string => "/etc/mtab";
"proc" string => "/proc";
vars:
freebsd::
"dmidecoder" string => "/usr/local/sbin/dmidecode";
!freebsd::
"dmidecoder" string => "/usr/sbin/dmidecode";
"proc_device_tree" string => "/proc/device-tree";
classes:
# setting this disables all the inventory modules except package_refresh
"disable_inventory" expression => "!any";
# disable specific inventory modules below
# by default disable the LSB inventory if the general inventory
# is disabled or the binary is missing. Note that the LSB
# binary is typically not very fast.
"disable_inventory_lsb" expression => "disable_inventory";
"disable_inventory_lsb" not => fileexists($(lsb_exec));
# If we have /proc/device-tree we should likely disable dmi completely
# as of 2022 systems with dmi dont have device-tree and vice versa.
"have_proc_device_tree" expression => fileexists($(proc_device_tree));
# by default disable the dmidecode inventory if the general
# inventory is disabled or the binary does not exist. Note that
# typically this is a very fast binary.
"disable_inventory_dmidecode" expression => "disable_inventory";
"disable_inventory_dmidecode" expression => "have_proc_device_tree";
"disable_inventory_dmidecode" not => fileexists($(dmidecoder));
# by default disable the LLDP inventory if the general inventory
# is disabled or the binary does not exist. Note that typically
# this is a reasonably fast binary but still may require network
# I/O.
"disable_inventory_LLDP" expression => "disable_inventory";
"disable_inventory_LLDP" not => fileexists($(lldpctl_exec));
# by default run the package inventory refresh every time, even
# if disable_inventory is set
"disable_inventory_package_refresh" expression => "!any";
# by default disable the mtab inventory if the general inventory
# is disabled or $(mtab) is missing. Note that this is very
# fast.
"disable_inventory_mtab" expression => "disable_inventory";
"disable_inventory_mtab" not => fileexists($(mtab));
# by default disable the fstab inventory if the general
# inventory is disabled or $(sys.fstab) is missing. Note that
# this is very fast.
"disable_inventory_fstab" expression => "disable_inventory";
"disable_inventory_fstab" not => fileexists($(sys.fstab));
# by default disable the proc inventory if the general
# inventory is disabled or /proc is missing. Note that
# this is typically fast.
"disable_inventory_proc" expression => "disable_inventory|freebsd";
"disable_inventory_proc" not => isdir($(proc));
reports:
verbose_mode.disable_inventory::
"$(this.bundle): All inventory modules disabled";
verbose_mode.!disable_inventory_lsb::
"$(this.bundle): LSB module enabled";
verbose_mode.!disable_inventory_dmidecode::
"$(this.bundle): dmidecode module enabled";
verbose_mode.!disable_inventory_LLDP::
"$(this.bundle): LLDP module enabled";
verbose_mode.!disable_inventory_mtab::
"$(this.bundle): mtab module enabled";
verbose_mode.!disable_inventory_fstab::
"$(this.bundle): fstab module enabled";
verbose_mode.!disable_inventory_proc::
"$(this.bundle): proc module enabled";
verbose_mode.!disable_inventory_package_refresh::
"$(this.bundle): package_refresh module enabled";
DEBUG|DEBUG_def::
"Executor Schedule: $(def.control_executor_schedule_value)";
}
This is where the list of policy files to include as defined from the augments
file is included.
control
Prototype: control
Implementation:
code
body file control
{
inputs => { @(def.augments_inputs) };
}
controls/reports.cf
This is where report settings for CFEngine Enterprise are found. Control which
variables and classes should be collected by central reporting based on tags
that should be included or excluded. It also controls which measuremtnts taken
by cf-monitord will be collected for central reporting.
default_data_select_host
Prototype: default_data_select_host
Description: Data authorized by non policy servers for collection by cf-hub
Implementation:
code
body report_data_select default_data_select_host
{
metatags_include => { "inventory", "report" };
metatags_exclude => { "noreport" };
promise_handle_exclude => { "noreport_.*" };
monitoring_include => { @(def.default_data_select_host_monitoring_include) };
}
default_data_select_policy_hub
Prototype: default_data_select_policy_hub
Description: Data authorized by policy servers for collection by cf-hub
Implementation:
code
body report_data_select default_data_select_policy_hub
{
metatags_include => { "inventory", "report" };
metatags_exclude => { "noreport" };
promise_handle_exclude => { "noreport_.*" };
monitoring_include => { @(def.default_data_select_policy_hub_monitoring_include) };
}
report_access_rules
Prototype: report_access_rules
Description: Access rules for Enterprise report collection
Implementation:
code
bundle server report_access_rules
{
vars:
enterprise::
"query_types" slist => {"delta", "rebase", "full"};
access:
!policy_server.enterprise::
"$(query_types)"
handle => "report_access_grant_$(query_types)_for_hosts",
comment => "Grant $(query_types) reporting query for the hub on the hosts",
resource_type => "query",
report_data_select => default_data_select_host,
admit => { @(def.policy_servers) };
policy_server.enterprise::
"$(query_types)"
handle => "report_access_grant_$(query_types)_for_hub",
comment => "Grant $(query_types) reporting query for the hub on the policy server",
resource_type => "query",
report_data_select => default_data_select_policy_hub,
admit => { "127.0.0.1", "::1", @(def.policy_servers) };
}
controls/update_def.cf
This is where most common variables and classes are defined for the update
policy. Note its variable scope can be augmented with def.json.
update_def
Prototype: update_def
Description: Main default settings for update policy
Implementation:
code
bundle common update_def
{
classes:
any::
"sys_policy_hub_port_exists" expression => isvariable("sys.policy_hub_port");
vars:
"hub_binary_version" -> { "ENT-10664" }
data => data_regextract(
"^(?<major_minor_patch>\d+\.\d+\.\d+)-(?<release>\d+)",
readfile("$(sys.statedir)$(const.dirsep)hub_cf_version.txt" ) ),
if => fileexists( "$(sys.statedir)$(const.dirsep)hub_cf_version.txt" );
"current_version" -> { "ENT-10664" }
string => "$(hub_binary_version[major_minor_patch])";
"current_release"
string => "$(hub_binary_version[release])";
# MPF Controls
# Because in some versions of cfengine bundlesequence in body common
# control does not support does not support iteration over data containers
# we must first pick out the bundles into a shallow container that we can
# then get a regular list from using getvalues().
"tbse" data => mergedata( "def.control_common_update_bundlesequence_end" );
# Since we have @(def.update_bundlesequence_end) in body common control
# bundlesequence we must have a list variable defined. It can be empty, but it
# must be defined. If it is not defined the agent will error complaining
# that '@(def.bundlesequence_end) is not a defined bundle.
# As noted in CFE-2460 getvalues behaviour varies between versions. 3.7.x
# getvalues will return an empty list when run on a non existant data
# container. On 3.9.1 it does not return an empty list.
# So we initialize it as an empty list first to be safe.
"bundlesequence_end" slist => {};
"bundlesequence_end" slist => getvalues( tbse );
"augments_inputs"
slist => {},
if => not( isvariable( "def.update_inputs" ) );
"augments_inputs"
slist => { @(def.update_inputs) },
if => isvariable( "def.update_inputs" );
# Default the input name patterns, if we don't find it defined in def
# (from the augments_file).
"input_name_patterns" -> { "CFE-3425" }
slist => { ".*\.cf",".*\.dat",".*\.txt", ".*\.conf", ".*\.mustache",
".*\.sh", ".*\.pl", ".*\.py", ".*\.rb", ".*\.sed", ".*\.awk",
"cf_promises_release_id", ".*\.json", ".*\.yaml", ".*\.csv",
".*\.ps1" },
comment => "Filename patterns to match when updating the policy
(see update/update_policy.cf)",
handle => "common_def_vars_input_name_patterns_policy_default",
if => and(and(not(isvariable("override_data_acl")),
not(isvariable("input_name_patterns"))),
not(isvariable("def.input_name_patterns"))),
meta => { "defvar" };
# define based on data in def (which comes from augments file), if
# present and input_name_patterns is not yet defined.).
"input_name_patterns"
slist => { @(def.input_name_patterns) },
comment => "Filename patterns to match when updating the policy
(see update/update_policy.cf)",
handle => "common_def_vars_input_name_patterns",
if => and( isvariable("def.input_name_patterns"),
not(isvariable("input_name_patterns"))),
meta => { "defvar" };
"input_name_patterns_extra" -> { "ENT-10480" }
slist => {},
comment => "Additional filename patterns to copy during policy update.",
if => not( isvariable( "input_name_patterns_extra" ) );
# the permissions for your masterfiles files (not dirs), which will propagate to inputs
"masterfiles_perms_mode_not_dir" -> { "CFE-951" }
string => "0600",
handle => "common_def_vars_masterfiles_perms_mode_not_dir",
meta => { "defvar" };
"masterfiles_perms_mode_dirs" -> { "CFE-951" }
string => "0700",
handle => "common_def_vars_masterfiles_perms_mode_dirs",
meta => { "defvar" };
"dc_scripts" string => "$(sys.workdir)/httpd/htdocs/api/dc-scripts",
comment => "Directory where VCS scripts are located on Enterprise Hub";
"DCWORKFLOW" string => "/opt/cfengine",
comment => "Directory where VCS related data things is stored";
"local_masterfiles_git" string => "$(DCWORKFLOW)/masterfiles.git",
comment => "Local bare git repository, serves as OOTB upstream repo";
"cf_git" string => "$(sys.workdir)/bin/git",
comment => "Path to git binary installed with CFEngine Enterprise";
"cf_apache_user" string => "cfapache",
comment => "User that CFEngine Enterprise webserver runs as",
handle => "common_def_vars_cf_cfapache_user";
"cf_apache_group" string => "cfapache",
comment => "Group that CFEngine Enterprise webserver runs as",
handle => "common_def_vars_cf_cfapache_group";
# Hubs get the explicit path because they perform local copies (especially
# during bootstrap) when cf-serverd may not be available. Else we use the
# "masterfiles" shortcut.
"mpf_update_policy_master_location" -> { "ENT-3692" }
string => ifelse( "am_policy_hub", "/var/cfengine/masterfiles",
"masterfiles");
# Here we allow the masterfiles location to be overridden via augments. If
# augments overides the value, use that. Note: Since hubs do not perform
# copies to themselves over cf-serverd, this should be a fully qualified
# path or special considerations must be made for hub bootstrapping.
"mpf_update_policy_master_location" -> { "ENT-3692" }
comment => "Directory where clients should get policy from.",
string => "$(def.mpf_update_policy_master_location)",
if => isvariable( "def.mpf_update_policy_master_location" );
# enable_cfengine_enterprise_hub_ha is defined below
# Disabled by default
# If we want to use the backup repository for update (because the class is
# defined) and if the location is not already configured (via Augments),
# set a default.
"control_agent_default_repository" -> { "ENT-10481" }
string => "$(sys.workdir)/backups",
if => and( "mpf_update_control_agent_default_repository",
not( isvariable( "control_agent_default_repository" ) ) );
enable_cfengine_enterprise_hub_ha::
"standby_servers" slist => filter("$(sys.policy_hub)", "ha_def.ips", false, true, 10);
"policy_servers" slist => { "$(sys.policy_hub)", "@(standby_servers)" };
!enable_cfengine_enterprise_hub_ha::
"policy_servers" slist => {"$(sys.policy_hub)"};
any::
"control_common_ignore_missing_bundles" -> { "CFE-2773" }
string => ifelse( strcmp( $(control_common_ignore_missing_bundles), "true" ),
"true",
"false");
"control_common_ignore_missing_inputs" -> { "CFE-2773" }
string => ifelse( strcmp( $(control_common_ignore_missing_inputs), "true" ),
"true",
"false");
"control_agent_agentfacility" -> { "ENT-10209" }
string => "",
if => not( isvariable ( "default:def.control_agent_agentfacility" ));
classes:
"control_agent_agentfacility_configured" -> { "ENT-10209" }
expression => regcmp( "LOG_(USER|DAEMON|LOCAL[0-7])",
$(control_agent_agentfacility) ),
comment => concat( "If default:def.control_agent_agentfacility is a",
" valid setting, we want to use it in body agent",
" control for setting agentfacility" );
"control_common_tls_min_version_defined" -> { "ENT-10198" }
expression => isvariable( "default:def.control_common_tls_min_version"),
comment => concat( "If default:def.control_common_tls_min_version is defined then",
" it's value will be used for the minimum version in outbound",
" connections. Else the binary default will be used.");
"control_common_tls_ciphers_defined" -> { "ENT-10198" }
expression => isvariable( "default:def.control_common_tls_ciphers"),
comment => concat( "If default:def.control_common_tls_ciphers is defined then",
" it's value will be used for the set of tls ciphers allowed",
" for outbound connections. Else the binary default will be used.");
# Trigger binary upgrade from policy hub
# Disable by default
"trigger_upgrade" or => {
"!any",
};
# Update masterfiles from Git
# Enabled for enterprise users by default
# you can also request it from the command line with
# -Dcfengine_internal_masterfiles_update
# NOTE THAT ENABLING THIS BY DEFAULT *WILL* OVERWRITE THE HUB'S $(sys.workdir)/masterfiles
#"cfengine_internal_masterfiles_update" expression => "enterprise.!(cfengine_3_4|cfengine_3_5)";
"cfengine_internal_masterfiles_update" expression => "!any";
# Transfer policies and binaries with encryption
# you can also request it from the command line with
# -Dcfengine_internal_encrypt_transfers
# NOTE THAT THIS CLASS ALSO NEEDS TO BE SET IN def.cf
"cfengine_internal_encrypt_transfers" expression => "!any";
# Do not purge policies that don't exist on the server side.
# you can also request it from the command line with
# -Dcfengine_internal_purge_policies_disabled
# NOTE THAT THIS CLASS ALSO NEEDS TO BE SET IN def.cf
"cfengine_internal_purge_policies_disabled" expression => "!any";
# Preserve permissions of the policy server's masterfiles.
# you can also request it from the command line with
# -Dcfengine_internal_preserve_permissions
# NOTE THAT THIS CLASS ALSO NEEDS TO BE SET IN def.cf
"cfengine_internal_preserve_permissions" expression => "!any";
# Disable checking of cf_promises_validated before updating clients.
# Disabling checking of cf_promises_validated ensures that remote agents
# will **always** scan all of masterfiles for any changes and update
# accordingly. This is not recommended as it both removes a safety
# mechanism that checks for policy to be valid before allowing clients to
# download updates, and the increased load on the hub will affect
# scalability. Consider using time_based, select_class, or dist based classes
# instead of any to retain some of the benefits. **DISABLE WITH CAUTION**
"cfengine_internal_disable_cf_promises_validated"
expression => "!any",
comment => "When cf_promises_validated is disabled remote agents will
always scan all of masterfiles for changes. Disabling this
is not recommended as it will increase the load on the policy
server and increases the possibility for remote agents to
receive broken policy.";
# Enable CFEngine Enterprise HA Policy
"enable_cfengine_enterprise_hub_ha" expression => "!any";
#"enable_cfengine_enterprise_hub_ha" expression => "enterprise_edition";
# Enable failover to node which is outside cluster
#"failover_to_replication_node_enabled" expression => "enterprise_edition";
}
This is where the list of update related policy files to include as defined
from the augments file is included.
control
Prototype: control
Description: Include policy specific to CFEngine Enterprise
Implementation:
code
body file control
{
inputs => { @(u_cfengine_enterprise.inputs) };
}
u_cfengine_enterprise
Prototype: u_cfengine_enterprise
Description: Inputs specific to CFEngine Enterprise
Implementation:
code
bundle common u_cfengine_enterprise
{
vars:
enable_cfengine_enterprise_hub_ha::
"input[ha_update]"
string => "cfe_internal/enterprise/ha/ha_update.cf";
"input[ha_def]"
string => "cfe_internal/enterprise/ha/ha_def.cf";
"def"
slist => { "ha_def", "ha_update" };
"inputs" slist => getvalues(input);
!enable_cfengine_enterprise_hub_ha::
"inputs" slist => { };
"def" slist => { "$(this.bundle)" };
}
controls/
This directory contains policy related to the internal control and functioning
of the various CFEngine components.
Note: Many of the tuneables specified in these files have been exposed in the
def bundle for use via the augments file. It is reccomended that direct
modifications to these files be limited in order to ease policy framework
upgrades. If you are altering one of these files, please consider making a pull
request to expose the tunable.
inventory/any.cf
This policy is inventory related policy that can be run on any OS. This
inventory processes is done by populating variables and data structures with
useful information gathered from the system. In the CFEngine Enterprise Edition
these inventoried variables and classes are automatically collected into a
centralized reporting system. In the CFEngine Community Edition these variables
are availbale from within policy, and may be reporting in numerous ways.
inventory_lslpp
Prototype: inventory_lslpp(update_interval)
Description: AIX lslpp installation method for inventory purposes only
Arguments:
update_interval: how often to update the package and patch list
Implementation:
code
meta => { "inventory", "attribute_name=Policy Servers" };
{
package_changes => "individual";
package_list_update_command => "/usr/bin/true";
package_list_update_ifelapsed => $(update_interval);
package_list_command => "/usr/bin/lslpp -Lqc"; # list RPMs too
package_list_version_regex => "[^:]+:[^:]+:([^:]+):.*";
# Make sure version is not included in the name, that indicates RPM
# packages, which we should ignore.
package_list_name_regex => "[^:]+:(([^-:]|-[^0-9])+):.*";
package_installed_regex => "[^:]+:(([^-:]|-[^0-9])+):[^:]+:[^:]+:.*";
package_name_convention => "$(name)-$(version).+";
package_add_command => "/usr/bin/true";
package_update_command => "/usr/bin/true";
package_patch_command => "/usr/bin/true";
package_delete_command => "/usr/bin/true";
package_verify_command => "/usr/bin/true";
}
inventory_scoped_classes_generic
Prototype: inventory_scoped_classes_generic(scope, x)
Description: Define x prefixed/suffixed with promise outcome
See also: scope
Arguments:
scope: The scope in which the class should be definedx: The unique part of the classes to be defined
Copy of scoped_classes_generic, which see.
Implementation:
code
package_verify_command => "/usr/bin/true";
{
scope => "$(scope)";
promise_repaired => { "promise_repaired_$(x)", "$(x)_repaired", "$(x)_ok", "$(x)_reached" };
repair_failed => { "repair_failed_$(x)", "$(x)_failed", "$(x)_not_ok", "$(x)_not_kept", "$(x)_not_repaired", "$(x)_reached" };
repair_denied => { "repair_denied_$(x)", "$(x)_denied", "$(x)_not_ok", "$(x)_not_kept", "$(x)_not_repaired", "$(x)_reached" };
repair_timeout => { "repair_timeout_$(x)", "$(x)_timeout", "$(x)_not_ok", "$(x)_not_kept", "$(x)_not_repaired", "$(x)_reached" };
promise_kept => { "promise_kept_$(x)", "$(x)_kept", "$(x)_ok", "$(x)_not_repaired", "$(x)_reached" };
}
inventory_in_shell
Prototype: inventory_in_shell
Description: run command in shell
Copy of in_shell, which see.
Implementation:
code
promise_kept => { "promise_kept_$(x)", "$(x)_kept", "$(x)_ok", "$(x)_not_repaired", "$(x)_reached" };
{
useshell => "true"; # canonical "useshell" but this is backwards-compatible
}
inventory_any
Prototype: inventory_any
Description: Do inventory for any OS
This common bundle is for any OS work not handled by specific
bundles.
Implementation:
code
bundle common inventory_any
{
vars:
"release_data" string => "$(this.promise_dirname)/../cf_promises_release_id";
"data"
data => readjson( $(release_data), inf ),
if => fileexists( $(release_data) );
"id"
string => "$(data[releaseId])",
meta => { "inventory", "attribute_name=Policy Release Id" };
"policy_version" -> { "ENT-9806" }
string => "$(default:control_common.version)",
meta => { "inventory", "attribute_name=CFEngine policy version" };
reports:
"DEBUG|DEBUG_$(this.bundle)"::
"DEBUG $(this.bundle): Inventory Policy Release Id=$(id)";
}
inventory_autorun
Prototype: inventory_autorun
Description: Autorun some inventory bundles
This agent bundle runs other "autorun" inventory agent bundles
explicitly. It will use bundlesmatching() when CFEngine 3.5 and
earlier are no longer supported.
Implementation:
code
bundle agent inventory_autorun
{
methods:
!disable_inventory_LLDP::
"LLDP" usebundle => cfe_autorun_inventory_LLDP(),
handle => "cfe_internal_autorun_inventory_LLDP";
!disable_inventory_package_refresh::
"packages_refresh" usebundle => cfe_autorun_inventory_packages(),
handle => "cfe_internal_autorun_inventory_packages";
!disable_inventory_policy_servers::
"Inventory Policy Servers"
handle => "cfe_internal_autorun_inventory_policy_servers",
usebundle => cfe_autorun_inventory_policy_servers;
!disable_inventory_proc::
"proc" usebundle => cfe_autorun_inventory_proc(),
handle => "cfe_internal_autorun_inventory_proc";
"proc_cpuinfo" usebundle => cfe_autorun_inventory_proc_cpuinfo(),
handle => "cfe_internal_autorun_inventory_proc_cpuinfo";
!disable_inventory_cpuinfo::
"cpuinfo" usebundle => cfe_autorun_inventory_cpuinfo(),
handle => "cfe_internal_autorun_inventory_cpuinfo";
!disable_inventory_fstab::
"fstab" usebundle => cfe_autorun_inventory_fstab(),
handle => "cfe_internal_autorun_inventory_fstab";
!disable_inventory_mtab::
"mtab" -> { "ENT-8338" }
usebundle => cfe_autorun_inventory_mtab(),
handle => "cfe_internal_autorun_inventory_mtab",
action => default:immediate;
!disable_inventory_dmidecode::
"dmidecode" usebundle => cfe_autorun_inventory_dmidecode(),
handle => "cfe_internal_autorun_inventory_dmidecode";
!disable_inventory_aws::
"aws" usebundle => cfe_autorun_inventory_aws(),
handle => "cfe_internal_autorun_inventory_aws";
!disable_inventory_aws|disable_inventory_aws_ec2_metadata::
"aws" usebundle => cfe_autorun_inventory_aws_ec2_metadata(),
handle => "cfe_internal_autorun_inventory_ec2_metadata";
!disable_inventory_setuid::
"Inventory SetUID Files" -> { "ENT-4158" }
usebundle => cfe_autorun_inventory_setuid(),
handle => "cfe_internal_autorun_inventory_setuid";
any::
"listening ports" usebundle => cfe_autorun_inventory_listening_ports(),
handle => "cfe_internal_autorun_listening_ports";
"disk" usebundle => cfe_autorun_inventory_disk(),
handle => "cfe_internal_autorun_disk";
"memory" usebundle => cfe_autorun_inventory_memory(),
handle => "cfe_internal_autorun_memory";
"loadaverage" usebundle => cfe_autorun_inventory_loadaverage(),
handle => "cfe_internal_autorun_loadaverage";
"IP addresses" -> { "ENT-2552", "ENT-4987" }
usebundle => cfe_autorun_inventory_ip_addresses,
handle => "cfe_internal_autorun_ip_addresses";
}
cfe_autorun_inventory_listening_ports
Prototype: cfe_autorun_inventory_listening_ports
Description: Inventory the listening ports
This bundle uses mon.listening_ports and is always enabled by
default, as it runs instantly and has no side effects.
Implementation:
code
bundle agent cfe_autorun_inventory_listening_ports
{
vars:
"ports" -> { "ENT-150" }
slist => sort( "mon.listening_ports", "int"),
meta => { "inventory", "attribute_name=Ports listening" },
if => some("[0-9]+", "mon.listening_ports"),
comment => "We only want to inventory the listening ports if we have
values that make sense.";
}
cfe_autorun_inventory_ip_addresses
Prototype: cfe_autorun_inventory_ip_addresses
Description: Inventory ipv4 addresses
This will filter the ipv4 and ipv4 loopback address (127.0.0.1, ::as it is likely not very interesting)
Implementation:
code
bundle agent cfe_autorun_inventory_ip_addresses
{
vars:
"ipv4_regex" -> { "ENT-4987" }
string => "\b(?:(?:25[0-5]|2[0-4][0-9]|1[0-9][0-9]|[1-9]?[0-9])\.){3}(?:25[0-5]|2[0-4][0-9]|1[0-9][0-9]|[1-9]?[0-9])\b";
"ipv4_loopback_regex" -> { "ENT-2552" }
string => "127\.0\.0\.1",
comment => "Addresses that match this regular expression will be filtered
from the inventory for ipv4 addresses";
"ipv6_loopback_regex" -> { "ENT-4987" }
string => "::1",
comment => "Addresses that match this regular expression will be filtered
from the inventory for ipv4 addresses";
# Strings are displayed more beautifully in Mission Portal than lists, so
# we first generate the list of addresses to be inventoried and then do
# inventory using an array.
"ipv4_addresses"
slist => sort( filter( $(ipv4_regex), "sys.ip_addresses", "true", "false", inf), lex ),
if => not( isvariable( $(this.promiser) ));
"ipv4_addresses_non_loopback" -> { "ENT-2552" }
slist => sort( filter( $(ipv4_loopback_regex), "$(this.bundle).ipv4_addresses", "true", "true", inf)),
if => not( isvariable( $(this.promiser) ));
"ipv4[$(ipv4_addresses_non_loopback)]" -> { "ENT-2552" }
string => "$(ipv4_addresses_non_loopback)",
meta => { "inventory", "attribute_name=IPv4 addresses" };
# sys.ip_addresses contains ipv4 and (as of 3.15.0) ipv6 addresses. We get
# the ipv6 addresses indirectly, based on excluding the ipv4 addresses
# (which we identify using a regular expression)
"ipv6_addresses" -> { "ENT-4987" }
slist => sort( difference( "sys.ip_addresses", "$(this.bundle).ipv4_addresses" ), lex),
if => not( isvariable( $(this.promiser) ));
"ipv4_addresses_non_loopback" -> { "ENT-4987" }
slist => sort( filter( $(ipv6_loopback_regex), "$(this.bundle).ipv4_addresses", "true", "true", inf)),
if => not( isvariable( $(this.promiser) ));
"ipv6[$(ipv6_addresses_non_loopback)]" -> { "ENT-4987" }
string => "$(ipv6_addresses_non_loopback)",
meta => { "inventory", "attribute_name=IPv6 addresses" };
reports:
DEBUG|DEBUG_cfe_autorun_inventory_ipv4_addresses::
"DEBUG $(this.bundle)";
"$(const.t)Inventorying: '$(ipv4_addresses)'";
"$(const.t)Inventorying: '$(ipv6_addresses)'";
}
cfe_autorun_inventory_disk
Prototype: cfe_autorun_inventory_disk
Description: Inventory the disk (Enterprise only)
Implementation:
code
bundle agent cfe_autorun_inventory_disk
{
vars:
enterprise::
"free" -> { "ENT-5190" }
string => "$(mon.value_diskfree)",
meta => { "inventory", "attribute_name=Disk free (%)" },
if => isvariable( "mon.value_diskfree" );
}
cfe_autorun_inventory_memory
Prototype: cfe_autorun_inventory_memory
Description: Inventory the memory (Enterprise only)
Implementation:
code
bundle agent cfe_autorun_inventory_memory
{
vars:
@if minimum_version(3.11)
# The `with` attribute is necessary for this to work in a single promise.
enterprise_edition.windows::
# wmic returns "TotalVisibleMemorySize=10760224" so split on = and take
# the second item (0-based with nth())
"total" -> { "ENT-4188" }
meta => { "inventory", "attribute_name=Memory size (MB)" },
string => format( "%d", eval("$(with)/1024", "math", "infix" )),
if => not( isvariable( "total" ) ),
with => nth( string_split( execresult("wmic OS get TotalVisibleMemorySize /format:list", useshell ),
"=", 2), 1);
"totalPhysical" -> { "CFE-2896" }
meta => { "inventory", "attribute_name=Physical memory (MB)" },
string => format( "%d", eval("$(with)/1024", "math", "infix" )),
if => not( isvariable( "total" ) ),
with => nth( string_split( execresult("wmic ComputerSystem get TotalPhysicalMemory /format:list", useshell ),
"=", 2), 1);
# This is a volatile metric, perhaps not well suited for inventory
"free"
meta => { "report" },
string => format( "%d", eval("$(with)/1024", "math", "infix" )),
if => not( isvariable( "free" ) ),
with => nth( string_split( execresult("wmic OS get FreePhysicalMemory /format:list", useshell ),
"=", 2), 1);
@endif
enterprise_edition.aix::
"total" -> { "CFE-2797", "CFE-2803" }
string => execresult("/usr/bin/lparstat -i | awk '/Online Memory/ { print $4 }'", "useshell"),
meta => { "inventory", "attribute_name=Memory size (MB)" };
enterprise_edition.hpux::
"total" -> { "ENT-4188" }
string => execresult( "machinfo | awk '/^Memory =/ {print $3}'", useshell ),
meta => { "inventory", "attribute_name=Memory size (MB)" };
enterprise_edition.!(aix|windows|hpux)::
"total" string => "$(mon.value_mem_total)",
meta => { "inventory", "attribute_name=Memory size (MB)" },
if => isvariable( "mon.value_mem_total" );
"free" string => "$(mon.value_mem_free)",
if => and( not( isvariable( "free" ) ),
isvariable( "mon.value_mem_free" )),
meta => { "report" };
}
cfe_autorun_inventory_setuid
Prototype: cfe_autorun_inventory_setuid
Description: Inventory setuid files and prune invalid entries from the setuid log
Implementation:
code
bundle agent cfe_autorun_inventory_setuid
{
vars:
!disable_inventory_setuid::
"candidates" slist => lsdir( "$(sys.workdir)", "cfagent\..*\.log", true );
"_reg_setuid_filestat_modeoct" string => "10(4|5|6|7)\d+";
"_reg_setgid_filestat_modeoct" string => "10(2|3|6|7)\d+";
"setuid_log_path"
comment => "We select the file that matches the downcased version of the
hostname since sys.fqhost always returns lower case",
string => "$(candidates)",
if => strcmp( "$(sys.workdir)/cfagent.$(sys.fqhost).log",
string_downcase($(candidates)));
"files" slist => readstringlist( $(setuid_log_path), "", "$(const.n)", inf, inf);
"setuid[$(files)]"
string => "$(files)",
meta => { "inventory", "attribute_name=Setuid files" },
if => regcmp( $(_reg_setuid_filestat_modeoct), filestat( $(files), modeoct ) );
"rootsetuid[$(files)]"
string => "$(files)",
meta => { "inventory", "attribute_name=Root owned setuid files" },
if => and( regcmp( $(_reg_setuid_filestat_modeoct), filestat( $(files), modeoct ) ),
regcmp( "0", filestat( $(files), uid ) ));
"setgid[$(files)]" -> { "ENT-6793" }
string => "$(files)",
meta => { "inventory", "attribute_name=Setgid files" },
if => regcmp( $(_reg_setuid_filestat_modeoct), filestat( $(files), modeoct ) );
"rootsetgid[$(files)]" -> { "ENT-6793" }
string => "$(files)",
meta => { "inventory", "attribute_name=Root owned setgid files" },
if => and( regcmp( $(_reg_setuid_filestat_modeoct), filestat( $(files), modeoct ) ),
regcmp( "0", filestat( $(files), gid ) ));
files:
!disable_inventory_setuid::
"$(setuid_log_path)"
comment => concat( "If the logged file is not currently setuid|setgid then we can",
"safely purge it from the list to avoid unnecessary work."),
edit_line => delete_lines_matching( escape( $(files) ) ),
if => not( regcmp( "($(_reg_setuid_filestat_modeoct))|($(_reg_setgid_filestat_modeoct))",
filestat( $(files), modeoct ) ) );
reports:
!disable_inventory_setuid.(DEBUG|DEBUG_cfe_autorun_inventory_setuid)::
"$(setuid_log_path) present"
if => fileexists( $(setuid_log_path) );
@if minimum_version(3.11)
"Previously logged (setuid|setgid) file: $(files) modeoct=$(with)"
with => filestat( $(files), modeoct );
"Should remove '$(files)' from '$(setuid_log_path)' because `filestat ($(files), modeoct )` returns '$(with)' which does not match '($(_reg_setuid_filestat_modeoct))|($(_reg_setgid_filestat_modeoct))' (setgid|setuid)"
comment => concat( "If the logged file is not currently set(uid&|gid) then we can",
"safely purge it from the list to avoid unnecessary work."),
with => filestat( $(files), modeoct ),
if => not( regcmp( "($(_reg_setuid_filestat_modeoct))|($(_reg_setgid_filestat_modeoct))",
filestat( $(files), modeoct ) ) );
# The `with` attribute was introduced in 3.11
"Inventory: setuid Files: $(files) modeoct=$(with)"
with => filestat( $(files), modeoct ),
if => regcmp( $(_reg_setuid_filestat_modeoct), filestat( $(files), modeoct ) );
"Inventory: root owned setuid Files: $(files) modeoct=$(with)"
with => filestat( $(files), modeoct ),
if => and( regcmp( $(_reg_setuid_filestat_modeoct), filestat( $(files), modeoct ) ),
regcmp( "0", filestat( $(files), uid ) ));
@endif
}
cfe_autorun_inventory_timezone
Prototype: cfe_autorun_inventory_timezone
Description: Inventory timezone and GMT offset
Implementation:
code
bundle agent cfe_autorun_inventory_timezone
{
vars:
"_now" int => now();
"timezone" -> { "ENT-6161" }
string => strftime( localtime, "%Z", $(_now) ),
meta => { "inventory", "attribute_name=Timezone" };
"gmt_offset" -> { "ENT-6161" }
string => strftime( localtime, "%z", $(_now) ),
meta => { "inventory", "attribute_name=Timezone GMT Offset" };
}
cfe_autorun_inventory_loadaverage
Prototype: cfe_autorun_inventory_loadaverage
Description: Inventory the loadaverage (Enterprise only)
Implementation:
code
bundle agent cfe_autorun_inventory_loadaverage
{
vars:
enterprise::
"value" -> { "ENT-5190" }
string => "$(mon.value_loadavg)",
meta => { "report" },
if => isvariable( "mon.value_loadavg" );
}
cfe_autorun_inventory_proc
Prototype: cfe_autorun_inventory_proc
Description: Do procfs inventory
This bundle will parse these /proc files: consoles, cpuinfo,
meminfo, modules, partitions, version, vmstat. There are
some general patterns you can follow to extend it for other /proc
items of interest.
Contributions welcome. /proc/net and /proc/sys in general are of
wide interest, if you're looking for something fun. For instance,
the network interfaces could be extracted here without calling
ifconfig.
Implementation:
code
bundle agent cfe_autorun_inventory_proc
{
vars:
# To override this set of base files, define default:cfe_autorun_inventory_proc.basefiles via augments.
# {
# "variables": {
# "default:cfe_autorun_inventory_proc.basefiles" : {
# "value": [ "consoles", "cpuinfo", "version" ],
# "comment": "We do not need the extra variables this produces since we get the info differently",
# "tags": [ "inventory", "attribute_name=My Inventory" ]
# }
# }
# }
"basefiles" -> { "CFE-4056" }
slist => { "consoles", "cpuinfo", "modules", "partitions", "version" },
unless => isvariable( "$(this.namespace):$(this.bundle).basefiles" );
"files[$(basefiles)]" string => "$(inventory_control.proc)/$(basefiles)";
_have_proc_consoles::
"console_count" int => readstringarrayidx("consoles",
"$(files[consoles])",
"\s*#[^\n]*",
"\s+",
500,
50000);
"console_idx" slist => getindices("consoles");
_have_proc_modules::
"module_count" int => readstringarrayidx("modules",
"$(files[modules])",
"\s*#[^\n]*",
"\s+",
2500,
250000);
"module_idx" slist => getindices("modules");
_have_proc_cpuinfo::
# this will extract all the keys in one bunch, so you won't get
# detailed info for processor 0 for example
"cpuinfo_count" int => readstringarrayidx("cpuinfo_array",
"$(files[cpuinfo])",
"\s*#[^\n]*",
"\s*:\s*",
500,
50000);
"cpuinfo_idx" slist => getindices("cpuinfo_array");
"cpuinfo[$(cpuinfo_array[$(cpuinfo_idx)][0])]" string => "$(cpuinfo_array[$(cpuinfo_idx)][1])";
"cpuinfo_keys" slist => getindices("cpuinfo");
_have_proc_partitions::
"partitions_count" int => readstringarrayidx("partitions_array",
"$(files[partitions])",
"major[^\n]*",
"\s+",
500,
50000);
"partitions_idx" slist => getindices("partitions_array");
"partitions[$(partitions_array[$(partitions_idx)][4])]" string => "$(partitions_array[$(partitions_idx)][3])";
"partitions_keys" slist => getindices("partitions");
_have_proc_version::
"version" string => readfile("$(files[version])", 2048);
classes:
"have_proc" expression => isdir($(inventory_control.proc));
have_proc::
"_have_proc_$(basefiles)"
expression => fileexists("$(files[$(basefiles)])");
_have_proc_consoles::
"have_console_$(consoles[$(console_idx)][0])"
expression => "any",
scope => "namespace";
_have_proc_modules::
"have_module_$(modules[$(module_idx)][0])"
expression => "any",
scope => "namespace";
reports:
_have_proc_consoles.verbose_mode::
"$(this.bundle): we have console $(consoles[$(console_idx)][0])";
_have_proc_modules.verbose_mode::
"$(this.bundle): we have module $(modules[$(module_idx)][0])";
_have_proc_cpuinfo.verbose_mode::
"$(this.bundle): we have cpuinfo $(cpuinfo_keys) = $(cpuinfo[$(cpuinfo_keys)])";
_have_proc_partitions.verbose_mode::
"$(this.bundle): we have partitions $(partitions_keys) with $(partitions[$(partitions_keys)]) blocks";
_have_proc_version.verbose_mode::
"$(this.bundle): we have kernel version '$(version)'";
}
cfe_autorun_inventory_proc_cpuinfo
Prototype: cfe_autorun_inventory_proc_cpuinfo
Description: Inventory cpu information from proc
Implementation:
code
bundle agent cfe_autorun_inventory_proc_cpuinfo
{
classes:
"_have_cpuinfo" expression => isvariable("default:cfe_autorun_inventory_proc.cpuinfo_idx");
# So that we don't inventory non dereferenced variables we check to see
# if we have the info first This is only necessary because its currently
# invalid to do isvariable on an array key that contains a space
# Ref: redmine#7088 https://dev.cfengine.com/issues/7088
"have_cpuinfo_cpu_cores" expression => strcmp("cpu cores", "$(default:cfe_autorun_inventory_proc.cpuinfo_array[$(default:cfe_autorun_inventory_proc.cpuinfo_idx)][0])");
"have_cpuinfo_model_name" expression => strcmp("model name", "$(default:cfe_autorun_inventory_proc.cpuinfo_array[$(default:cfe_autorun_inventory_proc.cpuinfo_idx)][0])");
"have_cpuinfo_hardware" expression => strcmp("Hardware", "$(default:cfe_autorun_inventory_proc.cpuinfo_array[$(default:cfe_autorun_inventory_proc.cpuinfo_idx)][0])");
"have_cpuinfo_revision" expression => strcmp("Revision", "$(default:cfe_autorun_inventory_proc.cpuinfo_array[$(default:cfe_autorun_inventory_proc.cpuinfo_idx)][0])");
vars:
_have_cpuinfo::
"cpuinfo_physical_cores"
string => "$(default:cfe_autorun_inventory_proc.cpuinfo[cpu cores])",
if => "have_cpuinfo_cpu_cores";
"cpuinfo_cpu_model_name"
string => "$(default:cfe_autorun_inventory_proc.cpuinfo[model name])",
if => "have_cpuinfo_model_name";
"cpuinfo_hardware"
string => "$(default:cfe_autorun_inventory_proc.cpuinfo[Hardware])",
if => "have_cpuinfo_hardware";
"cpuinfo_revision"
string => "$(default:cfe_autorun_inventory_proc.cpuinfo[Revision])",
if => "have_cpuinfo_revision";
# We need to be able to count the number of unique physical id lines in
# /proc/cpu in order to get a physical processor count.
"cpuinfo_lines" slist => readstringlist(
"$(default:cfe_autorun_inventory_proc.files[cpuinfo])",
"\s*#[^\n]*",
"\n",
500,
50000);
"cpuinfo_processor_lines"
slist => grep("processor\s+:\s\d+", "cpuinfo_lines"),
comment => "The number of processor entries in $(default:cfe_autorun_inventory_proc.files[cpuinfo]). If no
'physical id' entries are found this is the processor count";
"cpuinfo_processor_lines_count"
int => length("cpuinfo_processor_lines");
"cpuinfo_physical_id_lines"
slist => grep("physical id.*", "cpuinfo_lines"),
comment => "This identifies which physical socket a logical core is on,
the count of the unique physical id lines tells you how
many physical sockets you have. THis would not be present
on systems that are not multicore.";
"cpuinfo_physical_id_lines_unique"
slist => unique("cpuinfo_physical_id_lines");
"cpuinfo_physical_id_lines_unique_count"
int => length("cpuinfo_physical_id_lines_unique");
# If we have physical id lines in cpu info use that for socket inventory,
# else we should use the number of processor lines. physical id lines
# seem to only be present when multiple cores are active.
"cpuinfo_physical_socket_inventory"
string => ifelse(isgreaterthan( length("cpuinfo_physical_id_lines"), 0 ), "$(cpuinfo_physical_id_lines_unique_count)",
"$(cpuinfo_processor_lines_count)"),
meta => { "inventory", "attribute_name=CPU sockets" };
reports:
DEBUG|DEBUG_cfe_autorun_inventory_proc::
"DEBUG $(this.bundle)";
"$(const.t)cpuinfo[$(default:cfe_autorun_inventory_proc.cpuinfo_array[$(default:cfe_autorun_inventory_proc.cpuinfo_idx)][0])] = $(default:cfe_autorun_inventory_proc.cpuinfo[$(default:cfe_autorun_inventory_proc.cpuinfo_array[$(default:cfe_autorun_inventory_proc.cpuinfo_idx)][0])])";
"$(const.t)CPU physical cores: '$(cpuinfo_physical_cores)'"
if => "have_cpuinfo_cpu_cores";
"$(const.t)CPU model name: '$(cpuinfo_cpu_model_name)'"
if => "have_cpuinfo_model_name";
"$(const.t)CPU Physical Sockets: '$(cpuinfo_physical_socket_inventory)'";
}
cfe_autorun_inventory_cpuinfo
Prototype: cfe_autorun_inventory_cpuinfo
Description: Inventory cpu information
Implementation:
code
bundle agent cfe_autorun_inventory_cpuinfo
{
classes:
"_have_proc_cpu_model_name" expression => isvariable("default:cfe_autorun_inventory_proc_cpuinfo.cpuinfo_cpu_model_name");
"_have_proc_hardware" expression => isvariable("default:cfe_autorun_inventory_proc_cpuinfo.cpuinfo_hardware");
"_have_proc_revision" expression => isvariable("default:cfe_autorun_inventory_proc_cpuinfo.cpuinfo_revision");
"_have_proc_cpu_physical_cores" expression => isvariable("default:cfe_autorun_inventory_proc_cpuinfo.cpuinfo_physical_cores");
# We only accept dmidecode values that don't look like cfengine variables,
# (starting with dollar), or that have an apparent empty value.
"_have_dmidecode_cpu_model_name"
not => regcmp("($(const.dollar)\(.*\)|^$)", "$(default:cfe_autorun_inventory_dmidecode.dmi[processor-version])");
vars:
_have_proc_cpu_physical_cores::
"cpuinfo_physical_cores"
string => "$(default:cfe_autorun_inventory_proc.cpuinfo[cpu cores])",
#if => "have_cpuinfo_cpu_cores",
meta => { "inventory", "attribute_name=CPU physical cores", "derived-from=$(default:cfe_autorun_inventory_proc.files[cpuinfo])" };
_have_proc_cpu_model_name::
"cpu_model"
string => "$(default:cfe_autorun_inventory_proc_cpuinfo.cpuinfo_cpu_model_name)",
meta => { "inventory", "attribute_name=CPU model", "derived-from=$(default:cfe_autorun_inventory_proc.files[cpuinfo])" };
_have_proc_hardware::
"cpu_model"
string => "$(default:cfe_autorun_inventory_proc_cpuinfo.cpuinfo_hardware)",
meta => { "inventory", "attribute_name=CPU model", "derived-from=$(default:cfe_autorun_inventory_proc.files[cpuinfo])" };
_have_proc_revision::
"system_product_name"
string => "$(default:cfe_autorun_inventory_proc_cpuinfo.cpuinfo_revision)",
meta => { "inventory", "attribute_name=System product name", "derived-from=$(default:cfe_autorun_inventory_proc.files[cpuinfo])" };
_have_dmidecode_cpu_model_name.!_have_proc_cpu_model_name::
"cpu_model"
string => "$(default:cfe_autorun_inventory_dmidecode.dmi[processor-version])",
meta => { "inventory", "attribute_name=CPU model", "derived-from=$(inventory_control.dmidecoder) -s processor-version" };
reports:
DEBUG|DEBUG_cfe_autorun_inventory_cpuinfo::
"DEBUG $(this.bundle)";
"$(const.t) CPU model: $(cpu_model)";
"$(const.t) CPU physical cores: $(cpuinfo_physical_cores)";
}
cfe_autorun_inventory_aws
Prototype: cfe_autorun_inventory_aws
Description: inventory AWS EC2 instances
Provides:
ec2_instance class based on Amazon markers in dmidecode's system-uuid, bios-version or bios-vendor
Implementation:
code
bundle common cfe_autorun_inventory_aws
{
classes:
!disable_inventory_aws::
"ec2_instance" -> { "CFE-2924" }
comment => "See http://docs.aws.amazon.com/AWSEC2/latest/UserGuide/identify_ec2_instances.html",
scope => "namespace",
expression => regcmp("^[eE][cC]2.*", "$(cfe_autorun_inventory_dmidecode.dmi[system-uuid])"),
if => isvariable("cfe_autorun_inventory_dmidecode.dmi[system-uuid]");
"ec2_instance" -> { "CFE-2924" }
expression => regcmp(".*[aA]mazon.*", "$(cfe_autorun_inventory_dmidecode.dmi[bios-version])"),
scope => "namespace",
if => isvariable("cfe_autorun_inventory_dmidecode.dmi[bios-version]");
"ec2_instance" -> { "CFE-2924" }
expression => regcmp(".*[aA]mazon.*", "$(cfe_autorun_inventory_dmidecode.dmi[bios-vendor])"),
scope => "namespace",
if => isvariable("cfe_autorun_inventory_dmidecode.dmi[bios-vendor]");
@if minimum_version(3.22.0)
"sys_hypervisor_uuid_readable" -> { "ENT-9931" }
expression => isreadable("/sys/hypervisor/uuid", 1);
@else
"sys_hypervisor_uuid_readable" -> { "ENT-9931" }
expression => returnszero("${paths.cat} /sys/hypervisor/uuid >/dev/null 2>&1", "useshell");
@endif
!disable_inventory_aws.sys_hypervisor_uuid_readable::
"ec2_instance" -> { "CFE-2924" }
expression => regline( "^ec2.*", "/sys/hypervisor/uuid" ),
scope => "namespace",
if => fileexists("/sys/hypervisor/uuid");
reports:
(DEBUG|DEBUG_inventory_aws)::
"DEBUG $(this.bundle)";
"$(const.t)+ec2_instance"
if => "ec2_instance";
}
Prototype: cfe_autorun_inventory_aws_ec2_metadata
Description: Inventory ec2 metadata
Provides:
Implementation:
code
if => "ec2_instance";
{
methods:
!(disable_inventory_aws|disable_inventory_aws_ec2_metadata)::
"cfe_autorun_inventory_aws_ec2_metadata_data";
"cfe_autorun_inventory_aws_ec2_metadata_cache";
"cfe_aws_ec2_metadata_from_cache";
}
Prototype: cfe_autorun_inventory_aws_ec2_metadata_data
Description: Retrieve metadata from AWS API, preferring IMDSV2
Implementation:
code
"cfe_aws_ec2_metadata_from_cache";
{
vars:
ec2_instance.!(disable_inventory_aws|disable_inventory_aws_ec2_metadata)::
"base_url" string => "http://169.254.169.254/latest";
"imdsv2_token_cmd" string => '$(paths.curl) -s -X PUT "$(base_url)/api/token" -H "X-aws-ec2-metadata-token-ttl-seconds: 21600"';
# Store the token for imdsv2 query, and it's result just once.
"imdsv2_token"
string => execresult("$(imdsv2_token_cmd)", noshell, stdout),
if => not( isvariable( imdsv2_token ) );
"imdsv2_cmd" string => '$(paths.curl) -s -H "X-aws-ec2-metadata-token: $(imdsv2_token)" $(base_url)/dynamic/instance-identity/document';
"imdsv2_cmd_result"
string => execresult( "$(imdsv2_cmd)", noshell ),
if => not( isvariable( imdsv2_cmd_result ) );
# Store the result of the imdsv1 query, just once (if it's not alredy been defined) only if imdsv2 result is not valid
"imdsv1_cmd" string => "$(paths.curl) -s $(base_url)/dynamic/instance-identity/document";
"imdsv1_cmd_result"
string => execresult( "$(imdsv1_cmd)", noshell ),
if => and( not( isvariable( imdsv1_cmd_result ) ),
not( validjson( "$(imdsv2_cmd_result)" ) ) );
}
Prototype: cfe_autorun_inventory_aws_ec2_metadata_cache
Description: Cache ec2 metadata from http request
Provides cache of ec2 instance metadata for inventory
Implementation:
code
not( validjson( "$(imdsv2_cmd_result)" ) ) );
{
vars:
"cache" string => "$(sys.statedir)/aws_ec2_metadata";
classes:
"imdsv1_result_valid" expression => validjson( "$(cfe_autorun_inventory_aws_ec2_metadata_data.imdsv1_cmd_result)" );
"imdsv2_result_valid" expression => validjson( "$(cfe_autorun_inventory_aws_ec2_metadata_data.imdsv2_cmd_result)" );
files:
imdsv1_result_valid.!imdsv2_result_valid::
"$(cache)"
content => "$(cfe_autorun_inventory_aws_ec2_metadata_data.imdsv1_cmd_result)";
imdsv2_result_valid::
"$(cache)"
content => "$(cfe_autorun_inventory_aws_ec2_metadata_data.imdsv2_cmd_result)";
}
Prototype: cfe_aws_ec2_metadata_from_cache
Description: Inventory ec2 metadata from cache
Provides inventory for EC2 Region, EC2 Instance ID, EC2 Instance Type, EC2
Image ID, and EC2 Availability Zone
Implementation:
code
content => "$(cfe_autorun_inventory_aws_ec2_metadata_data.imdsv2_cmd_result)";
{
classes:
ec2_instance.!(disable_inventory_aws|disable_inventory_aws_ec2_metadata)::
"have_cached_instance_identity"
expression => fileexists( $(cfe_autorun_inventory_aws_ec2_metadata_cache.cache) );
vars:
have_cached_instance_identity.ec2_instance.!(disable_inventory_aws|disable_inventory_aws_ec2_metadata)::
"data" data => readjson( $(cfe_autorun_inventory_aws_ec2_metadata_cache.cache), 100K);
"region" string => "$(data[region])", meta => { "inventory", "attribute_name=EC2 Region" };
"instanceId" string => "$(data[instanceId])", meta => { "inventory", "attribute_name=EC2 Instance ID" };
"instanceType" string => "$(data[instanceType])", meta => { "inventory", "attribute_name=EC2 Instance Type" };
"imageId" string => "$(data[imageId])", meta => { "inventory", "attribute_name=EC2 Image ID" };
"availabilityZone" string => "$(data[availabilityZone])", meta => { "inventory", "attribute_name=EC2 Availability Zone" };
reports:
DEBUG|DEBUG_inventory_ec2_metadata|DEBUG_inventory_ec2_metadata_from_cache::
"DEBUG $(this.bundle):";
"$(const.t)Inventory 'EC2 Region' = '$(region)'";
"$(const.t)Inventory 'EC2 Instance ID' = '$(instanceId)'";
"$(const.t)Inventory 'EC2 Instance Type' = '$(instanceType)'";
"$(const.t)Inventory 'EC2 Image ID' = '$(imageId)'";
"$(const.t)Inventory 'EC2 Availability Zone' = '$(availabilityZone)'";
}
cfe_autorun_inventory_mtab
Prototype: cfe_autorun_inventory_mtab
Description: Do mtab inventory
Implementation:
code
"$(const.t)Inventory 'EC2 Availability Zone' = '$(availabilityZone)'";
{
vars:
have_mtab::
"mounts"
meta => { "noreport" },
data => data_readstringarrayidx( $(inventory_control.mtab),
"\s*#[^\n]*",
"\s+",
inf,
inf);
"mount_count"
int => length( mounts );
"idx" slist => getindices("mounts");
"inventory_mount_point[$(idx)]" -> { "ENT-8338" }
string => "$(mounts[$(idx)][1])",
meta => { "inventory", "attribute_name=Mount point" };
"inventory_mounted_fs[$(idx)]"
string => "$(mounts[$(idx)][2])",
meta => { "noreport" };
"slist_unique_fs_types"
slist => unique( sort( getvalues( inventory_mounted_fs ), lex ) );
"inventory_fs[$(slist_unique_fs_types)]" -> { "ENT-8338" }
string => "$(slist_unique_fs_types)",
meta => { "inventory", "attribute_name=File system" };
classes:
"have_mtab" expression => fileexists($(inventory_control.mtab));
# define classes like have_mount_ext4__var for a ext4 /var mount
"have_mount_$(mounts[$(idx)][2])_$(mounts[$(idx)][1])"
expression => "any",
scope => "namespace";
# define classes like have_mount_ext4 if there is a ext4 mount
"have_mount_$(mounts[$(idx)][2])"
expression => "any",
scope => "namespace";
reports:
verbose_mode::
"$(this.bundle): we have a $(mounts[$(idx)][2]) mount under $(mounts[$(idx)][1])";
}
cfe_autorun_inventory_fstab
Prototype: cfe_autorun_inventory_fstab
Description: Do fstab inventory
The fstab format is simple: each line looks like this format:
/dev/sda1 / auto noatime 0 1 (in order: DEV MOUNTPOINT FSTYPE
OPTIONS DUMP-FREQ PASS). Note the FSTYPE is not known from the
fstab.
Solaris has 'MOUNTDEV FSCKDEV MOUNTPOINT FSTYPE PASS MOUNT-AD-BOOT
OPTIONS' but is not supported here. Contributions welcome.
Implementation:
code
"$(this.bundle): we have a $(mounts[$(idx)][2]) mount under $(mounts[$(idx)][1])";
{
vars:
have_fstab::
"mount_count" int => readstringarrayidx("mounts",
$(sys.fstab),
"\s*#[^\n]*",
"\s+",
500,
50000);
"idx" slist => getindices("mounts");
classes:
"have_fstab" expression => fileexists($(sys.fstab));
# define classes like have_fs_ext4__var for a ext4 /var entry
"have_fs_$(mounts[$(idx)][2])_$(mounts[$(idx)][1])"
expression => "any",
scope => "namespace";
# define classes like have__var for a /var entry
"have_fs_$(mounts[$(idx)][1])"
expression => "any",
scope => "namespace";
# define classes like have_fs_ext4 if there is a ext4 entry
"have_fs_$(mounts[$(idx)][2])"
expression => "any",
scope => "namespace";
reports:
verbose_mode::
"$(this.bundle): we have a $(mounts[$(idx)][2]) fstab entry under $(mounts[$(idx)][1])";
}
cfe_autorun_inventory_dmidecode
Prototype: cfe_autorun_inventory_dmidecode
Description: Do hardware related inventory
This agent bundle reads dmi information from the sysfs and/or from dmidecode.
Sysfs is preferred for most variables, but if no sysfs (e.g. on RHEL 5),
or no sysfs equivalent to a dmidecode variable (e.g. system-version),
then dmidecode is run to collect the info.
For system-uuid, a parsed version of dmidecode is the preferred source.
The variable names dmi[...] are all based on dmidecode string keywords.
Information collected is:
- BIOS vendor
- BIOS version
- System serial number
- System manufacturer
- System version
- System product name
- Physical memory (MB)
On windows where powershell is available this bundle runs gwmi to inventory:
- BIOS vendor
- BIOS version
- System serial number
- System manufacturer
Implementation:
code
"$(this.bundle): we have a $(mounts[$(idx)][2]) fstab entry under $(mounts[$(idx)][1])";
{
vars:
any::
"sysfs_name_for"
comment => "The names in /sys/devices/virtual/dmi/id/ don't match
the strings to be passed to dmidecode, even though the
values do. We use the dmidecode string names for our
variables since that was the original source (i.e. for
backward compatibility with policies based on prior
versions of this code).",
# system-version has no equivalent in sysfs that I can find.
# Items after the line break aren't currently collected, but mapping is provided
# in case someone adds them to a custom dmidefs (so that they could be gotten
# from sysfs in that case).
data => parsejson('
{
"bios-vendor": "bios_vendor",
"bios-version": "bios_version",
"system-serial-number": "product_serial",
"system-manufacturer": "sys_vendor",
"system-product-name": "product_name",
"system-uuid": "product_uuid",
"baseboard-manufacturer": "board_vendor",
"baseboard-product-name": "board_name",
"baseboard-serial-number": "board_serial",
"baseboard-version": "board_version",
"bios-release-date": "bios_date",
"chassis-manufacturer": "chassis_vendor",
}');
vars:
any::
# The dmidefs variable controls which values are collected
# (and what are their inventory tags)
"dmidefs" data => parsejson('
{
"bios-vendor": "BIOS vendor",
"bios-version": "BIOS version",
"system-serial-number": "System serial number",
"system-manufacturer": "System manufacturer",
"system-version": "System version",
"system-product-name": "System product name",
"system-uuid": "System UUID",
}');
# We override dmidefs from augments when we can.
"dmidefs" -> { "CFE-2927" }
data => mergedata( "def.cfe_autorun_inventory_dmidecode[dmidefs]" ),
if => isvariable( "def.cfe_autorun_inventory_dmidecode[dmidefs]");
# other dmidecode variables you may want:
# baseboard-asset-tag
# baseboard-manufacturer
# baseboard-product-name
# baseboard-serial-number
# baseboard-version
# bios-release-date
# chassis-asset-tag
# chassis-manufacturer
# chassis-serial-number
# chassis-type
# chassis-version
# processor-family
# processor-frequency
# processor-manufacturer
#"processor-version": "CPU model" <- Collected by default, but not by iterating over the list
"dmivars" slist => getindices(dmidefs);
have_dmidecode::
"decoder" string => "$(inventory_control.dmidecoder)";
have_dmidecode._stdlib_path_exists_awk.!(redhat_4|redhat_3)::
# Awk script from https://kb.vmware.com/s/article/53609
# Edited only to add "-t1" (an improvement tested on RHEL 4/5/6/7 and FreeBSD)
# and to take out the "UUID: " prefix in the output.
# This works on a superset of systems where dmidecode -s system-uuid works,
# e.g. RHEL 5 with dmidecode-2.7-1.28.2.el5 where system-uuid is not one of the valid keywords;
# also, this returns the correct UUID on systems (such as VMWare VMs with hardware version 13)
# where dmidecode -s system-uuid shows the wrong UUID. Some such VMWare VMs also show the
# wrong UUID in sysfs, which is why we prefer the "dmidecode | awk" version to sysfs for UUID.
# (We still need to check sysfs for UUID to handle hosts without dmidecode such as CoreOS.)
"dmi[system-uuid]"
string => execresult(
"$(decoder) -u -t1 |
$(paths.awk) '
BEGIN { in1 = 0; hd = 0}
/, DMI type / { in1 = 0 }
/Strings:/ { hd = 0 }
{ if (hd == 2) { printf \"%s-%s\n\", $1 $2, $3 $4 $5 $6 $7 $8; hd = 0 } }
{ if (hd == 1) { printf \"%s-%s-%s-\", $9 $10 $11 $12, $13 $14, $15 $16; hd = 2 } }
/, DMI type 1,/ { in1 = 1 }
/Header and Data:/ { if (in1 != 0) { hd = 1 } }
'",
"useshell" ),
if => isvariable("dmidefs[system-uuid]"), # Only run this if system-uuid is marked for collection in dmidefs
meta => { "inventory", "attribute_name=$(dmidefs[system-uuid])" };
!disable_inventory_dmidecode.!windows::
# The reason disable_inventory_dmidecode is referenced here but not in the other context lines
# is because those vars depend on have_dmidecode which won't be set during pre-eval (and won't
# be set at all if this bundle isn't called). Without this guard here, we would attempt to
# read sysfs even if dmi inventory were turned off on the host via disable_inventory_dmidecode,
# which would be undesirable.
"dmi[$(dmivars)]"
unless => isvariable("dmi[$(dmivars)]"), # This is just for system-uuid really, which we get from the awk script above by preference.
if => fileexists("/sys/devices/virtual/dmi/id/$(sysfs_name_for[$(dmivars)])"),
string => readfile("/sys/devices/virtual/dmi/id/$(sysfs_name_for[$(dmivars)])", 0),
meta => { "inventory", "attribute_name=$(dmidefs[$(dmivars)])" };
# Redhat 4 can support the -s option to dmidecode if
# kernel-utils-2.4-15.el4 or greater is installed.
have_dmidecode.!(redhat_4|redhat_3).!have_proc_device_tree::
"dmi[$(dmivars)]" string => execresult("$(decoder) -s $(dmivars)",
"useshell"),
unless => isvariable("dmi[$(dmivars)]"), # If already defined from sysfs, don't run dmidecode
meta => { "inventory", "attribute_name=$(dmidefs[$(dmivars)])" };
# We do not want to inventory the model name from here, as inventory for
# CPU info has been abstracted away from DMI so we just collect it
# manually.
"dmi[processor-version]" string => execresult("$(decoder) -s processor-version",
"useshell");
windows.powershell::
"dmi[bios-vendor]" string => $(bios_array[1]),
meta => { "inventory", "attribute_name=BIOS vendor" };
"dmi[system-serial-number]" string => $(bios_array[2]),
meta => { "inventory", "attribute_name=System serial number" };
"dmi[bios-version]" string => $(bios_array[3]),
meta => { "inventory", "attribute_name=BIOS version" };
"dmi[system-version]" string => $(bios_array[4]),
meta => { "inventory", "attribute_name=System version" };
"dmi[processor-version]" string => $(processor_array[1]);
"split_pscomputername"
slist => string_split($(system_array[1]), "PSComputerName\s.*", 2),
comment => "Work around weird appearance of PSComputerName into System manufacturer";
"dmi[system-manufacturer]" string => nth(split_pscomputername, 0),
meta => { "inventory", "attribute_name=System manufacturer" };
classes:
"have_dmidecode" expression => fileexists($(inventory_control.dmidecoder));
windows.powershell::
"bios_match" expression => regextract(".*Manufacturer\s+:\s([a-zA-Z0-9 ]+)\n.*SerialNumber\W+([a-zA-Z0-9 ]+).*SMBIOSBIOSVersion\W+([a-zA-Z0-9 ]+).*Version\W+([a-zA-Z0-9 -]+)",
execresult("gwmi -query 'SELECT SMBIOSBIOSVersion, Manufacturer, SerialNumber, Version FROM WIN32_BIOS'", "powershell"),
"bios_array");
"processor_match" expression => regextract(".*Name\W+(.*)",
execresult("gwmi -query 'SELECT Name FROM WIN32_PROCESSOR'", "powershell"),
"processor_array");
"system_match" expression => regextract(".*Manufacturer\W+(.*)",
execresult("gwmi -query 'SELECT Manufacturer FROM WIN32_COMPUTERSYSTEM'", "powershell"),
"system_array");
# BEGIN Inventory Total Physical Memory MB
vars:
"total_physical_memory_MB" -> { "CFE-2896" }
string => readfile( "$(sys.statedir)/inventory-$(this.bundle)-total-physical-memory-MB.txt", 100),
meta => { "inventory", "attribute_name=Physical memory (MB)" },
if => fileexists( "$(sys.statedir)/inventory-$(this.bundle)-total-physical-memory-MB.txt" );
commands:
have_dmidecode::
"$(decoder) -t 17 | $(paths.awk) '/^\tSize:.*MB/ {a+=$2} /^\tSize:.*GB/ {b+=$2*1024} END {print a+b}' > '$(sys.statedir)/inventory-$(this.bundle)-total-physical-memory-MB.txt'" -> { "CFE-2896", "ENT-7714" }
contain => in_shell,
if => not( fileexists( "$(sys.statedir)/inventory-$(this.bundle)-total-physical-memory-MB.txt") );
files:
"$(sys.statedir)/inventory-$(this.bundle)-total-physical-memory-MB.txt" -> { "CFE-2896" }
delete => tidy,
file_select => older_than(0, 0, 1, 0, 0, 0),
comment => "Clear the cached value for total physical memory MB once a day.";
# END Inventory Total Physical Memory MB
reports:
DEBUG|DEBUG_cfe_autorun_inventory_dmidecode::
"DEBUG $(this.bundle): Obtained $(dmidefs[$(dmivars)]) = '$(dmi[$(dmivars)])'";
"DEBUG $(this.bundle): Obtained Physical memory (MB) = '$(total_physical_memory_MB)'";
}
cfe_autorun_inventory_LLDP
Prototype: cfe_autorun_inventory_LLDP
Description: Do LLDP-based inventory
This agent bundle runs lldpctl to discover information. See
http://vincentbernat.github.io/lldpd/ to run this yourself for
testing, and your Friendly Network Admin may be of help too.
Implementation:
code
"DEBUG $(this.bundle): Obtained Physical memory (MB) = '$(total_physical_memory_MB)'";
{
classes:
"lldpctl_exec_exists" expression => fileexists($(inventory_control.lldpctl_exec));
vars:
!disable_inventory_LLDP.lldpctl_exec_exists::
# TODO When CFE-3108 is DONE, migrate to capturing only stdout
"info" -> { "CFE-3109", "CFE-3108" }
data => parsejson(execresult("$(inventory_control.lldpctl_json) 2>/dev/null", "useshell")),
if => not(isvariable("def.lldpctl_json")),
comment => "Not all versions of lldpctl support json, and because an
absent lldpd will result in an error on stderr resulting noisy logs and
failure to parse the json we redirect to dev null";
"info" -> { "CFE-3109" }
data => parsejson(execresult($(inventory_control.lldpctl_json), "noshell")),
if => isvariable("def.lldpctl_json"),
comment => "For safety, we do not run lldpctl in a shell if the path to
lldpctl is customized via augments";
}
cfe_autorun_inventory_packages
Prototype: cfe_autorun_inventory_packages
Description: Package inventory auto-refresh
This bundle is for refreshing the package inventory. It runs on
startup, unless disabled. Other package methods can be added below.
Implementation:
code
lldpctl is customized via augments";
{
classes:
"have_patches" or => { "community_edition", # not in Community
fileexists("$(sys.workdir)/state/software_patches_avail.csv") };
"have_inventory" and => { "have_patches",
fileexists("$(sys.workdir)/state/software_packages.csv"),
};
"use_package_module_for_inventory" or => { "redhat", "debian", "suse", "sles", "alpinelinux", "windows" };
"use_package_method_for_inventory" or => { "gentoo", "aix" };
"use_package_method_generic_for_inventory"
not => "use_package_module_for_inventory|use_package_method_for_inventory";
vars:
# if we have the patches, 7 days; otherwise keep trying
"refresh" string => ifelse("have_inventory", "10080",
"0");
packages:
# The legacy implementation (package_method) of the packages type promise
# requires a packages promise to be triggered in order to generate package
# inventory. The following promises ensure that package inventory data
# exists. As package modules become available the package_methods should be
# removed.
aix::
"cfe_internal_non_existing_package"
package_policy => "add",
package_method => inventory_lslpp($(refresh)),
action => if_elapsed_day;
gentoo::
"cfe_internal_non_existing_package"
package_policy => "add",
package_method => emerge,
action => if_elapsed_day;
use_package_method_generic_for_inventory::
"cfe_internal_non_existing_package"
package_policy => "add",
package_method => generic,
action => if_elapsed_day;
reports:
DEBUG|DEBUG_cfe_autorun_inventory_packages::
"DEBUG $(this.bundle): refresh interval is $(refresh)";
"DEBUG $(this.bundle): we have the inventory files."
if => "have_inventory";
"DEBUG $(this.bundle): we don't have the inventory files."
if => "!have_inventory";
}
cfe_autorun_inventory_policy_servers
Prototype: cfe_autorun_inventory_policy_servers
Description: Inventory policy servers
Implementation:
code
if => "!have_inventory";
{
vars:
!disable_inventory_policy_servers::
"_primary_policy_server" -> { "ENT-6212" }
string => "$(sys.policy_hub)",
meta => { "inventory", "attribute_name=Primary Policy Server" };
"_policy_servers" -> { "ENT-6212" }
slist => { @(def.policy_servers) },
if => isgreaterthan( length( "def.policy_servers"), 0),
meta => { "inventory", "attribute_name=Policy Servers" };
}
inventory/debian.cf
This policy is inventory related to debian hosts.
inventory_debian
Prototype: inventory_debian
Description: Debian inventory
This common bundle is for Debian inventory work.
Implementation:
code
bundle common inventory_debian
{
vars:
has_lsb_release::
"lsb_release_info" string => readfile("/etc/lsb-release","256"),
comment => "Read more OS info" ;
has_etc_linuxmint_info::
"linuxmint_info" string => readfile("/etc/linuxmint/info","1024"),
comment => "Read Linux Mint specific info" ;
"lm_info_count"
int => parsestringarray("mint_info", # array to populate
"$(linuxmint_info)", # data to parse
"\s*#[^\n]*", # comments
"=", # split
100, # maxentries
2048) ; # maxbytes
"mint_release" string => "$(mint_info[RELEASE][1])" ;
"mint_codename" string => "$(mint_info[CODENAME][1])" ;
classes:
any::
"debian_derived_evaluated"
scope => "bundle",
or => { isvariable("sys.os_release"), "has_lsb_release", "has_etc_linuxmint_info" } ;
"linuxmint"
expression => "has_etc_linuxmint_info",
comment => "this is a Linux Mint system, of some sort",
meta => { "inventory", "attribute_name=none" } ;
has_lsb_release::
"linuxmint"
expression => regcmp("(?ms).*^DISTRIB_ID=LinuxMint$.*", "$(lsb_release_info)"),
comment => "this is a Linux Mint system, of some sort",
meta => { "inventory", "attribute_name=none" } ;
linuxmint::
"lmde"
expression => regcmp('.*LMDE.*', "$(sys.os_release[NAME])"),
comment => "this is a Linux Mint Debian Edition",
meta => { "inventory", "attribute_name=none", "derived-from=sys.os_release[NAME]" } ;
linuxmint.has_lsb_release::
"lmde"
expression => regcmp('(?ms).*^DISTRIB_DESCRIPTION="LMDE.*', "$(lsb_release_info)"),
comment => "this is a Linux Mint Debian Edition",
meta => { "inventory", "attribute_name=none", "derived-from=inventory_debian.lsb_release_info" } ;
has_etc_linuxmint_info::
"lmde"
expression => regcmp('(?ms).*^DESCRIPTION="LMDE.*',"$(linuxmint_info)"),
comment => "this is a Linux Mint Debian Edition",
meta => { "inventory", "attribute_name=none", "derived-from=inventory_debian.linuxmint_info" } ;
debian_derived_evaluated.has_etc_linuxmint_info.!lmde::
# These need to be evaluated only after debian_derived_evaluated is defined
# to ensure that the mint_info array has been evaluated as well.
# Failing to do that will create meaningless classes
# On non-LMDE Mint systems, this will create classes like, e.g.:
# linuxmint_14, nadia, linuxmint_nadia
"linuxmint_$(mint_release)" expression => "any",
meta => { "inventory", "attribute_name=none" } ;
"$(mint_codename)" expression => "any",
meta => { "inventory", "attribute_name=none" } ;
"linuxmint_$(mint_codename)" expression => "any",
meta => { "inventory", "attribute_name=none" } ;
debian_derived_evaluated::
"debian_pure" expression => "debian.!(ubuntu|linuxmint)",
comment => "pure Debian",
meta => { "inventory", "attribute_name=none" };
"debian_derived" expression => "debian.!debian_pure",
comment => "derived from Debian",
meta => { "inventory", "attribute_name=none" };
any::
"has_lsb_release" expression => fileexists("/etc/lsb-release"),
comment => "Check if we can get more info from /etc/lsb-release";
"has_etc_linuxmint_info" expression => fileexists("/etc/linuxmint/info"),
comment => "If this is a Linux Mint system, this *could* be available";
}
inventory/freebsd.cf
This policy is inventory related to freebsd hosts.
inventory_freebsd
Prototype: inventory_freebsd
Description: FreeBSD inventory bundle
This common bundle is for FreeBSD inventory work.
Implementation:
code
bundle common inventory_freebsd
{
}
inventory/generic.cf
This policy is inventory related to generic hosts.
inventory_generic
Prototype: inventory_generic
Description: Generic (unknown OS) inventory
This common bundle is for unknown operating systems, not handled by
specific bundles.
Implementation:
code
bundle common inventory_generic
{
}
inventory/linux.cf
This policy is inventory related to linux hosts.
inventory_linux
Prototype: inventory_linux
Description: Linux inventory
This common bundle is for Linux inventory work.
Provides:
systemd class based on linktarget of /proc/1/cmdline
Implementation:
code
bundle common inventory_linux
{
vars:
have_proc_device_tree::
"_model_path" string => "/proc/device-tree/model";
"proc_device_tree_model" string => readfile("$(_model_path)"),
if => fileexists("$(_model_path)"),
comment => "Read model from $(_model_path) because it's not available from DMI",
meta => { "inventory", "attribute_name=System version" };
"_serial_number_path" string => "/proc/device-tree/serial-number";
"proc_device_tree_serial_number" string => readfile("$(_serial_number_path)"),
if => fileexists("$(_serial_number_path)"),
comment => "Read serial number from $(_serial_number_path) because it's not available from DMI",
meta => { "inventory", "attribute_name=System serial number" };
has_proc_1_cmdline::
"proc_1_cmdline_split" slist => string_split(readfile("/proc/1/cmdline", "512"), " ", "2"),
comment => "Read /proc/1/cmdline and split off arguments";
"proc_1_cmdline" string => nth("proc_1_cmdline_split", 0),
comment => "Get argv[0] of /proc/1/cmdline";
# this is the same as the original file for non-links
"proc_1_process" string => filestat($(proc_1_cmdline), "linktarget");
any::
"proc_routes" data => data_readstringarrayidx("/proc/net/route",
"#[^\n]*","\s+",40,4k),
if => fileexists("/proc/net/route");
"routeidx" slist => getindices("proc_routes");
"dgw_ipv4_iface" string => "$(proc_routes[$(routeidx)][0])",
comment => "Name of the interface where default gateway is routed",
if => strcmp("$(proc_routes[$(routeidx)][1])", "00000000");
linux::
"nfs_servers" -> { "CFE-3259" }
comment => "NFS servers (to list hosts impacted by NFS outages)",
slist => maplist( regex_replace( $(this) , ":.*", "", "g"),
# NFS server is before the colon (:), that's all we want
# e.g., nfs.example.com:/vol/homedir/user1 /home/user1 ...
# ^^^^^^^^^^^^^^^
grep( ".* nfs .*",
readstringlist("/proc/mounts", "", "\n", inf, inf)
)
),
if => fileexists( "/proc/mounts" );
"nfs_server[$(nfs_servers)]"
string => "$(nfs_servers)",
meta => { "inventory", "attribute_name=NFS Server" };
classes:
any::
"has_proc_1_cmdline" expression => fileexists("/proc/1/cmdline"),
comment => "Check if we can read /proc/1/cmdline";
"inventory_have_python_symlink" expression => fileexists("$(sys.bindir)/cfengine-selected-python");
has_proc_1_cmdline::
"systemd" expression => strcmp(lastnode($(proc_1_process), "/"), "systemd"),
comment => "Check if (the link target of) /proc/1/cmdline is systemd";
inventory_have_python_symlink::
"cfe_python_for_package_modules_supported" -> { "CFE-2602", "CFE-3512", "ENT-10248" }
comment => concat( "Here we see if the version of python found is",
" acceptable ( 3.x or 2.4 or greater ) for package",
" modules. We use this guard to prevent errors",
" related to missing python modules."),
expression => returnszero("$(sys.bindir)/cfengine-selected-python -V 2>&1 | grep ^Python | cut -d' ' -f 2 | ( IFS=. read v1 v2 v3 ; [ $v1 -ge 3 ] || [ $v1 -eq 2 -a $v2 -ge 4 ] )",
useshell);
}
measure_entropy_available
Prototype: measure_entropy_available
Description: Measure amount of entropy available
Implementation:
code
bundle monitor measure_entropy_available
{
measurements:
linux::
# A lack of entropy can cause agents to hang
"/proc/sys/kernel/random/entropy_avail" -> { "ENT-6495", "ENT-6494" }
if => fileexists( "/proc/sys/kernel/random/entropy_avail" ),
handle => "entropy_avail",
stream_type => "file",
data_type => "int",
units => "bits",
history_type => "weekly",
match_value => single_value("\d+"),
comment => "Amount of entropy available";
}
inventory/lsb.cf
This policy is inventory related to lsb hosts.
inventory_lsb
Prototype: inventory_lsb
Description: LSB inventory bundle
This common bundle is for LSB inventory work.
Implementation:
code
bundle agent inventory_lsb
{
classes:
"have_lsb" expression => fileexists($(lsb_exec));
"_inventory_lsb_found" expression => regcmp("^[1-9][0-9]*$", $(dim)),
scope => "namespace";
_inventory_lsb_found::
"lsb_$(os)" expression => "any",
comment => "LSB Distributor ID",
depends_on => { "inventory_lsb_os" },
scope => "namespace",
meta => { "inventory", "attribute_name=none" };
"lsb_$(os)_$(release)" expression => "any",
comment => "LSB Distributor ID and Release",
depends_on => { "inventory_lsb_os", "inventory_lsb_release" },
scope => "namespace",
meta => { "inventory", "attribute_name=none" };
"lsb_$(os)_$(codename)" expression => "any",
comment => "LSB Distributor ID and Codename",
depends_on => { "inventory_lsb_os", "inventory_lsb_codename" },
scope => "namespace",
meta => { "inventory", "attribute_name=none" };
vars:
"lsb_exec" string => "$(inventory_control.lsb_exec)";
have_lsb::
"data" string => execresult("$(lsb_exec) -a", "noshell");
"dim" int => parsestringarray(
"lsb",
$(data),
"\s*#[^\n]*",
"\s*:\s+",
"15",
"4095"
);
_inventory_lsb_found::
"lsb_keys" slist => getindices("lsb");
"os" string => canonify("$(lsb[Distributor ID][1])"),
handle => "inventory_lsb_os",
comment => "LSB-provided OS name",
meta => { "inventory", "attribute_name=none" };
"codename" string => canonify("$(lsb[Codename][1])"),
handle => "inventory_lsb_codename",
comment => "LSB-provided OS code name",
meta => { "inventory", "attribute_name=none" };
"release" string => "$(lsb[Release][1])",
handle => "inventory_lsb_release",
comment => "LSB-provided OS release",
meta => { "inventory", "attribute_name=none" };
"flavor" string => canonify("$(lsb[Distributor ID][1])_$(lsb[Release][1])"),
handle => "inventory_lsb_flavor",
comment => "LSB-provided OS flavor",
meta => { "inventory", "attribute_name=none" };
"description" string => "$(lsb[Description][1])",
handle => "inventory_lsb_description",
comment => "LSB-provided OS description",
meta => { "inventory", "attribute_name=none" };
reports:
(DEBUG|DEBUG_inventory_lsb)._inventory_lsb_found::
"DEBUG $(this.bundle): OS = $(os), codename = $(codename), release = $(release), flavor = $(flavor), description = $(description)";
"DEBUG $(this.bundle): got $(dim) LSB keys";
"DEBUG $(this.bundle): prepared LSB key $(lsb_keys) = '$(lsb[$(lsb_keys)][1])'";
(DEBUG|DEBUG_inventory_lsb).!_inventory_lsb_found::
"DEBUG $(this.bundle): LSB inventory not found";
}
inventory/macos.cf
This policy is inventory related to macos hosts.
inventory_macos
Prototype: inventory_macos
Description: Mac OS X inventory bundle
This common bundle is for Mac OS X inventory work.
Implementation:
code
bundle common inventory_macos
{
}
inventory/os.cf
This policy is inventory related to os hosts.
inventory_os
Prototype: inventory_os
Implementation:
code
bundle common inventory_os
{
vars:
# NOTE TODO: This first part is the old implementation
# scroll down to the @if minimum_version part for the
# current implementation.
# This bundle uses variable overwriting, so the definitions further
# down are prioritized.
# Fall back to old LSB based implementation (Lowest priority):
_inventory_lsb_found::
"description" string => "$(inventory_lsb.os) $(inventory_lsb.release)",
meta => { "inventory", "attribute_name=OS" };
!_inventory_lsb_found.windows::
"description" string => "$(sys.release)",
meta => { "inventory", "attribute_name=OS" };
!_inventory_lsb_found.!windows::
"description" string => "$(sys.flavor) (LSB missing)",
meta => { "inventory", "attribute_name=OS" };
# Hard coded values for exceptions / platforms without os-release:
(redhat_5|redhat_6).redhat_pure::
"description" string => regex_replace("$(inventory_lsb.description)", " release ", " ", "g"),
if => isvariable("inventory_lsb.description"),
meta => { "inventory", "attribute_name=OS", "derived-from=inventory_lsb.description" };
centos_5::
"description" string => "CentOS Linux 5", # Matches format of os-release on 7+
meta => { "inventory", "attribute_name=OS", "derived-from=centos_5" };
centos_6::
"description" string => "CentOS Linux 6", # Matches format of os-release on 7+
meta => { "inventory", "attribute_name=OS", "derived-from=centos_6" };
# os-release PRETTY_NAME preferred whenever available (Highest priority):
any::
"description" string => "$(sys.os_release[PRETTY_NAME])",
if => isvariable("sys.os_release[PRETTY_NAME]"),
meta => { "inventory", "attribute_name=OS", "derived-from=sys.os_release" };
# TODO: Remove promises above this line once 3.15+ is what we care about
# New style for Inventory OS variable:
# As short and human-friendly as possible, and consistent across platforms(!)
# Examples: CentOS 7, Ubuntu 18, Debian 9, SUSE 12, etc.
@if minimum_version(3.15)
!_inventory_lsb_found.!windows::
"description" string => "$(sys.flavor) (LSB missing)",
meta => { "inventory", "attribute_name=OS" };
_inventory_lsb_found::
"description" string => "$(inventory_lsb.os) $(inventory_lsb.release)",
meta => { "inventory", "attribute_name=OS" };
windows::
"description" string => string_replace(string_replace(
"$(sys.release)",
"Windows Server", "Windows"),
"2012 R2", "2012"),
meta => { "inventory", "attribute_name=OS" };
# os-release is preferred over LSB:
any::
# os-release PRETTY_NAME
"description" string => string_replace(string_replace(string_replace(string_replace(
"$(sys.os_release[PRETTY_NAME])",
"Red Hat Enterprise Linux Server", "RHEL"),
"Debian GNU/Linux", "Debian"),
"CentOS Linux", "CentOS"),
"Rocky Linux", "Rocky"),
if => isvariable("sys.os_release[PRETTY_NAME]"),
meta => { "inventory", "attribute_name=OS", "derived-from=sys.os_release" };
"major_version_from_os_release" string => nth(string_split("$(sys.os_release[VERSION_ID])", "\.", 2), 0),
if => isvariable("sys.os_release[VERSION_ID]");
# os-release NAME VERSION_ID - preferred when available
"description" string => string_replace(string_replace(string_replace(string_replace(string_replace(string_replace(
"$(sys.os_release[NAME]) $(major_version_from_os_release)",
"Red Hat Enterprise Linux Server", "RHEL"), # Seen on RHEL 7...
"Red Hat Enterprise Linux", "RHEL"), # On RHEL 8 they changed their mind
"Debian GNU/Linux", "Debian"),
"CentOS Linux", "CentOS"),
"Rocky Linux", "Rocky"),
"SLES", "SUSE"),
if => and(isvariable("sys.os_release[NAME]"),
isvariable("major_version_from_os_release")),
meta => { "inventory", "attribute_name=OS", "derived-from=sys.os_release" };
# Hard coded values for exceptions / platforms without os-release:
redhat_5.redhat_pure::
"description" string => "RHEL 5",
meta => { "inventory", "attribute_name=OS", "derived-from=redhat_5" };
redhat_6.redhat_pure::
"description" string => "RHEL 6",
meta => { "inventory", "attribute_name=OS", "derived-from=redhat_6" };
centos_5::
"description" string => "CentOS 5",
meta => { "inventory", "attribute_name=OS", "derived-from=centos_5" };
centos_6::
"description" string => "CentOS 6",
meta => { "inventory", "attribute_name=OS", "derived-from=centos_6" };
@endif
# TODO: Remove all of the logic above once 3.18 clients are expected everywhere
@if minimum_version(3.18)
any::
"description"
string => "$(sys.os_name_human) $(sys.os_version_major)",
meta => { "inventory", "attribute_name=OS" };
rocky::
"description" -> { "ENT-8292" }
string => "Rocky $(sys.os_version_major)",
meta => { "inventory", "attribute_name=OS" };
amzn_2::
"description" -> { "ENT-10817" }
string => "Amazon 2",
meta => { "inventory", "attribute_name=OS" };
any::
"description"
string => "$(sys.os_release[PRETTY_NAME])",
if => and(
strcmp("$(sys.os_name_human)", "Unknown"),
isvariable("sys.os_release[PRETTY_NAME]")
),
meta => { "inventory", "attribute_name=OS", "derived-from=sys.os_release" };
@endif
}
inventory/redhat.cf
This policy is inventory related to redhat hosts.
inventory_redhat
Prototype: inventory_redhat
Description: Red Hat inventory bundle
This common bundle is for Red Hat Linux inventory work.
Implementation:
code
bundle common inventory_redhat
{
classes:
"redhat_pure" or => { strcmp( "$(sys.os_release[ID])" , "rhel" ), # Red Hat > 7 have /etc/os-release and the ID field is set to rhel
strcmp( "any", and( "redhat.!(centos|oracle|fedora|rocky|almalinux)", # Red Hat < 7 does not have /etc/os-release, and is pure if we don't find another known derivative
not( isvariable( "sys.os_release" ))))},
comment => "pure Red Hat",
meta => { "inventory", "attribute_name=none" };
"redhat_derived" expression => "redhat.!redhat_pure",
comment => "derived from Red Hat",
meta => { "inventory", "attribute_name=none" };
"inventory_redhat_have_python_symlink" expression => fileexists("$(sys.bindir)/cfengine-selected-python");
}
inventory/suse.cf
This policy is inventory related to suse hosts.
inventory_suse
Prototype: inventory_suse
Description: SUSE inventory bundle
This common bundle is for SUSE Linux inventory work.
Implementation:
code
bundle common inventory_suse
{
classes:
"suse_pure" expression => "(sles|sled).!opensuse",
comment => "pure SUSE",
meta => { "inventory", "attribute_name=none" };
"suse_derived" expression => "opensuse.!suse_pure",
comment => "derived from SUSE",
meta => { "inventory", "attribute_name=none" };
}
inventory/windows.cf
This policy is inventory related to windows hosts.
inventory_windows
Prototype: inventory_windows
Description: Windows inventory bundle
This common bundle is for Windows inventory work.
Implementation:
code
bundle common inventory_windows
{
}
inventory/
The CFEngine 3 inventory modules are pieces of CFEngine policy that are loaded
and used by promises.cf in order to inventory the system.
CFEngine Enterprise has specific functionality to show and use inventory data,
but users of the Community Version can use them as well locally on each host.
How It Works
The inventory modules are called in promises.cf:
code
body common control
{
bundlesequence => {
# Common bundle first (Best Practice)
inventory_control,
@(inventory.bundles),
...
As you see, this calls the inventory_control bundle, and then each
bundle in the list inventory.bundles. That list is built in the
top-level common inventory bundle, which will load the right things
for some common cases. The any.cf inventory module is always loaded;
the rest are loaded if they are appropriate for the platform. For
instance, Debian systems will load debian.cf and linux.cf and
lsb.cf but may load others as needed.
The effect for users is that the right inventory modules will be
loaded and evaluated.
The inventory_control bundle lives in def.cf and defines what
inventory modules should be disabled. You can simply set
disable_inventory to avoid the whole system, or you can look for the
disable_inventory_xyz class to disable module xyz.
Any inventory module works the same way, by doing some discovery work
and then tagging its classes and variables with the report or
inventory tags. For example:
code
vars:
"ports" slist => { @(mon.listening_ports) },
meta => { "inventory", "attribute_name=Ports listening" };
This defines a reported attribute "Ports listening" which contains a
list of strings representing the listening ports. More on this in a
second.
Your Very Own Inventory Module
The good news is, writing an inventory module is incredibly easy.
They are just CFEngine bundles. You can see a simple one that collects
the listening ports in any.cf:
code
bundle agent cfe_autorun_inventory_listening_ports
# @brief Inventory the listening ports
#
# This bundle uses `mon.listening_ports` and is always enabled by
# default, as it runs instantly and has no side effects.
{
vars:
"ports" slist => { @(mon.listening_ports) },
meta => { "inventory", "attribute_name=Ports listening" };
}
Well, the slist copy is a CFEngine detail (we get the listening ports from the
monitoring daemon), so just assume that the data is correct. What's important is
the second line that starts with meta.
That defines metadata for the promise that CFEngine will use to determine that
this data is indeed inventory data and should be reported to the CFEngine
Enterprise Hub.
That's it. Really. The comments are optional but nice to have. You don't have to
put your new bundle in a file under the inventory directory, either. The
variables and classes can be declared anywhere as long as they have the right
tags. So you can use the services directory or whatever else makes sense to
you.
In CFEngine Enterprise, the reported data is aggregated in the hub and
reported across the whole host population.
In CFEngine Community, users can use the classesmatching() and
variablesmatching() functions to collect all the inventory variables
and classes and report them in other ways.
Implementation Best Practice for CFEngine Enterprise
It is important that inventory variables and classes are continually
defined. Only inventory variables and classes defined during the last
reported run are available for use by the inventory reporting interface.
Inventory items that change frequently can create a burden on the
Enterprise reporting infrastructure. Generally, inventory attributes
should change infrequently.
If you wish to inventory attributes that frequently change or are expensive to
discover consider implementing a sample interval and caching mechanism.
What Modules Are Available?
As soon as you use the promises.cf provided in the parent directory,
quite a few inventory modules will be enabled (if appropriate for your
system). Here's the list of modules and what they provide. Note they
are all enabled by code in def.cf as explained above.
Package Inventory
- lives in:
any.cf
- applies to: All systems
- runs: package modules in order to report on packages installed and patches
available
- disable: define the class
disable_inventory_package_refresh. Note this
also disables the default package inventory used by the new packages promise
implementation. This will cause the packagesmatching() and
packageupdatesmatching() functions to rely on data supplied by the
legacy package promise implementation.
LSB
- lives in:
lsb.cf
- applies to: LSB systems (most Linux distributions, basically)
- runs:
lsb_release -a
- sample data:
code
Distributor ID: Ubuntu
Description: Ubuntu 14.04 LTS
Release: 14.04
Codename: trusty
provides:
- classes
lsb_$(os), lsb_$(os)_$(release), lsb_$(os)_$(codename)
- variables:
inventory_lsb.os (Distributor ID), inventory_lsb.codename, inventory_lsb.release, inventory_lsb.flavor, inventory_lsb.description
sample output:
code
% cf-agent -KI -binventory_control,inventory_lsb
R: inventory_lsb: OS = Ubuntu, codename = trusty, release = 14.04, flavor = Ubuntu_14_04, description = Ubuntu 14.04 LTS
SUSE
- lives in:
suse.cf
- applies to: SUSE Linux
- provides classes:
suse_pure and suse_derived
Debian
- lives in:
debian.cf
- applies to: Debian and its derivatives
- provides:
- variables:
inventory_debian.mint_release and inventory_debian.mint_codename
- classes:
debian_pure, debian_derived, linuxmint, lmde, linuxmint_$(mint_release), linuxmint_$(mint_codename), $(mint_codename)
Red Hat
- lives in:
redhat.cf
- applies to: Red Hat and its derivatives
- provides classes:
redhat_pure, redhat_derived
Windows
Mac OS X
Generic (unknown OS)
- lives in:
generic.cf (see any.cf for generally applicable inventory modules)
LLDP
- lives in:
any.cf
- runs
inventory_control.lldpctl_exec through a Perl filter
- provides variables:
cfe_autorun_inventory_LLDP.K for each K returned by the LLDB executable
mtab
code
% cf-agent -Kv -binventory_control,cfe_autorun_inventory_mtab|grep 'cfe_autorun_inventory_mtab: we have'
R: cfe_autorun_inventory_mtab: we have a ext4 mount under /
...
R: cfe_autorun_inventory_mtab: we have a cgroup mount under /sys/fs/cgroup/systemd
R: cfe_autorun_inventory_mtab: we have a tmpfs mount under /run/shm
fstab
code
% cf-agent -Kv -binventory_control,cfe_autorun_inventory_fstab|grep 'cfe_autorun_inventory_fstab: we have'
R: cfe_autorun_inventory_fstab: we have a ext4 fstab entry under /
R: cfe_autorun_inventory_fstab: we have a cifs fstab entry under /backups/load
R: cfe_autorun_inventory_fstab: we have a auto fstab entry under /mnt/cdrom
DMI decoding
code
% sudo /var/cfengine/bin/cf-agent -KI -binventory_control,cfe_autorun_inventory_dmidecode
R: cfe_autorun_inventory_dmidecode: Obtained BIOS vendor = 'Intel Corp.'
R: cfe_autorun_inventory_dmidecode: Obtained BIOS version = 'BLH6710H.86A.0146.2013.1555.1888'
R: cfe_autorun_inventory_dmidecode: Obtained System serial number = ''
R: cfe_autorun_inventory_dmidecode: Obtained System manufacturer = ''
R: cfe_autorun_inventory_dmidecode: Obtained System version = ''
R: cfe_autorun_inventory_dmidecode: Obtained CPU model = 'Intel(R) Core(TM) i7-2600 CPU @ 3.40GHz'
Listening ports
- lives in:
any.cf
- provides variables:
cfe_autorun_inventory_listening_ports.ports as a copy of mon.listening_ports
Disk space
- lives in:
any.cf
- provides variables:
cfe_autorun_inventory_disk.free as a copy of mon.value_diskfree
Available memory
- lives in:
any.cf
- provides variables:
cfe_autorun_inventory_memory.free as a copy of mon.value_mem_free and cfe_autorun_inventory_memory.total as a copy of mon.value_mem_total
Load average
- lives in:
any.cf
- provides variables:
cfe_autorun_inventory_loadaverage.value as a copy of mon.value_loadavg
procfs
- lives in:
any.cf
- parses:
consoles, cpuinfo, modules, partitions, version
- provides variables:
cfe_autorun_inventory_proc.console_count, cfe_autorun_inventory_proc.cpuinfo[K] for each CPU info key, cfe_autorun_inventory_proc.paritions[K] for each partition key
provides classes: _have_console_CONSOLENAME, have_module_MODULENAME
sample output (note this is verbose mode with -v because there's a LOT of output):
code
% cf-agent -Kv -binventory_control,cfe_autorun_inventory_proc|grep 'cfe_autorun_inventory_proc: we have'
R: cfe_autorun_inventory_proc: we have console tty0
R: cfe_autorun_inventory_proc: we have module snd_seq_midi
...
R: cfe_autorun_inventory_proc: we have module ghash_clmulni_intel
R: cfe_autorun_inventory_proc: we have cpuinfo flags = fpu vme de pse tsc msr pae mce cx8 apic sep mtrr pge mca cmov pat pse36 clflush dts acpi mmx fxsr sse sse2 ss ht tm pbe syscall nx rdtscp lm constant_tsc arch_perfmon pebs bts rep_good nopl xtopology nonstop_tsc aperfmperf eagerfpu pni pclmulqdq dtes64 monitor ds_cpl vmx smx est tm2 ssse3 cx16 xtpr pdcm pcid sse4_1 sse4_2 x2apic popcnt tsc_deadline_timer aes xsave avx lahf_lm ida arat epb xsaveopt pln pts dtherm tpr_shadow vnmi flexpriority ept vpid
...
R: cfe_autorun_inventory_proc: we have cpuinfo model name = Intel(R) Core(TM) i7-2600 CPU @ 3.40GHz
R: cfe_autorun_inventory_proc: we have partitions sr0 with 1048575 blocks
...
R: cfe_autorun_inventory_proc: we have partitions sda with 468851544 blocks
R: cfe_autorun_inventory_proc: we have kernel version 'Linux version 3.11.0-15-generic (buildd@roseapple) (gcc version 4.8.1 (Ubuntu/Linaro 4.8.1-10ubuntu8) ) #25-Ubuntu SMP Thu Jan 30 17:22:01 UTC 2014'
lib/autorun.cf
control
Prototype: control
Implementation:
code
body file control
{
services_autorun|services_autorun_inputs::
inputs => { @(services_autorun.found_inputs) };
}
autorun
Prototype: autorun
Implementation:
code
bundle agent autorun
{
vars:
services_autorun|services_autorun_bundles::
"sorted_bundles"
slist => sort( bundlesmatching(".*", "autorun"), "lex"),
comment => "Lexicographically sorted bundles for predictable order";
methods:
services_autorun|services_autorun_bundles::
"autorun" -> { "CFE-3795" }
usebundle => $(sorted_bundles),
action => immediate;
reports:
DEBUG|DEBUG_autorun|DEBUG_services_autorun::
"DEBUG $(this.bundle): found bundle $(sorted_bundles) with tag 'autorun'";
}
lib/bundles.cf
control
Prototype: control
Description: Include policy files used by this policy file as part of inputs
Implementation:
code
body file control
{
inputs => { @(bundles_common.inputs) };
}
bundles_common
Prototype: bundles_common
Description: Enumerate policy files used by this policy file for inclusion to inputs
Implementation:
code
bundle common bundles_common
{
vars:
"inputs" slist => { "$(this.promise_dirname)/paths.cf",
"$(this.promise_dirname)/files.cf",
"$(this.promise_dirname)/commands.cf" };
}
cronjob
Prototype: cronjob(commands, user, hours, mins)
Description: Defines a cron job for user
Adds a line to crontab, if necessary.
Arguments:
commands: The commands that should be runuser: The owner of crontabhours: The hours at which the job should runmins: The minutes at which the job should run
Example:
code
methods:
"cron" usebundle => cronjob("/bin/ls","mark","*","5,10");
Implementation:
code
bundle agent cronjob(commands,user,hours,mins)
{
vars:
suse|sles::
"crontab" string => "/var/spool/cron/tabs";
redhat|fedora::
"crontab" string => "/var/spool/cron";
freebsd::
"crontab" string => "/var/cron/tabs";
!(suse|sles|redhat|fedora|freebsd)::
"crontab" string => "/var/spool/cron/crontabs";
any::
# We escape the user supplied values so that we can search to see if the
# entry already exists with slightly different spacing.
"e_mins" string => escape("$(mins)");
"e_hours" string => escape("$(hours)");
"e_commands" string => escape("$(commands)");
classes:
!windows::
# We tolerate existing entries that differ only in whitespace and avoid
# entering duplicate entries.
"present_with_potentially_different_spacing"
expression => regline( "^$(e_mins)\s+$(e_hours)\s+\*\s+\*\s+\*\s+$(e_commands)", "$(crontab)/$(user)"),
if => fileexists( "$(crontab)/$(user)" );
files:
!windows.!present_with_potentially_different_spacing::
"$(crontab)/$(user)"
comment => "A user's regular batch jobs are added to this file",
create => "true",
edit_line => append_if_no_line("$(mins) $(hours) * * * $(commands)"),
perms => mo("600","$(user)"),
classes => if_repaired("changed_crontab");
processes:
changed_crontab::
"cron"
comment => "Most crons need to be huped after file changes",
signals => { "hup" };
}
rm_rf
Prototype: rm_rf(name)
Description: recursively remove name to any depth, including base
Arguments:
name: the file or directory name
This bundle will remove name to any depth, including name itself.
Example:
code
methods:
"bye" usebundle => rm_rf("/var/tmp/oldstuff");
Implementation:
code
bundle agent rm_rf(name)
{
methods:
"rm" usebundle => rm_rf_depth($(name),"inf");
}
rm_rf_depth
Prototype: rm_rf_depth(name, depth)
Description: recursively remove name to depth depth, including base
Arguments:
name: the file or directory namedepth: how far to descend
This bundle will remove name to depth depth, including name itself.
Example:
code
methods:
"bye" usebundle => rm_rf_depth("/var/tmp/oldstuff", "100");
Implementation:
code
bundle agent rm_rf_depth(name,depth)
{
classes:
"isdir" expression => isdir($(name));
files:
isdir::
"$(name)"
file_select => all,
depth_search => recurse_with_base($(depth)),
delete => tidy;
"$(name)/."
delete => tidy;
!isdir::
"$(name)" delete => tidy;
}
fileinfo
Prototype: fileinfo(f)
Description: provide access to file stat fields from the bundle caller and report
file stat info for file "f" if "verbose_mode" class is defined
Arguments:
Example:
code
bundle agent example
{
vars:
"files" slist => { "/tmp/example1", "/tmp/example2" };
files:
"$(files)"
create => "true",
classes => if_ok("verbose_mode"),
comment => "verbose_mode is defined because the fileinfo bundle restricts the report of the file info to verbose mode";
"/tmp/example3"
create => "true",
classes => if_ok("verbose_mode"),
comment => "verbose_mode is defined because the fileinfo bundle restricts the report of the file info to verbose mode";
methods:
"fileinfo" usebundle => fileinfo( @(files) );
"fileinfo" usebundle => fileinfo( "/tmp/example3" );
reports:
"$(this.bundle): $(files): $(fileinfo.fields) = '$(fileinfo.stat[$(files)][$(fileinfo.fields)])'";
"$(this.bundle): $(fileinfo.stat[/tmp/example3][size])";
"$(this.bundle): $(fileinfo.stat[/tmp/example3][gid])";
"$(this.bundle): $(fileinfo.stat[/tmp/example3][uid])";
"$(this.bundle): $(fileinfo.stat[/tmp/example3][ino])";
"$(this.bundle): $(fileinfo.stat[/tmp/example3][nlink])";
"$(this.bundle): $(fileinfo.stat[/tmp/example3][ctime])";
"$(this.bundle): $(fileinfo.stat[/tmp/example3][atime])";
"$(this.bundle): $(fileinfo.stat[/tmp/example3][mtime])";
"$(this.bundle): $(fileinfo.stat[/tmp/example3][mode])";
"$(this.bundle): $(fileinfo.stat[/tmp/example3][modeoct])";
"$(this.bundle): $(fileinfo.stat[/tmp/example3][permstr])";
"$(this.bundle): $(fileinfo.stat[/tmp/example3][permoct])";
"$(this.bundle): $(fileinfo.stat[/tmp/example3][type])";
"$(this.bundle): $(fileinfo.stat[/tmp/example3][devno])";
"$(this.bundle): $(fileinfo.stat[/tmp/example3][dev_minor])";
"$(this.bundle): $(fileinfo.stat[/tmp/example3][dev_major])";
"$(this.bundle): $(fileinfo.stat[/tmp/example3][basename])";
"$(this.bundle): $(fileinfo.stat[/tmp/example3][dirname])";
}
Implementation:
code
bundle agent fileinfo(f)
{
vars:
"fields" slist => splitstring("size,gid,uid,ino,nlink,ctime,atime,mtime,mode,modeoct,permstr,permoct,type,devno,dev_minor,dev_major,basename,dirname,linktarget,linktarget_shallow", ",", 999);
"stat[$(f)][$(fields)]" string => filestat($(f), $(fields));
reports:
verbose_mode::
"$(this.bundle): file $(f) has $(fields) = $(stat[$(f)][$(fields)])";
}
logrotate
Prototype: logrotate(log_files, max_size, rotate_levels)
Description: rotate specified "log_files" larger than "max_size". Keep
"rotate_levels" versions of the files before overwriting the oldest one
Arguments:
log_files: single file or list of files to evaluate for rotationmax_size: minimum size in bytes that the file will grow to before being rotatedrotate_levels: number of rotations to keep before overwriting the oldest one
Example:
code
bundle agent example
{
vars:
"logdirs" slist => { "/var/log/syslog", "/var/log/maillog"};
methods:
"logrotate" usebundle => logrotate( @(logdirs), "1M", "2" );
"logrotate" usebundle => logrotate( "/var/log/mylog, "1", "5" );
"logrotate" usebundle => logrotate( "/var/log/alog, "500k", "7" );
}
Implementation:
code
bundle agent logrotate(log_files, max_size, rotate_levels)
{
files:
"$(log_files)"
comment => "Rotate file if above specified size",
rename => rotate("$(rotate_levels)"),
file_select => bigger_than("$(max_size)"),
if => fileexists( $(log_files) );
}
prunedir
Prototype: prunedir(dir, max_days)
Description: delete plain files inside "dir" older than "max_days" (not recursively).
Arguments:
dir: directory to examine for filesmax_days: maximum number of days old a files mtime is allowed to before deletion
Example:
code
bundle agent example
{
vars:
"dirs" slist => { "/tmp/logs", "/tmp/logs2" };
methods:
"prunedir" usebundle => prunedir( @(dirs), "1" );
}
Implementation:
code
bundle agent prunedir(dir, max_days)
{
files:
"$(dir)"
comment => "Delete plain files inside directory older than max_days",
delete => tidy,
file_select => filetype_older_than("plain", "$(max_days)"),
depth_search => recurse("1");
}
prunetree
Prototype: prunetree(dir, depth, max_days)
Description: Delete files and directories inside "dir" up to "depth" older than "max_days".
Arguments:
dir: directory to examine for filesdepth: How many levels to descendmax_days: maximum number of days old a files mtime is allowed to before deletion
Example:
code
bundle agent example
{
vars:
"dirs" slist => { "/tmp/logs", "/tmp/logs2" };
methods:
"prunetree" usebundle => prunetree( @(dirs), inf, "1" );
}
Implementation:
code
bundle agent prunetree(dir, depth, max_days)
{
files:
"$(dir)"
comment => "Delete files and directories under $(dir) up to $(depth)
depth older than $(max_days)",
delete => tidy,
file_select => days_old( $(max_days) ),
depth_search => recurse_with_base( $(depth) );
}
url_ping
Prototype: url_ping(host, method, port, uri)
Description: ping HOST:PORT/URI using METHOD
Arguments:
host: the host namemethod: the HTTP method (HEAD or GET)port: the port number, e.g. 80uri: the URI, e.g. /path/to/resource
This bundle will send a simple HTTP request and read 20 bytes back,
then compare them to 200 OK.* (ignoring leading spaces).
If the data matches, the global class "url_ok_HOST" will be set, where
HOST is the canonified host name, i.e. canonify($(host))
Example:
code
methods:
"check" usebundle => url_ping("cfengine.com", "HEAD", "80", "/bill/was/here");
reports:
url_ok_cfengine_com::
"CFEngine's web site is up";
url_not_ok_cfengine_com::
"CFEngine's web site *may* be down. Or you're offline.";
Implementation:
code
bundle agent url_ping(host, method, port, uri)
{
vars:
"url_check" string => readtcp($(host),
$(port),
"$(method) $(uri) HTTP/1.1$(const.r)$(const.n)Host:$(host)$(const.r)$(const.n)$(const.r)$(const.n)",
20);
"chost" string => canonify($(host));
classes:
"url_ok_$(chost)"
scope => "namespace",
expression => regcmp("[^\n]*200 OK.*\n.*",
$(url_check));
"url_not_ok_$(chost)"
scope => "namespace",
not => regcmp("[^\n]*200 OK.*\n.*",
$(url_check));
reports:
verbose_mode::
"$(this.bundle): $(method) $(host):$(port)/$(uri) got 200 OK"
if => "url_ok_$(chost)";
"$(this.bundle): $(method) $(host):$(port)/$(uri) did *not* get 200 OK"
if => "url_not_ok_$(chost)";
}
cmerge
Prototype: cmerge(name, varlist)
Description: bundle to merge many data containers into one
Arguments:
name: the variable name to createvarlist: a list of variable names (**MUST** be a list)
The result will be in cmerge.$(name). You can also use
cmerge.$(name)_str for a string version of the merged containers.
The name is variable so you can call this bundle for more than one
merge.
If you merge a key-value map into an array or vice versa, the map
always wins. So this example will result in a key-value map even
though cmerge.$(name) starts as an array.
Example:
code
bundle agent run
{
vars:
# the "mymerge" tag is user-defined
"a" data => parsejson('{ "mark": "b" }'), meta => { "mymerge" };
"b" data => parsejson('{ "volker": "h" }'), meta => { "mymerge" };
# you can list them explicitly: "default:run.a" through "default:run.d"
"todo" slist => variablesmatching(".*", "mymerge");
# you can use cmerge.all_str instead of accessing the merged data directly
"merged_str" string => format("%S", "cmerge.all");
methods:
"go" usebundle => cmerge("all", @(todo)); # merge a, b into container cmerge.all
reports:
"merged = $(cmerge.all_str)"; # will print a map with keys "mark" and "volker"
}
Implementation:
code
bundle agent cmerge(name, varlist)
{
vars:
"$(name)" data => parsejson('[]'), policy => "free";
"$(name)" data => mergedata($(name), $(varlist)), policy => "free"; # iterates!
"$(name)_str" string => format("%S", $(name)), policy => "free";
}
collect_vars
Prototype: collect_vars(name, tag, flatten)
Description: bundle to collect tagged variables into a data container
Arguments:
name: the variable name to create inside collect_varstag: the tag regex string to match e.g. "beta,gamma=.*"flatten: to flatten variable values, set to "any" or "true" or "1"
The result will be a map in collect.$(name). You can also use
cmerge.$(name)_str for a string version of the merged containers
(if it fits in a CFEngine string).
The name is variable so you can call this bundle for more than one
collection.
Every found variable will be a key in the map, unless you specify
flatten, in which case they'll be flattened into a top-level array
of data.
The flatten parameter can be "any" or "true" or "1" to be true.
Example:
code
body common control
{
inputs => { "$(sys.libdir)/stdlib.cf" };
}
bundle agent main
{
vars:
# the "mymerge" tag is user-defined
"a" data => parsejson('{ "mark": "burgess" }'), meta => { "mymerge" };
"b" data => parsejson('{ "volker": "hilsheimer" }'), meta => { "mymerge" };
methods:
# merge a, b into container collect_vars.all
"go" usebundle => collect_vars("all", "mymerge", "");
# flatten a, b into container collect_vars.flattened
"go_flatten" usebundle => collect_vars("flattened", "mymerge", "true");
reports:
# merged = {"default:main.a":{"mark":"burgess"},"default:main.b":{"volker":"hilsheimer"}}
"merged = $(collect_vars.all_str)";
# flattened = {"mark":"burgess","volker":"hilsheimer"}
"flattened = $(collect_vars.flattened_str)";
}
Implementation:
code
bundle agent collect_vars(name, tag, flatten)
{
classes:
"flatten" expression => strcmp($(flatten), "any");
"flatten" expression => strcmp($(flatten), "1");
"flatten" expression => strcmp($(flatten), "true");
vars:
"todo_$(name)" slist => variablesmatching(".*", $(tag));
!flatten::
"$(name)"
data => parsejson('{}'),
policy => "free";
# this iterates!
"$(name)"
data => mergedata($(name), '{ "$(todo_$(name))": $(todo_$(name)) }'),
policy => "free";
flatten::
"$(name)"
data => parsejson('[]'),
policy => "free";
# this iterates!
"$(name)"
data => mergedata($(name), "$(todo_$(name))"),
policy => "free";
any::
"$(name)_str"
string => format("%S", $(name)),
policy => "free";
}
run_ifdefined
Prototype: run_ifdefined(namespace, mybundle)
Description: bundle to maybe run another bundle dynamically
Arguments:
namespace: the namespace, usually $(this.namespace)mybundle: the bundle to maybe run
This bundle simply is a way to run another bundle only if it's defined.
Example:
code
bundle agent run
{
methods:
# does nothing if bundle "runthis" is not defined
"go" usebundle => run_ifdefined($(this.namespace), runthis);
}
Implementation:
code
bundle agent run_ifdefined(namespace, mybundle)
{
vars:
"bundlesfound" slist => bundlesmatching("^$(namespace):$(mybundle)$");
"count" int => length(bundlesfound);
methods:
"any"
usebundle => $(bundlesfound),
if => strcmp(1, $(count));
reports:
verbose_mode::
"$(this.bundle): found matching bundles $(bundlesfound) for namespace '$(namespace)' and bundle '$(mybundle)'";
}
lib/cfe_internal.cf
control
Prototype: control
Description: Include necessary parts of stdlib
Implementation:
code
body file control
{
inputs => { @(cfe_internal_common.inputs) };
}
cfe_internal_common
Prototype: cfe_internal_common
Description: Select parts of the standard library that are dependant
Implementation:
code
bundle common cfe_internal_common
{
vars:
"inputs" slist => { "$(this.promise_dirname)/common.cf",
"$(this.promise_dirname)/commands.cf"};
}
cfe_internal_cleanup_agent_reports
Prototype: cfe_internal_cleanup_agent_reports
Description: Cleanup accumulated agent reports
Implementation:
code
bundle agent cfe_internal_cleanup_agent_reports
{
vars:
any::
# To avoid unnecessary work, we only findfiles if there is not already a
# variable defined.
"diff_files"
slist => findfiles("$(sys.workdir)/state/diff/*.diff"),
unless => isvariable( $(this.promiser) );
"promise_log_files"
slist => findfiles("$(sys.workdir)/state/promise_log/*.csv"),
unless => isvariable( $(this.promiser) );
"previous_state_files" -> { "ENT-3161" }
slist => findfiles("$(sys.workdir)/state/previous_state/*.cache"),
unless => isvariable( $(this.promiser) ),
comment => "The files in this directory record the state at the end of
the previous agent run. They are used in concert with the
promise logs to derive delta reports.";
"untracked_files" -> { "ENT-3161" }
slist => findfiles("$(sys.workdir)/state/untracked/*.idx"),
unless => isvariable( $(this.promiser) ),
comment => "The files in this directory are used in support of the
report_data_select filters. This is a record of all promises
that should not be collected";
"files"
slist => { @(diff_files),
@(promise_log_files),
@(previous_state_files),
@(untracked_files) };
"reports_size[$(files)]"
int => filesize("$(files)"),
unless => isvariable( $(this.promiser) );
"tmpmap"
slist => maparray("$(this.v)", reports_size);
# We need to make sure that we have files before summing or errors are
# produced in the log
have_files::
"total_report_size" real => sum(tmpmap);
classes:
"cfe_internal_purge_reports"
expression => isgreaterthan("$(total_report_size)","$(def.max_client_history_size)"),
comment => "Determine if the current sum of reports exceeds the max desired";
"have_files"
expression => isgreaterthan(length(tmpmap), 0);
files:
cfe_internal_purge_reports::
"$(files)"
delete => tidy,
handle => "cf_cleanup_agent_reports_$(files)";
reports:
DEBUG|DEBUG_cfe_internal_cleanup_agent_reports::
"DEBUG $(this.bundle): Size of '$(files)' = '$(reports_size[$(files)])'";
"DEBUG $(this.bundle): Size of all reports = '$(total_report_size)'";
"DEBUG $(this.bundle): Purge threshold = '$(def.max_client_history_size)'";
"DEBUG $(this.bundle): Client history purge triggered"
if => "cfe_internal_purge_reports";
}
lib/cfe_internal_hub.cf
control
Prototype: control
Description: Include policy files used by this policy file as part of inputs
Implementation:
code
body file control
{
inputs => { @(cfe_internal_hub_common.inputs) };
}
acquired_lock
Prototype: acquired_lock
Implementation:
code
body match_value acquired_lock
{
# Example log line
# 2019-06-11 18:49:39 GMT LOG: process 10427 acquired AccessShareLock on relation 17949 of database 16384 after 1122
select_line_matching => ".*acquired.*Lock.*";
extraction_regex => ".*after (\d+)";
track_growing_file => "true";
select_multiline_policy => "average"; # average, sum, first, last
}
cfe_internal_hub_common
Prototype: cfe_internal_hub_common
Description: Enumerate policy files used by this policy file for inclusion to inputs
Implementation:
code
bundle common cfe_internal_hub_common
{
vars:
"inputs" slist => { "$(this.promise_dirname)/common.cf",
"$(this.promise_dirname)/commands.cf"};
}
cfe_internal_hub_maintain
Prototype: cfe_internal_hub_maintain
Description: Executes reporting database maintenance process
By default database clean up interval is 24 hours.
Length of log history in database is controlled
by modifying "history_length_days" key in report_settings
variable.
Intervals less than 6 hours must be used with caution
as maintenance process could take a considerable time
Implementation:
code
bundle agent cfe_internal_hub_maintain
{
vars:
"report_settings"
data => parsejson('[
{
"report": "contexts",
"table": "__ContextsLog",
"history_length_days": 7,
"time_key": "ChangeTimeStamp"
},
{
"report": "variables",
"table": "__VariablesLog",
"history_length_days": 7,
"time_key": "ChangeTimeStamp"
},
{
"report": "software",
"table": "__SoftwareLog",
"history_length_days": 28,
"time_key": "ChangeTimeStamp"
},
{
"report": "software_updates",
"table": "__SoftwareUpdatesLog",
"history_length_days": 28,
"time_key": "ChangeTimeStamp"
},
{
"report": "filechanges",
"table": "__FileChangesLog",
"history_length_days": 365,
"time_key": "ChangeTimeStamp"
},
{
"report": "benchmarks",
"table": "__BenchmarksLog",
"history_length_days": 1,
"time_key": "CheckTimeStamp"
}
]');
"diagnostics_settings"
data => parsejson('[
{
"report": "hub_connection_errors",
"table": "__HubConnectionErrors",
"history_length_days": 1,
"time_key": "CheckTimeStamp"
},
{
"report": "diagnostics",
"table": "Diagnostics",
"history_length_days": 1,
"time_key": "TimeStamp"
}
]');
classes:
"enable_cfe_internal_reporting_database_purge_old_history" -> { "postgres", "CFEngine Enterprise" }
expression => "enterprise_edition.Hr00";
"enable_cfe_internal_parition_creation_job" -> { "postgres", "CFEngine Enterprise" }
expression => "enterprise_edition.Hr00";
methods:
enable_cfe_internal_reporting_database_purge_old_history::
"Remove old report history"
usebundle => cfe_internal_database_cleanup_reports(@(report_settings)),
action => if_elapsed_day;
"Remove cf-hub status history"
usebundle => cfe_internal_database_cleanup_cf_hub_status("3"),
action => if_elapsed_day;
"Remove diagnostics history"
usebundle => cfe_internal_database_cleanup_diagnostics(@(diagnostics_settings)),
action => if_elapsed_day;
"Remove promise log history"
usebundle => cfe_internal_database_cleanup_promise_log("7"),
action => if_elapsed_day;
enable_cfe_internal_parition_creation_job::
"Create new partitions for partitioned tables"
usebundle => cfe_internal_database_partitioning(),
action => if_elapsed_day;
}
cfe_internal_database_cleanup_reports
Prototype: cfe_internal_database_cleanup_reports(settings)
Description: clean up the reporting tables
Arguments:
settings of vars promiser index of vars promiser remove_query_$(settings[$(index)][report]) of commands promiser $(sys.bindir)/psql cfdb -c "$(remove_query_$(settings[$(index)][report]))"
Implementation:
code
bundle agent cfe_internal_database_cleanup_reports (settings)
{
vars:
"index" slist => getindices(settings);
"remove_query_$(settings[$(index)][report])"
comment => "This query will delete rows that have a changetimestamp
$(settings[$(index)][history_length_days]) older than the
hosts most recent changetimestamp in the table.",
string => "WITH z AS
(
SELECT hostkey,
Max($(settings[$(index)][time_key])) AS latest
FROM $(settings[$(index)][table])
GROUP BY hostkey)
DELETE
FROM $(settings[$(index)][table]) t
using z
WHERE z.hostkey = t.hostkey
AND t.$(settings[$(index)][time_key]) <= (z.latest - '$(settings[$(index)][history_length_days]) day'::interval);";
commands:
"$(sys.bindir)/psql cfdb -c \"$(remove_query_$(settings[$(index)][report]))\""
@if minimum_version(3.15.0)
inform => "false",
@endif
contain => default:silent,
handle => "cf_database_maintain_report_$(settings[$(index)][report])";
}
cfe_internal_database_cleanup_cf_hub_status
Prototype: cfe_internal_database_cleanup_cf_hub_status(row_count)
Description: keep up to row_count entries in the database
Arguments:
row_count of classes promiser has_sql_function_cleanup_historical_data of classes promiser has_sql_table___status of vars promiser status_table_name of vars promiser remove_query of vars promiser delete_future_ts_query: string, used in the value of attribute string of vars promiser remove_query of commands promiser $(sys.bindir)/psql cfdb -c "$(remove_query)" of commands promiser $(sys.bindir)/psql cfdb -c "$(delete_future_ts_query)"
Implementation:
code
bundle agent cfe_internal_database_cleanup_cf_hub_status (row_count)
{
classes:
# We probe the database to see if the function is defined
"has_sql_function_cleanup_historical_data"
expression => returnszero( "$(sys.bindir)/psql cfdb -c \"SELECT 'cleanup_historical_data'::regproc;\" > /dev/null 2>&1", useshell ),
if => isexecutable( "$(sys.bindir)/psql" );
"has_sql_table___status" -> { "ENT-4331" }
expression => returnszero( "$(sys.bindir)/psql cfdb -c \"SELECT 'public.__status'::regclass;\" > /dev/null 2>&1", useshell ),
if => isexecutable( "$(sys.bindir)/psql" );
vars:
any::
# TODO Redact after 3.15.x is no longer under standard support. Since this
# is used in 3.12.x and 3.12.x was supported at the time 3.15.0 was
# released we need to maintain the path for people upgrading from 3.12.x
# The status table changed it's name for 3.12.2 and 3.10.6, this handles
# using the proper table name in the cleanup query
"status_table_name" -> { "ENT-4331" }
string => ifelse( "has_sql_table___status", "__status", "status");
any::
# This is the fallback query to use in case the cleanup_historical_data
# function is not present.
"remove_query" -> { "ENT-4365" }
string => "DELETE FROM $(status_table_name) WHERE ts IN (SELECT ts FROM $(status_table_name) ORDER BY ts DESC OFFSET 50000);";
"delete_future_ts_query" -> { "ENT-4362", "ENT-4992" }
string => "DELETE FROM $(status_table_name) WHERE to_timestamp(ts::bigint) > (now() + interval '2 days')::timestamp;";
has_sql_function_cleanup_historical_data::
"remove_query"
string => "SELECT * FROM cleanup_historical_data('$(status_table_name)', 'ts', $(row_count), 'host');";
commands:
"$(sys.bindir)/psql cfdb -c \"$(remove_query)\""
@if minimum_version(3.15.0)
inform => "false",
@endif
contain => default:silent,
handle => "cf_database_maintain_consumer_status";
"$(sys.bindir)/psql cfdb -c \"$(delete_future_ts_query)\"" -> { "ENT-4362" }
@if minimum_version(3.15.0)
inform => "false",
@endif
contain => default:silent,
handle => "cf_database_maintain_consumer_status_no_future_timestamps";
}
cfe_internal_database_cleanup_diagnostics
Prototype: cfe_internal_database_cleanup_diagnostics(settings)
Arguments:
settings of vars promiser index of vars promiser remove_query_$(settings[$(index)][report]) of commands promiser $(sys.bindir)/psql cfdb -c "$(remove_query_$(settings[$(index)][report]))"
Implementation:
code
bundle agent cfe_internal_database_cleanup_diagnostics (settings)
{
vars:
"index" slist => getindices("settings");
"remove_query_$(settings[$(index)][report])"
string => "DELETE FROM $(settings[$(index)][table]) WHERE $(settings[$(index)][time_key]) < (CURRENT_TIMESTAMP - INTERVAL '$(settings[$(index)][history_length_days]) day');";
commands:
"$(sys.bindir)/psql cfdb -c \"$(remove_query_$(settings[$(index)][report]))\""
@if minimum_version(3.15.0)
inform => "false",
@endif
contain => default:silent,
handle => "cf_database_maintain_diagnostics_$(settings[$(index)][report])";
}
cfe_internal_database_cleanup_promise_log
Prototype: cfe_internal_database_cleanup_promise_log(history_length_days)
Description: clean up promise log files older than history_length_days
Arguments:
history_length_days: Number of days after which promise logs should be deleted
Implementation:
code
bundle agent cfe_internal_database_cleanup_promise_log (history_length_days)
{
vars:
"cleanup_query_repaired"
string => "SELECT promise_log_partition_cleanup('REPAIRED', '$(history_length_days) day');";
"cleanup_query_notkept"
string => "SELECT promise_log_partition_cleanup('NOTKEPT', '$(history_length_days) day');";
commands:
"$(sys.bindir)/psql cfdb -c \"$(cleanup_query_repaired)\""
@if minimum_version(3.15.0)
inform => "false",
@endif
contain => default:silent,
handle => "cf_database_maintain_promise_log_repaired";
"$(sys.bindir)/psql cfdb -c \"$(cleanup_query_notkept)\""
@if minimum_version(3.15.0)
inform => "false",
@endif
contain => default:silent,
handle => "cf_database_maintain_promise_log_notkept";
}
cfe_internal_database_partitioning
Prototype: cfe_internal_database_partitioning
Description: create any nesesary table partitions for database
Implementation:
code
bundle agent cfe_internal_database_partitioning()
{
vars:
"promise_outcome"
slist => {"REPAIRED", "NOTKEPT"};
"query_create_promise_log_$(promise_outcome)"
string => "SELECT promise_log_partition_create(NOW() - INTERVAL '7 day', 7 + 3, '$(promise_outcome)');";
commands:
"$(sys.bindir)/psql cfdb -c \"$(query_create_promise_log_$(promise_outcome))\""
@if minimum_version(3.15.0)
inform => "false",
@endif
contain => default:silent,
handle => "cf_database_create_partition_promise_log_$(promise_outcome)";
}
cfe_internal_postgresql_maintenance
Prototype: cfe_internal_postgresql_maintenance
Description: Vacuum Full PostgreSQL for maintenance
Implementation:
code
bundle agent cfe_internal_postgresql_maintenance
{
vars:
"vacuum_cfdb_cmd" string => "$(sys.bindir)/vacuumdb --full --dbname=cfdb",
comment => "Vacuum Full PostgreSQL (database: cfdb)",
handle => "cfe_internal_postgresql_maintenance_vacuum_full";
processes:
any::
"cf-hub" signals => { "term" },
comment => "Terminate cf-hub while doing PostgreSQL maintenance",
handle => "cfe_internal_postgresql_maintenance_processes_term_cf_hub";
commands:
any::
"$(vacuum_cfdb_cmd)"
comment => "Run vacuum db full command (database: cfdb)",
classes => kept_successful_command,
handle => "cfe_internal_postgresql_maintenance_commands_run_vacuumdb_cmd_full";
}
cfe_internal_postgresql_vacuum
Prototype: cfe_internal_postgresql_vacuum
Description: Vacuum (with analyze) over cfdb database.
Implementation:
code
bundle agent cfe_internal_postgresql_vacuum
{
vars:
"vacuum_cfdb_cmd"
string => "$(sys.bindir)/vacuumdb --analyze --quiet --dbname=cfdb",
comment => "Vacuum command with update statistics enabled";
commands:
"$(vacuum_cfdb_cmd)"
comment => "Run vacuum db command (database: cfdb)",
handle => "cfe_internal_postgresql_maintenance_commands_run_vacuumdb";
}
measure_psql
Prototype: measure_psql
Implementation:
code
bundle monitor measure_psql
{
measurements:
policy_server|am_policy_hub::
# We average the time for all entries in /var/log/postgresql.log that
# PostgreSQL waited before acquiring a lock and measure that over time.
"/var/log/postgresql.log"
if => fileexists( "/var/log/postgresql.log"),
handle => "psql_lock_wait_before_acquisition",
stream_type => "file",
data_type => "real",
history_type => "weekly",
units => "ms",
match_value => acquired_lock,
comment => "Approximate length of time PostgreSQL waits before acquiring lock";
}
lib/cfengine_enterprise_hub_ha.cf
control
Prototype: control
Description: Include policy specific to CFEngine Enterprise High Availability
Implementation:
code
body file control
{
inputs => { @(cfengine_enterprise_hub_ha.inputs) };
}
cfengine_enterprise_hub_ha
Prototype: cfengine_enterprise_hub_ha
Description: Inputs specific to CFEngine Enterprise High Availability
Implementation:
code
bundle common cfengine_enterprise_hub_ha
{
vars:
enable_cfengine_enterprise_hub_ha::
"input[ha_main]"
string => "cfe_internal/enterprise/ha/ha.cf";
"input[ha_def]"
string => "cfe_internal/enterprise/ha/ha_def.cf";
"classification_bundles"
slist => { "ha_def" };
"management_bundles"
slist => { "ha_main" };
"inputs" slist => getvalues(input);
!enable_cfengine_enterprise_hub_ha::
"classification_bundles"
slist => { "$(this.bundle)" };
"management_bundles"
slist => { "$(this.bundle)" };
"inputs"
slist => { };
}
lib/commands.cf
See the commands promises documentation for a
comprehensive reference on the body types and attributes used here.
powershell
Prototype: powershell
Description: Run command with powershell (windows only)
Example:
code
commands:
windows::
'schtasks /DELETE /TN "$(_taskname)" /F'
contain => powershell;
History:
Implementation:
code
body contain powershell
{
useshell => "powershell";
}
silent
Prototype: silent
Description: suppress command output
Implementation:
code
body contain silent
{
no_output => "true";
}
in_dir
Prototype: in_dir(dir)
Description: run command after switching to directory "dir"
Arguments:
dir: directory to change into
Example:
code
commands:
"/bin/pwd"
contain => in_dir("/tmp");
Implementation:
code
body contain in_dir(dir)
{
chdir => "$(dir)";
}
in_dir_shell
Prototype: in_dir_shell(dir)
Description: run command after switching to directory "dir" with full shell
Arguments:
dir: directory to change into
Example:
code
commands:
"/bin/pwd | /bin/cat"
contain => in_dir_shell("/tmp");
Implementation:
code
body contain in_dir_shell(dir)
{
chdir => "$(dir)";
useshell => "true"; # canonical "useshell" but this is backwards-compatible
}
silent_in_dir
Prototype: silent_in_dir(dir)
Description: run command after switching to directory and suppress output
Arguments:
dir: directory to change into
Example:
code
"/bin/pwd"
contain => silent_in_dir("/tmp");
Implementation:
code
body contain silent_in_dir(dir)
{
chdir => "$(dir)";
no_output => "true";
}
in_shell
Prototype: in_shell
Description: run command in shell
Example:
code
commands:
"/bin/pwd | /bin/cat"
contain => in_shell;
Implementation:
code
body contain in_shell
{
useshell => "true"; # canonical "useshell" but this is backwards-compatible
}
in_shell_bg
Prototype: in_shell_bg
Description: deprecated
This bundle previously had an invalid background attribute that was caught by
parser strictness enhancements. Backgrounding is handeled by the body action
background attribute.
Implementation:
code
body contain in_shell_bg
{
useshell => "true"; # canonical "useshell" but this is backwards-compatible
}
in_shell_and_silent
Prototype: in_shell_and_silent
Description: run command in shell and suppress output
Example:
code
commands:
"/bin/pwd | /bin/cat"
contain => in_shell_and_silent,
comment => "Silently run command in shell";
Implementation:
code
body contain in_shell_and_silent
{
useshell => "true"; # canonical "useshell" but this is backwards-compatible
no_output => "true";
}
in_dir_shell_and_silent
Prototype: in_dir_shell_and_silent(dir)
Description: run command in shell after switching to 'dir' and suppress output
Arguments:
dir: directory to change into
Example:
code
commands:
"/bin/pwd | /bin/cat"
contain => in_dir_shell_and_silent("/tmp"),
comment => "Silently run command in shell";
Implementation:
code
body contain in_dir_shell_and_silent(dir)
{
useshell => "true"; # canonical "useshell" but this is backwards-compatible
no_output => "true";
chdir => "$(dir)";
}
setuid
Prototype: setuid(owner)
Description: run command as specified user
Arguments:
owner: username or uid to run command as
Example:
code
commands:
"/usr/bin/id"
contain => setuid("apache");
"/usr/bin/id"
contain => setuid("503");
Implementation:
code
body contain setuid(owner)
{
exec_owner => "$(owner)";
}
setuid_sh
Prototype: setuid_sh(owner)
Description: run command as specified user in shell
Arguments:
owner: username or uid to run command as
Example:
code
commands:
"/usr/bin/id | /bin/cat"
contain => setuid("apache");
"/usr/bin/id | /bin/cat"
contain => setuid("503");
Implementation:
code
body contain setuid_sh(owner)
{
exec_owner => "$(owner)";
useshell => "true"; # canonical "useshell" but this is backwards-compatible
}
setuidgid_dir
Prototype: setuidgid_dir(owner, group, dir)
Description: run command as specified owner and group in shell
Arguments:
owner: username or uid to run command asgroup: groupname or gid to run command asdir: directory to run command from
Implementation:
code
body contain setuidgid_dir(owner,group,dir)
{
exec_owner => "$(owner)";
exec_group => "$(group)";
chdir => "$(dir)";
}
setuidgid_sh
Prototype: setuidgid_sh(owner, group)
Description: run command as specified owner and group in shell
Arguments:
owner: username or uid to run command asgroup: groupname or gid to run command as
Implementation:
code
body contain setuidgid_sh(owner,group)
{
exec_owner => "$(owner)";
exec_group => "$(group)";
useshell => "true"; # canonical "useshell" but this is backwards-compatible
}
jail
Prototype: jail(owner, jail_root, dir)
Description: run command as specified user in specified directory of jail
Arguments:
owner: username or uid to run command asjail_root: path that will be the root directory for the processdir: directory to change to before running command (must be within 'jail_root')
Implementation:
code
body contain jail(owner,jail_root,dir)
{
exec_owner => "$(owner)";
useshell => "true"; # canonical "useshell" but this is backwards-compatible
chdir => "$(dir)";
chroot => "$(jail_root)";
}
setuid_umask
Prototype: setuid_umask(owner, umask)
Description: run command as specified user with umask
| Valid Values |
Umask |
Octal (files) |
Symbolic (files) |
Octal (dirs) |
Symbolic (dirs) |
0 |
000 |
666 |
(rw-rw-rw-) |
777 |
(rwxrwxrwx) |
002 |
002 |
664 |
(rw-rw-r--) |
775 |
(rwxrwxr-x) |
22, 022 |
022 |
644 |
(rw-r--r--) |
755 |
(rwxr-xr-x) |
27, 027 |
027 |
640 |
(rw-r-----) |
750 |
(rwxr-x---) |
77, 077 |
077 |
600 |
(rw-------) |
700 |
(rwx------) |
72, 072 |
072 |
604 |
(rw----r--) |
705 |
(rwx---r-x) |
Arguments:
owner: username or uid to run command asumask: controls permissions of created files and directories
Example:
code
commands:
"/usr/bin/git pull"
contain => setuid_umask("git", "022");
Implementation:
code
body contain setuid_umask(owner, umask)
{
exec_owner => "$(owner)";
umask => "$(umask)";
}
setuid_gid_umask
Prototype: setuid_gid_umask(uid, gid, umask)
Description: run command as specified user with umask
| Valid Values |
Umask |
Octal (files) |
Symbolic (files) |
Octal (dirs) |
Symbolic (dirs) |
0 |
000 |
666 |
(rw-rw-rw-) |
777 |
(rwxrwxrwx) |
002 |
002 |
664 |
(rw-rw-r--) |
775 |
(rwxrwxr-x) |
22, 022 |
022 |
644 |
(rw-r--r--) |
755 |
(rwxr-xr-x) |
27, 027 |
027 |
640 |
(rw-r-----) |
750 |
(rwxr-x---) |
77, 077 |
077 |
600 |
(rw-------) |
700 |
(rwx------) |
72, 072 |
072 |
604 |
(rw----r--) |
705 |
(rwx---r-x) |
Arguments:
uid: username or uid to run command asgid: group name or gid to run command asumask: controls permissions of created files and directories
Example:
code
commands:
"/usr/bin/git pull"
contain => setuid_gid_umask("git", "minions", "022");
Implementation:
code
body contain setuid_gid_umask(uid, gid, umask)
{
exec_owner => "$(uid)";
exec_group => "$(uid)";
umask => "$(umask)";
}
daemonize
Prototype: daemonize(command)
Description: Run a command as a daemon. I.e., fully detaches from Cfengine.
Arguments:
command: The command to run detached
Note: There will be no output from the command reported by cf-agent. This
bundle has no effect on windows
Example:
cf3
methods:
"Launch Daemon"
usebundle => daemonize("/bin/sleep 30");
Implementation:
code
bundle agent daemonize(command)
{
commands:
!windows::
"exec 1>&-; exec 2>&-; $(command) &"
contain => in_shell;
reports:
"windows.(DEBUG|DEBUG_$(this.bundle))"::
"DEBUG $(this.bundle): This bundle does not support Windows";
}
lib/common.cf
See
the common promise attributes
documentation for a comprehensive reference on the body types and attributes
used here.
if_elapsed
Prototype: if_elapsed(x)
Description: Evaluate the promise every x minutes
Arguments:
x: The time in minutes between promise evaluations
Implementation:
code
body action if_elapsed(x)
{
ifelapsed => "$(x)";
expireafter => "$(x)";
}
if_elapsed_day
Prototype: if_elapsed_day
Description: Evalute the promise once every 24 hours
Implementation:
code
body action if_elapsed_day
{
ifelapsed => "1440"; # 60 x 24
expireafter => "1400";
}
Prototype: measure_performance(x)
Description: Measure repairs of the promiser every x minutes
Repair-attempts are cancelled after x minutes.
Arguments:
x: The time in minutes between promise evaluations.
Implementation:
code
body action measure_performance(x)
{
measurement_class => "Detect changes in $(this.promiser)";
ifelapsed => "$(x)";
expireafter => "$(x)";
}
measure_promise_time
Prototype: measure_promise_time(identifier)
Description: Performance will be measured and recorded under identifier
Arguments:
identifier: Measurement name.
Implementation:
code
body action measure_promise_time(identifier)
{
measurement_class => "$(identifier)";
}
warn_only
Prototype: warn_only
Description: Warn once an hour if the promise needs to be repaired
The promise does not get repaired.
Implementation:
code
body action warn_only
{
action_policy => "warn";
ifelapsed => "60";
}
bg
Prototype: bg(elapsed, expire)
Description: Evaluate the promise in the background every elapsed minutes, for at most expire minutes
Arguments:
elapsed: The time in minutes between promise evaluationsexpire: The time in minutes after which a repair-attempt gets cancelled
Implementation:
code
body action bg(elapsed,expire)
{
ifelapsed => "$(elapsed)";
expireafter => "$(expire)";
background => "true";
}
ifwin_bg
Prototype: ifwin_bg
Description: Evaluate the promise in the background when running on Windows
Implementation:
code
body action ifwin_bg
{
windows::
background => "true";
}
Prototype: immediate
Description: Evaluate the promise at every cf-agent execution.
Implementation:
code
body action immediate
{
ifelapsed => "0";
}
policy
Prototype: policy(p)
Description: Set the action_policy to p
Arguments:
Implementation:
code
body action policy(p)
{
action_policy => "$(p)";
}
log_repaired
Prototype: log_repaired(log, message)
Description: Log message to a file log=[/file|stdout]
Arguments:
log: The log file for repaired messagesmessage: The log message
Implementation:
code
body action log_repaired(log,message)
{
log_string => "$(sys.date), $(message)";
log_repaired => "$(log)";
}
log_verbose
Prototype: log_verbose
Description: Sets the log_level attribute to "verbose"
Implementation:
code
body action log_verbose
{
log_level => "verbose";
}
sample_rate
Prototype: sample_rate(x)
Description: Evaluate the promise every x minutes,
A repair-attempt is cancelled after 10 minutes
Arguments:
x: The time in minutes between promise evaluation
Implementation:
code
body action sample_rate(x)
{
ifelapsed => "$(x)";
expireafter => "10";
}
if_repaired
Prototype: if_repaired(x)
Description: Define class x if the promise has been repaired
Arguments:
Implementation:
code
body classes if_repaired(x)
{
promise_repaired => { "$(x)" };
}
if_else
Prototype: if_else(yes, no)
Description: Define the classes yes or no depending on promise outcome
Arguments:
yes: The name of the class that should be defined if the promise is kept or repairedno: The name of the class that should be defined if the promise could not be repaired
Implementation:
code
body classes if_else(yes,no)
{
promise_kept => { "$(yes)" };
promise_repaired => { "$(yes)" };
repair_failed => { "$(no)" };
repair_denied => { "$(no)" };
repair_timeout => { "$(no)" };
}
cf2_if_else
Prototype: cf2_if_else(yes, no)
Description: Define the classes yes or no, depending on promise outcome
A version of if_else that matches CFEngine2 semantics. Neither class is set if the promise
does not require any repair.
Arguments:
yes: The name of the class that should be defined if the promise is repairedno: The name of the class that should be defined if the promise could not be repaired
Implementation:
code
body classes cf2_if_else(yes,no)
{
promise_repaired => { "$(yes)" };
repair_failed => { "$(no)" };
repair_denied => { "$(no)" };
repair_timeout => { "$(no)" };
}
if_notkept
Prototype: if_notkept(x)
Description: Define the class x if the promise is not kept and cannot be repaired.
Arguments:
x: The name of the class that should be defined
Implementation:
code
body classes if_notkept(x)
{
repair_failed => { "$(x)" };
repair_denied => { "$(x)" };
repair_timeout => { "$(x)" };
}
if_ok
Prototype: if_ok(x)
Description: Define the class x if the promise is kept or repaired
Arguments:
x: The name of the class that should be defined
Implementation:
code
body classes if_ok(x)
{
promise_repaired => { "$(x)" };
promise_kept => { "$(x)" };
}
if_ok_cancel
Prototype: if_ok_cancel(x)
Description: Cancel the class x if the promise is kept or repaired
Arguments:
x: The name of the class that should be cancelled
Implementation:
code
body classes if_ok_cancel(x)
{
cancel_repaired => { "$(x)" };
cancel_kept => { "$(x)" };
}
cmd_repair
Prototype: cmd_repair(code, cl)
Description: Define the class cl if an external command in a commands, file or packages
promise is executed with return code code
Arguments:
code: The return codes that indicate a successful repaircl: The name of the class that should be defined
See also: repaired_returncodes
Implementation:
code
body classes cmd_repair(code,cl)
{
repaired_returncodes => { "$(code)" };
promise_repaired => { "$(cl)" };
}
classes_generic
Prototype: classes_generic(x)
Description: Define x prefixed/suffixed with promise outcome
Arguments:
x: The unique part of the classes to be defined
Implementation:
code
body classes classes_generic(x)
{
promise_repaired => { "promise_repaired_$(x)", "$(x)_repaired", "$(x)_ok", "$(x)_reached" };
repair_failed => { "repair_failed_$(x)", "$(x)_failed", "$(x)_not_ok", "$(x)_error", "$(x)_not_kept", "$(x)_reached" };
repair_denied => { "repair_denied_$(x)", "$(x)_denied", "$(x)_not_ok", "$(x)_error", "$(x)_not_kept", "$(x)_reached" };
repair_timeout => { "repair_timeout_$(x)", "$(x)_timeout", "$(x)_not_ok", "$(x)_error", "$(x)_not_kept", "$(x)_reached" };
promise_kept => { "promise_kept_$(x)", "$(x)_kept", "$(x)_ok", "$(x)_reached" };
}
results
Prototype: results(scope, class_prefix)
Description: Define classes prefixed with class_prefix and suffixed with
appropriate outcomes: _kept, _repaired, _not_kept, _error, _failed,
_denied, _timeout, _reached
Arguments:
scope: The scope in which the class should be defined (bundle or namespace)class_prefix: The prefix for the classes defined
This body can be applied to any promise and sets global
(namespace) or local (bundle) classes based on its outcome. For
instance, with class_prefix set to abc:
if the promise is to change a file's owner to nick and the file
was already owned by nick, the classes abc_reached and
abc_kept will be set.
if the promise is to change a file's owner to nick and the file
was owned by adam and the change succeeded, the classes
abc_reached and abc_repaired will be set.
This body is a simpler, more consistent version of the body
scoped_classes_generic, which see. The key difference is that
fewer classes are defined, and only for outcomes that we can know.
For example this body does not define "OK/not OK" outcome classes,
since a promise can be both kept and failed at the same time.
It's important to understand that promises may do multiple things,
so a promise is not simply "OK" or "not OK." The best way to
understand what will happen when your specific promises get this
body is to test it in all the possible combinations.
Suffix Notes:
_reached indicates the promise was tried. Any outcome will result
in a class with this suffix being defined.
_kept indicates some aspect of the promise was kept
_repaired indicates some aspect of the promise was repaired
_not_kept indicates some aspect of the promise was not kept.
error, failed, denied and timeout outcomes will result in a class
with this suffix being defined
_error indicates the promise repair encountered an error
_failed indicates the promise failed
_denied indicates the promise repair was denied
_timeout indicates the promise timed out
Example:
code
bundle agent example
{
commands:
"/bin/true"
classes => results("bundle", "my_class_prefix");
reports:
my_class_prefix_kept::
"My promise was kept";
my_class_prefix_repaired::
"My promise was repaired";
}
See also: scope, scoped_classes_generic, classes_generic
Implementation:
code
body classes results(scope, class_prefix)
{
scope => "$(scope)";
promise_kept => { "$(class_prefix)_reached",
"$(class_prefix)_kept" };
promise_repaired => { "$(class_prefix)_reached",
"$(class_prefix)_repaired" };
repair_failed => { "$(class_prefix)_reached",
"$(class_prefix)_error",
"$(class_prefix)_not_kept",
"$(class_prefix)_failed" };
repair_denied => { "$(class_prefix)_reached",
"$(class_prefix)_error",
"$(class_prefix)_not_kept",
"$(class_prefix)_denied" };
repair_timeout => { "$(class_prefix)_reached",
"$(class_prefix)_error",
"$(class_prefix)_not_kept",
"$(class_prefix)_timeout" };
}
diff_results
Prototype: diff_results(scope, x)
Description: Define x prefixed/suffixed with promise outcome with command return codes adjusted to align with diff.
Arguments:
scope: The scope the class should be defined with [bundle|namespace].x: The unique part of the classes to be defined.
From man diff:
Exit status is 0 if inputs are the same, 1 if
different, 2 if trouble.
Example:
code
bundle agent example
{
commands:
"/usr/bin/diff"
args => "/tmp/file1 /tmp/file2",
classes => diff_results("diff");
vars:
"c" slist => classesmatching("diff_.*");
reports:
"Found class '$(c)'";
"Files Differ!"
if => "diff_failed|diff_error|diff_not_kept";
"Files are the same."
if => "diff_kept";
}
Implementation:
code
body classes diff_results(scope, x)
{
inherit_from => results( $(scope), $(x) );
kept_returncodes => { "0" };
failed_returncodes => { "1","2" };
}
scoped_classes_generic
Prototype: scoped_classes_generic(scope, x)
Description: Define x prefixed/suffixed with promise outcome
See also: scope
Arguments:
scope: The scope in which the class should be definedx: The unique part of the classes to be defined
Implementation:
code
body classes scoped_classes_generic(scope, x)
{
scope => "$(scope)";
promise_repaired => { "promise_repaired_$(x)", "$(x)_repaired", "$(x)_ok", "$(x)_reached" };
repair_failed => { "repair_failed_$(x)", "$(x)_failed", "$(x)_not_ok", "$(x)_error", "$(x)_not_kept", "$(x)_reached" };
repair_denied => { "repair_denied_$(x)", "$(x)_denied", "$(x)_not_ok", "$(x)_error", "$(x)_not_kept", "$(x)_reached" };
repair_timeout => { "repair_timeout_$(x)", "$(x)_timeout", "$(x)_not_ok", "$(x)_error", "$(x)_not_kept", "$(x)_reached" };
promise_kept => { "promise_kept_$(x)", "$(x)_kept", "$(x)_ok", "$(x)_reached" };
}
state_repaired
Prototype: state_repaired(x)
Description: Define x for 10 minutes if the promise was repaired
Arguments:
x: The name of the class that should be defined
Implementation:
code
body classes state_repaired(x)
{
promise_repaired => { "$(x)" };
persist_time => "10";
scope => "namespace";
}
enumerate
Prototype: enumerate(x)
Description: Define x for 15 minutes if the promise is either kept or repaired
This is used by commercial editions to count instances of jobs in a cluster
Arguments:
x: The unique part of the class that should be defined
The class defined is prefixed with mXC_
Implementation:
code
body classes enumerate(x)
{
promise_repaired => { "mXC_$(x)" };
promise_kept => { "mXC_$(x)" };
persist_time => "15";
scope => "namespace";
}
always
Prototype: always(x)
Description: Define class x no matter what the outcome of the promise is
Arguments:
x: The name of the class to be defined
Implementation:
code
body classes always(x)
{
promise_repaired => { "$(x)" };
promise_kept => { "$(x)" };
repair_failed => { "$(x)" };
repair_denied => { "$(x)" };
repair_timeout => { "$(x)" };
}
kept_successful_command
Prototype: kept_successful_command
Description: Set command to "kept" instead of "repaired" if it returns 0
Implementation:
code
body classes kept_successful_command
{
kept_returncodes => { "0" };
}
lib/databases.cf
See the databases promises documentation for a
comprehensive reference on the body types and attributes used here.
local_mysql
Prototype: local_mysql(username, password)
Description: Defines a MySQL server running on localhost
Arguments:
username: The username for the server connectionpassword: The password for the server connection
See also: db_server_owner, db_server_password
Implementation:
code
body database_server local_mysql(username, password)
{
db_server_owner => "$(username)";
db_server_password => "$(password)";
db_server_host => "localhost";
db_server_type => "mysql";
db_server_connection_db => "mysql";
}
local_postgresql
Prototype: local_postgresql(username, password)
Description: Defines a PostgreSQL server running on localhost
Arguments:
username: The username for the server connectionpassword: The password for the server connection
See also: db_server_owner, db_server_password
Implementation:
code
body database_server local_postgresql(username, password)
{
db_server_owner => "$(username)";
db_server_password => "$(password)";
db_server_host => "localhost";
db_server_type => "postgres";
db_server_connection_db => "postgres";
}
lib/edit_xml.cf
xml_insert_tree_nopath
Prototype: xml_insert_tree_nopath(treestring)
Description: Insert XML tree with no path
This edit_xml bundle inserts the given XML tree. Use with an
empty XML document.
Arguments:
treestring: The XML tree, as a string
Example:
code
files:
"/newfile" edit_xml => xml_insert_tree_nopath('<x>y</x>');
Implementation:
code
bundle edit_xml xml_insert_tree_nopath(treestring)
{
insert_tree:
'$(treestring)';
}
xml_insert_tree
Prototype: xml_insert_tree(treestring, xpath)
Description: Insert XML tree at the given XPath
This edit_xml bundle inserts the given XML tree at a specific
XPath. Uses insert_tree.
Arguments:
treestring: The XML tree, as a stringxpath: A valid XPath string
Example:
code
files:
"/file.xml" edit_xml => xml_insert_tree('<x>y</x>', '/a/b/c');
Implementation:
code
bundle edit_xml xml_insert_tree(treestring, xpath)
{
insert_tree:
'$(treestring)' select_xpath => "$(xpath)";
}
xml_set_value
Prototype: xml_set_value(value, xpath)
Description: Sets or replaces a value in XML at the given XPath
This edit_xml bundle sets or replaces the value at a specific
XPath with the given value. Uses set_text.
Arguments:
value: The new valuexpath: A valid XPath string
Example:
code
files:
"/file.xml" edit_xml => xml_set_value('hello', '/a/b/c');
Implementation:
code
bundle edit_xml xml_set_value(value, xpath)
{
set_text:
"$(value)"
select_xpath => "$(xpath)";
}
xml_set_attribute
Prototype: xml_set_attribute(attr, value, xpath)
Description: Sets or replaces an attribute in XML at the given XPath
This edit_xml bundle sets or replaces an attribute at a specific
XPath with the given value. Uses set_attribute.
Arguments:
attr: The attribute namevalue: The new attribute valuexpath: A valid XPath string
Example:
code
files:
"/file.xml" edit_xml => xml_set_attribute('parameter', 'ha', '/a/b/c');
Implementation:
code
bundle edit_xml xml_set_attribute(attr, value, xpath)
{
set_attribute:
"$(attr)"
attribute_value => "$(value)",
select_xpath => "$(xpath)";
}
lib/event.cf
event_cancel_events
Prototype: event_cancel_events(events)
Description: Cancel any events
Arguments:
events: A slist of events to cancel
Implementation:
code
body classes event_cancel_events(events)
{
cancel_notkept => { @(events) };
cancel_kept => { @(events) };
cancel_repaired => { @(events) };
}
event_register
Prototype: event_register(prefix, type, name, persistence, metadata)
Description: Register a event_$(prefix)_$(type)_$(name) class with meta=metadata
Arguments:
prefix: The prefix (usually the issuing bundle name)type: The event typename: The event namepersistence: the time, in minutes, the class should persist on disk (unless collected)metadata: A slist with the event metadata
This bundle creates a class that conforms to the ad-hoc event protocol defined
herein.
See also: event_handle
Implementation:
code
bundle agent event_register(prefix, type, name, persistence, metadata)
{
vars:
"e" string => "event_$(prefix)_$(type)_$(name)";
"metadata_string" string => format("%S", metadata);
classes:
"$(e)" scope => "namespace",
persistence => $(persistence),
meta => { "event", "prefix=$(prefix)", "type=$(type)", "name=$(name)", @(metadata) };
reports:
inform_mode::
"$(this.bundle): creating event $(e) persistent for $(persistence) minutes with metadata $(metadata_string)";
}
event_handle
Prototype: event_handle(prefix, type)
Description: Handle all the events matching prefix and type through delegation
Arguments:
prefix: A prefix for the event, can be .* for alltype: A type for the event, can be .* for all
This bundle looks for all the event classes matching prefix and type, then
for all the bundles that have declared they can handle that prefix and type,
and then passes the corresponding event classes to each bundle.
See also: event_register
Implementation:
code
bundle agent event_handle(prefix, type)
{
vars:
"events_prefix" slist => classesmatching("event_.*", "prefix=$(prefix)");
"events_type" slist => classesmatching("event_.*", "type=$(type)");
"events" slist => intersection(events_prefix, events_type);
"events_string" string => format("%S", events);
"handlers_prefix" slist => bundlesmatching("default:event_.*", format("event_prefix=(%s|ALL)", escape($(prefix))));
"handlers_type" slist => bundlesmatching("default:event_.*", format("event_type=(%s|ALL)", escape($(type))));
"handlers" slist => intersection(handlers_prefix, handlers_type);
"handlers_string" string => format("%S", handlers);
methods:
"" usebundle => $(handlers)(@(events)),
classes => event_cancel_events(@(events));
reports:
inform_mode::
"$(this.bundle): with prefix $(prefix) and type $(type) found events $(events_string)";
"$(this.bundle): with prefix $(prefix) and type $(type) found handlers $(handlers_string)";
}
event_debug_handler
Prototype: event_debug_handler(events)
Description: Debug all the events matching the meta tags event_prefix and event_type
Arguments:
events: The list of events, passed from event_handle
This is an event handler that just prints out all the events it finds. To be
registered as a handler, it must have the meta tags indicated below.
See also: event_handle, event_register
Implementation:
code
bundle agent event_debug_handler(events)
{
meta:
"tags" slist => { "event_handler", "event_prefix=.*", "event_type=.*" };
vars:
"events_string" string => format("%S", events);
"tags_string" string => format("%S", "$(this.bundle)_meta.tags");
reports:
inform_mode::
"$(this.bundle): with tags $(tags_string) got events $(events_string)";
}
event_install_handler
Prototype: event_install_handler(events)
Description: Handle all the install events matching the meta tags event_prefix and event_type
Arguments:
events: The list of events, passed from event_handle
This is an event handler that just prints out all the install events it finds.
To be registered as a handler, it must have the meta tags indicated below.
The subtlety in event_prefix=ALL is that we want to match only
event_handle(ANYTHING, "install") but not event_handle(".*", ANYTHING). If
you're confused, just remember: debug handlers use event_prefix=.* and
everything else uses event_prefix=ALL.
See also: event_handle, event_register
Implementation:
code
bundle agent event_install_handler(events)
{
meta:
"tags" slist => { "event_handler", "event_prefix=ALL", "event_type=install" };
vars:
"events_string" string => format("%S", events);
"tags_string" string => format("%S", "$(this.bundle)_meta.tags");
reports:
inform_mode::
"$(this.bundle): with tags $(tags_string) got events $(events_string)";
}
event_usage_example
Prototype: event_usage_example
Description: Simple demo of event_register and event_handle usage
You can run it like this: cf-agent -K ./event.cf -b event_usage_example
Or for extra debugging, you can run it like this: cf-agent -KI ./event.cf -b event_usage_example
See also: event_handle, event_register
Expected output with -KI:
code
R: event_register: creating event event_event_usage_example_restart_apache persistent for 1440 minutes with metadata { }
R: event_register: creating event event_event_usage_example_install_php persistent for 2880 minutes with metadata { }
R: event_install_handler: with tags { "event_handler", "event_prefix=ALL", "event_type=install" } got events { "event_event_usage_example_install_php" }
R: event_handle: with prefix event_usage_example and type install found events { "event_event_usage_example_install_php" }
R: event_handle: with prefix event_usage_example and type install found handlers { "default:event_install_handler" }
R: event_debug_handler: with tags { "event_handler", "event_prefix=.*", "event_type=.*" } got events { "event_event_usage_example_restart_apache", "event_event_usage_example_install_php" }
R: event_handle: with prefix .* and type .* found events { "event_event_usage_example_restart_apache", "event_event_usage_example_install_php" }
R: event_handle: with prefix .* and type .* found handlers { "default:event_debug_handler" }
Implementation:
code
bundle agent event_usage_example
{
vars:
"empty" slist => {};
methods:
# register a restart event named "apache" with persistence = 1 day
"" usebundle => event_register($(this.bundle), "restart", "apache", 1440, @(empty)); # 1 day
# register an install event named "php" with persistence = 2 days
"" usebundle => event_register($(this.bundle), "install", "php", 2880, @(empty));
# the following can be run immediately, or up to 2 days later to collect
# the install event above
"" usebundle => event_handle($(this.bundle), "install");
# the following can be run immediately, or up to 1 day later to collect
# the restart event above
"" usebundle => event_handle(".*", ".*");
}
lib/examples.cf
probabilistic_usebundle
Prototype: probabilistic_usebundle(probability, bundlename)
Description: activate named bundle probabilistically
Arguments:
probability: probability that the named bundle will be activated during
a given agent executionbundlename: the bundle to activate based on the probability
Example:
code
bundle agent example
{
methods:
"Toss Coin"
usebundle => probabilistic_usebundle("50", "heads"),
comment => "Call bundle heads ~ 50% of the time";
"Trick Coin"
usebundle => probabilistic_usebundle("75", "heads"),
comment => "Call bundle heads ~ 75% of the time";
}
Implementation:
code
bundle agent probabilistic_usebundle(probability, bundlename)
{
classes:
"fifty_fifty"
expression => strcmp("$(probability)", "50"),
comment => "We have to special case 50 because of the way dist classes
work you would always get 50 defined";
"not_fifty_fifty" expression => "!fifty_fifty";
"have_remainder" expression => isvariable("remainder");
fifty_fifty.have_remainder::
"activate_bundle"
dist => { "$(probability)000", "$(remainder)"};
not_fifty_fifty.have_remainder::
"activate_bundle"
dist => { "$(probability)", "$(remainder)"};
vars:
fifty_fifty::
"remainder"
string => format("%d", eval("((100 - $(probability)) * 1000) +1", "math", "infix"));
not_fifty_fifty::
"remainder"
string => format("%d", eval("100 - $(probability)", "math", "infix"));
methods:
fifty_fifty::
"Activate bundle probabilistically"
handle => "probabilistic_usebundle_methods_special_case_fifty_fifty_activate_bundle",
usebundle => $(bundlename),
if => "activate_bundle_$(probability)000",
comment => "Activate $(bundlename) $(probability)%ish of the time";
not_fifty_fifty::
"Activate bundle probabilistically"
handle => "probabilistic_usebundle_methods_activate_bundle",
usebundle => $(bundlename),
if => "activate_bundle_$(probability)",
comment => "Activate $(bundlename) $(probability)% of the time";
reports:
DEBUG.fifty_fifty::
"$(this.bundle) Special case for 50/50";
"$(this.bundle) activate_bundle_$(probability)000"
if => "activate_bundle_$(probability)000";
"$(this.bundle) activate_bundle_$(probability)001"
if => "activate_bundle_$(probability)001";
}
lib/feature.cf
feature_cancel
Prototype: feature_cancel(x)
Description: Undefine class x when promise is kept or repaired
Used internally by bundle feature
Arguments:
Implementation:
code
body classes feature_cancel(x)
{
cancel_kept => { "$(x)" };
cancel_repaired => { "$(x)" };
}
feature
Prototype: feature
Description: Finds feature_set_X and feature_unset_X classes and sets/unsets X persistently
Finds all classes named feature_unset_X and clear class X.
Finds all classes named feature_set_DURATION_X and sets class X
persistently for DURATION. DURATION can be any digits followed by
k, m, or g.
In inform mode (-I) it will report what it does.
Example:
Set class xyz for 10 minutes, class qpr for 100 minutes, and
ijk for 90m minutes. Unset class abc.
cf-agent -I -f ./feature.cf -b feature -Dfeature_set_10_xyz,feature_set_100_qpr,feature_set_90m_ijk,feature_unset_abc
Implementation:
code
bundle agent feature
{
classes:
"parsed_$(on)" expression => regextract("feature_set_([0-9]+[kmgKMG]?)_(.*)",
$(on),
"extract_$(on)");
"parsed_$(off)" expression => regextract("feature_unset_(.*)",
$(off),
"extract_$(off)");
"$(extract_$(on)[2])" expression => "parsed_$(on)",
persistence => "$(extract_$(on)[1])";
vars:
"on" slist => classesmatching("feature_set_.*");
"off" slist => classesmatching("feature_unset_.*");
"_$(off)" string => "off", classes => feature_cancel("$(extract_$(off)[1])");
reports:
"DEBUG|DEBUG_$(this.bundle)"::
"DEBUG $(this.bundle): $(on) => SET class '$(extract_$(on)[2]) for '$(extract_$(on)[1])'"
if => "parsed_$(on)";
"DEBUG $(this.bundle): $(off) => UNSET class '$(extract_$(off)[1])'"
if => "parsed_$(off)";
"DEBUG $(this.bundle): have $(extract_$(on)[2])" if => "$(extract_$(on)[2])";
"DEBUG $(this.bundle): have no $(extract_$(on)[2])" if => "!$(extract_$(on)[2])";
"DEBUG $(this.bundle): have $(extract_$(off)[1])" if => "$(extract_$(off)[1])";
"DEBUG $(this.bundle): have no $(extract_$(off)[1])" if => "!$(extract_$(off)[1])";
}
feature_test
Prototype: feature_test
Description: Finds feature_set_X and feature_unset_X classes and reports X
Note that this bundle is intended to be used exactly like feature
and just show what's defined or undefined.
Example:
Check classes xyz, qpr, ijk, and abc.
cf-agent -I -f ./feature.cf -b feature_test -Dfeature_set_10_xyz,feature_set_100_qpr,feature_set_90m_ijk,feature_unset_abc
Implementation:
code
bundle agent feature_test
{
classes:
"parsed_$(on)" expression => regextract("feature_set_([0-9]+[kmgKMG]?)_(.*)",
$(on),
"extract_$(on)");
"parsed_$(off)" expression => regextract("feature_unset_(.*)",
$(off),
"extract_$(off)");
vars:
"on" slist => classesmatching("feature_set_.*");
"off" slist => classesmatching("feature_unset_.*");
reports:
"$(this.bundle): have $(extract_$(on)[2])" if => "$(extract_$(on)[2])";
"$(this.bundle): have no $(extract_$(on)[2])" if => "!$(extract_$(on)[2])";
"$(this.bundle): have $(extract_$(off)[1])" if => "$(extract_$(off)[1])";
"$(this.bundle): have no $(extract_$(off)[1])" if => "!$(extract_$(off)[1])";
}
lib/files.cf
See the files promises and edit_line bundles
documentation for a comprehensive reference on
the bundles, body types, and attributes used here.
control
Prototype: control
Description: Include policy files used by this policy file as part of inputs
Implementation:
code
body file control
{
inputs => { @(files_common.inputs) };
}
fstab_options
Prototype: fstab_options(newval, method)
Description: Edit the options field in a fstab format
Arguments:
This body edits the options field in the fstab file format. The
method is a field_operation which can be append, prepend,
set, delete, or alphanum. The newval option is OS-specific.
Example:
code
# from the `fstab_options_editor`
field_edits:
"(?!#)\S+\s+$(mount)\s.+"
edit_field => fstab_options($(option), $(method));
Implementation:
code
body edit_field fstab_options(newval, method)
{
field_separator => "\s+";
select_field => "4";
value_separator => ",";
field_value => "$(newval)";
field_operation => "$(method)";
}
quoted_var
Prototype: quoted_var(newval, method)
Description: Edit the quoted value of the matching line
Arguments:
newval: The new valuemethod: The method by which to edit the field
Implementation:
code
body edit_field quoted_var(newval,method)
{
field_separator => "\"";
select_field => "2";
value_separator => " ";
field_value => "$(newval)";
field_operation => "$(method)";
extend_fields => "false";
allow_blank_fields => "true";
}
col
Prototype: col(split, col, newval, method)
Description: Edit tabluar data with comma-separated sub-values
Arguments:
split: The separator that defines columnscol: The (1-based) index of the value to changenewval: The new valuemethod: The method by which to edit the field
Implementation:
code
body edit_field col(split,col,newval,method)
{
field_separator => "$(split)";
select_field => "$(col)";
value_separator => ",";
field_value => "$(newval)";
field_operation => "$(method)";
extend_fields => "true";
allow_blank_fields => "true";
}
line
Prototype: line(split, col, newval, method)
Description: Edit tabular data with space-separated sub-values
Arguments:
split: The separator that defines columnscol: The (1-based) index of the value to changenewval: The new valuemethod: The method by which to edit the field
Implementation:
code
body edit_field line(split,col,newval,method)
{
field_separator => "$(split)";
select_field => "$(col)";
value_separator => " ";
field_value => "$(newval)";
field_operation => "$(method)";
extend_fields => "true";
allow_blank_fields => "true";
}
text_between_match1_and_match2
Prototype: text_between_match1_and_match2(_text)
Description: Replace matched line with substituted string
Arguments:
_text: String to substitute between first and second match
Implementation:
code
body replace_with text_between_match1_and_match2( _text )
{
replace_value => "$(match.1)$(_text)$(match.2)";
occurrences => "all";
}
value
Prototype: value(x)
Description: Replace matching lines
Arguments:
x: The replacement string
Implementation:
code
body replace_with value(x)
{
replace_value => "$(x)";
occurrences => "all";
}
INI_section
Prototype: INI_section(x)
Description: Restrict the edit_line promise to the lines in section [x]
Arguments:
x: The name of the section in an INI-like configuration file
Implementation:
code
body select_region INI_section(x)
{
select_start => "\[$(x)\]\s*";
select_end => "\[.*\]\s*";
@if minimum_version(3.10)
select_end_match_eof => "true";
@endif
}
std_defs
Prototype: std_defs
Description: Standard definitions for edit_defaults
Don't empty the file before editing starts and don't make a backup.
Implementation:
code
body edit_defaults std_defs
{
empty_file_before_editing => "false";
edit_backup => "false";
#max_file_size => "300000";
}
empty
Prototype: empty
Description: Empty the file before editing
No backup is made
Implementation:
code
body edit_defaults empty
{
empty_file_before_editing => "true";
edit_backup => "false";
#max_file_size => "300000";
}
no_backup
Prototype: no_backup
Description: Don't make a backup of the file before editing
Implementation:
code
body edit_defaults no_backup
{
edit_backup => "false";
}
backup_timestamp
Prototype: backup_timestamp
Description: Make a timestamped backup of the file before editing
Implementation:
code
body edit_defaults backup_timestamp
{
empty_file_before_editing => "false";
edit_backup => "timestamp";
#max_file_size => "300000";
}
start
Prototype: start
Description: Editing occurs before the matched line
Implementation:
code
body location start
{
before_after => "before";
}
after
Prototype: after(str)
Description: Editing occurs after the line matching str
Arguments:
str: Regular expression matching the file line location
Implementation:
code
body location after(str)
{
before_after => "after";
select_line_matching => "$(str)";
}
before
Prototype: before(str)
Description: Editing occurs before the line matching str
Arguments:
str: Regular expression matching the file line location
Implementation:
code
body location before(str)
{
before_after => "before";
select_line_matching => "$(str)";
}
Prototype: comment(c)
Description: Comment all lines matching the pattern by preprending c
Arguments:
c: The prefix that comments out lines
Implementation:
code
body replace_with comment(c)
{
replace_value => "$(c) $(match.1)";
occurrences => "all";
}
Prototype: uncomment
Description: Uncomment all lines matching the pattern by removing
anything outside the matching string
Implementation:
code
body replace_with uncomment
{
replace_value => "$(match.1)";
occurrences => "all";
}
secure_cp
Prototype: secure_cp(from, server)
Description: Download a file from a remote server over an encrypted channel
Only copy the file if it is different from the local copy, and verify
that the copy is correct.
Arguments:
from: The location of the file on the remote serverserver: The hostname or IP of the server from which to download
Implementation:
code
body copy_from secure_cp(from,server)
{
source => "$(from)";
servers => { "$(server)" };
compare => "digest";
encrypt => "true";
verify => "true";
}
remote_cp
Prototype: remote_cp(from, server)
Description: Download a file from a remote server.
Arguments:
from: The location of the file on the remote serverserver: The hostname or IP of the server from which to download
Implementation:
code
body copy_from remote_cp(from,server)
{
servers => { "$(server)" };
source => "$(from)";
compare => "mtime";
}
remote_dcp
Prototype: remote_dcp(from, server)
Description: Download a file from a remote server if it is different from the local copy.
Arguments:
from: The location of the file on the remote serverserver: The hostname or IP of the server from which to download
See Also: local_dcp()
Implementation:
code
body copy_from remote_dcp(from,server)
{
servers => { "$(server)" };
source => "$(from)";
compare => "digest";
}
local_cp
Prototype: local_cp(from)
Description: Copy a file if the modification time or creation time of the source
file is newer (the default comparison mechanism).
Arguments:
from: The path to the source file.
Example:
code
bundle agent example
{
files:
"/tmp/file.bak"
copy_from => local_cp("/tmp/file");
}
See Also: local_dcp()
Implementation:
code
body copy_from local_cp(from)
{
source => "$(from)";
}
local_dcp
Prototype: local_dcp(from)
Description: Copy a local file if the hash on the source file differs.
Arguments:
from: The path to the source file.
Example:
code
bundle agent example
{
files:
"/tmp/file.bak"
copy_from => local_dcp("/tmp/file");
}
See Also: local_cp(), remote_dcp()
Implementation:
code
body copy_from local_dcp(from)
{
source => "$(from)";
compare => "digest";
}
perms_cp
Prototype: perms_cp(from)
Description: Copy a local file and preserve file permissions on the local copy.
Arguments:
from: The path to the source file.
Implementation:
code
body copy_from perms_cp(from)
{
source => "$(from)";
preserve => "true";
}
perms_dcp
Prototype: perms_dcp(from)
Description: Copy a local file if it is different from the existing copy and
preserve file permissions on the local copy.
Arguments:
from: The path to the source file.
Implementation:
code
body copy_from perms_dcp(from)
{
source => "$(from)";
preserve => "true";
compare => "digest";
}
backup_local_cp
Prototype: backup_local_cp(from)
Description: Copy a local file and keep a backup of old versions.
Arguments:
from: The path to the source file.
Implementation:
code
body copy_from backup_local_cp(from)
{
source => "$(from)";
copy_backup => "timestamp";
}
seed_cp
Prototype: seed_cp(from)
Description: Copy a local file if the file does not already exist, i.e. seed the
placement
Arguments:
from: The path to the source file.
Example:
code
bundle agent home_dir_init
{
files:
"/home/mark.burgess/."
copy_from => seed_cp("/etc/skel"),
depth_search => recurse(inf),
file_select => all,
comment => "We want to be sure that the home directory has files that are
present in the skeleton.";
}
Implementation:
code
body copy_from seed_cp(from)
{
source => "$(from)";
compare => "exists";
}
sync_cp
Prototype: sync_cp(from, server)
Description: Synchronize a file with a remote server.
- If the file does not exist on the remote server then it should be purged.
- Allow types to change (directories to files and vice versa).
- The mode of the remote file should be preserved.
- Files are compared using the default comparison (mtime or ctime).
Arguments:
from: The location of the file on the remote serverserver: The hostname or IP of the server from which to download
Example:
code
files:
"/tmp/masterfiles/."
copy_from => sync_cp( "/var/cfengine/masterfiles", $(sys.policy_server) ),
depth_search => recurse(inf),
file_select => all,
comment => "Mirror masterfiles from the hub to a temporary directory";
See Also: dir_sync(), copyfrom_sync()
Implementation:
code
body copy_from sync_cp(from,server)
{
servers => { "$(server)" };
source => "$(from)";
purge => "true";
preserve => "true";
type_check => "false";
}
no_backup_cp
Prototype: no_backup_cp(from)
Description: Copy a local file and don't make any backup of the previous version
Arguments:
from: The path to the source file.
Implementation:
code
body copy_from no_backup_cp(from)
{
source => "$(from)";
copy_backup => "false";
}
no_backup_cp_compare
Prototype: no_backup_cp_compare(from, comparison)
Description: Copy a local file (from) based on comparison (comparison) and don't make any backup of the previous version
Arguments:
from: The path to the source file.comparison: The comparison to use. (mtime|ctime|atime|exists|binary|hash|digest)
Implementation:
code
body copy_from no_backup_cp_compare(from, comparison)
{
source => "$(from)";
copy_backup => "false";
compare => "$(comparison)";
}
no_backup_dcp
Prototype: no_backup_dcp(from)
Description: Copy a local file if contents have changed, and don't make any backup
of the previous version
Arguments:
from: The path to the source file.
Implementation:
code
body copy_from no_backup_dcp(from)
{
source => "$(from)";
copy_backup => "false";
compare => "digest";
}
no_backup_rcp
Prototype: no_backup_rcp(from, server)
Description: Download a file if it's newer than the local copy, and don't make any
backup of the previous version
Arguments:
from: The location of the file on the remote serverserver: The hostname or IP of the server from which to download
Implementation:
code
body copy_from no_backup_rcp(from,server)
{
servers => { "$(server)" };
source => "$(from)";
compare => "mtime";
copy_backup => "false";
}
ln_s
Prototype: ln_s(x)
Description: Create a symbolink link to x
The link is created even if the source of the link does not exist.
Arguments:
x: The source of the link
Implementation:
code
body link_from ln_s(x)
{
link_type => "symlink";
source => "$(x)";
when_no_source => "force";
}
linkchildren
Prototype: linkchildren(tofile)
Description: Create a symbolink link to tofile
If the promiser is a directory, children are linked to the source, unless
entries with identical names already exist.
The link is created even if the source of the link does not exist.
Arguments:
tofile: The source of the link
Implementation:
code
body link_from linkchildren(tofile)
{
source => "$(tofile)";
link_type => "symlink";
when_no_source => "force";
link_children => "true";
when_linking_children => "if_no_such_file"; # "override_file";
}
linkfrom
Prototype: linkfrom(source, type)
Description: Make any kind of link to a file
Arguments:
source: link to thistype: the link's type (symlink or hardlink)
Implementation:
code
body link_from linkfrom(source, type)
{
source => $(source);
link_type => $(type);
}
m
Prototype: m(mode)
Description: Set the file mode
Arguments:
Implementation:
code
body perms m(mode)
{
mode => "$(mode)";
#+begin_ENT-951
# Remove after 3.20 is not supported
rxdirs => "true";
@if minimum_version(3.20)
rxdirs => "false";
@endif
#+end
}
mo
Prototype: mo(mode, user)
Description: Set the file's mode and owners
Arguments:
mode: The new modeuser: The username of the new owner
Implementation:
code
body perms mo(mode,user)
{
owners => { "$(user)" };
mode => "$(mode)";
#+begin_ENT-951
# Remove after 3.20 is not supported
rxdirs => "true";
@if minimum_version(3.20)
rxdirs => "false";
@endif
#+end
}
mog
Prototype: mog(mode, user, group)
Description: Set the file's mode, owner and group
Arguments:
mode: The new modeuser: The username of the new ownergroup: The group name
Implementation:
code
body perms mog(mode,user,group)
{
owners => { "$(user)" };
groups => { "$(group)" };
mode => "$(mode)";
#+begin_ENT-951
# Remove after 3.20 is not supported
rxdirs => "true";
@if minimum_version(3.20)
rxdirs => "false";
@endif
#+end
}
og
Prototype: og(u, g)
Description: Set the file's owner and group
Arguments:
u: The username of the new ownerg: The group name
Implementation:
code
body perms og(u,g)
{
owners => { "$(u)" };
groups => { "$(g)" };
}
owner
Prototype: owner(user)
Description: Set the file's owner
Arguments:
user: The username of the new owner
Implementation:
code
body perms owner(user)
{
owners => { "$(user)" };
}
system_owned
Prototype: system_owned(mode)
Description: Set the file owner and group to the system default
Arguments:
mode: the access permission in octal format
Example:
code
files:
"/etc/passwd" perms => system_owned("0644");
Implementation:
code
body perms system_owned(mode)
{
mode => "$(mode)";
#+begin_ENT-951
# Remove after 3.20 is not supported
rxdirs => "true";
@if minimum_version(3.20)
rxdirs => "false";
@endif
#+end
!windows::
owners => { "root" };
windows::
# NOTE: Setting owners will generate an error if the policy is not being
# executed as the user who's ownership is being targeted. While it seems
# that should typically be Administrator or SYSTEM, both are reported to
# result in errors by users, thus owners is currently omitted for Windows.
# ENT-9778
groups => { "Administrators" };
freebsd|openbsd|netbsd|darwin::
groups => { "wheel" };
linux::
groups => { "root" };
solaris::
groups => { "sys" };
aix::
groups => { "system" };
}
acl bodies
access_generic
Prototype: access_generic(acl)
Description: Set the aces of the access control as specified
Default/inherited ACLs are left unchanged. This body is
applicable for both files and directories on all platforms.
Arguments:
Implementation:
code
body acl access_generic(acl)
{
acl_method => "overwrite";
aces => { "@(acl)" };
windows::
acl_type => "ntfs";
!windows::
acl_type => "posix";
}
ntfs
Prototype: ntfs(acl)
Description: Set the aces on NTFS file systems, and overwrite
existing ACLs.
This body requires CFEngine Enterprise.
Arguments:
Implementation:
code
body acl ntfs(acl)
{
acl_type => "ntfs";
acl_method => "overwrite";
aces => { "@(acl)" };
}
strict
Prototype: strict
Description: Limit file access via ACLs to users with administrator privileges,
overwriting existing ACLs.
Note: May need to take ownership of file/dir to be sure no-one else is
allowed access.
Implementation:
code
body acl strict
{
acl_method => "overwrite";
windows::
aces => { "user:Administrator:rwx" };
!windows::
aces => { "user:root:rwx" };
}
recurse
Prototype: recurse(d)
Description: Search files and direcories recursively, up to the specified depth
Directories on different devices are excluded.
Arguments:
d: The maximum search depth
Implementation:
code
body depth_search recurse(d)
{
depth => "$(d)";
xdev => "true";
}
recurse_ignore
Prototype: recurse_ignore(d, list)
Description: Search files and directories recursively,
but don't recurse into the specified directories
Arguments:
d: The maximum search depthlist: The list of directories to be excluded
Implementation:
code
body depth_search recurse_ignore(d,list)
{
depth => "$(d)";
exclude_dirs => { @(list) };
}
include_base
Prototype: include_base
Description: Search files and directories recursively,
starting from the base directory.
Implementation:
code
body depth_search include_base
{
include_basedir => "true";
}
recurse_with_base
Prototype: recurse_with_base(d)
Description: Search files and directories recursively up to the specified
depth, starting from the base directory excluding directories on
other devices.
Arguments:
d: The maximum search depth
Implementation:
code
body depth_search recurse_with_base(d)
{
depth => "$(d)";
xdev => "true";
include_basedir => "true";
}
tidy
Prototype: tidy
Description: Delete the file and remove empty directories
and links to directories
Implementation:
code
body delete tidy
{
dirlinks => "delete";
rmdirs => "true";
}
disable
Prototype: disable
Description: Disable the file
Implementation:
code
body rename disable
{
disable => "true";
}
rotate
Prototype: rotate(level)
Description: Rotate and store up to level backups of the file
Arguments:
level: The number of backups to store
Implementation:
code
body rename rotate(level)
{
rotate => "$(level)";
}
to
Prototype: to(file)
Description: Rename the file to file
Arguments:
file: The new name of the file
Implementation:
code
body rename to(file)
{
newname => "$(file)";
}
name_age
Prototype: name_age(name, days)
Description: Select files that have a matching name and have not been modified for at least days
Arguments:
name: A regex that matches the file namedays: Number of days
Implementation:
code
body file_select name_age(name,days)
{
leaf_name => { "$(name)" };
mtime => irange(0,ago(0,0,"$(days)",0,0,0));
file_result => "mtime.leaf_name";
}
days_old
Prototype: days_old(days)
Description: Select files that have not been modified for at least days
Arguments:
Implementation:
code
body file_select days_old(days)
{
mtime => irange(0,ago(0,0,"$(days)",0,0,0));
file_result => "mtime";
}
size_range
Prototype: size_range(from, to)
Description: Select files that have a size within the specified range
Arguments:
from: The lower bound of the allowed file sizeto: The upper bound of the allowed file size
Implementation:
code
body file_select size_range(from,to)
{
search_size => irange("$(from)","$(to)");
file_result => "size";
}
bigger_than
Prototype: bigger_than(size)
Description: Select files that are above a given size
Arguments:
size: The number of bytes files have
Implementation:
code
body file_select bigger_than(size)
{
search_size => irange("0","$(size)");
file_result => "!size";
}
exclude
Prototype: exclude(name)
Description: Select all files except those that match name
Arguments:
name: A regular expression
Implementation:
code
body file_select exclude(name)
{
leaf_name => { "$(name)"};
file_result => "!leaf_name";
}
not_dir
Prototype: not_dir
Description: Select all files that are not directories
Implementation:
code
body file_select not_dir
{
file_types => { "dir" };
file_result => "!file_types";
}
plain
Prototype: plain
Description: Select plain, regular files
Implementation:
code
body file_select plain
{
file_types => { "plain" };
file_result => "file_types";
}
dirs
Prototype: dirs
Description: Select directories
Implementation:
code
body file_select dirs
{
file_types => { "dir" };
file_result => "file_types";
}
by_name
Prototype: by_name(names)
Description: Select files that match names
Arguments:
names: A regular expression
Implementation:
code
body file_select by_name(names)
{
leaf_name => { @(names)};
file_result => "leaf_name";
}
ex_list
Prototype: ex_list(names)
Description: Select all files except those that match names
Arguments:
names: A list of regular expressions
Implementation:
code
body file_select ex_list(names)
{
leaf_name => { @(names) };
file_result => "!leaf_name";
}
all
Prototype: all
Description: Select all file system entries
Implementation:
code
body file_select all
{
leaf_name => { ".*" };
file_result => "leaf_name";
}
older_than
Prototype: older_than(years, months, days, hours, minutes, seconds)
Description: Select files older than the date-time specified
Arguments:
years: Number of yearsmonths: Number of monthsdays: Number of dayshours: Number of hoursminutes: Number of minutesseconds: Number of seconds
Generic older_than selection body, aimed to have a common definition handy
for every case possible.
Implementation:
code
body file_select older_than(years, months, days, hours, minutes, seconds)
{
mtime => irange(0,ago("$(years)","$(months)","$(days)","$(hours)","$(minutes)","$(seconds)"));
file_result => "mtime";
}
filetype_older_than
Prototype: filetype_older_than(filetype, days)
Description: Select files of specified type older than specified number of days
Arguments:
filetype: File type to selectdays: Number of days
This body only takes a single filetype, see filetypes_older_than()
if you want to select more than one type of file.
Implementation:
code
body file_select filetype_older_than(filetype, days)
{
file_types => { "$(filetype)" };
mtime => irange(0,ago(0,0,"$(days)",0,0,0));
file_result => "file_types.mtime";
}
filetypes_older_than
Prototype: filetypes_older_than(filetypes, days)
Description: Select files of specified types older than specified number of days
This body only takes a list of filetypes
Arguments:
filetypes: A list of file typesdays: Number of days
See also: filetype_older_than()
Implementation:
code
body file_select filetypes_older_than(filetypes, days)
{
file_types => { @(filetypes) };
mtime => irange(0,ago(0,0,"$(days)",0,0,0));
file_result => "file_types.mtime";
}
symlinked_to
Prototype: symlinked_to(target)
Description: Select symlinks that point to $(target)
Arguments:
target: The file the symlink should point to in order to be selected
Implementation:
code
body file_select symlinked_to(target)
{
file_types => { "symlink" };
issymlinkto => { "$(target)" };
file_result => "issymlinkto";
}
detect_all_change
Prototype: detect_all_change
Description: Detect all file changes using the best hash method
This is fierce, and will cost disk cycles
Implementation:
code
body changes detect_all_change
{
hash => "best";
report_changes => "all";
update_hashes => "yes";
}
detect_all_change_using
Prototype: detect_all_change_using(hash)
Description: Detect all file changes using a given hash method
Detect all changes using a configurable hashing algorithm
for times when you care about both content and file stats e.g. mtime
Arguments:
hash: supported hashing algorithm (md5, sha1, sha224, sha256, sha384, sha512, best)
Implementation:
code
body changes detect_all_change_using(hash)
{
hash => "$(hash)";
report_changes => "all";
update_hashes => "yes";
}
detect_content
Prototype: detect_content
Description: Detect file content changes using md5
This is a cheaper alternative
Implementation:
code
body changes detect_content
{
hash => "md5";
report_changes => "content";
update_hashes => "yes";
}
detect_content_using
Prototype: detect_content_using(hash)
Description: Detect file content changes using a given hash algorithm.
For times when you only care about content, not file stats e.g. mtime
Arguments:
hash: - supported hashing algorithm (md5, sha1, sha224, sha256, sha384,
sha512, best)
Implementation:
code
body changes detect_content_using(hash)
{
hash => "$(hash)";
report_changes => "content";
update_hashes => "yes";
}
noupdate
Prototype: noupdate
Description: Detect content changes in (small) files that should never change
Implementation:
code
body changes noupdate
{
hash => "sha256";
report_changes => "content";
update_hashes => "no";
}
diff
Prototype: diff
Description: Detect file content changes using sha256
and report the diff to CFEngine Enterprise
Implementation:
code
body changes diff
{
hash => "sha256";
report_changes => "content";
report_diffs => "true";
update_hashes => "yes";
}
all_changes
Prototype: all_changes
Description: Detect all file changes using sha256
and report the diff to CFEngine Enterprise
Implementation:
code
body changes all_changes
{
hash => "sha256";
report_changes => "all";
report_diffs => "true";
update_hashes => "yes";
}
diff_noupdate
Prototype: diff_noupdate
Description: Detect content changes in (small) files
and report the diff to CFEngine Enterprise
Implementation:
code
body changes diff_noupdate
{
hash => "sha256";
report_changes => "content";
report_diffs => "true";
update_hashes => "no";
}
copyfrom_sync
Prototype: copyfrom_sync(f)
Description: Copy a directory or file with digest checksums, preserving attributes and purging leftovers
Arguments:
Implementation:
code
body copy_from copyfrom_sync(f)
{
source => "$(f)";
purge => "true";
preserve => "true";
type_check => "false";
compare => "digest";
}
files_common
Prototype: files_common
Description: Enumerate policy files used by this policy file for inclusion to inputs
Implementation:
code
bundle common files_common
{
vars:
"inputs" slist => { "$(this.promise_dirname)/common.cf" };
}
insert_before_if_no_line
Prototype: insert_before_if_no_line(before, string)
Description: Insert string before before if string is not found in the file
Arguments:
before: The regular expression matching the line which string will be
inserted beforestring: The string to be prepended
Implementation:
code
bundle edit_line insert_before_if_no_line(before, string)
{
insert_lines:
"$(string)"
location => before($(before)),
comment => "Prepend a line to the file if it doesn't already exist";
}
insert_file
Prototype: insert_file(templatefile)
Description: Reads the lines from templatefile and inserts those into the
file being edited.
Arguments:
templatefile: The name of the file from which to import lines.
Implementation:
code
bundle edit_line insert_file(templatefile)
{
insert_lines:
"$(templatefile)"
comment => "Insert the template file into the file being edited",
insert_type => "file";
}
lines_present
Prototype: lines_present(lines)
Description: Ensure lines are present in the file. Lines that do not exist are appended to the file
Arguments:
lines: List or string that should be present in the file
Example:
code
bundle agent example
{
vars:
"nameservers" slist => { "8.8.8.8", "8.8.4.4" };
files:
"/etc/resolv.conf" edit_line => lines_present( @(nameservers) );
"/etc/ssh/sshd_config" edit_line => lines_present( "PermitRootLogin no" );
}
Implementation:
code
bundle edit_line lines_present(lines)
{
insert_lines:
"$(lines)"
comment => "Append lines if they don't exist";
}
insert_lines
Prototype: insert_lines(lines)
Description: Alias for lines_present
Arguments:
lines: List or string that should be present in the file
Implementation:
code
bundle edit_line insert_lines(lines)
{
insert_lines:
"$(lines)"
comment => "Append lines if they don't exist";
}
append_if_no_line
Prototype: append_if_no_line(lines)
Description: Alias for lines_present
Arguments:
lines: List or string that should be present in the file
Implementation:
code
bundle edit_line append_if_no_line(lines)
{
insert_lines:
"$(lines)"
comment => "Append lines if they don't exist";
}
append_if_no_lines
Prototype: append_if_no_lines(lines)
Description: Alias for lines_present
Arguments:
lines: List or string that should be present in the file
Implementation:
code
bundle edit_line append_if_no_lines(lines)
{
insert_lines:
"$(lines)"
comment => "Append lines if they don't exist";
}
Prototype: comment_lines_matching(regex, comment)
Description: Comment lines in the file that matching an anchored regex
Arguments:
regex: Anchored regex that the entire line needs to matchcomment: A string that is prepended to matching lines
Implementation:
code
bundle edit_line comment_lines_matching(regex,comment)
{
replace_patterns:
"^($(regex))$"
replace_with => comment("$(comment)"),
comment => "Search and replace string";
}
contains_literal_string
Prototype: contains_literal_string(string)
Description: Ensure the literal string is present in the promised file
Arguments:
string: The string (potentially multiline) to ensure exists in the
promised file.
Implementation:
code
bundle edit_line contains_literal_string(string)
{
insert_lines:
"$(string)"
insert_type => "preserve_block",
expand_scalars => "false",
whitespace_policy => { "exact_match" };
}
Prototype: uncomment_lines_matching(regex, comment)
Description: Uncomment lines of the file where the regex matches
the entire text after the comment string
Arguments:
regex: The regex that lines need to match after commentcomment: The prefix of the line that is removed
Implementation:
code
bundle edit_line uncomment_lines_matching(regex,comment)
{
replace_patterns:
"^$(comment)\s?($(regex))$"
replace_with => uncomment,
comment => "Uncomment lines matching a regular expression";
}
Prototype: comment_lines_containing(regex, comment)
Description: Comment lines of the file matching a regex
Arguments:
regex: A regex that a part of the line needs to matchcomment: A string that is prepended to matching lines
Implementation:
code
bundle edit_line comment_lines_containing(regex,comment)
{
replace_patterns:
"^((?!$(comment)).*$(regex).*)$"
replace_with => comment("$(comment)"),
comment => "Comment out lines in a file";
}
Prototype: uncomment_lines_containing(regex, comment)
Description: Uncomment lines of the file where the regex matches
parts of the text after the comment string
Arguments:
regex: The regex that lines need to match after commentcomment: The prefix of the line that is removed
Implementation:
code
bundle edit_line uncomment_lines_containing(regex,comment)
{
replace_patterns:
"^$(comment)\s?(.*$(regex).*)$"
replace_with => uncomment,
comment => "Uncomment a line containing a fragment";
}
delete_lines_matching
Prototype: delete_lines_matching(regex)
Description: Delete lines matching a regular expression
Arguments:
regex: The regular expression that the lines need to match
Implementation:
code
bundle edit_line delete_lines_matching(regex)
{
delete_lines:
"$(regex)"
comment => "Delete lines matching regular expressions";
}
warn_lines_matching
Prototype: warn_lines_matching(regex)
Description: Warn about lines matching a regular expression
Arguments:
regex: The regular expression that the lines need to match
Implementation:
code
bundle edit_line warn_lines_matching(regex)
{
delete_lines:
"$(regex)"
comment => "Warn about lines in a file",
action => warn_only;
}
prepend_if_no_line
Prototype: prepend_if_no_line(string)
Description: Prepend string if it doesn't exist in the file
Arguments:
string: The string to be prepended
See also:
Implementation:
code
bundle edit_line prepend_if_no_line(string)
{
insert_lines:
"$(string)"
location => start,
comment => "Prepend a line to the file if it doesn't already exist";
}
replace_line_end
Prototype: replace_line_end(start, end)
Description: Give lines starting with start the ending given in end
Whitespaces will be left unmodified. For example,
replace_line_end("ftp", "2121/tcp") would replace
"ftp 21/tcp"
with
"ftp 2121/tcp"
Arguments:
start: The string lines have to start withend: The string lines should end with
Implementation:
code
bundle edit_line replace_line_end(start,end)
{
field_edits:
"\s*$(start)\s.*"
comment => "Replace lines with $(this.start) and $(this.end)",
edit_field => line("(^|\s)$(start)\s*", "2", "$(end)","set");
}
Prototype: replace_uncommented_substrings(_comment, _find, _replace)
Description: Replace all occurrences of _find with _replace on lines that do not follow a _comment
Arguments:
_comment: Sequence of characters, each indicating the start of a comment._find: String matching substring to replace_replace: String to substitute _find with
Example:
code
bundle agent example_replace_uncommented_substrings
{
files:
"/tmp/file.txt"
edit_line => replace_uncommented_substrings( "#", "ME", "YOU");
}
Notes:
- Only single character comments are supported as
_comment is used in the PCRE character group ([^...]).
- in _comment is interpreted as a range unless it's used as the first or last character. For example, setting _comment to 0-9 means any digit starts a comment.
History:
- Introduced 3.17.0, 3.15.3
Implementation:
code
bundle edit_line replace_uncommented_substrings( _comment, _find, _replace )
{
vars:
"_reg_match_uncommented_lines_containing_find"
string => "^([^$(_comment)]*)\Q$(_find)\E(.*$)";
replace_patterns:
"$(_reg_match_uncommented_lines_containing_find)"
replace_with => text_between_match1_and_match2( $(_replace) );
}
append_to_line_end
Prototype: append_to_line_end(start, end)
Description: Append end to any lines beginning with start
end will be appended to all lines starting with start and not
already ending with end. Whitespaces will be left unmodified.
For example, append_to_line_end("kernel", "vga=791") would replace
kernel /boot/vmlinuz root=/dev/sda7
with
kernel /boot/vmlinuz root=/dev/sda7 vga=791
WARNING: Be careful not to have multiple promises matching the same line, which would result in the line growing indefinitely.
Arguments:
start: pattern to match lines of interestend: string to append to matched lines
Example:
code
files:
"/tmp/boot-options" edit_line => append_to_line_end("kernel", "vga=791");
Implementation:
code
bundle edit_line append_to_line_end(start,end)
{
field_edits:
"\s*$(start)\s.*"
comment => "Append lines with $(this.start) and $(this.end)",
edit_field => line("(^|\s)$(start)\s*", "2", "$(end)","append");
}
regex_replace
Prototype: regex_replace(find, replace)
Description: Find exactly a regular expression and replace exactly the match with a string.
You can think of this like a PCRE powered sed.
Arguments:
find: The regular expressionreplace: The replacement string
Implementation:
code
bundle edit_line regex_replace(find,replace)
{
replace_patterns:
"$(find)"
replace_with => value("$(replace)"),
comment => "Search and replace string";
}
resolvconf
Prototype: resolvconf(search, list)
Description: Adds search domains and name servers to the system
resolver configuration.
Use this bundle to modify resolv.conf. Existing entries for
search and nameserver are replaced.
Arguments:
search: The search domains with spacelist: An slist of nameserver addresses
Implementation:
code
bundle edit_line resolvconf(search,list)
{
delete_lines:
"search.*" comment => "Reset search lines from resolver";
"nameserver.*" comment => "Reset nameservers in resolver";
insert_lines:
"search $(search)" comment => "Add search domains to resolver";
"nameserver $(list)" comment => "Add name servers to resolver";
}
resolvconf_o
Prototype: resolvconf_o(search, list, options)
Description: Adds search domains, name servers and options to the system
resolver configuration.
Use this bundle to modify resolv.conf. Existing entries for
search, nameserver and options are replaced.
Arguments:
search: The search domains with spacelist: An slist of nameserver addressesoptions: is an slist of variables to modify the resolver
Implementation:
code
bundle edit_line resolvconf_o(search,list,options)
{
delete_lines:
"search.*" comment => "Reset search lines from resolver";
"nameserver.*" comment => "Reset nameservers in resolver";
"options.*" comment => "Reset options in resolver";
insert_lines:
"search $(search)" comment => "Add search domains to resolver";
"nameserver $(list)" comment => "Add name servers to resolver";
"options $(options)" comment => "Add options to resolver";
}
manage_variable_values_ini
Prototype: manage_variable_values_ini(tab, sectionName)
Description: Sets the RHS of configuration items in the file of the form
LHS=RHS
If the line is commented out with #, it gets uncommented first.
Adds a new line if none exists.
Removes any variable value pairs not defined for the ini section.
Arguments:
tab: An associative array containing tab[sectionName][LHS]="RHS".
The value is not changed when the RHS is "dontchange"sectionName: The section in the file within which values should be
modified
See also: set_variable_values_ini()
Implementation:
code
bundle edit_line manage_variable_values_ini(tab, sectionName)
{
vars:
"index" slist => getindices("$(tab)[$(sectionName)]");
delete_lines:
".*"
select_region => INI_section(escape("$(sectionName)")),
comment => "Remove all entries in the region so there are no extra entries";
insert_lines:
"[$(sectionName)]"
location => start,
comment => "Insert lines";
"$(index)=$($(tab)[$(sectionName)][$(index)])"
select_region => INI_section(escape("$(sectionName)"));
}
set_variable_values_ini
Prototype: set_variable_values_ini(tab, sectionName)
Description: Sets the RHS of configuration items in the file of the form
LHS=RHS
If the line is commented out with #, it gets uncommented first.
Adds a new line if none exists.
Arguments:
tab: An associative array containing tab[sectionName][LHS]="RHS".
The value is not changed when the RHS is "dontchange"sectionName: The section in the file within which values should be
modified
See also: manage_variable_values_ini()
Implementation:
code
bundle edit_line set_variable_values_ini(tab, sectionName)
{
vars:
"index" slist => getindices("$(tab)[$(sectionName)]");
# Be careful if the index string contains funny chars
"cindex[$(index)]" string => canonify("$(index)");
classes:
"edit_$(cindex[$(index)])" not => strcmp("$($(tab)[$(sectionName)][$(index)])","dontchange"),
comment => "Create conditions to make changes";
field_edits:
# If the line is there, but commented out, first uncomment it
"#+\s*$(index)\s*=.*"
select_region => INI_section(escape("$(sectionName)")),
edit_field => col("\s*=\s*","1","$(index)","set"),
if => "edit_$(cindex[$(index)])";
# match a line starting like the key something
"\s*$(index)\s*=.*"
edit_field => col("\s*=\s*","2","$($(tab)[$(sectionName)][$(index)])","set"),
select_region => INI_section(escape("$(sectionName)")),
classes => results("bundle", "set_variable_values_ini_not_$(cindex[$(index)])"),
if => "edit_$(cindex[$(index)])";
insert_lines:
"[$(sectionName)]"
location => start,
comment => "Insert lines";
"$(index)=$($(tab)[$(sectionName)][$(index)])"
select_region => INI_section(escape("$(sectionName)")),
if => "!(set_variable_values_ini_not_$(cindex[$(index)])_kept|set_variable_values_ini_not_$(cindex[$(index)])_repaired).edit_$(cindex[$(index)])";
}
insert_ini_section
Prototype: insert_ini_section(name, config)
Description: Inserts a INI section with content
code
# given an array "barray"
files:
"myfile.ini" edit_line => insert_ini_section("foo", "barray");
Inserts a section in an INI file with the given configuration
key-values from the array config.
Arguments:
name: the name of the INI sectionconfig: The fully-qualified name of an associative array containing v[LHS]="rhs"
Implementation:
code
bundle edit_line insert_ini_section(name, config)
{
vars:
# TODO: refactor once 3.7.x is EOL
"indices" slist => getindices($(config));
"k" slist => sort("indices", lex);
insert_lines:
"[$(name)]"
location => start,
comment => "Insert an ini section with values if not present";
"$(k)=$($(config)[$(k)])"
location => after("[$(name)]");
}
set_quoted_values
Prototype: set_quoted_values(v)
Description: Sets the RHS of variables in shell-like files of the form:
Adds a new line if no LHS exists, and replaces RHS values if one does exist.
If the line is commented out with #, it gets uncommented first.
Arguments:
v: The fully-qualified name of an associative array containing v[LHS]="rhs"
Example:
code
vars:
"stuff[lhs-1]" string => "rhs1";
"stuff[lhs-2]" string => "rhs2";
files:
"myfile"
edit_line => set_quoted_values(stuff)
See also: set_variable_values()
Implementation:
code
bundle edit_line set_quoted_values(v)
{
meta:
"tags"
slist =>
{
"deprecated=3.6.0",
"deprecation-reason=Generic reimplementation",
"replaced-by=set_line_based"
};
vars:
"index" slist => getindices("$(v)");
# Be careful if the index string contains funny chars
"cindex[$(index)]" string => canonify("$(index)");
field_edits:
# If the line is there, but commented out, first uncomment it
"#+\s*$(index)\s*=.*"
edit_field => col("=","1","$(index)","set");
# match a line starting like the key = something
"\s*$(index)\s*=.*"
edit_field => col("=","2",'"$($(v)[$(index)])"',"set"),
classes => results("bundle", "$(cindex[$(index)])_in_file"),
comment => "Match a line starting like key = something";
insert_lines:
'$(index)="$($(v)[$(index)])"'
comment => "Insert a variable definition",
if => "!($(cindex[$(index)])_in_file_kept|$(cindex[$(index)])_in_file_repaired)";
}
set_variable_values
Prototype: set_variable_values(v)
Description: Sets the RHS of variables in files of the form:
Adds a new line if no LHS exists, and replaces RHS values if one does exist.
If the line is commented out with #, it gets uncommented first.
Arguments:
v: The fully-qualified name of an associative array containing v[LHS]="rhs"
Example:
code
vars:
"stuff[lhs-1]" string => "rhs1";
"stuff[lhs-2]" string => "rhs2";
files:
"myfile"
edit_line => set_variable_values(stuff)
See also: set_quoted_values()
Implementation:
code
bundle edit_line set_variable_values(v)
{
meta:
"tags"
slist =>
{
"deprecated=3.6.0",
"deprecation-reason=Generic reimplementation",
"replaced-by=set_line_based"
};
vars:
"index" slist => getindices("$(v)");
# Be careful if the index string contains funny chars
"cindex[$(index)]" string => canonify("$(index)");
"cv" string => canonify("$(v)");
field_edits:
# match a line starting like the key = something
"\s*$(index)\s*=.*"
edit_field => col("\s*$(index)\s*=","2","$($(v)[$(index)])","set"),
classes => results("bundle", "$(cv)_$(cindex[$(index)])_in_file"),
comment => "Match a line starting like key = something";
insert_lines:
"$(index)=$($(v)[$(index)])"
comment => "Insert a variable definition",
if => "!($(cv)_$(cindex[$(index)])_in_file_kept|$(cv)_$(cindex[$(index)])_in_file_repaired)";
}
set_config_values
Prototype: set_config_values(v)
Description: Sets the RHS of configuration items in the file of the form:
If the line is commented out with #, it gets uncommented first.
Adds a new line if none exists.
Arguments:
v: The fully-qualified name of an associative array containing v[LHS]="rhs"
Implementation:
code
bundle edit_line set_config_values(v)
{
meta:
"tags"
slist =>
{
"deprecated=3.6.0",
"deprecation-reason=Generic reimplementation",
"replaced-by=set_line_based"
};
vars:
"index" slist => getindices("$(v)");
# Be careful if the index string contains funny chars
"cindex[$(index)]" string => canonify("$(index)");
# Escape the value (had a problem with special characters and regex's)
"ev[$(index)]" string => escape("$($(v)[$(index)])");
# Do we have more than one line commented out?
"index_comment_matches_$(cindex[$(index)])"
int => countlinesmatching("^\s*#\s*($(index)\s+.*|$(index))$","$(edit.filename)");
classes:
# Check to see if this line exists
"line_exists_$(cindex[$(index)])"
expression => regline("^\s*($(index)\s.*|$(index))$","$(edit.filename)"),
scope => "bundle";
# if there's more than one comment, just add new (don't know who to use)
"multiple_comments_$(cindex[$(index)])"
expression => isgreaterthan("$(index_comment_matches_$(cindex[$(index)]))","1"),
scope => "bundle";
replace_patterns:
# If the line is commented out, uncomment and replace with
# the correct value
"^\s*#\s*($(index)\s+.*|$(index))$"
comment => "If we find a single commented entry we can uncomment it to
keep the settings near any inline documentation. If there
are multiple comments, then we don't try to replace them and
instead will later append the new value after the first
commented occurrence of $(index).",
handle => "set_config_values_replace_commented_line",
replace_with => value("$(index) $($(v)[$(index)])"),
if => "!line_exists_$(cindex[$(index)]).!replace_attempted_$(cindex[$(index)])_reached.!multiple_comments_$(cindex[$(index)])",
classes => results("bundle", "uncommented_$(cindex[$(index)])");
# If the line is there with the wrong value, replace with
# the correct value
"^\s*($(index)\s+(?!$(ev[$(index)])$).*|$(index))$"
comment => "Correct the value $(index)",
replace_with => value("$(index) $($(v)[$(index)])"),
classes => results("bundle", "replace_attempted_$(cindex[$(index)])");
insert_lines:
# If the line doesn't exist, or there is more than one occurrence
# of the LHS commented out, insert a new line and try to place it
# after the commented LHS (keep new line with old comments)
"$(index) $($(v)[$(index)])"
comment => "Insert the value, marker exists $(index)",
location => after("^\s*#\s*($(index)\s+.*|$(index))$"),
if => "replace_attempted_$(cindex[$(index)])_reached.multiple_comments_$(cindex[$(index)])";
# If the line doesn't exist and there are no occurrences
# of the LHS commented out, insert a new line at the eof
"$(index) $($(v)[$(index)])"
comment => "Insert the value, marker doesn't exist $(index)",
if => "replace_attempted_$(cindex[$(index)])_reached.!multiple_comments_$(cindex[$(index)])";
}
set_line_based
Prototype: set_line_based(v, sep, bp, kp, cp)
Description: Sets the RHS of configuration items in the file of the form:
Example usage for x=y lines (e.g. rsyncd.conf):
code
"myfile"
edit_line => set_line_based("test.config", "=", "\s*=\s*", ".*", "\s*#\s*");
Example usage for x y lines (e.g. sshd_config):
code
"myfile"
edit_line => set_line_based("test.config", " ", "\s+", ".*", "\s*#\s*");
If the line is commented out with $(cp), it gets uncommented first.
Adds a new line if none exists or if more than one commented-out
possible matches exist.
Note: If the data structure being used for the first parameter is in the current bundle, you can use $(this.bundle).variable.
Originally set_config_values by Ed King.
Arguments:
v: The fully-qualified name (bundlename.variable) of an associative array containing v[LHS]="rhs"sep: The separator to insert, e.g. bp: The key-value separation regex, e.g. \s+ for space-separatedkp: The keys to select from v, use .* for allcp: The comment pattern from line-start, e.g. \s*#\s*
Implementation:
code
bundle edit_line set_line_based(v, sep, bp, kp, cp)
{
meta:
"tags"
slist =>
{
"replaces=set_config_values",
"replaces=set_config_values_matching",
"replaces=set_variable_values",
"replaces=set_quoted_values",
"replaces=maintain_key_values",
};
vars:
"vkeys" slist => getindices("$(v)");
"i" slist => grep($(kp), vkeys);
# Be careful if the index string contains funny chars
"ci[$(i)]" string => canonify("$(i)");
# Escape the value (had a problem with special characters and regex's)
"ev[$(i)]" string => escape("$($(v)[$(i)])");
# Do we have more than one line commented out?
"comment_matches_$(ci[$(i)])"
int => countlinesmatching("^$(cp)($(i)$(bp).*|$(i))$",
$(edit.filename));
classes:
# 3.21.0 and greater know about a file being emptied before editing and
# skip this check since it does not make sense.
@if minimum_version(3.21)
# Check to see if this line exists
"exists_$(ci[$(i)])"
expression => regline("^\s*($(i)$(bp).*|$(i))$",
$(edit.filename)),
unless => strcmp( "true", $(edit.empty_before_use) );
@endif
@if minimum_version(3.18)
!(cfengine_3_18_0|cfengine_3_18_1|cfengine_3_18_2)::
"exists_$(ci[$(i)])"
expression => regline("^\s*($(i)$(bp).*|$(i))$",
$(edit.filename)),
unless => strcmp( "true", $(edit.empty_before_use) );
@endif
(cfengine_3_15|cfengine_3_16|cfengine_3_17|cfengine_3_18_0|cfengine_3_18_1|cfengine_3_18_2|cfengine_3_19|cfengine_3_20)::
# Version 3.15.0 does not know about the before_version macro, so we keep the same behavior
# TODO Remove after 3.21 is no longer supported. (3.15.0 was supported when 3.21 was released)
# Check to see if this line exists
"exists_$(ci[$(i)])"
expression => regline("^\s*($(i)$(bp).*|$(i))$",
$(edit.filename));
any::
# if there's more than one comment, just add new (don't know who to use)
"multiple_comments_$(ci[$(i)])"
expression => isgreaterthan("$(comment_matches_$(ci[$(i)]))",
"1");
replace_patterns:
# If the line is commented out, uncomment and replace with
# the correct value
"^$(cp)($(i)$(bp).*|$(i))$"
comment => "Uncommented the value '$(i)'",
replace_with => value("$(i)$(sep)$($(v)[$(i)])"),
if => "!exists_$(ci[$(i)]).!replace_attempted_$(ci[$(i)])_reached.!multiple_comments_$(ci[$(i)])",
classes => results("bundle", "uncommented_$(ci[$(i)])");
# If the line is there with the wrong value, replace with
# the correct value
"^\s*($(i)$(bp)(?!$(ev[$(i)])$).*|$(i))$"
comment => "Correct the value '$(i)'",
replace_with => value("$(i)$(sep)$($(v)[$(i)])"),
classes => results("bundle", "replace_attempted_$(ci[$(i)])");
insert_lines:
# If the line doesn't exist, or there is more than one occurrence
# of the LHS commented out, insert a new line and try to place it
# after the commented LHS (keep new line with old comments)
"$(i)$(sep)$($(v)[$(i)])"
comment => "Insert the value, marker '$(i)' exists",
location => after("^$(cp)($(i)$(bp).*|$(i))$"),
if => "replace_attempted_$(ci[$(i)])_reached.multiple_comments_$(ci[$(i)])";
# If the line doesn't exist and there are no occurrences
# of the LHS commented out, insert a new line at the eof
"$(i)$(sep)$($(v)[$(i)])"
comment => "Insert the value, marker '$(i)' doesn't exist",
if => "replace_attempted_$(ci[$(i)])_reached.!multiple_comments_$(ci[$(i)]).!exists_$(ci[$(i)])";
reports:
verbose_mode|EXTRA::
"$(this.bundle): Line for '$(i)' exists" if => "exists_$(ci[$(i)])";
"$(this.bundle): Line for '$(i)' does not exist" if => "!exists_$(ci[$(i)])";
}
set_config_values_matching
Prototype: set_config_values_matching(v, pat)
Description: Sets the RHS of configuration items in the file of the form
If the line is commented out with #, it gets uncommented first.
Adds a new line if none exists.
Arguments:
v: the fully-qualified name of an associative array containing v[LHS]="rhs"pat: Only elements of v that match the regex pat are use
Implementation:
code
bundle edit_line set_config_values_matching(v,pat)
{
meta:
"tags"
slist =>
{
"deprecated=3.6.0",
"deprecation-reason=Generic reimplementation",
"replaced-by=set_line_based"
};
vars:
"allparams" slist => getindices("$(v)");
"index" slist => grep("$(pat)", "allparams");
# Be careful if the index string contains funny chars
"cindex[$(index)]" string => canonify("$(index)");
replace_patterns:
# If the line is there, maybe commented out, uncomment and replace with
# the correct value
"^\s*($(index)\s+(?!$($(v)[$(index)])).*|# ?$(index)\s+.*)$"
comment => "Correct the value",
replace_with => value("$(index) $($(v)[$(index)])"),
classes => results("bundle", "replace_attempted_$(cindex[$(index)])");
insert_lines:
"$(index) $($(v)[$(index)])"
if => "replace_attempted_$(cindex[$(index)])_reached";
}
maintain_key_values
Prototype: maintain_key_values(v, sep)
Description: Sets the RHS of configuration items with an giving separator
Contributed by David Lee
Arguments:
v of meta promiser tags: string, used to set promise attribute slist of vars promiser index of vars promiser cindex[$(index)] of vars promiser keypat[$(index)]: string, used to set promise attribute string of vars promiser ve[$(index)] of classes promiser $(cindex[$(index)])_key_in_file: string, used to set promise attribute replace_with of replace_patterns promiser $(keypat[$(index]))(?!$(ve[$(index)])$).*, used as promiser of type insert_lines
sep of meta promiser tags of vars promiser index of vars promiser cindex[$(index)]: string, used in the value of attribute string of vars promiser keypat[$(index)] of vars promiser ve[$(index)] of classes promiser $(cindex[$(index)])_key_in_file of replace_patterns promiser $(keypat[$(index]))(?!$(ve[$(index)])$).*, used as promiser of type insert_lines
Implementation:
code
bundle edit_line maintain_key_values(v,sep)
{
meta:
"tags"
slist =>
{
"deprecated=3.6.0",
"deprecation-reason=Generic reimplementation",
"replaced-by=set_line_based"
};
vars:
"index" slist => getindices("$(v)");
# Be careful if the index string contains funny chars
"cindex[$(index)]" string => canonify("$(index)");
# Matching pattern for line (basically key-and-separator)
"keypat[$(index)]" string => "\s*$(index)\s*$(sep)\s*";
# Values may contain regexps. Escape them for replace_pattern matching.
"ve[$(index)]" string => escape("$($(v)[$(index)])");
classes:
"$(cindex[$(index)])_key_in_file"
comment => "Dynamic Class created if patterns matching",
expression => regline("^$(keypat[$(index)]).*", "$(edit.filename)");
replace_patterns:
# For convergence need to use negative lookahead on value:
# "key sep (?!value).*"
"^($(keypat[$(index)]))(?!$(ve[$(index)])$).*"
comment => "Replace definition of $(index)",
replace_with => value("$(match.1)$($(v)[$(index)])");
insert_lines:
"$(index)$(sep)$($(v)[$(index)])"
comment => "Insert definition of $(index)",
if => "!$(cindex[$(index)])_key_in_file";
}
append_users_starting
Prototype: append_users_starting(v)
Description: For adding to /etc/passwd or etc/shadow
Arguments:
v: An array v[username] string => "line..."
Note: To manage local users with CFEngine 3.6 and later,
consider making users promises instead of modifying system files.
Implementation:
code
bundle edit_line append_users_starting(v)
{
vars:
"index" slist => getindices("$(v)");
classes:
"add_$(index)" not => userexists("$(index)"),
comment => "Class created if user does not exist";
insert_lines:
"$($(v)[$(index)])"
comment => "Append users into a password file format",
if => "add_$(index)";
}
append_groups_starting
Prototype: append_groups_starting(v)
Description: For adding groups to /etc/group
Arguments:
v: An array v[groupname] string => "line..."
Note: To manage local users with CFEngine 3.6 and later,
consider making users promises instead of modifying system files.
Implementation:
code
bundle edit_line append_groups_starting(v)
{
vars:
"index" slist => getindices("$(v)");
classes:
"add_$(index)" not => groupexists("$(index)"),
comment => "Class created if group does not exist";
insert_lines:
"$($(v)[$(index)])"
comment => "Append users into a group file format",
if => "add_$(index)";
}
set_colon_field
Prototype: set_colon_field(key, field, val)
Description: Set the value of field number field of the line whose
first field is key to the value val, in a colon-separated file.
Arguments:
key: The value the first field has to matchfield: The field to be modifiedval: The new value of field
Implementation:
code
bundle edit_line set_colon_field(key,field,val)
{
field_edits:
"$(key):.*"
comment => "Edit a colon-separated file, using the first field as a key",
edit_field => col(":","$(field)","$(val)","set");
}
set_user_field
Prototype: set_user_field(user, field, val)
Description: Set the value of field number "field" in a :-field
formatted file like /etc/passwd
Arguments:
user: A regular expression matching the user(s) to be modifiedfield: The field that should be modifiedval: The value for field
Note: To manage local users with CFEngine 3.6 and later,
consider making users promises instead of modifying system files.
See also:
Implementation:
code
bundle edit_line set_user_field(user,field,val)
{
field_edits:
"$(user):.*"
comment => "Edit a user attribute in the password file",
edit_field => col(":","$(field)","$(val)","set");
}
set_escaped_user_field
Prototype: set_escaped_user_field(user, field, val)
Description: Set the value of field number "field" in a :-field
formatted file like /etc/passwd
Arguments:
user: The user to be modifiedfield: The field that should be modifiedval: The value for field
Note: To manage local users with CFEngine 3.6 and later,
consider making users promises instead of modifying system files.
See also:
Implementation:
code
bundle edit_line set_escaped_user_field(user,field,val)
{
vars:
"escaped_user"
string => escape( "$(user)" );
field_edits:
"$(escaped_user):.*"
comment => "Edit a user attribute in the password file",
edit_field => col(":","$(field)","$(val)","set");
}
append_user_field
Prototype: append_user_field(group, field, allusers)
Description: For adding users to to a file like /etc/group
at field position field, comma separated subfields
Arguments:
group: The group to be modifiedfield: The field where users should be addedallusers: The list of users to add to field
Note: To manage local users with CFEngine 3.6 and later,
consider making users promises instead of modifying system files.
Implementation:
code
bundle edit_line append_user_field(group,field,allusers)
{
field_edits:
"$(group):.*"
comment => "Append users into a password file format",
edit_field => col(":","$(field)","$(allusers)","alphanum");
}
expand_template
Prototype: expand_template(templatefile)
Description: Read in the named text file and expand $(var) inside the file
Arguments:
templatefile: The name of the file
Implementation:
code
bundle edit_line expand_template(templatefile)
{
insert_lines:
"$(templatefile)"
insert_type => "file",
comment => "Expand variables in the template file",
expand_scalars => "true";
}
replace_or_add
Prototype: replace_or_add(pattern, line)
Description: Replace a pattern in a file with a single line.
If the pattern is not found, add the line to the file.
Arguments:
pattern: The pattern that should be replaced
The pattern must match the whole line (it is automatically
anchored to the start and end of the line) to avoid
ambiguity.line: The line with which to replace matches of pattern
Implementation:
code
bundle edit_line replace_or_add(pattern,line)
{
vars:
"cline" string => canonify("$(line)");
"eline" string => escape("$(line)");
replace_patterns:
"^(?!$(eline)$)$(pattern)$"
comment => "Replace a pattern here",
replace_with => value("$(line)"),
classes => results("bundle", "replace_$(cline)");
insert_lines:
"$(line)"
if => "replace_$(cline)_reached";
}
converge
Prototype: converge(marker, lines)
Description: Converge lines marked with marker
Any content marked with marker is removed, then lines are
inserted. Every line should contain marker.
Arguments:
marker: The marker (not a regular expression; will be escaped)lines: The lines to insert; all must contain marker
Example:
code
bundle agent pam_d_su_include
#@brief Ensure /etc/pam.d/su has includes configured properly
{
files:
ubuntu::
"/etc/pam.d/su"
edit_line => converge( "@include", "@include common-auth
**Implementation:**
```cf3
bundle edit_line converge(marker, lines)
{
vars:
"regex" string => escape($(marker));
delete_lines:
".*$(regex).*" comment => "Delete lines matching the marker";
insert_lines:
"$(lines)" comment => "Insert the given lines";
}
converge_prepend
Prototype: converge_prepend(marker, lines)
Description: Converge lines marked with marker to start of content
Any content marked with marker is removed, then lines are
inserted at start of content. Every line should contain marker.
Arguments:
marker: The marker (not a regular expression; will be escaped)lines: The lines to insert; all must contain marker
Example:
code
bundle agent pam_d_su_session
@brief Ensure /etc/pam.d/su has session configured properly
{
files:
ubuntu::
"/etc/pam.d/su"
edit_line => converge_prepend( "session", "session required pam_env.so readenv=1 envfile=/etc/default/locale
session optional pam_mail.so nopen
session required pam_limits.so" );
}
History:
- Introduced in 3.17.0, 3.15.3, 3.12.6
Implementation:
code
bundle edit_line converge_prepend(marker, lines)
{
vars:
"regex" string => escape($(marker));
delete_lines:
".*$(regex).*" comment => "Delete lines matching the marker";
insert_lines:
"$(lines)" location => start, comment => "Insert the given lines";
}
fstab_option_editor
Prototype: fstab_option_editor(method, mount, option)
Description: Add or remove /etc/fstab options for a mount
This bundle edits the options field of a mount. The method is a
field_operation which can be append, prepend, set, delete,
or alphanum. The option is OS-specific.
Arguments:
method: field_operation to applymount: the mount pointoption: the option to add or remove
Example:
code
files:
"/etc/fstab" edit_line => fstab_option_editor("delete", "/", "acl");
"/etc/fstab" edit_line => fstab_option_editor("append", "/", "acl");
Implementation:
code
bundle edit_line fstab_option_editor(method, mount, option)
{
field_edits:
"(?!#)\S+\s+$(mount)\s.+"
edit_field => fstab_options($(option), $(method));
}
file_mustache
Prototype: file_mustache(mustache_file, json_file, target_file)
Description: Make a file from a Mustache template and a JSON file
Arguments:
mustache_file: the file with the Mustache templatejson_file: a file with JSON datatarget_file: the target file to write
Example:
code
methods:
"m" usebundle => file_mustache("x.mustache", "y.json", "z.txt");
Implementation:
code
bundle agent file_mustache(mustache_file, json_file, target_file)
{
files:
"$(target_file)"
create => "true",
edit_template => $(mustache_file),
template_data => readjson($(json_file), "100k"),
template_method => "mustache";
}
file_mustache_jsonstring
Prototype: file_mustache_jsonstring(mustache_file, json_string, target_file)
Description: Make a file from a Mustache template and a JSON string
Arguments:
mustache_file: the file with the Mustache templatejson_string: a string with JSON datatarget_file: the target file to write
Example:
code
methods:
"m" usebundle => file_mustache_jsonstring("x.mustache", '{ "x": "y" }', "z.txt");
Implementation:
code
bundle agent file_mustache_jsonstring(mustache_file, json_string, target_file)
{
files:
"$(target_file)"
create => "true",
edit_template => $(mustache_file),
template_data => parsejson($(json_string)),
template_method => "mustache";
}
file_tidy
Prototype: file_tidy(file)
Description: Remove a file
Arguments:
Example:
code
methods:
"" usebundle => file_tidy("/tmp/z.txt");
Implementation:
code
bundle agent file_tidy(file)
{
files:
"$(file)" delete => tidy;
reports:
"DEBUG|DEBUG_$(this.bundle)"::
"DEBUG $(this.bundle): deleting $(file) with delete => tidy";
}
dir_sync
Prototype: dir_sync(from, to)
Description: Synchronize a directory entire, deleting unknown files
Arguments:
from: source directoryto: destination directory
Example:
code
methods:
"" usebundle => dir_sync("/tmp", "/var/tmp");
Implementation:
code
bundle agent dir_sync(from, to)
{
files:
"$(to)/."
create => "true",
depth_search => recurse("inf"),
copy_from => copyfrom_sync($(from));
reports:
"DEBUG|DEBUG_$(this.bundle)"::
"DEBUG $(this.bundle): copying directory $(from) to $(to)";
}
file_copy
Prototype: file_copy(from, to)
Description: Copy a file
Arguments:
from: source fileto: destination file
Example:
code
methods:
"" usebundle => file_copy("/tmp/z.txt", "/var/tmp/y.txt");
Implementation:
code
bundle agent file_copy(from, to)
{
files:
"$(to)"
copy_from => copyfrom_sync($(from));
reports:
"DEBUG|DEBUG_$(this.bundle)"::
"DEBUG $(this.bundle): copying file $(from) to $(to)";
}
file_make
Prototype: file_make(file, str)
Description: Make a file from a string
Arguments:
file: targetstr: the string data
Example:
code
methods:
"" usebundle => file_make("/tmp/z.txt", "Some text
and some more text here");
Implementation:
code
bundle agent file_make(file, str)
{
vars:
"len" int => string_length($(str));
summarize::
"summary" string => format("%s...%s",
string_head($(str), 18),
string_tail($(str), 18));
classes:
"summarize" expression => isgreaterthan($(len), 40);
files:
"$(file)"
create => "true",
edit_line => insert_lines($(str)),
edit_defaults => empty;
reports:
"DEBUG|DEBUG_$(this.bundle)"::
"DEBUG $(this.bundle): creating $(file) with contents '$(str)'"
if => "!summarize";
"DEBUG $(this.bundle): creating $(file) with contents '$(summary)'"
if => "summarize";
}
file_make_mog
Prototype: file_make_mog(file, str, mode, owner, group)
Description: Make a file from a string with mode, owner, group
Arguments:
file: targetstr: the string datamode: the file permissions in octalowner: the file owner as a name or UIDgroup: the file group as a name or GID
Example:
code
methods:
"" usebundle => file_make_mog("/tmp/z.txt", "Some text
and some more text here", "0644", "root", "root");
Implementation:
code
bundle agent file_make_mog(file, str, mode, owner, group)
{
vars:
"len" int => string_length($(str));
summarize::
"summary" string => format("%s...%s",
string_head($(str), 18),
string_tail($(str), 18));
classes:
"summarize" expression => isgreaterthan($(len), 40);
files:
"$(file)"
create => "true",
edit_line => insert_lines($(str)),
perms => mog($(mode), $(owner), $(group)),
edit_defaults => empty;
reports:
"DEBUG|DEBUG_$(this.bundle)"::
"DEBUG $(this.bundle): creating $(file) with contents '$(str)', mode '$(mode)', owner '$(owner)' and group '$(group)'"
if => "!summarize";
"DEBUG $(this.bundle): creating $(file) with contents '$(summary)', mode '$(mode)', owner '$(owner)' and group '$(group)'"
if => "summarize";
}
file_make_mustache
Prototype: file_make_mustache(file, template, data)
Description: Make a file from a mustache template
Arguments:
file: Target file to rendertemplate: Path to mustache templatedata: Data container to use
Example:
code
vars:
"state" data => datastate();
methods:
"" usebundle => file_make_mustache( "/tmp/z.txt", "/tmp/z.mustache", @(state) );
Implementation:
code
bundle agent file_make_mustache(file, template, data)
{
files:
"$(file)"
create => "true",
edit_template => "$(template)",
template_method => "mustache",
template_data => @(data);
reports:
"DEBUG|DEBUG_$(this.bundle)"::
"DEBUG $(this.bundle): rendering $(file) with template '$(template)'";
}
file_make_mustache_with_perms
Prototype: file_make_mustache_with_perms(file, template, data, mode, owner, group)
Description: Make a file from a mustache template
Arguments:
file: Target file to rendertemplate: Path to mustache templatedata: Data container to usemode: File permissionsowner: Target file ownergroup: Target file group
Example:
code
vars:
"state" data => datastate();
methods:
"" usebundle => file_make_mustache( "/tmp/z.txt", "/tmp/z.mustache", @(state),
600, "root", "root" );
Implementation:
code
bundle agent file_make_mustache_with_perms(file, template, data, mode, owner, group)
{
files:
"$(file)"
create => "true",
edit_template => "$(template)",
template_method => "mustache",
perms => mog( $(mode), $(owner), $(group) ),
template_data => @(data);
reports:
"DEBUG|DEBUG_$(this.bundle)"::
"DEBUG $(this.bundle): rendering $(file) with template '$(template)'";
}
file_empty
Prototype: file_empty(file)
Description: Make an empty file
Arguments:
Example:
code
methods:
"" usebundle => file_empty("/tmp/z.txt");
Implementation:
code
bundle agent file_empty(file)
{
files:
"$(file)"
create => "true",
edit_defaults => empty;
reports:
"DEBUG|DEBUG_$(this.bundle)"::
"DEBUG $(this.bundle): creating empty $(file) with 0 size";
}
file_hardlink
Prototype: file_hardlink(target, link)
Description: Make a hard link to a file
Arguments:
target: of linklink: the hard link's location
Example:
code
methods:
"" usebundle => file_hardlink("/tmp/z.txt", "/tmp/z.link");
Implementation:
code
bundle agent file_hardlink(target, link)
{
files:
"$(link)"
move_obstructions => "true",
link_from => linkfrom($(target), "hardlink");
reports:
"DEBUG|DEBUG_$(this.bundle)"::
"DEBUG $(this.bundle): $(link) will be a hard link to $(target)";
}
file_link
Prototype: file_link(target, link)
Description: Make a symlink to a file
Arguments:
target: of symlinklink: the symlink's location
Example:
code
methods:
"" usebundle => file_link("/tmp/z.txt", "/tmp/z.link");
Implementation:
code
bundle agent file_link(target, link)
{
files:
"$(link)"
move_obstructions => "true",
link_from => linkfrom($(target), "symlink");
reports:
"DEBUG|DEBUG_$(this.bundle)"::
"DEBUG $(this.bundle): $(link) will be a symlink to $(target)";
}
lib/guest_environments.cf
kvm
Prototype: kvm(name, arch, cpu_count, mem_kb, disk_file)
Description: An environment_resources body for a KVM virtual machine.
The env_spec attribute is set to a KVM XML specification.
Arguments:
name: The name of the virtual machinearch: The architecturecpu_count: The number of CPUs the virtual machine should havemem_kb: The amount of RAM in kilobytedisk_file: The file on the host system for the virtual machine's harddrive
Example:
code
bundle agent manage_vm
{
guest_environments:
am_vm_host::
"db_server"
environment_host => atlas,
environment_type => "kvm",
environment_state => "create",
environment_resources => kvm("PSQL1, "x86_64", "4", "4096", "/var/lib/libvirt/images/psql1.iso")
}
Implementation:
code
body environment_resources kvm(name, arch, cpu_count, mem_kb, disk_file)
{
env_spec =>
"<domain type='kvm'>
<name>$(name)</name>
<memory>$(mem_kb)</memory>
<currentMemory>$(mem_kb)</currentMemory>
<vcpu>$(cpu_count)</vcpu>
<os>
<type arch='$(arch)'>hvm</type>
</os>
<features>
<acpi/>
<apic/>
<pae/>
</features>
<on_poweroff>destroy</on_poweroff>
<on_reboot>restart</on_reboot>
<on_crash>restart</on_crash>
<devices>
<emulator>/usr/bin/kvm</emulator>
<disk type='file' device='disk'>
<source file='$(disk_file)'/>
<target dev='vda' bus='virtio'/>
</disk>
<interface type='network'>
<source network='default'/>
</interface>
<input type='mouse' bus='ps2'/>
<graphics type='vnc' port='-1' autoport='yes'/>
</devices>
</domain>";
}
lib/monitor.cf
scan_log
Prototype: scan_log(line)
Description: Selects lines matching line in a growing file
Arguments:
line: Regular expression for matching lines.
See also: select_line_matching, track_growing_file
Implementation:
code
body match_value scan_log(line)
{
select_line_matching => "$(line)";
track_growing_file => "true";
}
scan_changing_file
Prototype: scan_changing_file(line)
Description: Selects lines matching line in a changing file
Arguments:
line: Regular expression for matching lines.
See also: select_line_matching, track_growing_file
Implementation:
code
body match_value scan_changing_file(line)
{
select_line_matching => "$(line)";
track_growing_file => "false";
}
single_value
Prototype: single_value(regex)
Description: Extract lines matching regex as values
Arguments:
regex: Regular expression matching lines and values
See also: select_line_matching, extraction_regex
Implementation:
code
body match_value single_value(regex)
{
select_line_matching => "$(regex)";
extraction_regex => "($(regex))";
}
line_match_value
Prototype: line_match_value(line_match, extract_regex)
Description: Find lines matching line_match and extract a value matching extract_regex
Arguments:
line_match: Regular expression matching line where value is foundextract_regex: Regular expression matching value to extract
See also: select_line_matching, extraction_regex
Example:
code
bundle monitor example
{
vars:
"regex_vsz" string => "root\s+[0-9]+\s+[0-9]+\s+[0-9]+\s+[0-9.]+\s+[0-9.]+\s+([0-9]+).*";
measurements:
"/var/cfengine/state/cf_procs"
handle => "cf_serverd_vsz",
comment => "Tracking the memory consumption of a process can help us identify possible memory leaks",
stream_type => "file",
data_type => "int",
history_type => "weekly",
units => "kB",
match_value => line_match_value(".*cf-serverd.*", "$(regex_vsz)");
}
Implementation:
code
body match_value line_match_value(line_match, extract_regex)
{
select_line_matching => "$(line_match)";
extraction_regex => "$(extract_regex)";
}
lib/packages.cf
See the packages promises documentation for a
comprehensive reference on the body types and attributes used here.
apk
Prototype: apk
Implementation:
code
body package_module apk
{
query_installed_ifelapsed => "$(package_module_knowledge.query_installed_ifelapsed)";
query_updates_ifelapsed => "$(package_module_knowledge.query_updates_ifelapsed)";
}
apt_get
Prototype: apt_get
Implementation:
code
body package_module apt_get
{
query_installed_ifelapsed => "$(package_module_knowledge.query_installed_ifelapsed)";
query_updates_ifelapsed => "$(package_module_knowledge.query_updates_ifelapsed)";
#default_options => {};
@if minimum_version(3.12.2)
termux::
interpreter => "$(paths.bin_path)/python";
!termux::
interpreter => "$(sys.bindir)/cfengine-selected-python";
@endif
}
zypper
Prototype: zypper
Implementation:
code
body package_module zypper
{
query_installed_ifelapsed => "$(package_module_knowledge.query_installed_ifelapsed)";
query_updates_ifelapsed => "$(package_module_knowledge.query_updates_ifelapsed)";
#default_options => {};
@if minimum_version(3.12.2)
interpreter => "$(sys.bindir)/cfengine-selected-python";
@endif
}
nimclient
Prototype: nimclient
Description: Define details used when interfacing with nimclient package
module
Example:
code
bundle agent example_nimclient
{
packages:
"expect.base"
policy => "present",
options => { "lpp_source=lppaix71034" },
package_module => nimclient;
}
Implementation:
code
body package_module nimclient
{
query_installed_ifelapsed => "$(package_module_knowledge.query_installed_ifelapsed)";
query_updates_ifelapsed => "$(package_module_knowledge.query_updates_ifelapsed)";
# This would likey be customized based on your infrastructure specifics
# you may for example want to default the lpp_source based on something
# like `oslevel -s` output.
#default_options => {};
}
pkgsrc
Prototype: pkgsrc
Description: Define details used when interfacing with the pkgsrc package
module.
Example:
cf3
bundle agent main
{
packages:
"vim"
policy => "present",
package_module => pkgsrc;
}
Implementation:
code
body package_module pkgsrc
{
query_installed_ifelapsed => "$(package_module_knowledge.query_installed_ifelapsed)";
query_updates_ifelapsed => "$(package_module_knowledge.query_updates_ifelapsed)";
}
yum
Prototype: yum
Description: Define details used when interfacing with yum
Implementation:
code
body package_module yum
{
query_installed_ifelapsed => "$(package_module_knowledge.query_installed_ifelapsed)";
query_updates_ifelapsed => "$(package_module_knowledge.query_updates_ifelapsed)";
#default_options => {};
@if minimum_version(3.12.2)
interpreter => "$(sys.bindir)/cfengine-selected-python";
@endif
}
slackpkg
Prototype: slackpkg
Description: Define details used when interfacing with slackpkg
Implementation:
code
body package_module slackpkg
{
query_installed_ifelapsed => "$(package_module_knowledge.query_installed_ifelapsed)";
query_updates_ifelapsed => "$(package_module_knowledge.query_updates_ifelapsed)";
#default_options => {};
}
pkg
Prototype: pkg
Description: Define details used when interfacing with pkg
Implementation:
code
body package_module pkg
{
query_installed_ifelapsed => "$(package_module_knowledge.query_installed_ifelapsed)";
query_updates_ifelapsed => "$(package_module_knowledge.query_updates_ifelapsed)";
#default_options => {};
}
snap
Prototype: snap
Description: Define details used when interfacing with snapcraft
Implementation:
code
body package_module snap
{
query_installed_ifelapsed => "$(package_module_knowledge.query_installed_ifelapsed)";
query_updates_ifelapsed => "$(package_module_knowledge.query_updates_ifelapsed)";
#default_options => {};
}
freebsd_ports
Prototype: freebsd_ports
Description: Define details used when interfacing with the freebsd ports package
module.
Note: Ports are expected to be setup prior to trying to use the packages
promise. You may need to ensure that portsnap extract has been run, e.g.
fileexists("/usr/ports/Mk/bsd.port.mk")
Example:
cf3
bundle agent main
{
packages:
freebsd::
"vim"
policy => "present",
package_module => freebsd_ports;
}
Implementation:
code
body package_module freebsd_ports
{
query_installed_ifelapsed => "$(package_module_knowledge.query_installed_ifelapsed)";
query_updates_ifelapsed => "$(package_module_knowledge.query_updates_ifelapsed)";
}
control
Prototype: control
Description: include policy needed by this file
Implementation:
code
body file control
{
inputs => { @(packages_common.inputs) };
}
pip
Prototype: pip(flags)
Description: Python `pip' package management
`pip' is a package manager for Python
http://www.pip-installer.org/en/latest/
Available commands : add, delete, (add)update, verify
Arguments:
flags: The command line parameter passed to pip
Note: "update" command performs recursive upgrade (of dependencies) by
default. Set $flags to "--no-deps" to perform non-recursive upgrade.
http://www.pip-installer.org/en/latest/cookbook.html#non-recursive-upgrades
Example:
code
packages:
"Django" package_method => pip(""), package_policy => "add";
"django-registration" package_method => pip(""), package_policy => "delete";
"requests" package_method => pip(""), package_policy => "verify";
Note: "Django" with a capital 'D' in the example above.
Explicitly match the name of the package, capitalization does count!
code
$ pip search django | egrep "^Django\s+-"
Django - A high-level Python Web framework [..output trimmed..]
Implementation:
code
body package_method pip(flags)
{
package_changes => "individual";
package_noverify_regex => "";
package_list_update_ifelapsed => "$(common_knowledge.list_update_ifelapsed)";
package_list_name_regex => "$(pip_knowledge.pip_list_name_regex)";
package_list_version_regex => "$(pip_knowledge.pip_list_version_regex)";
package_installed_regex => "$(pip_knowledge.pip_installed_regex)";
package_name_convention => "$(name)";
package_delete_convention => "$(name)";
package_list_command => "$(paths.path[pip]) list $(flags)";
package_verify_command => "$(paths.path[pip]) show $(flags)";
package_add_command => "$(paths.path[pip]) install $(flags)";
package_delete_command => "$(paths.path[pip]) uninstall --yes $(flags)";
package_update_command => "$(paths.path[pip]) install --upgrade $(flags)";
}
npm
Prototype: npm(dir)
Description: Node.js `npm' local-mode package management
`npm' is a package manager for Node.js
https://npmjs.org/package/npm
Available commands : add, delete, (add)update, verify
For the difference between local and global install see here:
https://npmjs.org/doc/cli/npm-install.html
Arguments:
dir: The prefix path to ./node_modules/
Example:
code
vars:
"dirs" slist => { "/root/myproject", "/home/somedev/someproject" };
packages:
"express" package_method => npm("$(dirs)"), package_policy => "add";
"redis" package_method => npm("$(dirs)"), package_policy => "delete";
Implementation:
code
body package_method npm(dir)
{
package_changes => "individual";
package_noverify_regex => "";
package_list_update_ifelapsed => "$(common_knowledge.list_update_ifelapsed)";
package_list_name_regex => "$(npm_knowledge.npm_list_name_regex)";
package_list_version_regex => "$(npm_knowledge.npm_list_version_regex)";
package_installed_regex => "$(npm_knowledge.npm_installed_regex)";
package_name_convention => "$(name)";
package_delete_convention => "$(name)";
package_list_command => "$(npm_knowledge.call_npm) list --prefix $(dir)";
package_verify_command => "$(npm_knowledge.call_npm) list --prefix $(dir)";
package_add_command => "$(npm_knowledge.call_npm) install --prefix $(dir)";
package_delete_command => "$(npm_knowledge.call_npm) remove --prefix $(dir)";
package_update_command => "$(npm_knowledge.call_npm) update --prefix $(dir)";
}
npm_g
Prototype: npm_g
Description: Node.js `npm' global-mode package management
`npm' is a package manager for Node.js
https://npmjs.org/package/npm
Available commands : add, delete, (add)update, verify
For the difference between global and local install see here:
https://npmjs.org/doc/cli/npm-install.html
Example:
code
packages:
"express" package_method => npm_g, package_policy => "add";
"redis" package_method => npm_g, package_policy => "delete";
Implementation:
code
body package_method npm_g
{
package_changes => "individual";
package_noverify_regex => "";
package_list_update_ifelapsed => "$(common_knowledge.list_update_ifelapsed)";
package_list_name_regex => "$(npm_knowledge.npm_list_name_regex)";
package_list_version_regex => "$(npm_knowledge.npm_list_version_regex)";
package_installed_regex => "$(npm_knowledge.npm_installed_regex)";
package_name_convention => "$(name)";
package_delete_convention => "$(name)";
package_list_command => "$(npm_knowledge.call_npm) list --global";
package_verify_command => "$(npm_knowledge.call_npm) list --global";
package_add_command => "$(npm_knowledge.call_npm) install --global";
package_delete_command => "$(npm_knowledge.call_npm) remove --global";
package_update_command => "$(npm_knowledge.call_npm) update --global";
}
brew
Prototype: brew(user)
Description: Darwin/Mac OS X + Homebrew installation method
Homebrew is a package manager for OS X -- http://brew.sh
Available commands : add, delete, (add)update (with package_version).
Arguments:
user: The user under which to run the commands
Homebrew expects a regular (non-root) user to install packages.
https://github.com/mxcl/homebrew/wiki/FAQ#why-does-homebrew-say-sudo-is-bad
As CFEngine doesn't give the possibility to run package_add_command
with a different user, this body uses sudo -u.
Example:
code
packages:
"mypackage" package_method => brew("adminuser"), package_policy => "add";
"uppackage" package_method => brew("adminuser"), package_policy => "update", package_version => "3.5.2";
Implementation:
code
body package_method brew(user)
{
package_changes => "bulk";
package_add_command => "$(darwin_knowledge.call_sudo) -u $(user) $(darwin_knowledge.call_brew) install";
package_delete_command => "$(darwin_knowledge.call_sudo) -u $(user) $(darwin_knowledge.call_brew) uninstall";
package_delete_convention => "$(name)";
package_name_convention => "$(name)";
# Homebrew can list only installed packages along versions.
# for a complete list of packages, we could use `brew search`, but there's no easy
# way to determine the version or wether it's installed.
package_installed_regex => ".*";
package_list_command => "$(darwin_knowledge.call_sudo) -u $(user) $(darwin_knowledge.call_brew) list --versions";
package_list_name_regex => "$(darwin_knowledge.brew_name_regex)";
package_list_version_regex => "$(darwin_knowledge.brew_version_regex)";
package_list_update_command => "$(darwin_knowledge.call_sudo) -u $(user) $(darwin_knowledge.call_brew) update";
package_list_update_ifelapsed => "$(common_knowledge.list_update_ifelapsed)";
# brew list [package] will print the installed files and return 1 if not found.
package_verify_command => "$(darwin_knowledge.call_sudo) -u $(user) $(darwin_knowledge.call_brew) list";
package_noverify_returncode => "1";
# remember to specify the package version
package_update_command => "$(darwin_knowledge.call_sudo) -u $(user) $(darwin_knowledge.call_brew) upgrade";
}
apt
Prototype: apt
Description: APT installation package method
This package method interacts with the APT package manager through aptitude.
Example:
code
packages:
"mypackage" package_method => apt, package_policy => "add";
Implementation:
code
body package_method apt
{
package_changes => "bulk";
package_list_command => "$(debian_knowledge.call_dpkg) -l";
package_list_name_regex => "$(debian_knowledge.list_name_regex)";
package_list_version_regex => "$(debian_knowledge.list_version_regex)";
package_installed_regex => ".i.*"; # packages that have been uninstalled may be listed
package_name_convention => "$(name)";
# set it to "0" to avoid caching of list during upgrade
package_list_update_ifelapsed => "$(common_knowledge.list_update_ifelapsed)";
# make correct version comparisons
package_version_less_command => "$(debian_knowledge.dpkg_compare_less)";
package_version_equal_command => "$(debian_knowledge.dpkg_compare_equal)";
have_aptitude::
package_add_command => "$(debian_knowledge.call_aptitude) $(debian_knowledge.dpkg_options) --assume-yes install";
package_list_update_command => "$(debian_knowledge.call_aptitude) update";
package_delete_command => "$(debian_knowledge.call_aptitude) $(debian_knowledge.dpkg_options) --assume-yes -q remove";
package_update_command => "$(debian_knowledge.call_aptitude) $(debian_knowledge.dpkg_options) --assume-yes install";
package_patch_command => "$(debian_knowledge.call_aptitude) $(debian_knowledge.dpkg_options) --assume-yes install";
package_verify_command => "$(debian_knowledge.call_aptitude) show";
package_noverify_regex => "(State: not installed|E: Unable to locate package .*)";
package_patch_list_command => "$(debian_knowledge.call_aptitude) --assume-yes --simulate --verbose full-upgrade";
package_patch_name_regex => "$(debian_knowledge.patch_name_regex)";
package_patch_version_regex => "$(debian_knowledge.patch_version_regex)";
!have_aptitude::
package_add_command => "$(debian_knowledge.call_apt_get) $(debian_knowledge.dpkg_options) --yes install";
package_list_update_command => "$(debian_knowledge.call_apt_get) update";
package_delete_command => "$(debian_knowledge.call_apt_get) $(debian_knowledge.dpkg_options) --yes -q remove";
package_update_command => "$(debian_knowledge.call_apt_get) $(debian_knowledge.dpkg_options) --yes install";
package_patch_command => "$(debian_knowledge.call_apt_get) $(debian_knowledge.dpkg_options) --yes install";
package_verify_command => "$(debian_knowledge.call_dpkg) -s";
package_noverify_returncode => "1";
package_patch_list_command => "$(debian_knowledge.call_apt_get) --just-print dist-upgrade";
package_patch_name_regex => "$(debian_knowledge.patch_name_regex)";
package_patch_version_regex => "$(debian_knowledge.patch_version_regex)";
}
apt_get
Prototype: apt_get
Description: APT installation package method
This package method interacts with the APT package manager through apt-get.
Example:
code
packages:
"mypackage" package_method => apt_get, package_policy => "add";
Implementation:
code
body package_method apt_get
{
package_changes => "bulk";
package_list_command => "$(debian_knowledge.call_dpkg) -l";
package_list_name_regex => "$(debian_knowledge.list_name_regex)";
package_list_version_regex => "$(debian_knowledge.list_version_regex)";
package_installed_regex => ".i.*"; # packages that have been uninstalled may be listed
package_name_convention => "$(name)=$(version)";
# set it to "0" to avoid caching of list during upgrade
package_list_update_ifelapsed => "$(common_knowledge.list_update_ifelapsed)";
# Target a specific release, such as backports
package_add_command => "$(debian_knowledge.call_apt_get) $(debian_knowledge.dpkg_options) --yes install";
package_list_update_command => "$(debian_knowledge.call_apt_get) update";
package_delete_command => "$(debian_knowledge.call_apt_get) $(debian_knowledge.dpkg_options) --yes -q remove";
package_update_command => "$(debian_knowledge.call_apt_get) $(debian_knowledge.dpkg_options) --yes install";
package_patch_command => "$(debian_knowledge.call_apt_get) $(debian_knowledge.dpkg_options) --yes install";
package_verify_command => "$(debian_knowledge.call_dpkg) -s";
package_noverify_returncode => "1";
package_patch_list_command => "$(debian_knowledge.call_apt_get) --just-print dist-upgrade";
package_patch_name_regex => "$(debian_knowledge.patch_name_regex)";
package_patch_version_regex => "$(debian_knowledge.patch_version_regex)";
# make correct version comparisons
package_version_less_command => "$(debian_knowledge.dpkg_compare_less)";
package_version_equal_command => "$(debian_knowledge.dpkg_compare_equal)";
}
apt_get_permissive
Prototype: apt_get_permissive
Description: APT permissive (just by name) package method
This package method interacts with the APT package manager through
apt-get.
Normally you have to specify the package version, and it defaults to
*, which then triggers the bug of installing xyz-abc when you ask for xyz.
This "permissive" body sets
package_name_convention => "$(name)";
which is permissive in the sense of not requiring the version.
Example:
code
packages:
"mypackage" package_method => apt_get_permissive, package_policy => "add";
Implementation:
code
body package_method apt_get_permissive
{
package_changes => "bulk";
package_list_command => "$(debian_knowledge.call_dpkg) -l";
package_list_name_regex => "$(debian_knowledge.list_name_regex)";
package_list_version_regex => "$(debian_knowledge.list_version_regex)";
package_installed_regex => ".i.*"; # packages that have been uninstalled may be listed
package_name_convention => "$(name)";
# set it to "0" to avoid caching of list during upgrade
package_list_update_ifelapsed => "$(common_knowledge.list_update_ifelapsed)";
# Target a specific release, such as backports
package_add_command => "$(debian_knowledge.call_apt_get) $(debian_knowledge.dpkg_options) --yes install";
package_list_update_command => "$(debian_knowledge.call_apt_get) update";
package_delete_command => "$(debian_knowledge.call_apt_get) $(debian_knowledge.dpkg_options) --yes -q remove";
package_update_command => "$(debian_knowledge.call_apt_get) $(debian_knowledge.dpkg_options) --yes install";
package_patch_command => "$(debian_knowledge.call_apt_get) $(debian_knowledge.dpkg_options) --yes install";
package_verify_command => "$(debian_knowledge.call_dpkg) -s";
package_noverify_returncode => "1";
package_patch_list_command => "$(debian_knowledge.call_apt_get) --just-print dist-upgrade";
package_patch_name_regex => "$(debian_knowledge.patch_name_regex)";
package_patch_version_regex => "$(debian_knowledge.patch_version_regex)";
# make correct version comparisons
package_version_less_command => "$(debian_knowledge.dpkg_compare_less)";
package_version_equal_command => "$(debian_knowledge.dpkg_compare_equal)";
}
apt_get_release
Prototype: apt_get_release(release)
Description: APT installation package method
Arguments:
release: specific release to use
This package method interacts with the APT package manager through apt-get but sets a specific target release.
Example:
code
packages:
"mypackage" package_method => apt_get_release("xyz"), package_policy => "add";
Implementation:
code
body package_method apt_get_release(release)
{
package_changes => "bulk";
package_list_command => "$(debian_knowledge.call_dpkg) -l";
package_list_name_regex => "$(debian_knowledge.list_name_regex)";
package_list_version_regex => "$(debian_knowledge.list_version_regex)";
package_installed_regex => ".i.*"; # packages that have been uninstalled may be listed
package_name_convention => "$(name)";
# set it to "0" to avoid caching of list during upgrade
package_list_update_ifelapsed => "$(common_knowledge.list_update_ifelapsed)";
# Target a specific release, such as backports
package_add_command => "$(debian_knowledge.call_apt_get) $(debian_knowledge.dpkg_options) --yes --target-release $(release) install";
package_list_update_command => "$(debian_knowledge.call_apt_get) update";
package_delete_command => "$(debian_knowledge.call_apt_get) $(debian_knowledge.dpkg_options) --yes -q remove";
package_update_command => "$(debian_knowledge.call_apt_get) $(debian_knowledge.dpkg_options) --yes --target-release $(release) install";
package_patch_command => "$(debian_knowledge.call_apt_get) $(debian_knowledge.dpkg_options) --yes --target-release $(release) install";
package_verify_command => "$(debian_knowledge.call_dpkg) -s";
package_noverify_returncode => "1";
package_patch_list_command => "$(debian_knowledge.call_apt_get) --just-print dist-upgrade";
package_patch_name_regex => "$(debian_knowledge.patch_name_regex)";
package_patch_version_regex => "$(debian_knowledge.patch_version_regex)";
# make correct version comparisons
package_version_less_command => "$(debian_knowledge.dpkg_compare_less)";
package_version_equal_command => "$(debian_knowledge.dpkg_compare_equal)";
}
dpkg_version
Prototype: dpkg_version(repo)
Description: dpkg installation package method
Arguments:
repo: specific repo to use
This package method interacts with dpkg.
Example:
code
packages:
"mypackage" package_method => dpkg_version("xyz"), package_policy => "add";
Implementation:
code
body package_method dpkg_version(repo)
{
package_changes => "individual";
package_list_command => "$(debian_knowledge.call_dpkg) -l";
# set it to "0" to avoid caching of list during upgrade
package_list_update_command => "$(debian_knowledge.call_apt_get) update";
package_list_update_ifelapsed => "$(common_knowledge.list_update_ifelapsed)";
package_list_name_regex => "$(debian_knowledge.list_name_regex)";
package_list_version_regex => "$(debian_knowledge.list_version_regex)";
package_installed_regex => ".i.*"; # packages that have been uninstalled may be listed
package_file_repositories => { "$(repo)" };
debian.x86_64::
package_name_convention => "$(name)_$(version)_amd64.deb";
debian.i686::
package_name_convention => "$(name)_$(version)_i386.deb";
have_aptitude::
package_patch_list_command => "$(debian_knowledge.call_aptitude) --assume-yes --simulate --verbose full-upgrade";
package_patch_name_regex => "$(debian_knowledge.patch_name_regex)";
package_patch_version_regex => "$(debian_knowledge.patch_version_regex)";
!have_aptitude::
package_patch_list_command => "$(debian_knowledge.call_apt_get) --just-print dist-upgrade";
package_patch_name_regex => "$(debian_knowledge.patch_name_regex)";
package_patch_version_regex => "$(debian_knowledge.patch_version_regex)";
debian::
package_add_command => "$(debian_knowledge.call_dpkg) --install";
package_delete_command => "$(debian_knowledge.call_dpkg) --purge";
package_update_command => "$(debian_knowledge.call_dpkg) --install";
package_patch_command => "$(debian_knowledge.call_dpkg) --install";
# make correct version comparisons
package_version_less_command => "$(debian_knowledge.dpkg_compare_less)";
package_version_equal_command => "$(debian_knowledge.dpkg_compare_equal)";
}
rpm_version
Prototype: rpm_version(repo)
Description: RPM direct installation method
Arguments:
This package method interacts with the RPM package manager for a specific repo.
Example:
code
packages:
"mypackage" package_method => rpm_version("myrepo"), package_policy => "add";
Implementation:
code
body package_method rpm_version(repo)
{
package_changes => "individual";
package_list_command => "$(rpm_knowledge.call_rpm) -qa --queryformat \"$(rpm_knowledge.rpm_output_format)\"";
# set it to "0" to avoid caching of list during upgrade
package_list_update_command => "$(redhat_knowledge.call_yum) $(redhat_knowledge.yum_options) check-update $(redhat_knowledge.check_update_postproc)";
package_list_update_ifelapsed => "$(common_knowledge.list_update_ifelapsed)";
package_list_name_regex => "$(rpm_knowledge.rpm_name_regex)";
package_list_version_regex => "$(rpm_knowledge.rpm_version_regex)";
package_list_arch_regex => "$(rpm_knowledge.rpm_arch_regex)";
package_installed_regex => "i.*";
package_file_repositories => { "$(repo)" };
package_name_convention => "$(name)-$(version).$(arch).rpm";
package_add_command => "$(rpm_knowledge.call_rpm) -ivh ";
package_update_command => "$(rpm_knowledge.call_rpm) -Uvh ";
package_patch_command => "$(rpm_knowledge.call_rpm) -Uvh ";
package_delete_command => "$(rpm_knowledge.call_rpm) -e --nodeps";
package_verify_command => "$(rpm_knowledge.call_rpm) -V";
package_noverify_regex => ".*[^\s].*";
package_version_less_command => "$(redhat_knowledge.rpm_compare_less)";
package_version_equal_command => "$(redhat_knowledge.rpm_compare_equal)";
}
windows_feature
Prototype: windows_feature
Description: Method for managing Windows features
Implementation:
code
body package_method windows_feature
{
package_changes => "individual";
package_name_convention => "$(name)";
package_delete_convention => "$(name)";
package_installed_regex => ".*";
package_list_name_regex => "(.*)";
package_list_version_regex => "(.*)"; # FIXME: the listing does not give version, so takes name for version too now
package_add_command => "$(sys.winsysdir)\\WindowsPowerShell\\v1.0\\powershell.exe -Command \"Import-Module ServerManager; Add-WindowsFeature -Name\"";
package_delete_command => "$(sys.winsysdir)\\WindowsPowerShell\\v1.0\\powershell.exe -Command \"Import-Module ServerManager; Remove-WindowsFeature -confirm:$false -Name\"";
package_list_command => "$(sys.winsysdir)\\WindowsPowerShell\\v1.0\\powershell.exe -Command \"Import-Module ServerManager; Get-WindowsFeature | where {$_.installed -eq $True} |foreach {$_.Name}\"";
}
msi_implicit
Prototype: msi_implicit(repo)
Description: Windows MSI method
Arguments:
repo: The package file repository
Uses the whole file name as promiser, e.g. "7-Zip-4.50-x86_64.msi".
The name, version and arch is then deduced from the promiser.
See also: msi_explicit()
Implementation:
code
body package_method msi_implicit(repo)
{
package_changes => "individual";
package_file_repositories => { "$(repo)" };
package_installed_regex => ".*";
package_name_convention => "$(name)-$(version)-$(arch).msi";
package_delete_convention => "$(firstrepo)$(name)-$(version)-$(arch).msi";
package_name_regex => "^(\S+)-(\d+\.?)+";
package_version_regex => "^\S+-((\d+\.?)+)";
package_arch_regex => "^\S+-[\d\.]+-(.*).msi";
package_add_command => "\"$(sys.winsysdir)\msiexec.exe\" /qn /i";
package_update_command => "\"$(sys.winsysdir)\msiexec.exe\" /qn /i";
package_delete_command => "\"$(sys.winsysdir)\msiexec.exe\" /qn /x";
}
msi_explicit
Prototype: msi_explicit(repo)
Description: Windows MSI method
Arguments:
repo: The package file repository
Uses software name as promiser, e.g. "7-Zip", and explicitly
specify any package_version and package_arch.
See also: msi_implicit()
Implementation:
code
body package_method msi_explicit(repo)
{
package_changes => "individual";
package_file_repositories => { "$(repo)" };
package_installed_regex => ".*";
package_name_convention => "$(name)-$(version)-$(arch).msi";
package_delete_convention => "$(firstrepo)$(name)-$(version)-$(arch).msi";
package_add_command => "\"$(sys.winsysdir)\msiexec.exe\" /qn /i";
package_update_command => "\"$(sys.winsysdir)\msiexec.exe\" /qn /i";
package_delete_command => "\"$(sys.winsysdir)\msiexec.exe\" /qn /x";
}
yum
Prototype: yum
Description: Yum+RPM installation method
This package method interacts with the Yum and RPM package managers.
It is a copy of yum_rpm(), which was contributed by Trond Hasle
Amundsen. The old yum package method has been removed.
This is an efficient package method for RPM-based systems - uses rpm
instead of yum to list installed packages.
It will use rpm -e to remove packages. Please note that if several packages
with the same name but varying versions or architectures are installed,
rpm -e will return an error and not delete any of them.
Example:
code
packages:
"mypackage" package_method => yum, package_policy => "add";
Implementation:
code
body package_method yum
{
package_changes => "bulk";
package_list_command => "$(rpm_knowledge.call_rpm) -qa --qf '$(rpm_knowledge.rpm3_output_format)'";
package_patch_list_command => "$(redhat_knowledge.call_yum) $(redhat_knowledge.yum_offline_options) check-update $(redhat_knowledge.check_update_postproc)";
package_list_name_regex => "$(rpm_knowledge.rpm3_name_regex)";
package_list_version_regex => "$(rpm_knowledge.rpm3_version_regex)";
package_list_arch_regex => "$(rpm_knowledge.rpm3_arch_regex)";
package_installed_regex => ".*";
package_name_convention => "$(name)-$(version).$(arch)";
# just give the package name to rpm to delete, otherwise it gets "name.*" (from package_name_convention above)
package_delete_convention => "$(name)";
# set it to "0" to avoid caching of list during upgrade
package_list_update_command => "$(redhat_knowledge.call_yum) $(redhat_knowledge.yum_options) check-update $(redhat_knowledge.check_update_postproc)";
package_list_update_ifelapsed => "$(common_knowledge.list_update_ifelapsed)";
package_patch_name_regex => "$(redhat_knowledge.patch_name_regex)";
package_patch_version_regex => "$(redhat_knowledge.patch_version_regex)";
package_patch_arch_regex => "$(redhat_knowledge.patch_arch_regex)";
package_add_command => "$(redhat_knowledge.call_yum) $(redhat_knowledge.yum_options) -y install";
package_update_command => "$(redhat_knowledge.call_yum) $(redhat_knowledge.yum_options) -y update";
package_patch_command => "$(redhat_knowledge.call_yum) $(redhat_knowledge.yum_options) -y update";
package_delete_command => "$(rpm_knowledge.call_rpm) -e --nodeps";
package_verify_command => "$(rpm_knowledge.call_rpm) -V";
package_noverify_returncode => "1";
package_version_less_command => "$(redhat_knowledge.rpm_compare_less)";
package_version_equal_command => "$(redhat_knowledge.rpm_compare_equal)";
}
yum_rpm
Prototype: yum_rpm
Description: Yum+RPM installation method
This package method interacts with the Yum and RPM package managers.
Contributed by Trond Hasle Amundsen
This is an efficient package method for RPM-based systems - uses rpm
instead of yum to list installed packages.
It will use rpm -e to remove packages. Please note that if several packages
with the same name but varying versions or architectures are installed,
rpm -e will return an error and not delete any of them.
Example:
code
packages:
"mypackage" package_method => yum_rpm, package_policy => "add";
Implementation:
code
body package_method yum_rpm
{
package_changes => "bulk";
package_list_command => "$(rpm_knowledge.call_rpm) -qa --qf '$(rpm_knowledge.rpm3_output_format)'";
package_patch_list_command => "$(redhat_knowledge.call_yum) $(redhat_knowledge.yum_offline_options) check-update $(redhat_knowledge.check_update_postproc)";
package_list_name_regex => "$(rpm_knowledge.rpm3_name_regex)";
package_list_version_regex => "$(rpm_knowledge.rpm3_version_regex)";
package_list_arch_regex => "$(rpm_knowledge.rpm3_arch_regex)";
package_installed_regex => ".*";
package_name_convention => "$(name)-$(version).$(arch)";
# just give the package name to rpm to delete, otherwise it gets "name.*" (from package_name_convention above)
package_delete_convention => "$(name)";
# set it to "0" to avoid caching of list during upgrade
package_list_update_command => "$(redhat_knowledge.call_yum) $(redhat_knowledge.yum_options) check-update $(redhat_knowledge.check_update_postproc)";
package_list_update_ifelapsed => "$(common_knowledge.list_update_ifelapsed)";
package_patch_name_regex => "$(redhat_knowledge.patch_name_regex)";
package_patch_version_regex => "$(redhat_knowledge.patch_version_regex)";
package_patch_arch_regex => "$(redhat_knowledge.patch_arch_regex)";
package_add_command => "$(redhat_knowledge.call_yum) $(redhat_knowledge.yum_options) -y install";
package_update_command => "$(redhat_knowledge.call_yum) $(redhat_knowledge.yum_options) -y update";
package_patch_command => "$(redhat_knowledge.call_yum) $(redhat_knowledge.yum_options) -y update";
package_delete_command => "$(rpm_knowledge.call_rpm) -e --nodeps";
package_verify_command => "$(rpm_knowledge.call_rpm) -V";
package_noverify_returncode => "1";
package_version_less_command => "$(redhat_knowledge.rpm_compare_less)";
package_version_equal_command => "$(redhat_knowledge.rpm_compare_equal)";
}
yum_rpm_permissive
Prototype: yum_rpm_permissive
Description: Yum+RPM permissive (just by name) package method
This package method interacts with the Yum and RPM package managers.
Copy of yum_rpm which was contributed by Trond Hasle Amundsen
This is an efficient package method for RPM-based systems - uses
rpm instead of yum to list installed packages. It can't delete
packages and can't take a target version or architecture, so only
the "add" and "addupdate" methods should be used.
Normally you have to specify the package version, and it defaults to
*, which then triggers the bug of installing xyz-abc when you ask for xyz.
This "permissive" body sets
package_name_convention => "$(name)";
which is permissive in the sense of not requiring the version.
Example:
code
packages:
"mypackage" package_method => yum_rpm_permissive, package_policy => "add";
Implementation:
code
body package_method yum_rpm_permissive
{
package_changes => "bulk";
package_list_command => "$(rpm_knowledge.call_rpm) -qa --qf '$(rpm_knowledge.rpm3_output_format)'";
package_patch_list_command => "$(redhat_knowledge.call_yum) $(redhat_knowledge.yum_offline_options) check-update $(redhat_knowledge.check_update_postproc)";
package_list_name_regex => "$(rpm_knowledge.rpm3_name_regex)";
package_list_version_regex => "$(rpm_knowledge.rpm3_version_regex)";
package_list_arch_regex => "$(rpm_knowledge.rpm3_arch_regex)";
package_installed_regex => ".*";
package_name_convention => "$(name)";
# not needed, same as package_name_convention above
package_delete_convention => "$(name)";
# set it to "0" to avoid caching of list during upgrade
package_list_update_command => "$(redhat_knowledge.call_yum) $(redhat_knowledge.yum_options) check-update $(redhat_knowledge.check_update_postproc)";
package_list_update_ifelapsed => "$(common_knowledge.list_update_ifelapsed)";
package_patch_name_regex => "$(redhat_knowledge.patch_name_regex)";
package_patch_version_regex => "$(redhat_knowledge.patch_version_regex)";
package_patch_arch_regex => "$(redhat_knowledge.patch_arch_regex)";
package_add_command => "$(redhat_knowledge.call_yum) $(redhat_knowledge.yum_options) -y install";
package_update_command => "$(redhat_knowledge.call_yum) $(redhat_knowledge.yum_options) -y update";
package_patch_command => "$(redhat_knowledge.call_yum) $(redhat_knowledge.yum_options) -y update";
package_delete_command => "$(rpm_knowledge.call_rpm) -e --nodeps";
package_verify_command => "$(rpm_knowledge.call_rpm) -V";
package_noverify_returncode => "1";
package_version_less_command => "$(redhat_knowledge.rpm_compare_less)";
package_version_equal_command => "$(redhat_knowledge.rpm_compare_equal)";
}
yum_rpm_enable_repo
Prototype: yum_rpm_enable_repo(repoid)
Description: Yum+RPM repo-specific installation method
Arguments:
repoid: the repository name as in yum --enablerepo=???
This package method interacts with the RPM package manager for a specific repo.
Based on yum_rpm() with addition to enable a repository for the install.
Sometimes repositories are configured but disabled by default. For example
this pacakge_method could be used when installing a package that exists in
the EPEL, which normally you do not want to install packages from.
Example:
code
packages:
"mypackage" package_method => yum_rpm_enable_repo("myrepo"), package_policy => "add";
Implementation:
code
body package_method yum_rpm_enable_repo(repoid)
{
package_changes => "bulk";
package_list_command => "$(rpm_knowledge.call_rpm) -qa --qf '$(rpm_knowledge.rpm2_output_format)'";
package_patch_list_command => "$(redhat_knowledge.call_yum) $(redhat_knowledge.yum_offline_options) check-update $(redhat_knowledge.check_update_postproc)";
package_list_name_regex => "$(rpm_knowledge.rpm2_name_regex)";
package_list_version_regex => "$(rpm_knowledge.rpm2_version_regex)";
package_list_arch_regex => "$(rpm_knowledge.rpm2_arch_regex)";
package_installed_regex => ".*";
package_name_convention => "$(name)";
# set it to "0" to avoid caching of list during upgrade
package_list_update_command => "$(redhat_knowledge.call_yum) $(redhat_knowledge.yum_options) check-update $(redhat_knowledge.check_update_postproc)";
package_list_update_ifelapsed => "$(common_knowledge.list_update_ifelapsed)";
package_patch_name_regex => "$(redhat_knowledge.patch_name_regex)";
package_patch_version_regex => "$(redhat_knowledge.patch_version_regex)";
package_patch_arch_regex => "$(redhat_knowledge.patch_arch_regex)";
package_add_command => "$(redhat_knowledge.call_yum) $(redhat_knowledge.yum_options) --enablerepo=$(repoid) -y install";
package_update_command => "$(redhat_knowledge.call_yum) $(redhat_knowledge.yum_options) --enablerepo=$(repoid) -y update";
package_patch_command => "$(redhat_knowledge.call_yum) $(redhat_knowledge.yum_options) -y update";
package_delete_command => "$(rpm_knowledge.call_rpm) -e --nodeps --allmatches";
package_verify_command => "$(rpm_knowledge.call_rpm) -V";
package_noverify_returncode => "1";
package_version_less_command => "$(redhat_knowledge.rpm_compare_less)";
package_version_equal_command => "$(redhat_knowledge.rpm_compare_equal)";
}
yum_group
Prototype: yum_group
Description: RPM direct installation method
Makes use of the "groups of packages" feature of Yum possible. (yum
groupinstall, yum groupremove)
Groups must be specified by their groupids, available through yum
grouplist -v (between parentheses). For example, below
network-tools is the groupid.
code
$ yum grouplist -v|grep Networking|head -n 1
Networking Tools (network-tools)
Example:
code
Policies examples:
-Install "web-server" group:
vars:
"groups" slist => { "debugging", "php" };
packages:
"$(groups)"
package_policy => "delete",
package_method => yum_group;
Implementation:
code
body package_method yum_group
{
package_add_command => "$(redhat_knowledge.call_yum) $(redhat_knowledge.yum_options) groupinstall -y";
package_changes => "bulk";
package_delete_command => "$(redhat_knowledge.call_yum) $(redhat_knowledge.yum_options) groupremove -y";
package_delete_convention => "$(name)";
package_installed_regex => "^i.*";
# Generate a dpkg -l like listing, "i" means installed, "a" available, and a dummy version 1
package_list_command =>
"$(redhat_knowledge.call_yum) grouplist -v|awk '$0 ~ /^Done$/ {next} {sub(/.*\(/, \"\");sub(/\).*/, \"\")} /Available/ {h=\"a\";next} /Installed/ {h=\"i\";next} h==\"i\" || h==\"a\" {print h\" \"$0\" 1\"}'";
package_list_name_regex => "a|i ([^\s]+) 1";
package_list_update_command => "$(redhat_knowledge.call_yum) $(redhat_knowledge.yum_options) check-update $(redhat_knowledge.check_update_postproc)";
package_list_update_ifelapsed => "$(common_knowledge.list_update_ifelapsed)";
package_list_version_regex => "(1)";
package_name_convention => "$(name)";
package_name_regex => "(.*)";
package_noverify_returncode => "0";
package_update_command => "$(redhat_knowledge.call_yum) $(redhat_knowledge.yum_options) groupupdate";
# grep -x to only get full line matching
package_verify_command => "$(redhat_knowledge.call_yum) grouplist -v|awk '$0 ~ /^Done$/ {next} {sub(/.*\(/, \"\");sub(/\).*/, \"\")} /Available/ {h=\"a\";next} /Installed/ {h=\"i\";next} h==\"i\"|grep -qx";
}
rpm_filebased
Prototype: rpm_filebased(path)
Description: install packages from local filesystem-based RPM repository.
Arguments:
path: the path to the local package repository
Contributed by Aleksey Tsalolikhin. Written on 29-Feb-2012.
Based on yum_rpm() body by Trond Hasle Amundsen.
Example:
code
packages:
"epel-release"
package_policy => "add",
package_version => "5-4",
package_architectures => { "noarch" },
package_method => rpm_filebased("/repo/RPMs");
Implementation:
code
body package_method rpm_filebased(path)
{
package_file_repositories => { "$(path)" };
# the above is an addition to Trond's yum_rpm body
package_add_command => "$(rpm_knowledge.call_rpm) -ihv ";
# The above is a change from Trond's yum_rpm body, this makes the commands rpm only.
# The reason I changed the install command from yum to rpm is yum will be default
# refuse to install the epel-release RPM as it does not have the EPEL GPG key,
# but rpm goes ahead and installs the epel-release RPM and the EPEL GPG key.
package_name_convention => "$(name)-$(version).$(arch).rpm";
# The above is a change from Tron's yum_rpm body. When package_file_repositories is in play,
# package_name_convention has to match the file name, not the package name, per the
# CFEngine 3 Reference Manual
# set it to "0" to avoid caching of list during upgrade
package_list_update_command => "$(redhat_knowledge.call_yum) $(redhat_knowledge.yum_options) check-update $(redhat_knowledge.check_update_postproc)";
package_list_update_ifelapsed => "$(common_knowledge.list_update_ifelapsed)";
# The rest is unchanged from Trond's yum_rpm body
package_changes => "bulk";
package_list_command => "$(rpm_knowledge.call_rpm) -qa --qf '$(rpm_knowledge.rpm2_output_format)'";
package_list_name_regex => "$(rpm_knowledge.rpm2_name_regex)";
package_list_version_regex => "$(rpm_knowledge.rpm2_version_regex)";
package_list_arch_regex => "$(rpm_knowledge.rpm2_arch_regex)";
package_installed_regex => ".*";
package_delete_command => "$(rpm_knowledge.call_rpm) -e --allmatches";
package_verify_command => "$(rpm_knowledge.call_rpm) -V";
package_noverify_returncode => "1";
package_version_less_command => "$(redhat_knowledge.rpm_compare_less)";
package_version_equal_command => "$(redhat_knowledge.rpm_compare_equal)";
}
ips
Prototype: ips
Description: Image Package System method, used by OpenSolaris based systems (Solaris 11, Illumos, etc)
A note about Solaris 11.1 versioning format:
code
$ pkg list -v --no-refresh zsh
FMRI IFO
pkg://solaris/shell/zsh@4.3.17,5.11-0.175.1.0.0.24.0:20120904T174236Z i--
name--------- |<----->| |/________________________\|
version---------------- |\ /|
Notice that the publisher and timestamp aren't used. And that the package
version then must have the commas replaced by underscores.
Thus,
4.3.17,5.11-0.175.1.0.0.24.0
Becomes:
4.3.17_5.11-0.175.1.0.0.24.0
Therefore, a properly formatted package promise looks like this:
code
"shell/zsh"
package_policy => "addupdate",
package_method => ips,
package_select => ">=",
package_version => "4.3.17_5.11-0.175.1.0.0.24.0";
Implementation:
code
body package_method ips
{
package_changes => "bulk";
package_list_command => "$(paths.path[pkg]) list -v --no-refresh";
package_list_name_regex => "pkg://.+?(?<=/)([^\s]+)@.*$";
package_list_version_regex => "[^\s]+@([^\s]+):.*";
package_installed_regex => ".*(i..)"; # all reported are installed
# set it to "0" to avoid caching of list during upgrade
package_list_update_command => "$(paths.path[pkg]) refresh --full";
package_list_update_ifelapsed => "$(common_knowledge.list_update_ifelapsed)";
package_add_command => "$(paths.path[pkg]) install --accept ";
package_delete_command => "$(paths.path[pkg]) uninstall";
package_update_command => "$(paths.path[pkg]) install --accept";
package_patch_command => "$(paths.path[pkg]) install --accept";
package_verify_command => "$(paths.path[pkg]) list -a -v --no-refresh";
package_noverify_regex => "(.*---|pkg list: no packages matching .* installed)";
}
smartos
Prototype: smartos
Description: pkgin method for SmartOS (solaris 10 fork by Joyent)
Implementation:
code
body package_method smartos
{
package_changes => "bulk";
package_list_command => "/opt/local/bin/pkgin list";
package_list_name_regex => "([^\s]+)\-[0-9][^\s;]+.*[\s;]";
package_list_version_regex => "[^\s]+\-([0-9][^\s;]+).*[\s;]";
package_installed_regex => ".*"; # all reported are installed
package_list_update_command => "/opt/local/bin/pkgin -y update";
package_list_update_ifelapsed => "$(common_knowledge.list_update_ifelapsed)";
package_add_command => "/opt/local/bin/pkgin -y install";
package_delete_command => "/opt/local/bin/pkgin -y remove";
# pkgin update doesn't do what you think it does. pkgin install against and
# already installed package will upgrade it however.
package_update_command => "/opt/local/bin/pkgin -y install";
}
smartos_pkg_add
Prototype: smartos_pkg_add(repo)
Description: SmartOS pkg_add installation package method
This package method interacts with SmartOS pkg_add to install from local
or remote repositories. It is slightly different than the FreeBSD pkg_add.
This example installs "perl5" from a remote repository:
code
vars:
environment => { "PACKAGESITE=http://repo.example.com/private/8_STABLE/" };
packages:
"perl5"
package_policy => "add",
package_method => freebsd;
Implementation:
code
body package_method freebsd
{
package_changes => "individual";
# Could use rpm for this
package_list_command => "/usr/sbin/pkg info";
# Remember to escape special characters like |
package_list_name_regex => "([^\s]+)-.*";
package_list_version_regex => "[^\s]+-([^\s]+).*";
package_name_regex => "([^\s]+)-.*";
package_version_regex => "[^\s]+-([^\s]+).*";
package_installed_regex => ".*";
package_name_convention => "$(name)-$(version)";
package_add_command => "/usr/sbin/pkg install -y";
package_delete_command => "/usr/sbin/pkg delete -y";
}
freebsd_portmaster
Prototype: freebsd_portmaster
Description: FreeBSD portmaster package installation method
This package method interacts with portmaster to build and install packages.
Note that you must use the complete package name as it appears in
/usr/ports/*/name, such as 'perl5.14' rather than 'perl5'.
Repositories are hard-coded to /usr/ports; alternate locations are
unsupported at this time.
This method supports both pkg_* and pkgng systems.
Example:
code
packages:
"perl5.14"
package_policy => "add",
package_method => freebsd_portmaster;
Implementation:
code
body package_method freebsd_portmaster
{
package_changes => "individual";
package_list_command => "/usr/sbin/pkg info";
package_list_name_regex => "([^\s]+)-.*";
package_list_version_regex => "[^\s]+-([^\s]+).*";
package_installed_regex => ".*";
package_name_convention => "$(name)";
package_delete_convention => "$(name)-$(version)";
package_file_repositories => {
"/usr/ports/accessibility/",
"/usr/port/arabic/",
"/usr/ports/archivers/",
"/usr/ports/astro/",
"/usr/ports/audio/",
"/usr/ports/benchmarks/",
"/usr/ports/biology/",
"/usr/ports/cad/",
"/usr/ports/chinese/",
"/usr/ports/comms/",
"/usr/ports/converters/",
"/usr/ports/databases/",
"/usr/ports/deskutils/",
"/usr/ports/devel/",
"/usr/ports/dns/",
"/usr/ports/editors/",
"/usr/ports/emulators/",
"/usr/ports/finance/",
"/usr/ports/french/",
"/usr/ports/ftp/",
"/usr/ports/games/",
"/usr/ports/german/",
"/usr/ports/graphics/",
"/usr/ports/hebrew/",
"/usr/ports/hungarian/",
"/usr/ports/irc/",
"/usr/ports/japanese/",
"/usr/ports/java/",
"/usr/ports/korean/",
"/usr/ports/lang/",
"/usr/ports/mail/",
"/usr/ports/math/",
"/usr/ports/mbone/",
"/usr/ports/misc/",
"/usr/ports/multimedia/",
"/usr/ports/net/",
"/usr/ports/net-im/",
"/usr/ports/net-mgmt/",
"/usr/ports/net-p2p/",
"/usr/ports/news/",
"/usr/ports/packages/",
"/usr/ports/palm/",
"/usr/ports/polish/",
"/usr/ports/ports-mgmt/",
"/usr/ports/portuguese/",
"/usr/ports/print/",
"/usr/ports/russian/",
"/usr/ports/science/",
"/usr/ports/security/",
"/usr/ports/shells/",
"/usr/ports/sysutils/",
"/usr/ports/textproc/",
"/usr/ports/ukrainian/",
"/usr/ports/vietnamese/",
"/usr/ports/www/",
"/usr/ports/x11/",
"/usr/ports/x11-clocks/",
"/usr/ports/x11-drivers/",
"/usr/ports/x11-fm/",
"/usr/ports/x11-fonts/",
"/usr/ports/x11-servers/",
"/usr/ports/x11-themes/",
"/usr/ports/x11-toolkits/",
"/usr/ports/x11-wm/",
};
package_add_command => "/usr/local/sbin/portmaster -D -G --no-confirm";
package_update_command => "/usr/local/sbin/portmaster -D -G --no-confirm";
package_delete_command => "/usr/local/sbin/portmaster --no-confirm -e";
}
alpinelinux
Prototype: alpinelinux
Description: Alpine Linux apk package installation method
This package method interacts with apk to manage packages.
Example:
code
packages:
"vim"
package_policy => "add",
package_method => alpinelinux;
Implementation:
code
body package_method alpinelinux
{
package_changes => "bulk";
package_list_command => "/sbin/apk info -v";
package_list_name_regex => "([^\s]+)-.*";
package_list_version_regex => "[^\s]+-([^\s]+).*";
package_name_regex => ".*";
package_installed_regex => ".*";
package_name_convention => "$(name)";
package_add_command => "/sbin/apk add";
package_delete_command => "/sbin/apk del";
}
emerge
Prototype: emerge
Description: Gentoo emerge package installation method
This package method interacts with emerge to build and install packages.
Example:
code
packages:
"zsh"
package_policy => "add",
package_method => emerge;
Implementation:
code
body package_method emerge
{
package_changes => "individual";
package_list_command => "/bin/sh -c '/bin/ls -d /var/db/pkg/*/* | cut -c 13-'";
package_list_name_regex => ".*/([^\s]+)-\d.*";
package_list_version_regex => ".*/[^\s]+-(\d.*)";
package_installed_regex => ".*"; # all reported are installed
package_name_convention => "$(name)";
package_list_update_command => "/bin/true"; # I prefer manual syncing
#package_list_update_command => "/usr/bin/emerge --sync"; # if you like automatic
package_list_update_ifelapsed => "$(common_knowledge.list_update_ifelapsed)";
package_add_command => "/usr/bin/emerge -q --quiet-build";
package_delete_command => "/usr/bin/emerge --depclean";
package_update_command => "/usr/bin/emerge --update";
package_patch_command => "/usr/bin/emerge --update";
package_verify_command => "/usr/bin/emerge -s";
package_noverify_regex => ".*(Not Installed|Applications found : 0).*";
}
pacman
Prototype: pacman
Description: Arch Linux pacman package management method
Implementation:
code
body package_method pacman
{
package_changes => "bulk";
package_list_command => "/usr/bin/pacman -Q";
package_verify_command => "/usr/bin/pacman -Q";
package_noverify_regex => "error:\b.*\bwas not found";
# set it to "0" to avoid caching of list during upgrade
package_list_update_ifelapsed => "$(common_knowledge.list_update_ifelapsed)";
package_list_name_regex => "(.*)\s+.*";
package_list_version_regex => ".*\s+(.*)";
package_installed_regex => ".*";
package_name_convention => "$(name)";
package_add_command => "/usr/bin/pacman -S --noconfirm --noprogressbar --needed";
package_delete_command => "/usr/bin/pacman -Rs --noconfirm";
package_update_command => "/usr/bin/pacman -S --noconfirm --noprogressbar --needed";
}
zypper
Prototype: zypper
Description: SUSE installation method
This package method interacts with the SUSE Zypper package manager
Example:
code
packages:
"mypackage" package_method => zypper, package_policy => "add";
Implementation:
code
body package_method zypper
{
package_changes => "bulk";
package_list_command => "$(paths.path[rpm]) -qa --queryformat \"$(rpm_knowledge.rpm_output_format)\"";
# set it to "0" to avoid caching of list during upgrade
package_list_update_command => "$(suse_knowledge.call_zypper) list-updates";
package_list_update_ifelapsed => "$(common_knowledge.list_update_ifelapsed)";
package_patch_list_command => "$(suse_knowledge.call_zypper) patches";
package_installed_regex => "i.*";
package_list_name_regex => "$(rpm_knowledge.rpm_name_regex)";
package_list_version_regex => "$(rpm_knowledge.rpm_version_regex)";
package_list_arch_regex => "$(rpm_knowledge.rpm_arch_regex)";
package_patch_installed_regex => ".*Installed.*|.*Not Applicable.*";
package_patch_name_regex => "[^|]+\|\s+([^\s]+).*";
package_patch_version_regex => "[^|]+\|[^|]+\|\s+([^\s]+).*";
package_name_convention => "$(name)";
package_add_command => "$(suse_knowledge.call_zypper) --non-interactive install";
package_delete_command => "$(suse_knowledge.call_zypper) --non-interactive remove --force-resolution";
package_update_command => "$(suse_knowledge.call_zypper) --non-interactive update";
package_patch_command => "$(suse_knowledge.call_zypper) --non-interactive patch$"; # $ means no args
package_verify_command => "$(suse_knowledge.call_zypper) --non-interactive verify$";
}
generic
Prototype: generic
Description: Generic installation package method
This package method attempts to handle all platforms.
The Redhat section is a verbatim insertion of yum_rpm(), which was
contributed by Trond Hasle Amundsen.
Example:
code
packages:
"mypackage" package_method => generic, package_policy => "add";
Implementation:
code
body package_method generic
{
suse|sles|opensuse::
package_changes => "bulk";
package_list_command => "$(rpm_knowledge.call_rpm) -qa --queryformat \"$(rpm_knowledge.rpm_output_format)\"";
# set it to "0" to avoid caching of list during upgrade
package_list_update_command => "$(suse_knowledge.call_zypper) list-updates";
package_list_update_ifelapsed => "$(common_knowledge.list_update_ifelapsed)";
package_patch_list_command => "$(suse_knowledge.call_zypper) patches";
package_installed_regex => "i.*";
package_list_name_regex => "$(rpm_knowledge.rpm_name_regex)";
package_list_version_regex => "$(rpm_knowledge.rpm_version_regex)";
package_list_arch_regex => "$(rpm_knowledge.rpm_arch_regex)";
package_patch_installed_regex => ".*Installed.*|.*Not Applicable.*";
package_patch_name_regex => "[^|]+\|\s+([^\s]+).*";
package_patch_version_regex => "[^|]+\|[^|]+\|\s+([^\s]+).*";
package_name_convention => "$(name)";
package_add_command => "$(suse_knowledge.call_zypper) --non-interactive install";
package_delete_command => "$(suse_knowledge.call_zypper) --non-interactive remove --force-resolution";
package_update_command => "$(suse_knowledge.call_zypper) --non-interactive update";
package_patch_command => "$(suse_knowledge.call_zypper) --non-interactive patch$"; # $ means no args
package_verify_command => "$(suse_knowledge.call_zypper) --non-interactive verify$";
redhat::
package_changes => "bulk";
package_list_command => "$(rpm_knowledge.call_rpm) -qa --qf '$(rpm_knowledge.rpm3_output_format)'";
package_patch_list_command => "$(redhat_knowledge.call_yum) $(redhat_knowledge.yum_offline_options) check-update $(redhat_knowledge.check_update_postproc)";
package_list_name_regex => "$(rpm_knowledge.rpm3_name_regex)";
package_list_version_regex => "$(rpm_knowledge.rpm3_version_regex)";
package_list_arch_regex => "$(rpm_knowledge.rpm3_arch_regex)";
package_installed_regex => ".*";
package_name_convention => "$(name)-$(version).$(arch)";
# just give the package name to rpm to delete, otherwise it gets "name.*" (from package_name_convention above)
package_delete_convention => "$(name)";
# set it to "0" to avoid caching of list during upgrade
package_list_update_command => "$(redhat_knowledge.call_yum) $(redhat_knowledge.yum_options) check-update $(redhat_knowledge.check_update_postproc)";
package_list_update_ifelapsed => "$(common_knowledge.list_update_ifelapsed)";
package_patch_name_regex => "$(redhat_knowledge.patch_name_regex)";
package_patch_version_regex => "$(redhat_knowledge.patch_version_regex)";
package_patch_arch_regex => "$(redhat_knowledge.patch_arch_regex)";
package_add_command => "$(redhat_knowledge.call_yum) $(redhat_knowledge.yum_options) -y install";
package_update_command => "$(redhat_knowledge.call_yum) $(redhat_knowledge.yum_options) -y update";
package_patch_command => "$(redhat_knowledge.call_yum) $(redhat_knowledge.yum_options) -y update";
package_delete_command => "$(rpm_knowledge.call_rpm) -e --nodeps";
package_verify_command => "$(rpm_knowledge.call_rpm) -V";
package_noverify_returncode => "1";
package_version_less_command => "$(redhat_knowledge.rpm_compare_less)";
package_version_equal_command => "$(redhat_knowledge.rpm_compare_equal)";
debian::
package_changes => "bulk";
package_list_command => "$(debian_knowledge.call_dpkg) -l";
package_list_name_regex => "$(debian_knowledge.list_name_regex)";
package_list_version_regex => "$(debian_knowledge.list_version_regex)";
package_installed_regex => ".i.*"; # packages that have been uninstalled may be listed
package_name_convention => "$(name)";
package_list_update_ifelapsed => "$(common_knowledge.list_update_ifelapsed)";
# make correct version comparisons
package_version_less_command => "$(debian_knowledge.dpkg_compare_less)";
package_version_equal_command => "$(debian_knowledge.dpkg_compare_equal)";
debian.have_aptitude::
package_add_command => "$(debian_knowledge.call_aptitude) $(debian_knowledge.dpkg_options) --assume-yes install";
package_list_update_command => "$(debian_knowledge.call_aptitude) update";
package_delete_command => "$(debian_knowledge.call_aptitude) $(debian_knowledge.dpkg_options) --assume-yes remove";
package_update_command => "$(debian_knowledge.call_aptitude) $(debian_knowledge.dpkg_options) --assume-yes install";
package_patch_command => "$(debian_knowledge.call_aptitude) $(debian_knowledge.dpkg_options) --assume-yes install";
package_verify_command => "$(debian_knowledge.call_aptitude) show";
package_noverify_regex => "(State: not installed|E: Unable to locate package .*)";
package_patch_list_command => "$(debian_knowledge.call_aptitude) --assume-yes --simulate --verbose full-upgrade";
package_patch_name_regex => "$(debian_knowledge.patch_name_regex)";
package_patch_version_regex => "$(debian_knowledge.patch_version_regex)";
debian.!have_aptitude::
package_add_command => "$(debian_knowledge.call_apt_get) $(debian_knowledge.dpkg_options) --yes install";
package_list_update_command => "$(debian_knowledge.call_apt_get) update";
package_delete_command => "$(debian_knowledge.call_apt_get) $(debian_knowledge.dpkg_options) --yes remove";
package_update_command => "$(debian_knowledge.call_apt_get) $(debian_knowledge.dpkg_options) --yes install";
package_patch_command => "$(debian_knowledge.call_apt_get) $(debian_knowledge.dpkg_options) --yes install";
package_verify_command => "$(debian_knowledge.call_dpkg) -s";
package_noverify_returncode => "1";
package_patch_list_command => "$(debian_knowledge.call_apt_get) --just-print dist-upgrade";
package_patch_name_regex => "$(debian_knowledge.patch_name_regex)";
package_patch_version_regex => "$(debian_knowledge.patch_version_regex)";
freebsd::
package_changes => "individual";
package_list_command => "/usr/sbin/pkg info";
package_list_name_regex => "([^\s]+)-.*";
package_list_version_regex => "[^\s]+-([^\s]+).*";
package_name_regex => "([^\s]+)-.*";
package_version_regex => "[^\s]+-([^\s]+).*";
package_installed_regex => ".*";
package_name_convention => "$(name)-$(version)";
package_add_command => "/usr/sbin/pkg install -y";
package_delete_command => "/usr/sbin/pkg delete";
alpinelinux::
package_changes => "bulk";
package_list_command => "/sbin/apk info -v";
package_list_name_regex => "([^\s]+)-.*";
package_list_version_regex => "[^\s]+-([^\s]+).*";
package_name_regex => ".*";
package_installed_regex => ".*";
package_name_convention => "$(name)";
package_add_command => "/sbin/apk add";
package_delete_command => "/sbin/apk del";
gentoo::
package_changes => "individual";
package_list_command => "/bin/sh -c '/bin/ls -d /var/db/pkg/*/* | cut -c 13-'";
package_list_name_regex => "([^/]+/(?:(?!-\d).)+)-\d.*";
package_list_version_regex => "[^/]+/(?:(?!-\d).)+-(\d.*)";
package_installed_regex => ".*"; # all reported are installed
package_name_convention => "$(name)";
package_list_update_command => "/bin/true"; # I prefer manual syncing
#package_list_update_command => "/usr/bin/emerge --sync"; # if you like automatic
package_list_update_ifelapsed => "$(common_knowledge.list_update_ifelapsed)";
package_add_command => "/usr/bin/emerge -q --quiet-build";
package_delete_command => "/usr/bin/emerge --depclean";
package_update_command => "/usr/bin/emerge --update";
package_patch_command => "/usr/bin/emerge --update";
package_verify_command => "/usr/bin/emerge -s";
package_noverify_regex => ".*(Not Installed|Applications found : 0).*";
archlinux::
package_changes => "bulk";
package_list_command => "/usr/bin/pacman -Q";
package_verify_command => "/usr/bin/pacman -Q";
package_noverify_regex => "error:\b.*\bwas not found";
package_list_name_regex => "(.*)\s+.*";
package_list_version_regex => ".*\s+(.*)";
package_installed_regex => ".*";
package_name_convention => "$(name)";
package_list_update_ifelapsed => "$(common_knowledge.list_update_ifelapsed)";
package_add_command => "/usr/bin/pacman -S --noconfirm --noprogressbar --needed";
package_delete_command => "/usr/bin/pacman -Rs --noconfirm";
package_update_command => "/usr/bin/pacman -S --noconfirm --noprogressbar --needed";
}
package_module_knowledge
Prototype: package_module_knowledge
Description: common package_module_knowledge bundle
This common bundle defines which package modules are the defaults on different
platforms.
Implementation:
code
bundle common package_module_knowledge
{
vars:
# First we set the default package manager based on the platform:
# TODO Refactor to use ifelse()?
debian::
"platform_default" string => "apt_get";
freebsd::
"platform_default" string => "pkg";
redhat|amazon_linux::
"platform_default" string => "yum";
suse|sles|opensuse::
"platform_default" string => "zypper";
aix::
"platform_default" string => "nimclient";
slackware::
"platform_default" string => "slackpkg";
windows::
"platform_default" string => "msiexec";
alpinelinux::
"platform_default" string => "apk";
termux::
"platform_default" string => "apt_get";
any::
# By default, we don't want additional package managers inventoried, but
# we need the variable to be defined, so we initialize it to an empty
# list.
"additional_inventory" slist => {};
# We look to see if additional package inventory modules should be used.
# `default:def.additional_package_inventory_modules` is expected to be a data
# structure keyed with values expected to match the value of `sys.flavor`.
# For example: { "aix_7": [ "yum"], "ubuntu_20: [ "snap" ] }
# If there is additional inventory defined for the platform we want to use them
"additional_inventory" -> { "CFE-3612" }
slist => getvalues( "default:def.additional_package_inventory_modules[$(sys.flavor)]" ),
if => isvariable( "default:def.additional_package_inventory_modules[$(sys.flavor)]" );
# Package inventory refresh
"query_installed_ifelapsed" -> { "CFE-2771", "CFE-3504" }
string => ifelse( isvariable( "def.package_module_$(this.promiser)" ),
"$(def.package_module_$(this.promiser))",
"0"); # Always refresh local package inventory
"query_updates_ifelapsed" -> { "CFE-2771", "CFE-3504" }
string => ifelse( isvariable( "def.package_module_$(this.promiser)" ),
"$(def.package_module_$(this.promiser))",
"1440"); # Refresh software updates available once a day
# It's possible that a user wants to use a different default package
# manager. To support that we look at
# `default:def.default_package_module`, a data structure keyed
# with values expected to match the value of `sys.flavor`
"platform_default" -> { "CFE-3612" }
string => "$(default:def.default_package_module[$(sys.flavor)])",
if => isvariable( "default:def.default_package_module[$(sys.flavor)]"),
comment => concat( "default:def.default_package_module[$(sys.flavor)] has been defined.",
"This overrides the default package manager.");
}
packages_common
Prototype: packages_common
Description: Define inputs required for this policy file
Implementation:
code
bundle common packages_common
{
vars:
"inputs" slist => {
"$(this.promise_dirname)/paths.cf",
"$(this.promise_dirname)/files.cf",
"$(this.promise_dirname)/common.cf"
};
}
common_knowledge
Prototype: common_knowledge
Description: common packages knowledge bundle
This common bundle defines general things about platforms.
Implementation:
code
bundle common common_knowledge
{
vars:
# This variable can be customized via augments:
# { "variables": { "default:common_knowledge.list_update_ifelapsed": { "value": "0" } } }
"list_update_ifelapsed"
string => "240",
if => not( isvariable( "list_update_ifelapsed" )),
comment => concat( "The number of minutes to wait before updating the",
" package cache. Note this controls both the software",
" installed and the software updates available.");
}
debian_knowledge
Prototype: debian_knowledge
Description: common Debian knowledge bundle
This common bundle has useful information about Debian.
Implementation:
code
bundle common debian_knowledge
{
vars:
# Debian default package architecture, see https://wiki.debian.org/Multiarch/Tuples
"default_arch" string => ifelse("x86_64", "amd64",
"i386", "i386",
$(sys.arch));
"apt_prefix" string => "/usr/bin/env DEBIAN_FRONTEND=noninteractive LC_ALL=C PATH=/bin:/sbin/:/usr/bin:/usr/sbin";
"call_dpkg" string => "$(apt_prefix) $(paths.path[dpkg])";
"call_apt_get" string => "$(apt_prefix) $(paths.path[apt_get])";
"call_aptitude" string => "$(apt_prefix) $(paths.path[aptitude])";
"dpkg_options" string => "-o Dpkg::Options::=--force-confold -o Dpkg::Options::=--force-confdef";
"dpkg_compare_equal" string => "$(call_dpkg) --compare-versions '$(v1)' eq '$(v2)'";
"dpkg_compare_less" string => "$(call_dpkg) --compare-versions '$(v1)' lt '$(v2)'";
"list_name_regex" string => "^.i\s+([^\s:]+).*";
"list_version_regex" string => "^.i\s+[^\s]+\s+([^\s]+).*";
"patch_name_regex" string => "^Inst\s+(\S+)\s+.*";
"patch_version_regex" string => "^Inst\s+\S+\s+\[\S+\]\s+\((\S+)\s+.*";
}
rpm_knowledge
Prototype: rpm_knowledge
Description: common RPM knowledge bundle
This common bundle has useful information about platforms using RPM
Implementation:
code
bundle common rpm_knowledge
{
vars:
"call_rpm" string => "$(paths.rpm)";
"rpm_output_format" string => "i | repos | %{name} | %{version}-%{release} | %{arch}\n";
"rpm_name_regex" string => "[^|]+\|[^|]+\|\s+([^\s|]+).*";
"rpm_version_regex" string => "[^|]+\|[^|]+\|[^|]+\|\s+([^\s|]+).*";
"rpm_arch_regex" string => "[^|]+\|[^|]+\|[^|]+\|[^|]+\|\s+([^\s]+).*";
"rpm2_output_format" string => "%{name} %{version}-%{release} %{arch}\n";
"rpm2_name_regex" string => "^(\S+?)\s\S+?\s\S+$";
"rpm2_version_regex" string => "^\S+?\s(\S+?)\s\S+$";
"rpm2_arch_regex" string => "^\S+?\s\S+?\s(\S+)$";
"rpm3_output_format" string => "%{name} %{arch} %{version}-%{release}\n";
"rpm3_name_regex" string => "(\S+).*";
"rpm3_version_regex" string => "\S+\s+\S+\s+(\S+).*";
"rpm3_arch_regex" string => "\S+\s+(\S+).*";
}
redhat_no_locking_knowledge
Prototype: redhat_no_locking_knowledge
Description: common Red Hat knowledge bundle
This common bundle has useful information about Red Hat and its
derivatives
Implementation:
code
bundle common redhat_no_locking_knowledge {
{
vars:
# Red Hat default package architecture
"default_arch" string => $(sys.arch);
"call_yum" string => "$(paths.path[yum])";
"call_rpmvercmp" string => "$(sys.bindir)/rpmvercmp";
# on RHEL 3/4, Yum doesn't know how to be --quiet
"yum_options" string => ifelse("centos_4|redhat_4|centos_3|redhat_3", "",
"--quiet ${redhat_no_locking_knowledge.no_locking_option}");
"yum_offline_options" string => "$(yum_options) -C";
"rpm_compare_equal" string => "$(call_rpmvercmp) '$(v1)' eq '$(v2)'";
"rpm_compare_less" string => "$(call_rpmvercmp) '$(v1)' lt '$(v2)'";
# yum check-update prints a lot of extra useless lines, but the format of
# the actual package lines is:
#
# <name>.<arch> <version> <repo>
#
# We try to match that format as closely as possible, so we reject
# possibly interspersed error messages.
"patch_name_regex" string => "^(\S+)\.[^\s.]+\s+\S+\s+\S+\s*$";
"patch_version_regex" string => "^\S+\.[^\s.]+\s+(\S+)\s+\S+\s*$";
"patch_arch_regex" string => "^\S+\.([^\s.]+)\s+\S+\s+\S+\s*$";
# Combine multiline entries into one line. A line without at least three
# fields gets combined with the next line, if that line starts with a
# space.
"check_update_postproc" string => "| $(paths.sed) -r -n -e '
:begin;
/\S+\s+\S+\s+\S+/!{ # Check for valid line.
N; # If not, read in the next line and append it.
/\n /!{ # Check whether that line started with a space.
h; # If not, copy buffer to clipboard.
s/\n[^\n]*$//; # Erase last line.
p; # Print current buffer.
x; # Restore from clipboard.
s/^.*\n//; # Erase everything but last line.
};
s/\n / /; # Combine lines by removing newline.
bbegin; # Jump back to begin.
};
p; # Print current buffer.'";
}
redhat_knowledge
Prototype: redhat_knowledge
Description: common Red Hat knowledge bundle
This common bundle has useful information about Red Hat and its
derivatives
Implementation:
code
bundle common redhat_knowledge
{
vars:
# Red Hat default package architecture
"default_arch" string => $(sys.arch);
"call_yum" string => "$(paths.path[yum])";
"call_rpmvercmp" string => "$(sys.bindir)/rpmvercmp";
# on RHEL 3/4, Yum doesn't know how to be --quiet
"yum_options" string => ifelse("centos_4|redhat_4|centos_3|redhat_3", "",
"--quiet ${redhat_no_locking_knowledge.no_locking_option}");
"yum_offline_options" string => "$(yum_options) -C";
"rpm_compare_equal" string => "$(call_rpmvercmp) '$(v1)' eq '$(v2)'";
"rpm_compare_less" string => "$(call_rpmvercmp) '$(v1)' lt '$(v2)'";
# yum check-update prints a lot of extra useless lines, but the format of
# the actual package lines is:
#
# <name>.<arch> <version> <repo>
#
# We try to match that format as closely as possible, so we reject
# possibly interspersed error messages.
"patch_name_regex" string => "^(\S+)\.[^\s.]+\s+\S+\s+\S+\s*$";
"patch_version_regex" string => "^\S+\.[^\s.]+\s+(\S+)\s+\S+\s*$";
"patch_arch_regex" string => "^\S+\.([^\s.]+)\s+\S+\s+\S+\s*$";
# Combine multiline entries into one line. A line without at least three
# fields gets combined with the next line, if that line starts with a
# space.
"check_update_postproc" string => "| $(paths.sed) -r -n -e '
:begin;
/\S+\s+\S+\s+\S+/!{ # Check for valid line.
N; # If not, read in the next line and append it.
/\n /!{ # Check whether that line started with a space.
h; # If not, copy buffer to clipboard.
s/\n[^\n]*$//; # Erase last line.
p; # Print current buffer.
x; # Restore from clipboard.
s/^.*\n//; # Erase everything but last line.
};
s/\n / /; # Combine lines by removing newline.
bbegin; # Jump back to begin.
};
p; # Print current buffer.'";
}
suse_knowledge
Prototype: suse_knowledge
Description: common SUSE knowledge bundle
Implementation:
code
bundle common suse_knowledge
{
vars:
# SUSE default package architecture
"default_arch" string => $(sys.arch);
"call_zypper" string => "$(paths.zypper)";
}
darwin_knowledge
Prototype: darwin_knowledge
Description: common Darwin / Mac OS X knowledge bundle
This common bundle has useful information about Darwin / Mac OS X.
Implementation:
code
bundle common darwin_knowledge
{
vars:
"call_brew" string => "$(paths.path[brew])";
"call_sudo" string => "$(paths.path[sudo])";
# used with brew list --versions format '%{name} %{version}\n'
"brew_name_regex" string => "([\S]+)\s[\S]+";
"brew_version_regex" string => "[\S]+\s([\S]+)";
}
npm_knowledge
Prototype: npm_knowledge
Description: Node.js `npm' knowledge bundle
This common bundle has useful information about the Node.js `npm' package manager.
Implementation:
code
bundle common npm_knowledge
{
vars:
"call_npm" string => "$(paths.path[npm])";
"npm_list_name_regex" string => "^[^ /]+ ([\w\d-._~]+)@[\d.]+";
"npm_list_version_regex" string => "^[^ /]+ [\w\d-._~]+@([\d.]+)";
"npm_installed_regex" string => "^[^ /]+ ([\w\d-._~]+@[\d.]+)";
}
pip_knowledge
Prototype: pip_knowledge
Description: Python `pip' knowledge bundle
This common bundle has useful information about the Python `pip' package manager.
Implementation:
code
bundle common pip_knowledge
{
vars:
"call_pip" string => "$(paths.path[pip])";
"pip_list_name_regex" string => "^([[:alnum:]-_]+)\s\([\d.]+\)";
"pip_list_version_regex" string => "^[[:alnum:]-_]+\s\(([\d.]+)\)";
"pip_installed_regex" string => "^([[:alnum:]-_]+\s\([\d.]+\))";
}
solaris_knowledge
Prototype: solaris_knowledge
Description: Solaris knowledge bundle
This common bundle has useful information about the Solaris packages.
Implementation:
code
bundle common solaris_knowledge
{
vars:
"call_pkgadd" string => "$(paths.path[pkgadd])";
"call_pkgrm" string => "$(paths.path[pkgrm])";
"call_pkginfo" string => "$(paths.path[pkginfo])";
"admin_nocheck" string => "mail=
instance=unique
partial=nocheck
runlevel=nocheck
idepend=nocheck
rdepend=nocheck
space=nocheck
setuid=nocheck
conflict=nocheck
action=nocheck
networktimeout=60
networkretries=3
authentication=quit
keystore=/var/sadm/security
proxy=
basedir=default";
}
create_solaris_admin_file
Prototype: create_solaris_admin_file
Description: The following bundle is part of a package setup for solaris
See unit examples.
Implementation:
code
bundle edit_line create_solaris_admin_file
{
insert_lines:
"$(solaris_knowledge.admin_nocheck)"
comment => "Insert contents of Solaris admin file (automatically install packages)";
}
package_absent
Prototype: package_absent(package)
Description: Ensure package is absent
Arguments:
package: the packages to remove
This package method will remove package, using
package_ensure.
Example:
code
methods:
"nozip" usebundle => package_absent("zip");
Implementation:
code
bundle agent package_absent(package)
{
packages:
debian::
"$(package)"
package_policy => "delete",
package_method => apt_get_permissive;
redhat::
"$(package)"
package_policy => "delete",
package_method => yum_rpm_permissive;
suse|sles|opensuse::
"$(package)"
package_policy => "delete",
package_method => zypper;
!debian.!redhat.!(suse|sles|opensuse)::
"$(package)"
package_policy => "delete",
package_method => generic;
}
package_present
Prototype: package_present(package)
Description: Ensure package is present
Arguments:
package: the packages to install
This package method will install package. On Debian, it will use
apt_get_permissive. On Red Hat, yum_rpm_permissive. Otherwise,
generic.
Example:
code
methods:
"pleasezip" usebundle => package_present("zip");
Implementation:
code
bundle agent package_present(package)
{
packages:
debian::
"$(package)"
package_policy => "add",
package_method => apt_get_permissive;
redhat::
"$(package)"
package_policy => "add",
package_method => yum_rpm_permissive;
suse|sles|opensuse::
"$(package)"
package_policy => "add",
package_method => zypper;
!debian.!redhat.!(suse|sles|opensuse)::
"$(package)"
package_policy => "add",
package_method => generic;
}
package_latest
Prototype: package_latest(package)
Description: Ensure package is present and updated
Arguments:
package: the package to add/update
This package method will install package or update it to the
latest version. On Debian, it will use apt_get_permissive. On Red
Hat, yum_rpm_permissive. Otherwise, generic.
Example:
code
methods:
"latestzip" usebundle => package_latest("zip");
Implementation:
code
bundle agent package_latest(package)
{
packages:
debian::
"$(package)"
package_policy => "addupdate",
package_version => "999999999:9999999999",
package_method => apt_get_permissive;
redhat::
"$(package)"
package_policy => "addupdate",
package_version => "999999999",
package_method => yum_rpm_permissive;
suse|sles|opensuse::
"$(package)"
package_policy => "addupdate",
package_version => "999999999",
package_method => zypper;
!debian.!redhat.!(suse|sles|opensuse)::
"$(package)"
package_policy => "addupdate",
package_method => generic;
}
package_specific_present
Prototype: package_specific_present(packageorfile, package_version, package_arch)
Description: Ensure package is present
Arguments:
This package method will add packageorfile as a package or file,
using package_specific.
Example:
code
methods:
"addfilezip"
usebundle => package_specific_present("/mydir/zip",
"3.0-7",
$(debian_knowledge.default_arch));
Implementation:
code
bundle agent package_specific_present(packageorfile, package_version, package_arch)
{
methods:
"ensure" usebundle => package_specific($(packageorfile),
"add",
$(package_version),
$(package_arch));
}
package_specific_absent
Prototype: package_specific_absent(packageorfile, package_version, package_arch)
Description: Ensure package is absent
Arguments:
This package method will remove packageorfile as a package or file,
using package_specific.
Example:
code
methods:
"addfilezip"
usebundle => package_specific_absent("/mydir/zip",
"3.0-7",
$(debian_knowledge.default_arch));
Implementation:
code
bundle agent package_specific_absent(packageorfile, package_version, package_arch)
{
methods:
"ensure" usebundle => package_specific($(packageorfile),
"delete",
$(package_version),
$(package_arch));
}
package_specific_latest
Prototype: package_specific_latest(packageorfile, package_version, package_arch)
Description: Ensure package is added or updated
Arguments:
This package method will add or update packageorfile as a package
or file, using package_specific.
Example:
code
methods:
"latestfilezip"
usebundle => package_specific_latest("/mydir/zip",
"3.0-7",
$(debian_knowledge.default_arch));
"latestzip"
usebundle => package_specific_latest("/mydir/zip",
"3.0-7",
$(debian_knowledge.default_arch));
Implementation:
code
bundle agent package_specific_latest(packageorfile, package_version, package_arch)
{
methods:
"ensure" usebundle => package_specific($(packageorfile),
"addupdate",
$(package_version),
$(package_arch));
}
package_specific
Prototype: package_specific(package_name, desired, package_version, package_arch)
Description: Ensure package_name has the desired state
Arguments:
package_name: the packages to ensure (can be files)desired: the desired package_policy, add or delete or addupdatepackage_version: the desired package_versionpackage_arch: the desired package architecture
This package method will manage packages with package_policy set
to desired, using package_version, and package_arch.
If package_name is not a file name: on Debian, it will use
apt_get. On Red Hat, yum_rpm. Otherwise, generic.
If package_name is a file name, it will use dpkg_version or
rpm_version from the file's directory.
For convenience on systems where sys.arch is not correct, you can
use debian_knowledge.default_arch and
redhat_knowledge.default_arch.
Solaris is only supported with pkgadd. Patches welcome.
Example:
code
methods:
"ensure" usebundle => package_specific("zsh", "add", "1.2.3", "amd64");
"ensure" usebundle => package_specific("/mydir/package.deb", "add", "9.8.7", "amd64");
"ensure" usebundle => package_specific("tcsh", "delete", "2.3.4", "x86_64");
Implementation:
code
bundle agent package_specific(package_name, desired, package_version, package_arch)
{
classes:
"filebased" expression => fileexists($(package_name));
"solaris_pkgadd" and => { "solaris", "_stdlib_path_exists_pkgadd" };
vars:
"solaris_adminfile" string => "/tmp/cfe-adminfile";
filebased::
"package_basename" string => lastnode($(package_name), "/");
"dir" string => dirname($(package_name));
methods:
solaris_pkgadd.filebased::
"" usebundle => file_make($(solaris_adminfile),
$(solaris_knowledge.admin_nocheck)),
classes => scoped_classes_generic("bundle", "solaris_adminfile");
packages:
debian.!filebased::
"$(package_name)"
package_policy => $(desired),
package_select => '>=', # see verify_packages.c
package_version => $(package_version),
package_architectures => { $(package_arch) },
package_method => apt_get;
debian.filebased::
"$(package_basename)"
package_policy => $(desired),
package_select => '>=',
package_version => $(package_version),
package_architectures => { $(package_arch) },
package_method => dpkg_version($(dir));
redhat.!filebased::
"$(package_name)"
package_policy => $(desired),
package_select => '>=', # see verify_packages.c
package_version => $(package_version),
package_architectures => { $(package_arch) },
package_method => yum_rpm;
suse|sles|opensuse::
"$(package_name)"
package_policy => $(desired),
package_select => '>=', # see verify_packages.c
package_version => $(package_version),
package_architectures => { $(package_arch) },
package_method => zypper;
(redhat|aix).filebased::
"$(package_basename)"
package_policy => $(desired),
package_select => '>=',
package_version => $(package_version),
package_architectures => { $(package_arch) },
package_method => rpm_version($(dir));
solaris_adminfile_ok::
"$(package_name)"
package_policy => $(desired),
package_select => '>=',
package_version => $(package_version),
package_method => solaris_install($(solaris_admin_file));
!filebased.!debian.!redhat.!(suse|sles|opensuse)::
"$(package_name)"
package_policy => $(desired),
package_method => generic;
reports:
"(DEBUG|DEBUG_$(this.bundle)).filebased.!(suse|sles|opensuse).!debian.!redhat.!aix.!solaris_pkgadd"::
"DEBUG $(this.bundle): sorry, can't do file-based installs on $(sys.os)";
}
lib/paths.cf
paths
Prototype: paths
Description: Defines an array path with common paths to standard binaries and
directories as well as classes for defined and existing paths.
If the current platform knows that binary XYZ should be present,
_stdlib_has_path_XYZ is defined. Furthermore, if XYZ is actually present
(i.e. the binary exists) in the expected location, _stdlib_path_exists_XYZ is
defined.
Example:
code
bundle agent no_carriage_returns(filename)
{
commands:
_stdlib_path_exists_sed::
"$(paths.sed)" -> { "CFE-3216" }
args => "-i 's/^M//' $(filename)",
comment => "Preferred reference style";
"$(paths[sed])"
args => "-i 's/^M//' $(filename)",
comment => "Alternate array reference style";
}
The paths bundle can be extended with custom paths by tagging classic array variables with paths.cf.
Example:
code
bundle agent extended_paths_example
{
meta:
"tags" slist => { "autorun" };
vars:
# NOTE: the key will be canonified when it's pulled in to the paths bundle.
"path[orange]" string => "/bin/true", meta => { "paths.cf" };
"path[true-blue]" string => "/bin/true", meta => { "paths.cf" };
"foo[bar]" string => "/bin/true", meta => { "paths.cf" };
this_context_isnt_defined_so_no_path::
"path[red]" string => "/bin/true", meta => { "paths.cf" };
reports:
_stdlib_path_exists_orange::
"path paths.orange == $(paths.orange)";
"path paths.path[orange] == $(paths.path[orange])";
_stdlib_path_exists_bar::
"path paths.bar == $(paths.bar)";
"path paths.path[bar] == $(paths.path[bar])";
_stdlib_path_exists_true_blue::
"path paths.true_blue == $(paths.true_blue)";
"path paths.path[true_blue] == $(paths.path[true_blue])";
_stdlib_path_exists_red::
"path paths.red == $(paths.red)";
"path paths.path[red] == $(paths.path[red])";
!_stdlib_path_exists_red::
"path paths.red was not found";
"path paths.path[red] was not found";
}
Additionally several path entries are present to aid in policy sharing between
unix systems and Android Termux environments.
Example:
code
bundle agent track_sshd_config
{
files:
"$(paths.etc_path)/sshd/sshd_config"
changes => detect_all_change;
}
In case of termux, paths.etc_path will be /data/data/com.termux/files/usr/etc.
History:
- Ability to extend paths by tagging classic array variables added 3.17.0 (works with binary version 3.11.0 and greater)
Implementation:
code
bundle common paths
{
vars:
#
# Common full pathname of commands for OS
#
enterprise.(am_policy_hub|policy_server)::
"path[git]"
string => "$(sys.workdir)/bin/git",
comment => "CFEngine Enterprise Hub ships with its own git which is used internally";
!(enterprise.(am_policy_hub|policy_server))::
"path[git]" string => "/usr/bin/git";
!(freebsd|darwin|smartos)::
"path[npm]" string => "/usr/bin/npm";
"path[pip]" string => "/usr/bin/pip";
"path[virtualenv]" string => "/usr/bin/virtualenv";
!(freebsd|darwin)::
"path[getfacl]" string => "/usr/bin/getfacl";
"path[setfacl]" string => "/usr/bin/setfacl";
freebsd|darwin::
"path[npm]" string => "/usr/local/bin/npm";
"path[pip]" string => "/usr/local/bin/pip";
"path[virtualenv]" string => "/usr/local/bin/virtualenv";
"path[automount]" string => "/usr/sbin/automount";
_have_bin_env::
"path[env]" string => "/bin/env";
!_have_bin_env::
"path[env]" string => "/usr/bin/env";
_have_bin_systemctl::
"path[systemctl]" string => "/bin/systemctl";
!_have_bin_systemctl::
"path[systemctl]" string => "/usr/bin/systemctl";
_have_bin_journalctl::
"path[journalctl]" string => "/bin/journalctl";
!_have_bin_journalctl::
"path[journalctl]" string => "/usr/bin/journalctl";
_have_bin_timedatectl::
"path[timedatectl]" string => "/bin/timedatectl";
!_have_bin_timedatectl::
"path[timedatectl]" string => "/usr/bin/timedatectl";
linux::
"path[date]" string => "/usr/bin/date";
"path[lsattr]" string => "/usr/bin/lsattr";
"path[lsmod]" string => "/sbin/lsmod";
"path[tar]" string => "/bin/tar";
"path[true]" string => "/bin/true";
"path[false]" string => "/bin/false";
"path[pgrep]" string => "/usr/bin/pgrep";
"path[getent]" string => "/usr/bin/getent";
"path[mailx]" string => "/usr/bin/mailx";
"path[prelink]" string => "/usr/sbin/prelink";
"path[ssh]" string => "/usr/bin/ssh";
"path[ss]" string => "/usr/bin/ss";
aix::
"path[awk]" string => "/usr/bin/awk";
"path[bc]" string => "/usr/bin/bc";
"path[cat]" string => "/bin/cat";
"path[cksum]" string => "/usr/bin/cksum";
"path[crontabs]" string => "/var/spool/cron/crontabs";
"path[cut]" string => "/usr/bin/cut";
"path[dc]" string => "/usr/bin/dc";
"path[df]" string => "/usr/bin/df";
"path[diff]" string => "/usr/bin/diff";
"path[dig]" string => "/usr/bin/dig";
"path[echo]" string => "/usr/bin/echo";
"path[egrep]" string => "/usr/bin/egrep";
"path[find]" string => "/usr/bin/find";
"path[grep]" string => "/usr/bin/grep";
"path[ls]" string => "/usr/bin/ls";
"path[netstat]" string => "/usr/bin/netstat";
"path[oslevel]" string => "/usr/bin/oslevel";
"path[ping]" string => "/usr/bin/ping";
"path[perl]" string => "/usr/bin/perl";
"path[printf]" string => "/usr/bin/printf";
"path[sed]" string => "/usr/bin/sed";
"path[sort]" string => "/usr/bin/sort";
"path[tr]" string => "/usr/bin/tr";
"path[yum]" string => "/usr/bin/yum";
archlinux::
"path[awk]" string => "/usr/bin/awk";
"path[bc]" string => "/usr/bin/bc";
"path[cat]" string => "/usr/bin/cat";
"path[cksum]" string => "/usr/bin/cksum";
"path[crontab]" string => "/usr/bin/crontab";
"path[cut]" string => "/usr/bin/cut";
"path[dc]" string => "/usr/bin/dc";
"path[df]" string => "/usr/bin/df";
"path[diff]" string => "/usr/bin/diff";
"path[dig]" string => "/usr/bin/dig";
"path[dmidecode]" string => "/usr/bin/dmidecode";
"path[echo]" string => "/usr/bin/echo";
"path[egrep]" string => "/usr/bin/egrep";
"path[ethtool]" string => "/usr/bin/ethtool";
"path[find]" string => "/usr/bin/find";
"path[free]" string => "/usr/bin/free";
"path[grep]" string => "/usr/bin/grep";
"path[hostname]" string => "/usr/bin/hostname";
"path[init]" string => "/usr/bin/init";
"path[iptables]" string => "/usr/bin/iptables";
"path[iptables_save]" string => "/usr/bin/iptables-save";
"path[iptables_restore]" string => "/usr/bin/iptables-restore";
"path[ls]" string => "/usr/bin/ls";
"path[lsof]" string => "/usr/bin/lsof";
"path[netstat]" string => "/usr/bin/netstat";
"path[ping]" string => "/usr/bin/ping";
"path[perl]" string => "/usr/bin/perl";
"path[printf]" string => "/usr/bin/printf";
"path[sed]" string => "/usr/bin/sed";
"path[sort]" string => "/usr/bin/sort";
"path[test]" string => "/usr/bin/test";
"path[top]" string => "/usr/bin/top";
"path[tr]" string => "/usr/bin/tr";
#
"path[pacman]" string => "/usr/bin/pacman";
"path[yaourt]" string => "/usr/bin/yaourt";
"path[useradd]" string => "/usr/bin/useradd";
"path[groupadd]" string => "/usr/bin/groupadd";
"path[ip]" string => "/usr/bin/ip";
"path[ifconfig]" string => "/usr/bin/ifconfig";
"path[journalctl]" string => "/usr/bin/journalctl";
"path[netctl]" string => "/usr/bin/netctl";
coreos::
"path[awk]" string => "/usr/bin/awk";
"path[cat]" string => "/usr/bin/cat";
"path[cksum]" string => "/usr/bin/cksum";
"path[curl]" string => "/usr/bin/curl";
"path[cut]" string => "/usr/bin/cut";
"path[diff]" string => "/usr/bin/diff";
"path[dig]" string => "/usr/bin/dig";
"path[echo]" string => "/usr/bin/echo";
"path[ip]" string => "/usr/bin/ip";
"path[lsof]" string => "/usr/bin/lsof";
"path[netstat]" string => "/usr/bin/netstat";
"path[ping]" string => "/usr/bin/ping";
"path[printf]" string => "/usr/bin/printf";
"path[sed]" string => "/usr/bin/sed";
"path[sort]" string => "/usr/bin/sort";
"path[test]" string => "/usr/bin/test";
"path[wget]" string => "/usr/bin/wget";
freebsd|netbsd|openbsd::
"path[awk]" string => "/usr/bin/awk";
"path[bc]" string => "/usr/bin/bc";
"path[cat]" string => "/bin/cat";
"path[crontabs]" string => "/var/cron/tabs";
"path[cut]" string => "/usr/bin/cut";
"path[dc]" string => "/usr/bin/dc";
"path[df]" string => "/bin/df";
"path[diff]" string => "/usr/bin/diff";
"path[dig]" string => "/usr/bin/dig";
"path[echo]" string => "/bin/echo";
"path[egrep]" string => "/usr/bin/egrep";
"path[find]" string => "/usr/bin/find";
"path[grep]" string => "/usr/bin/grep";
"path[ls]" string => "/bin/ls";
"path[netstat]" string => "/usr/bin/netstat";
"path[perl]" string => "/usr/bin/perl";
"path[printf]" string => "/usr/bin/printf";
"path[sed]" string => "/usr/bin/sed";
"path[sort]" string => "/usr/bin/sort";
"path[tr]" string => "/usr/bin/tr";
freebsd.!(freebsd_9_3|freebsd_10|freebsd_11)|netbsd|openbsd::
"path[ping]" string => "/usr/bin/ping";
freebsd_9_3|freebsd_10|freebsd_11::
"path[ping]" string => "/sbin/ping";
freebsd|netbsd::
"path[cksum]" string => "/usr/bin/cksum";
"path[realpath]" string => "/bin/realpath";
freebsd::
"path[bhyvectl]" string => "/usr/sbin/bhyvectl";
"path[getfacl]" string => "/bin/getfacl";
"path[setfacl]" string => "/bin/setfacl";
"path[dtrace]" string => "/usr/sbin/dtrace";
"path[service]" string => "/usr/sbin/service";
"path[zpool]" string => "/sbin/zpool";
"path[zfs]" string => "/sbin/zfs";
openbsd::
"path[cksum]" string => "/bin/cksum";
smartos::
"path[npm]" string => "/opt/local/bin/npm";
"path[pip]" string => "/opt/local/bin/pip";
solaris::
"path[bc]" string => "/usr/bin/bc";
"path[cat]" string => "/usr/bin/cat";
"path[cksum]" string => "/usr/bin/cksum";
"path[crontab]" string => "/usr/bin/crontab";
"path[crontabs]" string => "/var/spool/cron/crontabs";
"path[curl]" string => "/usr/bin/curl";
"path[cut]" string => "/usr/bin/cut";
"path[dc]" string => "/usr/bin/dc";
"path[diff]" string => "/usr/bin/diff";
"path[dig]" string => "/usr/sbin/dig";
"path[echo]" string => "/usr/bin/echo";
"path[netstat]" string => "/usr/bin/netstat";
"path[ping]" string => "/usr/bin/ping";
"path[perl]" string => "/usr/bin/perl";
"path[printf]" string => "/usr/bin/printf";
"path[wget]" string => "/usr/bin/wget";
#
"path[svcs]" string => "/usr/bin/svcs";
"path[svcadm]" string => "/usr/sbin/svcadm";
"path[svccfg]" string => "/usr/sbin/svccfg";
"path[svcprop]" string => "/usr/bin/svcprop";
"path[netadm]" string => "/usr/sbin/netadm";
"path[dladm]" string => "/usr/sbin/dladm";
"path[ipadm]" string => "/usr/sbin/ipadm";
"path[pkg]" string => "/usr/bin/pkg";
"path[pkginfo]" string => "/usr/bin/pkginfo";
"path[pkgadd]" string => "/usr/sbin/pkgadd";
"path[pkgrm]" string => "/usr/sbin/pkgrm";
"path[zoneadm]" string => "/usr/sbin/zoneadm";
"path[zonecfg]" string => "/usr/sbin/zonecfg";
solaris.(mpf_stdlib_use_posix_utils.!disable_mpf_stdlib_use_posix_utils)::
"path[awk]" string => "/usr/xpg4/bin/awk";
"path[df]" string => "/usr/xpg4/bin/df";
"path[egrep]" string => "/usr/xpg4/bin/egrep";
"path[find]" string => "/usr/xpg4/bin/find";
"path[grep]" string => "/usr/xpg4/bin/grep";
"path[ls]" string => "/usr/xpg4/bin/ls";
"path[sed]" string => "/usr/xpg4/bin/sed";
"path[sort]" string => "/usr/xpg4/bin/sort";
"path[tr]" string => "/usr/xpg4/bin/tr";
solaris.!(mpf_stdlib_use_posix_utils.!disable_mpf_stdlib_use_posix_utils)::
"path[awk]" string => "/usr/bin/awk";
"path[df]" string => "/usr/bin/df";
"path[egrep]" string => "/usr/bin/egrep";
"path[find]" string => "/usr/bin/find";
"path[grep]" string => "/usr/bin/grep";
"path[ls]" string => "/usr/bin/ls";
"path[sed]" string => "/usr/bin/sed";
"path[sort]" string => "/usr/bin/sort";
"path[tr]" string => "/usr/bin/tr";
redhat::
"path[awk]" string => "/bin/awk";
"path[bc]" string => "/usr/bin/bc";
"path[cat]" string => "/bin/cat";
"path[cksum]" string => "/usr/bin/cksum";
"path[createrepo]" string => "/usr/bin/createrepo";
"path[crontab]" string => "/usr/bin/crontab";
"path[crontabs]" string => "/var/spool/cron";
"path[curl]" string => "/usr/bin/curl";
"path[cut]" string => "/bin/cut";
"path[dc]" string => "/usr/bin/dc";
"path[df]" string => "/bin/df";
"path[diff]" string => "/usr/bin/diff";
"path[dig]" string => "/usr/bin/dig";
"path[domainname]" string => "/bin/domainname";
"path[echo]" string => "/bin/echo";
"path[egrep]" string => "/bin/egrep";
"path[ethtool]" string => "/usr/sbin/ethtool";
"path[find]" string => "/usr/bin/find";
"path[free]" string => "/usr/bin/free";
"path[getenforce]" string => "/usr/sbin/getenforce";
"path[grep]" string => "/bin/grep";
"path[hostname]" string => "/bin/hostname";
"path[init]" string => "/sbin/init";
"path[iptables]" string => "/sbin/iptables";
"path[iptables_save]" string => "/sbin/iptables-save";
"path[ls]" string => "/bin/ls";
"path[lsof]" string => "/usr/sbin/lsof";
"path[netstat]" string => "/bin/netstat";
"path[nologin]" string => "/sbin/nologin";
"path[ping]" string => "/usr/bin/ping";
"path[perl]" string => "/usr/bin/perl";
"path[printf]" string => "/usr/bin/printf";
"path[restorecon]" string => "/sbin/restorecon";
"path[sed]" string => "/bin/sed";
"path[semanage]" string => "/usr/sbin/semanage";
"path[sort]" string => "/bin/sort";
"path[test]" string => "/usr/bin/test";
"path[tr]" string => "/usr/bin/tr";
"path[wc]" string => "/usr/bin/wc";
"path[wget]" string => "/usr/bin/wget";
"path[realpath]" string => "/usr/bin/realpath";
#
"path[chkconfig]" string => "/sbin/chkconfig";
"path[groupadd]" string => "/usr/sbin/groupadd";
"path[groupdel]" string => "/usr/sbin/groupdel";
"path[ifconfig]" string => "/sbin/ifconfig";
"path[ip]" string => "/sbin/ip";
"path[rpm]" string => "/bin/rpm";
"path[service]" string => "/sbin/service";
"path[svc]" string => "/sbin/service";
"path[useradd]" string => "/usr/sbin/useradd";
"path[userdel]" string => "/usr/sbin/userdel";
"path[usermod]" string => "/usr/sbin/usermod";
"path[yum]" string => "/usr/bin/yum";
darwin::
"path[awk]" string => "/usr/bin/awk";
"path[bc]" string => "/usr/bin/bc";
"path[cat]" string => "/bin/cat";
"path[cksum]" string => "/usr/bin/cksum";
"path[createrepo]" string => "/usr/bin/createrepo";
"path[crontab]" string => "/usr/bin/crontab";
"path[crontabs]" string => "/usr/lib/cron/tabs";
"path[cut]" string => "/usr/bin/cut";
"path[dc]" string => "/usr/bin/dc";
"path[df]" string => "/bin/df";
"path[diff]" string => "/usr/bin/diff";
"path[dig]" string => "/usr/bin/dig";
"path[domainname]" string => "/bin/domainname";
"path[dscl]" string => "/usr/bin/dscl";
"path[echo]" string => "/bin/echo";
"path[egrep]" string => "/usr/bin/egrep";
"path[find]" string => "/usr/bin/find";
"path[grep]" string => "/usr/bin/grep";
"path[hostname]" string => "/bin/hostname";
"path[ls]" string => "/bin/ls";
"path[lsof]" string => "/usr/sbin/lsof";
"path[netstat]" string => "/usr/sbin/netstat";
"path[ping]" string => "/sbin/ping";
"path[perl]" string => "/usr/bin/perl";
"path[printf]" string => "/usr/bin/printf";
"path[sed]" string => "/usr/bin/sed";
"path[sort]" string => "/usr/bin/sort";
"path[test]" string => "/bin/test";
"path[tr]" string => "/usr/bin/tr";
#
"path[brew]" string => "/usr/local/bin/brew";
"path[sudo]" string => "/usr/bin/sudo";
debian::
"path[awk]" string => "/usr/bin/awk";
"path[bc]" string => "/usr/bin/bc";
"path[cat]" string => "/bin/cat";
"path[chkconfig]" string => "/sbin/chkconfig";
"path[cksum]" string => "/usr/bin/cksum";
"path[createrepo]" string => "/usr/bin/createrepo";
"path[crontab]" string => "/usr/bin/crontab";
"path[crontabs]" string => "/var/spool/cron/crontabs";
"path[curl]" string => "/usr/bin/curl";
"path[cut]" string => "/usr/bin/cut";
"path[dc]" string => "/usr/bin/dc";
"path[df]" string => "/bin/df";
"path[diff]" string => "/usr/bin/diff";
"path[dig]" string => "/usr/bin/dig";
"path[dmidecode]" string => "/usr/sbin/dmidecode";
"path[domainname]" string => "/bin/domainname";
"path[echo]" string => "/bin/echo";
"path[egrep]" string => "/bin/egrep";
"path[ethtool]" string => "/sbin/ethtool";
"path[find]" string => "/usr/bin/find";
"path[free]" string => "/usr/bin/free";
"path[getenforce]" string => "/usr/sbin/getenforce";
"path[grep]" string => "/bin/grep";
"path[hostname]" string => "/bin/hostname";
"path[init]" string => "/sbin/init";
"path[iptables]" string => "/sbin/iptables";
"path[iptables_save]" string => "/sbin/iptables-save";
"path[ls]" string => "/bin/ls";
"path[lsof]" string => "/usr/bin/lsof";
"path[netstat]" string => "/bin/netstat";
"path[nologin]" string => "/usr/sbin/nologin";
"path[ping]" string => "/bin/ping";
"path[perl]" string => "/usr/bin/perl";
"path[printf]" string => "/usr/bin/printf";
"path[restorecon]" string => "/sbin/restorecon";
"path[sed]" string => "/bin/sed";
"path[semanage]" string => "/usr/sbin/semanage";
"path[sort]" string => "/usr/bin/sort";
"path[test]" string => "/usr/bin/test";
"path[tr]" string => "/usr/bin/tr";
"path[wc]" string => "/usr/bin/wc";
"path[wget]" string => "/usr/bin/wget";
"path[realpath]" string => "/usr/bin/realpath";
#
"path[apt_cache]" string => "/usr/bin/apt-cache";
"path[apt_config]" string => "/usr/bin/apt-config";
"path[apt_get]" string => "/usr/bin/apt-get";
"path[apt_key]" string => "/usr/bin/apt-key";
"path[aptitude]" string => "/usr/bin/aptitude";
"path[dpkg]" string => "/usr/bin/dpkg";
"path[dpkg_divert]" string => "/usr/bin/dpkg-divert";
"path[groupadd]" string => "/usr/sbin/groupadd";
"path[groupdel]" string => "/usr/sbin/groupdel";
"path[groupmod]" string => "/usr/sbin/groupmod";
"path[ifconfig]" string => "/sbin/ifconfig";
"path[ip]" string => "/sbin/ip";
"path[service]" string => "/usr/sbin/service";
"path[svc]" string => "/usr/sbin/service";
"path[update_alternatives]" string => "/usr/bin/update-alternatives";
"path[update_rc_d]" string => "/usr/sbin/update-rc.d";
"path[useradd]" string => "/usr/sbin/useradd";
"path[userdel]" string => "/usr/sbin/userdel";
"path[usermod]" string => "/usr/sbin/usermod";
archlinux||darwin::
"path[sysctl]" string => "/usr/bin/sysctl";
!(archlinux||darwin)::
"path[sysctl]" string => "/sbin/sysctl";
!(suse|sles)::
"path[logger]" string => "/usr/bin/logger";
opensuse::
"path[ls]" string => "/usr/bin/ls";
"path[lsof]" string => "/usr/bin/lsof";
"path[awk]" string => "/usr/bin/awk";
"path[cat]" string => "/usr/bin/cat";
"path[cksum]" string => "/usr/bin/cksum";
"path[crontab]" string => "/usr/bin/crontab";
"path[curl]" string => "/usr/bin/curl";
"path[cut]" string => "/usr/bin/cut";
"path[df]" string => "/usr/bin/df";
"path[diff]" string => "/usr/bin/diff";
"path[dig]" string => "/usr/bin/dig";
"path[dmidecode]" string => "/usr/sbin/dmidecode";
"path[echo]" string => "/usr/bin/echo";
"path[egrep]" string => "/usr/bin/egrep";
"path[ethtool]" string => "/usr/sbin/ethtool";
"path[find]" string => "/usr/bin/find";
"path[free]" string => "/usr/bin/free";
"path[grep]" string => "/usr/bin/grep";
"path[hostname]" string => "/usr/bin/hostname";
"path[init]" string => "/sbin/init";
"path[iptables]" string => "/usr/sbin/iptables";
"path[ls]" string => "/usr/bin/ls";
"path[lsof]" string => "/usr/bin/lsof";
"path[nologin]" string => "/sbin/nologin";
"path[ping]" string => "/usr/bin/ping";
"path[perl]" string => "/usr/bin/perl";
"path[printf]" string => "/usr/bin/printf";
"path[sed]" string => "/usr/bin/sed";
"path[sort]" string => "/usr/bin/sort";
"path[test]" string => "/usr/bin/test";
"path[tr]" string => "/usr/bin/tr";
"path[logger]" string => "/usr/bin/logger";
"path[wget]" string => "/usr/bin/wget";
"path[chkconfig]" string => "/sbin/chkconfig";
"path[groupadd]" string => "/usr/sbin/groupadd";
"path[groupdel]" string => "/usr/sbin/groupdel";
"path[groupmod]" string => "/usr/sbin/groupmod";
"path[ip]" string => "/sbin/ip";
"path[rpm]" string => "/usr/bin/rpm";
"path[service]" string => "/sbin/service";
"path[useradd]" string => "/usr/sbin/useradd";
"path[userdel]" string => "/usr/sbin/userdel";
"path[usermod]" string => "/usr/sbin/usermod";
"path[zypper]" string => "/usr/bin/zypper";
suse|sles::
"path[awk]" string => "/usr/bin/awk";
"path[bc]" string => "/usr/bin/bc";
"path[cat]" string => "/bin/cat";
"path[cksum]" string => "/usr/bin/cksum";
"path[createrepo]" string => "/usr/bin/createrepo";
"path[crontab]" string => "/usr/bin/crontab";
"path[crontabs]" string => "/var/spool/cron/tabs";
"path[curl]" string => "/usr/bin/curl";
"path[cut]" string => "/usr/bin/cut";
"path[dc]" string => "/usr/bin/dc";
"path[df]" string => "/bin/df";
"path[diff]" string => "/usr/bin/diff";
"path[dig]" string => "/usr/bin/dig";
"path[dmidecode]" string => "/usr/sbin/dmidecode";
"path[domainname]" string => "/bin/domainname";
"path[echo]" string => "/bin/echo";
"path[egrep]" string => "/usr/bin/egrep";
"path[ethtool]" string => "/usr/sbin/ethtool";
"path[find]" string => "/usr/bin/find";
"path[free]" string => "/usr/bin/free";
"path[grep]" string => "/usr/bin/grep";
"path[hostname]" string => "/bin/hostname";
"path[init]" string => "/sbin/init";
"path[iptables]" string => "/usr/sbin/iptables";
"path[iptables_save]" string => "/usr/sbin/iptables-save";
"path[ls]" string => "/bin/ls";
"path[lsof]" string => "/usr/bin/lsof";
"path[netstat]" string => "/bin/netstat";
"path[nologin]" string => "/sbin/nologin";
"path[ping]" string => "/bin/ping";
"path[perl]" string => "/usr/bin/perl";
"path[printf]" string => "/usr/bin/printf";
"path[sed]" string => "/bin/sed";
"path[sort]" string => "/usr/bin/sort";
"path[test]" string => "/usr/bin/test";
"path[tr]" string => "/usr/bin/tr";
"path[logger]" string => "/bin/logger";
"path[wget]" string => "/usr/bin/wget";
#
"path[chkconfig]" string => "/sbin/chkconfig";
"path[groupadd]" string => "/usr/sbin/groupadd";
"path[groupdel]" string => "/usr/sbin/groupdel";
"path[groupmod]" string => "/usr/sbin/groupmod";
"path[ifconfig]" string => "/sbin/ifconfig";
"path[ip]" string => "/sbin/ip";
"path[rpm]" string => "/bin/rpm";
"path[service]" string => "/sbin/service";
"path[useradd]" string => "/usr/sbin/useradd";
"path[userdel]" string => "/usr/sbin/userdel";
"path[usermod]" string => "/usr/sbin/usermod";
"path[zypper]" string => "/usr/bin/zypper";
linux|solaris::
"path[shadow]" string => "/etc/shadow";
freebsd|openbsd|netbsd|darwin::
"path[shadow]" string => "/etc/master.passwd";
"path[mailx]" string => "/usr/bin/mailx";
aix::
"path[shadow]" string => "/etc/security/passwd";
termux::
"path[tar]" string => "/usr/bin/tar";
"path[true]" string => "/usr/bin/true";
"path[false]" string => "/usr/bin/false";
"path[cat]" string => "/usr/bin/cat";
"path[sysctl]" string => "/usr/bin/sysctl";
"path[env]" string => "/usr/bin/env";
# now, mangle the values by prepending the TERMUX_PREFIX
"files_path" string => "/data/data/com.termux/files";
"etc_path" string => "$(files_path)/usr/etc";
"tmp_path" string => "$(files_path)/usr/tmp";
"bin_path" string => "$(files_path)/usr/bin";
"var_path" string => "$(files_path)/usr/var";
"tmp_paths" slist => getindices("path");
"tmp_path[$(tmp_paths)]" string => "$(files_path)$(path[$(tmp_paths)])";
"path[$(tmp_paths)]" string => "$(tmp_path[$(tmp_paths)])";
!(termux|windows)::
# reasonable defaults for unix systems to allow for writing
# more portable paths between termux and other systems
"etc_path" string => "/etc";
"tmp_path" string => "/tmp";
"bin_path" string => "/bin";
"var_path" string => "/var";
any::
@if minimum_version(3.11.0)
# Pull in variables tagged with `paths.cf`
"_extended_path_data" -> { "CFE-3426" }
data => variablesmatching_as_data( ".*", "paths.cf" );
"_i" -> { "CFE-3426" }
slist => getindices( _extended_path_data );
"path[$(with)]" -> { "CFE-3426" }
string => "$(_extended_path_data[$(_i)])",
with => canonify( regex_replace( $(_i), ".*\[(.*)\]", "$1", "") );
@endif
"all_paths" slist => getindices("path");
"$(all_paths)" string => "$(path[$(all_paths)])";
classes:
"_have_bin_env" expression => fileexists("/bin/env");
"_have_bin_systemctl" expression => fileexists("/bin/systemctl");
"_have_bin_timedatectl" expression => fileexists("/bin/timedatectl");
"_have_bin_journalctl" expression => fileexists("/bin/journalctl");
"_stdlib_has_path_$(all_paths)"
expression => isvariable("$(all_paths)"),
comment => "It's useful to know if a given path is defined";
"_stdlib_path_exists_$(all_paths)"
expression => fileexists("$(path[$(all_paths)])"),
comment => "It's useful to know if $(all_paths) exists on the filesystem as defined";
}
lib/processes.cf
See the processes promises documentation for a
comprehensive reference on the body types and attributes used here.
exclude_procs
Prototype: exclude_procs(x)
Description: Select all processes excluding those matching x
Arguments:
x: Regular expression matching the command/cmd field
of the processes that should be excluded
Implementation:
code
body process_select exclude_procs(x)
{
command => "$(x)";
process_result => "!command";
}
days_older_than
Prototype: days_older_than(d)
Description: Select all processes that are older than d days
Arguments:
d: Days that processes need to be old to be selected
Implementation:
code
body process_select days_older_than(d)
{
stime_range => irange(ago(0,0,"$(d)",0,0,0),now);
process_result => "!stime";
}
by_owner
Prototype: by_owner(u)
Description: Select processes owned by user u
Arguments:
Matches processes against the given username and the given username's uid
in case only uid is visible in process list.
Implementation:
code
body process_select by_owner(u)
{
process_owner => { "$(u)", canonify(getuid("$(u)")) };
process_result => "process_owner";
}
by_pid
Prototype: by_pid(pid)
Description: Select a process matching the given PID
Arguments:
pid: PID of the process to be matched
Implementation:
code
body process_select by_pid(pid)
{
pid => irange("$(pid)","$(pid)");
process_result => "pid";
}
any_count
Prototype: any_count(cl)
Description: Define class cl if the process is running
Arguments:
cl: Name of the class to be defined
Implementation:
code
body process_count any_count(cl)
{
match_range => "0,0";
out_of_range_define => { "$(cl)" };
}
check_range
Prototype: check_range(name, lower, upper)
Description: Define a class if the number of processes is not
within the specified range.
Arguments:
name: The name part of the class $(name)_out_of_rangelower: The lower bound of the rangeupper: The upper bound of the range
Implementation:
code
body process_count check_range(name,lower,upper)
{
match_range => irange("$(lower)","$(upper)");
out_of_range_define => { "$(name)_out_of_range" };
}
process_kill
Prototype: process_kill(name)
Description: Kill a process by name (can be a regular expression)
Arguments:
name: the regular expression or string
Example:
code
methods:
"kill" usebundle => process_kill("badprocess");
Implementation:
code
bundle agent process_kill(name)
{
processes:
!windows::
# Signals are presented as an ordered list to the process.
"$(name)" signals => { "term", "kill" };
windows::
# On Windows, only the kill signal is supported, which terminates the process.
"$(name)" signals => { "kill" };
}
lib/reports.cf
cat
Prototype: cat(file)
Description: Report the contents of a file
Arguments:
file: The full path of the file to report
Implementation:
code
body printfile cat(file)
{
file_to_print => "$(file)";
number_of_lines => "inf";
}
head
Prototype: head(file)
Description: Report the first 10 lines of a file
Arguments:
file: The full path of the file to report
Implementation:
code
body printfile head(file)
{
file_to_print => "$(file)";
# GNU head defaults to 10
number_of_lines => "10";
}
head_n
Prototype: head_n(file, n)
Description: Report the first n lines of a file
Arguments:
file: The full path of the file to reportn: The number of lines to report
Implementation:
code
body printfile head_n(file, n)
{
file_to_print => "$(file)";
number_of_lines => "$(n)";
}
tail
Prototype: tail(file)
Description: Report the last 10 lines of a file
Arguments:
file: The full path of the file to report
Implementation:
code
body printfile tail(file)
{
file_to_print => "$(file)";
# GNU tail defaults to 10
number_of_lines => "-10";
}
tail_n
Prototype: tail_n(file, n)
Description: Report the last n lines of a file
Arguments:
file: The full path of the file to reportn: The number of lines to report
Implementation:
code
body printfile tail_n(file, n)
{
file_to_print => "$(file)";
number_of_lines => "-$(n)";
}
lib/services.cf
See the services promises documentation for a
comprehensive reference on the body types and attributes used here.
control
Prototype: control
Description: Include policy files used by this policy file as part of inputs
Implementation:
code
body file control
{
inputs => { @(services_common.inputs) };
}
bootstart
Prototype: bootstart
Description: Start the service and all its dependencies at boot time
See also: service_autostart_policy, service_dependence_chain
Implementation:
code
body service_method bootstart
{
service_autostart_policy => "boot_time";
service_dependence_chain => "start_parent_services";
windows::
service_type => "windows";
}
force_deps
Prototype: force_deps
Description: Start all dependendencies when this service starts, and stop all
dependent services when this service stops.
The service does not get automatically started.
See also: service_autostart_policy, service_dependence_chain
Implementation:
code
body service_method force_deps
{
service_dependence_chain => "all_related";
windows::
service_type => "windows";
}
standard_services
Prototype: standard_services
Description: Default services_method for when you wan't to call it explicitly
By default this service_method is not used. The call for standard_services
is within the core and not here. In case you use a promise like:
code
services:
"ssh"
service_policy => "start";
Then this method is skipped and CFEngine calls standard_services bundle
directly. This is here as a helper in case you wan't to be explicit
with your service promise and point it to standard_services (for readability,
documentation, etc).
Do note that any options defined in this method does not apply to service
promises without explicit template_method call for standard_services.
Example:
code
services:
"ssh"
service_policy => "start",
service_method => standard_services;
Implementation:
code
body service_method standard_services
{
service_bundle => default:standard_services( $(this.promiser), $(this.service_policy) );
}
systemd_services
Prototype: systemd_services
Description: systemd service method
Example:
code
services:
"ssh"
service_policy => "enabled",
service_method => systemd_services;
Implementation:
code
body service_method systemd_services
{
service_bundle => default:systemd_services( $(this.promiser), $(this.service_policy) );
}
fresh_systemd_state
Prototype: fresh_systemd_state
Description: An 'action' body ensuring the state information for a systemd service is always fresh
This 'action' body disables caching for functions, in particular the
execresult*() family of functions.
Although it's now the same as the 'immediate' action body, this may change in
the future.
Implementation:
code
body action fresh_systemd_state
{
cfengine::
# ^Needed for versions 3.15.x and older that did not
# support empty bodies. When 3.15.x is no longer
# supported, this can be removed.
@if minimum_version(3.18.1)
# Beginning with 3.18.1 ifelapsed being set to 0 results in bypassing of
# function caching. In versions prior to 3.18, if an action body with
# ifelapsed set to 0 was used in a vars type promise a warning was
# emitted. This is guarded to suppress that warning in older versions
# where this setting would not change the behavior.
ifelapsed => "0";
@endif
}
services_common
Prototype: services_common
Description: Enumerate policy files used by this policy file for inclusion to inputs
Implementation:
code
bundle common services_common
{
vars:
"inputs" slist => { "$(this.promise_dirname)/common.cf",
"$(this.promise_dirname)/paths.cf" };
}
standard_services
Prototype: standard_services(service, state)
Description: Standard services bundle, used by CFEngine by default
Arguments:
service: Name of service to controlstate: The desired state for that service: "start", "restart", "reload", "stop", or "disable". "enable", "enabled", and "disabled" are also able to be used when systemd is detected. "active" and "inactive" states are supported for systemd managed hosts and can be used for controlling the services currently running state, but make no promises about the service state on boot.
This bundle is used by CFEngine if you don't specify a services
handler explicitly, and will work with systemd or chkconfig or other
non-sysvinit service managers. It will try to automate service
discovery, unlike classic_services which requires known service
names. If it can't do the automatic management, it will pass control
to classic_services.
This bundle receives the service name and the desired service state,
then does the needful to reach the desired state.
If you're running systemd, systemctl will be used via systemd_services.
Else, if chkconfig is present, it will be used.
Else, if the service command is available, if will be used.
Else, if the svcadm command is available, if will be used. Note you
have to supply the full SMF service identifier.
Else, control is passed to classic_services.
Note you do not have to call this bundle from services
promises. You can simply make a methods call to it. That would
enable you to use systemd states like try-restart for instance.
Example:
code
services:
"sshd" service_policy => "start"; # uses `standard_services`
methods:
"" usebundle => standard_services("sshd", "start"); # direct
Alternatively, since services promises are an abstraction around bundles, the service state can be promised via a methods type promise.
code
methods:
"SSHD should be running" usebundle => standard_services("sshd", "start");
Notes:
FreeBSD uses "one" prefixed commands, e.g. onestatus, onestart, onestop so that services that are not enabled can still be managed
Implementation:
code
bundle agent standard_services(service,state)
{
vars:
"c_service" string => canonify("$(service)");
freebsd::
"init" string => ifelse(fileexists("/usr/local/etc/rc.d/$(service)"),
"/usr/local/etc/rc.d/$(service)",
"/etc/rc.d/$(service)");
!freebsd::
"init" string => "/etc/init.d/$(service)";
start|restart|reload::
"chkconfig_mode" string => "on";
"svcadm_mode" string => "enable";
stop|disable::
"chkconfig_mode" string => "off";
"svcadm_mode" string => "disable";
classes:
# define a class named after the desired state
"$(state)" expression => "any";
"non_disabling" or => { "start", "stop", "restart", "reload" };
"chkconfig" expression => "!systemd._stdlib_path_exists_chkconfig";
"sysvservice" expression => "!systemd.!chkconfig._stdlib_path_exists_service";
"smf" expression => "!systemd.!chkconfig.!sysvservice._stdlib_path_exists_svcadm";
"fallback" expression => "!systemd.!chkconfig.!sysvservice.!smf";
"have_init" expression => fileexists($(init));
chkconfig.have_init::
"running" expression => returnszero("$(init) status > /dev/null", "useshell");
sysvservice.have_init::
# We use one prefixed service commands on freebsd so that service
# management works even when the service is not enabled in /etc/rc.conf.
"running" -> { "CFE-4323" }
with => ifelse( "freebsd", "one", ""),
expression => returnszero("$(paths.service) $(service) $(with)status > /dev/null",
"useshell");
chkconfig.SuSE::
"onboot"
expression => returnszero("$(paths.chkconfig) $(service) | $(paths.grep) 'on$' >/dev/null", "useshell"),
comment => "SuSE chkconfig outputs current state to stdout rather than as an exit code";
chkconfig.!SuSE::
"onboot"
expression => returnszero("$(paths.chkconfig) $(service)", "noshell"),
comment => "We need to know if the service is configured to start at boot or not";
# We redirect stderr and stdout to dev null so that we do not create noise in the logs
"chkconfig_$(c_service)_unregistered"
not => returnszero("$(paths.chkconfig) --list $(service) &> /dev/null", "useshell"),
comment => "We need to know if the service is registered with chkconfig
so that we can perform other chkconfig operations, if the
service is not registered it must be added. Note we do not
automatically try to add the service at this time.";
commands:
chkconfig.stop.onboot::
# Only chkconfig disable if it's currently set to start on boot
"$(paths.chkconfig) $(service) $(chkconfig_mode)"
classes => kept_successful_command,
contain => silent;
chkconfig.start.!onboot::
# Only chkconfig enable service if it's not already set to start on boot, and if its a registered chkconfig service
"$(paths.chkconfig) $(service) $(chkconfig_mode)"
if => "!chkconfig_$(c_service)_unregistered",
classes => kept_successful_command,
contain => silent;
chkconfig.have_init.(((start|restart).!running)|((stop|restart|reload).running)).non_disabling::
"$(init) $(state)"
contain => silent;
sysvservice.start.!running::
# We use one prefixed service commands on freebsd so that service
# management works even when the service is not enabled in /etc/rc.conf.
"$(paths.service) $(service) $(with)start" -> { "CFE-4323" }
handle => "standard_services_sysvservice_not_running_start",
classes => kept_successful_command,
with => ifelse( "freebsd", "one", "");
sysvservice.restart::
# We use one prefixed service commands on freebsd so that service
# management works even when the service is not enabled in /etc/rc.conf.
"$(paths.service) $(service) $(with)restart" -> { "CFE-4323" }
handle => "standard_services_sysvservice_restart",
classes => kept_successful_command,
with => ifelse( "freebsd", "one", "");
sysvservice.reload.running::
# If the service should be reloaded we issue the standard service command
# to reload the service, but only if it's currently running as to not
# start a service that was not already running. This may not be triggered
# as service state parameters are limited and translated to the closest
# meaning.
"$(paths.service) $(service) $(with)reload" -> { "CFE-4323" }
handle => "standard_services_sysvservice_reload",
classes => kept_successful_command,
with => ifelse( "freebsd", "one", "");
sysvservice.((stop|disable).running)::
# If the service should be stopped or disabled and it is currently running
# then we should issue the standard service command to stop the service
"$(paths.service) $(service) $(with)stop" -> { "CFE-4323" }
handle => "standard_services_sysvservice_not_freebsd stop",
classes => kept_successful_command,
with => ifelse( "freebsd", "one", "");
smf::
"$(paths.svcadm) $(svcadm_mode) $(service)"
classes => kept_successful_command;
methods:
fallback::
"classic" usebundle => classic_services($(service), $(state));
systemd::
"systemd"
usebundle => systemd_services( $(service), $(state) );
reports:
verbose_mode.systemd::
"$(this.bundle): using systemd layer to $(state) $(service)";
verbose_mode.systemd.!service_loaded::
"$(this.bundle): Service $(service) unit file is not loaded; doing nothing";
verbose_mode.chkconfig::
"$(this.bundle): using chkconfig layer to $(state) $(service) (chkconfig mode $(chkconfig_mode))"
if => "!chkconfig_$(c_service)_unregistered.((start.!onboot)|(stop.onboot))";
verbose_mode.chkconfig::
"$(this.bundle): skipping chkconfig layer to $(state) $(service) because $(service) is not registered with chkconfig (chkconfig --list $(service))"
if => "chkconfig_$(c_service)_unregistered";
verbose_mode.sysvservice::
"$(this.bundle): using System V service / Upstart layer to $(state) $(service)";
verbose_mode.smf::
"$(this.bundle): using Solaris SMF to $(state) $(service) (svcadm mode $(svcadm_mode))";
verbose_mode.fallback::
"$(this.bundle): falling back to classic_services to $(state) $(service)";
}
systemd_services
Prototype: systemd_services(service, state)
Description: Manage systemd service state
Arguments:
service: specific service to controlstate: The desired state for that service: "active", "inactive", "restart", "reload", "enabled", "disabled", "start", and "stop" are specifically understood states. Any other custom state will be passed through to systemctl.
State descriptions:
- active - Service should be running, no promise about state on boot made.
- inactive - Service should not be running, no promise about state on boot made.
- restart - Service should be restarted, no promise about state on boot made.
- reload - Service should be reloaded, no promise about state on boot made.
- enabled - Service should be enabled, no promise about state on boot made.
- disabled - Service should be reloaded, no promise about state on boot made.
- start - Service should be running, service should be started on boot (active + enabled).
- stop - Service should not be running, service should not be started on boot (inactive + disabled).
Example:
code
services:
# Uses `standard_services`, dynamic decision about init subsystem
"sshd"
service_policy => "enabled";
# Explicitly use `systemd_services`
"sshd"
service_policy => "running",
service_policy => "systemd_services";
Alternatively, since services promises are an abstraction around bundles, the service state can be promised via a methods type promise.
code
methods:
"SSHD should be running" usebundle => systemd_services("sshd", "enabled");
Implementation:
code
bundle agent systemd_services(service,state)
{
vars:
systemd::
"call_systemctl"
string => "$(paths.systemctl) --no-ask-password --global --system";
"systemd_properties"
string => "-pLoadState,CanStop,UnitFileState,ActiveState,LoadState,CanStart,CanReload";
"systemd_service_info"
slist => string_split(execresult("$(call_systemctl) $(systemd_properties) show $(service)",
"noshell"), "\n", "10"),
action => fresh_systemd_state; # Ensure this info is always fresh and not cached [CFE-3753]
classes:
systemd::
"service_enabled" expression => reglist(@(systemd_service_info), "UnitFileState=enabled");
"service_enabled" -> { "CFE-2923" }
expression => returnszero( "$(call_systemctl) is-enabled $(service) > /dev/null 2>&1", useshell);
"service_active" -> { "CFE-3238" }
expression => reglist(@(systemd_service_info), "ActiveState=(active|activating)");
"service_loaded" expression => reglist(@(systemd_service_info), "LoadState=loaded");
"service_notfound" expression => reglist(@(systemd_service_info), "LoadState=not-found");
"can_stop_service" expression => reglist(@(systemd_service_info), "CanStop=yes");
"can_start_service" expression => reglist(@(systemd_service_info), "CanStart=yes");
"can_reload_service" expression => reglist(@(systemd_service_info), "CanReload=yes");
"request_start" expression => strcmp("start", "$(state)");
"request_stop" expression => strcmp("stop", "$(state)");
"request_reload" expression => strcmp("reload", "$(state)");
"request_restart" expression => strcmp("restart", "$(state)");
"request_disable" expression => strcmp("disable", "$(state)");
"request_disabled" expression => strcmp("disabled", "$(state)");
"request_enable" expression => strcmp("enable", "$(state)");
"request_enabled" expression => strcmp("enabled", "$(state)");
"request_active" expression => strcmp("active", "$(state)");
"request_inactive" expression => strcmp("inactive", "$(state)");
"action_custom" expression => "!(request_start|request_stop|request_reload|request_restart|request_disable|request_disabled|request_enable|request_enabled|request_active|request_inactive)";
"action_start" expression => "(request_start|request_active).!service_active.can_start_service";
"action_stop" expression => "(request_stop|request_inactive).service_active.can_stop_service";
"action_reload" expression => "request_reload.service_active.can_reload_service";
"action_restart" or => {
"request_restart",
# Possibly undesirable... if a reload is
# requested, and the service "can't" be
# reloaded, then we restart it instead.
"request_reload.!can_reload_service.service_active",
};
# Starting a service implicitly enables it
"action_enable" expression => "(request_start|request_enable|request_enabled).!service_enabled";
# Respectively, stopping it implicitly disables it
"action_disable" expression => "(request_disable|request_disabled|request_stop).service_enabled";
commands:
systemd.service_loaded:: # note this class is defined in `inventory/linux.cf`
# conveniently, systemd states map to `services` states, except
# for `enable`
"$(call_systemctl) -q start $(service)"
if => "action_start";
"$(call_systemctl) -q stop $(service)"
if => "action_stop";
"$(call_systemctl) -q reload $(service)"
if => "action_reload";
"$(call_systemctl) -q restart $(service)"
if => "action_restart";
"$(call_systemctl) -q enable $(service)"
if => "action_enable";
"$(call_systemctl) -q disable $(service)"
if => "action_disable";
# Custom action for any of the non-standard systemd actions such a
# status, try-restart, isolate, et al.
"$(call_systemctl) $(state) $(service)"
if => "action_custom";
reports:
systemd.service_notfound.(start|restart|reload).(inform_mode|verbose_mode)::
"$(this.bundle): Could not find service: $(service)";
}
classic_services
Prototype: classic_services(service, state)
Description: Classic services bundle
Arguments:
service: specific service to controlstate: desired state for that service
This bundle is used by standard_services if it doesn't have an
automatic driver for the current service manager.
It receives the service name and the desired service state, then
does the needful to reach the desired state.
Example:
code
services:
"ntp" service_policy => "start";
"ssh" service_policy => "stop";
There's multiple ways you can add new services to this list.
Here's few examples:
a) The zeroconf mode; If the new service matches these rules,
you don't need to add anything to the standard_services:
- Your init script basename =
$(service)
- Your init script argument =
$(state)
- Your init script lives in
/etc/init.d/ (for non-*bsd),
or /etc/rc.d/ (for *bsd)
- Your process regex pattern =
\b$(service)\b
- You call the init as
/etc/init.d/<script> <arg> (for non-*bsd),
or /etc/rc.d/<script> <arg> (for *bsd)
b) If the 1st rule doesn't match, but rest does:
Use the baseinit[$(service)] array to point towards your
init script's basename. For example:
code
"baseinit[www]" string => "httpd";
This would fire up init script /etc/init.d/httpd, instead of
the default /etc/init.d/www. From /etc/rc.d/ if you're on *bsd system.
c) If the 4th rule doesn't match, but rest does:
Use the pattern[$(service)] array to specify your own
regex match. It's advisable to use conservative regex so
there's less chance of getting a mismatch.
code
"pattern[www]" string => ".*httpd.*";
Instead of matching the default '\bwww\b', this now matches
your given string,
d) 5th rule doesn't match:
If you can specify the init system used.
Currently supported: sysvinitd, sysvservice, systemd
code
"init[www]" string => "sysvservice";
"init[www]" string => "sysvinitd";
"init[www]" string => "systemd";
^ The above is not a valid syntax as you can only use one init[]
per service, but it shows all the currently supported ones.
code
"sysvservice" == /(usr/)?sbin/service
"sysvinitd" == /etc/init.d/ (non-*bsd) | /etc/rc.d/ (*bsd)
"systemd" == /bin/systemctl
e) 2nd and 3rd rule matches, but rest doesn't:
Use a combination of the pattern[], baseinit[] and init[],
to fill your need.
code
"baseinit[www]" string => "httpd";
"pattern[www]" string => ".*httpd.*";
"init[www]" string => "sysvservice";
f) As a fallback, if none of the above rules match, you can also
define exactly what you need for each $(state).
code
"startcommand[rhnsd]" string => "/sbin/service rhnsd start";
"restartcommand[rhnsd]" string => "/sbin/service rhnsd restart";
"reloadcommand[rhnsd]" string => "/sbin/service rhnsd reload";
"stopcommand[rhnsd]" string => "/sbin/service rhnsd stop";
"pattern[rhnsd]" string => "rhnsd";
If any of the (re)?(start|load|stop)command variables are set for
your service, they take priority in case there's conflict of intent
with other data.
Say you'd have the following service definition:
code
"startcommand[qwerty]" string => "/sbin/service qwerty start";
"stopcommand[qwerty]" string => "/sbin/service qwerty stop";
"pattern[qwerty]" string => ".*qwerty.*";
"baseinit[qwerty]" string => "asdfgh"
"init[qwerty]" string => "systemd";
There's a conflict of intent now. As the ~command definitions takes
priority, this kind of service config for qwerty would execute the
following commands:
code
start: "/sbin/service qwerty start"
stop: "/sbin/service qwerty stop"
restart: "/bin/systemctl asdfgh restart"
reload: "/bin/systemctl asdfgh reload"
Implementation:
code
bundle agent classic_services(service,state)
{
vars:
"all_states" slist => { "start", "restart", "reload", "stop", "disable" };
"inits" slist => { "sysvinitd", "sysvservice", "systemd", "chkconfig" },
comment => "Currently handled init systems";
"default[prefix][sysvservice]" string => "$(paths.service) ",
comment => "Command for sysv service interactions";
"default[prefix][systemd]" string => "$(paths.systemctl) ",
comment => "Command for systemd interactions";
"default[prefix][sysvinitd]" string => ifelse("openbsd", "/etc/rc.d/",
"freebsd", "/etc/rc.d/",
"netbsd", "/etc/rc.d/",
"/etc/init.d/"),
comment => "Command prefix for sysv init script interactions";
"default[prefix][chkconfig]" string => "$(default[prefix][sysvinitd])",
comment => "Command prefix for chkconfig init script interactions";
"default[cmd][$(inits)]" string => "$(default[prefix][$(inits)])$(service) $(state)",
comment => "Default command to control the service";
"default[pattern]" string => "\b$(service)\b",
comment => "Set default pattern for proc matching";
_stdlib_path_exists_chkconfig::
"default[init]" string => "chkconfig",
comment => "Use chkconfig as the default init system if one isn't defined";
!_stdlib_path_exists_chkconfig::
"default[init]" string => "sysvinitd",
comment => "Use sysvinitd as the default init system if one isn't defined";
no_inits_set::
"init_system" string => "$(default[init])";
any::
"init_system" string => "$(init[$(service)])",
if => "$(inits_set)";
start|restart|reload::
"chkconfig_mode" string => "on";
stop|disable::
"chkconfig_mode" string => "off";
any::
"stakeholders[cfengine3]" slist => { "cfengine_in" };
"stakeholders[acpid]" slist => { "cpu", "cpu0", "cpu1", "cpu2", "cpu3" };
"stakeholders[postfix]" slist => { "smtp_in" };
"stakeholders[sendmail]" slist => { "smtp_in" };
"stakeholders[www]" slist => { "www_in", "wwws_in", "www_alt_in" };
"stakeholders[ssh]" slist => { "ssh_in" };
"stakeholders[mysql]" slist => { "mysql_in" };
"stakeholders[nfs]" slist => { "nfsd_in" };
"stakeholders[syslog]" slist => { "syslog" };
"stakeholders[rsyslog]" slist => { "syslog" };
"stakeholders[tomcat5]" slist => { "www_alt_in" };
"stakeholders[tomcat6]" slist => { "www_alt_in" };
linux::
"pattern[acpid]" string => ".*acpid.*";
"pattern[cfengine3]" string => ".*cf-execd.*";
"pattern[fancontrol]" string => ".*fancontrol.*";
"pattern[hddtemp]" string => ".*hddtemp.*";
"pattern[irqbalance]" string => ".*irqbalance.*";
"pattern[lm-sensor]" string => ".*psensor.*";
"pattern[openvpn]" string => ".*openvpn.*";
"pattern[postfix]" string => ".*postfix.*";
"pattern[rsync]" string => ".*rsync.*";
"pattern[rsyslog]" string => ".*rsyslogd.*";
"pattern[sendmail]" string => ".*sendmail.*";
"pattern[tomcat5]" string => ".*tomcat5.*";
"pattern[tomcat6]" string => ".*tomcat6.*";
"pattern[varnish]" string => ".*varnish.*";
"pattern[wpa_supplicant]" string => ".*wpa_supplicant.*";
suse|sles::
"baseinit[mysql]" string => "mysqld";
"pattern[mysql]" string => ".*mysqld.*";
"baseinit[www]" string => "apache2";
"pattern[www]" string => ".*apache2.*";
"baseinit[ssh]" string => "sshd";
# filter out "sshd: ..." children
"pattern[ssh]" string => ".*\Ssshd.*";
"pattern[ntpd]" string => ".*ntpd.*";
redhat::
"pattern[anacron]" string => ".*anacron.*";
"pattern[atd]" string => ".*sbin/atd.*";
"pattern[auditd]" string => ".*auditd$";
"pattern[autofs]" string => ".*automount.*";
"pattern[capi]" string => ".*capiinit.*";
"pattern[conman]" string => ".*conmand.*";
"pattern[cpuspeed]" string => ".*cpuspeed.*";
"pattern[crond]" string => ".*crond.*";
"pattern[dc_client]" string => ".*dc_client.*";
"pattern[dc_server]" string => ".*dc_server.*";
"pattern[dnsmasq]" string => ".*dnsmasq.*";
"pattern[dund]" string => ".*dund.*";
"pattern[gpm]" string => ".*gpm.*";
"pattern[haldaemon]" string => ".*hald.*";
"pattern[hidd]" string => ".*hidd.*";
"pattern[irda]" string => ".*irattach.*";
"pattern[iscsid]" string => ".*iscsid.*";
"pattern[isdn]" string => ".*isdnlog.*";
"pattern[lvm2-monitor]" string => ".*vgchange.*";
"pattern[mcstrans]" string => ".*mcstransd.*";
"pattern[mdmonitor]" string => ".*mdadm.*";
"pattern[mdmpd]" string => ".*mdmpd.*";
"pattern[messagebus]" string => ".*dbus-daemon.*";
"pattern[microcode_ctl]" string => ".*microcode_ctl.*";
"pattern[multipathd]" string => ".*multipathd.*";
"pattern[netplugd]" string => ".*netplugd.*";
"pattern[NetworkManager]" string => ".*NetworkManager.*";
"pattern[nfs]" string => ".*nfsd.*";
"pattern[nfslock]" string => ".*rpc.statd.*";
"pattern[nscd]" string => ".*nscd.*";
"pattern[ntpd]" string => ".*ntpd.*";
"pattern[oddjobd]" string => ".*oddjobd.*";
"pattern[pand]" string => ".*pand.*";
"pattern[pcscd]" string => ".*pcscd.*";
"pattern[portmap]" string => ".*portmap.*";
"pattern[postgresql]" string => ".*postmaster.*";
"pattern[rdisc]" string => ".*rdisc.*";
"pattern[readahead_early]" string => ".*readahead.*early.*";
"pattern[readahead_later]" string => ".*readahead.*later.*";
"pattern[restorecond]" string => ".*restorecond.*";
"pattern[rpcgssd]" string => ".*rpc.gssd.*";
"pattern[rpcidmapd]" string => ".*rpc.idmapd.*";
"pattern[rpcsvcgssd]" string => ".*rpc.svcgssd.*";
"pattern[saslauthd]" string => ".*saslauthd.*";
"pattern[smartd]" string => ".*smartd.*";
"pattern[svnserve]" string => ".*svnserve.*";
"pattern[syslog]" string => ".*syslogd.*";
"pattern[tcsd]" string => ".*tcsd.*";
"pattern[xfs]" string => ".*xfs.*";
"pattern[ypbind]" string => ".*ypbind.*";
"pattern[yum-updatesd]" string => ".*yum-updatesd.*";
"pattern[munin-node]" string => ".*munin-node.*";
"baseinit[bluetoothd]" string => "bluetooth";
"pattern[bluetoothd]" string => ".*hcid.*";
"baseinit[mysql]" string => "mysqld";
"pattern[mysql]" string => ".*mysqld.*";
"baseinit[www]" string => "httpd";
"pattern[www]" string => ".*httpd.*";
"baseinit[ssh]" string => "sshd";
# filter out "sshd: ..." children
"pattern[ssh]" string => ".*\Ssshd.*";
"init[rhnsd]" string => "sysvservice";
"pattern[rhnsd]" string => "rhnsd";
"baseinit[snmpd]" string => "snmpd";
"pattern[snmpd]" string => "/usr/sbin/snmpd";
debian|ubuntu::
"pattern[atd]" string => "atd.*";
"pattern[bluetoothd]" string => ".*bluetoothd.*";
"pattern[bootlogd]" string => ".*bootlogd.*";
"pattern[crond]" string => ".*cron.*";
"pattern[kerneloops]" string => ".*kerneloops.*";
"pattern[mysql]" string => ".*mysqld.*";
"pattern[NetworkManager]" string => ".*NetworkManager.*";
"pattern[ondemand]" string => ".*ondemand.*";
"pattern[plymouth]" string => ".*plymouthd.*";
"pattern[saned]" string => ".*saned.*";
"pattern[udev]" string => ".*udev.*";
"pattern[udevmonitor]" string => ".*udevadm.*monitor.*";
"pattern[snmpd]" string => "/usr/sbin/snmpd";
"pattern[pgbouncer]" string => ".*pgbouncer.*";
"pattern[supervisor]" string => ".*supervisord.*";
"pattern[munin-node]" string => ".*munin-node.*";
"pattern[carbon-cache]" string => ".*carbon-cache.*";
"pattern[cassandra]" string => ".*jsvc\.exec.*apache-cassandra\.jar.*";
# filter out "sshd: ..." children
"pattern[ssh]" string => ".*\Ssshd.*";
"baseinit[ntpd]" string => "ntp";
"pattern[ntpd]" string => ".*ntpd.*";
"baseinit[postgresql84]" string => "postgresql-8.4";
"pattern[postgresql84]" string => ".*postgresql.*";
"baseinit[postgresql91]" string => "postgresql-9.1";
"pattern[postgresql91]" string => ".*postgresql.*";
"baseinit[www]" string => "apache2";
"pattern[www]" string => ".*apache2.*";
"baseinit[nrpe]" string => "nagios-nrpe-server";
"pattern[nrpe]" string => ".*nrpe.*";
"baseinit[omsa-dataeng]" string => "dataeng";
"pattern[omsa-dataeng]" string => ".*dsm_sa_datamgr.*";
"baseinit[quagga]" string => "quagga";
"pattern[quagga]" string => "quagga/.*";
freebsd::
"pattern[ntpd]" string => ".*ntpd.*";
"baseinit[ssh]" string => "sshd";
"pattern[ssh]" string => "/usr/sbin/sshd.*";
"baseinit[syslog]" string => "syslogd";
"pattern[syslog]" string => "/usr/sbin/syslogd.*";
"baseinit[crond]" string => "cron";
"pattern[crond]" string => "/usr/sbin/cron.*";
"baseinit[snmpd]" string => "bsnmpd";
"pattern[snmpd]" string => "/usr/sbin/bsnmpd.*";
"pattern[newsyslog]" string => "/usr/sbin/newsyslog.*";
classes:
# Set classes for each possible state after $(all_states)
"$(all_states)" expression => strcmp($(all_states), $(state)),
comment => "Set a class named after the desired state";
"$(inits)_set" expression => strcmp("$(init[$(service)])","$(inits)"),
comment => "Check if init system is specified";
"no_inits_set" not => isvariable("init[$(service)]"),
comment => "Check if no init system is specified";
# define a class to tell us what init system we're using
"using_$(init_system)" expression => "any";
commands:
using_chkconfig::
"$(paths.chkconfig) $(service) $(chkconfig_mode)"
classes => kept_successful_command;
processes:
start::
"$(pattern[$(service)])" -> { "@(stakeholders[$(service)])" }
comment => "Verify that the service appears in the process table",
restart_class => "start_$(service)",
if => and(isvariable("pattern[$(service)]"));
"$(default[pattern])" -> { "@(stakeholders[$(service)])" }
comment => "Verify that the service appears in the process table",
restart_class => "start_$(service)",
if => not(isvariable("pattern[$(service)]"));
stop|disable::
"$(pattern[$(service)])" -> { "@(stakeholders[$(service)])" }
comment => "Verify that the service does not appear in the process",
process_stop => "$(stopcommand[$(service)])",
signals => { "term", "kill"},
if => and(isvariable("stopcommand[$(service)]"),
isvariable("pattern[$(service)]"));
"$(default[pattern])" -> { "@(stakeholders[$(service)])" }
comment => "Verify that the service does not appear in the process",
process_stop => "$(stopcommand[$(service)])",
signals => { "term", "kill"},
if => and(isvariable("stopcommand[$(service)]"),
not(isvariable("pattern[$(service)]")));
"$(pattern[$(service)])" -> { "@(stakeholders[$(service)])" }
comment => "Verify that the service does not appear in the process",
process_stop => "$(default[prefix][$(default[init])])$(baseinit[$(service)]) $(state)",
signals => { "term", "kill"},
if => and(not(isvariable("stopcommand[$(service)]")),
isvariable("baseinit[$(service)]"),
isvariable("pattern[$(service)]"),
"no_inits_set");
"$(pattern[$(service)])" -> { "@(stakeholders[$(service)])" }
comment => "Verify that the service does not appear in the process",
process_stop => "$(default[prefix][$(inits)])$(baseinit[$(service)]) $(state)",
signals => { "term", "kill"},
if => and(not(isvariable("stopcommand[$(service)]")),
isvariable("baseinit[$(service)]"),
isvariable("pattern[$(service)]"),
canonify("$(inits)_set"));
##
"$(default[pattern])" -> { "@(stakeholders[$(service)])" }
comment => "Verify that the service does not appear in the process",
process_stop => "$(default[prefix][$(default[init])])$(baseinit[$(service)]) $(state)",
signals => { "term", "kill"},
if => and(not(isvariable("stopcommand[$(service)]")),
isvariable("baseinit[$(service)]"),
not(isvariable("pattern[$(service)]")),
"no_inits_set");
"$(default[pattern])" -> { "@(stakeholders[$(service)])" }
comment => "Verify that the service does not appear in the process",
process_stop => "$(default[prefix][$(inits)])$(baseinit[$(service)]) $(state)",
signals => { "term", "kill"},
if => and(not(isvariable("stopcommand[$(service)]")),
isvariable("baseinit[$(service)]"),
not(isvariable("pattern[$(service)]")),
canonify("$(inits)_set"));
##
"$(pattern[$(service)])" -> { "@(stakeholders[$(service)])" }
comment => "Verify that the service does not appear in the process",
process_stop => "$(default[cmd][$(default[init])])",
signals => { "term", "kill"},
if => and(not(isvariable("stopcommand[$(service)]")),
not(isvariable("baseinit[$(service)]")),
isvariable("pattern[$(service)]"),
"no_inits_set");
"$(pattern[$(service)])" -> { "@(stakeholders[$(service)])" }
comment => "Verify that the service does not appear in the process",
process_stop => "$(default[cmd][$(inits)])",
signals => { "term", "kill"},
if => and(not(isvariable("stopcommand[$(service)]")),
not(isvariable("baseinit[$(service)]")),
isvariable("pattern[$(service)]"),
canonify("$(inits)_set"));
##
"$(default[pattern])" -> { "@(stakeholders[$(service)])" }
comment => "Verify that the service does not appear in the process",
process_stop => "$(default[cmd][$(default[init])])",
signals => { "term", "kill"},
if => and(not(isvariable("stopcommand[$(service)]")),
not(isvariable("baseinit[$(service)]")),
not(isvariable("pattern[$(service)]")),
"no_inits_set");
"$(default[pattern])" -> { "@(stakeholders[$(service)])" }
comment => "Verify that the service does not appear in the process",
process_stop => "$(default[cmd][$(inits)])",
signals => { "term", "kill"},
if => and(not(isvariable("stopcommand[$(service)]")),
not(isvariable("baseinit[$(service)]")),
not(isvariable("pattern[$(service)]")),
canonify("$(inits)_set"));
commands:
"$(startcommand[$(service)])" -> { "@(stakeholders[$(service)])" }
comment => "Execute command to start the $(service) service",
classes => kept_successful_command,
if => and(isvariable("startcommand[$(service)]"),
canonify("start_$(service)"));
##
"$(default[prefix][$(default[init])])$(baseinit[$(service)]) $(state)" -> { "@(stakeholders[$(service)])" }
comment => "Execute (baseinit init) command to start the $(service) service",
classes => kept_successful_command,
if => and(not(isvariable("startcommand[$(service)]")),
isvariable("baseinit[$(service)]"),
canonify("start_$(service)"),
"no_inits_set");
"$(default[prefix][$(inits)])$(baseinit[$(service)]) $(state)" -> { "@(stakeholders[$(service)])" }
comment => "Execute (baseinit init) command to start the $(service) service",
classes => kept_successful_command,
if => and(not(isvariable("startcommand[$(service)]")),
isvariable("baseinit[$(service)]"),
canonify("start_$(service)"),
canonify("$(inits)_set"));
##
"$(default[cmd][$(default[init])])" -> { "@(stakeholders[$(service)])" }
comment => "Execute (default) command to start the $(service) service",
classes => kept_successful_command,
if => and(not(isvariable("startcommand[$(service)]")),
not(isvariable("baseinit[$(service)]")),
canonify("start_$(service)"),
"no_inits_set");
"$(default[cmd][$(inits)])" -> { "@(stakeholders[$(service)])" }
comment => "Execute (default) command to start the $(service) service",
classes => kept_successful_command,
if => and(not(isvariable("startcommand[$(service)]")),
not(isvariable("baseinit[$(service)]")),
canonify("start_$(service)"),
canonify("$(inits)_set"));
restart::
"$(restartcommand[$(service)])" -> { "@(stakeholders[$(service)])" }
comment => "Execute command to restart the $(service) service",
classes => kept_successful_command,
if => and(isvariable("restartcommand[$(service)]"));
##
"$(default[prefix][$(default[init])])$(baseinit[$(service)]) $(state)" -> { "@(stakeholders[$(service)])" }
comment => "Execute (baseinit init) command to restart the $(service) service",
classes => kept_successful_command,
if => and(not(isvariable("restartcommand[$(service)]")),
isvariable("baseinit[$(service)]"),
"no_inits_set");
"$(default[prefix][$(inits)])$(baseinit[$(service)]) $(state)" -> { "@(stakeholders[$(service)])" }
comment => "Execute (baseinit init) command to restart the $(service) service",
classes => kept_successful_command,
if => and(not(isvariable("restartcommand[$(service)]")),
isvariable("baseinit[$(service)]"),
canonify("$(inits)_set"));
##
"$(default[cmd][$(default[init])])" -> { "@(stakeholders[$(service)])" }
comment => "Execute (default) command to restart the $(service) service",
classes => kept_successful_command,
if => and(not(isvariable("restartcommand[$(service)]")),
not(isvariable("baseinit[$(service)]")),
"no_inits_set");
"$(default[cmd][$(inits)])" -> { "@(stakeholders[$(service)])" }
comment => "Execute (default) command to restart the $(service) service",
classes => kept_successful_command,
if => and(not(isvariable("restartcommand[$(service)]")),
not(isvariable("baseinit[$(service)]")),
canonify("$(inits)_set"));
reload::
"$(reloadcommand[$(service)])" -> { "@(stakeholders[$(service)])" }
comment => "Execute command to reload the $(service) service",
classes => kept_successful_command,
if => and(isvariable("reloadcommand[$(service)]"));
##
"$(default[prefix][$(default[init])])$(baseinit[$(service)]) $(state)" -> { "@(stakeholders[$(service)])" }
comment => "Execute (baseinit init) command to reload the $(service) service",
classes => kept_successful_command,
if => and(not(isvariable("reloadcommand[$(service)]")),
isvariable("baseinit[$(service)]"),
"no_inits_set");
"$(default[prefix][$(inits)])$(baseinit[$(service)]) $(state)" -> { "@(stakeholders[$(service)])" }
comment => "Execute (baseinit init) command to reload the $(service) service",
classes => kept_successful_command,
if => and(not(isvariable("reloadcommand[$(service)]")),
isvariable("baseinit[$(service)]"),
canonify("$(inits)_set"));
##
"$(default[cmd][$(default[init])])" -> { "@(stakeholders[$(service)])" }
comment => "Execute (default) command to reload the $(service) service",
classes => kept_successful_command,
if => and(not(isvariable("reloadcommand[$(service)]")),
not(isvariable("baseinit[$(service)]")),
"no_inits_set");
"$(default[cmd][$(inits)])" -> { "@(stakeholders[$(service)])" }
comment => "Execute (default) command to reload the $(service) service",
classes => kept_successful_command,
if => and(not(isvariable("reloadcommand[$(service)]")),
not(isvariable("baseinit[$(service)]")),
canonify("$(inits)_set"));
reports:
"DEBUG|DEBUG_$(this.bundle)"::
"DEBUG $(this.bundle): Using init system $(inits)"
if => and(canonify("$(inits)_set"));
"DEBUG $(this.bundle): No init system is set, using $(default[init])"
if => "no_inits_set";
"DEBUG $(this.bundle): The service $(service) needs to be started"
if => and(canonify("start_$(service)"));
"DEBUG $(this.bundle): The service pattern is provided: $(pattern[$(service)])"
if => and(isvariable("pattern[$(service)]"));
"DEBUG $(this.bundle): The default service pattern was used: $(default[pattern])"
if => not(isvariable("pattern[$(service)]"));
"DEBUG $(this.bundle): The stopcommand is provided: $(stopcommand[$(service)])"
if => and(isvariable("stopcommand[$(service)]"));
"DEBUG $(this.bundle): The stopcommand is NOT provided, using default"
if => not(isvariable("stopcommand[$(service)]"));
"DEBUG $(this.bundle): The startcommand is provided: $(startcommand[$(service)])"
if => and(isvariable("startcommand[$(service)]"));
"DEBUG $(this.bundle): The startcommand is NOT provided, using default"
if => not(isvariable("startcommand[$(service)]"));
"DEBUG $(this.bundle): The restartcommand is provided: $(restartcommand[$(service)])"
if => and(isvariable("restartcommand[$(service)]"));
"DEBUG $(this.bundle): The restartcommand is NOT provided, using default"
if => not(isvariable("restartcommand[$(service)]"));
"DEBUG $(this.bundle): The reloadcommand is provided: $(reloadcommand[$(service)])"
if => and(isvariable("reloadcommand[$(service)]"));
"DEBUG $(this.bundle): The reloadcommand is NOT provided, using default"
if => not(isvariable("reloadcommand[$(service)]"));
"DEBUG $(this.bundle): The baseinit is provided: $(baseinit[$(service)])"
if => and(isvariable("baseinit[$(service)]"));
"DEBUG $(this.bundle): The baseinit is NOT provided, using default"
if => not(isvariable("baseinit[$(service)]"));
}
lib/stdlib.cf
control
Prototype: control
Description: Include the standard library files selected to inputs
Implementation:
code
body file control
{
inputs => { @(stdlib_common.inputs) };
}
stdlib_common
Prototype: stdlib_common
Description: Select which parts of the stdlib should be added to inputs
Implementation:
code
bundle common stdlib_common
{
vars:
"input[paths]" string => "$(this.promise_dirname)/paths.cf";
"input[common]" string => "$(this.promise_dirname)/common.cf";
"input[commands]" string => "$(this.promise_dirname)/commands.cf";
"input[packages]" string => "$(this.promise_dirname)/packages.cf";
"input[files]" string => "$(this.promise_dirname)/files.cf";
"input[edit_xml]" string => "$(this.promise_dirname)/edit_xml.cf";
"input[services]" string => "$(this.promise_dirname)/services.cf";
"input[processes]" string => "$(this.promise_dirname)/processes.cf";
"input[storage]" string => "$(this.promise_dirname)/storage.cf";
"input[databases]" string => "$(this.promise_dirname)/databases.cf";
"input[users]" string => "$(this.promise_dirname)/users.cf";
"input[monitor]" string => "$(this.promise_dirname)/monitor.cf";
"input[guest_environments]" string => "$(this.promise_dirname)/guest_environments.cf";
"input[bundles]" string => "$(this.promise_dirname)/bundles.cf";
"input[reports]" string => "$(this.promise_dirname)/reports.cf";
"input[cfe_internal]" string => "$(this.promise_dirname)/cfe_internal.cf";
"input[cfe_internal_hub]" string => "$(this.promise_dirname)/cfe_internal_hub.cf";
"input[cfengine_enterprise_hub_ha]" string => "$(this.promise_dirname)/cfengine_enterprise_hub_ha.cf";
# jUnit and TAP reports
"input[testing]" string => "$(this.promise_dirname)/testing.cf";
any::
"inputs" slist => getvalues(input);
reports:
verbose_mode::
"$(this.bundle): adding COPBL stdlib inputs='$(inputs)'";
}
lib/storage.cf
See the storage promises documentation for a
comprehensive reference on the body types and attributes used here.
min_free_space
Prototype: min_free_space(free)
Description: Warn if the storage doesn't have at least free free space.
A warnings is also generated if the storage is smaller than 10K or as
less than 2 file entries.
Arguments:
free: Absolute or percentage minimum disk space that should be
available before warning
Implementation:
code
body volume min_free_space(free)
{
check_foreign => "false";
freespace => "$(free)";
sensible_size => "10000";
sensible_count => "2";
}
nfs
Prototype: nfs(server, source)
Description: Mounts the storage at source on server via nfs protocol.
Also modifies the file system table.
Arguments:
server: Hostname or IP of remote serversource: Path of remote file system to mount
See also: nfs_p(), unmount()
Implementation:
code
body mount nfs(server,source)
{
mount_type => "nfs";
mount_source => "$(source)";
mount_server => "$(server)";
edit_fstab => "true";
}
nfs_p
Prototype: nfs_p(server, source, perm)
Description: Mounts the storage via nfs, with perm passed as options to mount.
Also modifies the file system table.
Arguments:
server: Hostname or IP of remote serversource: Path of remote file system to mountperm: A list of options that's passed to the mount command
See also: nfs, unmount()
Implementation:
code
body mount nfs_p(server,source,perm)
{
mount_type => "nfs";
mount_source => "$(source)";
mount_server => "$(server)";
mount_options => {"$(perm)"};
edit_fstab => "true";
}
unmount
Prototype: unmount
Description: Unmounts the nfs storage.
Also modifies the file system table.
See also: nfs(), nfs_p()
Implementation:
code
body mount unmount
{
mount_type => "nfs";
edit_fstab => "true";
unmount => "true";
}
lib/testing.cf
The testing.cf library provides bundles for working testing frameworks like
TAP and jUnit.
These bodies are included in the stdlib by default.
testing_ok_if
Prototype: testing_ok_if(classname, message, error, trace, format)
Description: Report outcome for test on classname in format format with optional error and trace
Arguments:
classname: The class namemessage: The test messageerror: The error to report, if the class is not definedtrace: The error trace detail to report, if the class is not definedformat: TAP (immediate output) or jUnit or anything else for delayed TAP
See also: testing_junit_report, testing_tap_report, testing_ok, testing_todo, and testing_skip
Implementation:
code
bundle agent testing_ok_if(classname, message, error, trace, format)
{
vars:
"next_testing_$(classname)" int => length(classesmatching("testing_.*", "testing_(passed|failed|skipped|todo)"));
"next_testing_$(classname)_failed" int => length(classesmatching("testing_.*", "testing_(passed|failed|skipped|todo)"));
classes:
"tap" expression => strcmp('tap', string_downcase($(format)));
"testing_$(classname)" expression => $(classname), scope => "namespace", meta => { "testing_passed", "error=$(error)", "trace=$(trace)", "message=$(message)" };
"testing_$(classname)_failed" not => $(classname), scope => "namespace", meta => { "testing_failed", "error=$(error)", "trace=$(trace)", "message=$(message)" };
reports:
inform_mode::
"$(this.bundle): adding testing report for class $(classname) at position $(next_testing_$(classname))";
"tap.testing_$(classname)"::
"$(const.n)ok $(message)";
"tap.testing_$(classname)_failed"::
"$(const.n)not ok $(message)";
}
testing_ok
Prototype: testing_ok(classname, message, format)
Description: Report expected success in format format for classname and its test
Arguments:
classname: The class namemessage: The test messageformat: TAP (immediate output) or jUnit or anything else for delayed TAP
This bundle calls testing_ok_if expecting classname to be defined and thus the
test to be a success; the error and trace reflect that.
See also: testing_junit_report, testing_tap_report, testing_ok_if, testing_todo, and testing_skip
Implementation:
code
bundle agent testing_ok(classname, message, format)
{
methods:
"" usebundle => testing_ok_if($(classname), $(message), "unexpected error for $(classname)", "no error trace available", $(format));
}
testing_skip
Prototype: testing_skip(classname, message, format)
Description: Report skipped classname in format format
Arguments:
classname: The class namemessage: The test messageformat: TAP (immediate output) or jUnit or anything else for delayed TAP
This bundle reports that classname was skipped regardless of whether it's
defined.
See also: testing_junit_report, testing_tap_report, testing_ok_if, testing_todo, and testing_ok
Implementation:
code
bundle agent testing_skip(classname, message, format)
{
vars:
"next_testing_$(classname)" int => length(classesmatching("testing_.*", "testing_(passed|failed|skipped|todo)"));
classes:
"tap" expression => strcmp('tap', string_downcase($(format)));
"testing_$(classname)" scope => "namespace", meta => { "testing_skipped", "message=$(message)" };
reports:
inform_mode::
"$(this.bundle): adding testing skip report for class $(classname) at position $(next_testing_$(classname))";
tap::
"$(const.n)ok # SKIP $(message)";
}
testing_todo
Prototype: testing_todo(classname, message, format)
Description: Report TODO classname in format format
Arguments:
classname: The class namemessage: The test messageformat: TAP (immediate output) or jUnit or anything else for delayed TAP
This bundle reports that classname was skipped regardless of whether it's
defined.
See also: testing_junit_report, testing_tap_report, testing_ok_if, testing_skip, and testing_ok
Implementation:
code
bundle agent testing_todo(classname, message, format)
{
vars:
"next_testing_$(classname)" int => length(classesmatching("testing_.*", "testing_(passed|failed|skipped|todo)"));
classes:
"tap" expression => strcmp('tap', string_downcase($(format)));
"testing_$(classname)" scope => "namespace", meta => { "testing_todo", "message=$(message)" };
reports:
inform_mode::
"$(this.bundle): adding testing TODO report for class $(classname) at position $(next_testing_$(classname))";
tap::
"$(const.n)ok # TODO $(message)";
}
testing_tap_report
Prototype: testing_tap_report(outfile)
Description: Report all test messages in TAP format to outfile
Arguments:
outfile: A text file with the final TAP report or empty `` for STDOUT report
Note that the TAP format ignores error messages, trace messages, and class names.
See also: testing_junit_report, testing_tap_report, testing_ok_if, testing_todo, testing_skip, testing_tap_bailout, and testing_ok
Implementation:
code
bundle agent testing_tap_report(outfile)
{
methods:
"" usebundle => testing_generic_report('TAP', $(outfile));
}
testing_junit_report
Prototype: testing_junit_report(outfile)
Description: Report all test knowledge in jUnit format to outfile
Arguments:
outfile: A XML file with the final jUnit report or empty `` for STDOUT report
See also: testing_tap_report, testing_ok_if, testing_todo, testing_skip, and testing_ok
Implementation:
code
bundle agent testing_junit_report(outfile)
{
methods:
"" usebundle => testing_generic_report('jUnit', $(outfile));
}
testing_generic_report
Prototype: testing_generic_report(format, outfile)
Description: Report all test knowledge in jUnit format to outfile
Arguments:
format: The output format, either jUnit or TAP (case is ignored)outfile: A file with the final report or empty for STDOUT
Note that jUnit output to STDOUT will most likely be truncated due to the 4K
limitation on string lengths.
See also: testing_tap_report, testing_ok_if, testing_todo, testing_skip, and testing_ok
Implementation:
code
bundle agent testing_generic_report(format, outfile)
{
classes:
"junit" expression => strcmp('junit', string_downcase($(format)));
"tap" expression => strcmp('tap', string_downcase($(format)));
"stdout" expression => strcmp('', $(outfile));
"tofile" not => strcmp('', $(outfile));
vars:
"failed" slist => classesmatching("testing_.*", testing_failed);
"passed" slist => classesmatching("testing_.*", testing_passed);
"skipped" slist => classesmatching("testing_.*", testing_skipped);
"todo" slist => classesmatching("testing_.*", testing_todo);
"count_passed" int => length(passed);
"count_skipped" int => length(skipped);
"count_todo" int => length(todo);
"count_failed" int => length(failed);
"count_total" string => format("%d", sum('[$(count_failed), $(count_passed), $(count_skipped), $(count_todo)]'));
"timestamp" string => strftime("localtime", "%FT%T", now());
"tests_passed" data => '[]';
"tests_passed"
data => mergedata(tests_passed,
format('[{ "testcase": "%s", "test_offset": %d, "test_message": "%s" }]',
regex_replace($(passed), "^testing_", "", "T"),
"$(testing_ok_if.next_$(passed))",
regex_replace(join(",", grep("^message=.*", getclassmetatags($(passed)))), "^message=", "", "T"),
regex_replace(join(",", grep("^message=.*", getclassmetatags($(passed)))), "^message=", "", "T")));
"tests_failed" data => '[]';
"tests_failed"
data => mergedata(tests_failed,
format('[{ "testcase": "%s", "failure": true, "fail_message": "%s", "trace_message": "%s", "test_offset": %d, "test_message": "%s" }]',
regex_replace($(failed), "^testing_", "", "T"),
regex_replace(join(",", grep("^error=.*", getclassmetatags($(failed)))), "^error=", "", "T"),
regex_replace(join(",", grep("^trace=.*", getclassmetatags($(failed)))), "^trace=", "", "T"),
"$(testing_ok_if.next_$(failed))",
regex_replace(join(",", grep("^message=.*", getclassmetatags($(failed)))), "^message=", "", "T"),
regex_replace(join(",", grep("^message=.*", getclassmetatags($(failed)))), "^message=", "", "T")));
"tests_skipped" data => '[]';
"tests_skipped"
data => mergedata(tests_skipped,
format('[{ "testcase": "%s", "test_offset": %d, "test_message": "%s", "skip": true }]',
regex_replace($(skipped), "^testing_", "", "T"),
"$(testing_skip.next_$(skipped))",
regex_replace(join(",", grep("^message=.*", getclassmetatags($(skipped)))), "^message=", "", "T"),
regex_replace(join(",", grep("^message=.*", getclassmetatags($(skipped)))), "^message=", "", "T")));
"tests_todo" data => '[]';
"tests_todo"
data => mergedata(tests_todo,
format('[{ "testcase": "%s", "test_offset": %d, "test_message": "%s", "todo": true }]',
regex_replace($(todo), "^testing_", "", "T"),
"$(testing_todo.next_$(todo))",
regex_replace(join(",", grep("^message=.*", getclassmetatags($(todo)))), "^message=", "", "T"),
regex_replace(join(",", grep("^message=.*", getclassmetatags($(todo)))), "^message=", "", "T")));
inform_mode::
"out" string => format("counts = %d/%d/%d/%d/%d failed = %S, passed = %S, skipped = %S, todo = %S, failed = %S; tests = %S+%S+%S+%S", $(count_total), $(count_passed), $(count_skipped), $(count_todo), $(count_failed), failed, passed, skipped, todo, failed, tests_passed, tests_skipped, tests_todo, tests_failed);
junit.stdout::
"junit_out" string => string_mustache(readfile("$(this.promise_dirname)/templates/junit.mustache", 4k), bundlestate("testing_generic_report"));
tap::
"tap_tests" data => mergedata(tests_passed, tests_failed, tests_skipped, tests_todo);
"tap_json" string => string_mustache(
concat(
'[ ',
'',
'"',
'not ok ',
'ok ',
' ',
' # SKIP ',
' # TODO ',
'", ',
'',
' ]'),
tap_tests);
"tap_results" data => parsejson("${tap_json}");
tap.inform_mode::
"tap_tests_info" string => format("%S", tap_tests);
"tap_results_info" string => format("%S", tap_results);
files:
junit.tofile::
"$(outfile)"
create => "true",
template_data => bundlestate("testing_generic_report"),
template_method => "mustache",
edit_template => "$(this.promise_dirname)/templates/junit.mustache";
tap.tofile::
"$(outfile)"
create => "true",
template_data => bundlestate("testing_generic_report"),
template_method => "mustache",
edit_template => "$(this.promise_dirname)/templates/tap.mustache";
reports:
junit.stdout::
"$(const.n)$(junit_out)";
tap.stdout::
"$(const.n)1..$(count_total)" ;
inform_mode::
"$(this.bundle): report summary: $(out)";
tap.inform_mode::
"$(this.bundle): TAP report summary: $(tap_tests_info)";
"$(this.bundle): TAP report results summary: $(tap_results_info)";
}
testing_tap_bailout
Prototype: testing_tap_bailout(reason)
Description: Bail out in TAP format immediately
Arguments:
reason: the bailout reason
See also: testing_tap_report, testing_ok_if, testing_todo, testing_skip, and testing_ok
Implementation:
code
bundle agent testing_tap_bailout(reason)
{
reports:
"$(const.n)Bail out! $(reason)";
}
testing_usage_example
Prototype: testing_usage_example
Description: Simple demo of testing_junit_report and testing_tap_report testing.cf usage
You can run it like this: cf-agent -K ./testing.cf -b testing_usage_example
Or for extra debugging, you can run it like this: cf-agent -KI ./testing.cf -b testing_usage_example
You can either use tap as the format parameter for any testing bundle, in
which case you get immediate TAP output, OR you can use anything else, in
which case you can still get TAP output but at the end.
So your use cases are:
- format=jUnit, then testing_junit_report(''): all jUnit to STDOUT, output at end
- format=TAP, then testing_tap_report(''): all TAP to STDOUT, immediate output
- format=delayed_TAP, then testing_tap_report(MYFILE): all TAP to MYFILE, output at end
- format=jUnit, then testing_jUnit_report(MYFILE): all jUnit to MYFILE, output at end
Implementation:
code
bundle agent testing_usage_example
{
classes:
"reported_class" scope => "namespace";
methods:
"" usebundle => testing_ok("reported_class", "ok message", "TAP");
"" usebundle => testing_ok_if("missing_class", "missing message", "error1", "error trace 1", "TAP");
"" usebundle => testing_ok_if("missing_class2", "missing message2", "error2", "error trace 2", "TAP");
"" usebundle => testing_skip("skipped_class", "we skipped this", "TAP");
"" usebundle => testing_todo("todo_class", "we need to do this", "TAP");
# output the reports to some files
# "" usebundle => testing_junit_report("/var/cfengine/outputs/junit.xml");
# "" usebundle => testing_tap_report("/var/cfengine/outputs/tap.txt");
# output the reports to STDOUT
"" usebundle => testing_junit_report('');
"" usebundle => testing_tap_report('');
}
lib/users.cf
See the users promises documentation for a
comprehensive reference on the body types and attributes used here.
plaintext_password
Prototype: plaintext_password(text)
Description: Sets the plaintext password for the user to text
Arguments:
text: the plain text version of the password
Note: Don't use that unless you really have no choice
See also: hashed_password()
Implementation:
code
body password plaintext_password(text)
{
format => "plaintext";
data => $(text);
}
hashed_password
Prototype: hashed_password(hash)
Description: Sets the hashed password for the user to hash
Arguments:
hash: the hashed representation of the password
The hashing method is up to the platform.
See also: plaintext_password()
Implementation:
code
body password hashed_password(hash)
{
format => "hash";
data => $(hash);
}
lib/vcs.cf
The vcs.cf library provides bundles for working with version control tools.
control
Prototype: control
Description: Include policy files used by this policy file as part of inputs
Implementation:
code
body file control
{
inputs => { @(vcs_common.inputs) };
}
vcs_common
Prototype: vcs_common
Description: Enumerate policy files used by this policy file for inclusion to inputs
Implementation:
code
bundle common vcs_common
{
vars:
"inputs" slist => { "$(this.promise_dirname)/common.cf",
"$(this.promise_dirname)/paths.cf",
"$(this.promise_dirname)/commands.cf" };
}
git_init
Prototype: git_init(repo_path)
Description: initializes a new git repository if it does not already exist
Arguments:
repo_path: absolute path of where to initialize a git repository
Example:
code
bundle agent my_git_repositories
{
vars:
"basedir" string => "/var/git";
"repos" slist => { "myrepo", "myproject", "myPlugForMoreHaskell" };
files:
"$(basedir)/$(repos)/."
create => "true";
methods:
"git_init" usebundle => git_init("$(basedir)/$(repos)");
}
Implementation:
code
bundle agent git_init(repo_path)
{
classes:
"ok_norepo" not => fileexists("$(repo_path)/.git");
methods:
ok_norepo::
"git_init" usebundle => git("$(repo_path)", "init", "");
}
git_add
Prototype: git_add(repo_path, file)
Description: adds files to the supplied repository's index
Arguments:
repo_path: absolute path to a git repositoryfile: a file to stage in the index
Example:
code
bundle agent add_files_to_git_index
{
vars:
"repo" string => "/var/git/myrepo";
"files" slist => { "fileA", "fileB", "fileC" };
methods:
"git_add" usebundle => git_add("$(repo)", "$(files)");
}
Implementation:
code
bundle agent git_add(repo_path, file)
{
classes:
"ok_repo" expression => fileexists("$(repo_path)/.git");
methods:
ok_repo::
"git_add" usebundle => git("$(repo_path)", "add", "$(file)");
}
git_checkout
Prototype: git_checkout(repo_path, branch)
Description: checks out an existing branch in the supplied git repository
Arguments:
repo_path: absolute path to a git repositorybranch: the name of an existing git branch to checkout
Example:
code
bundle agent git_checkout_some_existing_branch
{
vars:
"repo" string => "/var/git/myrepo";
"branch" string => "dev/some-topic-branch";
methods:
"git_checkout" usebundle => git_checkout("$(repo)", "$(branch)");
}
Implementation:
code
bundle agent git_checkout(repo_path, branch)
{
classes:
"ok_repo" expression => fileexists("$(repo_path)/.git");
methods:
ok_repo::
"git_checkout" usebundle => git("$(repo_path)", "checkout", "$(branch)");
}
git_checkout_new_branch
Prototype: git_checkout_new_branch(repo_path, new_branch)
Description: checks out and creates a new branch in the supplied git repository
Arguments:
repo_path: absolute path to a git repositorynew_branch: the name of the git branch to create and checkout
Example:
code
bundle agent git_checkout_new_branches
{
vars:
"repo[myrepo]" string => "/var/git/myrepo";
"branch[myrepo]" string => "dev/some-new-topic-branch";
"repo[myproject]" string => "/var/git/myproject";
"branch[myproject]" string => "dev/another-new-topic-branch";
"repo_names" slist => getindices("repo");
methods:
"git_checkout_new_branch" usebundle => git_checkout_new_branch("$(repo[$(repo_names)])", "$(branch[$(repo_names)])");
}
Implementation:
code
bundle agent git_checkout_new_branch(repo_path, new_branch)
{
classes:
"ok_repo" expression => fileexists("$(repo_path)/.git");
methods:
ok_repo::
"git_checkout" usebundle => git("$(repo_path)", "checkout -b", "$(branch)");
}
git_clean
Prototype: git_clean(repo_path)
Description: Ensure that a given git repo is clean
Arguments:
repo_path: Path to the clone
Example:
code
methods:
"test"
usebundle => git_clean("/opt/cfengine/masterfiles_staging_tmp"),
comment => "Ensure that the staging area is a clean clone";
Implementation:
code
bundle agent git_clean(repo_path)
{
methods:
"" usebundle => git("$(repo_path)", "clean", ' --force -d'),
comment => "To have a clean clone we must remove any untracked files and
directories. These should have all been stashed, but in case
of error we go ahead and clean anyway.";
}
git_stash
Prototype: git_stash(repo_path, stash_name)
Description: Stash any changes (including untracked files if git is capable) in repo_path
Arguments:
repo_path: Path to the clonestash_name: Stash name
Example:
code
methods:
"test"
usebundle => git_stash("/opt/cfengine/masterfiles_staging_tmp", "temp"),
comment => "Stash any changes, including untracked files";
Implementation:
code
bundle agent git_stash(repo_path, stash_name)
{
classes:
_stdlib_path_exists_git::
"_git_stash_supports_including_untracked_files" -> { "CFE-3383" }
expression => regcmp( ".*--include-untracked.*",
execresult( "$(paths.git) stash --help", noshell ) );
vars:
"_stash_options"
string => concat( "save ",
"--quiet ",
ifelse( "_git_stash_supports_including_untracked_files",
"--include-untracked", ""),
"$(stash_name)");
methods:
"" usebundle => git($(repo_path), "stash", $(_stash_options)),
comment => "So that we don't lose any trail of what happened and so that
we don't accidentally delete something important we stash any
changes.
Note:
1. This promise will fail if user.email is not set
2. We are respecting ignored files.";
!_stdlib_path_exists_git::
"Warning: bundle '$(this.bundle)' actuated, but git not found";
}
git_stash_and_clean
Prototype: git_stash_and_clean(repo_path)
Description: Ensure that a given git repo is clean and attempt to save any modifications
Arguments:
repo_path: Path to the clone
Example:
code
methods:
"test"
usebundle => git_stash_and_clean("/opt/cfengine/masterfiles_staging_tmp"),
comment => "Ensure that the staging area is a clean clone after attempting to stash any changes";
Implementation:
code
bundle agent git_stash_and_clean(repo_path)
{
vars:
"stash" string => "CFEngine AUTOSTASH: $(sys.date)";
methods:
"" usebundle => git_stash($(repo_path), $(stash)),
classes => scoped_classes_generic("bundle", "git_stash");
git_stash_ok::
"" usebundle => git_clean($(repo_path));
reports:
git_stash_not_ok::
"$(this.bundle):: Warning: Not saving changes or cleaning. Git stash failed. Perhaps 'user.email' or 'user.name' is not set.";
}
git_commit
Prototype: git_commit(repo_path, message)
Description: executes a commit to the specificed git repository
Arguments:
repo_path: absolute path to a git repositorymessage: the message to associate to the commmit
Example:
code
bundle agent make_git_commit
{
vars:
"repo" string => "/var/git/myrepo";
"msg" string => "dituri added some bundles for common git operations";
methods:
"git_commit" usebundle => git_commit("$(repo)", "$(msg)");
}
Implementation:
code
bundle agent git_commit(repo_path, message)
{
classes:
"ok_repo" expression => fileexists("$(repo_path)/.git");
methods:
ok_repo::
"git_commit" usebundle => git("$(repo_path)", "commit", '-m "$(message)"');
}
git
Prototype: git(repo_path, subcmd, args)
Description: generic interface to git
Arguments:
repo_path: absolute path to a new or existing git repositorysubcmd: any valid git sub-commandargs: a single string of arguments to pass
This bundle will drop privileges if running as root (uid 0) and the
repository is owned by a different user. Use DEBUG or DEBUG_git (from the
command line, -D DEBUG_git) to see every Git command it runs.
Example:
code
bundle agent git_rm_files_from_staging
{
vars:
"repo" string => "/var/git/myrepo";
"git_cmd" string => "reset --soft";
"files" slist => { "fileA", "fileB", "fileC" };
methods:
"git_reset" usebundle => git("$(repo)", "$(git_cmd)", "HEAD -- $(files)");
}
Implementation:
code
bundle agent git(repo_path, subcmd, args)
{
vars:
"oneliner" string => "$(paths.path[git])";
"repo_uid"
string => filestat($(repo_path), "uid"),
comment => "So that we don't mess up permissions, we will just execute
all commands as the current owner of .git";
"repo_gid"
string => filestat($(repo_path), "gid"),
comment => "So that we don't mess up permissions, we will just execute
all commands as the current group of .git";
# Data container with user info
# {"description":"Luke Skywalker","gid":1000,"home_dir":"/home/luke","shell":"/bin/bash","uid":1000,"username":"luke"}
"repo_userinfo"
data => getuserinfo( "$(repo_uid)" );
classes:
"am_root" expression => strcmp($(this.promiser_uid), "0");
# $(repo_uid) must be defined before we try to test this or we will end up
# having at least one pass during evaluation the agent will not know it
# needs to drop privileges, leading to some files like .git/index being
# created with elevated privileges, and subsequently causing the agent to
# not be able to commit as a normal user.
"need_to_drop"
not => strcmp($(this.promiser_uid), $(repo_uid)),
if => isvariable( repo_uid );
commands:
am_root.need_to_drop::
# Because cfengine does not inherit the shell environment when
# executing commands, git will look for the root users git
# config and error when the executing user does not have
# access. So we need to set the home directory of the executing
# user.
"$(paths.env) HOME=$(repo_userinfo[home_dir]) $(oneliner)"
args => "$(subcmd) $(args)",
classes => kept_successful_command,
contain => setuidgid_dir( $(repo_uid), $(repo_gid), $(repo_path) );
!am_root|!need_to_drop::
"$(oneliner)"
args => "$(subcmd) $(args)",
classes => kept_successful_command,
contain => in_dir( $(repo_path) );
reports:
"DEBUG|DEBUG_$(this.bundle).am_root.need_to_drop"::
"DEBUG $(this.bundle): with dropped privileges to uid '$(repo_uid)' and gid '$(repo_gid)', in directory '$(repo_path)', running Git command '$(paths.env) HOME=\"$(repo_userinfo[home_dir])\" $(oneliner) $(subcmd) $(args)'"
if => isvariable("repo_userinfo[home_dir]");
"DEBUG|DEBUG_$(this.bundle).(!am_root|!need_to_drop)"::
"DEBUG $(this.bundle): with current privileges, in directory '$(repo_path)', running Git command '$(oneliner) $(subcmd) $(args)'";
}
lib/
This directory contains the standard library akak COPBL or the Community Open
Promise Body Library. The bodies and bundles found here are contributed and
maintained by the CFEngine community. They codify many common and useful
patterns.
This directories contents are expected to be found in the following locations:
modules/mustache/
Files in this directory ending in .mustache are rendered to
$(sys.workdir)/modules (typically /var/cfengine/modules) using datastate()
from the update.cf policy entry. Templates in sub-directories are not
considered.
For example hello.sh.mustache will be rendered to
$(sys.workdir)/modules/hello.sh and sub-dir/goodbye.sh.mustache would not be
rendered to $(sys.workdir)/modules/sub-dir/goodby.sh.
History
modules/packages/vendored/
This directory tree is used for distributing package modules that are rendered into place with mustache. The modules found here are rendered into place if no plain copy is found in the parent directory.
modules/packages/
This directory tree is used for distributing package modules.
Files in this directory have an executable copy in $(sys.workdir)/modules/packages/ and take precedence over modules in the vendored directory.
Package modules in the vendored sub-directory are rendered into $(sys.workdir)/modules/packages if no customized copy is found.
modules/promises/cfengine.py
code
import sys
import json
import traceback
from copy import copy
from collections import OrderedDict
_LOG_LEVELS = {
level: idx
for idx, level in enumerate(
("critical", "error", "warning", "notice", "info", "verbose", "debug")
)
}
def _skip_until_empty_line(file):
while True:
line = file.readline().strip()
if not line:
break
def _get_request(file, record_file=None):
line = file.readline()
blank_line = file.readline()
if record_file is not None:
record_file.write("< " + line)
record_file.write("< " + blank_line)
return json.loads(line.strip())
def _put_response(data, file, record_file=None):
data = json.dumps(data)
file.write(data + "\n\n")
file.flush()
if record_file is not None:
record_file.write("> " + data + "\n")
record_file.write("> \n")
def _would_log(level_set, msg_level):
if msg_level not in _LOG_LEVELS:
# uknown level, assume it would be logged
return True
return _LOG_LEVELS[msg_level] <= _LOG_LEVELS[level_set]
def _cfengine_type(typing):
if typing is str:
return "string"
if typing is int:
return "int"
if typing in (list, tuple):
return "slist"
if typing is dict:
return "data container"
if typing is bool:
return "true/false"
return "Error in promise module"
class AttributeObject(object):
def __init__(self, d):
for key, value in d.items():
setattr(self, key, value)
def __repr__(self):
return "{}({})".format(
self.__class__.__qualname__,
", ".join("{}={!r}".format(k, v) for k, v in self.__dict__.items())
)
class ValidationError(Exception):
def __init__(self, message):
self.message = message
class ProtocolError(Exception):
def __init__(self, message):
self.message = message
class Result:
# Promise evaluation outcomes, can reveal "real" problems with system:
KEPT = "kept" # Satisfied already, no change
REPAIRED = "repaired" # Not satisfied before , but fixed
NOT_KEPT = "not_kept" # Not satisfied before , not fixed
# Validation only, can reveal problems in CFEngine policy:
VALID = "valid" # Validation successful
INVALID = "invalid" # Validation failed, error in cfengine policy
# Generic succes / fail for init / terminate requests:
SUCCESS = "success"
FAILURE = "failure"
# Unexpected, can reveal problems in promise module:
ERROR = "error" # Something went wrong in module / protocol
class PromiseModule:
def __init__(
self, name="default_module_name", version="0.0.1", record_file_path=None
):
self.name = name
self.version = version
# Note: The class doesn't expose any way to set protocol version
# or flags, because that should be abstracted away from the
# user (module author).
self._validator_attributes = OrderedDict()
self._result_classes = None
# File to record all the incoming and outgoing communication
self._record_file = open(record_file_path, "a") if record_file_path else None
def start(self, in_file=None, out_file=None):
self._in = in_file or sys.stdin
self._out = out_file or sys.stdout
first_line = self._in.readline()
if self._record_file is not None:
self._record_file.write("< " + first_line)
header = first_line.strip().split(" ")
name = header[0]
version = header[1]
protocol_version = header[2]
# flags = header[3:] -- unused for now
assert len(name) > 0 # cf-agent
assert version.startswith("3.") # 3.18.0
assert protocol_version[0] == "v" # v1
_skip_until_empty_line(self._in)
header_reply = "{name} {version} v1 json_based\n\n".format(
name=self.name, version=self.version
)
self._out.write(header_reply)
self._out.flush()
if self._record_file is not None:
self._record_file.write("> " + header_reply.strip() + "\n")
self._record_file.write(">\n")
while True:
self._response = {}
self._result = None
request = _get_request(self._in, self._record_file)
self._handle_request(request)
def _convert_types(self, promiser, attributes):
# Will only convert types if module has typing information:
if not self._has_validation_attributes:
return promiser, attributes
replacements = {}
for name, value in attributes.items():
if type(value) is not str:
# If something is not string, assume it is correct type
continue
if name not in self._validator_attributes:
# Unknown attribute, this will cause a validation error later
continue
# "true"/"false" -> True/False
if self._validator_attributes[name]["typing"] is bool:
if value == "true":
replacements[name] = True
elif value == "false":
replacements[name] = False
# "int" -> int()
elif self._validator_attributes[name]["typing"] is int:
try:
replacements[name] = int(value)
except ValueError:
pass
# Don't edit dict while iterating over it, after instead:
attributes.update(replacements)
return (promiser, attributes)
def _handle_request(self, request):
if not request:
sys.exit("Error: Empty/invalid request or EOF reached")
operation = request["operation"]
self._log_level = request.get("log_level", "info")
self._response["operation"] = operation
# Agent will never request log level critical
assert self._log_level in [
"error",
"warning",
"notice",
"info",
"verbose",
"debug",
]
if operation in ["validate_promise", "evaluate_promise"]:
promiser = request["promiser"]
attributes = request.get("attributes", {})
promiser, attributes = self._convert_types(promiser, attributes)
promiser, attributes = self.prepare_promiser_and_attributes(
promiser, attributes
)
self._response["promiser"] = promiser
self._response["attributes"] = attributes
if operation == "init":
self._handle_init()
elif operation == "validate_promise":
self._handle_validate(promiser, attributes, request)
elif operation == "evaluate_promise":
self._handle_evaluate(promiser, attributes, request)
elif operation == "terminate":
self._handle_terminate()
else:
self._log_level = None
raise ProtocolError(
"Unknown operation: '{operation}'".format(operation=operation)
)
self._log_level = None
def _add_result(self):
self._response["result"] = self._result
def _add_result_classes(self):
if self._result_classes:
self._response["result_classes"] = self._result_classes
def _add_traceback_to_response(self):
if self._log_level != "debug":
return
trace = traceback.format_exc()
logs = self._response.get("log", [])
logs.append({"level": "debug", "message": trace})
self._response["log"] = logs
def add_attribute(
self,
name,
typing,
default=None,
required=False,
default_to_promiser=False,
validator=None,
):
attribute = OrderedDict()
attribute["name"] = name
attribute["typing"] = typing
attribute["default"] = default
attribute["required"] = required
attribute["default_to_promiser"] = default_to_promiser
attribute["validator"] = validator
self._validator_attributes[name] = attribute
@property
def _has_validation_attributes(self):
return bool(self._validator_attributes)
def create_attribute_dict(self, promiser, attributes):
# Check for missing required attributes:
for name, attribute in self._validator_attributes.items():
if attribute["required"] and name not in attributes:
raise ValidationError(
"Missing required attribute '{name}'".format(name=name)
)
# Check for unknown attributes:
for name in attributes:
if name not in self._validator_attributes:
raise ValidationError("Unknown attribute '{name}'".format(name=name))
# Check typings and run custom validator callbacks:
for name, value in attributes.items():
expected = _cfengine_type(self._validator_attributes[name]["typing"])
found = _cfengine_type(type(value))
if found != expected:
raise ValidationError(
"Wrong type for attribute '{name}', requires '{expected}', not '{value}'({found})".format(
name=name, expected=expected, value=value, found=found
)
)
if self._validator_attributes[name]["validator"]:
# Can raise ValidationError:
self._validator_attributes[name]["validator"](value)
attribute_dict = OrderedDict()
# Copy attributes specified by user policy:
for key, value in attributes.items():
attribute_dict[key] = value
# Set defaults based on promise module validation hints:
for name, value in self._validator_attributes.items():
if value.get("default_to_promiser", False):
attribute_dict.setdefault(name, promiser)
elif value.get("default", None) is not None:
attribute_dict.setdefault(name, copy(value["default"]))
else:
attribute_dict.setdefault(name, None)
return attribute_dict
def create_attribute_object(self, promiser, attributes):
attribute_dict = self.create_attribute_dict(promiser, attributes)
return AttributeObject(attribute_dict)
def _validate_attributes(self, promiser, attributes):
if not self._has_validation_attributes:
# Can only validate attributes if module
# provided typings for attributes
return
self.create_attribute_object(promiser, attributes)
return # Only interested in exceptions, return None
def _handle_init(self):
self._result = self.protocol_init(None)
self._add_result()
_put_response(self._response, self._out, self._record_file)
def _handle_validate(self, promiser, attributes, request):
meta = {"promise_type": request.get("promise_type")}
try:
self.validate_attributes(promiser, attributes, meta)
returned = self.validate_promise(promiser, attributes, meta)
if returned is None:
# Good, expected
self._result = Result.VALID
else:
# Bad, validate method shouldn't return anything else
self.log_critical(
"Bug in promise module {name} - validate_promise() should not return anything".format(
name=self.name
)
)
self._result = Result.ERROR
except ValidationError as e:
message = str(e)
if "promise_type" in request:
message += " for {request_promise_type} promise with promiser '{promiser}'".format(
request_promise_type=request["promise_type"], promiser=promiser
)
else:
message += " for promise with promiser '{promiser}'".format(
promiser=promiser
)
if "filename" in request and "line_number" in request:
message += " ({request_filename}:{request_line_number})".format(
request_filename=request["filename"],
request_line_number=request["line_number"],
)
self.log_error(message)
self._result = Result.INVALID
except Exception as e:
self.log_critical(
"{error_type}: {error}".format(error_type=type(e).__name__, error=e)
)
self._add_traceback_to_response()
self._result = Result.ERROR
self._add_result()
_put_response(self._response, self._out, self._record_file)
def _handle_evaluate(self, promiser, attributes, request):
self._result_classes = None
meta = {"promise_type": request.get("promise_type")}
try:
results = self.evaluate_promise(promiser, attributes, meta)
# evaluate_promise should return either a result or a (result, result_classes) pair
if type(results) == str:
self._result = results
else:
assert len(results) == 2
self._result = results[0]
self._result_classes = results[1]
except Exception as e:
self.log_critical(
"{error_type}: {error}".format(error_type=type(e).__name__, error=e)
)
self._add_traceback_to_response()
self._result = Result.ERROR
self._add_result()
self._add_result_classes()
_put_response(self._response, self._out, self._record_file)
def _handle_terminate(self):
self._result = self.protocol_terminate()
self._add_result()
_put_response(self._response, self._out, self._record_file)
sys.exit(0)
def _log(self, level, message):
if self._log_level is not None and not _would_log(self._log_level, level):
return
# Message can be str or an object which implements __str__()
# for example an exception:
message = str(message).replace("\n", r"\n")
assert "\n" not in message
self._out.write("log_{level}={message}\n".format(level=level, message=message))
self._out.flush()
if self._record_file is not None:
self._record_file.write(
"log_{level}={message}\n".format(level=level, message=message)
)
def log_critical(self, message):
self._log("critical", message)
def log_error(self, message):
self._log("error", message)
def log_warning(self, message):
self._log("warning", message)
def log_notice(self, message):
self._log("notice", message)
def log_info(self, message):
self._log("info", message)
def log_verbose(self, message):
self._log("verbose", message)
def log_debug(self, message):
self._log("debug", message)
def _log_traceback(self):
trace = traceback.format_exc().split("\n")
for line in trace:
self.log_debug(line)
# Functions to override in subclass:
def protocol_init(self, version):
return Result.SUCCESS
def prepare_promiser_and_attributes(self, promiser, attributes):
"""Override if you want to modify promiser or attributes before validate or evaluate"""
return (promiser, attributes)
def validate_attributes(self, promiser, attributes, meta):
"""Override this if you want to prevent automatic validation"""
return self._validate_attributes(promiser, attributes)
def validate_promise(self, promiser, attributes, meta):
"""Must override this or use validation through self.add_attribute()"""
if not self._has_validation_attributes:
raise NotImplementedError("Promise module must implement validate_promise")
def evaluate_promise(self, promiser, attributes, meta):
raise NotImplementedError("Promise module must implement evaluate_promise")
def protocol_terminate(self):
return Result.SUCCESS
modules/promises/cfengine.sh
code
#!/bin/false
#
# This file should be sourced, not run
log() {
if [ "$#" != 2 ] ; then
echo "log_critical=Error in promise module (log must be used with 2 arguments, level and message)"
exit 1
fi
level="$1"
message="$2"
echo "log_$level=$message"
}
reset_state() {
# Set global variables before we begin another request
# Variables parsed directly from request:
request_operation=""
request_log_level=""
request_promise_type=""
request_promiser=""
for var in $(env | cut -d '=' -f 1 | grep '^request_attribute_'); do
unset $var
done
# Variables to put into response:
response_result=""
# Other state:
saw_unknown_key="no"
saw_unknown_attribute="no"
unknown_attribute_names=""
}
handle_input_line() {
# Split the line of input on the first '=' into 2 - key and value
IFS='=' read -r key value <<< "$1"
case "$key" in
operation)
request_operation="$value" ;;
log_level)
request_log_level="$value" ;;
promise_type)
request_promise_type="$value" ;;
promiser)
request_promiser="$value" ;;
attribute_*)
attribute_name=${key#"attribute_"}
if ! expr " $required_attributes $optional_attributes " : ".* $attribute_name " >/dev/null; then
saw_unknown_attribute="yes"
unknown_attribute_names="$unknown_attribute_names, $attribute_name"
fi
eval "request_${key}=\$value" ;;
*)
saw_unknown_key="yes" ;;
esac
}
receive_request() {
# Read lines from input until empty line
# Call handle_input_line for each non-empty line
while IFS='$\n' read -r line; do
if [ "x$line" = "x" ] ; then
break
fi
handle_input_line "$line" # Parses a key=value pair
done
}
write_response() {
echo "operation=$request_operation"
echo "result=$response_result"
echo "result_classes=$response_classes"
echo ""
}
operation_terminate() {
response_result="success"
type do_terminate >/dev/null 2>&1 && do_terminate
write_response
exit 0
}
operation_validate() {
response_result="valid"
if [ "$saw_unknown_attribute" != "no" -a "$all_attributes_are_valid" != "yes" ] ; then
log error "Unknown attribute/s: ${unknown_attribute_names#, }"
response_result="invalid"
fi
if [ ! -z "$required_attributes" ]; then
for attribute_name in $required_attributes; do
# Note: ${!varname} syntax expands to value of variable, which name
# is saved in $varname variable. Example:
# var_1=something
# varname=var_1
# echo "${!varname}" # prints "something"
varname="request_attribute_$attribute_name"
if [ -z "${!varname}" ]; then
log error "Attribute '$attribute_name' is missing or empty"
response_result="invalid"
fi
done
fi
type do_validate >/dev/null 2>&1 && do_validate
write_response
}
operation_evaluate() {
response_result="error" # it's responsibility of do_evaluate to override this
type do_evaluate >/dev/null 2>&1 && do_evaluate
write_response
}
operation_unknown() {
response_result="error"
log error "Promise module received unexpected operation: $request_operation"
write_response
}
perform_operation() {
case "$request_operation" in
validate_promise)
operation_validate ;;
evaluate_promise)
operation_evaluate ;;
terminate)
operation_terminate ;;
*)
operation_unknown ;;
esac
}
handle_request() {
response_classes=""
reset_state # 1. Reset global variables
receive_request # 2. Receive / parse an operation from agent
perform_operation # 3. Perform operation (validate, evaluate, terminate)
}
skip_header() {
# Skip until (and including) the first empty line
while IFS='$\n' read -r line; do
if [ "x$line" = "x" ] ; then
return;
fi
done
}
module_main() {
# Check arguments provided by the caller. Must have two arguments with no spaces.
if [ "$#" != 2 ] || expr "$1$2" : ".* " >/dev/null; then
exit 1
fi
module_name="$1"
module_version="$2"
# Skip the protocol header given by agent:
skip_header
# Write our header to request line based protocol:
echo "$module_name $module_version v1 line_based"
echo ""
type do_initialize >/dev/null 2>&1 && do_initialize
# Loop indefinitely, handling requests:
while true; do
handle_request
done
# Should never get here.
}
modules/promises/
This directory tree is used for distributing promise modules and supporting libraries.
Files in this directory have an executable copy in $(sys.workdir)/modules/packages/ and take precedence over modules in the vendored directory.
Package modules in the vendored sub-directory are rendered into $(sys.workdir)/modules/packages if no customized copy is found.
modules/
This directory tree is used for distributing Modules. The packages subtree is used for vendoring packages modules and the promises sub-directory is used for promise modules, including the libraries used by promise modules.
Distribute custom package modules by placing them in the packages directory. Modules placed in the root of the packages directory are copied into $(sys.workdir)/modules/.
services/autorun/
When the services_autorun class is defined .cf files located in services/autorun/ are automatically
included in inputs and bundles tagged with autorun are actuated in lexical order.
Example definition of services_autorun using Augments (def.json):
code
{
"classes": {
"services_autorun": [ "any::" ]
}
}
Example policy with bundle tagged for execution when services_autorun is defined:
code
bundle agent example
{
meta:
"tags" slist => { "autorun" };
reports:
"I will report when 'services_autorun' is defined."
}
Note: The services_autorun_inputs and services_autorun_bundles classes
allow policy files to be dynamically loaded or tagged bundles to be run
independently of each-other. If you have an automatically loaded policy file in
services/autorun which loads additional policy dynamically, cf-promises may
not be able to resolve syntax errors. Use
mpf_extra_autorun_inputs
and or
control_common_bundlesequence_classification
to work around this limitation.
History:
When the services_autorun_inputs class is defined .cf files located
in services/autorun/ are automatically included in inputs.
Example definition of services_autorun_inputs using Augments (def.json):
code
{
"classes": {
"services_autorun_inputs": [ "any::" ]
}
}
History:
- Added in CFEngine 3.19.0, 3.18.1
Automatically run bundles tagged autorun
When the services_autorun_bundles class is defined bundles tagged with autorun are actuated in lexical order.
Example definition of services_autorun_bundles using Augments (def.json):
code
{
"classes": {
"services_autorun_bundles": [ "any::" ]
}
}
History:
- Added in CFEngine 3.19.0, 3.18.1
When def.mpf_extra_autorun_inputs is defined (and services_autorun is defined), the policy files (*.cf) in those directories will be added to inputs. If a directory is specified but is not a directory, it will be skipped.
code
{
"vars": {
"mpf_extra_autorun_inputs": [ "$(sys.policy_entry_dirname)/services/autorun/custom2",
"$(sys.policy_entry_dirname)/services/custom1" ]
}
}
See Also: Append to inputs used by main policy, Append to inputs used by update policy
History:
services/main.cf
This directory is the suggested place to add your custom policies.
services/
This directory is the suggested place to add your custom policies.
promises.cf
$(sys.inputdir)/promises.cf is the default policy run by the agent. It is
responsible for specifying additional policy files that should be included as
part of the policy and the order in which to run bundles.
Policy
control
Prototype: control
Description: Control options common to all agents
Implementation:
code
body common control
{
bundlesequence => {
# Common bundle first (Best Practice)
inventory_control,
@(inventory.bundles),
def,
@(cfengine_enterprise_hub_ha.classification_bundles),
# Custom classification
@(def.bundlesequence_classification),
# autorun system
services_autorun,
@(services_autorun.bundles),
# Agent bundle
cfe_internal_management, # See cfe_internal/CFE_cfengine.cf
mpf_main,
@(cfengine_enterprise_hub_ha.management_bundles),
@(def.bundlesequence_end),
};
inputs => {
# User policy init, for example for defining custom promise types:
"services/init.cf",
# File definition for global variables and classes
@(cfengine_controls.def_inputs),
# Inventory policy
@(inventory.inputs),
# CFEngine internal policy for the management of CFEngine itself
@(cfe_internal_inputs.inputs),
# Control body for all CFEngine robot agents
@(cfengine_controls.inputs),
# COPBL/Custom libraries. Eventually this should use wildcards.
@(cfengine_stdlib.inputs),
# autorun system
@(services_autorun.inputs),
"services/main.cf",
};
version => "CFEngine Promises.cf 3.24.0a.9e96fcf45";
# From 3.7 onwards there is a new package promise implementation using package
# modules in which you MUST provide package modules used to generate
# software inventory reports. You can also provide global default package module
# instead of specifying it in all package promises.
(debian).!disable_inventory_package_refresh::
package_inventory => { $(package_module_knowledge.platform_default), @(default:package_module_knowledge.additional_inventory) };
# We only define package_inventory on redhat like systems that have a
# python version that works with the package module.
(redhat|centos|suse|sles|opensuse|amazon_linux).cfe_yum_package_module_supported.!disable_inventory_package_refresh::
package_inventory => { $(package_module_knowledge.platform_default), @(default:package_module_knowledge.additional_inventory)};
aix.!disable_inventory_package_refresh::
package_inventory => { $(package_module_knowledge.platform_default), @(default:package_module_knowledge.additional_inventory) };
freebsd.!disable_inventory_package_refresh::
package_inventory => { $(package_module_knowledge.platform_default), @(default:package_module_knowledge.additional_inventory) };
aix::
package_module => $(package_module_knowledge.platform_default);
(debian|redhat|suse|sles|opensuse|amazon_linux|freebsd)::
package_module => $(package_module_knowledge.platform_default);
windows::
package_inventory => { $(package_module_knowledge.platform_default), @(default:package_module_knowledge.additional_inventory) };
package_module => $(package_module_knowledge.platform_default);
termux::
package_module => $(package_module_knowledge.platform_default);
alpinelinux::
package_module => $(package_module_knowledge.platform_default);
any::
ignore_missing_bundles => "$(def.control_common_ignore_missing_bundles)";
ignore_missing_inputs => "$(def.control_common_ignore_missing_inputs)";
# The number of minutes after which last-seen entries are purged from cf_lastseen.lmdb
lastseenexpireafter => "$(def.control_common_lastseenexpireafter)";
control_common_tls_min_version_defined::
tls_min_version => "$(default:def.control_common_tls_min_version)"; # See also: allowtlsversion in body server control
control_common_tls_ciphers_defined::
tls_ciphers => "$(default:def.control_common_tls_ciphers)"; # See also: allowciphers in body server control
}
inventory
Prototype: inventory
Description: Set up inventory inputs
This bundle creates the inputs for inventory bundles.
Inventory bundles are simply common bundles loaded before anything
else in promises.cf
Implementation:
code
bundle common inventory
{
classes:
"other_unix_os" expression => "!(windows|macos|linux|freebsd|aix)";
"specific_linux_os" expression => "redhat|debian|suse|sles";
vars:
# This list is intended to grow as needed
debian::
"inputs" slist => { "inventory/any.cf", "inventory/linux.cf", "inventory/lsb.cf", "inventory/debian.cf", "inventory/os.cf" };
"bundles" slist => { "inventory_control", "inventory_any", "inventory_autorun", "inventory_linux", "inventory_lsb", "inventory_debian", "inventory_os" };
redhat::
"inputs" slist => { "inventory/any.cf", "inventory/linux.cf", "inventory/lsb.cf", "inventory/redhat.cf", "inventory/os.cf" };
"bundles" slist => { "inventory_control", "inventory_any", "inventory_autorun", "inventory_linux", "inventory_lsb", "inventory_redhat", "inventory_os" };
suse|sles::
"inputs" slist => { "inventory/any.cf", "inventory/linux.cf", "inventory/lsb.cf", "inventory/suse.cf", "inventory/os.cf" };
"bundles" slist => { "inventory_control", "inventory_any", "inventory_autorun", "inventory_linux", "inventory_lsb", "inventory_suse", "inventory_os" };
windows::
"inputs" slist => { "inventory/any.cf", "inventory/windows.cf", "inventory/os.cf" };
"bundles" slist => { "inventory_control", "inventory_any", "inventory_autorun", "inventory_windows", "inventory_os" };
macos::
"inputs" slist => { "inventory/any.cf", "inventory/macos.cf", "inventory/os.cf" };
"bundles" slist => { "inventory_control", "inventory_any", "inventory_autorun", "inventory_macos", "inventory_os" };
freebsd::
"inputs" slist => { "inventory/any.cf", "inventory/freebsd.cf", "inventory/os.cf" };
"bundles" slist => { "inventory_control", "inventory_any", "inventory_autorun", "inventory_freebsd", "inventory_os" };
linux.!specific_linux_os::
"inputs" slist => { "inventory/any.cf", "inventory/linux.cf", "inventory/lsb.cf", "inventory/os.cf" };
"bundles" slist => { "inventory_control", "inventory_any", "inventory_autorun", "inventory_linux", "inventory_lsb", "inventory_os" };
aix::
"inputs" slist => { "inventory/any.cf", "inventory/generic.cf", "inventory/aix.cf", "inventory/os.cf" };
"bundles" slist => { "inventory_control", "inventory_any", "inventory_autorun", "inventory_generic", "inventory_aix", "inventory_os" };
other_unix_os::
"inputs" slist => { "inventory/any.cf", "inventory/generic.cf", "inventory/os.cf" };
"bundles" slist => { "inventory_control", "inventory_any", "inventory_autorun", "inventory_generic", "inventory_os" };
reports:
verbose_mode::
"$(this.bundle): loading inventory module '$(inputs)'";
}
Prototype: cfe_internal_inputs
Description: Include internal self management policies
Implementation:
code
bundle common cfe_internal_inputs
{
vars:
any::
"input[cfe_internal_management]"
string => "cfe_internal/CFE_cfengine.cf",
comment => "This policy activates internal management policies
for both core and enterprise";
"input[core_main]"
string => "cfe_internal/core/main.cf",
comment => "This policy activates other core policies";
"input[core_limit_robot_agents]"
string => "cfe_internal/core/limit_robot_agents.cf",
comment => "The policy here ensures that we don't have too many
cf-monitord or cf-execd processes";
"input[core_log_rotation]"
string => "cfe_internal/core/log_rotation.cf",
comment => "This policy ensures that various cfengine log files
do not grow without bound and fill up the disk";
"input[core_host_info_report]"
string => "cfe_internal/core/host_info_report.cf",
comment => "This policy produces a text based host info report
and serves as a functional example of using mustache templates";
"input[cfengine_internal_core_watchdog]"
string => "cfe_internal/core/watchdog/watchdog.cf",
comment => "This policy configures external watchdogs to ensure that
cf-execd is always running.";
enterprise_edition.(policy_server|am_policy_hub)::
"input[enterprise_hub_specific]"
string => "cfe_internal/enterprise/CFE_hub_specific.cf",
comment => "Policy relating to CFEngine Enterprise Hub, for example
software updates, webserver configuration, and alerts";
@if minimum_version(3.12.0)
"input[enterprise_hub_federation]"
string => "cfe_internal/enterprise/federation/federation.cf",
comment => "Policy relating to CFEngine Federated Reporting";
@endif
enterprise_edition::
"input[enterprise_knowledge]"
string => "cfe_internal/enterprise/CFE_knowledge.cf",
comment => "Settings mostly releated to CFEngine Enteprise Mission Portal";
"input[enterprise_main]"
string => "cfe_internal/enterprise/main.cf",
comment => "This policy activates other enterprise specific policies";
"input[change_management]"
string => "cfe_internal/enterprise/file_change.cf",
comment => "This policy monitors critical system files for change";
"input[enterprise_mission_portal]"
string => "cfe_internal/enterprise/mission_portal.cf",
comment => "This policy manages Mission Portal related configurations.";
any::
"inputs" slist => getvalues("input");
}
cfengine_stdlib
Prototype: cfengine_stdlib
Description: Include the standard library
Implementation:
code
bundle common cfengine_stdlib
{
vars:
any::
"inputs" slist => { "$(sys.local_libdir)/stdlib.cf" };
# As part of ENT-2719 3.12.2 introduced package_method attributes for
# specifying the interpreter and specifying the module path. These
# attributes are not known in previous versions and must not be seen by
# the parser or they will be seen as syntax errors. A cleaner way to do
# this using the minimum_version macro is possible, but that would break
# masterfiles compatibility in 3.12 with 3.7 binaries since 3.7 binaries
# do not support major.minor.patch with minimum_version, only major.minor.
windows.cfengine_3_12.!(cfengine_3_12_0|cfengine_3_12_1)::
"inputs" slist => { "$(sys.local_libdir)/stdlib.cf",
"$(sys.local_libdir)/packages-ENT-3719.cf" };
@if minimum_version(3.14)
windows::
"inputs" slist => { "$(sys.local_libdir)/stdlib.cf",
"$(sys.local_libdir)/packages-ENT-3719.cf" };
@endif
reports:
verbose_mode::
"$(this.bundle): defining inputs='$(inputs)'";
}
cfengine_controls
Prototype: cfengine_controls
Description: Include various agent control policies
Implementation:
code
bundle common cfengine_controls
{
vars:
"def_inputs"
slist => {
"controls/def.cf",
"controls/def_inputs.cf",
},
comment => "We strictly order the def inputs because they should be parsed first";
"input[cf_agent]"
string => "controls/cf_agent.cf",
comment => "Agent control options";
"input[cf_execd]"
string => "controls/cf_execd.cf",
comment => "Executor (scheduler) control options";
"input[cf_monitord]"
string => "controls/cf_monitord.cf",
comment => "Monitor/Measurement control options";
"input[cf_serverd]"
string => "controls/cf_serverd.cf",
comment => "Server control options";
"input[cf_runagent]"
string => "controls/cf_runagent.cf",
comment => "Runagent (remote activation request) control options";
enterprise_edition::
"input[cf_hub]" -> { "CFEngine Enterprise" }
string => "controls/cf_hub.cf",
comment => "Hub (agent report collection) control options";
"input[reports]" -> { "CFEngine Enterprise" }
string => "controls/reports.cf",
comment => "Report collection options";
any::
"inputs" slist => getvalues(input);
reports:
DEBUG|DEBUG_cfengine_controls::
"DEBUG $(this.bundle)";
"$(const.t)defining inputs='$(inputs)'";
}
services_autorun
Prototype: services_autorun
Description: Include autorun policy and discover autorun bundles if enabled
Files inside directories listed in def.mpf_extra_autorun_inputs will be
added to inputs automatically.
Implementation:
code
bundle common services_autorun
{
vars:
services_autorun|services_autorun_inputs::
"_default_autorun_input_dir"
string => "$(this.promise_dirname)/services/autorun";
"_default_autorun_inputs"
slist => sort( lsdir( "$(_default_autorun_input_dir)", ".*\.cf", "true"), lex);
"_extra_autorun_input_dirs"
slist => { @(def.mpf_extra_autorun_inputs) },
if => isvariable( "def.mpf_extra_autorun_inputs" );
"_extra_autorun_inputs[$(_extra_autorun_input_dirs)]"
slist => sort( lsdir("$(_extra_autorun_input_dirs)/.", ".*\.cf", "true"), lex),
if => isdir( $(_extra_autorun_input_dirs) );
"found_inputs" slist => { @(_default_autorun_inputs),
sort( getvalues(_extra_autorun_inputs), "lex") };
!(services_autorun|services_autorun_inputs|services_autorun_bundles)::
# If services_autorun is not enabled, then we should not extend inputs
# automatically.
"inputs" slist => { };
"found_inputs" slist => {};
"bundles" slist => { "services_autorun" }; # run self
services_autorun|services_autorun_inputs|services_autorun_bundles::
"inputs" slist => { "$(sys.local_libdir)/autorun.cf" };
"bundles" slist => { "autorun" }; # run loaded bundles
reports:
DEBUG|DEBUG_services_autorun::
"DEBUG $(this.bundle): Services Autorun Disabled"
if => "!(services_autorun|services_autorun_bundles|services_autorun_inputs)";
"DEBUG $(this.bundle): Services Autorun Enabled"
if => "services_autorun";
"DEBUG $(this.bundle): Services Autorun Bundles Enabled"
if => "services_autorun_bundles";
"DEBUG $(this.bundle): Services Autorun Inputs Enabled"
if => "services_autorun_inputs";
"DEBUG $(this.bundle): Services Autorun (Bundles & Inputs) Enabled"
if => "services_autorun_inputs.services_autorun_bundles";
"DEBUG $(this.bundle): adding input='$(inputs)'"
if => isvariable("inputs");
"DEBUG $(this.bundle): adding input='$(found_inputs)'"
if => isvariable("found_inputs");
}
.no-distrib/
This directory is excluded from policy updates.
Place things here that are primarily useful on your policy distribution servers or that your policy will explicitly copy from.
update.cf
$(sys.inputdir)/update.cf is responsible for updating
policy from the hub as well as ensuring various core
cfenigne components are running.
control
Prototype: control
Description: Common control attributes for all components
Implementation:
code
body common control
{
bundlesequence => {
"update_def",
"u_cfengine_enterprise",
@(u_cfengine_enterprise.def),
"cfe_internal_dc_workflow",
"cfe_internal_update_policy",
"cfengine_internal_standalone_self_upgrade",
"cfe_internal_update_processes",
@(update_def.bundlesequence_end), # Define control_common_update_bundlesequnce_end via augments
};
version => "update.cf 3.24.0a.9e96fcf45";
inputs => {
"cfe_internal/update/lib.cf",
"cfe_internal/update/systemd_units.cf",
@(cfengine_update_controls.update_def_inputs),
"cfe_internal/update/cfe_internal_dc_workflow.cf",
"cfe_internal/update/cfe_internal_update_from_repository.cf",
"cfe_internal/update/update_policy.cf",
"cfe_internal/update/update_processes.cf",
@(update_def.augments_inputs)
};
any::
ignore_missing_bundles => "$(update_def.control_common_ignore_missing_bundles)";
ignore_missing_inputs => "$(update_def.control_common_ignore_missing_inputs)";
control_common_tls_min_version_defined::
tls_min_version => "$(default:def.control_common_tls_min_version)"; # See also: allowtlsversion in body server control
control_common_tls_ciphers_defined::
tls_ciphers => "$(default:def.control_common_tls_ciphers)"; # See also: allowciphers in body server control
}
control
Prototype: control
Description: Agent controls for update
Implementation:
code
body agent control
{
ifelapsed => "1";
skipidentify => "true";
control_agent_agentfacility_configured::
agentfacility => "$(default:update_def.control_agent_agentfacility)";
mpf_update_control_agent_default_repository::
# Location to backup files before they are edited by cfengine
default_repository => "$(update_def.control_agent_default_repository)";
}
u_kept_successful_command
Prototype: u_kept_successful_command
Description: Set command to "kept" instead of "repaired" if it returns 0
Implementation:
code
body classes u_kept_successful_command
{
kept_returncodes => { "0" };
failed_returncodes => { "1" };
}
in_shell
Prototype: in_shell
Implementation:
code
body contain in_shell
{
useshell => "true";
}
cfengine_update_controls
Prototype: cfengine_update_controls
Description: Resolve other controls necessary for update
Implementation:
code
bundle common cfengine_update_controls
{
vars:
"update_def_inputs"
slist => {
"controls/update_def.cf",
"controls/update_def_inputs.cf",
};
reports:
DEBUG|DEBUG_cfengine_update_controls::
"DEBUG $(this.bundle): update def inputs='$(update_def_inputs)'";
}
cfengine_internal_standalone_self_upgrade
Prototype: cfengine_internal_standalone_self_upgrade
Description: Manage desired version state and execution of policy to reach the target version.
Implementation:
code
bundle agent cfengine_internal_standalone_self_upgrade
{
methods:
"cfengine_internal_standalone_self_upgrade_state_data";
"cfengine_internal_standalone_self_upgrade_execution";
}
cfengine_internal_standalone_self_upgrade_state_data
Prototype: cfengine_internal_standalone_self_upgrade_state_data
Description: Clear stale recorded desired version information from state
Implementation:
code
bundle agent cfengine_internal_standalone_self_upgrade_state_data
{
vars:
"binary_upgrade_entry"
string => "$(this.promise_dirname)/standalone_self_upgrade.cf";
"desired_pkg_data_path" string =>
"$(cfengine_internal_standalone_self_upgrade_execution.desired_pkg_data_path)";
files:
# We consider the data stale if it's older than the policy that generated it
"$(desired_pkg_data_path)" -> { "ENT-4317" }
delete => u_tidy,
if => isnewerthan( $(binary_upgrade_entry) , $(desired_pkg_data_path) );
}
cfengine_internal_standalone_self_upgrade_execution
Prototype: cfengine_internal_standalone_self_upgrade_execution
Description: Manage the version of CFEngine that is currently installed. This policy
executes a stand alone policy as a sub agent. If systemd is found we assume
that it is necessary to escape the current unit via systemd-run.
If the running version matches either the desired version information in state
or the version supplied from augments, then we skip running the standalone
upgrade policy.
Implementation:
code
bundle agent cfengine_internal_standalone_self_upgrade_execution
{
vars:
"exec_prefix"
string => ifelse( isexecutable("/bin/systemd-run"), "/bin/systemd-run --unit=cfengine-upgrade --scope ", # trailing space in commands important
isexecutable( "/usr/bin/systemd-run" ), "/usr/bin/systemd-run --unit=cfengine-upgrade --scope ",
"");
"local_update_log_dir"
string => translatepath("$(sys.workdir)/software_updates/update_log"),
comment => "This directory is used for logging the current version of cfengine running.";
"hub_binary_version" -> { "ENT-10664" }
data => data_regextract(
"^(?<major_minor_patch>\d+\.\d+\.\d+)-(?<release>\d+)",
readfile("$(sys.statedir)$(const.dirsep)hub_cf_version.txt" ) ),
if => fileexists( "$(sys.statedir)$(const.dirsep)hub_cf_version.txt" );
classes:
# If we are running the version explicitly defined by the user
"at_desired_version_by_user_specification" -> { "ENT-3592" }
expression => strcmp( "$(def.cfengine_software_pkg_version)", "$(sys.cf_version)" );
"at_desired_version_by_hub_binary_version" -> { "ENT-10664" }
expression => strcmp( "$(hub_binary_version[major_minor_patch])", "$(sys.cf_version)" );
"at_desired_version"
or => { "at_desired_version_by_user_specification",
"at_desired_version_by_hub_binary_version" };
policy_server|am_policy_hub::
"downloaded_target_binaries"
expression => fileexists( "$(sys.workdir)/master_software_updates/$(def.cfengine_software_pkg_version)-downloaded.txt"),
if => isvariable( "def.cfengine_software_pkg_version");
"downloaded_target_binaries"
expression => fileexists( "$(sys.workdir)/master_software_updates/$(sys.cf_version_major).$(sys.cf_version_minor).$(sys.cf_version_patch)-downloaded.txt"),
if => not( isvariable( "def.cfengine_software_pkg_version") );
files:
!(policy_server|am_policy_hub)::
"$(sys.statedir)/hub_cf_version.txt" -> { "ENT-10664", "handle:server_access_grant_access_state_cf_version" }
comment => concat( "We copy the hub binary version state locally",
" so that we can target the hubs binary",
" version as the default target version for",
" self upgrade." ),
handle => "cfe_internal_update_hub_cf_version",
copy_from => u_remote_dcp_missing_ok( "hub-cf_version", $(sys.policy_hub) );
policy_server|am_policy_hub::
"$(sys.statedir)/cf_version.txt" -> { "ENT-10664", "handle:server_access_grant_access_state_cf_version" }
comment => concat( "We record the hubs binary version in state and this",
" is shared with clients so that clients can target",
" the hubs binary version as the default target",
" version for self upgrade." ),
handle => "cfe_internal_update_state_cf_version",
content => "$(sys.cf_version_major).$(sys.cf_version_minor).$(sys.cf_version_patch)-$(sys.cf_version_release)";
enterprise_edition::
"$(local_update_log_dir)/$(sys.cf_version)_is_running" -> { "ENT-4352" }
comment => "This results in a record of the first time the enterprise
agent of a given version is seen to run on a host.",
handle => "cfe_internal_update_bins_files_version_is_running",
create => "true";
commands:
trigger_upgrade.!(at_desired_version|mpf_disable_hub_masterfiles_software_update_seed|downloaded_target_binaries)::
'$(exec_prefix)$(sys.cf_agent) --inform --timestamp --file "$(this.promise_dirname)$(const.dirsep)standalone_self_upgrade.cf" --define trigger_upgrade,update_cf_initiated >"$(sys.workdir)$(const.dirsep)outputs/standalone_self_upgrade_$(sys.cdate).log"'
handle => "standalone_self_upgrade",
contain => in_shell;
reports:
trigger_upgrade.(inform_mode|verbose_mode|DEBUG|DEBUG_cfengine_internal_standalone_self_upgrade)::
"Skipped self upgrade because we are running the desired version $(sys.cf_version)" -> { "ENT-3592" }
if => "at_desired_version";
}
standalone_self_upgrade.cf
$(sys.inputdir)/standalone_self_upgrade.cf is an independent policy set entry
like promises.cf and update.cf. The policy is executed by an independent
agent executed from the update.cf entry when the class trigger_upgrade is
defined and the host is not seen to be running the desired version of the agent.
The policy is designed for use with Enterprise packages, but can be customized
for use with community packages.
control
Prototype: control
Implementation:
code
body file control
{
inputs => { @(standalone_self_upgrade_file_control.inputs) };
}
control
Prototype: control
Description: Agent controls for standalone self upgrade
Implementation:
code
body agent control
{
control_agent_agentfacility_configured::
agentfacility => "$(default:update_def.control_agent_agentfacility)";
}
Prototype: u_immediate
Description: Ignore promise locks, actuate the promise immediately
Implementation:
code
body action u_immediate
{
ifelapsed => "0";
}
u_dsync
Prototype: u_dsync(from, server)
Description: Synchronize promiser with from on server using digest comparison. If host is a policy hub, then it skips the remote copy, preferring the local file path. For this reason, this body is not compatible with shortcuts defined by cf-serverd.
Arguments:
from: File path to copy from on remote serverserver: Remote server to copy file from if executing host is not a policy server
Implementation:
code
body copy_from u_dsync(from,server)
{
# NOTE policy servers cheat and copy directly from the local file system.
# This works even if cf-serverd is down and it makes sense if your serving
# yourself.
source => "$(from)";
compare => "digest";
trustkey => "false";
purge => "true";
!am_policy_hub::
servers => { "$(server)" };
cfengine_internal_encrypt_transfers::
encrypt => "true";
}
u_if_repaired
Prototype: u_if_repaired(x)
Description: Define x if promise results in a repair
Arguments:
x: Name of the class to be defined if promise results in repair
Implementation:
code
body classes u_if_repaired(x)
{
promise_repaired => { "$(x)" };
}
u_if_else
Prototype: u_if_else(yes, no)
Description: Define yes if promise results in a repair, no if promise is not kept (failed, denied, timeout)
Arguments:
yes: class to define if promise results in repairno: class to define if promise is not kept (failed, denied, timeout)
Implementation:
code
body classes u_if_else(yes,no)
{
# promise_kept => { "$(yes)" };
promise_repaired => { "$(yes)" };
repair_failed => { "$(no)" };
repair_denied => { "$(no)" };
repair_timeout => { "$(no)" };
}
control
Prototype: control
Description: Common control for standalone self upgrade
Implementation:
code
body common control
{
version => "CFEngine Standalone Self Upgrade 3.24.0a.9e96fcf45";
control_common_tls_min_version_defined::
tls_min_version => "$(default:def.control_common_tls_min_version)"; # See also: allowtlsversion in body server control
control_common_tls_ciphers_defined::
tls_ciphers => "$(default:def.control_common_tls_ciphers)"; # See also: allowciphers in body server control
(debian|ubuntu)::
package_inventory => { $(package_module_knowledge.platform_default) };
# We only define pacakge_inventory on redhat like systems that have a
# python version that works with the package module.
(redhat|centos)::
package_inventory => { $(package_module_knowledge.platform_default) };
(debian|redhat)::
package_module => $(package_module_knowledge.platform_default);
}
u_recurse_basedir
Prototype: u_recurse_basedir(d)
Description: Search recursively from (and including) the referenced directory directory to depth d excluding common version control paths
Arguments:
d: maximum depth to descend
Implementation:
code
body depth_search u_recurse_basedir(d)
{
include_basedir => "true";
depth => "$(d)";
exclude_dirs => { "\.svn", "\.git", "git-core" };
}
u_empty_no_backup
Prototype: u_empty_no_backup
Description: Do not create backups and ensure we are promising the entire content of
the file.
Implementation:
code
body edit_defaults u_empty_no_backup
{
empty_file_before_editing => "true";
edit_backup => "false";
}
plain
Prototype: plain
Description: Select plain, regular files
Implementation:
code
body file_select plain
{
file_types => { "plain" };
file_result => "file_types";
}
u_generic
Prototype: u_generic(repo)
Description: Generic package_method capable of managing packages on multiple platforms.
Arguments:
repo: Local directory to look for packages in
Implementation:
code
body package_method u_generic(repo)
{
debian::
package_changes => "individual";
package_list_command => "/usr/bin/dpkg -l";
# package_list_update_command => "/usr/bin/apt-get update";
package_list_update_ifelapsed => "$(u_common_knowledge.list_update_ifelapsed_now)";
package_list_name_regex => "ii\s+([^\s:]+).*";
# package_list_version_regex => "ii\s+[^\s]+\s+([^\s]+).*";
package_list_version_regex => "ii\s+[^\s]+\s+(\d+\.\d+((\.|-)\d+)+).*";
package_installed_regex => ".*"; # all reported are installed
package_file_repositories => { "$(repo)" };
package_version_equal_command => "/usr/bin/dpkg --compare-versions '$(v1)' eq '$(v2)'";
package_version_less_command => "/usr/bin/dpkg --compare-versions '$(v1)' lt '$(v2)'";
debian.x86_64::
package_name_convention => "$(name)_$(version)_amd64.deb";
debian.i686::
package_name_convention => "$(name)_$(version)_i386.deb";
debian::
package_add_command => "/usr/bin/dpkg --force-confdef --force-confnew --install";
package_delete_command => "/usr/bin/dpkg --purge";
redhat|SuSE|suse|sles::
package_changes => "individual";
package_list_command => "/bin/rpm -qa --queryformat \"i | repos | %{name} | %{version}-%{release} | %{arch}\n\"";
package_list_update_ifelapsed => "$(u_common_knowledge.list_update_ifelapsed_now)";
package_list_name_regex => "[^|]+\|[^|]+\|\s+([^\s|]+).*";
package_list_version_regex => "[^|]+\|[^|]+\|[^|]+\|\s+([^\s|]+).*";
package_list_arch_regex => "[^|]+\|[^|]+\|[^|]+\|[^|]+\|\s+([^\s]+).*";
package_installed_regex => "i.*";
package_file_repositories => { "$(repo)" };
package_name_convention => "$(name)-$(version).$(arch).rpm";
package_add_command => "/bin/rpm -ivh ";
package_delete_command => "/bin/rpm -e --nodeps";
package_verify_command => "/bin/rpm -V";
package_noverify_regex => ".*[^\s].*";
package_version_less_command => "$(sys.bindir)/rpmvercmp '$(v1)' lt '$(v2)'";
package_version_equal_command => "$(sys.bindir)/rpmvercmp '$(v1)' eq '$(v2)'";
(redhat|SuSE|suse|sles|debian|solarisx86|solaris)::
package_update_command => "$(sys.workdir)/bin/cf-upgrade -b $(cfengine_software_version_packages1.backup_script) -s $(cfengine_software_version_packages1.backup_file) -i $(cfengine_software_version_packages1.install_script)";
redhat.!redhat_4::
package_list_update_command => "/usr/bin/yum --quiet check-update";
redhat_4::
package_list_update_command => "/usr/bin/yum check-update";
SuSE|suse|sles::
package_list_update_command => "/usr/bin/zypper list-updates";
windows::
package_changes => "individual";
package_list_update_ifelapsed => "$(u_common_knowledge.list_update_ifelapsed_now)";
package_file_repositories => { "$(repo)" };
package_installed_regex => ".*";
package_name_convention => "$(name)-$(version)-$(arch).msi";
package_add_command => "\"$(sys.winsysdir)\msiexec.exe\" /qn /i";
package_update_command => "\"$(sys.winsysdir)\msiexec.exe\" /qn /i";
package_delete_command => "\"$(sys.winsysdir)\msiexec.exe\" /qn /x";
package_version_less_command => '$(sys.winsysdir)$(const.dirsep)WindowsPowerShell$(const.dirsep)v1.0$(const.dirsep)powershell.exe "$(sys.bindir)$(const.dirsep)vercmp.ps1" "$(v1)" "lt" "$(v2)"';
package_version_equal_command => '$(sys.winsysdir)$(const.dirsep)WindowsPowerShell$(const.dirsep)v1.0$(const.dirsep)powershell.exe "$(sys.bindir)$(const.dirsep)vercmp.ps1" "$(v1)" "eq" "$(v2)"';
freebsd::
package_changes => "individual";
package_list_command => "/usr/sbin/pkg_info";
package_list_update_command => "/usr/bin/true";
package_list_update_ifelapsed => "$(u_common_knowledge.list_update_ifelapsed_now)";
package_list_name_regex => "^(\S+)-(\d+\.?)+";
package_list_version_regex => "^\S+-((\d+\.?)+\_\d)";
package_file_repositories => { "$(repo)" };
package_installed_regex => ".*";
package_name_convention => "$(name)-$(version).tbz";
package_delete_convention => "$(name)-$(version)";
package_add_command => "/usr/sbin/pkg_add";
package_delete_command => "/usr/sbin/pkg_delete";
netbsd::
package_changes => "individual";
package_list_command => "/usr/sbin/pkg_info";
package_list_update_command => "/usr/bin/true";
package_list_update_ifelapsed => "$(u_common_knowledge.list_update_ifelapsed_now)";
package_list_name_regex => "^(\S+)-(\d+\.?)+";
package_list_version_regex => "^\S+-((\d+\.?)+\nb\d)";
package_file_repositories => { "$(repo)" };
package_installed_regex => ".*";
package_name_convention => "$(name)-$(version).tgz";
package_delete_convention => "$(name)-$(version)";
package_add_command => "/usr/sbin/pkg_add";
package_delete_command => "/usr/sbin/pkg_delete";
solarisx86|solaris::
package_changes => "individual";
package_list_command => "/usr/bin/pkginfo -l";
package_list_update_command => "/usr/bin/true";
package_list_update_ifelapsed => "$(u_common_knowledge.list_update_ifelapsed_now)";
package_multiline_start => "\s*PKGINST:\s+[^\s]+";
package_list_name_regex => "\s*PKGINST:\s+([^\s]+)";
package_list_version_regex => "\s*VERSION:\s+([^\s]+)";
package_list_arch_regex => "\s*ARCH:\s+([^\s]+)";
package_file_repositories => { "$(repo)" };
package_installed_regex => "\s*STATUS:\s*(completely|partially)\s+installed.*";
package_name_convention => "$(name)-$(version)-$(arch).pkg";
package_delete_convention => "$(name)";
# Cfengine appends path to package and package name below, respectively
package_add_command => "/bin/sh $(repo)/add_scr $(repo)/admin_file";
package_delete_command => "/usr/sbin/pkgrm -n -a $(repo)/admin_file";
aix::
package_changes => "individual";
package_list_update_command => "/usr/bin/true";
package_list_update_ifelapsed => "$(u_common_knowledge.list_update_ifelapsed_now)";
package_list_command => "/usr/bin/lslpp -lc";
package_list_name_regex => "[^:]+:([^:]+):[^:]+:.*";
package_list_version_regex => "[^:]+:[^:]+:([^:]+):.*";
package_file_repositories => { "$(repo)" };
package_installed_regex => "[^:]+:[^:]+:[^:]+:[^:]*:(COMMITTED|APPLIED):.*";
package_name_convention => "$(name)-$(version).bff";
package_delete_convention => "$(name)";
# Redirecting the output to '/dev/null' below makes sure 'geninstall' has
# its stdout open even if the 'cf-agent' process that started it
# terminates (e.g. gets killed).
package_add_command => "/usr/bin/rm -f $(repo)/.toc && /usr/sbin/geninstall -IacgXNY -d $(repo) cfengine-nova > /dev/null$";
package_update_command => "/usr/bin/rm -f $(repo)/.toc && /usr/sbin/geninstall -IacgXNY -d $(repo) cfengine-nova > /dev/null$";
package_delete_command => "/usr/sbin/installp -ug cfengine-nova$";
# Internal version comparison model doesn't work for W.X.Y.Z
package_version_less_command => "$(sys.bindir)/rpmvercmp '$(v1)' lt '$(v2)'";
package_version_equal_command => "$(sys.bindir)/rpmvercmp '$(v1)' eq '$(v2)'";
}
yum
Prototype: yum
Description: Yum package module default settings
Implementation:
code
body package_module yum
{
query_installed_ifelapsed => "10";
query_updates_ifelapsed => "30";
@if minimum_version(3.12.2)
interpreter => "$(sys.bindir)/cfengine-selected-python";
@endif
}
apt_get
Prototype: apt_get
Description: apt_get package module default settings
Implementation:
code
body package_module apt_get
{
query_installed_ifelapsed => "10";
query_updates_ifelapsed => "30";
@if minimum_version(3.12.2)
interpreter => "$(sys.bindir)/cfengine-selected-python";
@endif
}
zypper
Prototype: zypper
Implementation:
code
body package_module zypper
{
query_installed_ifelapsed => "0";
query_updates_ifelapsed => "30";
#default_options => {};
@if minimum_version(3.12.2)
interpreter => "$(sys.bindir)/cfengine-selected-python";
@endif
}
msiexec
Prototype: msiexec
Description: msiexec package module default settings
Implementation:
code
body package_module msiexec
{
query_installed_ifelapsed => "10";
query_updates_ifelapsed => "30";
@if minimum_version(3.12.2)
interpreter => "$(sys.winsysdir)$(const.dirsep)cmd.exe /c ";
@endif
module_path => "$(sys.workdir)$(const.dirsep)modules$(const.dirsep)packages$(const.dirsep)msiexec.bat";
}
u_m
Prototype: u_m(p)
Description: Ensure mode is p
Arguments:
Implementation:
code
body perms u_m(p)
{
mode => "$(p)";
}
local_dcp
Prototype: local_dcp(from)
Description: Copy a local file if the hash on the source file differs.
Arguments:
from: The path to the source file.
Example:
code
bundle agent example
{
files:
"/tmp/file.bak"
copy_from => local_dcp("/tmp/file");
}
See Also: local_cp(), remote_dcp()
Implementation:
code
body copy_from local_dcp(from)
{
source => "$(from)";
compare => "digest";
}
standalone_self_upgrade_file_control
Prototype: standalone_self_upgrade_file_control
Implementation:
code
bundle common standalone_self_upgrade_file_control
{
vars:
"inputs" slist => { "$(this.promise_dirname)$(const.dirsep)cfe_internal$(const.dirsep)update$(const.dirsep)windows_unattended_upgrade.cf" };
}
def_standalone_self_upgrade
Prototype: def_standalone_self_upgrade
Implementation:
code
bundle common def_standalone_self_upgrade
{
vars:
"control_agent_agentfacility" -> { "ENT-10209" }
string => "",
if => not( isvariable ( "default:def.control_agent_agentfacility" ));
classes:
"control_agent_agentfacility_configured" -> { "ENT-10209" }
expression => regcmp( "LOG_(USER|DAEMON|LOCAL[0-7])",
$(control_agent_agentfacility) ),
comment => concat( "If default:def.control_agent_agentfacility is a",
" valid setting, we want to use it in body agent",
" control for setting agentfacility" );
"control_common_tls_min_version_defined" -> { "ENT-10198" }
expression => isvariable( "default:def.control_common_tls_min_version"),
comment => concat( "If default:def.control_common_tls_min_version is defined then",
" its value will be used for the minimum version in outbound",
" connections. Else the binary default will be used.");
"control_common_tls_ciphers_defined" -> { "ENT-10198" }
expression => isvariable( "default:def.control_common_tls_ciphers"),
comment => concat( "If default:def.control_common_tls_ciphers is defined then",
" its value will be used for the set of tls ciphers allowed",
" for outbound connections. Else the binary default will be used.");
}
main
Prototype: main
Description: This bundle drives the self upgrade. It actuates the appropriate
bundles to download binaries to the hub for serving to clients, caching the
software to remote clients, and managing the version of cfengine installed on
non hubs.
Implementation:
code
bundle agent main
{
classes:
"policy_server_dat_unstable"
expression => isnewerthan( "$(sys.workdir)/policy_server.dat", "$(sys.workdir)/outputs" ),
comment => "If $(sys.workdir)/policy_server.dat is newer than the
outputs directory, it can indicate that the current agent
execution is a result of bootstrap. For stability we want to
skip upgrades during bootstrap. The outputs directory should
be newer than the policy_server.dat on the next agent run
and allow upgrade then.";
reports:
"Running $(this.promise_filename)";
methods:
"cfengine_software";
(am_policy_hub|policy_server).!mpf_disable_hub_masterfiles_software_update_seed::
"Master Software Repository Data"
usebundle => cfengine_master_software_content;
!(am_policy_hub|policy_server|policy_server_dat_unstable)::
"Local Software Cache"
usebundle => cfengine_software_cached_locally;
"CFEngine Version"
usebundle => cfengine_software_version;
}
package_module_knowledge
Prototype: package_module_knowledge
Description: common package_module_knowledge bundle
This common bundle defines which package modules are the defaults on different
platforms.
Implementation:
code
bundle common package_module_knowledge
{
vars:
debian|ubuntu::
"platform_default" string => "apt_get";
redhat|centos|amazon_linux::
"platform_default" string => "yum";
}
u_common_knowledge
Prototype: u_common_knowledge
Description: standalone common packages knowledge bundle
This common bundle defines general things about platforms.
Implementation:
code
bundle common u_common_knowledge
{
vars:
"list_update_ifelapsed_now" string => "10080";
}
cfengine_software
Prototype: cfengine_software
Description: Variables to control the specifics in desired package selection
Implementation:
code
bundle agent cfengine_software
{
vars:
any::
# Extract the hub binary version info if it's available. Only expected to
# be available on a client.
"hub_binary_version" -> { "ENT-10664" }
data => data_regextract(
"^(?<major_minor_patch>\d+\.\d+\.\d+)-(?<release>\d+)",
readfile("$(sys.statedir)$(const.dirsep)hub_cf_version.txt" ) ),
if => fileexists( "$(sys.statedir)$(const.dirsep)hub_cf_version.txt" );
# Default desired CFEngine software
"pkg_name" string => ifelse( isvariable( "def.cfengine_software_pkg_name" ), $(def.cfengine_software_pkg_name), "cfengine-nova");
"pkg_version" -> { "ENT-10664" }
string => "$(sys.cf_version_major).$(sys.cf_version_minor).$(sys.cf_version_patch)",
if => "am_policy_hub|policy_server",
comment => "The hub will use its own version to seed client packages.";
"pkg_version" -> { "ENT-10664" }
string => "$(hub_binary_version[major_minor_patch])",
if => isvariable("hub_binary_version[major_minor_patch]"),
comment => "Use the hub binary version if available.";
"pkg_version"
string => "$(def.cfengine_software_pkg_version)",
if => isvariable( "def.cfengine_software_pkg_version" ),
comment => "If the target version is explicitly set, we want to use that.";
"pkg_release" string => "$(sys.cf_version_release)", if => "am_policy_hub|policy_server";
"pkg_release" string => "$(hub_binary_version[release])", if => isvariable("hub_binary_version[release]");
"pkg_release" string => "$(def.cfengine_software_pkg_release)", if => isvariable("def.cfengine_software_pkg_release");
"pkg_arch" string => ifelse( isvariable( "def.cfengine_software_pkg_arch" ), $(def.cfengine_software_pkg_arch), "x86_64");
"package_dir" string => ifelse( isvariable( "def.cfengine_software_pkg_dir" ), $(def.cfengine_software_pkg_dir), "$(sys.flavour)_$(sys.arch)");
"pkg_edition_path" string => ifelse( isvariable( "def.cfengine_software_pkg_edition_path" ), $(def.cfengine_software_pkg_edition_path), "enterprise/Enterprise-$(pkg_version)/agent");
community_edition::
"pkg_name" string => "cfengine-community";
"pkg_edition_path" string => "community_binaries/Community-$(pkg_version)";
aix::
"pkg_name" string => "cfengine-nova";
"pkg_arch" string => "default";
solaris|solarisx86::
"pkg_name" string => "cfengine-nova";
amzn_2::
"package_dir"
string => "amazon_2_$(pkg_arch)";
(debian|ubuntu).64_bit::
"pkg_arch"
string => "amd64",
comment => "On debian hosts it's the standard to use 'amd64' instead of
'x86_64' in package architectures.";
(debian|ubuntu).aarch64::
"pkg_arch"
string => "arm64",
comment => concat( "On debian hosts it's the CFEngine standard to use 'arm64' in",
"the package filename." );
"package_dir"
string => "$(sys.flavor)_arm_64";
(redhat|centos|suse|sles).32_bit::
"pkg_arch"
string => "i386",
comment => "i686 is the detected architecture, but the package is
compatible from i386 up.";
hpux::
"package_dir"
string => "$(sys.class)_$(sys.arch)",
comment => "The directory within software updates to look for packages.
On HPUX sys.flavor includes versions, so we use sys.class
instead.";
windows::
"package_dir" -> { "ENT-9010" }
string => "$(sys.class)_$(sys.arch)",
comment => concat( "The directory within software updates to look for ",
"packages. Since one package is built for each",
"supported architecture instead of each platform",
"version architecture we use sys.class and sys.arch.");
any::
"local_software_dir"
string => translatepath( "$(sys.workdir)/software_updates/$(package_dir)" ),
comment => "So that we converge on the first pass we set this last as
package_dir may vary across platforms.";
reports:
DEBUG|DEBUG_cfengine_software::
"$(this.bundle) pkg_name = $(pkg_name)";
"$(this.bundle) pkg_version = $(pkg_version)";
"$(this.bundle) pkg_release = $(pkg_release)";
"$(this.bundle) pkg_arch = $(pkg_arch)";
"$(this.bundle) package_dir = $(package_dir)";
files:
windows::
"$(sys.bindir)$(const.dirsep)vercmp.ps1"
create => "true",
template_method => "mustache",
edit_template => "$(this.promise_dirname)$(const.dirsep)/templates/vercmp.ps1",
template_data => mergedata( '{}' ),
comment => "We need to use specialized version comparison logic for unattended self upgrades.";
}
cfengine_software_cached_locally
Prototype: cfengine_software_cached_locally
Description: Ensure that the internal local software mirror is up to date
Implementation:
code
bundle agent cfengine_software_cached_locally
{
reports:
inform_mode::
"Ensuring local software cache in $(local_software_dir) is up to date";
vars:
"local_software_dir"
string => "$(cfengine_software.local_software_dir)";
"package_dir"
string => "$(cfengine_software.package_dir)";
"master_software_location" -> { "ENT-4953" }
string => "master_software_updates",
comment => "The Cfengine binary updates directory on the policy server",
handle => "cfe_internal_update_bins_vars_master_software_location";
files:
"$(local_software_dir)/."
create => "true",
comment => "Ensure the local software directory exists for new binaries
to be downloaded to";
# NOTE This is pegged to the single upstream policy hub, it won't fail
# over to a secondary for copying the binarys to update.
"$(local_software_dir)"
comment => "Copy binary updates from master source on policy server",
handle => "cfe_internal_update_bins_files_pkg_copy",
copy_from => u_dsync( "$(master_software_location)/$(package_dir)", $(sys.policy_hub) ),
file_select => plain,
depth_search => u_recurse_basedir(inf),
action => u_immediate,
classes => u_if_repaired("bin_newpkg");
}
cfengine_software_version
Prototype: cfengine_software_version
Description: Ensure the version of CFEngine installed is correct for supported
platforms. Different platforms leverage different implementations for self
upgrading.
Implementation:
code
bundle agent cfengine_software_version
{
classes:
"__supported_platform" -> { "ENT-5045", "ENT-5152", "ENT-4094", "ENT-8247" }
or => {
"amazon_linux",
"redhat.!redhat_4",
"centos.!centos_4",
"debian",
"suse|opensuse",
"ubuntu",
"hpux",
"aix",
"windows", # ENT-4094
};
# Add "windows" to __new_implementation classes with ENT-6823
"__new_implementation"
or => { "amazon_linux", "redhat", "centos", "ubuntu", "debian", "suse", "opensuse" };
vars:
"pkg_name" string => "$(cfengine_software.pkg_name)";
"pkg_version" string => "$(cfengine_software.pkg_version)";
"pkg_release" string => "$(cfengine_software.pkg_release)";
"_cf_version_release" string => ifelse( isvariable( "sys.cf_version_release" ), "$(sys.cf_version_release)", "1" );
"pkg_arch" string => "$(cfengine_software.pkg_arch)";
"package_dir" string => "$(cfengine_software.package_dir)";
"local_software_dir" string => "$(cfengine_software.local_software_dir)";
methods:
__supported_platform.__new_implementation::
"Manage CFEngine Version"
usebundle => cfengine_software_version_packages2;
__supported_platform.!__new_implementation::
"Manage CFEngine Version"
usebundle => cfengine_software_version_packages1;
# TODO, remove this and cfe_internal/enterprise/windows_unattended_upgrade.cf
# when ENT-6823 allows us to use msiexec.bat packages module.
"Windows Unattended Upgrade Workaround"
usebundle => windows_unattended_upgrade,
if => and(
"windows",
or(
not(strcmp("$(cfengine_software.pkg_version)", "$(sys.cf_version)")),
not(strcmp("$(cfengine_software.pkg_release)", "$(_cf_version_release)"))
)
);
reports:
!__supported_platform.inform_mode::
"$(this.bundle) $(package_dir) is not supported";
}
cfengine_software_version_packages2
Prototype: cfengine_software_version_packages2
Description: Ensure the correct version of software is installed using the new packages promise implementation
Implementation:
code
bundle agent cfengine_software_version_packages2
{
vars:
"pkg_name" string => "$(cfengine_software.pkg_name)";
"pkg_version" string => "$(cfengine_software.pkg_version)";
"pkg_release" string => "$(cfengine_software.pkg_release)";
"pkg_arch" string => "$(cfengine_software.pkg_arch)";
"package_dir" string => "$(cfengine_software.package_dir)";
"local_software_dir" string => "$(cfengine_software.local_software_dir)";
packages:
(amazon_linux|redhat|centos)::
"$(local_software_dir)/$(cfengine_package_names.my_pkg)"
policy => "present",
package_module => yum,
comment => "Ensure the latest package is installed";
(debian|ubuntu)::
"$(local_software_dir)/$(cfengine_package_names.my_pkg)"
policy => "present",
package_module => apt_get,
comment => "Ensure the latest package is installed";
(opensuse|suse)::
"$(local_software_dir)/$(cfengine_package_names.my_pkg)"
policy => "present",
package_module => zypper,
comment => "Ensure the latest package is installed";
# TODO, uncomment the following to enable msiexec packages module (ENT-6823)
# windows::
# "$(local_software_dir)$(const.dirsep)$(cfengine_package_names.my_pkg)"
# policy => "present",
# package_module => msiexec,
# comment => "Ensure the latest package is installed";
reports:
"DEBUG|DEBUG_$(this.bundle)"::
"Running $(this.bundle)";
}
cfengine_software_version_packages1
Prototype: cfengine_software_version_packages1
Description: Ensure the correct version of software is installed using the legacy self update mechanism
Implementation:
code
bundle agent cfengine_software_version_packages1
{
classes:
"cf_upgrade" expression => "(redhat|suse|sles|debian|solaris|solarisx86).!(am_policy_hub|policy_server)";
vars:
# NOTE These logs are not actively used or cleaned up by anything. Their
# use will be phased as platforms migrate to the new packages
# implementation for self upgrades.
"local_update_log_dir"
string => translatepath("$(sys.workdir)/software_updates/update_log"),
comment => "Local directory to store update log for this host.",
handle => "cfe_internal_update_bins_vars_local_update_log_dir";
"local_software_dir" string => "$(cfengine_software.local_software_dir)";
"desired_version" -> { "ENT-4094" }
string => ifelse("linux", "$(cfengine_software.pkg_version)-$(cfengine_software.pkg_release)",
"windows", "$(cfengine_software.pkg_version).$(cfengine_software.pkg_release)", # ENT-4094
"aix", "$(cfengine_software.pkg_version).0",
$(cfengine_software.pkg_version) ),
comment => "The version attribute sometimes contains package release
information and sometimes does not. Here we construct the
version used in the package promise for the given
platform.";
cf_upgrade::
# We only use cf-upgrade for some platforms, the need for it has been
# deprecated by the new packages promise implementation.
# backup script for cf-upgrade
# the script should have 2 conditions, BACKUP and RESTORE
# BACKUP and RESTORE status is $(const.dollar)1 variable in the script
# see more details at bundle edit_line u_backup_script
# NOTE cf-upgrade wants to execute from /tmp by default. This is
# problematic for systems where /tmp is mounted with no-exec.
"backup_script" string => "/tmp/cf-upgrade_backup.sh";
# a single compressed backup file for cf-upgrade
# this backup_file is passed to backup_script as $(const.dollar)2 variable
# cf-upgrade will extract this file if return signal of upgrade command is not 0
"backup_file" string => "/tmp/cfengine-nova-$(sys.cf_version).tar.gz";
# install script for cf-upgrade
# each distribution has its own way to upgrade a package
# see more details at bundle edit_line u_install_script
"install_script" string => "/tmp/cf-upgrade_install.sh";
(solarisx86|solaris).enterprise::
# to automatically remove or install packages on Solaris
# admin_file is a must to have to avoid pop-up interaction
# see more details at bundle edit_line u_admin_file
"admin_file" string => "/tmp/cf-upgrade_admin_file";
files:
# Remote enterprise agents (non policy hubs) that have `trigger_upgrade` defined
cf_upgrade.enterprise.trigger_upgrade::
"$(backup_script)"
comment => "Create a backup script for cf-upgrade",
handle => "cfe_internal_update_bins_files_backup_script",
create => "true",
if => "!windows",
edit_defaults => u_empty_no_backup,
edit_line => u_backup_script,
perms => u_m("0755");
"$(install_script)"
comment => "Create an install script for cf-upgrade",
handle => "cfe_internal_update_bins_files_install_script",
create => "true",
if => "!windows",
edit_defaults => u_empty_no_backup,
edit_line => u_install_script,
perms => u_m("0755");
"$(admin_file)"
comment => "Create solaris admin_file to automate remove and install packages",
handle => "cfe_internal_update_bins_files_solaris_admin_file",
create => "true",
edit_defaults => u_empty_no_backup,
edit_line => u_admin_file,
perms => u_m("0644"),
if => "solarisx86|solaris";
packages:
# Only non policy hubs running are allowed to self upgrade
# We don't upgrade during bootstrap
!(am_policy_hub|policy_server|bootstrap_mode).enterprise_edition::
"$(cfengine_software.pkg_name)"
comment => "Update Nova package to a newer version",
handle => "cfe_internal_update_bins_packages_nova_update",
package_policy => "update",
package_select => "==",
package_architectures => { "$(cfengine_software.pkg_arch)" },
package_version => "$(desired_version)",
package_method => u_generic( $(cfengine_software.local_software_dir) ),
classes => u_if_else("bin_update_success", "bin_update_fail");
reports:
"DEBUG|DEBUG_$(this.bundle)"::
"Running $(this.bundle)";
}
cfengine_package_names
Prototype: cfengine_package_names
Description: Maps platforms to the package naming convention used by the self upgrade policy
Implementation:
code
bundle common cfengine_package_names
{
vars:
"pkg_name" string => "$(cfengine_software.pkg_name)";
"pkg_version" string => "$(cfengine_software.pkg_version)";
"pkg_release" string => "$(cfengine_software.pkg_release)";
"pkg_arch" string => "$(cfengine_software.pkg_arch)";
# Redhat/Centos/Oracle 5, SuSE 11 use the same package
"pkg[redhat_5_x86_64]" string => "$(pkg_name)-$(pkg_version)-$(pkg_release).el5.centos.x86_64.rpm";
"pkg[centos_5_x86_64]" string => "$(pkg[redhat_5_x86_64])";
"pkg[oracle_5_x86_64]" string => "$(pkg[redhat_5_x86_64])";
"pkg[SuSE_11_x86_64]" string => "$(pkg[redhat_5_x86_64])";
# 32bit RPMs
"pkg[$(cfengine_master_software_content._rpm_dists)_$(cfengine_master_software_content._32bit_arches)]" string => "$(pkg_name)-$(pkg_version)-$(pkg_release).el5.centos.i386.rpm";
# Redhat/Centos/Oracle 6, SuSE 12-15, Opensuse Leap 15 use the same package
"pkg[redhat_6_x86_64]" string => "$(pkg_name)-$(pkg_version)-$(pkg_release).el6.x86_64.rpm";
"pkg[centos_6_x86_64]" string => "$(pkg[redhat_6_x86_64])";
"pkg[oracle_6_x86_64]" string => "$(pkg[redhat_6_x86_64])";
"pkg[SuSE_12_x86_64]" string => "$(pkg[redhat_6_x86_64])";
"pkg[SuSE_15_x86_64]" string => "$(pkg[redhat_6_x86_64])";
"pkg[opensuse_leap_15_x86_64]" string => "$(pkg[redhat_6_x86_64])";
# Redhat/Centos/Oracle/Rocky 7/Amazon 2 use the same package
"pkg[redhat_7_x86_64]" string => "$(pkg_name)-$(pkg_version)-$(pkg_release).el7.x86_64.rpm";
"pkg[centos_7_x86_64]" string => "$(pkg[redhat_7_x86_64])";
"pkg[oracle_7_x86_64]" string => "$(pkg[redhat_7_x86_64])";
"pkg[rocky_7_x86_64]" string => "$(pkg[redhat_7_x86_64])";
"pkg[amazon_2_x86_64]" string => "$(pkg[redhat_7_x86_64])";
# Redhat/Centos/Oracle/Rocky 8 use the same package
"pkg[redhat_8_x86_64]" string => "$(pkg_name)-$(pkg_version)-$(pkg_release).el8.x86_64.rpm";
"pkg[centos_8_x86_64]" string => "$(pkg[redhat_8_x86_64])";
"pkg[oracle_8_x86_64]" string => "$(pkg[redhat_8_x86_64])";
"pkg[rocky_8_x86_64]" string => "$(pkg[redhat_8_x86_64])";
# Redhat/Centos/Oracle/Rocky 8 use the same package
"pkg[redhat_9_x86_64]" string => "$(pkg_name)-$(pkg_version)-$(pkg_release).el9.x86_64.rpm";
"pkg[centos_9_x86_64]" string => "$(pkg[redhat_9_x86_64])";
"pkg[oracle_9_x86_64]" string => "$(pkg[redhat_9_x86_64])";
"pkg[rocky_9_x86_64]" string => "$(pkg[redhat_9_x86_64])";
# 64bit Debian
"pkg[debian_7_x86_64]" string => "$(pkg_name)_$(pkg_version)-$(pkg_release).debian7_amd64.deb";
"pkg[debian_8_x86_64]" string => "$(pkg_name)_$(pkg_version)-$(pkg_release).debian8_amd64.deb";
"pkg[debian_9_x86_64]" string => "$(pkg_name)_$(pkg_version)-$(pkg_release).debian9_amd64.deb";
"pkg[debian_10_x86_64]" string => "$(pkg_name)_$(pkg_version)-$(pkg_release).debian10_amd64.deb";
"pkg[debian_11_x86_64]" string => "$(pkg_name)_$(pkg_version)-$(pkg_release).debian11_amd64.deb";
# 64bit Ubuntu
"pkg[ubuntu_14_x86_64]" string => "$(pkg_name)_$(pkg_version)-$(pkg_release).ubuntu14_amd64.deb";
"pkg[ubuntu_16_x86_64]" string => "$(pkg_name)_$(pkg_version)-$(pkg_release).ubuntu16_amd64.deb";
"pkg[ubuntu_18_x86_64]" string => "$(pkg_name)_$(pkg_version)-$(pkg_release).ubuntu18_amd64.deb";
"pkg[ubuntu_20_x86_64]" string => "$(pkg_name)_$(pkg_version)-$(pkg_release).ubuntu20_amd64.deb";
"pkg[ubuntu_22_x86_64]" string => "$(pkg_name)_$(pkg_version)-$(pkg_release).ubuntu22_amd64.deb";
# aarch64 Ubuntu
"pkg[ubuntu_22_arm_64]" string => "$(pkg_name)_$(pkg_version)-$(pkg_release).ubuntu22_arm64.deb";
# aarch64 Debian
"pkg[debian_11_arm_64]" string => "$(pkg_name)_$(pkg_version)-$(pkg_release).debian11_arm64.deb";
# 32bit DEBs
"pkg[$(cfengine_master_software_content._deb_dists)_$(cfengine_master_software_content._32bit_arches)]" string => "$(pkg_name)_$(pkg_version)-$(pkg_release).debian7_i386.deb";
# Windows
"pkg[windows_x86_64]" string => "$(pkg_name)-$(pkg_version)-$(pkg_release)-x86_64.msi";
"pkg[windows_i686]" string => "$(pkg_name)-$(pkg_version)-$(pkg_release)-i686.msi";
"my_pkg"
string => "$(pkg[$(cfengine_software.package_dir)])",
comment => "The package name for the currently executing platform.";
reports:
"DEBUG|DEBUG_$(this.bundle)"::
"My Package: $(my_pkg)";
}
cfengine_master_software_content
Prototype: cfengine_master_software_content
Description: When cfengine_master_software_content_state_present is defined the software
will try be be automatically downloaded.
Implementation:
code
bundle agent cfengine_master_software_content
{
vars:
"pkg_name" string => "$(cfengine_software.pkg_name)";
"pkg_version" string => "$(cfengine_software.pkg_version)";
"pkg_release" string => "$(cfengine_software.pkg_release)";
"pkg_arch" string => "$(cfengine_software.pkg_arch)";
"package_dir" string => "$(cfengine_software.package_dir)";
"pkg_edition" string => "$(cfengine_software.pkg_edition_path)";
"base_url" string => "https://cfengine-package-repos.s3.amazonaws.com/$(pkg_edition)";
# Map platform/directory identifier to upstream package URLs
# Better to read in an external explicit data structure?
"_32bit_arches" slist => { "i386", "i586", "i686" };
# Redhat/Centos/Oracle 5 and SuSE 11 all use the same package
"dir[redhat_5_x86_64]" string => "agent_rpm_x86_64";
"dir[centos_5_x86_64]" string => "$(dir[redhat_5_x86_64])";
"dir[oracle_5_x86_64]" string => "$(dir[redhat_5_x86_64])";
"dir[SuSE_11_x86_64]" string => "$(dir[redhat_5_x86_64])";
"pkg[SuSE_12_x86_64]" string => "$(pkg[redhat_6_x86_64])";
"pkg[SuSE_15_x86_64]" string => "$(pkg[redhat_6_x86_64])";
"pkg[opensuse_leap_15_x86_64]" string => "$(pkg[redhat_6_x86_64])";
# All 32bit rpms use the same package
"_rpm_dists" slist => { "redhat_5", "redhat_6", "redhat_7",
"centos_5", "centos_6", "centos_7",
"SuSE_11", "SuSE_10" };
"dir[$(_rpm_dists)_$(_32bit_arches)]" string => "agent_rpm_i386";
# Redhat/Centos/Oracle 6 use the same package
"dir[redhat_6_x86_64]" string => "agent_rhel6_x86_64";
"dir[centos_6_x86_64]" string => "$(dir[redhat_6_x86_64])";
"dir[oracle_6_x86_64]" string => "$(dir[redhat_6_x86_64])";
# Redhat/Centos/Oracle/Rocky 7/Amazon 2 use the same package
"dir[redhat_7_x86_64]" string => "agent_rhel7_x86_64";
"dir[centos_7_x86_64]" string => "$(dir[redhat_7_x86_64])";
"dir[oracle_7_x86_64]" string => "$(dir[redhat_7_x86_64])";
"dir[rocky_7_x86_64]" string => "$(dir[redhat_7_x86_64])";
"dir[amazon_2_x86_64]" string => "$(dir[redhat_7_x86_64])";
# Redhat/Centos/Oracle/Rocky 8 use the same package
"dir[redhat_8_x86_64]" string => "agent_rhel8_x86_64";
"dir[centos_8_x86_64]" string => "$(dir[redhat_8_x86_64])";
"dir[oracle_8_x86_64]" string => "$(dir[redhat_8_x86_64])";
"dir[rocky_8_x86_64]" string => "$(dir[redhat_8_x86_64])";
# Redhat/Centos/Oracle/Rocky 9 use the same package
"dir[redhat_9_x86_64]" string => "agent_rhel9_x86_64";
"dir[centos_9_x86_64]" string => "$(dir[redhat_9_x86_64])";
"dir[oracle_9_x86_64]" string => "$(dir[redhat_9_x86_64])";
"dir[rocky_9_x86_64]" string => "$(dir[redhat_9_x86_64])";
# Debian
"dir[debian_7_x86_64]" string => "agent_deb_x86_64";
"dir[debian_8_x86_64]" string => "agent_debian8_x86_64";
"dir[debian_9_x86_64]" string => "agent_debian9_x86_64";
"dir[debian_10_x86_64]" string => "agent_debian10_x86_64";
"dir[debian_11_x86_64]" string => "agent_debian11_x86_64";
"dir[debian_11_arm_64]" string => "agent_debian11_arm_64";
# Ubuntu
"dir[ubuntu_14_x86_64]" string => "agent_ubuntu14_x86_64";
"dir[ubuntu_16_x86_64]" string => "agent_ubuntu16_x86_64";
"dir[ubuntu_18_x86_64]" string => "agent_ubuntu18_x86_64";
"dir[ubuntu_20_x86_64]" string => "agent_ubuntu20_x86_64";
"dir[ubuntu_22_x86_64]" string => "agent_ubuntu22_x86_64";
"dir[ubuntu_22_arm_64]" string => "agent_ubuntu22_arm_64";
# All 32bit debs use the same package
"_deb_dists" slist => { "debian_4", "debian_5", "debian_6",
"debian_7", "debian_8", "debian_9",
"debian_10", "ubuntu_14", "ubuntu_16",
"ubuntu_18" };
"dir[$(_deb_dists)_$(_32bit_arches)]" string => "agent_deb_i386";
# Windows
"dir[windows_x86_64]" string => "windows_x86_64";
"dir[windows_i686]" string => "windows_i686";
"platform_dir" slist => getindices( dir );
"download_dir" string => "$(sys.workdir)/master_software_updates";
files:
"$(download_dir)/$(platform_dir)/."
create => "true",
comment => "We need a place to download each packge we build";
"$(download_dir)/$(cfengine_software.pkg_version)-downloaded.txt"
content => join( "\n", classesmatching( "binary_downloaded_.*" ) ),
if => isgreaterthan( length(classesmatching( "binary_downloaded_.*" )),
0 ),
comment => concat( "We place a marker of the files downloaded so that",
" the hub can skip the self upgrade policy after",
" download.");
commands:
# Fetch each package that we don't already have
"/usr/bin/curl"
args => "-s $(base_url)/$(dir[$(platform_dir)])/$(cfengine_package_names.pkg[$(platform_dir)]) --output /var/cfengine/master_software_updates/$(platform_dir)/$(cfengine_package_names.pkg[$(platform_dir)])",
if => not( fileexists( "$(download_dir)/$(platform_dir)/$(cfengine_package_names.pkg[$(platform_dir)])" ) ),
classes => u_if_else("binary_downloaded_$(platform_dir)","binary_not_downloaded");
reports:
DEBUG|DEBUG_cfengine_master_software_content::
"curl -s $(base_url)/$(dir[$(platform_dir)])/$(cfengine_package_names.pkg[$(platform_dir)]) --output $(download_dir)/$(platform_dir)/$(cfengine_package_names.pkg[$(platform_dir)])";
}
u_backup_script
Prototype: u_backup_script
Description: Backup script used by cf-upgrade
Implementation:
code
bundle edit_line u_backup_script
{
insert_lines:
linux::
"#!/bin/sh
if [ $(const.dollar)1 = \"BACKUP\" ]; then
tar cfzS $(const.dollar)2 $(sys.workdir) > /dev/null
fi
if [ $(const.dollar)1 = \"RESTORE\" ]; then
tar xfz $(const.dollar)2
fi";
solarisx86|solaris::
"#!/bin/sh
if [ $(const.dollar)1 = \"BACKUP\" ]; then
tar cf $(const.dollar)2 $(sys.workdir); gzip $(const.dollar)2
fi
if [ $(const.dollar)1 = \"RESTORE\" ]; then
gunzip $(const.dollar)2.gz; tar xf $(const.dollar)2
fi";
}
u_install_script
Prototype: u_install_script
Description: Install script used by cf-upgrade
Implementation:
code
bundle edit_line u_install_script
{
insert_lines:
redhat|suse|sles::
"#!/bin/sh
/bin/rpm -U $(const.dollar)1";
debian::
"#!/bin/sh
/usr/bin/dpkg --force-confdef --force-confnew --install $(const.dollar)1 > /dev/null";
solarisx86|solaris::
"#!/bin/sh
pkgname=`pkginfo -d $(const.dollar)1 | awk '{print $(const.dollar)2}'`
/usr/sbin/pkgrm -n -a $(cfengine_software_version_packages1.admin_file) $pkgname
/usr/sbin/pkgadd -n -a $(cfengine_software_version_packages1.admin_file) -d $(const.dollar)1 all
$(sys.workdir)/bin/cf-execd || true
exit 0";
}
u_admin_file
Prototype: u_admin_file
Description: Admin file specification to enable unattended installation
Implementation:
code
bundle edit_line u_admin_file
{
insert_lines:
sunos_5_8::
"mail=
instance=unique
partial=nocheck
runlevel=nocheck
idepend=nocheck
rdepend=nocheck
space=nocheck
setuid=nocheck
conflict=nocheck
action=nocheck
basedir=default";
solaris.!sunos_5_8::
"mail=
instance=overwrite
partial=nocheck
runlevel=nocheck
idepend=nocheck
rdepend=nocheck
space=nocheck
setuid=nocheck
conflict=nocheck
action=nocheck
networktimeout=60
networkretries=3
authentication=quit
keystore=/var/sadm/security
proxy=
basedir=default";
}
All promise and body types
All promise types
and: clist in range [a-zA-Z0-9_!&@@$|.()\[\]{}:]+dist: rlist in range -9.99999E100,9.99999E100expression: class expression in range [a-zA-Z0-9_!&@@$|.()\[\]{}:]+not: class expression in range [a-zA-Z0-9_!&@@$|.()\[\]{}:]+or: clist in range [a-zA-Z0-9_!&@@$|.()\[\]{}:]+persistence: int in range 0,99999999999scope: one of namespace, bundleselect_class: clist in range [a-zA-Z0-9_!&@@$|.()\[\]{}:]+xor: clist in range [a-zA-Z0-9_!&@@$|.()\[\]{}:]+
environment_host: string in range [a-zA-Z0-9_]+environment_interface: body environment_interfaceenvironment_resources: body environment_resourcesenvironment_state: one of create, delete, running, suspended, downenvironment_type: one of xen, kvm, esx, vbox, test, xen_net, kvm_net, esx_net, test_net, zone, ec2, eucalyptus
additional_packages: slistarchitecture: stringoptions: slistpackage_architectures: slistpackage_method: body package_methodpackage_module: body package_modulepackage_policy: one of add, delete, reinstall, update, addupdate, patch, verifypackage_select: one of >, <, ==, !=, >=, <=package_version: stringpolicy: one of absent, presentversion: string
All body Types
aces: slist in range ((user|group):[^:]+:[-=+,rwx()dtTabBpcoD]*(:(allow|deny))?)|((all|mask):[-=+,rwx()]*(:(allow|deny))?)acl_default: one of nochange, access, specify, clearacl_directory_inheritdeprecated: one of nochange, parent, specify, clearacl_inherit: one of true, false, yes, no, on, off, nochangeacl_method: one of append, overwriteacl_type: one of generic, posix, ntfsinherit_from: body inherit_frommeta: slistspecify_default_aces: slist in range ((user|group):[^:]+:[-=+,rwx()dtTabBpcoD]*(:(allow|deny))?)|((all|mask):[-=+,rwx()]*(:(allow|deny))?)specify_inherit_acesdeprecated: slist in range ((user|group):[^:]+:[-=+,rwx()dtTabBpcoD]*(:(allow|deny))?)|((all|mask):[-=+,rwx()]*(:(allow|deny))?)
action_policy: one of fix, warn, nopaudit: booleanbackground: booleanexpireafter: int in range 0,99999999999ifelapsed: int in range 0,99999999999inherit_from: body inherit_fromlog_failed: string in range stdout|udp_syslog|("?[a-zA-Z]:\\.*)|(/.*)log_kept: string in range stdout|udp_syslog|("?[a-zA-Z]:\\.*)|(/.*)log_level: one of inform, verbose, error, loglog_priority: one of emergency, alert, critical, error, warning, notice, info, debuglog_repaired: string in range stdout|udp_syslog|("?[a-zA-Z]:\\.*)|(/.*)log_string: stringmeasurement_class: stringmeta: slistreport_level: one of inform, verbose, error, log
abortbundleclasses: slist in range .*abortclasses: slist in range .*addclasses: slist in range .*agentaccess: slist in range .*agentfacility: one of LOG_USER, LOG_DAEMON, LOG_LOCAL0, LOG_LOCAL1, LOG_LOCAL2, LOG_LOCAL3, LOG_LOCAL4, LOG_LOCAL5, LOG_LOCAL6, LOG_LOCAL7allclassesreport: booleanalwaysvalidate: booleanbindtointerface: string in range .*checksum_alert_time: int in range 0,60childlibpath: string in range .*copyfrom_restrict_keys: slist in range .*default_repository: string in range "?(/.*)default_timeout: int in range 0,99999999999defaultcopytype: one of mtime, atime, ctime, digest, hash, binarydryrun: booleaneditbinaryfilesize: int in range 0,99999999999editfilesize: int in range 0,99999999999environment: slist in range [A-Za-z0-9_]+=.*expireafter: int in range 0,99999999999files_auto_define: slistfiles_single_copy: slisthashupdates: booleanhostnamekeys: booleanifelapsed: int in range 0,99999999999inform: booleanintermittency: booleanmax_children: int in range 0,99999999999maxconnections: int in range 0,99999999999mountfilesystems: booleannonalphanumfiles: booleanrefresh_processes: slist in range [a-zA-Z0-9_$(){}\[\].:]+repchar: string in range .report_class_log: booleansecureinput: booleanselect_end_match_eof: booleansensiblecount: int in range 0,99999999999sensiblesize: int in range 0,99999999999skipidentify: booleansuspiciousnames: slisttimezone: slistverbose: boolean
check_root: booleancollapse_destination_dir: booleancompare: one of atime, mtime, ctime, digest, hash, exists, binarycopy_backup: one of true, false, timestampcopy_size: irange in range 0,infcopylink_patterns: slistencrypt: booleanfindertype: one of MacOSXforce_ipv4: booleanforce_update: booleaninherit_from: body inherit_fromlink_type: one of symlink, hardlink, relative, absolutelinkcopy_patterns: slistmeta: slistmissing_ok: booleanportnumber: stringpreserve: booleanprotocol_version: one of 1, classic, 2, tls, 3, cookie, latestpurge: booleanservers: slist in range [A-Za-z0-9_.:\-\[\]]+source: string in range .+stealth: booleantimeout: int in range 1,3600trustkey: booleantype_check: booleanverify: boolean
agent_expireafter: int in range 0,10080exec_command: string in range "?(/.*)executorfacility: one of LOG_USER, LOG_DAEMON, LOG_LOCAL0, LOG_LOCAL1, LOG_LOCAL2, LOG_LOCAL3, LOG_LOCAL4, LOG_LOCAL5, LOG_LOCAL6, LOG_LOCAL7mailfilter_exclude: slistmailfilter_include: slistmailfrom: string in range .*@.*mailmaxlines: int in range 0,1000mailsubject: stringmailto: string in range .*@.*runagent_socket_allow_users: slistschedule: slistsmtpserver: string in range .*splaytime: int in range 0,99999999999
atime: irange in range 0,2147483647ctime: irange in range 0,2147483647exec_program: string in range "?(/.*)exec_regex: string in range .*file_result: string in range [!*(leaf_name|path_name|file_types|mode|size|owner|group|atime|ctime|mtime|issymlinkto|exec_regex|exec_program|bsdflags)[|&.]*]*file_types: olist in range plain,reg,symlink,dir,socket,fifo,door,char,blockinherit_from: body inherit_fromissymlinkto: slistleaf_name: slistmeta: slistmtime: irange in range 0,2147483647path_name: slist in range "?(/.*)search_bsdflags: slist in range [+-]*[(arch|archived|nodump|opaque|sappnd|sappend|schg|schange|simmutable|sunlnk|sunlink|uappnd|uappend|uchg|uchange|uimmutable|uunlnk|uunlink)]+search_groups: slistsearch_mode: slist in range [0-7augorwxst,+-=]+search_owners: slistsearch_size: irange in range 0,inf
forgetrate: real in range 0,1histograms: booleanmonitorfacility: one of LOG_USER, LOG_DAEMON, LOG_LOCAL0, LOG_LOCAL1, LOG_LOCAL2, LOG_LOCAL3, LOG_LOCAL4, LOG_LOCAL5, LOG_LOCAL6, LOG_LOCAL7tcpdump: booleantcpdumpcommand: string in range "?(/.*)
allowallconnects: slistallowciphers: stringallowconnects: slistallowlegacyconnects: slistallowtlsversion: stringallowusers: slistauditing: booleanbindtointerface: stringcall_collect_interval: int in range 0,99999999999cfruncommand: string in range .+collect_window: int in range 0,99999999999denybadclocks: booleandenyconnects: slistdynamicaddresses: slisthostnamekeys: booleanlisten: booleanlogallconnections: booleanlogencryptedtransfers: booleanmaxconnections: int in range 0,99999999999port: int in range 1,65535serverfacility: one of LOG_USER, LOG_DAEMON, LOG_LOCAL0, LOG_LOCAL1, LOG_LOCAL2, LOG_LOCAL3, LOG_LOCAL4, LOG_LOCAL5, LOG_LOCAL6, LOG_LOCAL7skipverifydeprecated: slisttrustkeysfrom: slist
 Chat
Chat Ask a question on Github
 Mailing list
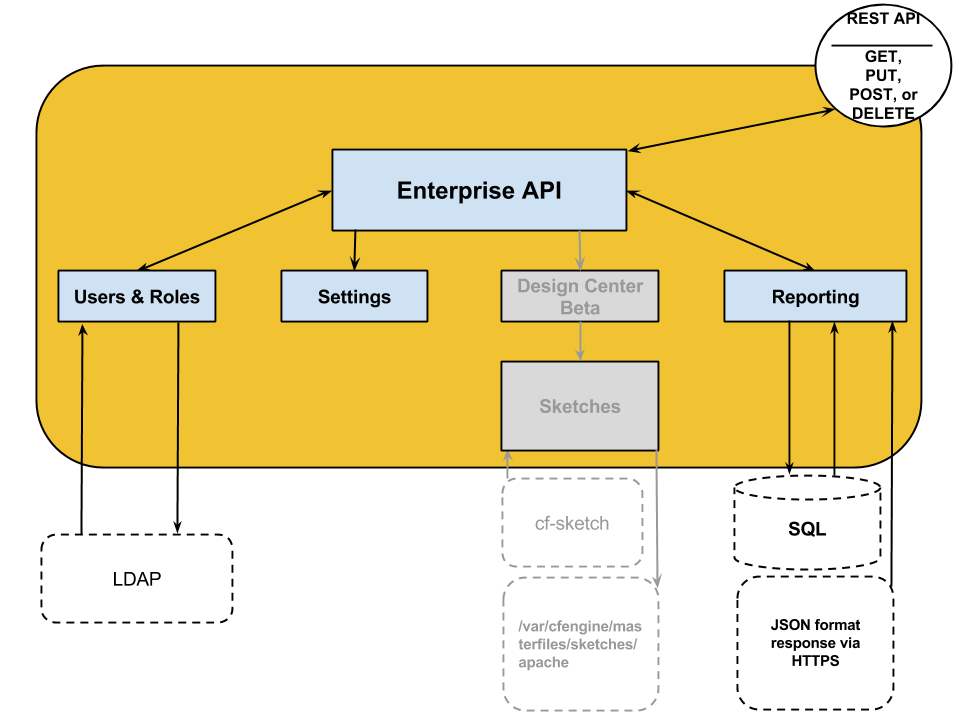
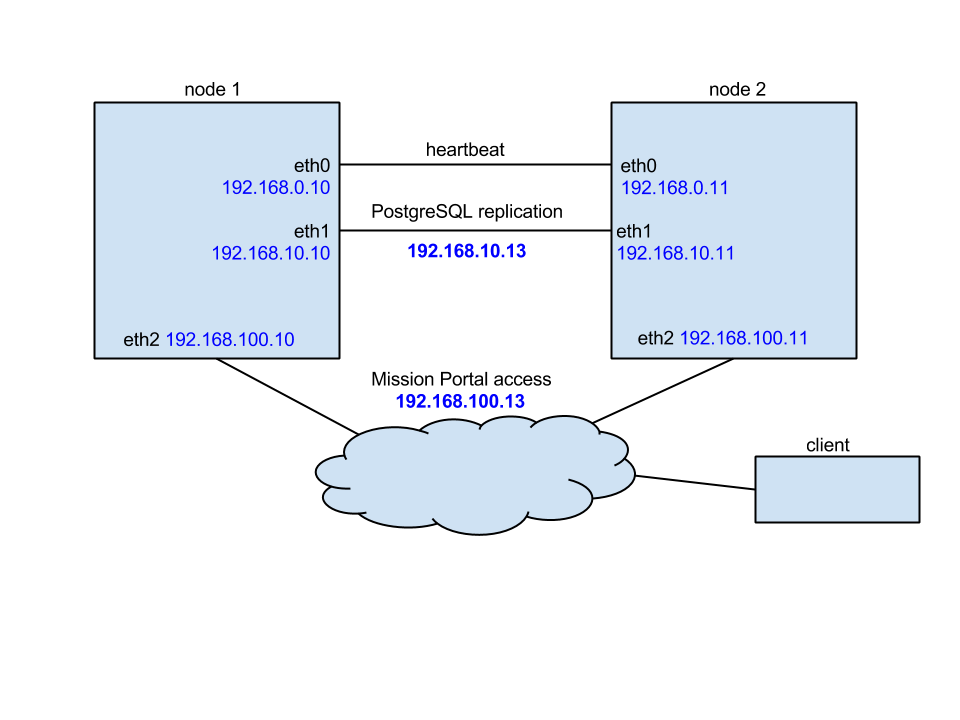
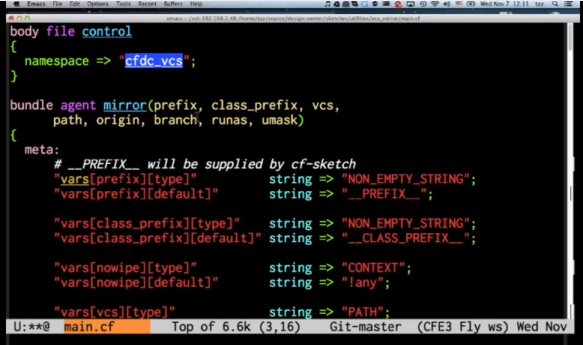
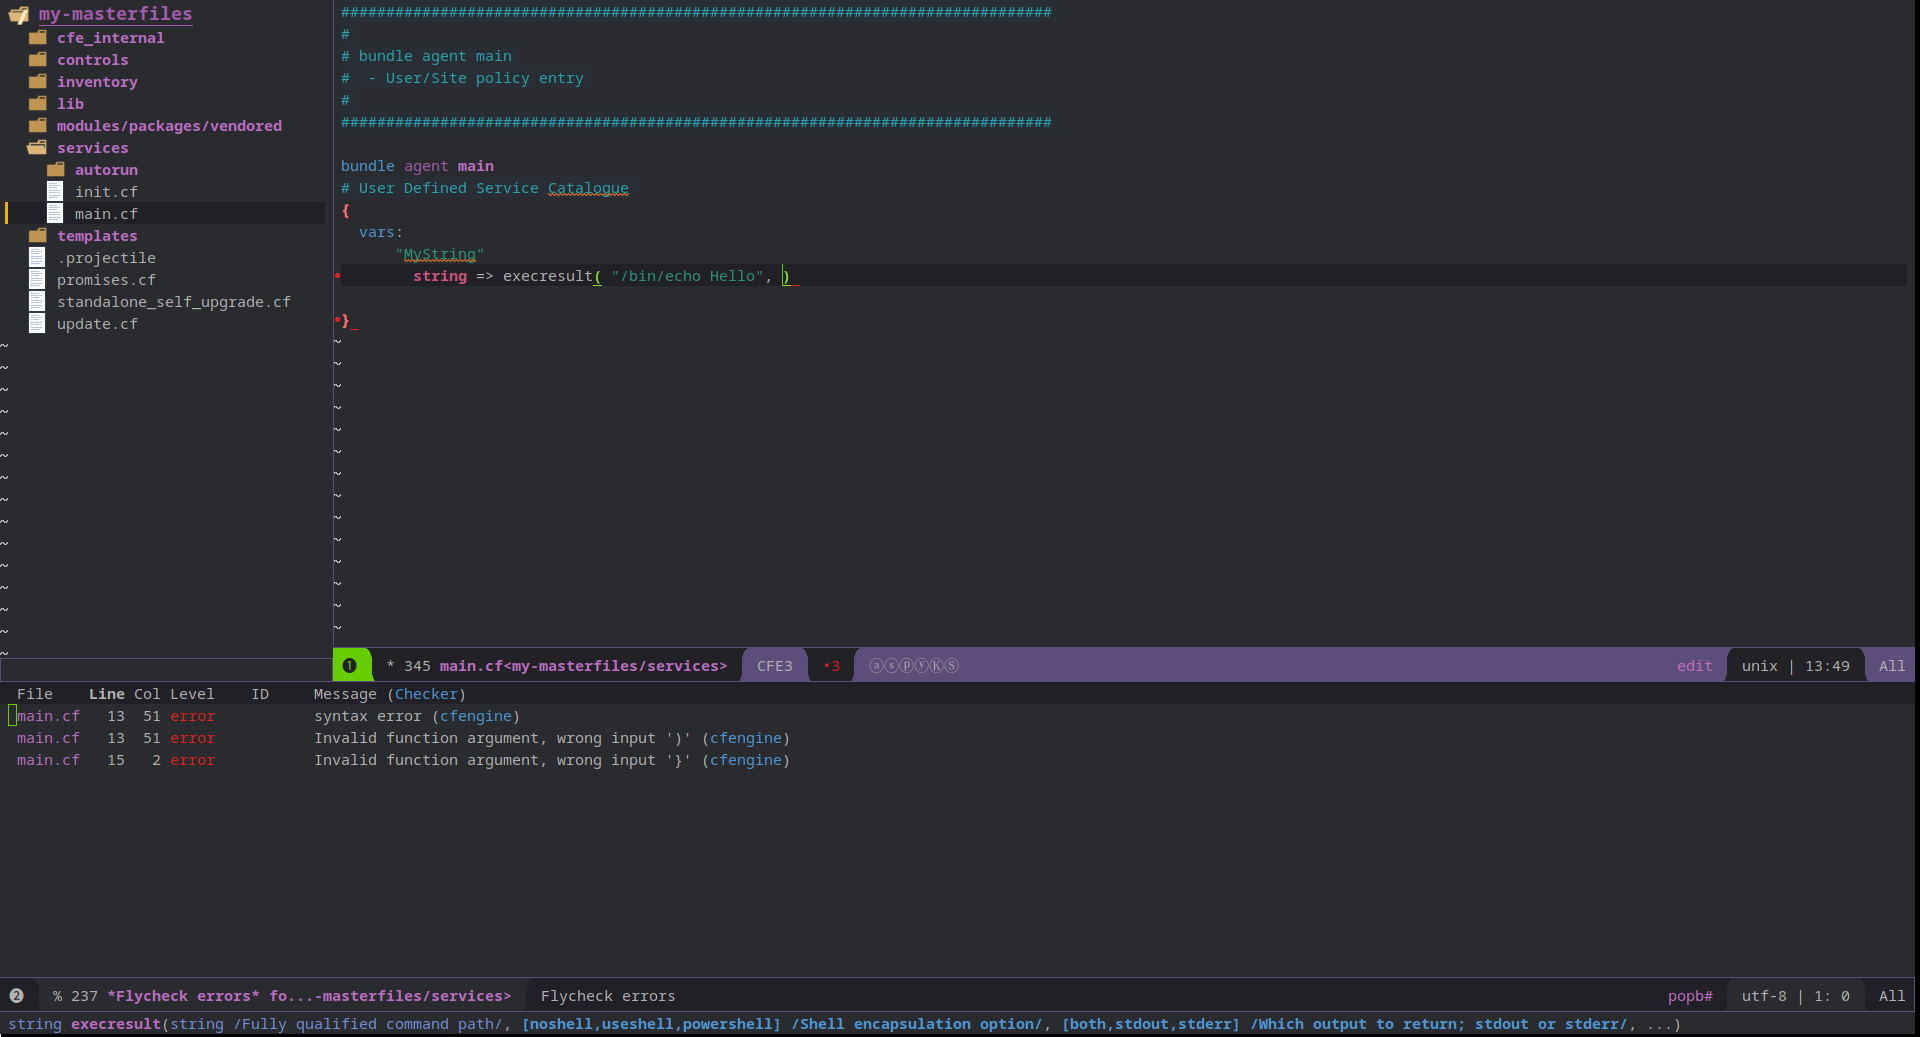
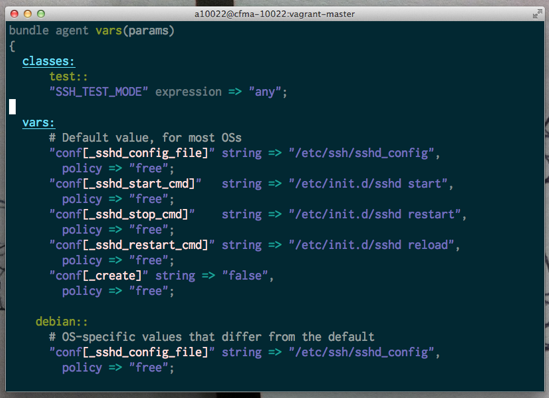
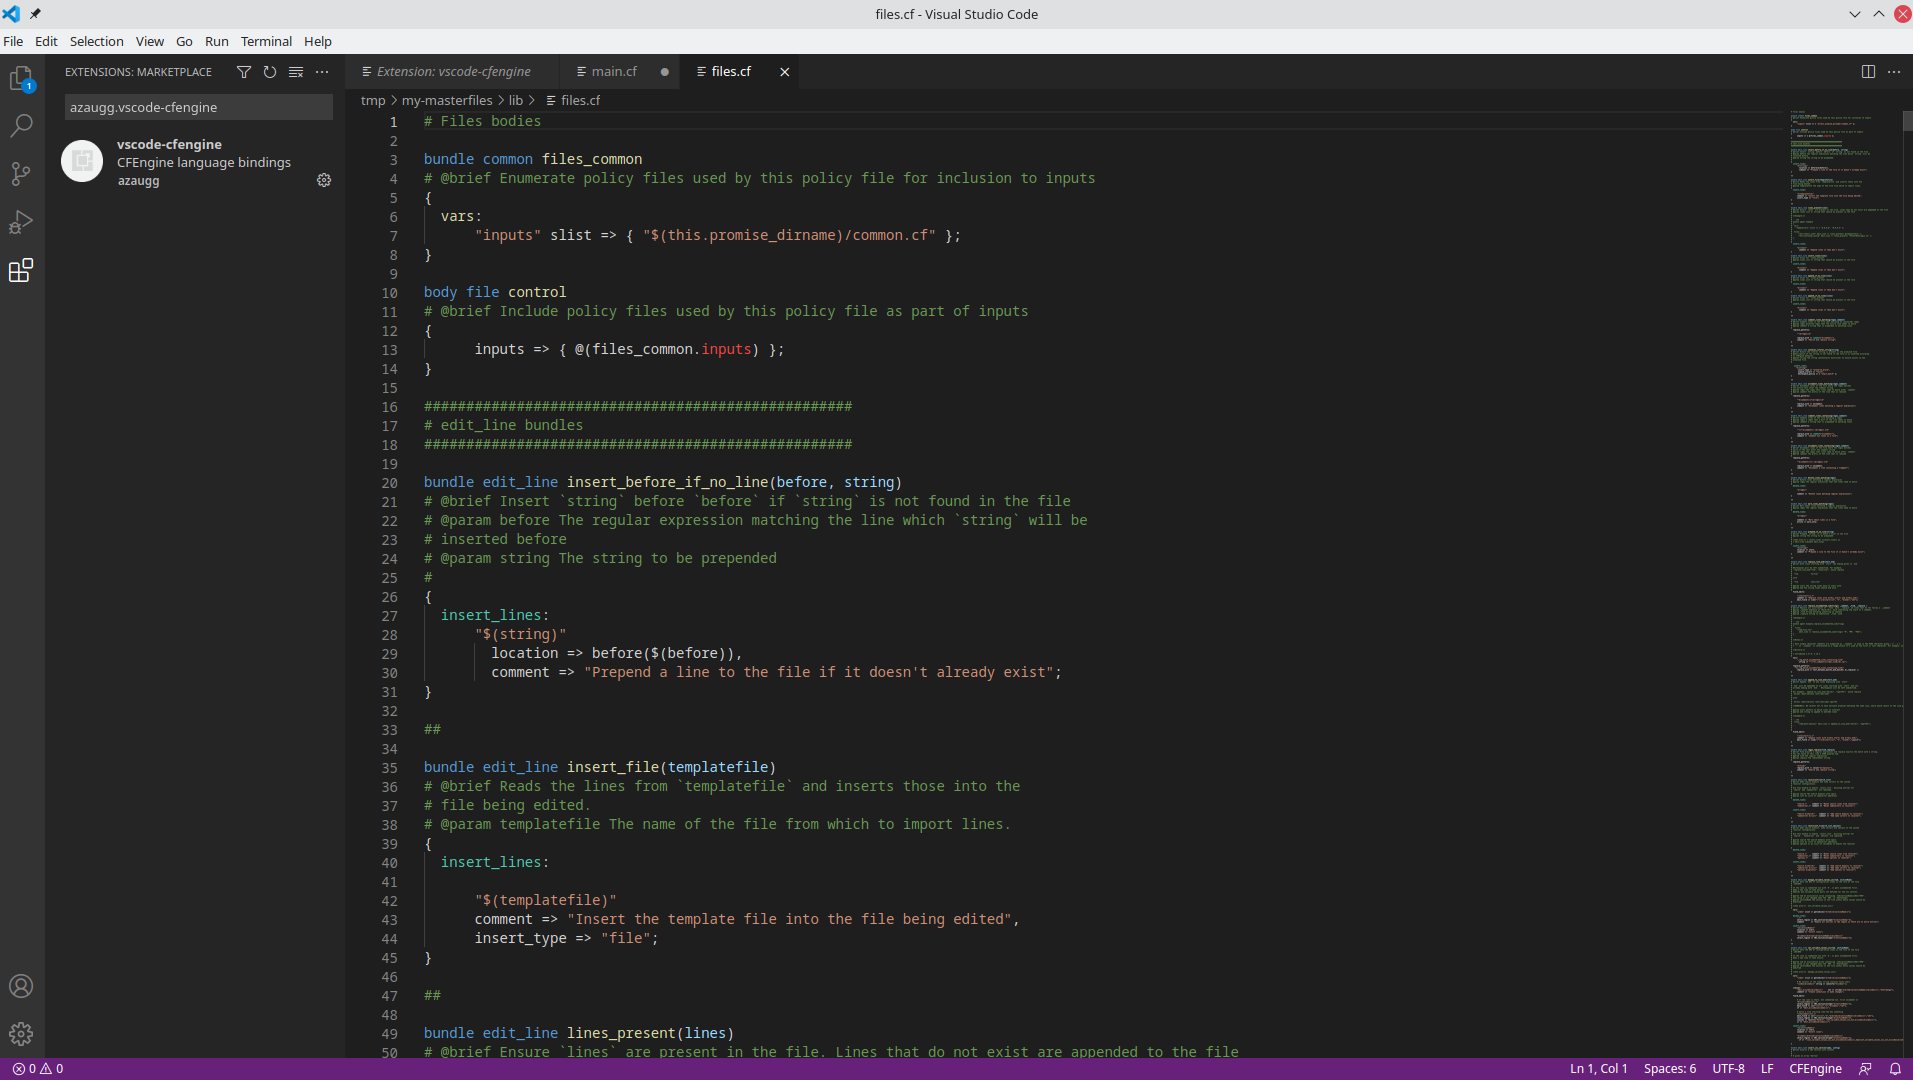
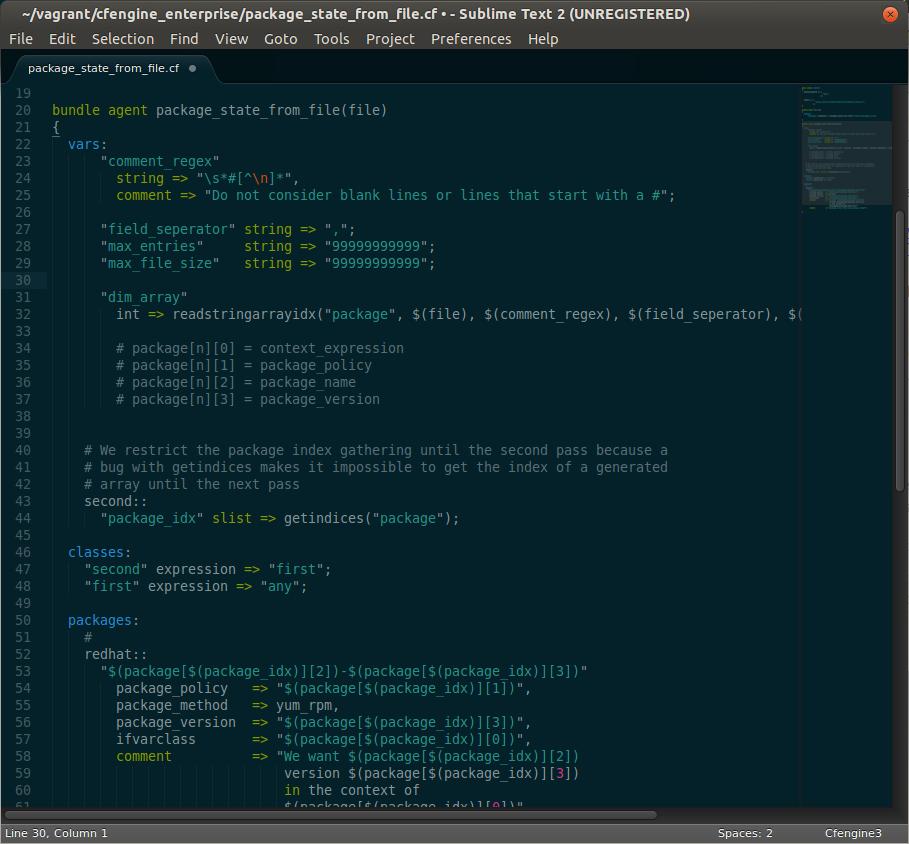
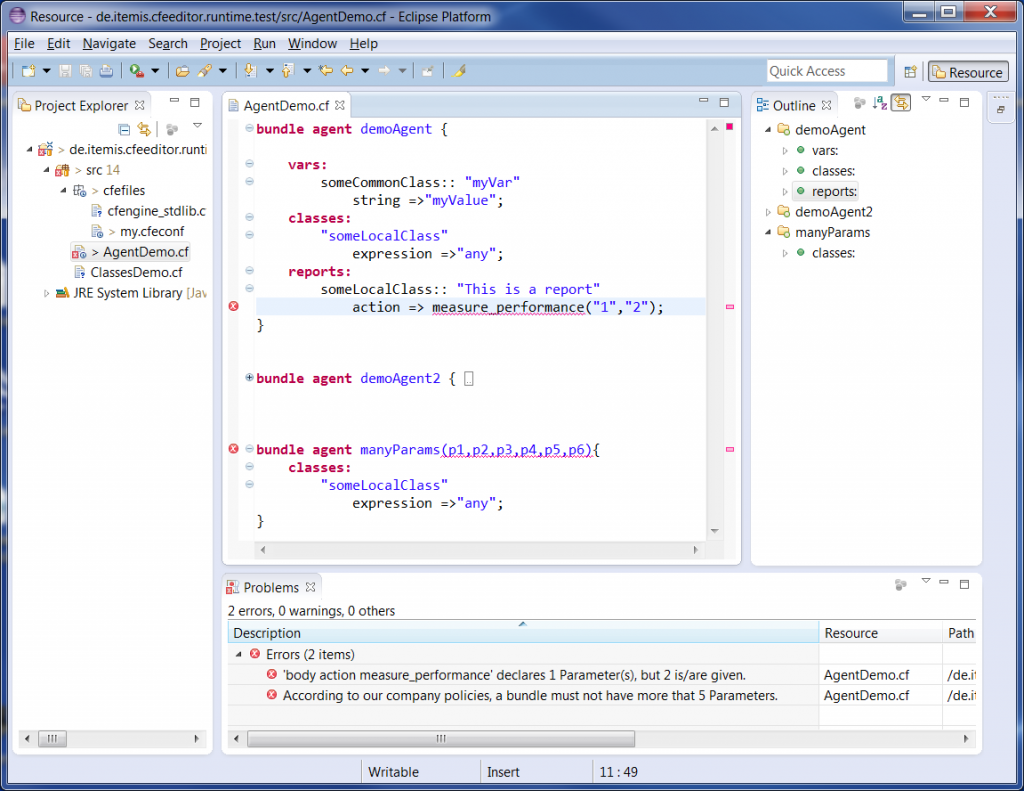

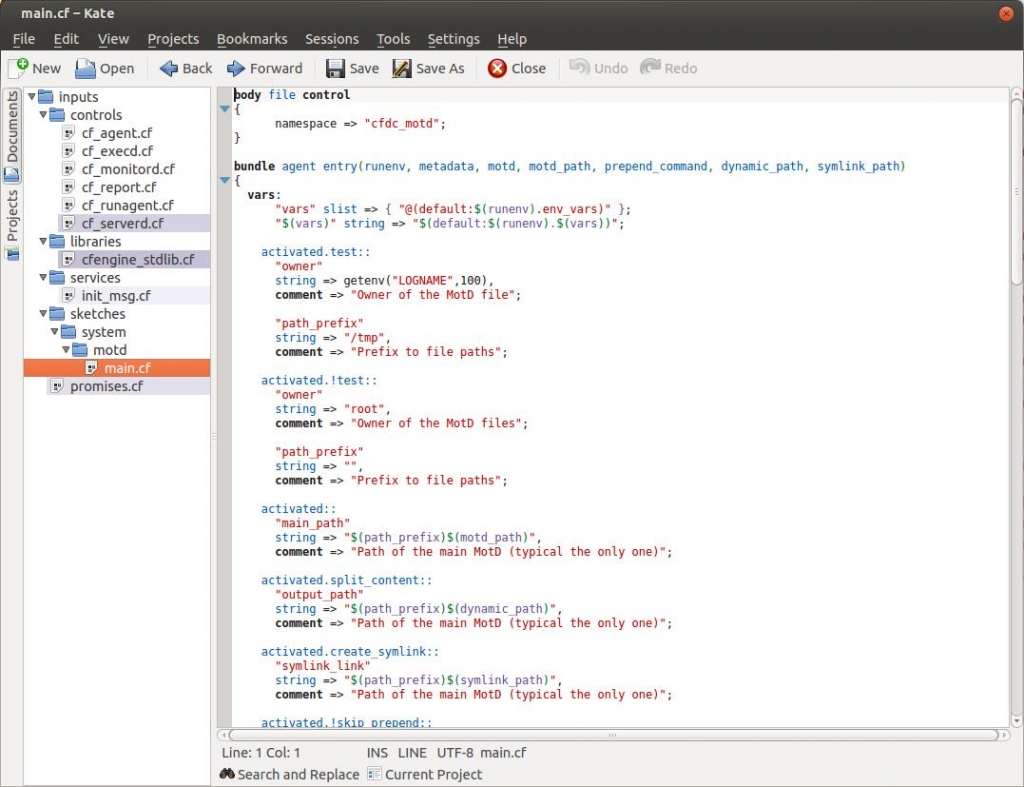
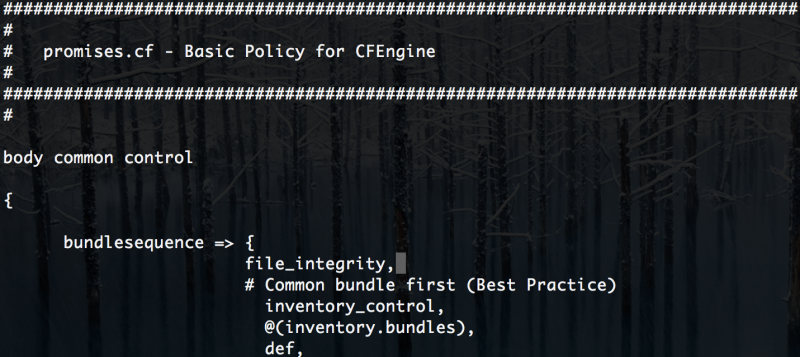
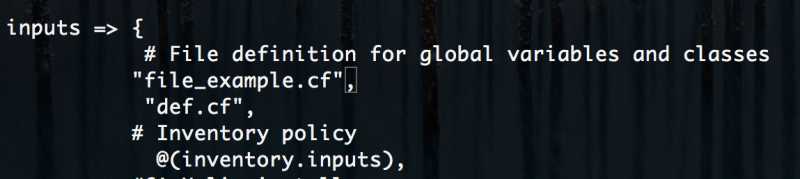


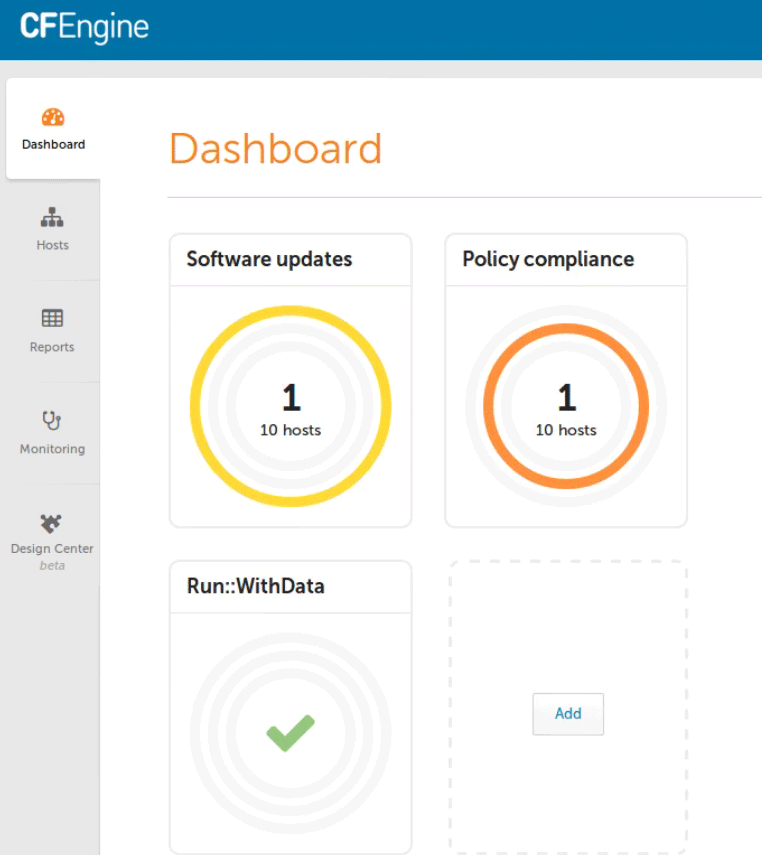
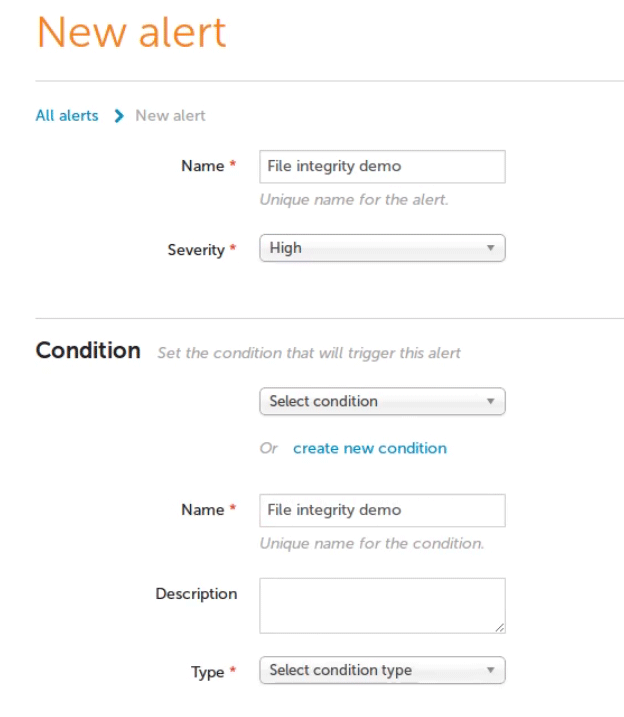
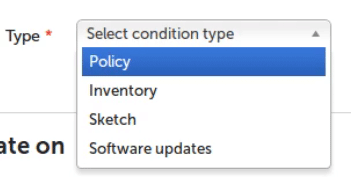
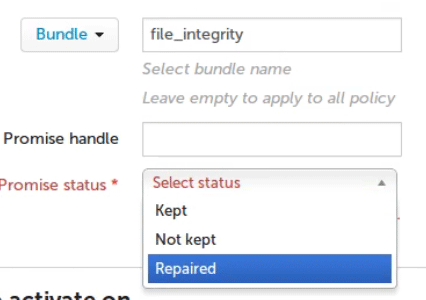

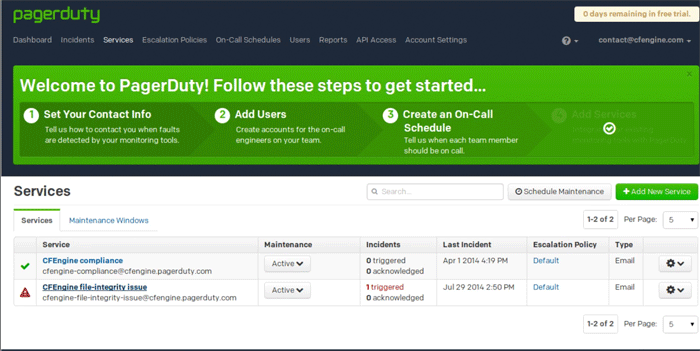
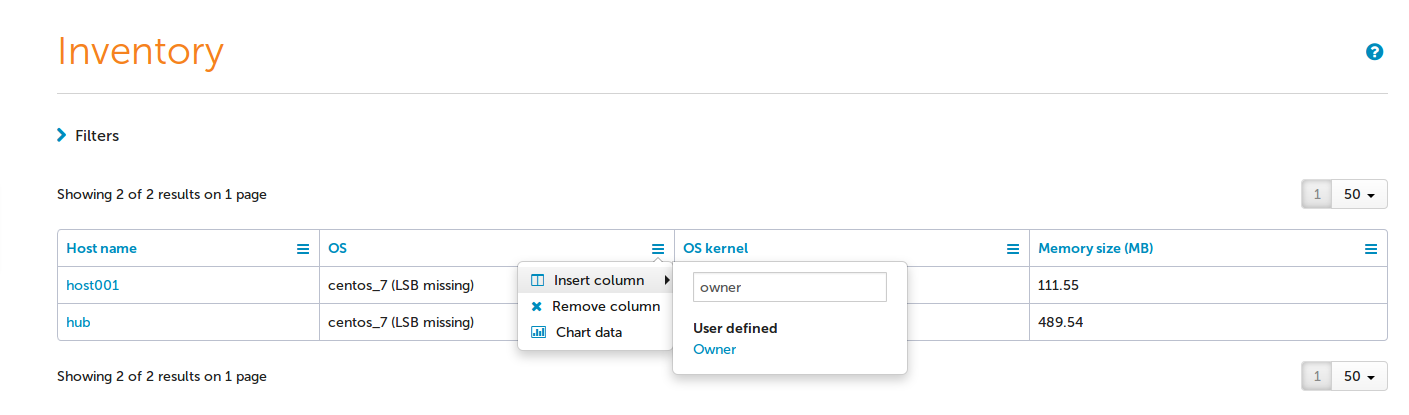
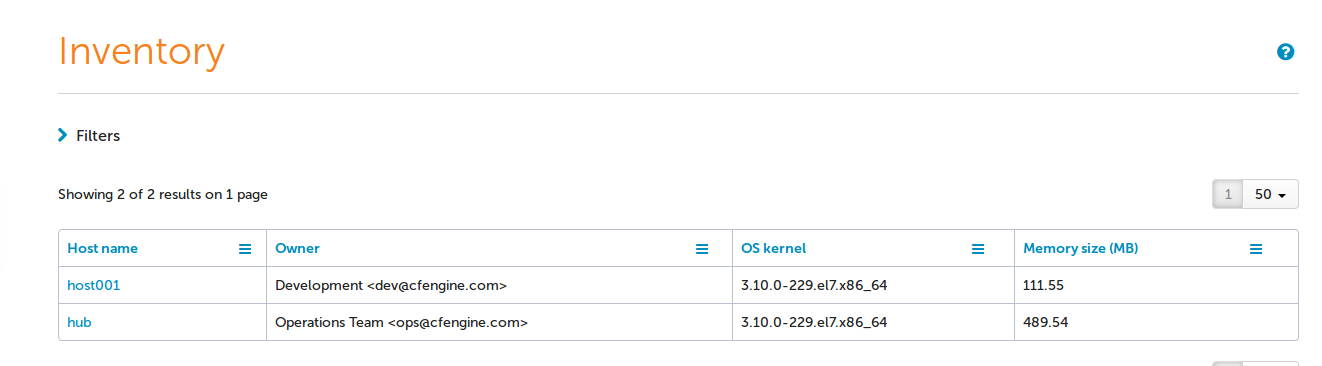
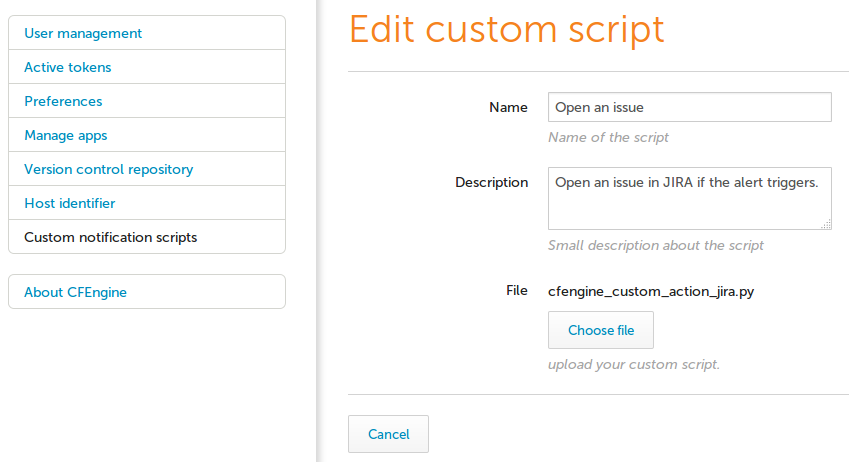
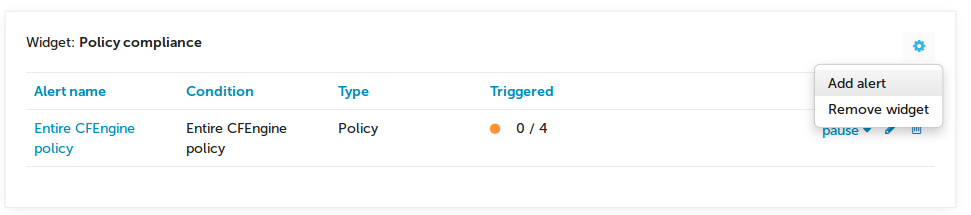
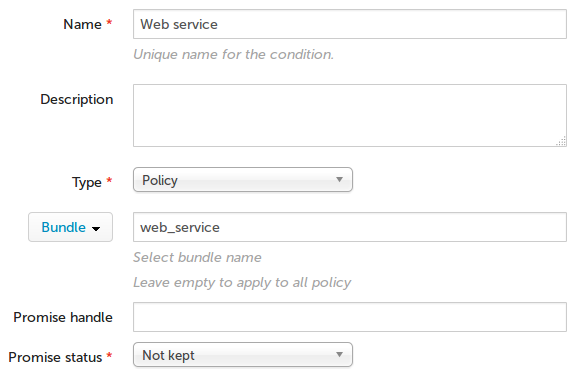
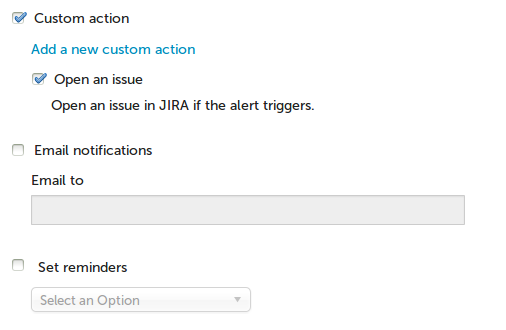
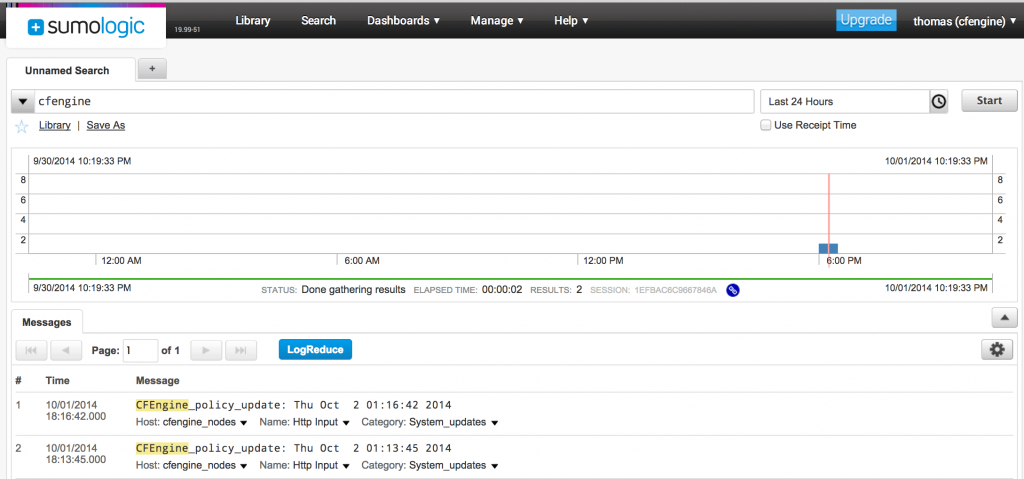
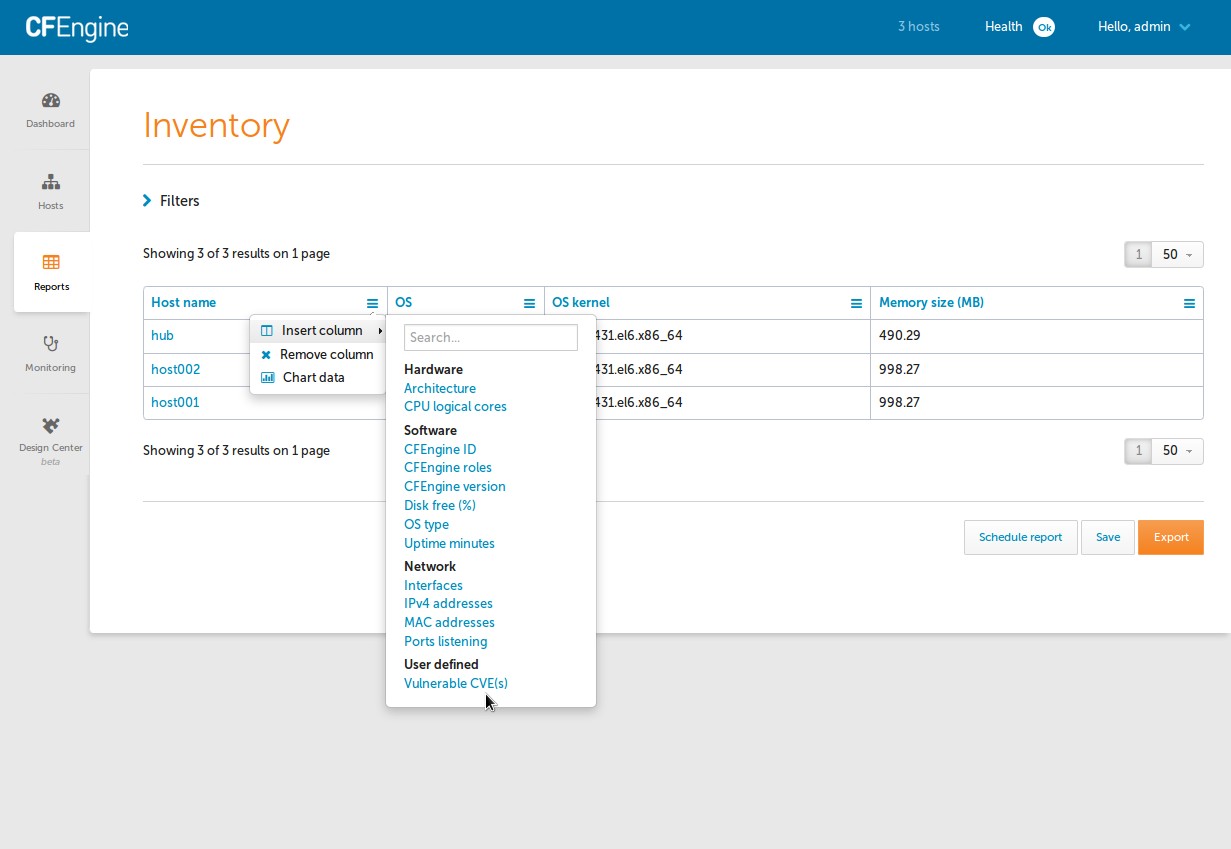
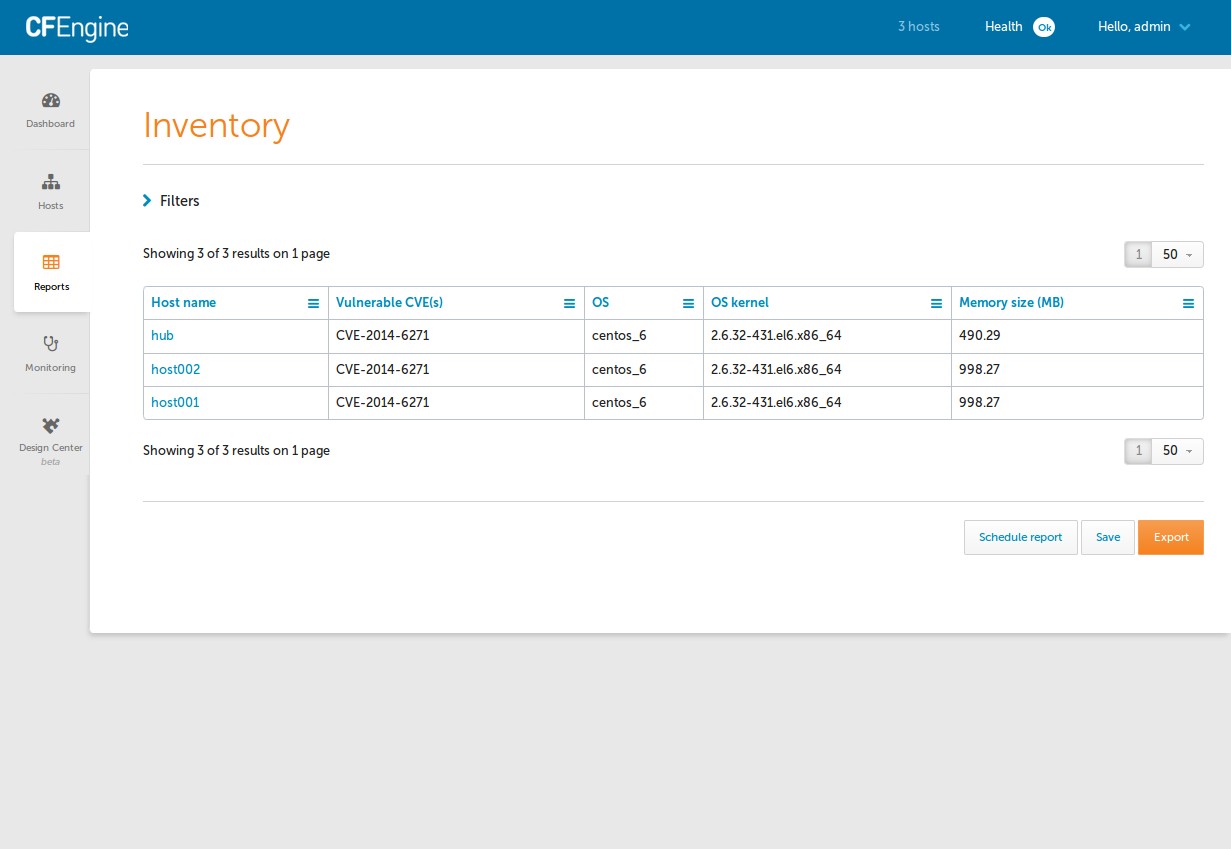
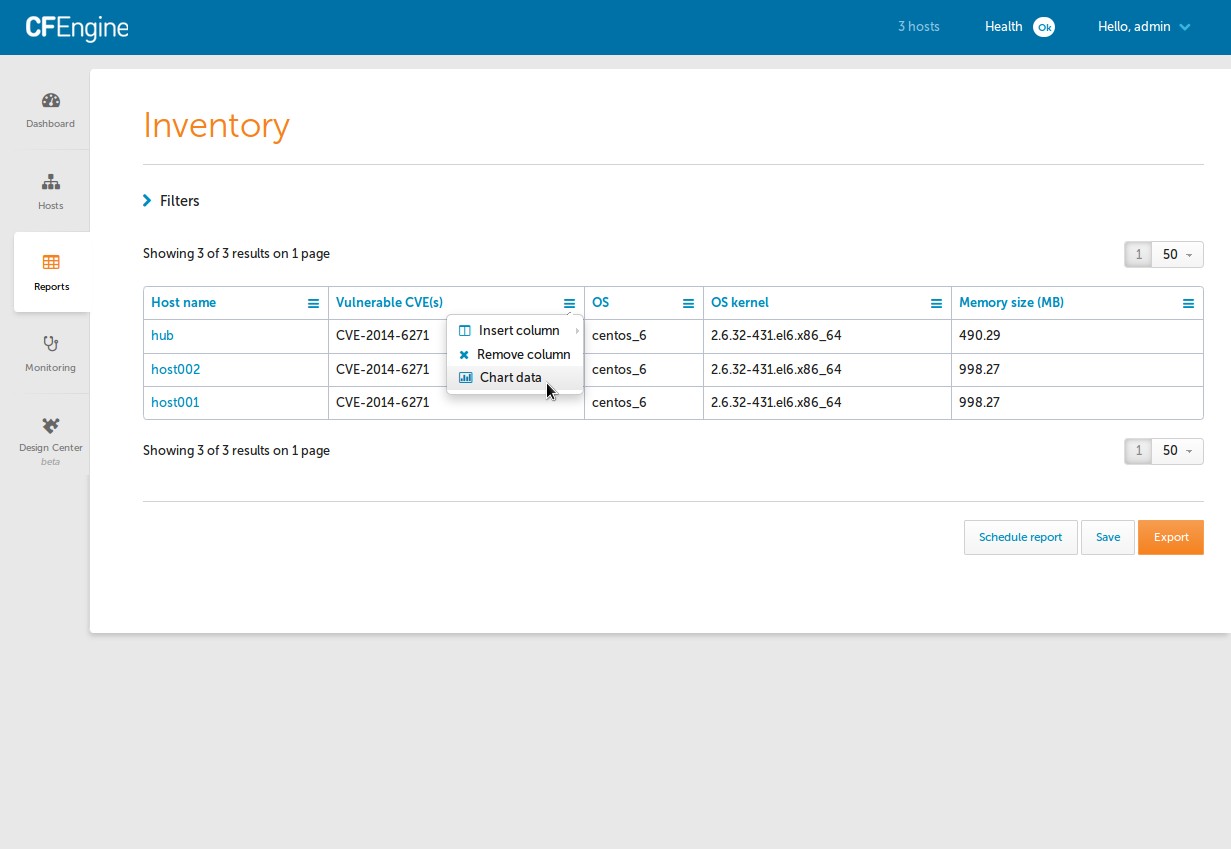
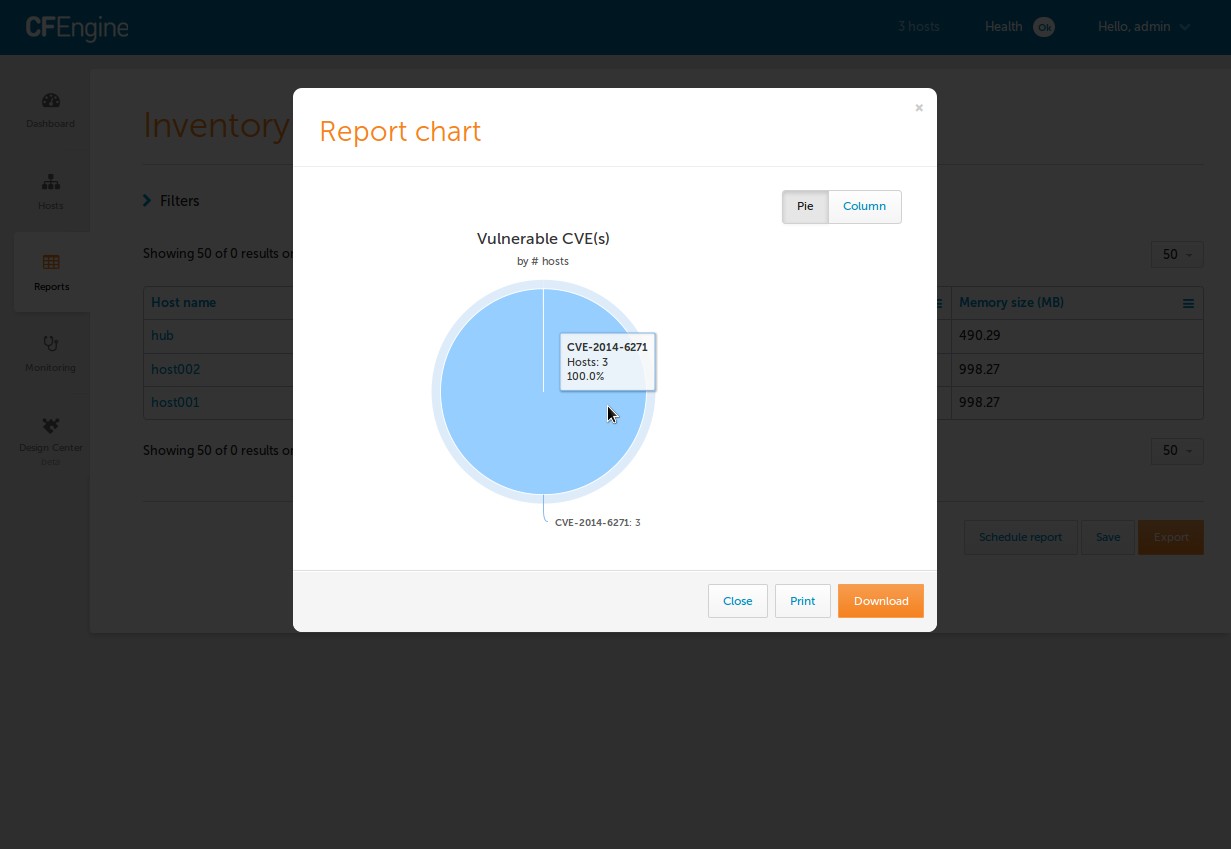
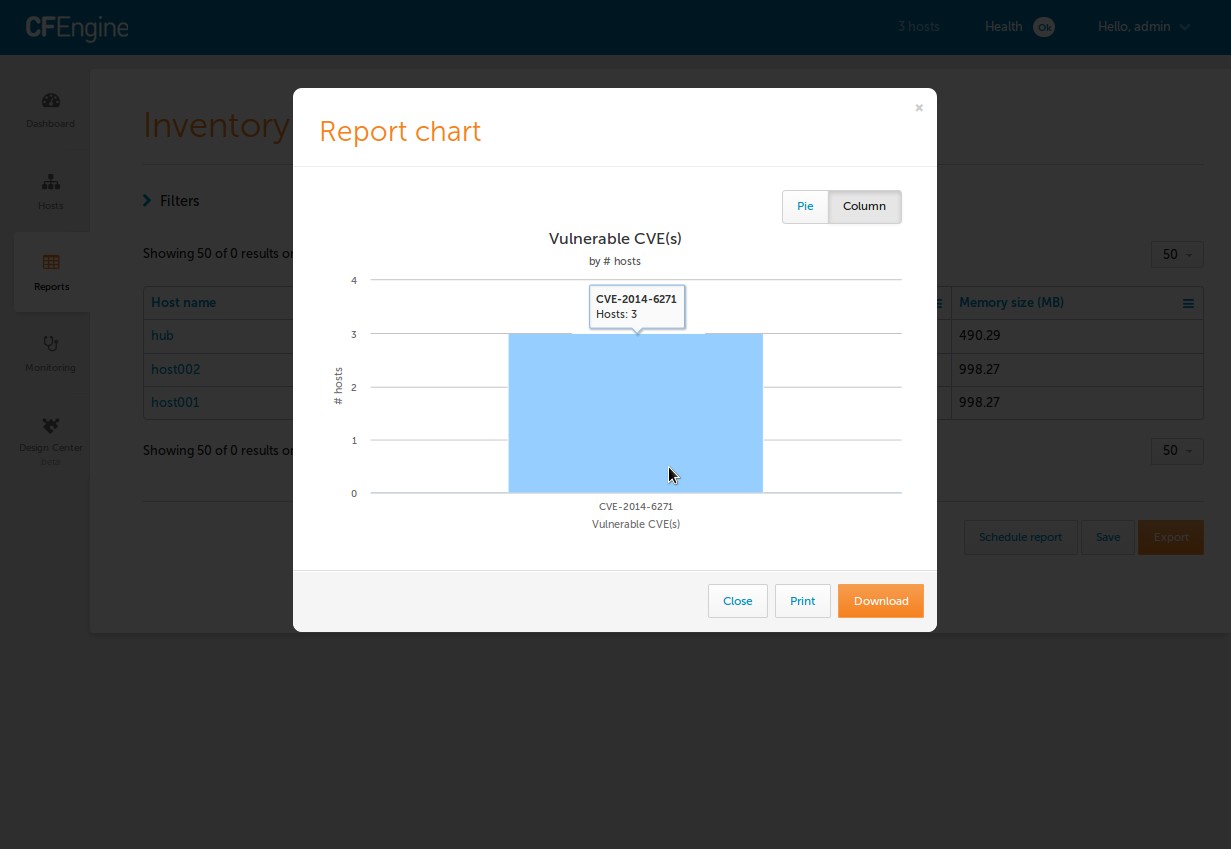
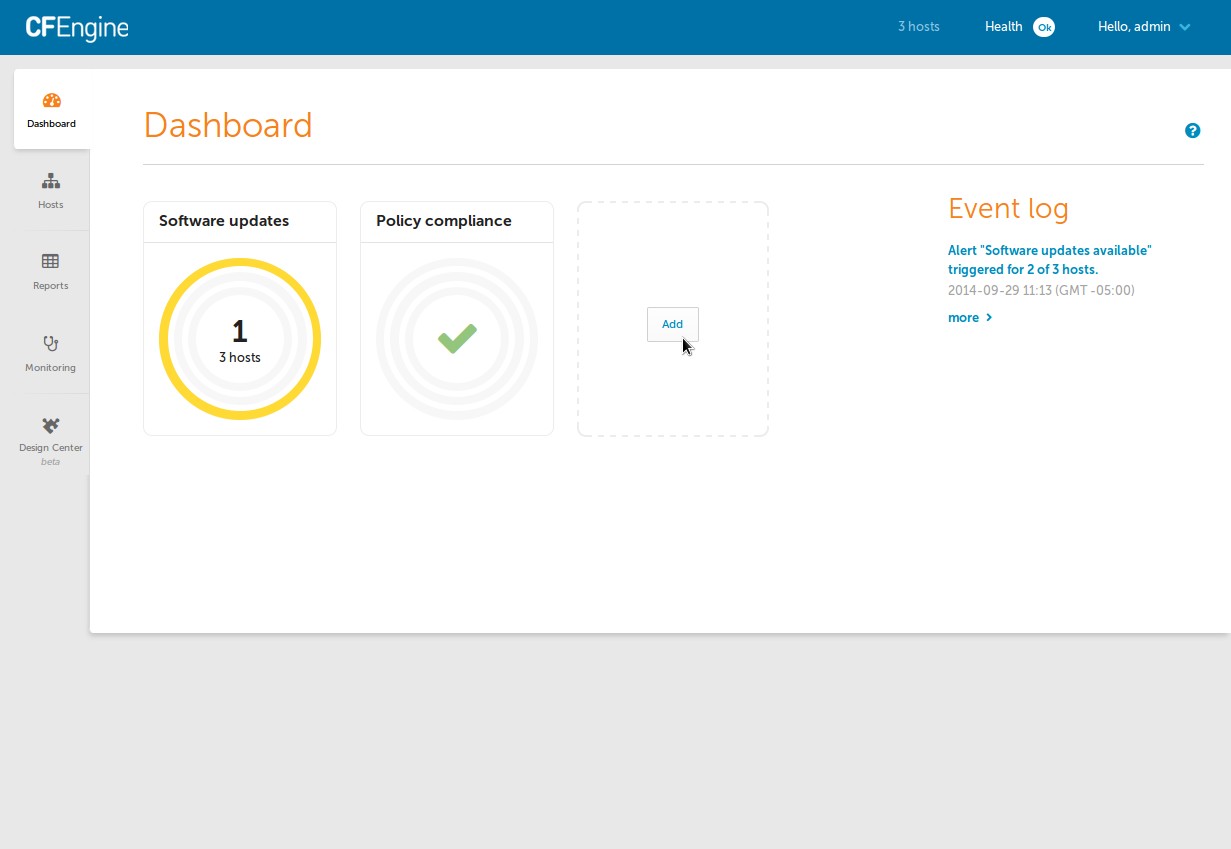
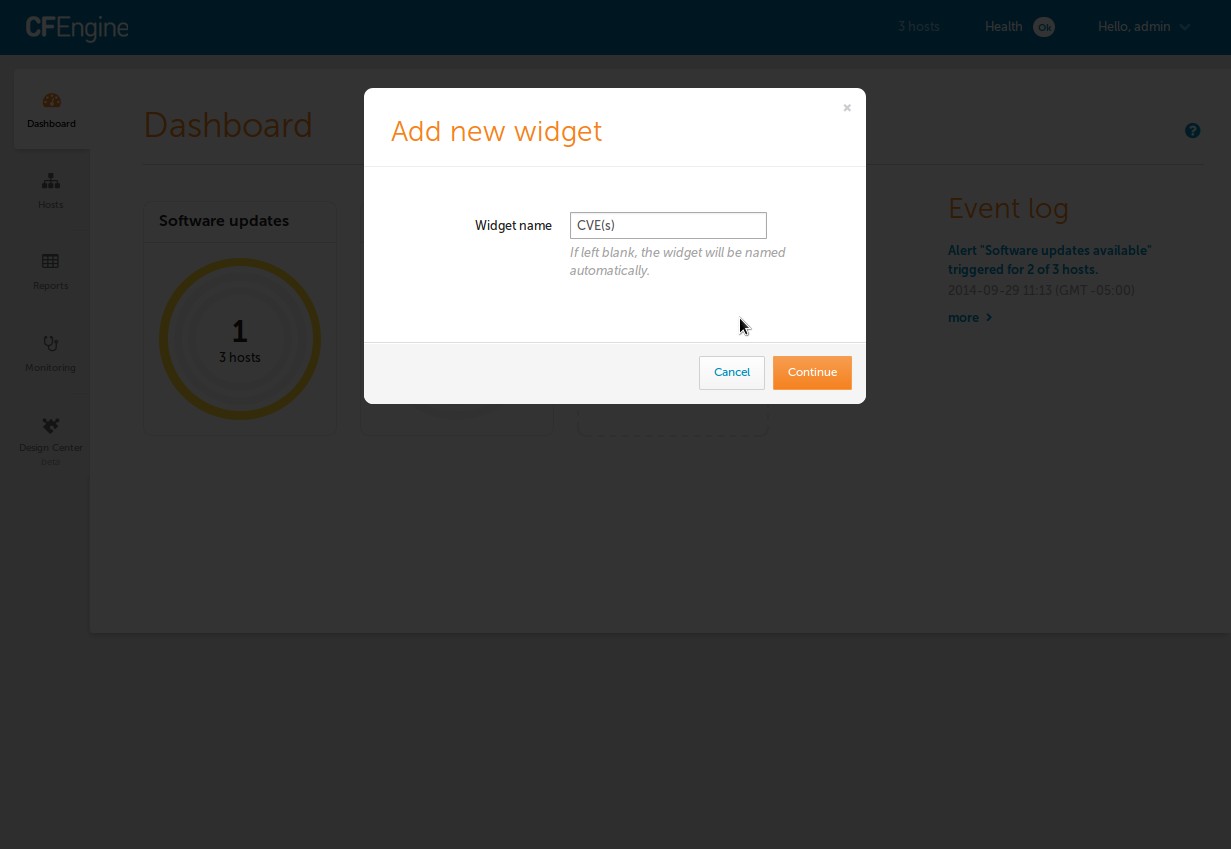
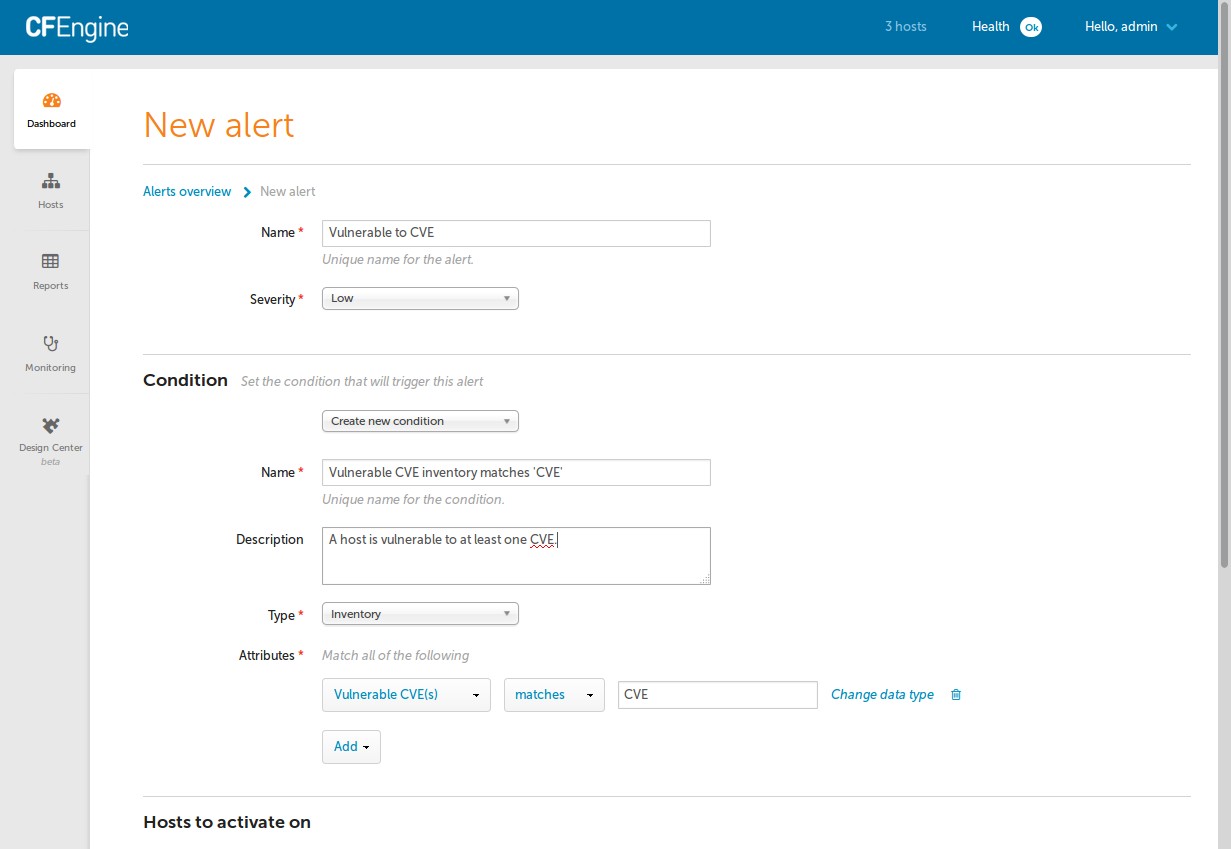
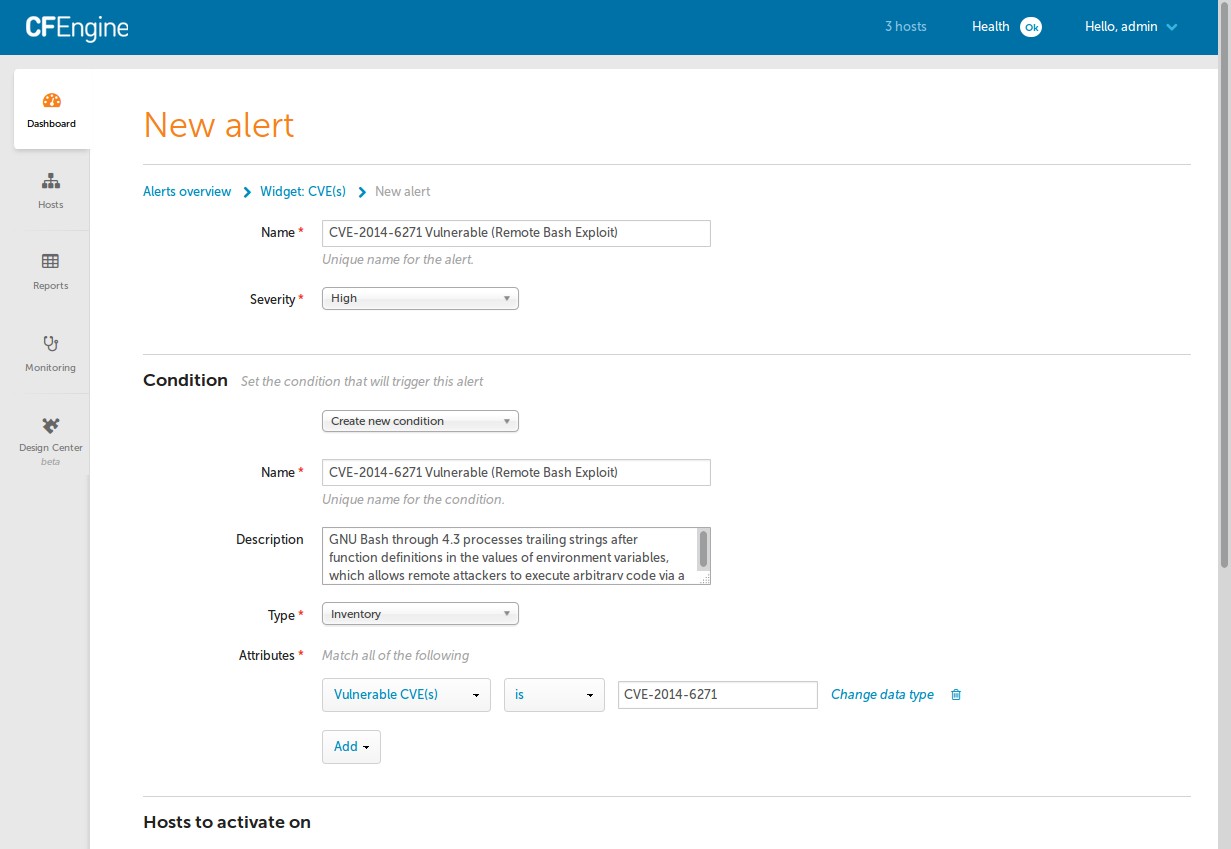
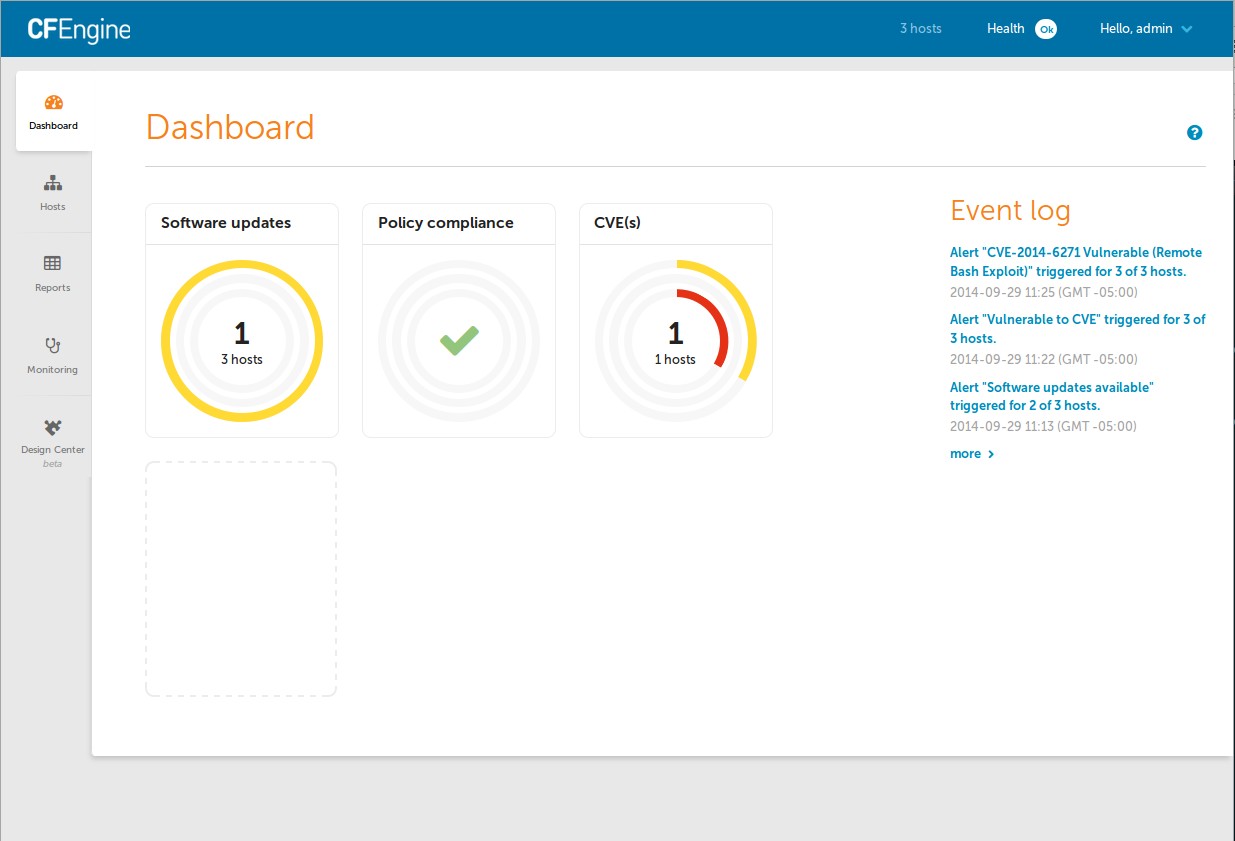
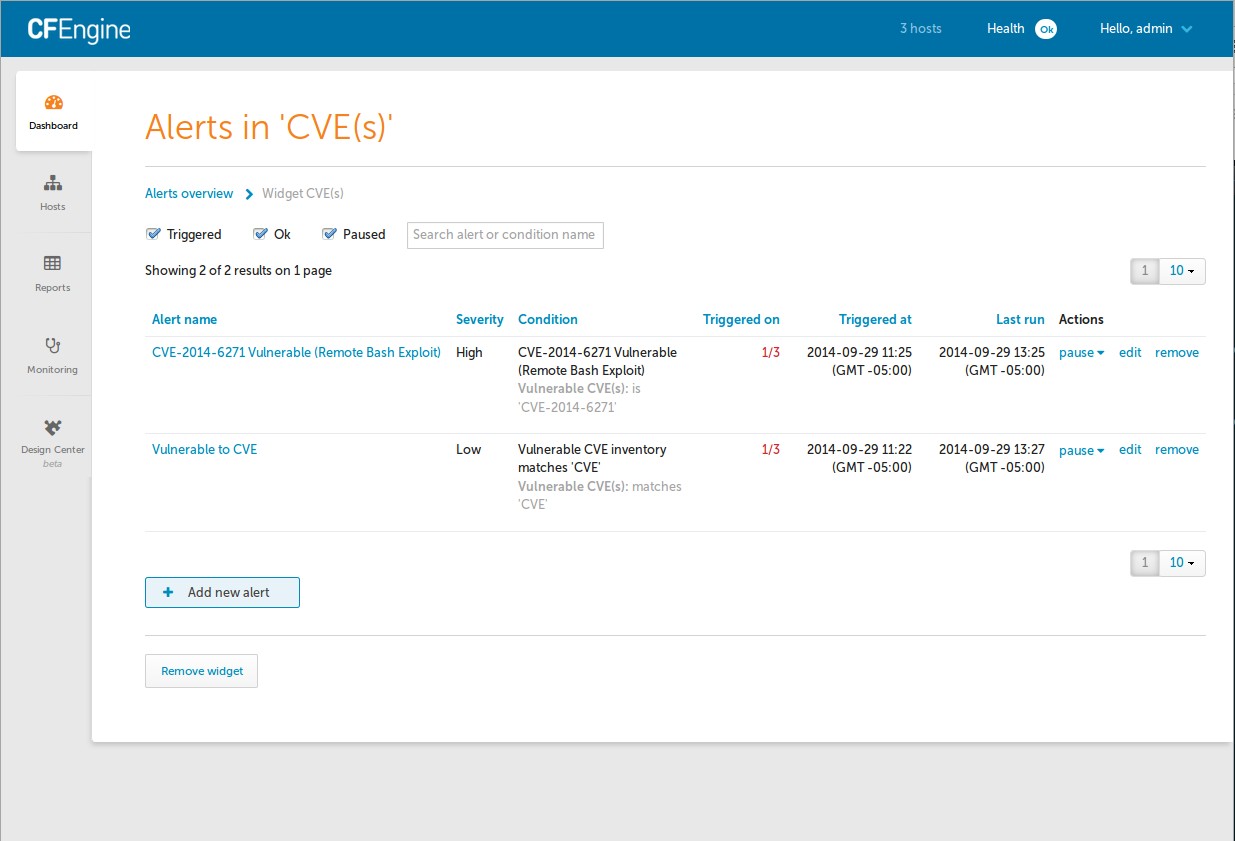
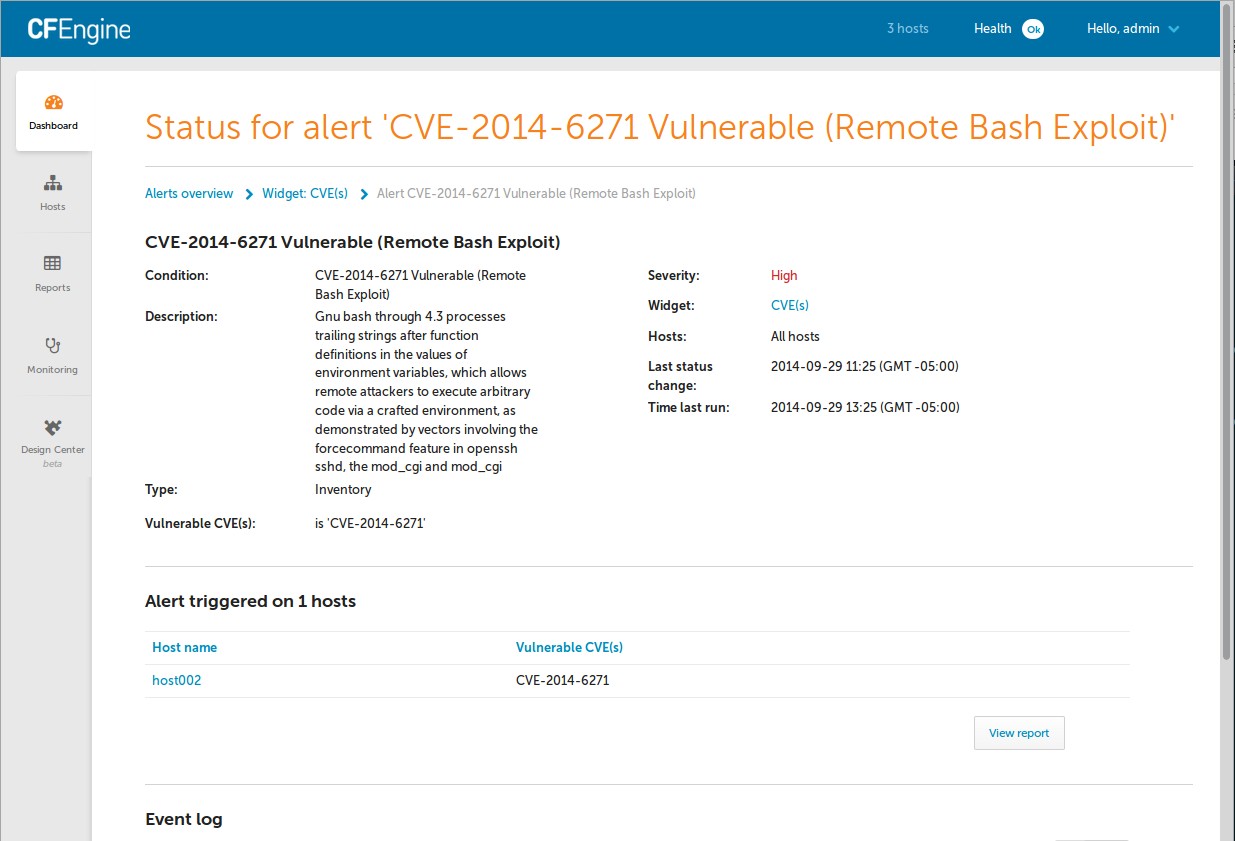
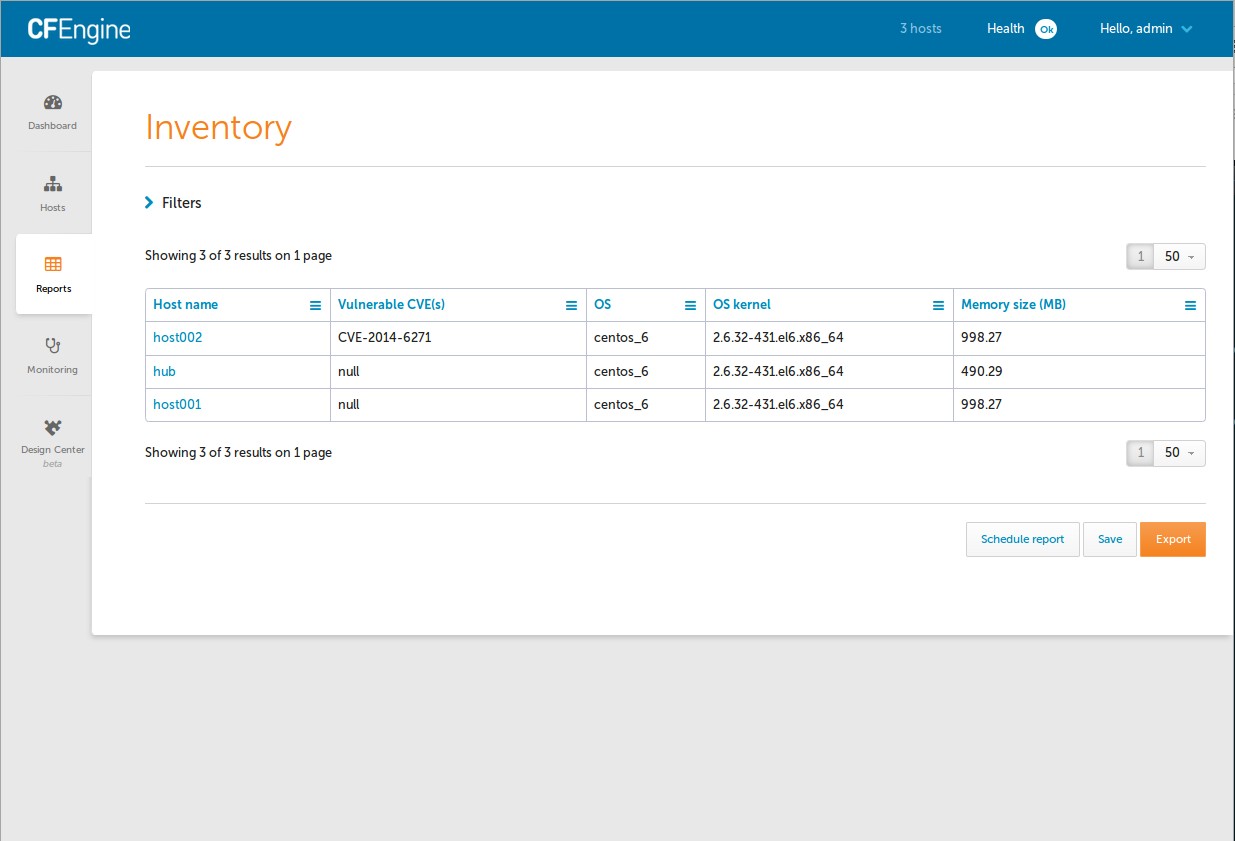
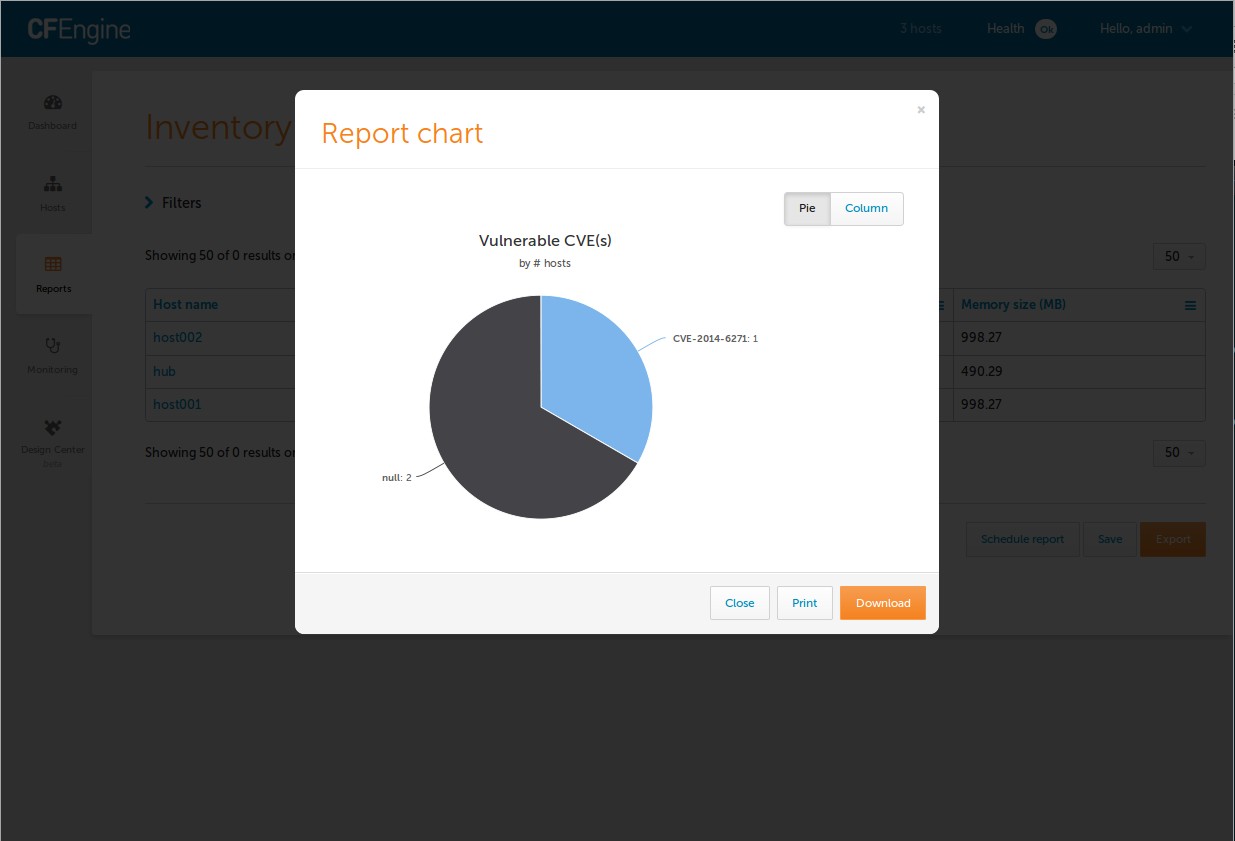
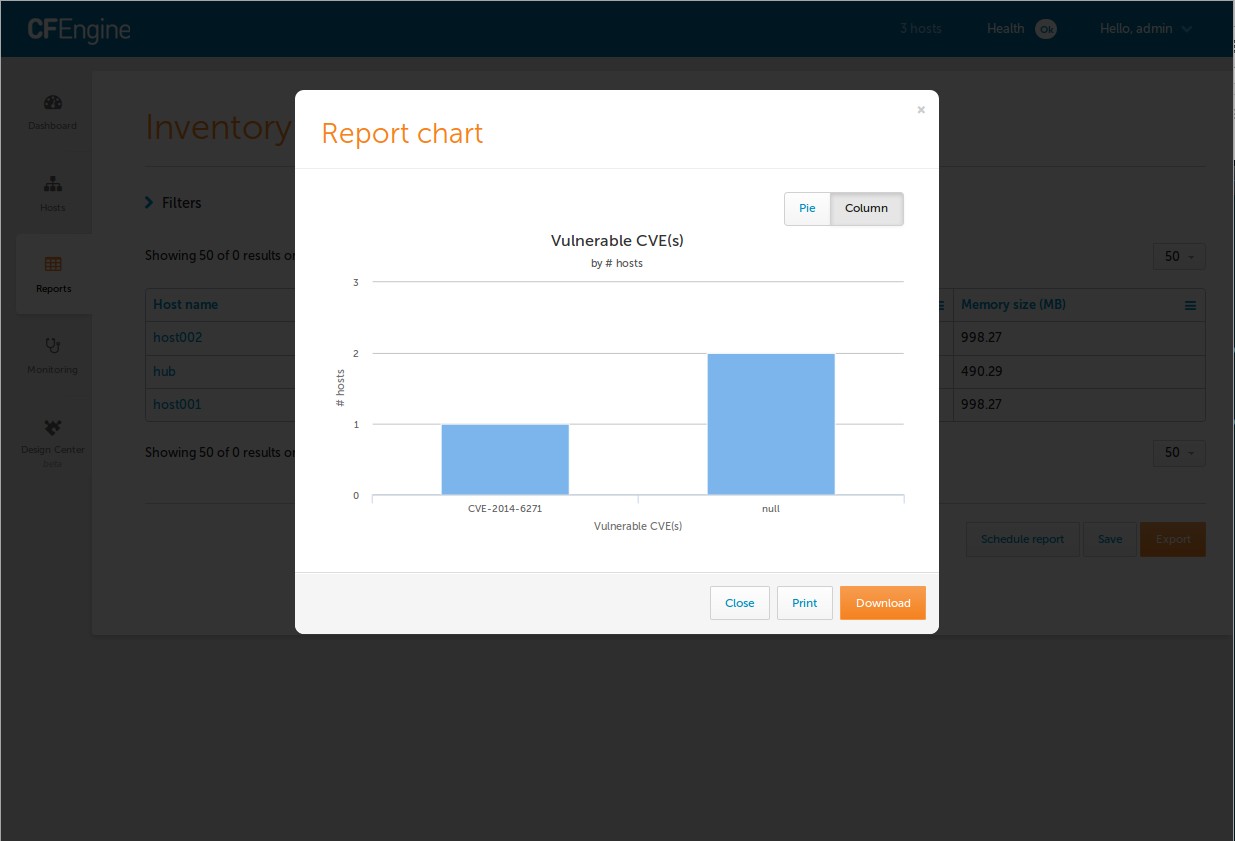
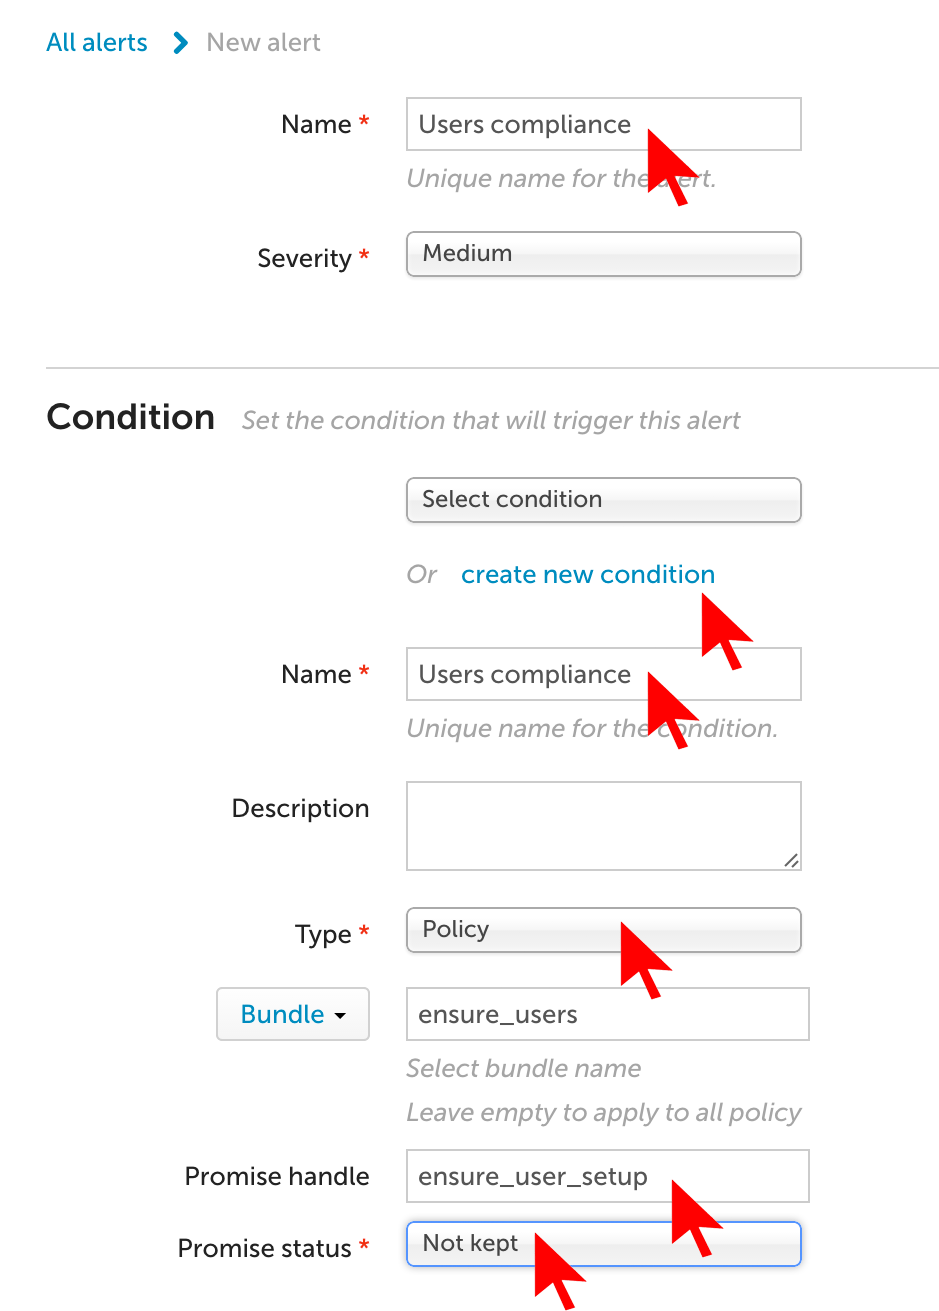

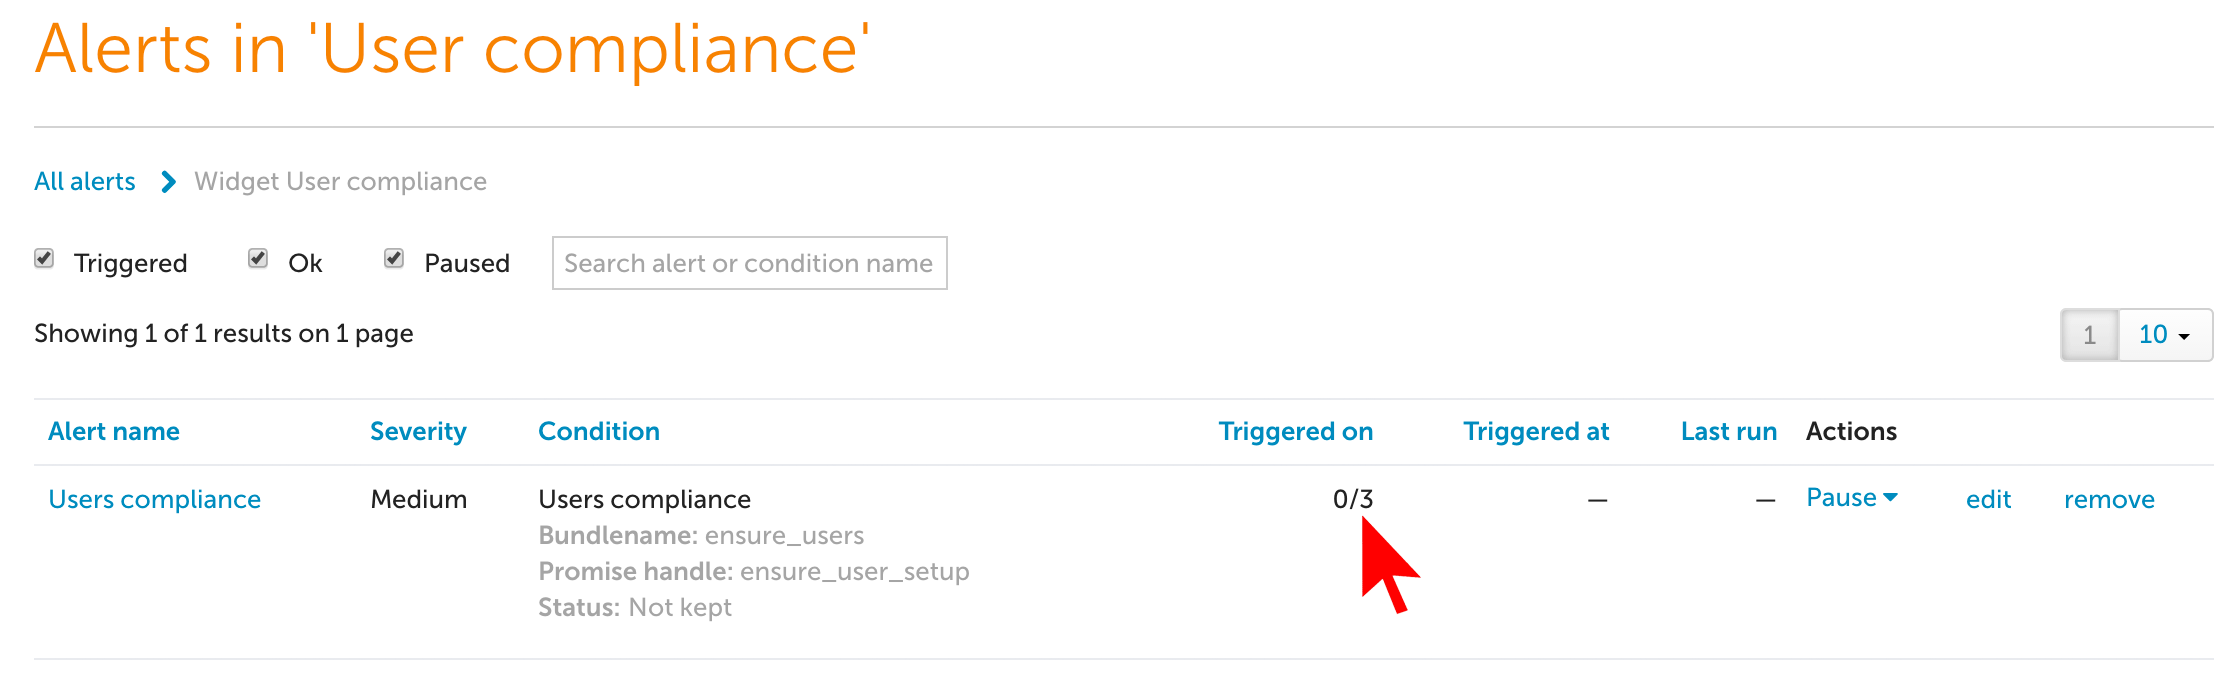
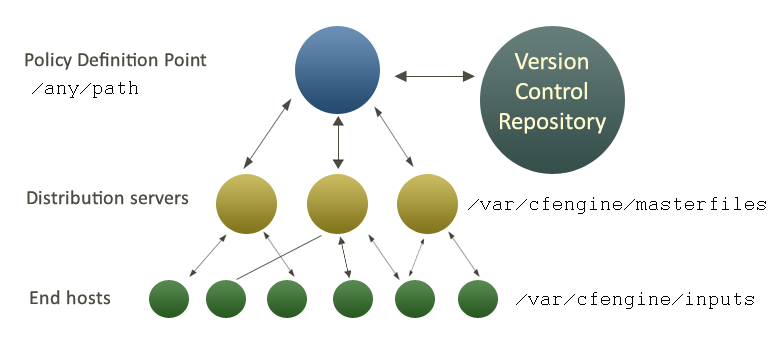

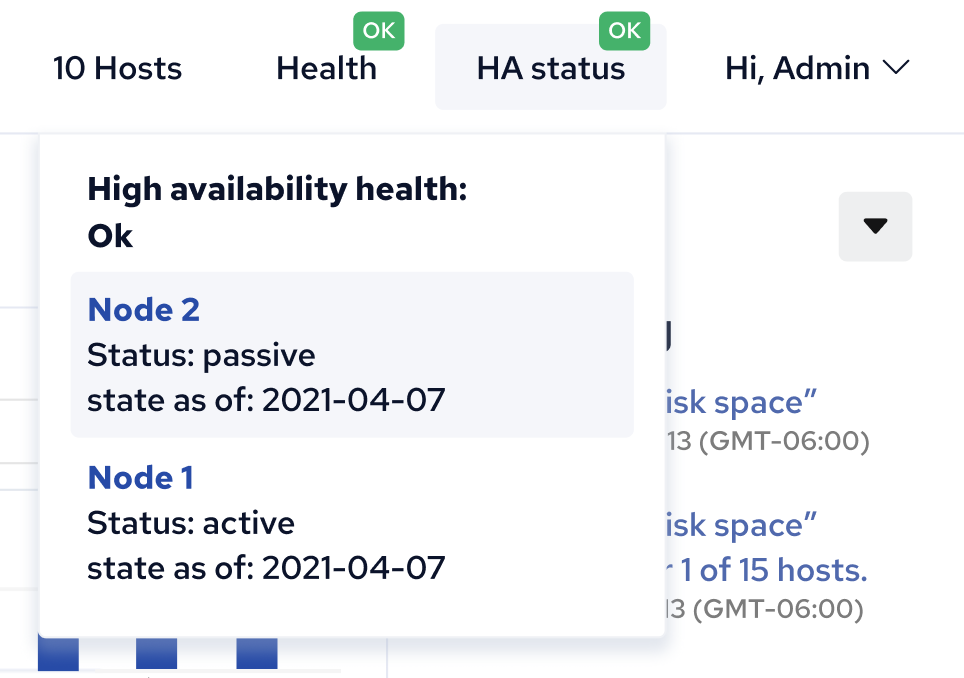
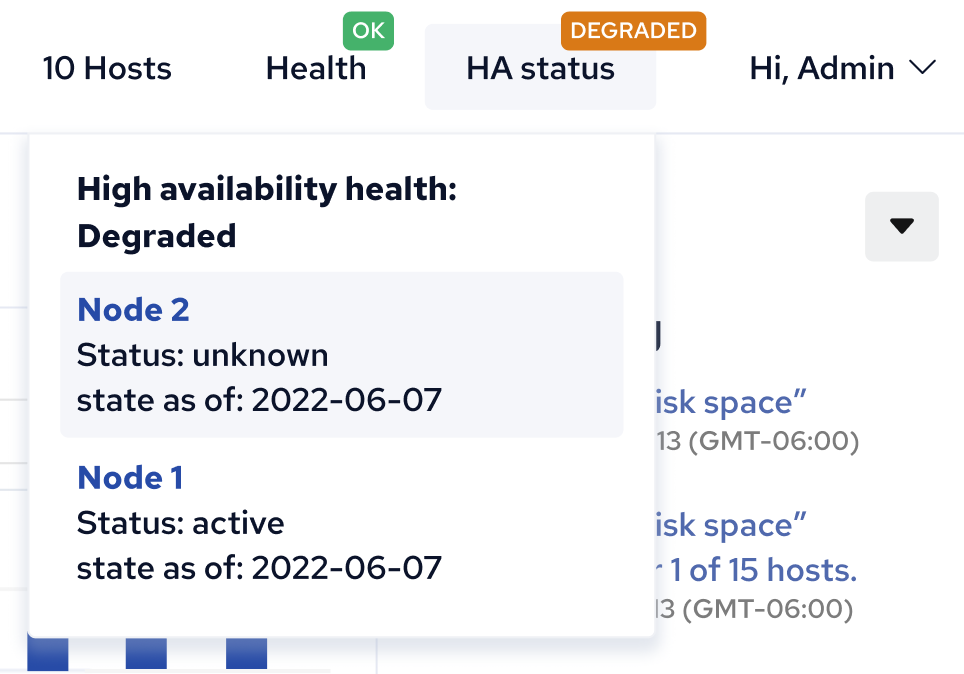
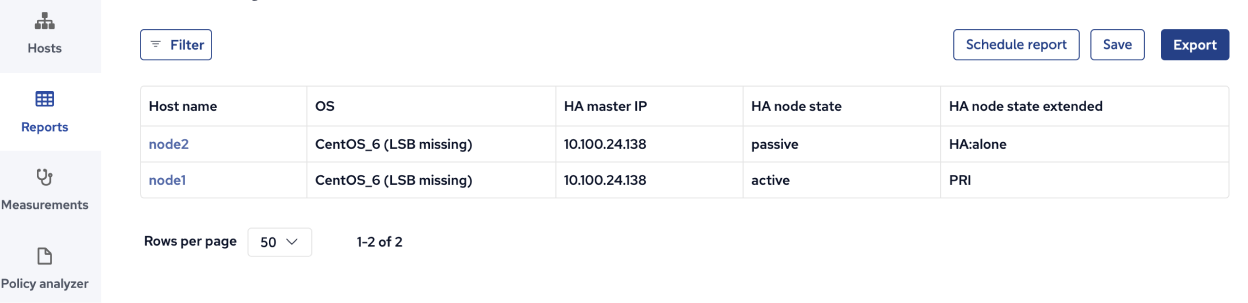


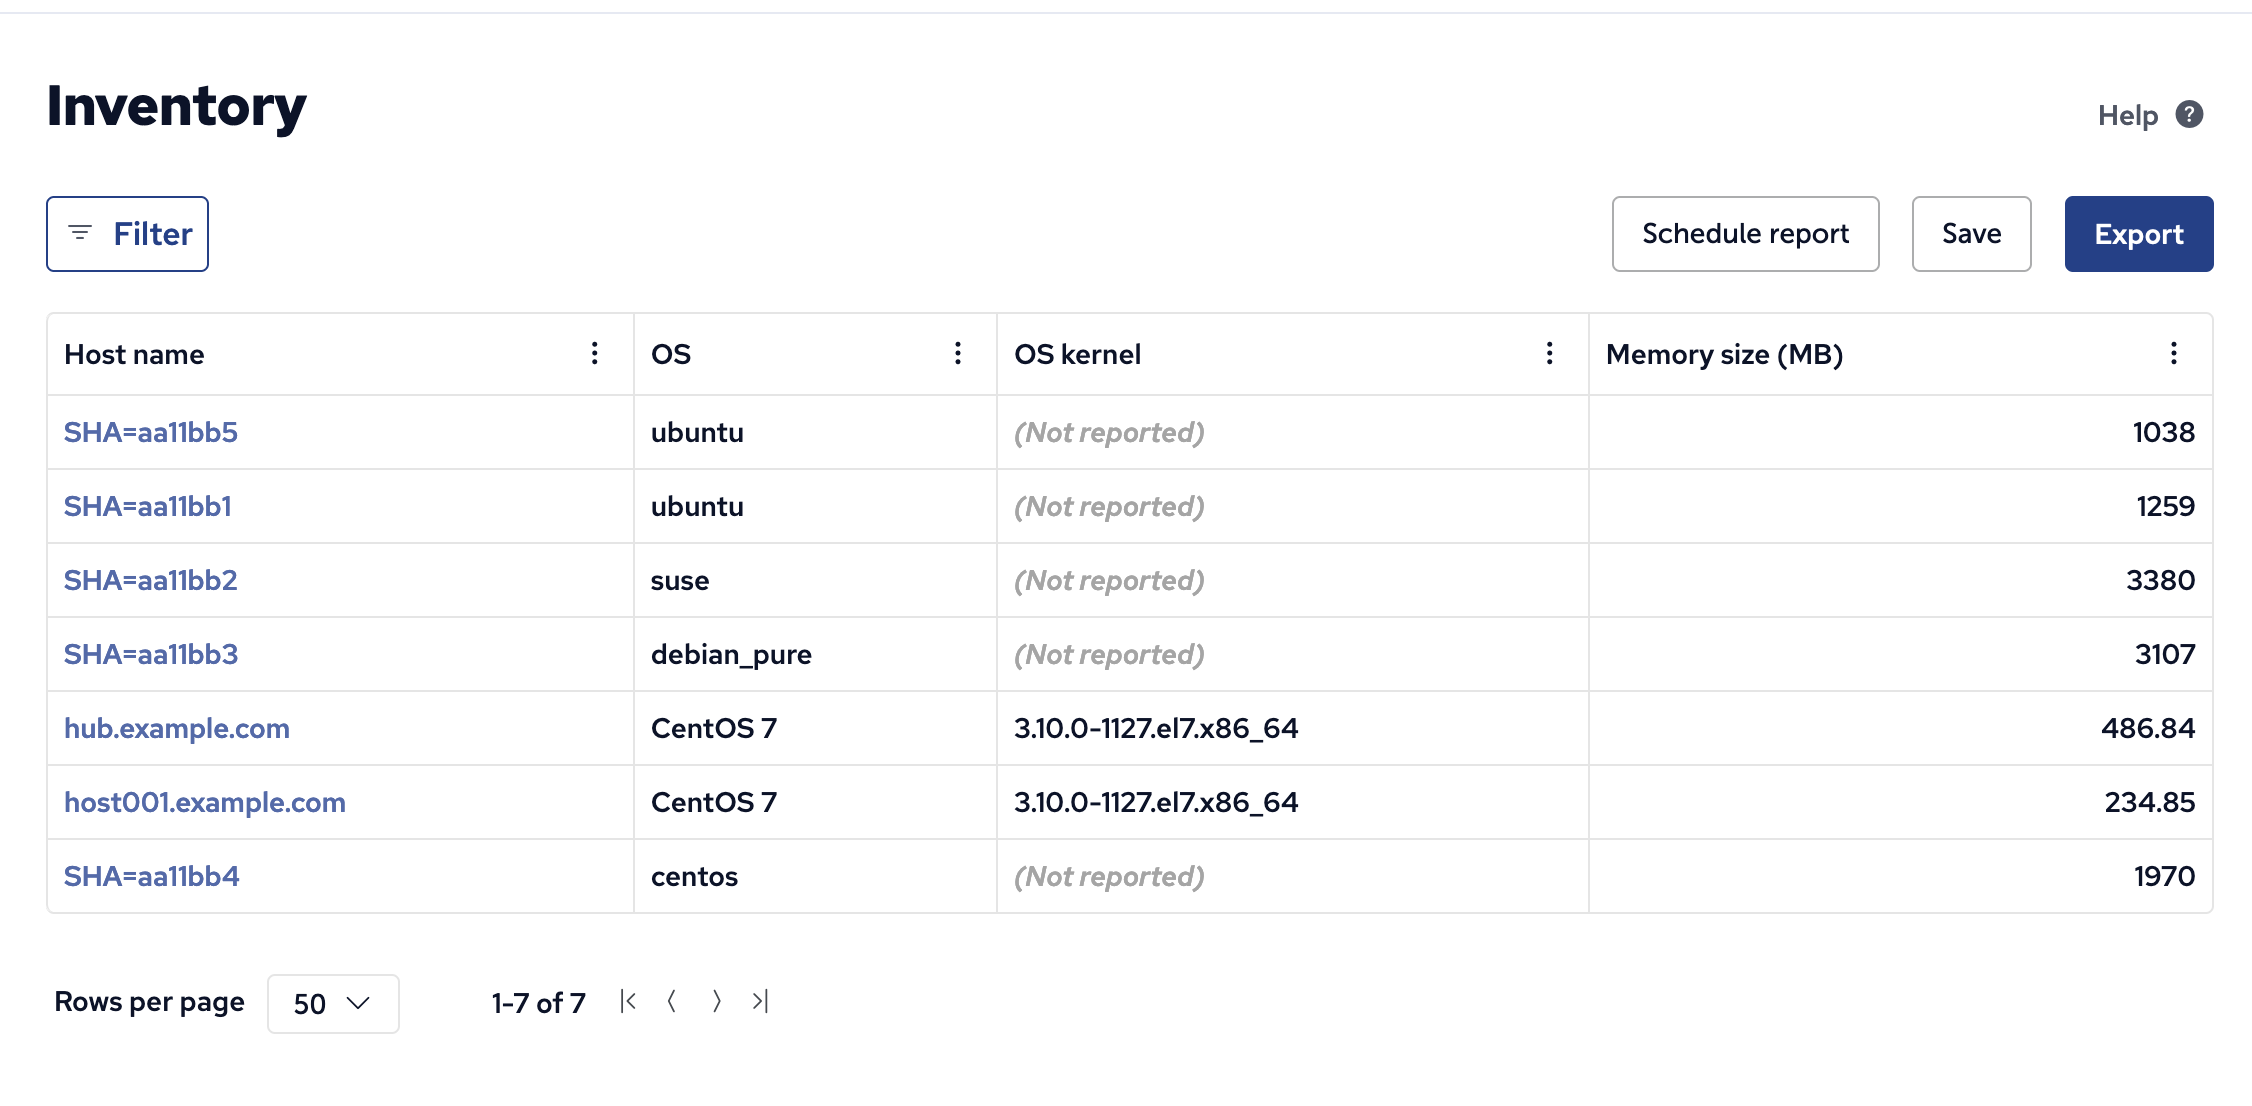
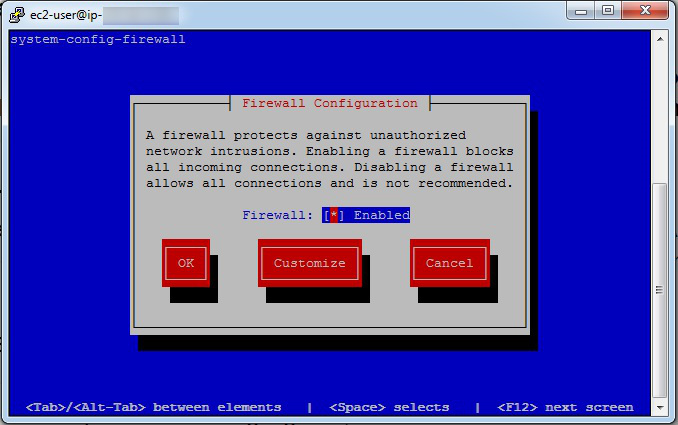
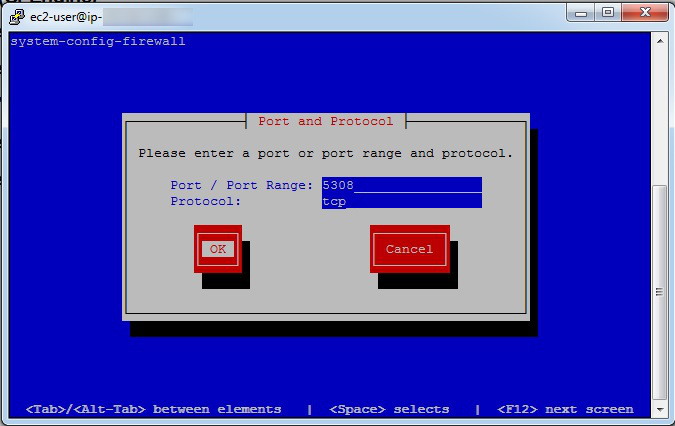
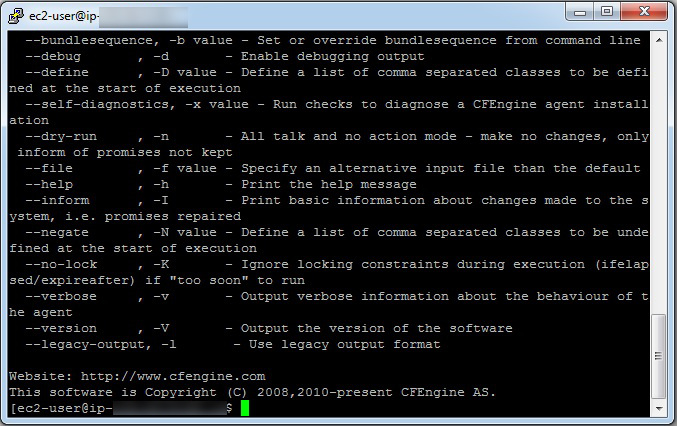
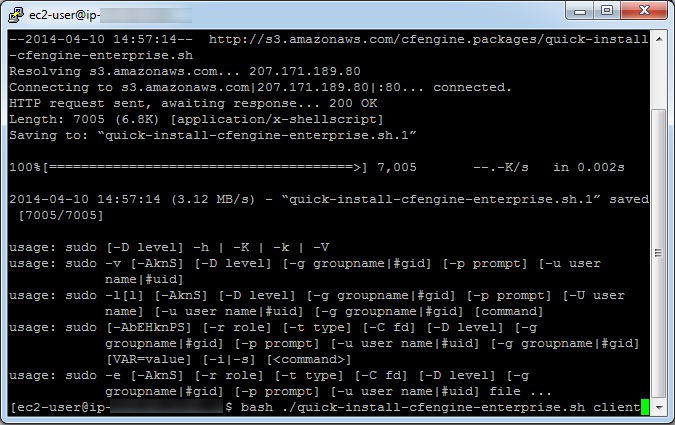
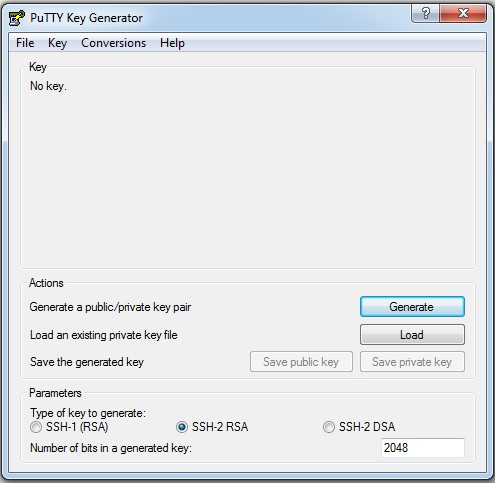
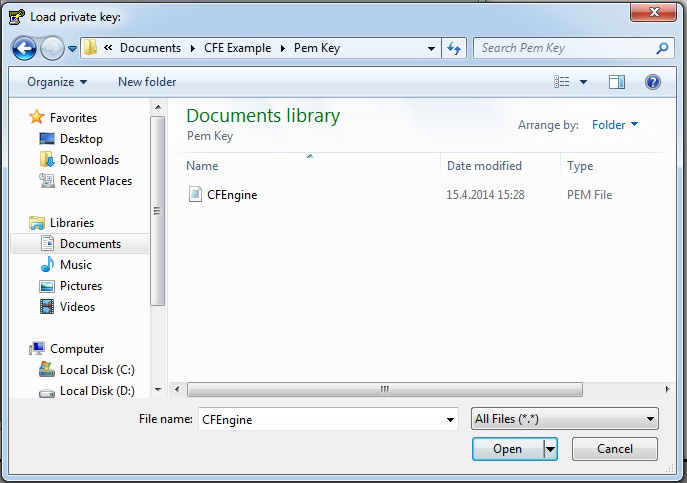
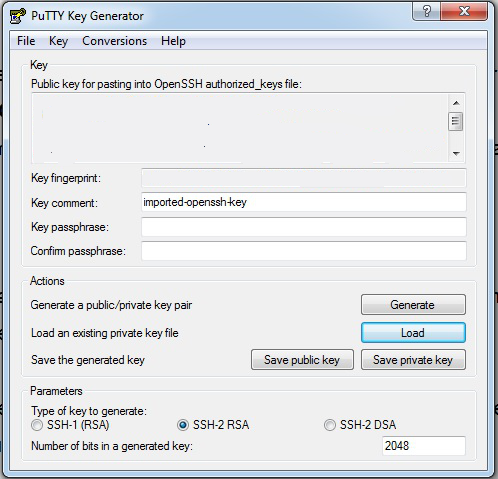

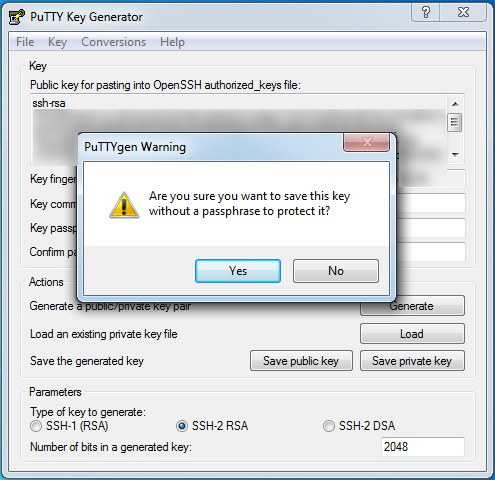
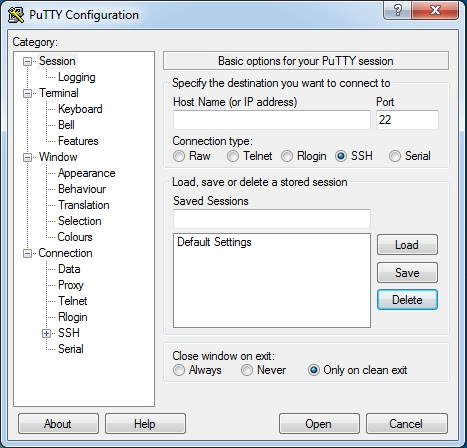
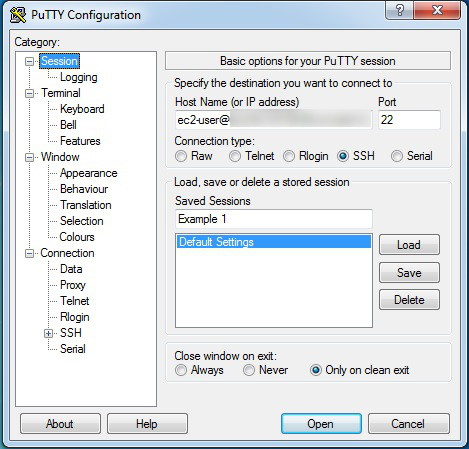
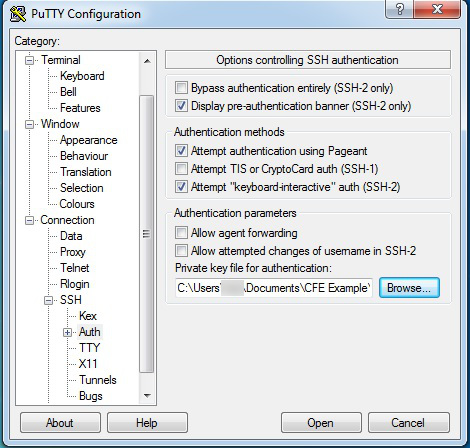

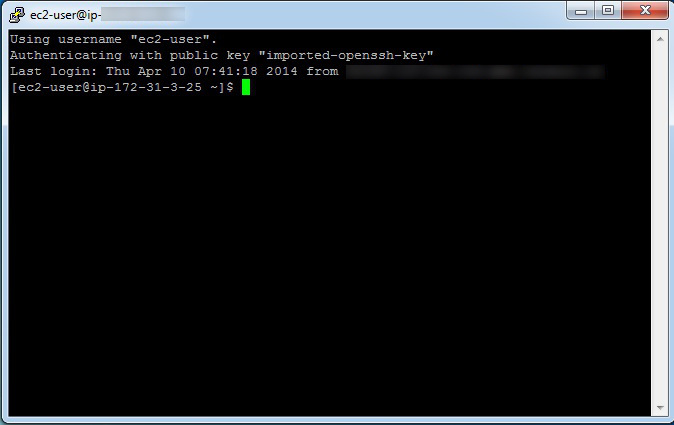
 Make a contribution
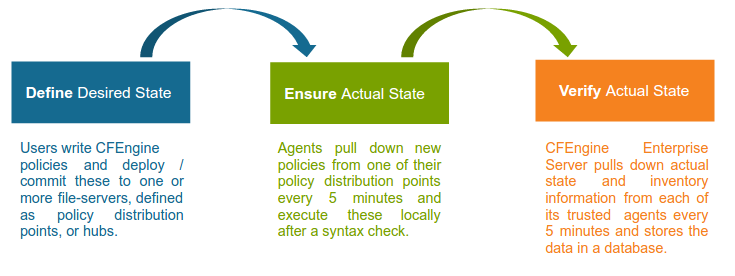
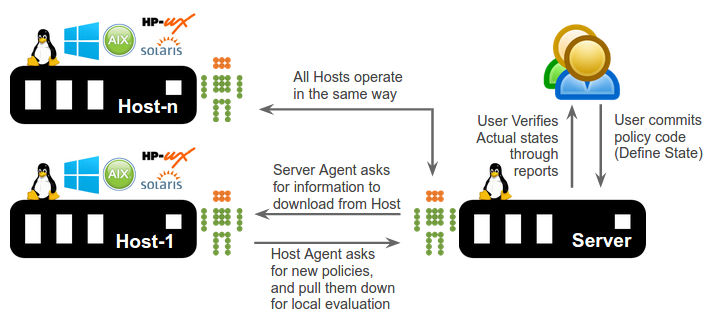
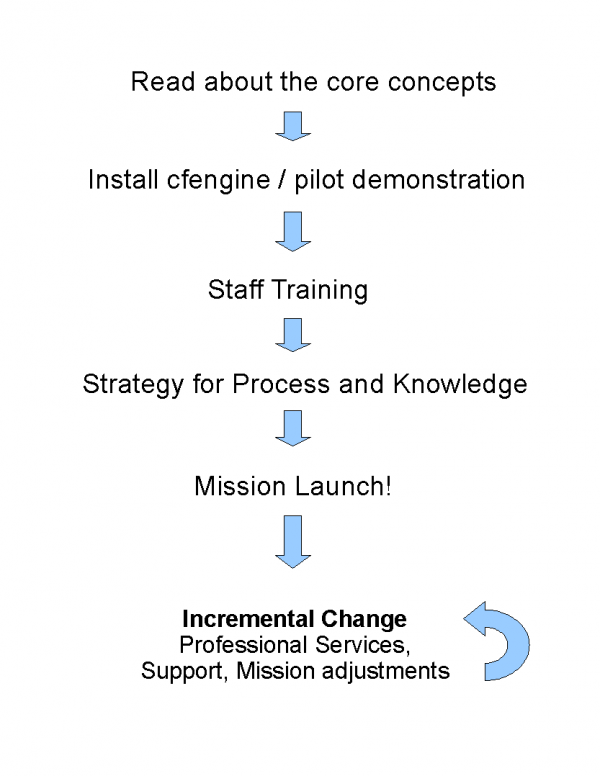
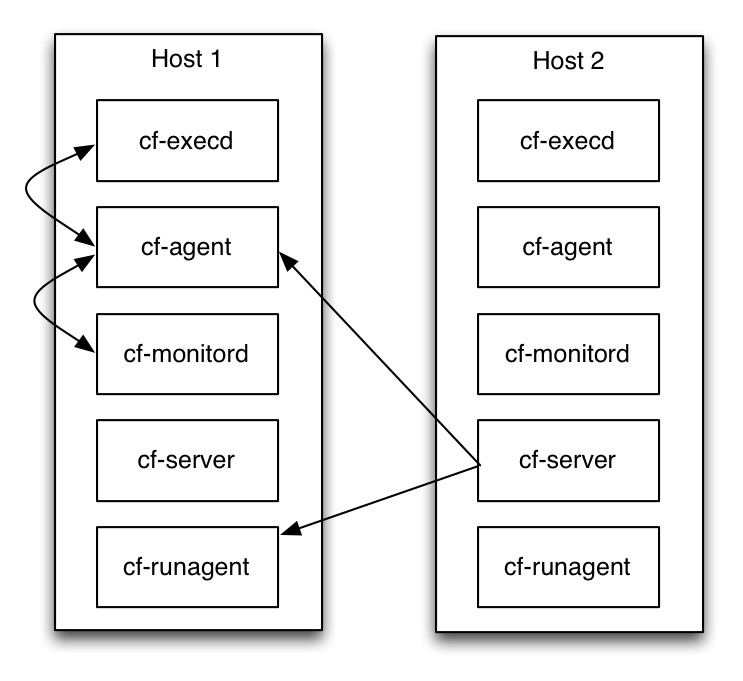
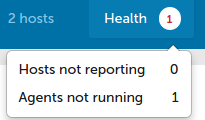
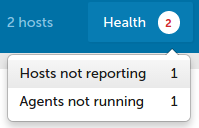
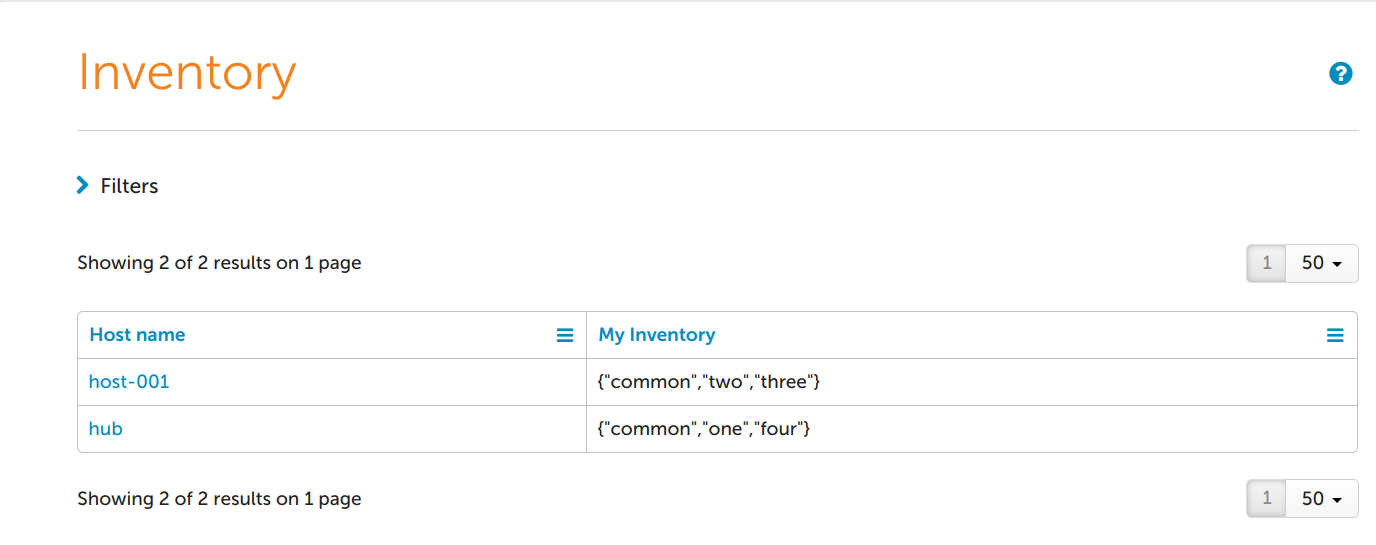
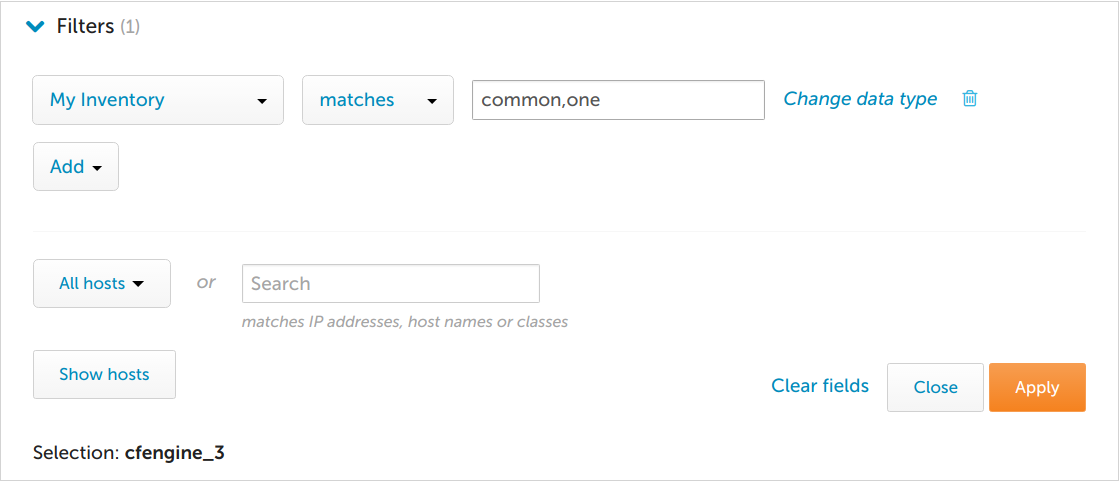
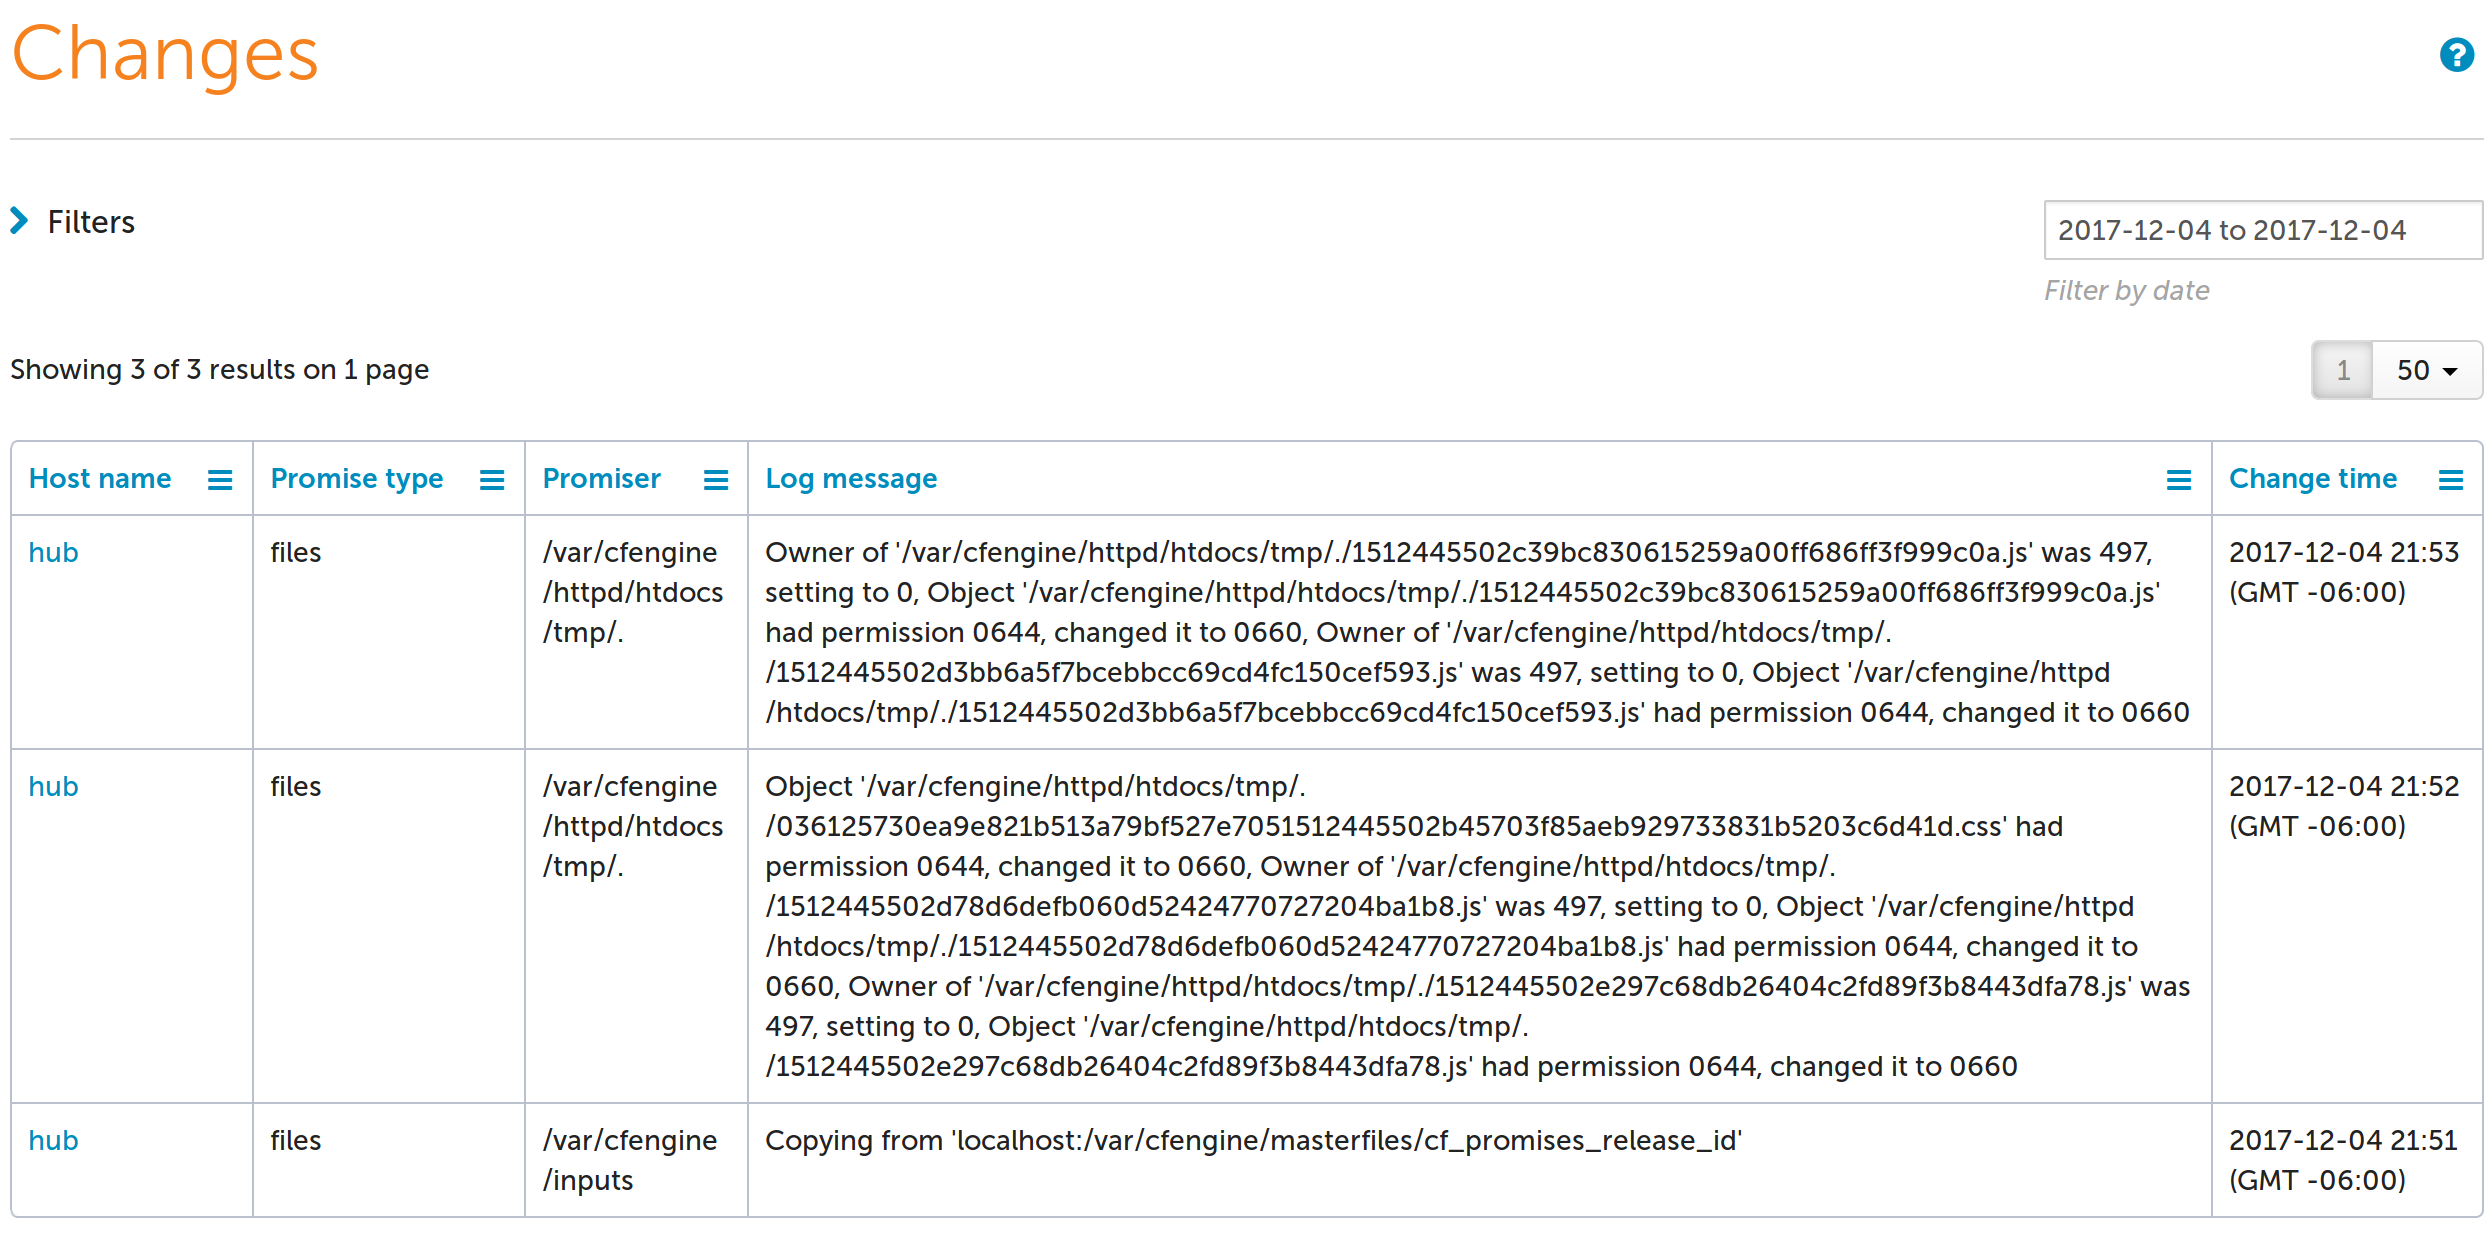
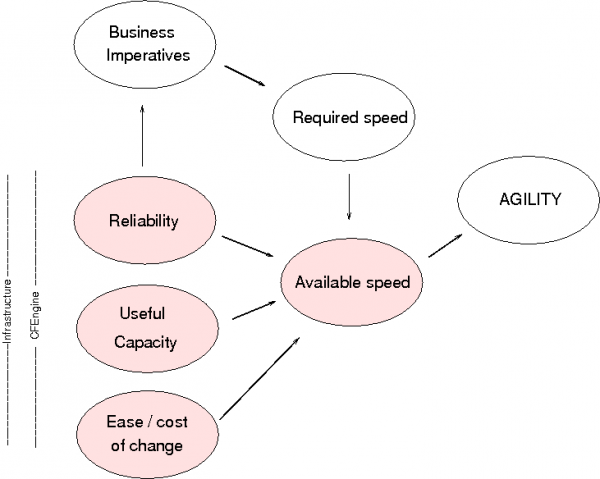


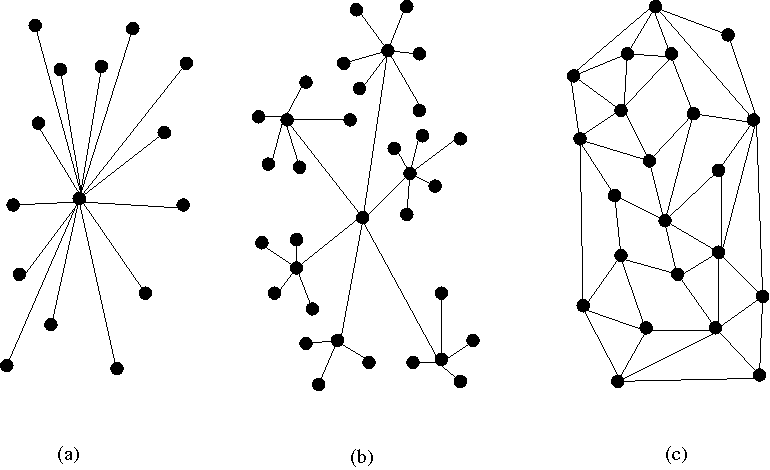
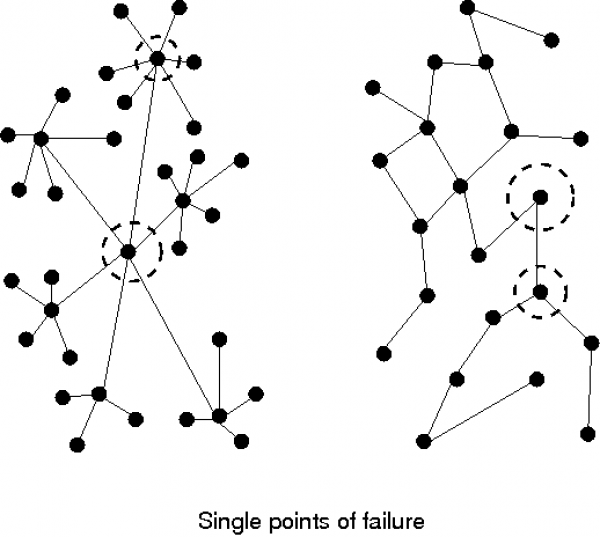
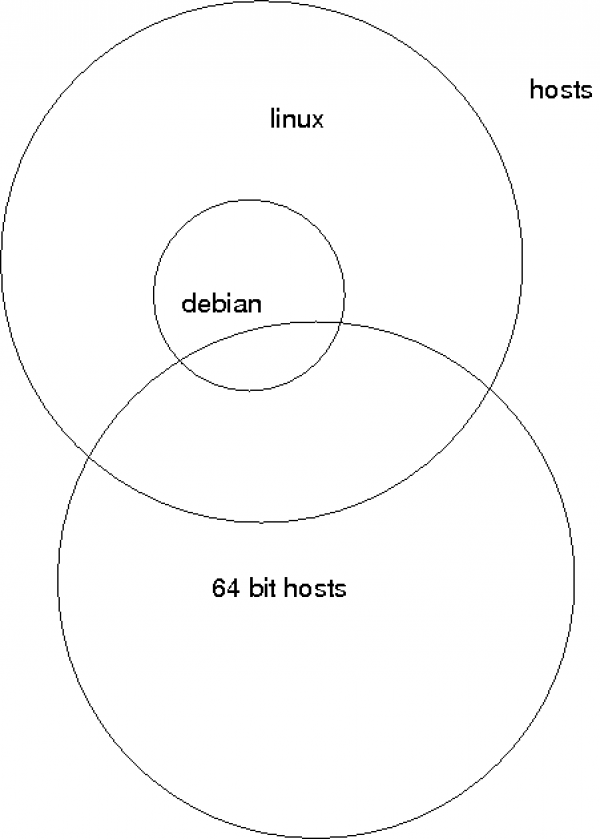
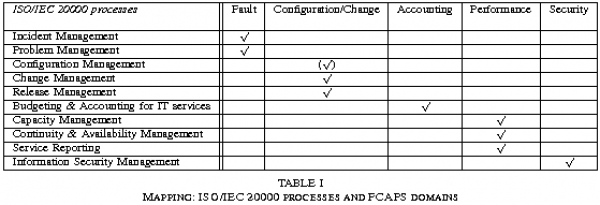
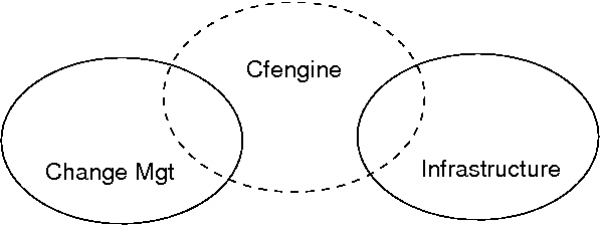
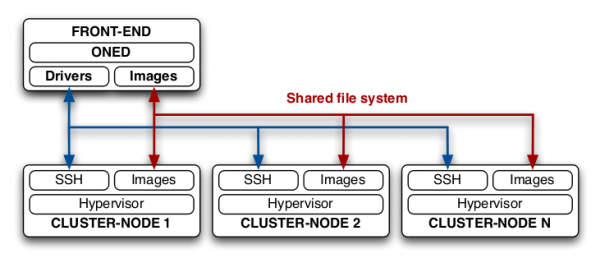
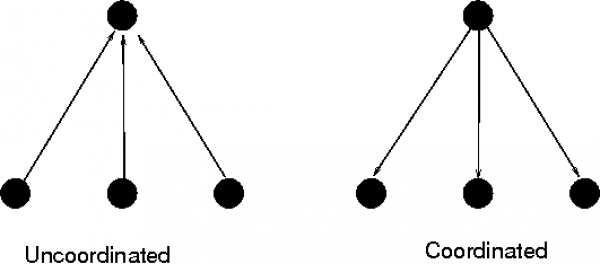

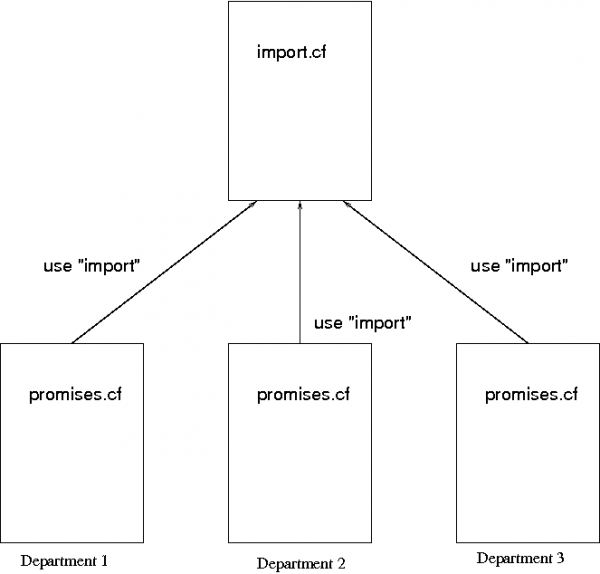
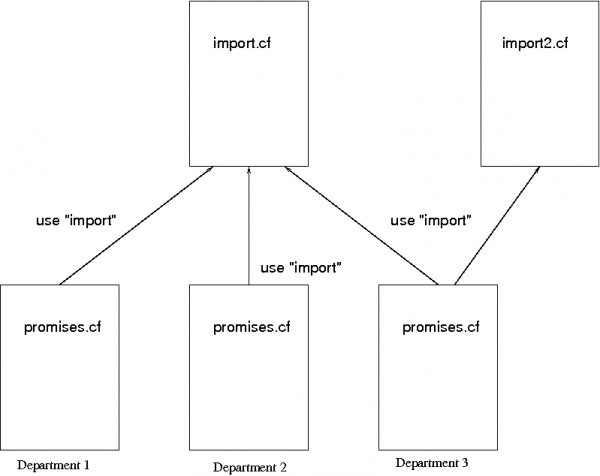

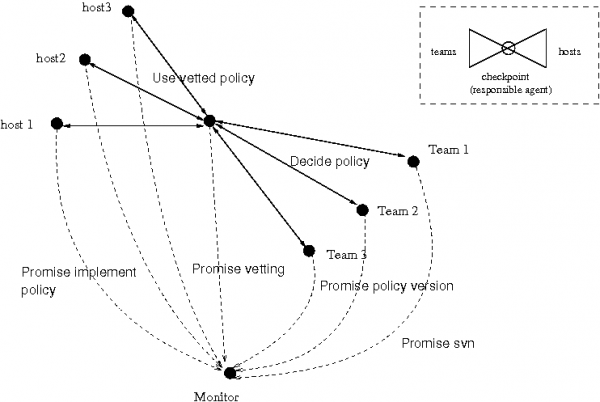


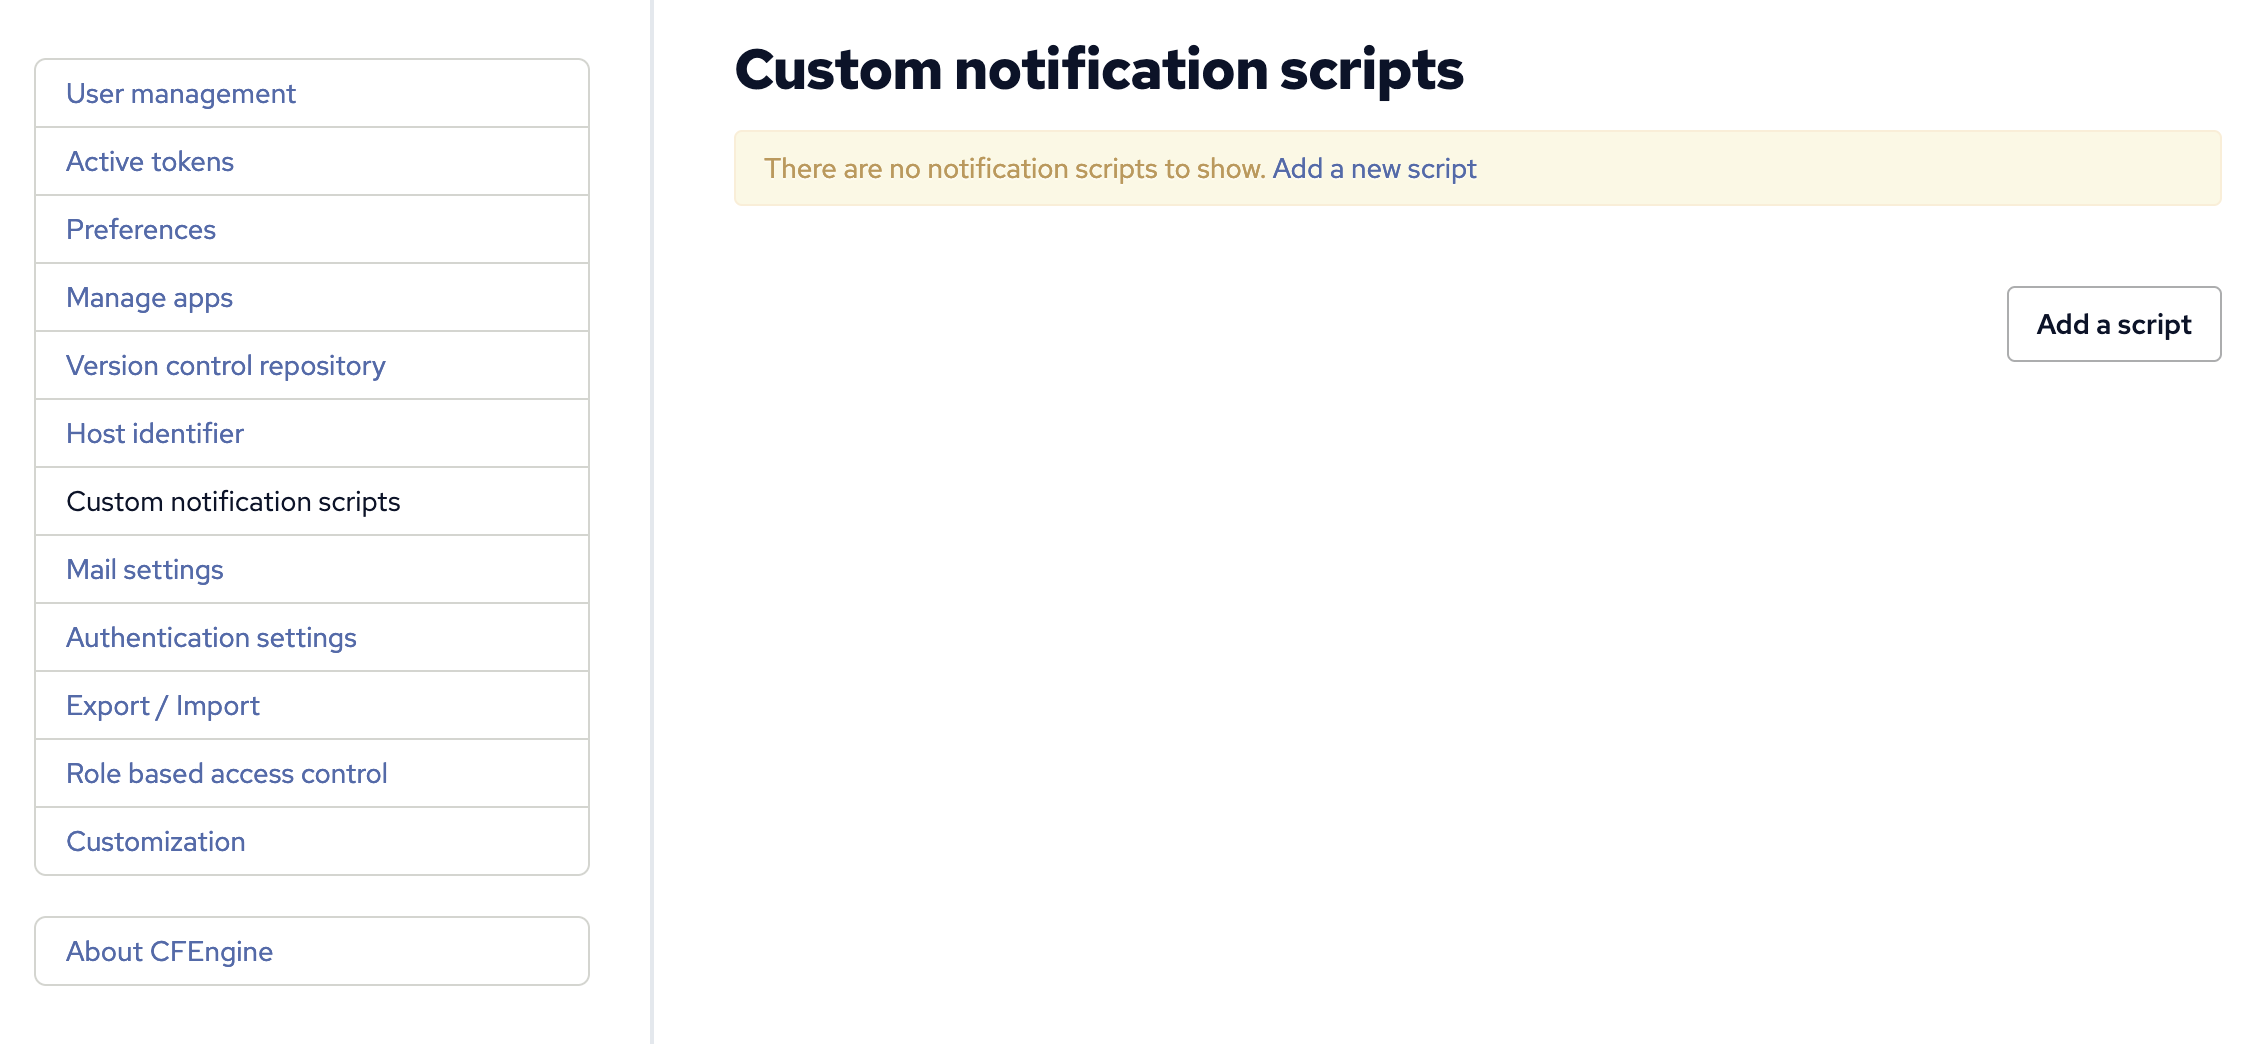
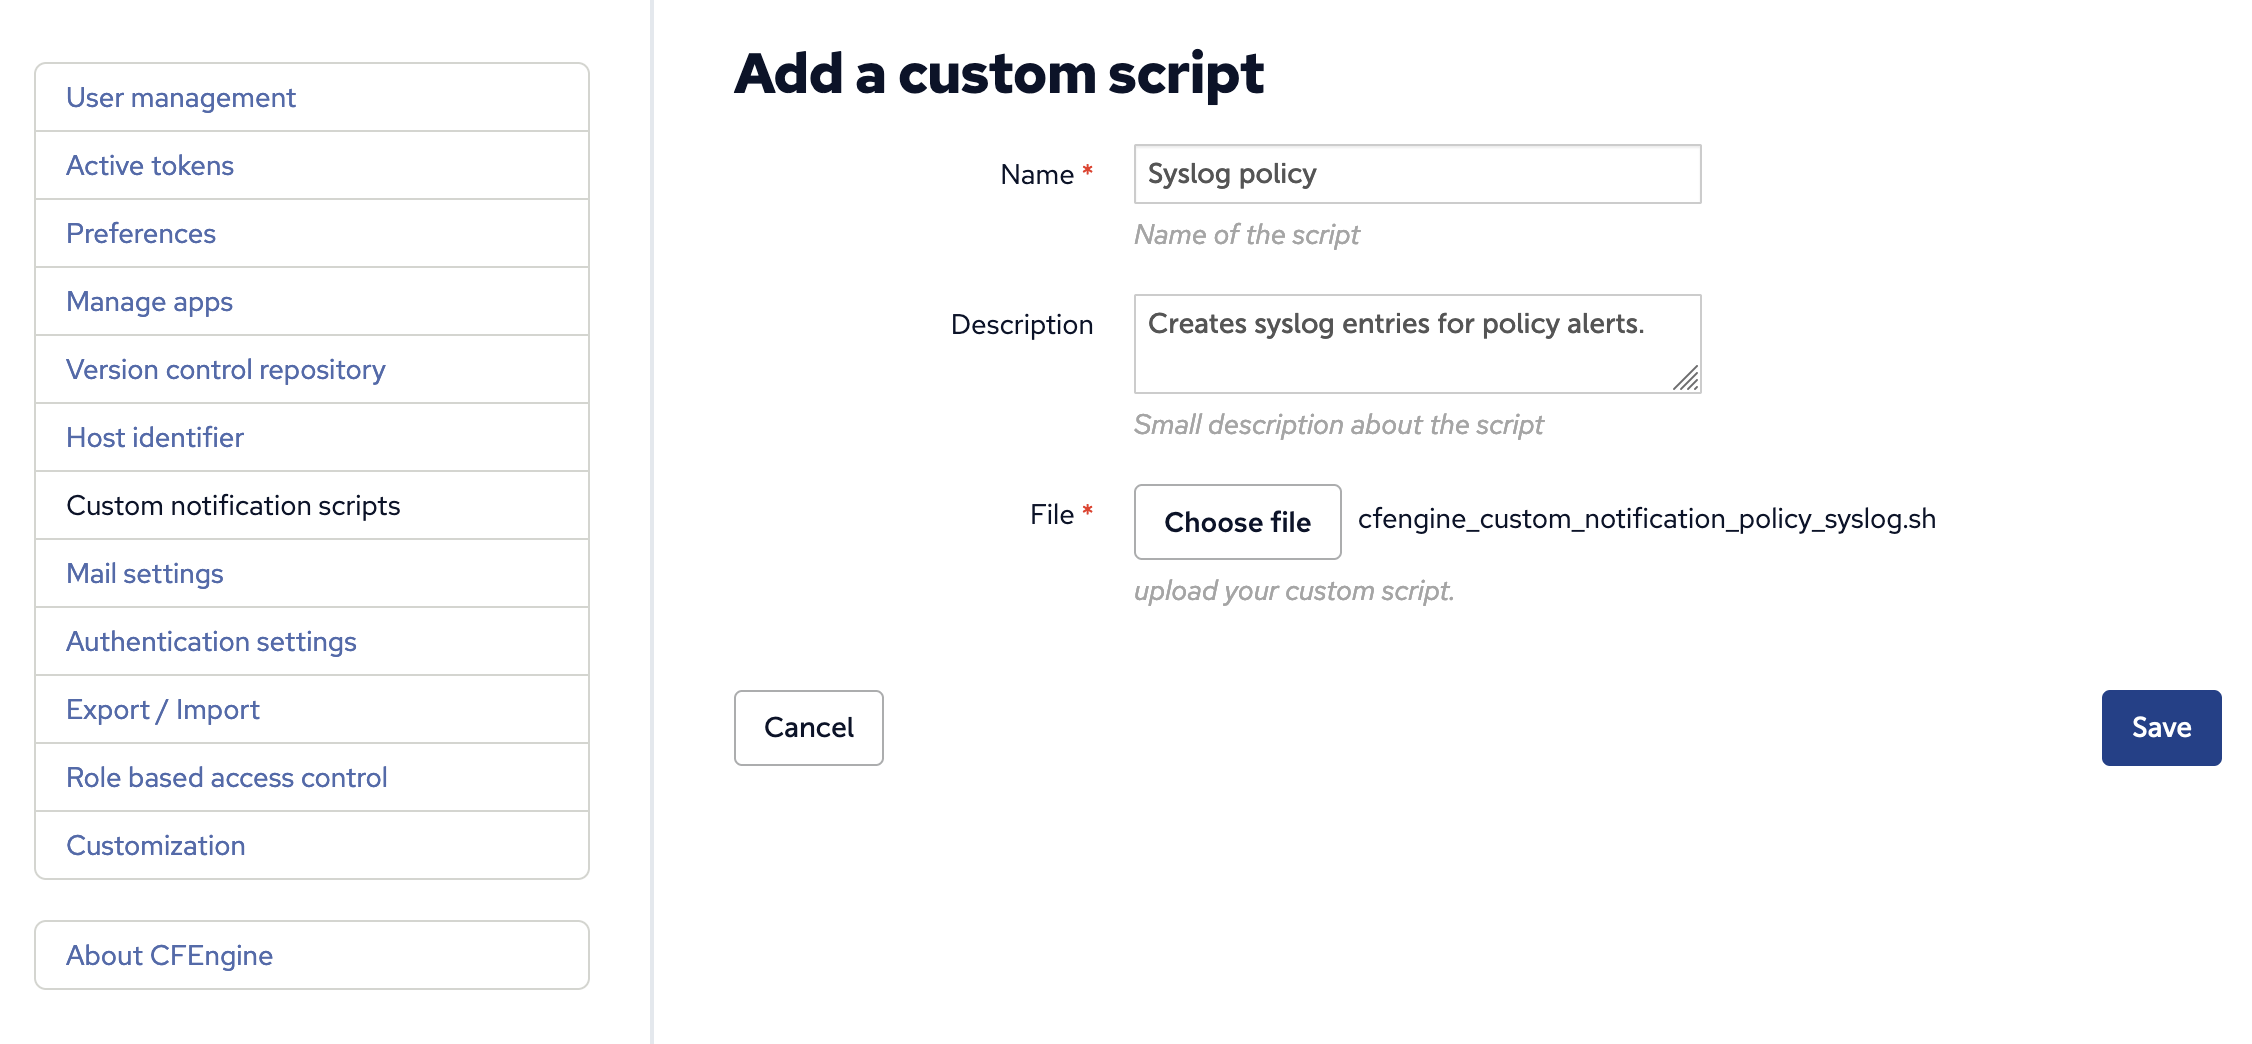
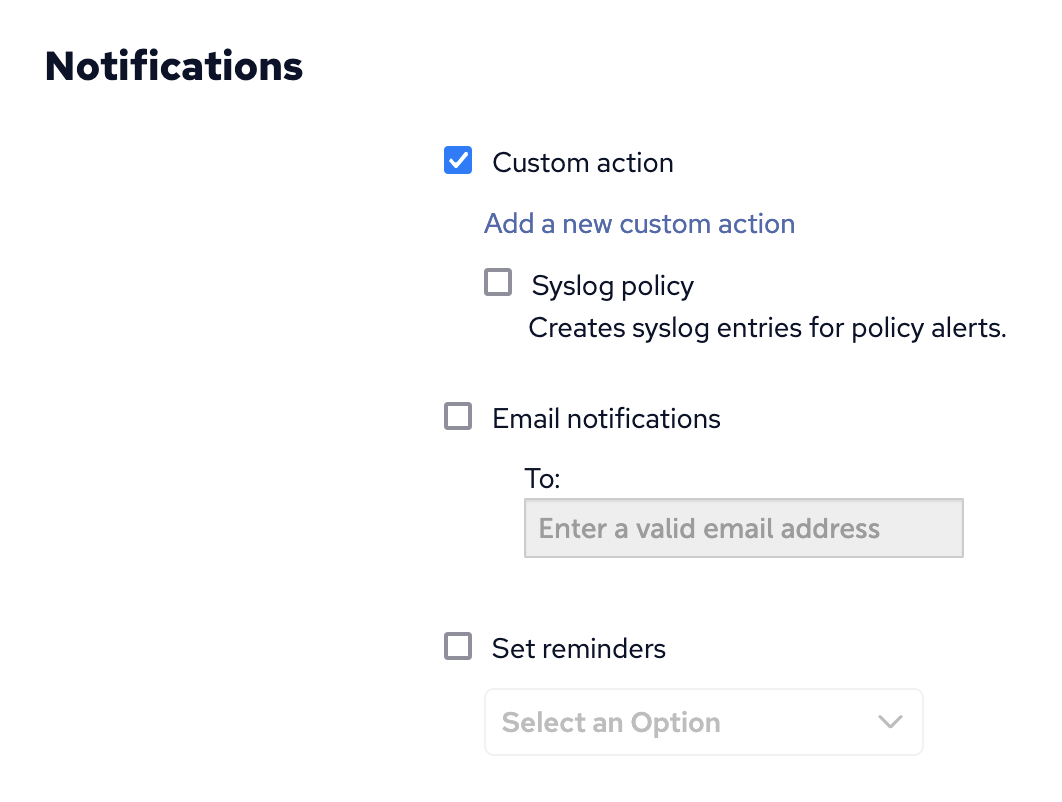

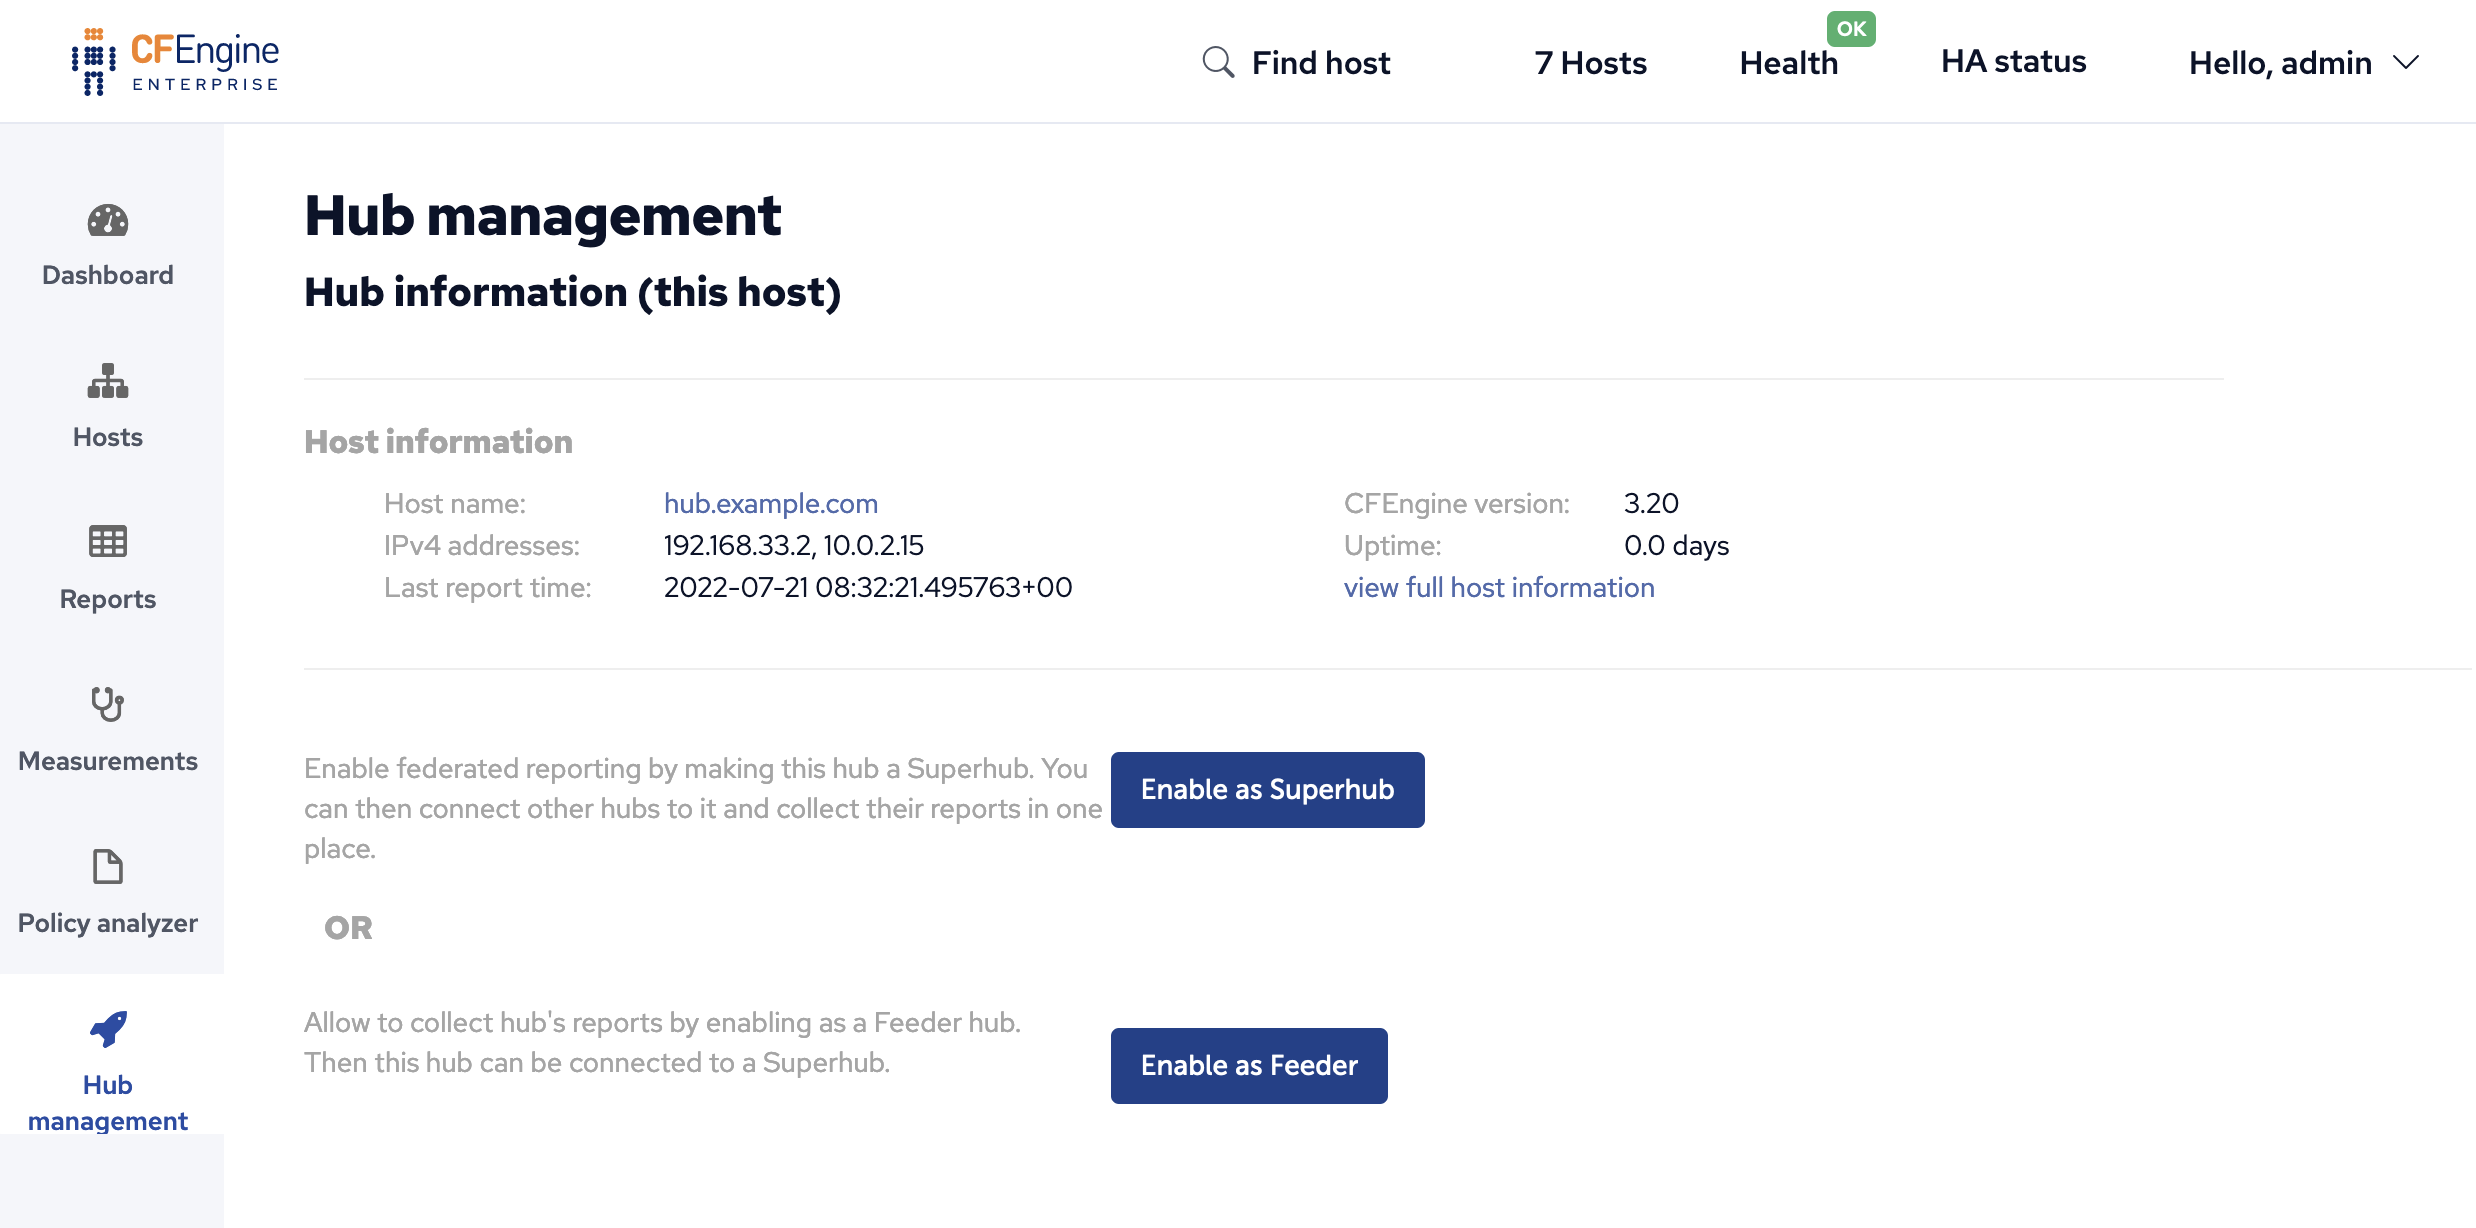
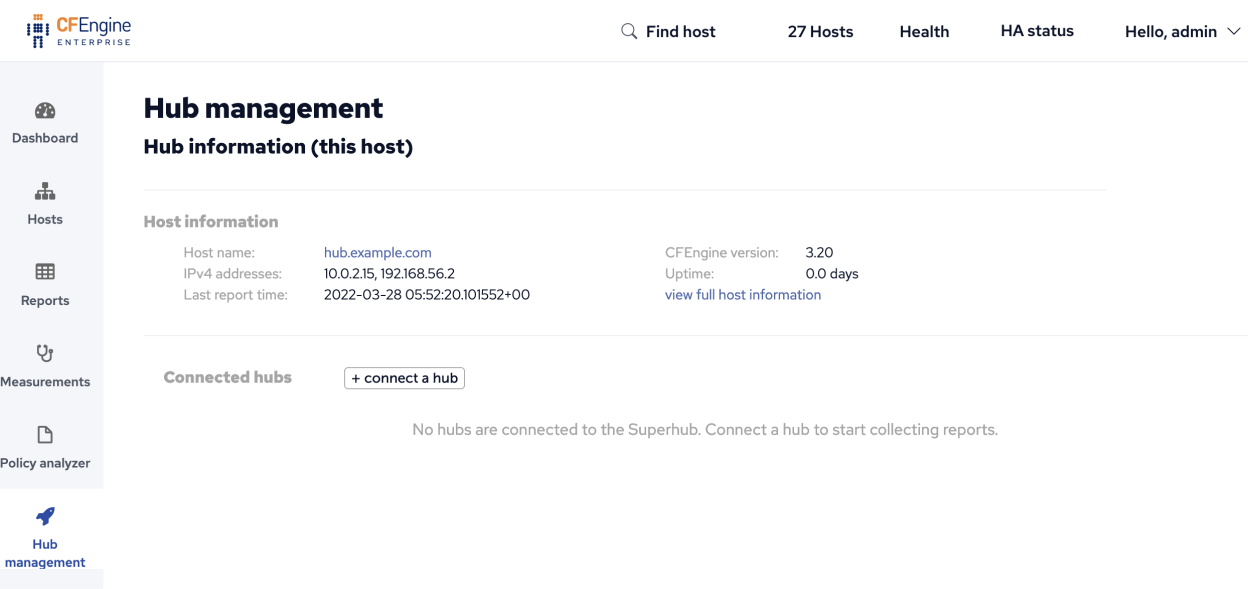

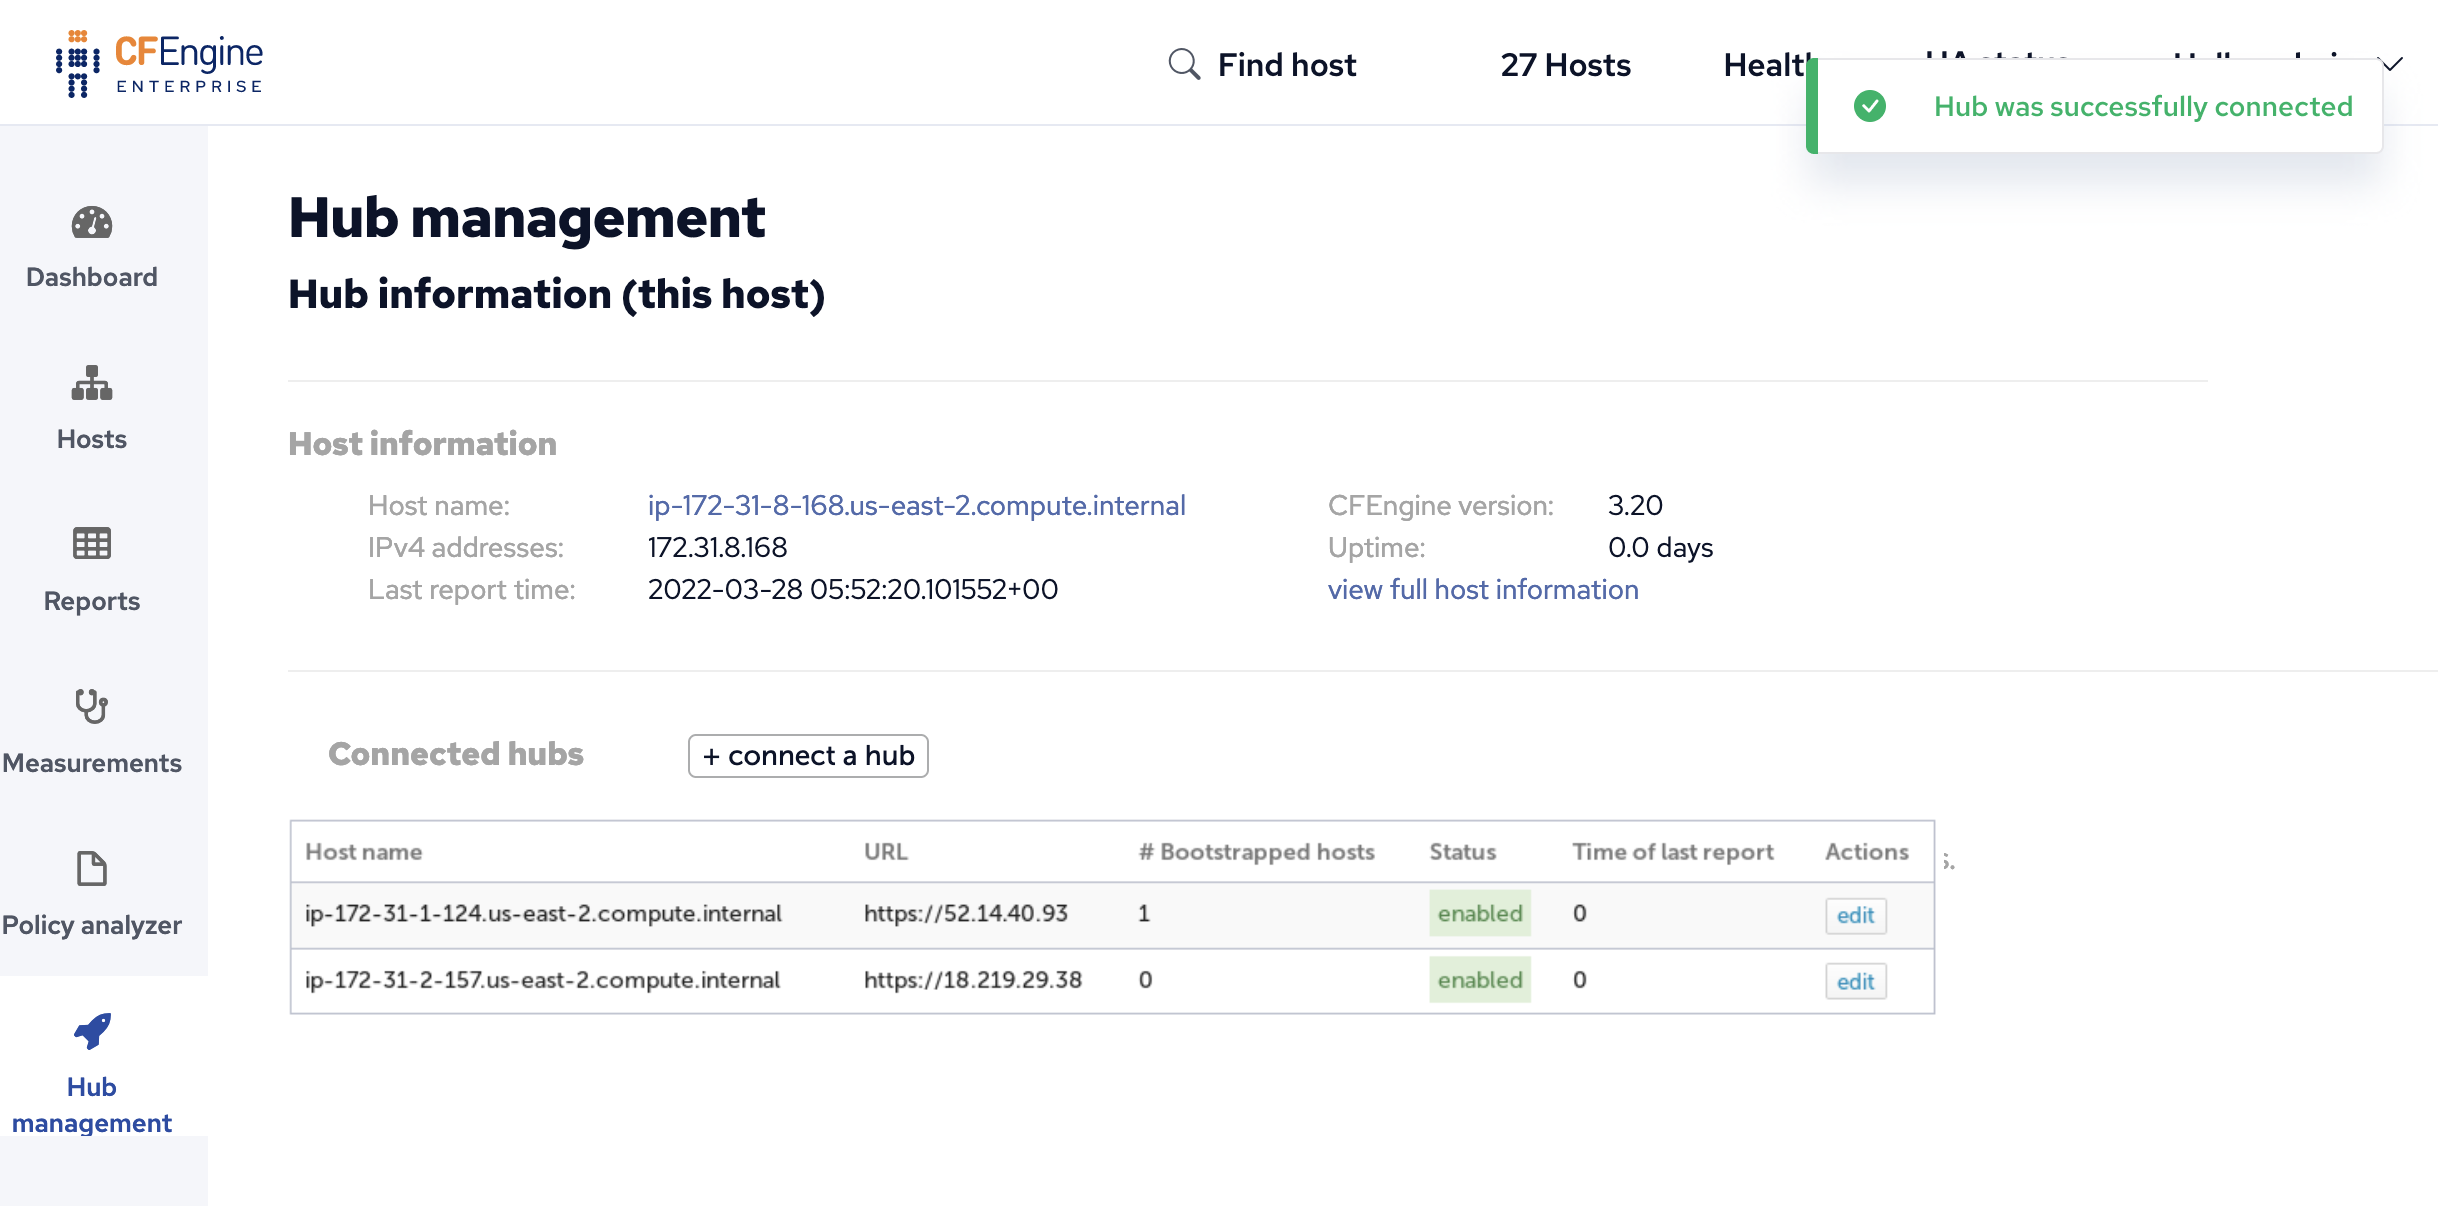


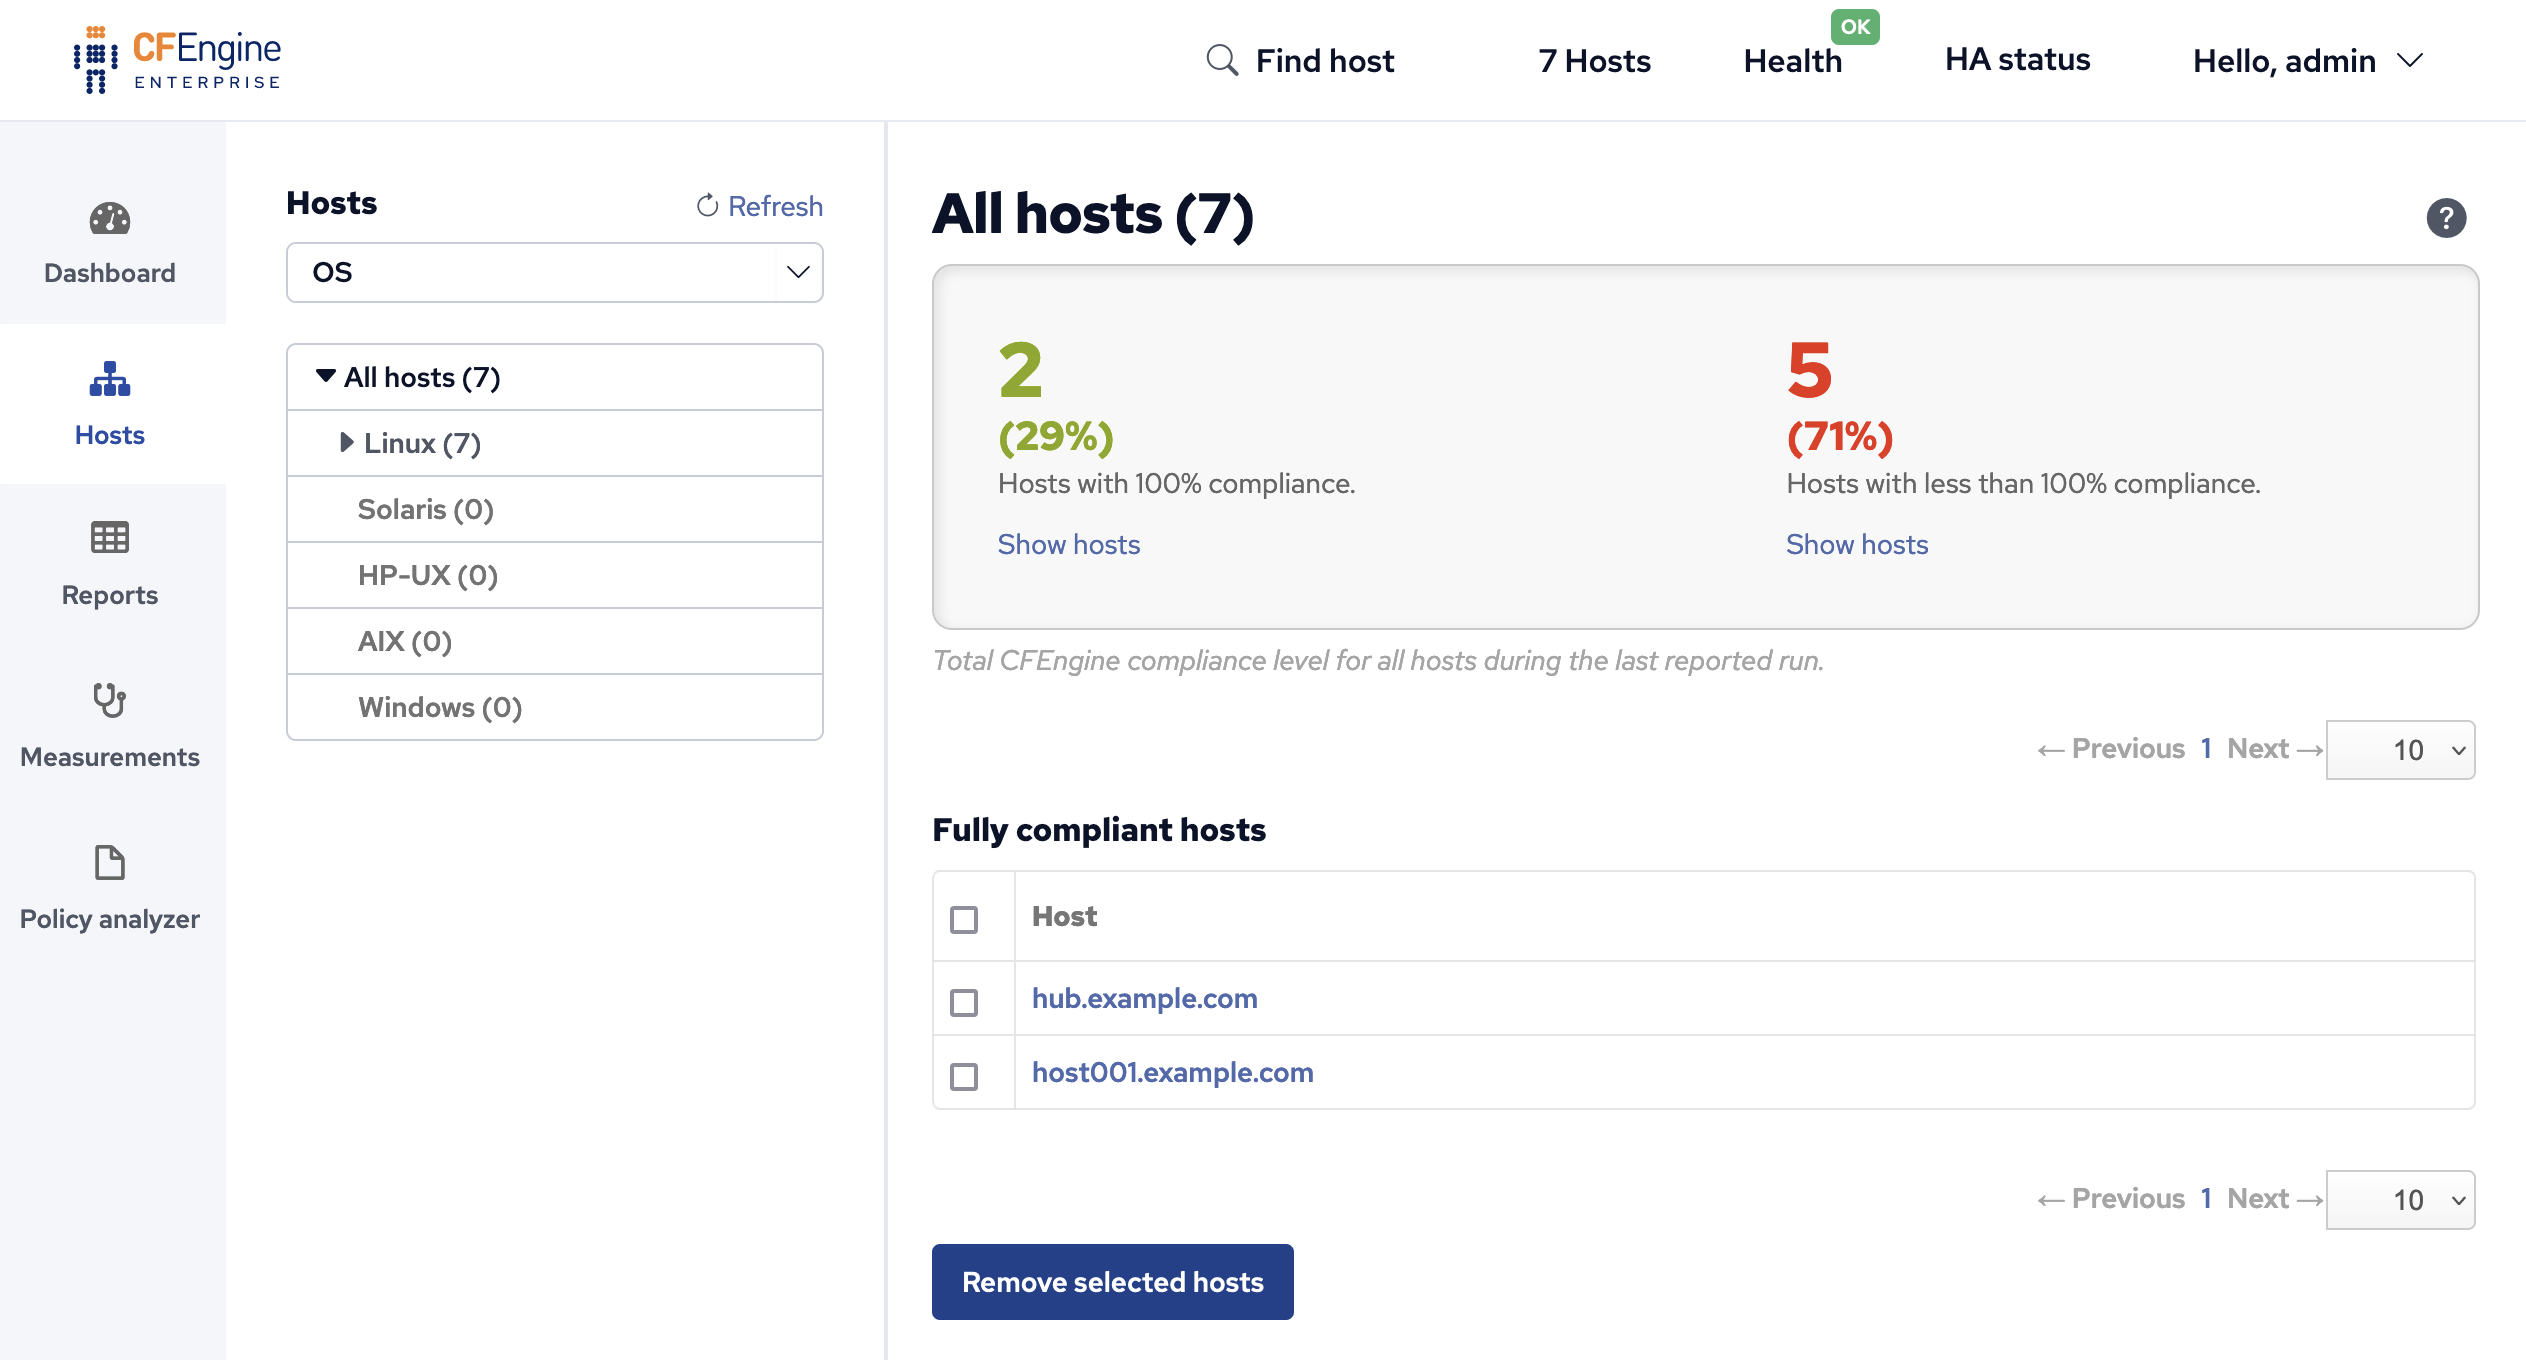
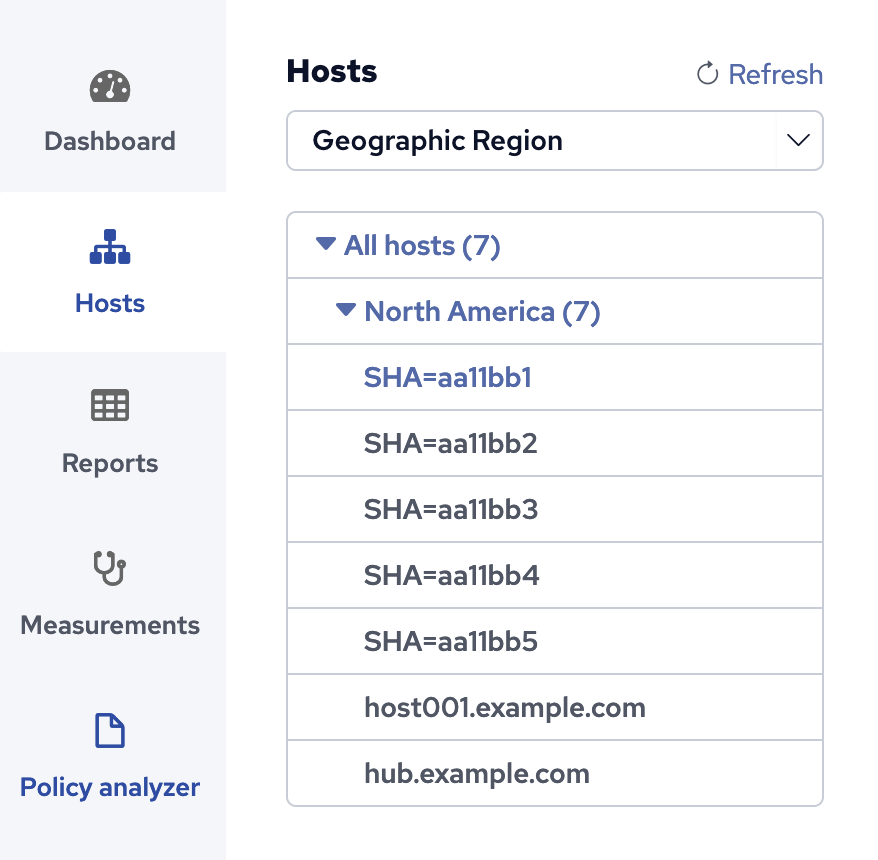
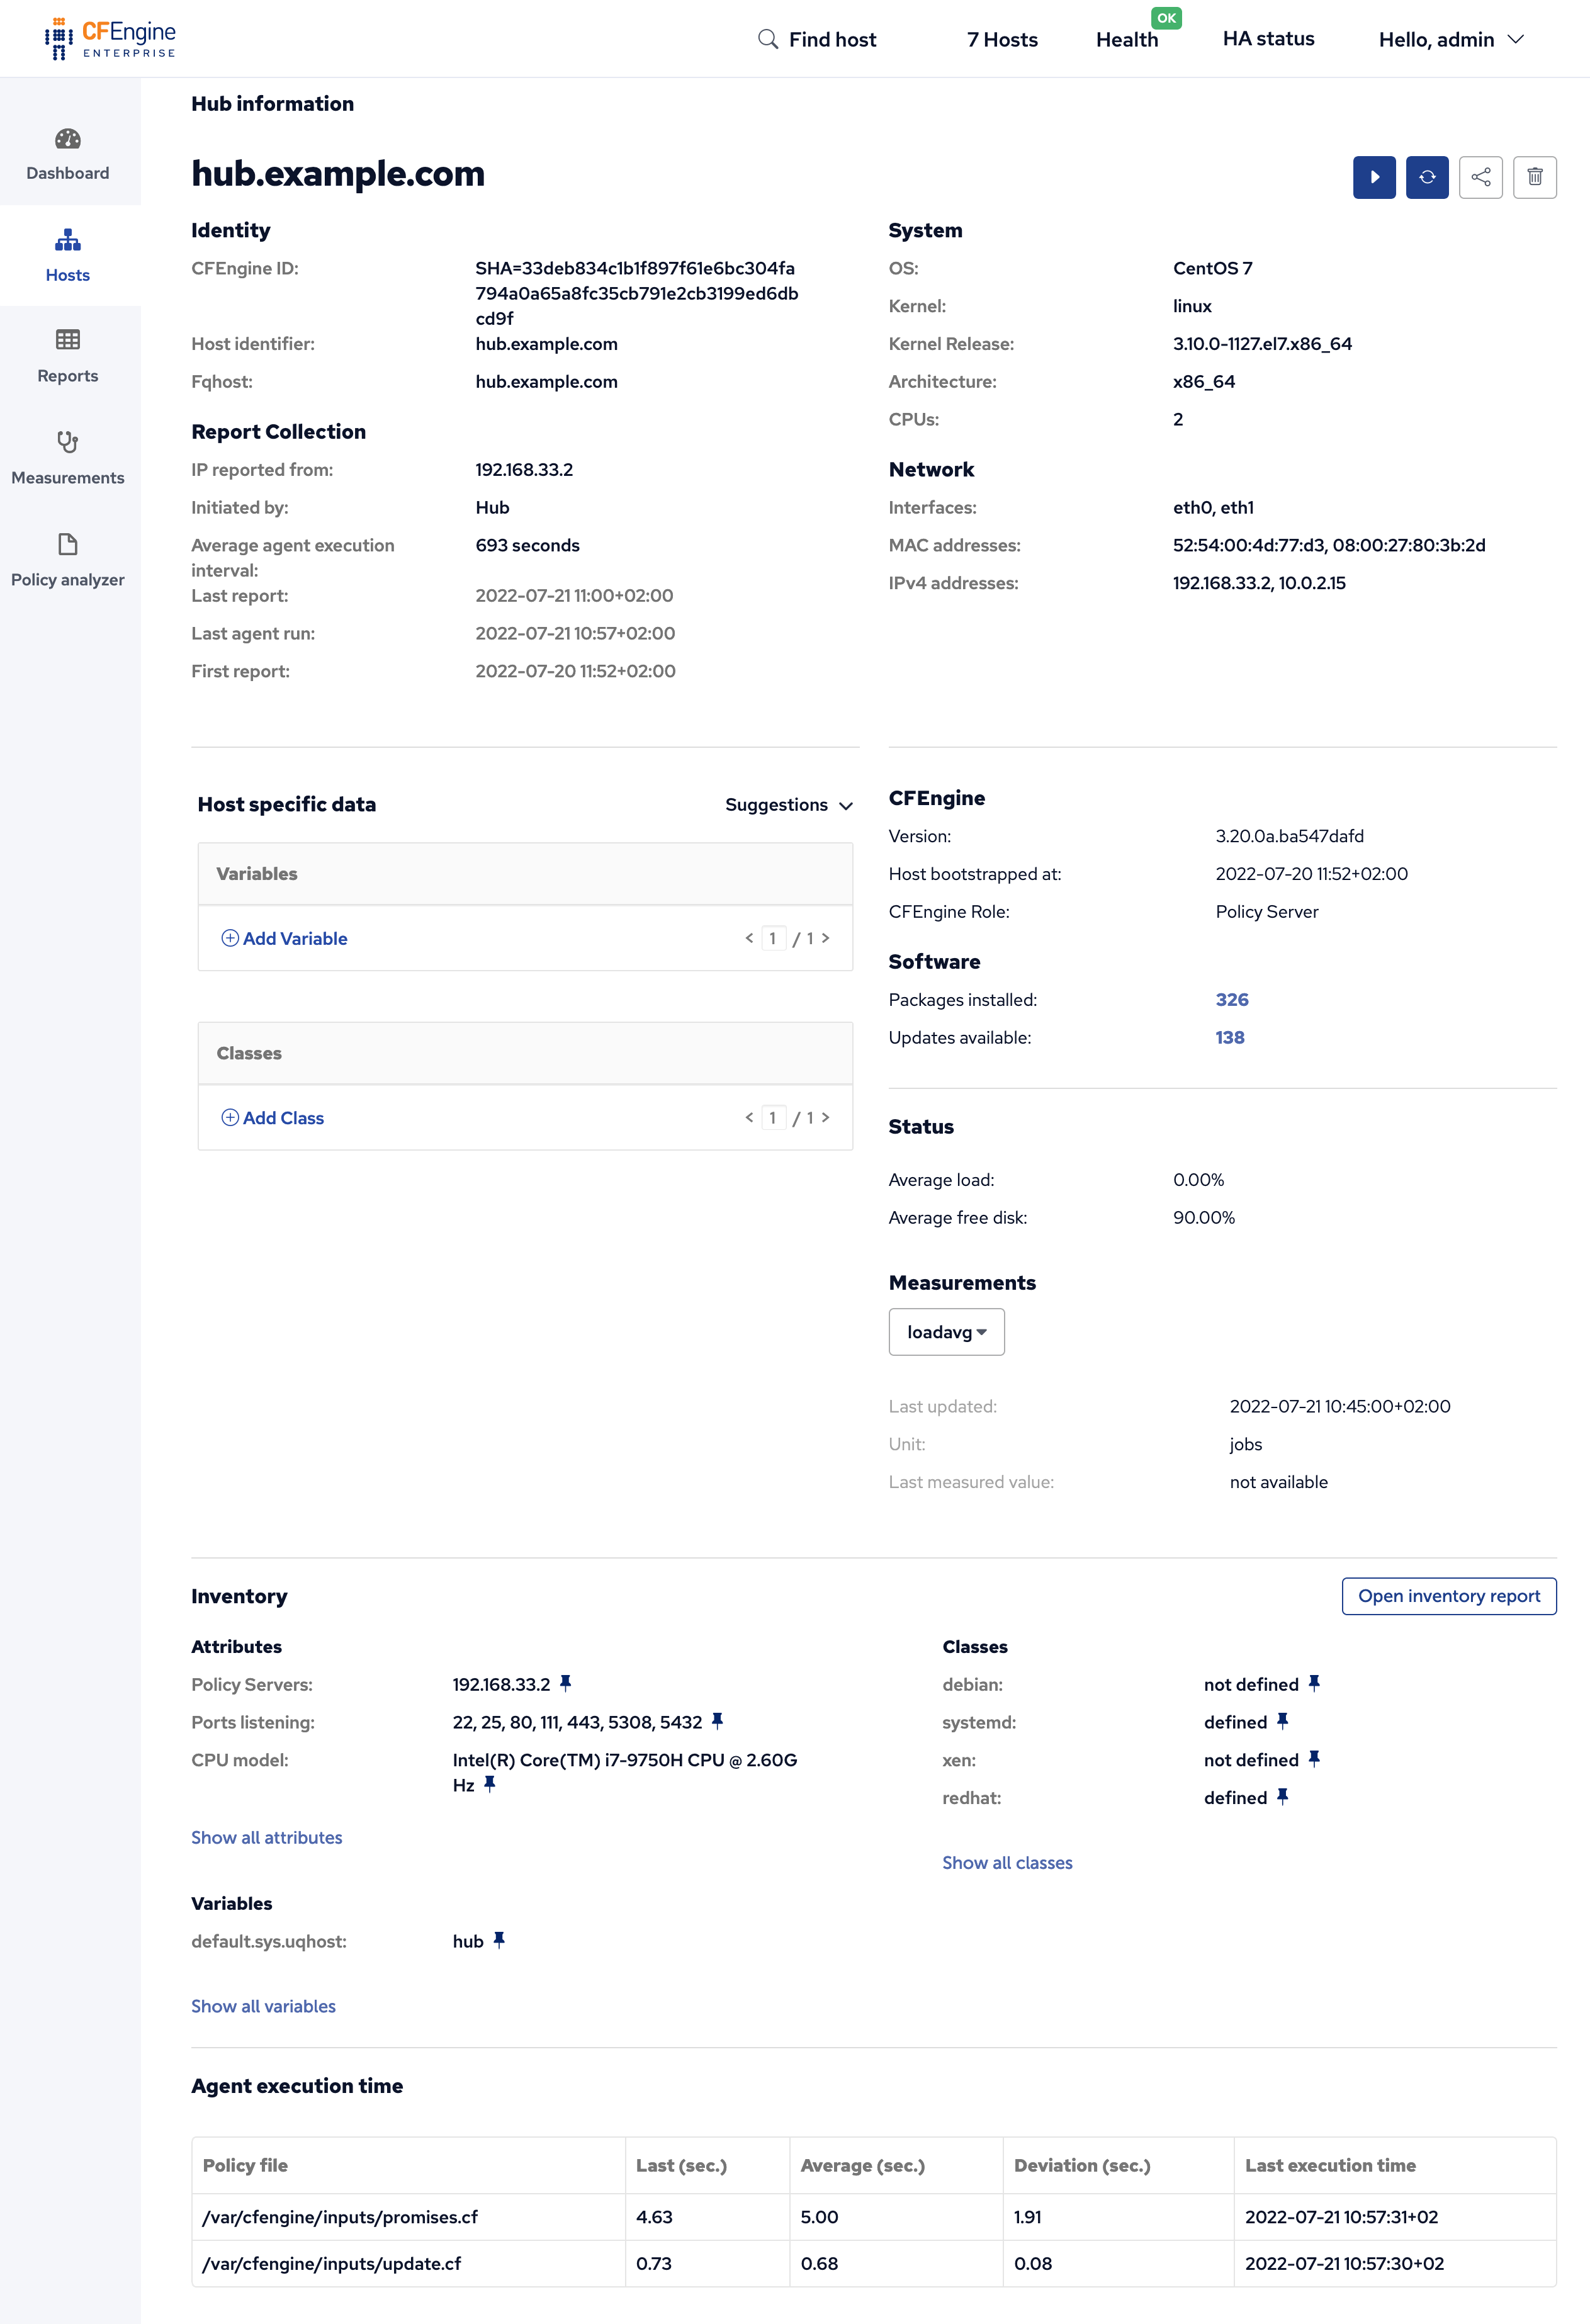

 :: Request an unscheduled policy run
 :: Request report collection
 :: Get the URL to the specific hosts info page
 :: Delete the host